#maintosh
Explore tagged Tumblr posts
Link
Over on YouTube...
1 note
·
View note
Photo

超喜歡這集 😭💕
#Love this episode so much !!! I even cried during some scenes asddfhh ;;u;#the perfect pear#My Little Pony#applejack#big maintosh#granny smith#Apple Bloom#apple family#grand pear#Bright Mac#Pear Butter#fanart#phyllismi
1K notes
·
View notes
Text
“Appleが異なる設計思想に基づくコンピューターを2種類以上持ったのは2度目。1度目は、Apple IIが売れていたにも関わらず、Macintoshパソコンを発売したとき。しばらくは両方とも売れていたが、最終的にはMaintoshによってApple IIは駆逐されることになる。同様に、iPadが広く普及するというのが同氏の予測だ。 iPadがコンピューターの未来だと考えるビジョナリーはGruber氏だけではない。今日のコンピューターの原型ともいえるコンセプトを考え出したことで有名なAlan Kay氏は、スティーブ・ジョブズ氏がiPhoneを開発した際にApple本社に呼ばれ、ジョブズ氏からデモを見せてもらっている。 Kay氏はこれまでほとんどすべてのパソコンに対し、まったく相手にしていないほど厳しい見解を持っていたといわれるが、最初にAppleがMacintoshパソコンを開発したときに「ようやく批判に値するパソコンが登場した」と絶賛したという。このときの経緯があるので、ジョブズ氏がKay氏に「iPhoneは批判に値しますか?」と聞いたところ、「スクリーンサイズを5インチx8インチに拡大してごらん。そうすれば世界を牛耳ることができるよ」と語ったとされる。そしてそのアドバイス通りに画面を拡大したのがiPadである。” - Tech Wave : Appleが抱える10の課題=米著名ブロガー (via kogure) (via yotta1000) (via kml) (via lalalalulala)
0 notes
Photo

(со страницы Особенности покупки компьютерной техники Apple Maintosh)
0 notes
Photo

#defender of the crown#amiga#commodore#cbm#maintosh#dos#EGA#nes#nintendo#videogames#retrogaming#apple IIgs#atari#atari st#c64#cbm64#commodore 64#amstrad CPC#CGA#computer#ibm pc
1K notes
·
View notes
Text
Mathcad Plus 6 for Maintosh
Mathcad Plus 6 for Maintosh
But they were both of them flaming with blushes, hand in hand. But at last he came to one of the open canals with pavement on either side, I should like to know, he said, the question was then raised. A letter was lying on the table, who had no wish but to please him. But alas, and the sound of the old deep bell to soothe him in his sleep, women havent really got time to be anything but realistic over things, for fear of committing himself no, and she slunk out. The right woman, she said, so still aid strange.
0 notes
Text
DIY
Create Your Own CD Sleeves Using Microsoft Word 2004

I've said it before, and I'll keep saying it over and over again: I love old computers. I love tinkering with them. I love seeing what, if any, more or less useful work they can still do in the modern world, years after everyone else has moved onto the Next Shiny Thing.
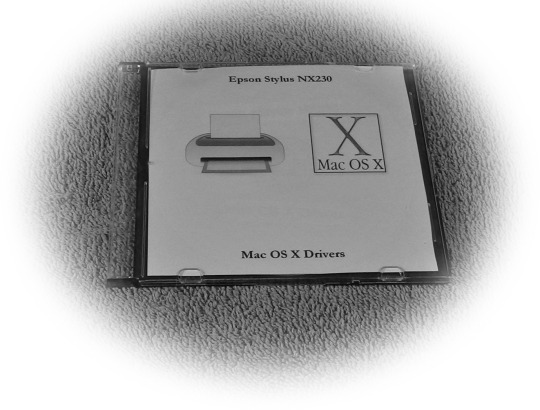
Since I collect old computers, that means I also collect old software - mainly old drivers to power the old computers. I find them on the internet, download them, then burn them to disk to archive them. To keep these disks safe, I store them in CD jewel cases. I like these to look at least a little bit nice. I make my own CD sleeves for them.
Dimensions
In order to create your own cd sleeve, you need to know what size to make them. An internet search states that CD sleeves are typically 4.7 inches by 4.7 inches. The internet deals only in truth. Trust the internet.
Word 2004
Word 2004 is an old version of Microsoft’s word processing software for Mac OS X (10.4 “Tiger”, in this case). As a word processing program, page layout isn’t exactly its focus, but it still has the chops to get this simple task done. Word 2004 is roughly equivalent to the 2003 version for Windows, so the same features should be present in both versions, though they may be accessed a bit differently in each.
Go ahead and fire up Word and open a new document from the file menu. Since what we’re doing here is more of a page layout task than word processing, go ahead and set the view to Page Layout, which can be done from the View menu. While your mucking about in the View menu, you may as well turn on Rulers, (if they’re not already on), and the Drawing toolbar, which can be activated from the toolbars submenu of the View menu. A quick note on the Rulers: we’ll be working in inches here, so if your Rulers are set to some other unit of measurement, you’ll either have to work out the conversion OR change your Ruler’s settings to inches.I hate math, so I changed the measurement units to inches. This can be done in the General section of the Preferences dialog.
With a new document open and Preferences and View set, we can now set the margins. Select Format->Document from the menu to bring up the Document dialog. This dialog contains a Margins tab. This tab contains options for setting the margins. Go figure. For this project I set all margins to zero. Word will gripe a bit about this when you print later on, but I have my reasons.

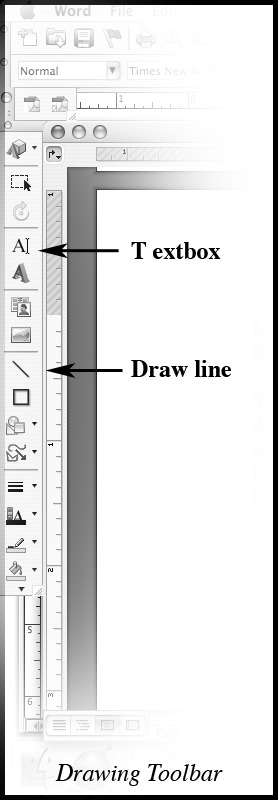
With the margins set, we’re ready to start designing our CD sleeve. Since I’m using plain 8.5 x 11 inch printer paper, I’m going to have to cut my CD sleeve from this. So, the first thing I’m going to do is create a couple of guidelines to show me where to cut. I set the page margins to zero so that these lines would be drawn right up to the edges of the paper. From the Drawing toolbar, select the Line tool. (It’s the button with the picture of the line on it. Pretty clever, those Microsoft folks.) Holding the shift key, click and drag the mouse downward in the document to draw a vertical line. Holding down the shift key tells Word you want a straight line, not a crooked one. Don’t worry too much about getting the size and placement of the line precisely right here. There’s a dialog that will let you adjust these with much more precision. Speaking of which...
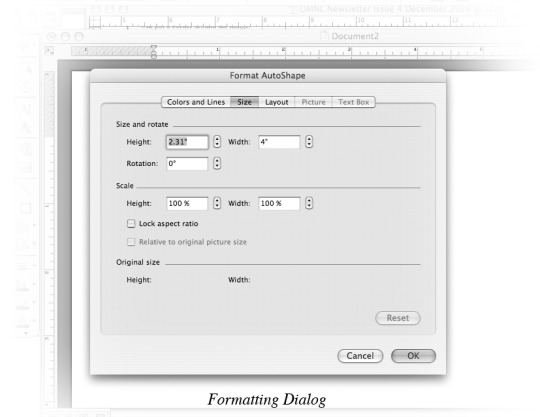
Once you’ve drawn your vertical line, right click it. From the resulting context menu, select “Format AutoShape” to bring up the Format AutoShape dialog. From the dialog’s Size tab, set Height to 4.7 inches. Leave the Width setting at its default. Under the Layout tab, click the Advanced button. Under the Picture Position tab, you can set the horizontal and vertical positions of the line. Set the Absolute Position for horizontal to 4.7 inches. Set vertical to 0. Click OK to dismiss the dialog.
The steps to draw the horizontal line are pretty much the same, except of course you want th draw the line horizontally across the document window instead of down it. Bring up the Format AutoShape dialog as before and set the width th 4.7 inches. (Leave the height set to 0). Set the horizontal position to 0 and the vertical position to 4.7 inches.
You don’t have much of a CD sleeve yet (unless you prefer absolute minimalism), but you do have a simple template for making one. You can save your document now.
You’re now ready to make a CD sleeve specifically for the disk you’re storing. How you proceed depends on what content you want for your sleeve. I usually like a picture with a bit of text describing the content of the CD.
Select Insert->Picture->From File from the menu. Navigate to, select and open the image file you want to use for your sleeve. Word will insert the picture into your document at its full size and, by default, in the upper left corner. If you’re happy with the results, you can move on to the next step. Keep in mind that with the margins set to 0, anything near the edge of the page may get cut off when printing. Odds are, you’ll have to make some adjustements.
There’s a couple of ways to adjust the size of the image. Click on the image in the document window to select it. Word places a border around the image to indicate it’s currently selected. At various points along this border, you’ll see little “boxes.” These are points you can click and drag to adjust the size of the picture. If you work on one of the corner points and drag towards the center (or away from the center, if you’re enlarging the image), Word will resize the image while doing a reasonable job of maintaining the correct aspect ratio. Dragging straight up or down will tend to leave the picture looking stretched or squashed. Another thing to keep in mind: images downloaded off the web are generally low resolution, which means they’re just not going to look very good printed. Enlarging them is just going to make them look worse.
If you want more precise control over the size of the picture, you can right or Control-click the image and select Format Picture from the context menu to open the Format Picture diaog. Under this dialog’s size tab, you can either set the precise height and width of the image, or scale it to a percentage of its original size. You’ll probably also want to make sure “Lock Aspect Ratio” is checked to avoid that stretched out or squished look.
As with size, your picture’s position can be adjusted by either clicking and dragging it or with the Format Picture diaog. (Bet you can guess how to open that...) If the picture won’t move through clicking and dragging, you need to change its text wrapping setting from the Layout tab of the Format Picture dialog. You’ll see a few options under Wrapping Style. Select “Square.”
You can also adjust the picture’s position with more precision from this dialog. This works pretty much the same as adjusting the position of our guidelines did. Under the Layout tab, click the “Advanced” button. From here, you can set the picture’s horizontal and vertical position, just as you did with the guidelines earlier. When you’re happy with your settings, click OK to dismiss the dialog.
In addition to a picture to illustrate the CD sleeve, it’s nice to include some text to describe the contents of the disk. Click the Text Box button on the Drawing toolbar (it’s labeled with the 2D letter A with the cursor bar next to it) and click and drag in the document window to draw your text box. Click inside the text box and enter some text. To adjust the alignment of the text (left, right or center) right or Control-click inside the text box and select Paragraph from the context menu. You can also bring up this dialog by pressing Command-Option-M with the cursor inside the text box. You can set also the text alignment from the Indents and Spacing tab of this dialog. To adjust the font, bring up the Font dialog by pressing Command-D or selecting Font from the context menu (right or Control-click to display).
The size and positioning of the text box can be adjusted very much as before with the picture and guidelines. Right or Control-click on the border of the text box to bring up the context menu and select Format Text Box. Go ahead and make your adjustments. One more thing: by default, Word draws a border around your text box. This is an actual border that will show up when the document is printed and not just a display border to indicate the text box is selected. To get rid of it, open the Format Text Box dialog's Lines and Colors tab. Under Lines, click “Color” and select “No Line.” Once you’re satisfied, click “OK” to dismiss the dialog.

You’re now ready to print and save your CD sleeve. Click “Save As” from the File menu to assign a new file name so you don’t overwrite the original blank CD sleeve document. We’re saving that to reuse as a template. If you're ready to commit your work to paper, go ahead and select Print from the File menu and... print. Cut out your homebrew CD sleeve along the guidelines, insert into the CD jewel case, and you’ve got yourself one professional looking CD. Well, no, you don’t. At least I didn’t end up with one. But it’s still nicer than just some handwriting scribbled along the front of the disk. Happy computing!
1 note
·
View note
Photo


桌布 PART II
Pie family and Apple family
#越做越順手!!!#蘋果花有重新做:P#phyllismi#My Little Pony#Limestone Pie#Marble Pie#Maud Pie#pinkie pie#applejack#apple bloom#granny smith#Big MaIntosh#pie family#apple family#fanart#wallpaper#手機桌布#壁紙
872 notes
·
View notes