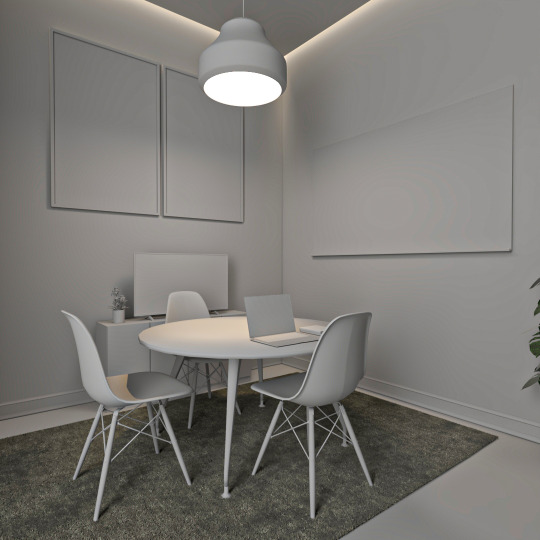
#lumion effects
Explore tagged Tumblr posts
Visit Tumblr Blog
Explore Tumblr blogs with no restrictions, modern design and the best experience.
Last Seen Tumblr Blogs


Fun Fact
Premium Tumblr themes are available from anywhere between $9 to $49.
Text
7+ Rendering Programs for Sketchup (Latest)
SketchUp is one of the best design apps available in the market. However, to create realistic 3D models, users need to use a rendering application for SketchUp. Following are the 7+ best rendering programs that you can use to render your 3d images:
V-Ray V-Ray is one of the most popular rendering applications for SketchUp. With V-Ray, users can create highly realistic and detailed renderings. This application is also equipped with advanced features such as texture mapping, light settings, and shadow effects.
Lumion Lumion is a very popular rendering application among SketchUp users. This application is very easy to use and comes with advanced features such as texture mapping, lighting settings, and shadow effects.
Enscape Enscape is a very popular rendering application among SketchUp users. This application is very easy to use and comes with advanced features such as texture mapping, lighting settings, and shadow effects.
Corona renderer Corona Renderer is a very popular rendering application among SketchUp users. This application is very easy to use and comes with advanced features such as texture mapping, lighting settings, and shadow effects.
Octane Render Octane Render is a very popular rendering application among SketchUp users. This application is very easy to use and comes with advanced features such as texture mapping, lighting settings, and shadow effects.
FluidRay and D5 Render
4 notes
·
View notes
Text
3D Real Estate Walkthrough Agency in India
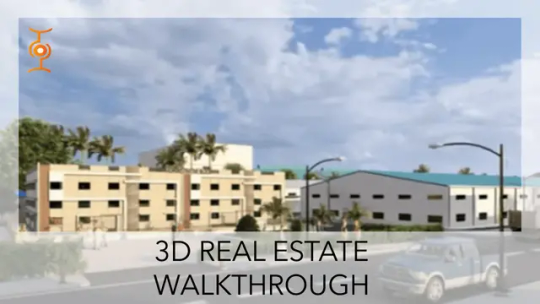
Introduction: 3D Real Estate Walkthrough Agency
In this article, we will start with 3D Real Estate Walkthrough. From Real Estate Virtual Tour to how to make 3D Real Estate Walkthrough Video, we will cover each topic related to Architectural Walkthroughs such as real estate virtual tour services, walkthrough benefits, Real estate 360 virtual tour software, Property walkthrough Virtual tour company, etc.
Finally, learn why to choose Chasing Illusions Studio as your best walkthrough real estate company in India.
What is 3D Real Estate Walkthrough?
A 3D Real Estate Walkthrough is a highly realistic, immersive digital tour that showcases a property’s interior and exterior walkthrough in detail. Using advanced 3D rendering and animation techniques, these walkthroughs allow potential buyers, investors, and tenants to explore a space virtually before physically visiting it.
Unlike static images or traditional video tours, a 3D walkthrough provides a dynamic, interactive experience, offering a true sense of scale, layout, and ambiance. It highlights key features such as architectural design, lighting, textures, and even surrounding amenities like parks, roads, and landscapes.
This cutting-edge real estate virtual tour visualization tool enhances real estate/property marketing by attracting more potential clients, reducing site visits, and accelerating sales or leasing decisions.
How to make a best Real Estate virtual tour 3D Walkthrough Video?
Creating a high-quality 3D real estate walkthrough requires careful planning, advanced 3D modeling, and precise animation. Here’s a step-by-step guide of creating best Real Estate virtual tour:
Gather Property Details & References
Collect floor plans, architectural blueprints, and elevation drawings.
Gather reference images or videos to understand materials, textures, and lighting.
Create 3D Modeling & Texturing
Build a detailed 3D model of the property, including interiors and exteriors.
Apply realistic textures, materials, and furniture to enhance visual appeal.
Set Up Camera Paths & Animations
Define smooth camera movements to showcase key areas of the property.
Add animations like opening doors, moving lights, or environmental elements.
Add Realistic Lighting & Shadows
Implement natural and artificial lighting to enhance realism.
Adjust shadows and reflections for a lifelike appearance.
Render the Walkthrough Animation
Use high-quality rendering software (like V-Ray, Unreal Engine, or Lumion).
Optimize settings for smooth performance and realistic output.
Edit & Enhance the Video
Add background music, voiceovers, or captions for a professional touch.
Include branding elements like logos, contact details, and call-to-action messages.
Export & Share the Final Video
Export in high resolution (4K or Full HD) for clarity.
Share on websites, social media, and real estate platforms to attract potential buyers.
What are 3D Home Walkthrough Video benefits?
Realistic Virtual Experience – Provides an immersive, lifelike tour of the property, allowing potential buyers to explore every detail.
Saves Time & Effort – Reduces the need for multiple physical site visits, making the buying process more efficient.
Boosts Buyer Confidence – Offers a clear understanding of the home’s layout, design, and ambiance, leading to quicker decision-making.
Enhances Marketing & Engagement – Increases online visibility, attracting more potential buyers through websites, social media, and real estate listings.
Showcases Interiors & Exteriors – Highlights architectural details, furniture arrangements, lighting, and even surrounding amenities.
24/7 Accessibility – Allows buyers to view the property anytime, from anywhere, without geographical limitations.
Increases Sales Potential – Creates a strong emotional connection with buyers, leading to higher conversion rates.
Cost-Effective Solution – Reduces marketing expenses compared to traditional photography, physical staging, and repeated property showings.
Ideal for Pre-Construction Sales – Helps developers and realtors sell under-construction homes by visualizing the final property before completion.
What are 3D Real Estate Walkthrough Agency Services?
Let's get started with Real Estate Company i.e., chasing Illusions Studio's services provided to bring unimaginable concept with engaging 3D Walkthroughs Animation Videos.
3D Interior & Exterior Walkthrough Animation: We create immersive 3D walkthrough animations that bring architectural visions to life. From breathtaking interior designs to stunning exterior landscapes, our team meticulously crafts detailed 3D models and animations that provide a realistic and engaging experience, allowing clients to explore and appreciate their projects before they even exist.
3D Mechanical Walkthrough Animation: We specialize in creating captivating 3D mechanical walkthrough animations that bring complex machinery and systems to life. We meticulously model and animate intricate mechanisms, providing a clear and engaging understanding of their operation, maintenance, and assembly processes.
3D Architectural Walkthrough Animation: We transform architectural concepts into captivating 3D walkthrough animations. Our team meticulously models every detail, from intricate interiors to stunning exteriors, creating immersive experiences that allow clients to virtually explore and experience their projects before they even exist.
3D Real-estate Walkthrough Animation: We create immersive 3D real estate walkthrough animations that allow potential buyers and investors to experience properties before they are even built. Our team models every detail, from architectural features to interior design elements, creating photorealistic visualizations that showcase the unique character and appeal of each property.
3D Floor plan Walkthrough Animation: We transform 2D floor plans into immersive 3D walkthrough animations, bringing architectural designs to life before construction begins. We recreate every detail, from room layouts and furniture arrangements to lighting and materials, allowing clients to virtually experience their spaces and make informed decisions throughout the design and construction process.
3D Hotel and Resort Walkthrough Animation: We craft immersive 3D walkthrough animations that transport viewers into the heart of luxurious hotels and resorts. From opulent lobbies and elegantly appointed guest rooms to stunning poolside views and breathtaking landscapes, we recreate every detail, creating a virtual experience that showcases the unique charm and ambiance of each property.
What are 3D Walkthrough Software for Real Estate & Architectural Visualization?
Unreal Engine – A powerful real-time rendering engine offering high-quality visuals, interactivity, and VR integration.
Lumion – A user-friendly software known for fast rendering, realistic lighting, and intuitive scene creation for architects and designers.
Autodesk 3ds Max – Industry-standard software with advanced modeling, animation, and rendering capabilities, often paired with V-Ray.
Blender – A free and open-source tool with robust 3D modeling, animation, and rendering features for high-quality walkthroughs.
Twinmotion – Developed by Epic Games, it provides real-time rendering with drag-and-drop simplicity for quick and stunning walkthroughs.
SketchUp + V-Ray – Ideal for creating architectural models with photorealistic rendering capabilities for detailed walkthroughs.
Enscape – A real-time rendering and VR tool that integrates with Revit, SketchUp, Rhino, and ArchiCAD for seamless visualization.
Cinema 4D – Known for its smooth workflow, advanced motion graphics, and realistic rendering for architectural animations.
Revit – Used for Building Information Modeling (BIM) with the ability to create detailed 3D walkthroughs for architectural projects.
D5 Render – A real-time rendering software with AI-driven lighting, reflections, and realistic textures for fast and stunning walkthroughs.
What is the role of 3D Architectural Walkthrough Animation?
We a 3D Real Estate Walkthrough Agency plays a crucial role in transforming blueprints and designs into immersive 3d walkthroughs video, lifelike visual experiences. 3D Architectural Walkthrough Animation allows architects, real estate developers, and interior designers to showcase properties with stunning realism, capturing every intricate detail of interiors, exteriors, and surrounding landscapes.
Our high-quality 3D walkthrough animations help clients visualize spaces before construction, enabling better decision-making, improved marketing, and increased buyer confidence. By incorporating smooth camera movements, realistic lighting, and dynamic animations, we ensure that every project stands out, making architectural walkthroughs more engaging and impactful.
Which is best Real Estate 3D Walkthroughs Studio?
The best real estate 3D walkthrough studio is Chasing Illusions Studio stands out as a leader in delivering high-quality, immersive, and visually stunning 3D walkthrough animations. Our expertise in 3D architectural walkthroughs visualization helps real estate developers, builders, and interior designers showcase properties with unmatched realism.
We create detailed and engaging walkthroughs that highlight every aspect of a property, from interiors and exteriors to surrounding landscapes and amenities. With cutting-edge technology, realistic lighting, and smooth camera transitions, we bring architectural designs to life, helping clients and attract buyers with confidence.
What is Real Estate virtual tour pricing In India?
The pricing for real estate virtual tours in India varies based on factors like property size, level of detail, animation quality, and the software used. On average, a basic 3D walkthrough for a small apartment or villa can start from ₹20,000 to ₹50,000, while high-end, ultra-realistic 3D architectural walkthroughs for luxury projects, commercial spaces, or large townships can range from ₹1 lakh to ₹5 lakhs or more.
Costs also depend on elements like realistic lighting, high-resolution textures, interactive features, and custom branding. We offer tailored 3D walkthrough video animation solutions at competitive prices, ensuring top-notch quality to help real estate developers, architects, and marketers enhance property presentations and boost sales.
Note: Real estate virtual tour pricing is subject to change. Please refer latest source for the lates 3D Walkthrough price in India.
Why to choose Chasing Illusions Studio for Virtual 3D Walkthrough Real Estate?
Choosing Chasing Illusions Studio for your Virtual 3D Walkthrough Real Estate needs means partnering with a team that delivers high-quality, immersive, and visually stunning property walkthroughs. We specialize in crafting realistic 3D animations that bring 3d animated architectural walkthroughs designs to life, showcasing every detail of interiors, exteriors, and surrounding landscapes with precision.
Our expertise in real estate visualization ensures that developers, architects, and marketers can present properties with clarity, attracting buyers and investors with confidence. Using cutting-edge technology, smooth camera transitions, lifelike textures, and dynamic lighting, we create engaging virtual tours that elevate real estate marketing.
Whether for 3D Interior & Exterior Walkthrough, 3D Floor plan Walkthrough, 3D Hotel and Resort Walkthrough or 3D Mechanical Walkthrough, etc., we're ready to bring complex unimaginable concept to engaging 3D walkthrough video animation.
Conclusion: 3D Real Estate Walkthrough Agency
3D real estate walkthroughs are a transformative tool that enhances property marketing and elevates client engagement. By offering a realistic, immersive experience, these virtual tours help potential buyers visualize spaces and make informed decisions.
At Chasing Illusions Studio, we are dedicated to providing high-quality, tailored 3D walkthrough solutions that meet the unique needs of our clients. Our commitment to excellence, combined with cutting-edge technology and artistic creativity, ensures that your properties stand out in a competitive market.
CONTACT NOW
Bring your real estate vision to life with stunning 3D walkthroughs by Chasing Illusions Studio – where imagination meets reality!
1 note
·
View note
Text
What Changes Have We Seen in Architectural 3D Visualization Over Time?
Changes in Architectural 3D Visualization Over Time
Over time, architectural 3D visualization has changed dramatically, moving from hand-drawn sketches to incredibly lifelike digital renderings. Architects and designers may now provide clients with immersive visual experiences thanks to technological breakthroughs. The communication of architectural concepts has changed with the emergence of architectural rendering services, architectural 3D modeling, and advanced visualization tools. The development of architectural 3D visualization and its effects on the industry are examined in this article.
1. The Age of Renderings by Hand
3D Architectural visualization services presented their plans using watercolor representations and hand-drawn sketches prior to the invention of digital tools. Despite being creative, these sketches took a lot of time and frequently lacked accuracy. Clients found it difficult to fully envision the finished project because to the inability to display realistic lighting, textures, and materials. Although these conventional drawings were essential for architectural presentations, their scalability and level of detail were constrained.
2. Computer-Aided Design (CAD)
Architectural visualization was transformed by the introduction of Computer-Aided Design (CAD) software in the latter half of the 20th century. Architects were able to produce more accurate and detailed 2D and 3D designs thanks to programs like AutoCAD. Digital architectural rendering services were introduced around this time, enabling quicker design iterations and increased project efficiency. However, because they prioritized technical accuracy over aesthetic appeal, early CAD models still lacked realism.
3. The Development of 3D Modeling and Rendering Software for Architecture
Architectural 3D modeling advanced with the creation of sophisticated Architectural rendering companies, programs like 3ds Max, SketchUp, and Revit. Architects were able to apply realistic materials, design intricate structures, and add lighting effects because to these technologies. High-quality 3D renderings that offered realistic project representations were first made available by architectural rendering companies. Architects were better able to convey their concepts to stakeholders and clients because to the capacity to produce lifelike visuals.
4. The Development of Real-Time Rendering and 3D Architectural Visualization Services
3D architecture visualization services have grown in popularity as a result of consumer demand for immersive experiences. Architectural rendering companies, were able to produce interactive walkthroughs and virtual tours thanks to real-time rendering systems like Lumion and Unreal Engine. Design approvals would be quicker and more effective if clients could examine ideas in a realistic setting. In addition to enhancing presentation quality, these developments made it possible for developers, designers, and architects to work together seamlessly.
5. The Future: Architectural Visualization Using VR, and AR
The future of 3D Architectural visualization services is being shaped by emerging technologies such as augmented reality (AR), virtual reality (VR). Powered solutions shorten the time needed to produce high-quality graphics by automating rendering procedures. Before construction starts, clients can "walk" around a digital model of a building thanks to immersive experiences offered by VR and AR. With these developments, architectural rendering services will function in a whole new way, resulting in more dynamic and captivating design presentations than in the past.
In conclusion
Hand-drawn sketches have given way to extremely interactive digital experiences in architectural 3D visualization. The way designs are presented and comprehended has improved with the development of architectural rendering services, architectural 3D modeling, and 3D architectural visualization services. The future of architectural visualization has even more exciting possibilities with the integration of AI, VR, and AR, which will revolutionize the way architects realize their ideas.
FAQs
1. What are rendering services for architecture?
Architectural rendering services allow clients see projects before they are built by using 3D software to create photorealistic images and animations of buildings.
2. How are design presentations improved by architectural rendering firms?
High-quality 3D renderings, interactive walkthroughs, and virtual experiences are produced by architectural rendering businesses using sophisticated software, which enhances the realism and engagement of presentations.
3. What is 3D modeling for architecture?
The process of producing digital representations of buildings and structures, including characteristics like textures, lighting, and materials, is known as architectural 3D modeling.
4. In what ways have services for 3D architectural visualization evolved over time?
From basic CAD drawings to incredibly lifelike, immersive experiences through real-time rendering, virtual reality, and AI-driven automation, 3D architectural visualization services have advanced significantly.
5. How will 3D visualization of architecture develop in the future?
In the future, clients will be able to interact with designs in real time prior to construction using augmented reality applications, virtual reality walkthroughs, and AI-powered rendering.
Architectural rendering services,
Architectural rendering companies,
Architectural 3d modeling,
3D Architectural visualization services
#Architectural rendering services#Architectural rendering companies#Architectural 3d modeling#3D Architectural visualization services
0 notes
Text
Architectural Design Development : Process, Challenges, and Solutions

Architectural Design Development is a crucial phase in the architectural workflow, bridging the gap between conceptual design and construction documentation. At ADSBIM, we specialize in Architectural Design Development Services across India, the UK, the USA, and the UAE, ensuring high-quality, efficient, and cost-effective solutions for architects, designers, and construction firms.
This blog explores the process of architectural design development, common challenges faced in the industry, and how ADSBIM provides innovative solutions using advanced BIM technology and industry-leading software.
The Architectural Design Development Process
The Design Development phase is where the initial architectural concept is refined, detailed, and prepared for construction documentation. It involves:
1. Concept Development & Refinement
Translating initial sketches into detailed 3D models.
Incorporating client feedback and refining design iterations.
Ensuring compliance with zoning laws, building codes, and sustainability standards.
2. Spatial Planning & Technical Detailing
Defining the dimensions and arrangement of spaces.
Developing structural, mechanical, electrical, and plumbing (MEP) layouts.
Ensuring coordination between different disciplines for seamless execution.
3. Material Selection & Specification
Selecting appropriate building materials for sustainability and cost-effectiveness.
Specifying finishes, textures, and other aesthetic elements.
4. BIM Integration for Design Validation
Utilizing Building Information Modeling (BIM) to validate the design before construction.
Detecting and resolving clashes between architectural, structural, and MEP systems.
Enhancing collaboration between architects, engineers, and contractors.
5. Construction Documentation & Approval
Creating detailed architectural drawings, sections, and elevations.
Preparing permit drawings for government approvals.
Finalizing construction-ready blueprints.
Challenges in Architectural Design Development
Despite its importance, the design development phase presents multiple challenges, including:
Design Coordination Issues
Ensuring seamless coordination between architectural, structural, and MEP systems is complex.
Solution: ADSBIM employs BIM for Design Development Services to integrate all disciplines in a single model, reducing errors.
Lack of Visualization & Design Validation
Traditional 2D drawings often lead to misinterpretation.
Solution: We use 3D modeling, rendering, and virtual walkthroughs to provide realistic previews of the final project.
Time and Cost Overruns
Frequent design changes and errors lead to increased costs and delays.
Solution: Our BIM-based clash detection and real-time design collaboration minimize changes during construction.
Sustainability
Adhering to different building codes across India, the UK, the USA, and the UAE is challenging.
Solution: ADSBIM ensures compliance through automated code-checking tools and sustainable material selection.
Tools & Software We Use
At ADSBIM, we leverage industry-leading tools to enhance our Architectural Design Services:
Autodesk Revit – For detailed BIM modeling, coordination, and documentation. AutoCAD – For 2D drafting and construction drawings. SketchUp – For conceptual design and 3D visualization. Navisworks – For clash detection and design validation. Lumion/Enscape – For high-quality 3D rendering and walkthroughs. Dynamo for Revit – For automation and parametric modeling.
By utilizing these tools, we streamline the Architectural Design Development process and deliver efficient, error-free designs.
FAQs
1 What is Architectural Design Development?
Architectural Design Development is the process of refining the conceptual design into a detailed, construction-ready blueprint, incorporating spatial planning, technical detailing, and material selection.
2 How does BIM help in Architectural Design Development?
BIM (Building Information Modeling) enhances design accuracy, coordination, and visualization, ensuring smooth collaboration between architects, engineers, and contractors.
3 What industries benefit from Architectural Design Development services?
Architectural Design Development services are essential for residential, commercial, industrial, healthcare, and hospitality projects.
Conclusion
The Architectural Design Development phase is critical in bringing conceptual ideas to life while ensuring technical accuracy and feasibility. At ADSBIM, we specialize in BIM for Design Development Services, enabling architects and developers to achieve efficient, cost-effective, and high-quality designs.
If you’re looking for Architectural Design Development Services in India, the UK, the USA, or the UAE, contact ADSBIM today and let us help you transform your vision into reality!
🚀 Get in Touch for Expert BIM Solutions! 🚀
#Infographic Discription#challenges like design coordination#cost overruns#regulatory compliance#and visualization issues often arise.#At ADSBIM#the UK#the USA#and the UAE#ensuring seamless collaboration#accuracy#and efficiency.#ArchitecturalDesignDevelopment#BIMforDesignDevelopment#ArchitecturalDesignServices#DesignDevelopment#BIMModeling#ConstructionTechnology#ArchitecturalConceptDesign#BuildingDesign#AECIndustry#ArchitecturalBIM#RevitModeling#DesignCoordination#SustainableArchitecture#ConstructionInnovation#ADSBIM
0 notes
Text
Architectural Models VS Digital Render
In the realm of architecture, communicating ideas effectively is as vital as the design itself. Two of the most prevalent tools architects use to bring their visions to life are architectural models and digital renders.
While both serve the purpose of translating ideas into tangible or visual formats, they each bring unique strengths and challenges to the design process. As technology advances, the debate about which medium is superior continues, but the reality is that both have a place in modern architectural practice.
Architectural Models: Tangibility in a digital age
Architectural models, the physical miniaturized representations of buildings or spaces, have been a staple in the industry for centuries. Crafted from materials like wood, foam, or 3D-printed resin, these models provide a tangible, three-dimensional perspective of a design.
Advantages:
Physical presence: Architectural models allow stakeholders to physically interact with the design, providing a visceral sense of scale, proportion, and spatial relationships.
Material experimentation: Physical models can showcase textures, material finishes, and construction techniques in ways digital tools often struggle to replicate.
Emotional impact: Holding and observing a model evokes a unique connection to the design that a digital screen cannot replicate.
Challenges:
Time-Intensive: Creating an accurate model can be laborious and require significant craftsmanship.
Costly: High-quality materials and skilled labor add to the expense, making models less practical for early-stage conceptual work.
Limited flexibility: Modifications to physical models can be cumbersome and may require starting from scratch.
Despite these challenges, architectural models remain irreplaceable in their ability to foster collaboration, particularly during client presentations or in educational settings.
Digital Renders: The power of visualization
Digital rendering has revolutionized architectural visualization, offering hyper-realistic, computer-generated images that simulate every detail of a proposed design. Using advanced software like Blender, Lumion, or V-Ray, architects can create photorealistic visuals, animations, and even immersive virtual reality (VR) experiences.
Advantages:
Speed and efficiency: Digital renders can be created more quickly than traditional models, especially with templates, libraries, and automated tools.
Realism: Renders showcase materials, lighting, and environmental contexts with stunning detail, helping clients envision the final product.
Flexibility: Digital designs can be updated in real-time, allowing for quick iterations based on feedback.
Cost-Effectiveness: Once the software and hardware are in place, rendering designs is often more economical than building physical models.
Challenges:
Technology barrier: Mastering rendering software can require significant training and investment in high-powered computers.
Over-Reliance on Aesthetics: The focus on creating visually stunning renders can sometimes prioritize style over functionality.
Impersonal Nature: While digital renders are highly detailed, they can lack the tactile connection that physical models provide.
The Intersection of Both Worlds
In contemporary architecture, the best results often come from a hybrid approach that leverages the strengths of both physical models and digital renders. For example:
Early-Stage design: Architects may use quick physical models to explore forms and spatial relationships, then transition to digital renders for refined presentations.
Client communication: Combining physical models with immersive digital experiences (like VR) can create a compelling narrative that appeals to both the emotional and logical sides of a client’s decision-making process.
Sustainability and Innovation: Advanced tools like 3D printing now allow architects to blend the tangibility of models with the efficiency of digital design, creating intricate physical representations directly from digital files.
The debate between architectural models and digital renders isn’t about choosing one over the other—it’s about understanding how they complement each other in the design process.
Architectural models offer a tangible, hands-on perspective that fosters emotional connection and collaboration. Digital renders, on the other hand, provide efficiency, realism, and a dynamic way to experiment with ideas.
As technology continues to evolve, the integration of these tools will only grow stronger, pushing the boundaries of architectural visualization. By combining tradition with innovation, architects can ensure their designs not only look good but also resonate deeply with the people they serve.
0 notes
Text
Some commonly used tools and machinery for luxury interior design dubai
In luxury interior design dubai, the use of professional equipment is crucial for achieving high-quality design outcomes. Here are some commonly used tools and machinery:
Design and Modeling Tools
CAD Software: Such as AutoCAD and Revit, used for creating precise floor plans, elevations, and 3D models. These tools help designers visualize spatial layouts and details in the early stages of design.
3D Modeling Software: Like 3ds Max and SketchUp, used to produce more realistic interior renderings, showcasing the final design effects.
Rendering Software: Such as V-Ray and Lumion, used to render 3D models with high quality, making the design effects more realistic and vivid.
Fabrication and Construction Equipment
Carpentry Equipment: Including planers, circular saws, and jointers, used for processing and crafting wooden furniture and decorative items.
Stone Processing Equipment: Such as marble cutters and polishers, used for cutting and polishing stone to ensure the correct dimensions and surface quality.
Welding Equipment: Like arc welders and semi-automatic gas shielded welders, used for welding metal components.
Decoration and Installation Equipment
Spray Guns: Used for applying paint and coatings evenly, ensuring a smooth and aesthetically pleasing finish.
Polishing Machines: Used for polishing surfaces of wood, stone, and other materials to enhance their texture.
Lifting and Hoisting Equipment: Used during construction to transport and install large furniture and decorative items.
Smart Home Devices
Smart Control Systems: Such as smart lighting, smart blinds, and smart security systems, used for automating and managing home functions.
Environmental Monitoring Devices: Like air quality monitors and temperature/humidity sensors, used to monitor the indoor environment in real-time, ensuring comfort.
The use of these tools and equipment not only improves the efficiency and quality of design and construction but also supports the personalization and high-end realization of luxury interior design dubai.
0 notes
Text
How Architectural Rendering Companies Ensure Realism in Visualizations
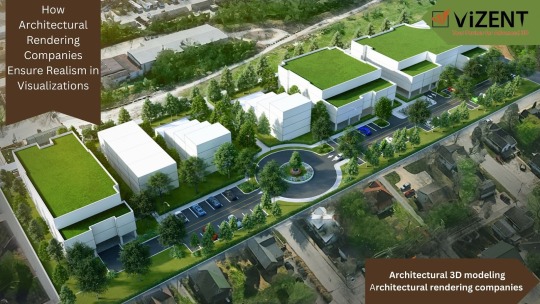
Architectural Rendering Companies Ensure Realism in Visualizations
Have you ever come across architectural renderings that look so real you thought they were actual photographs? That's not magic—it's the result of meticulous craftsmanship by architectural rendering companies. These professionals blend art, technology, and architectural expertise to create visuals that mirror reality. But how do they achieve such remarkable realism? Let’s dive into the techniques and tools behind their stunning work.
Mastering the Art of Architectural 3D Modeling
Realism begins with a strong foundation, and that foundation is architectural 3D modeling. Skilled 3D modelers build precise digital representations of structures, ensuring every element—from windows to wall textures—is accurately proportioned. Whether it’s a sleek modern building or a rustic countryside home, attention to detail in modeling ensures that the visualization is lifelike from the ground up.
Through advanced software like AutoCAD, SketchUp, and 3ds Max, architectural rendering companies can create highly detailed models. They also incorporate exact measurements and real-world scale, ensuring that what you see in the render is exactly what you’ll get in the final structure.
Incorporating Real-World Textures and Materials
One of the secrets to hyper-realistic 3D architectural visualization services lies in texture mapping. Real-world materials—wood grains, polished marble, weathered bricks—are carefully integrated into the model. These textures are applied using high-resolution maps that mimic the way light interacts with surfaces, creating authentic-looking finishes.
Architectural rendering companies often source textures from actual samples or libraries of pre-scanned materials. This ensures the surfaces of walls, floors, and even furniture look as close to reality as possible.
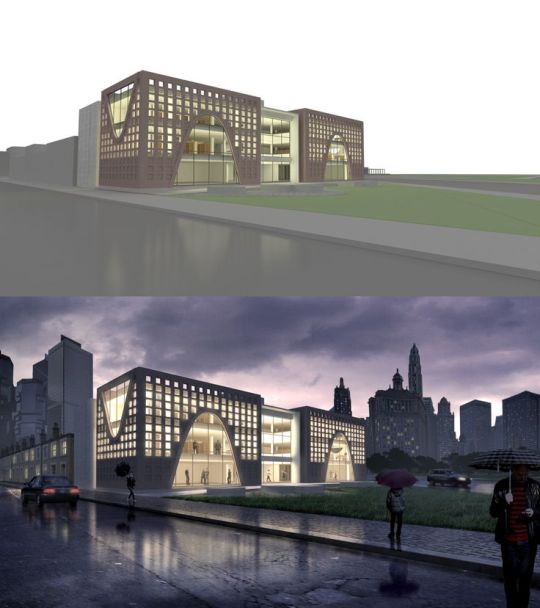
Playing with Light and Shadows
Lighting is a game-changer in architectural visualization. Natural and artificial light sources are simulated to showcase how a building will appear at different times of day. Companies utilize tools like ray tracing to simulate the way light bounces off surfaces, creating soft shadows, reflections, and highlights that elevate the realism.
Want to see how your future living room will glow during golden hour? Or how the office space will look under fluorescent lights? These companies fine-tune every light source to match the intended ambiance of the design.
Adding Context with Lifelike Environments
Realistic 3D architectural visualizations services don’t exist in a vacuum. To enhance realism, companies embed the building within a believable environment. These contextual elements provide a sense of scale and functionality, making the design feel grounded in the real world.
Some companies even go a step further by integrating moving elements, like cars, people, or fluttering curtains, adding a touch of life to the scene.
Leveraging Cutting-Edge Technology
Behind every jaw-dropping visualization is cutting-edge technology. Architectural rendering companies often employ industry-leading rendering engines like V-Ray, Lumion, or Unreal Engine. These tools enable real-time rendering, photorealistic outputs, and immersive virtual walkthroughs.
Additionally, some companies utilize AI and machine learning to automate repetitive tasks, such as texture adjustments or environmental effects, speeding up the process without compromising quality.
Staying Updated with Trends
Trends in 3D architectural visualization services are constantly evolving. From virtual reality (VR) walkthroughs to augmented reality (AR) integrations, rendering companies stay ahead of the curve to offer clients a comprehensive experience. These innovations not only add realism but also allow clients to interact with the designs like never before.
Why It Matters
For architects, designers, and real estate professionals, realism in visualization isn’t just a bonus—it’s essential. High-quality renders help clients envision their future spaces, aiding in decision-making and boosting confidence in the project. Realistic visuals also play a crucial role in marketing, as they can captivate potential buyers or investors.
Final Thoughts
Creating hyper-realistic renders isn’t just about using the latest software—it’s about combining creativity, technical skill, and an understanding of architecture. By excelling in architectural 3D modeling, mastering textures, and perfecting lighting, architectural rendering companies bring blueprints to life. The next time you see a breathtaking render, you’ll know the incredible effort and expertise behind the scenes!
0 notes
Text
Blog Post 9.
Digital Module
This high-fidelity module captures the full scope of the project, including the tree, accurate scale, and proven feasibility. Using SketchUp for modeling and Lumion for rendering, I was able to bring the concept to life in a way that demonstrates its practicality and visual impact. I’m very pleased with the result, as it effectively presents the complete vision of the project.


0 notes
Text
From Sketching to 3D Modeling: Tools and Techniques Taught in Architecture Education
Architecture is a field that seamlessly combines creativity, technical skills, and innovative thinking. Aspiring architects undergo rigorous education and training to develop the necessary tools and techniques to bring their ideas to life. From traditional sketching to modern 3D modeling, architecture education from the best colleges for architecture equips students with a range of tools and techniques that serve as the foundation for their design process. This blog will explore the various tools and techniques taught in architecture education, from initial sketches to advanced 3D modeling.
Sketching and Hand-drawing:
Sketching is the backbone of architectural design education. It allows architects to visualize and communicate their ideas on paper quickly. Architectural students learn the art of sketching, including techniques such as freehand drawing, perspective drawing, and rendering. This skill helps them to develop their creative thinking and effectively convey their design concepts during the early stages of the design process.
Drafting and Technical Drawing:
Technical drawing is an essential skill in architecture education. Students learn to create accurate and detailed drawings using drafting tools such as rulers, compasses, and protractors. This skill enables them to produce precise floor plans, elevations, sections, and construction details. Proficiency in technical drawing is crucial for architects to communicate their designs to clients, contractors, and other professionals involved in the construction process.
Computer-Aided Design (CAD):
With technological advancements, computer-aided design (CAD) has become an integral part of architecture education. CAD software such as AutoCAD, Revit, and ArchiCAD allows students to create digital drawings, 2D floor plans, 3D models, and photorealistic renderings. CAD enhances efficiency, accuracy, and precision in architectural design, enabling students to explore complex geometries, analyze structural systems, and produce comprehensive documentation.
Building Information Modeling (BIM):
Building Information Modeling (BIM) is a powerful tool that revolutionizes the architectural design process. It goes beyond 3D modeling and incorporates detailed information about building components, materials, and performance. BIM software allows students to create intelligent 3D models that facilitate collaboration, clash detection, and accurate quantity takeoffs. BIM skills acquired by attending architecture universities in UAE are highly sought after in the architecture industry as it enhances project coordination and efficiency.
Physical Model Making:
Physical model-making is another important aspect of architecture education. Students learn to translate their designs into tangible models using various materials such as cardboard, foam, wood, or 3D printing. Physical models help architects and clients visualize spatial relationships, test design concepts, and understand the scale and proportions of a building. Model making also develops manual dexterity and craftsmanship skills, allowing students to refine their designs through hands-on exploration.
Parametric Design:
Parametric design is an emerging technique in architecture education that allows architects to generate complex forms and patterns using algorithms and mathematical equations. Parametric design software, such as Grasshopper for Rhino, enables students to create intricate designs that respond to environmental, structural, and contextual parameters. This approach promotes innovative and sustainable design solutions by exploring various iterations and optimizing performance.
Visualization and Rendering:
Architecture education emphasizes the art of visual communication. Students learn techniques to enhance their presentations through digital rendering software like Lumion, V-Ray, or Photoshop. These tools enable them to create realistic visualizations and renderings that bring their designs to life. By mastering visualization and rendering techniques when obtaining a Master’s degree in architecture, students can effectively communicate their ideas to clients, stakeholders, and the general public.
Architecture education equips students with diverse tools and techniques, from traditional sketching to advanced 3D modeling and rendering. By integrating hand-drawing, drafting, CAD, BIM, physical model making, parametric design, and visualization, aspiring architects gain the necessary skills to transform their ideas into tangible designs.
About Ajman University’s Department of Architecture
The Department of Architecture is a vital component of the College of Architecture, Art, and Design at Ajman University. The department offers three distinctive programs: Bachelor of Architecture, Bachelor of Building Engineering and Construction Management, and Master in Urban Design. The Department of Architecture is committed to delivering up-to-date programs that significantly impact society and provide high-quality professional pathways. With accreditation from the higher ministry and international validation from UIA UNESCO for the Architecture Program, the department has established itself locally, regionally, and internationally as a leader in architectural education.
0 notes
Text
Ultimate List of Popular 3D Rendering Software in 2024

In 2024, 3D rendering software continues to play a crucial role in industries like architecture, gaming, film, and product design. These tools allow designers and developers to create stunning, realistic visuals that captivate audiences and streamline workflows. Whether you're a professional or a hobbyist, choosing the right 3D rendering software is key to achieving top-notch results. Here is the ultimate list of popular 3D rendering software in 2024, showcasing the best options available today.
1. Blender
Blender has established itself as one of the most popular open-source 3D rendering and modeling software options in the world. It's favored by both professionals and hobbyists due to its comprehensive range of tools, high-quality rendering engines (Eevee and Cycles), and active user community.
Pros: Free, versatile, robust community support, and frequent updates.
Cons: Steep learning curve for beginners.
Best for: Animation, game development, VFX, and 3D modeling.
2. Autodesk 3ds Max
Autodesk 3ds Max remains a popular choice in 2024, especially among architects, engineers, and designers. Known for its powerful modeling capabilities and V-Ray rendering integration, 3ds Max provides users with a professional-grade toolset for creating stunning, photorealistic images.
Pros: Powerful tools, excellent for architectural visualization, large asset library.
Cons: Expensive, Windows-only software.
Best for: Architectural rendering, product design, and visual effects.
3. V-Ray
V-Ray is one of the most widely used rendering engines and can be integrated with several 3D software platforms like 3ds Max, Maya, and SketchUp. Its ability to produce photorealistic results with precise lighting and shading makes it a go-to solution for many industries.
Pros: High-quality photorealistic rendering, integration with multiple software.
Cons: Pricey, requires powerful hardware for optimal performance.
Best for: Architectural visualization, interior design, and film production.
4. Cinema 4D
Cinema 4D is a popular choice for 3D artists and motion designers in 2024. With an intuitive interface, powerful rendering tools, and smooth integration with Adobe products like After Effects, Cinema 4D continues to attract professionals in the motion graphics industry.
Pros: User-friendly interface, fast rendering, excellent for motion graphics.
Cons: Expensive, limited plugin support compared to other software.
Best for: Motion graphics, VFX, and 3D animation.
5. KeyShot
KeyShot is revered for its speed and simplicity, making it a favorite among product designers and engineers. It offers real-time rendering with minimal setup and provides users with easy-to-use tools that deliver high-quality results.
Pros: Real-time rendering, easy to learn, fast setup.
Cons: Limited in-depth modeling tools.
Best for: Product visualization, engineering, and industrial design.
6. Lumion
Lumion is a favorite among architects and landscape designers, offering easy-to-use tools that produce stunning architectural visualizations. Its fast real-time rendering allows users to see changes immediately, making it perfect for creating quick project iterations.
Pros: Real-time rendering, easy-to-use for architects.
Cons: Limited flexibility compared to more advanced software.
Best for: Architectural and landscape rendering.
7. Octane Render
Octane Render is one of the first and fastest GPU-accelerated, unbiased rendering engines available. Its ability to produce lifelike images with highly detailed lighting, shadows, and materials makes it a top choice for artists looking to render scenes quickly and efficiently.
Pros: GPU-accelerated, extremely fast, high-quality rendering.
Cons: Requires powerful GPU, steep learning curve for advanced features.
Best for: VFX, architectural visualization, and animation.
8. Arnold
Arnold is an industry-standard rendering software, used by major studios to produce high-quality films and animations. It’s particularly well-known for its ability to handle complex scenes with photorealistic lighting and textures, making it a top choice for professionals in animation and VFX.
Pros: High-quality results, ideal for handling large, complex scenes.
Cons: Expensive and resource-intensive.
Best for: Film, VFX, and animation.
9. Maya
Autodesk Maya is a staple in the 3D industry, renowned for its comprehensive 3D modeling, animation, and rendering capabilities. With Arnold as its primary rendering engine, Maya is widely used in film production and game development.
Pros: Industry-standard, powerful rendering tools, strong animation capabilities.
Cons: Expensive, steep learning curve.
Best for: Animation, VFX, and game development.
10. Redshift
Redshift is a GPU-accelerated renderer known for its balance between speed and flexibility. It's favored by users in industries like film, TV, and advertising for its ability to handle high-quality visual effects while maintaining fast render times.
Pros: Fast GPU rendering, supports complex projects.
Cons: Requires high-end hardware.
Best for: VFX, animation, and visual effects.
Conclusion
The 3D rendering software market in 2024 is packed with options for professionals and beginners alike. Whether you're creating architectural visualizations, cinematic effects, or product designs, these popular 3D rendering tools provide the power, flexibility, and photorealistic quality needed to bring your creative vision to life.
0 notes
Text
Old But Gold Pt.2
Today I'm going to talk about another Lumione classic that deserves more love from readers. It is the sequel to the story mentioned in the previous post, This Living Hand, Now Warm and Capable.
Original published date on ff. net: Sep 16, 2011
Summary:
Hermione and Lucius and the aftermath of battle.
In this follow up one shot, we witness the end of the affair between Lucius and Hermione in the previous fic I Think I Know Enough of Hate.
Lucius and Hermione's relationship was twisted and tragic, filled with so much contempt, both for each other and for themselves. Yet there was something more underneath, something speaking of a more tender sentiment that might never be uttered. Whatever it was, it made them cling to one another, wrapping up in a tangle of love and hate and obsession.
Lucius and Hermione's mutual loathing and desire is depicted so phenomenally through the short, sharp paragraphs and haunting prose, further illustrate the corruption of British Wizarding Society as well as the pain of a hollow existence, of pointless conflicts and never-ending power struggle.
Each word and phrase were designed for maximum emotional effect, so unforgettable and effective that shook you to the core. The ambiguity of the fic's context added to the desperate and melancholic vibe of the one shot.
The stories left so much up to interpretation that I've decided to write an AU WIP to explore them more on my own! (with the permission from the og writer.)
1 note
·
View note
Text
Choosing the Best Software for Interior 3D Rendering
Interior 3D rendering has become a cornerstone of modern interior design, allowing designers, architects, and clients to visualize spaces before they’re built or renovated. The effectiveness of these visualizations largely depends on the software used for creating them. With numerous options available, choosing the right software for interior 3D rendering can be a daunting task. This guide will help you navigate through the essential features, usability, and benefits of the top software options to ensure you make the best choice for your needs.
1. Key Features to Look for in Interior 3D Rendering Software
When selecting software for interior 3D rendering, it’s important to focus on the features that will enhance your workflow and the quality of your renders. Here are some essential features to consider:
Realistic Rendering Capabilities: The software should offer high-quality rendering capabilities, producing photorealistic images that accurately represent materials, lighting, and textures. This is crucial for creating detailed and convincing visualizations that clients can trust.
User-Friendly Interface: An intuitive interface is essential, especially for beginners. Software with a steep learning curve can slow down your workflow, so look for options that are easy to navigate and come with helpful tutorials or user communities.
Library of Materials and Objects: A comprehensive library of pre-made materials, furniture, and objects can save you time and enhance the realism of your renders. The ability to import custom objects and materials is also a plus.
Lighting and Shadow Control: Advanced lighting and shadow controls allow you to create realistic scenes by simulating natural and artificial light sources. This feature is key for achieving accurate interior 3D rendering results.
Compatibility and Integration: Ensure the software is compatible with other design tools and file formats you frequently use. Integration with CAD software, Photoshop, or other 3D modeling tools can streamline your workflow.
2. Top Software Options for Interior 3D Rendering
Now that you know what features to look for, let’s explore some of the best software options available for interior 3D rendering:
SketchUp: SketchUp is a popular choice for both beginners and professionals due to its user-friendly interface and powerful rendering capabilities. Paired with V-Ray or Enscape, it can produce highly realistic interior renders. SketchUp also offers a vast library of pre-made objects and materials, making it easier to create detailed interior designs.
3ds Max: 3ds Max is a powerful tool widely used in the industry for interior 3D rendering. Its robust modeling capabilities, coupled with the V-Ray or Corona Renderer plugins, make it ideal for producing photorealistic interiors. Although it has a steeper learning curve, the results are worth the effort.
Lumion: Lumion is known for its speed and ease of use, making it a great choice for quick and impressive interior renders. It offers a real-time rendering engine, allowing designers to see changes instantly. Lumion is especially useful for creating immersive, walk-through animations and presentations.
Blender: Blender is a free, open-source 3D modeling and rendering software that offers a wide range of features for interior design. With its powerful Cycles and Eevee rendering engines, Blender can produce stunning interior 3D rendering images. Its steep learning curve is offset by a supportive online community and extensive tutorials.
Revit: Revit is particularly useful for interior designers who work closely with architects and need to integrate 3D models into larger building projects. It offers excellent parametric modeling and rendering capabilities, making it ideal for detailed and accurate interior visualizations.
3. How to Choose the Right Software for Your Needs
When choosing the best software for interior 3D rendering, consider the following factors:
Project Scale and Complexity: For complex projects with intricate details, opt for software like 3ds Max or Revit, which offer advanced features and robust performance. For smaller or less complex projects, SketchUp or Lumion might be more suitable.
Budget: Consider your budget when selecting software. While some options like Blender are free, others like 3ds Max and Revit can be costly. Weigh the software’s features against your needs to ensure you’re making a cost-effective choice.
Skill Level: If you’re new to interior 3D rendering, start with software that offers an easier learning curve, such as SketchUp or Lumion. As you gain experience, you can explore more advanced tools like 3ds Max or Blender.
4. Conclusion
Choosing the best software for interior 3D rendering is crucial for delivering high-quality, realistic visualizations that meet your clients’ expectations. By considering the key features, exploring top software options, and aligning your choice with your project needs, budget, and skill level, you can select the perfect tool to enhance your interior design workflow. Whether you’re a beginner or a seasoned professional, investing in the right interior 3D rendering software will set you up for success in creating stunning and effective interior designs.
0 notes
Text
How Architectural Rendering Services Are Transforming Modern Design?
architectural rendering services,
architectural rendering companies,
architectural 3d modeling,
3d architectural visualization services
Transforming the Modern Design by Architectural Rendering Services
In today's fast-paced real estate and construction industries, visualization plays a critical role in project success. Gone are the days when blueprints and 2D drawings were the only means of presenting architectural concepts. Thanks to advancements in architectural rendering services, architects, designers, and developers can now showcase realistic 3D representations of their projects before construction begins.
With the help of architectural rendering companies, firms can bring ideas to life with stunning visuals. This is where architectural 3D modeling and 3D architectural visualization services come into play. In this article, we’ll explore how these services enhance the industry and why they are a game-changer for architects and real estate professionals.
What Are Architectural Rendering Services?
Architectural rendering services involve creating lifelike 3D representations of buildings, interiors, and landscapes. These digital models help stakeholders visualize projects in a realistic manner, making design presentations more engaging and effective.
Types of Architectural Rendering Services
Exterior Rendering: Showcases the outer appearance of a building, including landscaping and surroundings.
Interior Rendering: Highlights interior spaces, furniture, lighting, and textures.
360° Virtual Tours: Allows users to navigate through a space virtually.
3D Floor Plans: Provides a top-down perspective of building layouts.
The Role of Architectural Rendering Companies
Many businesses rely on architectural rendering companies to transform their sketches and ideas into photorealistic visuals. These companies use advanced software like 3ds Max, V-Ray, and Lumion to create detailed and immersive architectural models.
Benefits of Hiring Architectural Rendering Companies
High-Quality Visualizations: Professional rendering firms ensure accuracy and precision in their work.
Cost Savings: Identifying design flaws early reduces costly modifications during construction.
Enhanced Marketing Materials: Developers use 3D renders to attract investors and buyers.
Better Client Communication: Clients can understand project designs without technical knowledge.
How Architectural 3D Modeling Enhances Design
1. Accurate Project Representation
Architectural 3D modeling creates detailed representations of buildings, ensuring accurate proportions, materials, and spatial arrangements.
2. Improved Collaboration
With 3D architectural visualization services, architects, engineers, and clients can collaborate effectively, making real-time adjustments to designs.
3. Faster Decision-Making
When clients can see a realistic model of their project, decision-making becomes quicker and more informed.
The Impact of 3D Architectural Visualization Services
1. Realistic Previews of Projects
Using 3D architectural visualization services, developers can present realistic previews of buildings, allowing clients to explore the design before construction begins.
2. Increased Sales in Real Estate
Real estate companies use architectural rendering services to showcase properties to potential buyers, even before they are built.
3. Reduced Errors in Construction
By visualizing projects in 3D, architects can detect and correct design flaws before they lead to costly construction errors.
Industries That Benefit from Architectural Rendering Services
1. Real Estate Development
Real estate firms use 3D architectural visualization services to create immersive property presentations that attract buyers.
2. Interior Design
Interior designers rely on architectural 3D modeling to experiment with furniture layouts, materials, and lighting.
3. Urban Planning
City planners use architectural rendering services to design and visualize large-scale infrastructure projects.
Future Trends in Architectural 3D Modeling and Visualization
1. AI-Powered Rendering
Artificial intelligence is making architectural rendering services faster and more efficient, automating complex design processes.
2. Virtual Reality (VR) and Augmented Reality (AR)
Clients can now experience properties in immersive VR environments, enhancing engagement and understanding.
3. Cloud-Based Collaboration
Modern architectural rendering companies offer cloud-based tools that allow real-time collaboration on projects.
Conclusion
The demand for architectural rendering services is growing as industries recognize the value of high-quality visualizations. Whether through architectural 3D modeling or cutting-edge 3D architectural visualization services, these technologies are transforming the way projects are designed, marketed, and built. Architectural rendering companies continue to push the boundaries of realism, helping architects and developers turn visions into reality.
FAQs
1. What is the difference between architectural rendering and architectural 3D modeling? Architectural rendering focuses on creating realistic visualizations, while architectural 3D modeling involves designing the digital structure of a building.
2. How do architectural rendering services help real estate developers? They provide high-quality visuals that help market properties and attract buyers before construction is completed.
3. What software is used for 3D architectural visualization services? Popular tools include 3ds Max, V-Ray, SketchUp, Revit, and Lumion.
4. How do architectural rendering companies improve project efficiency? They help detect design flaws early, reducing costly revisions and enhancing communication between architects and clients.
5. Are architectural 3D modeling services expensive? Costs vary based on complexity, but they are generally a cost-effective solution compared to traditional design revisions and marketing materials.
read more.....
Read more.......
3D Furniture Modeling Enhances & Customization for Interior Designers
The Art and Science of Creating Photorealistic Architectural 3D Models
Why You Need Professional 3D Product Modeling Services for Your Brand Furniture 3D Visualization
How 3D Furniture Design Is Shaping the Future of Interior Decor 3D Furniture Design
How Can Furniture 3D Visualization Enhance Online Shopping?
Top 5 Trends Shaping the Future of Architectural 3D Visualization
How Architectural 3D Visualizations Improves Client Presentations? Architectural 3D Visualizations Enhance Client Presentations Presenting...
How Can 3D Rendering Help in Designing of 3D Furniture Visualization?
What are the Key Software and Tools Used in Architectural 3D Visualization?
What is Furniture 3D Visualization And how It Helps In Transforming Interior Design?
How the Future of Architectural 3D Visualization Transforms Design and Construction?
How 3D Product Rendering Services Are Changing the Industry?
What is the Power of Architectural Rendering Services in Modern Design?
Streamlining Manufacturing: How 3D Furniture Design Accelerates Prototyping
Architectural Rendering Companies as Sustainability Advocates A Green Approach to Visualization
How 3D Visualization of Architecture Transforming Contemporary Design
Beyond the Catalog Using 3D Product Visualization for Interactive Furniture Selection Using 3D Product Visualization for Interactive Furni...
The Competitive Edge How Architectural Rendering Services Boost Project Success
Design Without Limits The Flexibility of 3D Furniture Models for Modular Interiors
How 3D Product Rendering Services Enhance User Experience in Virtual Stores
Bridging the Gap Between Architects and Clients with 3D Architectural Visualization Services
Photorealistic 3D Furniture Models: The Key to Revolutionizing Online Retail
Interactive Experiences The Rise of Real-Time 3D Architectural Visualization Services
The Role of 3D Product Visualization in Reducing Time-to-Market for Furniture
Architectural 3D Modeling The Foundation of Stunning Visualizations
Why 3D Furniture Design Is the Ultimate Solution for Bespoke Home Decor
The Future of Real Estate Marketing the Role of 3D Architectural Visualization Services
From Idea to Icon how 3D Product Rendering Services Redefine Brand Identity
Beyond Blueprints How Architectural Rendering Companies Revolutionize Pre-Construction Planning
The Art and Science of Architectural 3D Modeling
Interactive Architecture Visualization: Engaging Clients with Real-Time 3D Models
The Importance of Lighting in 3D Furniture Rendering
Augmented Reality and 3D Furniture Visualization: The Perfect Match
Furniture Prototyping Made Easy with 3D Visualization
The Benefits of Furniture 3D Rendering for Custom Designs
The Benefits of Outsourcing to Architectural Rendering Companies
How 3D Product Visualization Brings Ideas to Life From Concept to Reality
How Can 3D Rendering Help in Designing of 3D Furniture Visualization?
#architectural rendering services#architectural rendering companies#architectural 3d modeling#3d architectural visualization services
0 notes
Text
A Step-by-Step Guide to Creating Stunning 3D Architectural Animations
3D architectural animations have revolutionized the way we visualize and present architectural designs. Whether it's for commercial architecture animations, residential projects, or urban planning, these animations provide a dynamic and immersive experience that static images simply cannot match. In this guide, we'll walk you through the process of creating stunning 3D architectural animations, from concept to final render.

Step 1: Conceptualize Your Animation
Before diving into the technical aspects, it's crucial to have a clear vision of what you want to achieve with your 3D animation architecture design. Consider the following:
Purpose: What is the goal of your animation? Is it to showcase a commercial building, a residential complex, or an urban development?
Audience: Who will be viewing this animation? Clients, stakeholders, or the general public?
Key Features: Identify the key architectural elements and features you want to highlight.
Step 2: Gather Reference Materials
Collect all the necessary reference materials, including architectural plans, sketches, photographs, and any existing 3D models. This will help ensure that your animation is accurate and true to the original design.
Step 3: Choose the Right Software
Selecting the right software is crucial for creating high-quality 3D architecture animation. Popular choices include:
Autodesk 3ds Max: Known for its powerful modeling and rendering capabilities.
SketchUp: Ideal for quick modeling and easy integration with other software.
Lumion: Excellent for real-time rendering and creating realistic environments.
Blender: A free, open-source option with robust features.
Step 4: Create the 3D Model
Start by building a detailed 3D model of your architectural design. Pay attention to the following aspects:
Accuracy: Ensure all dimensions and proportions are precise.
Detailing: Add architectural details such as doors, windows, textures, and materials.
Environment: Incorporate the surrounding environment, including landscaping, roads, and neighboring buildings.
Step 5: Animate the Scene
With your 3D model ready, it's time to bring it to life through animation architecture techniques. Focus on:
Camera Paths: Define smooth camera movements to guide the viewer through the space.
Lighting: Set up realistic lighting to enhance the mood and highlight key features.
Movement: Animate any dynamic elements, such as people, vehicles, or trees swaying in the wind.
Step 6: Add Textures and Materials
Textures and materials play a crucial role in making your 3D animation architecture design look realistic. Use high-quality textures and pay attention to details such as reflections, bump maps, and transparency.
Step 7: Render the Animation
Rendering is the process of generating the final images from your 3D model and animations. This step can be time-consuming, but it's essential for achieving photorealistic results. Consider:
Resolution: Choose an appropriate resolution for your final output.
Render Settings: Optimize settings for the best balance between quality and render time.
Post-Processing: Use software like Adobe After Effects for additional enhancements, such as color correction and motion blur.
Step 8: Review and Revise
Once the initial render is complete, review the animation for any issues or improvements. Get feedback from colleagues or clients and make necessary adjustments.
Step 9: Final Output
Export the final animation in the desired format, ready for presentation or distribution. Common formats include MP4, AVI, and MOV.
Conclusion
Creating stunning 3D architectural animations requires a combination of creativity, technical skill, and attention to detail. By following these steps and utilizing the right tools, you can produce compelling animations that effectively showcase your architectural designs. Whether you're working on commercial architecture animations, residential projects, or urban developments, the impact of a well-crafted 3D animation cannot be overstated.
#commercial architecture animations#3d animation architecture design#3d architecture animation#architecture animation#animation architecture#3d architectural animation services#3d animation architecture
0 notes
Text
Architectural Visualization and Rendering Mastery: Bringing Designs to Life
Transform your architectural concepts into stunning visual realities with our Architectural Visualization and Rendering Mastery course. This comprehensive program teaches you the art and science of creating photorealistic renderings and immersive visualizations. Explore advanced techniques in lighting, texturing, and composition using industry-leading software like V-Ray, Lumion, and 3ds Max. Learn to effectively communicate design ideas through compelling visuals that captivate clients and stakeholders. Elevate your presentation skills and bring your architectural projects to life with unparalleled clarity and detail. Join us to become a master in architectural visualization and rendering.
0 notes
Text
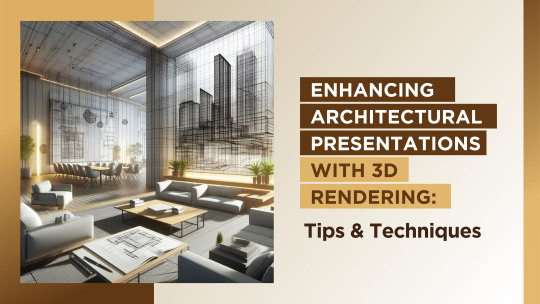
Enhancing Architectural Presentations with 3D Rendering: Tips and Techniques
Are you tired of presenting architectural designs that fail to captivate your audience?
Imagine if your presentations could transport your viewers into a realistic, immersive world where they could see every detail of your vision.
Welcome to the world of 3D rendering.
In today's competitive market, standing out requires more than just great designs; it demands powerful presentations that leave a lasting impression. 3D rendering offers a game-changing solution, transforming static plans into vibrant, lifelike images.
This blog will guide you through essential tips and techniques to enhance your architectural presentations with stunning 3D renderings.
Understanding the Basics of 3D Rendering
3D rendering is the process of converting 3D models into 2D images with realistic lighting, textures, and materials. This technology enables architects to create photorealistic visualizations of their designs, providing a clear and compelling way to present ideas to clients and stakeholders.
By leveraging 3D rendering, architects can explore different design options, experiment with materials and lighting, and make data-driven decisions to enhance their projects. Common software tools include Autodesk 3ds Max, SketchUp, and Lumion, each offering unique features tailored to various aspects of architectural visualization. The benefits of using 3D rendering extend beyond visualization; it also allows for the identification and correction of design flaws early in the process, ultimately saving time and resources.
Preparing Your Architectural Design for 3D Rendering
To achieve the best results in 3D rendering, it is crucial to start with detailed and accurate architectural plans. Ensure that your drawings are clear and comprehensive and include all necessary details, such as dimensions, materials, and textures. This level of detail helps the rendering software produce precise and realistic images.
Additionally, consider the level of detail in your design—too much detail can slow down the rendering process and make files cumbersome, while too little detail can result in a lackluster final product. Optimize your designs by focusing on essential elements that will have the most visual impact. Avoid common pitfalls, such as overlooking small but important elements, and always double-check your work for accuracy before starting the rendering process. By doing so, you can ensure that your 3D renders are both visually stunning and true to your architectural vision.
Enhancing Presentations with Advanced Techniques
Advanced techniques can take your architectural presentations to the next level, making them more interactive and immersive.
Virtual Reality (VR) and Augmented Reality (AR): Utilize VR for immersive walkthroughs and AR to overlay designs onto real-world settings.
Interactive Presentations: Create models that allow clients to explore different design options interactively.
Animation and Dynamic Elements: Use animations to simulate movements and changes over time, such as lighting variations.
Real-world Examples: Showcase successful projects that have used these techniques to demonstrate their effectiveness.
Implementing these advanced techniques can make your presentations more engaging and persuasive.
Tips for Effective 3D Rendering
Creating an effective 3D rendering involves several key techniques to ensure your presentations are realistic and compelling.
Choosing the Right Software: Select software that aligns with your project's needs and your expertise, such as Autodesk 3ds Max, SketchUp, or Lumion.
Achieving Photorealism: Focus on high-quality textures and accurate lighting settings that mimic real-world conditions.
Perspective and Camera Angles: Experiment with different viewpoints to highlight unique architectural features.
Environmental Context: Incorporate surrounding elements like landscaping and adjacent buildings to provide context.
By mastering these tips, you can significantly enhance the visual impact of your 3D renderings.
Enhancing Presentations with Advanced Techniques
Advanced techniques can take your architectural presentations to the next level, making them more interactive and immersive. Utilize Virtual Reality (VR) for immersive walkthroughs and Augmented Reality (AR) to overlay designs onto real-world settings. Interactive presentations that allow clients to explore different design options can be very effective. Additionally, incorporating animations to simulate movements and changes over time, such as lighting variations, can add dynamic elements to your presentation. Showcasing real-world examples of successful projects that have used these techniques can demonstrate their effectiveness. Implementing these advanced techniques can make your presentations more engaging and persuasive.
3D rendering is a powerful tool that can transform your architectural presentations, making them more realistic, engaging, and impactful. By understanding the basics, preparing your designs meticulously, and leveraging both effective rendering tips and advanced techniques, you can create stunning presentations that leave a lasting impression on clients and stakeholders. Embrace these strategies to elevate your presentations and stay ahead in the competitive field of architecture. The future of architectural presentations is here, and it’s vividly three-dimensional.
0 notes