#limited selection because I have a lot of blorbos
Explore tagged Tumblr posts
Note
Hello! Question from a prompt meme newbie: what does it mean to claim a prompt? Would I be promising to write a fic for it, and if so, are there word count or posting date requirements? One of the promtps has really sparked my muse and I'd love to write a fic for it, but my life's chaotic enough right now that I hesitate to make a promise I might not be able to keep. Thank you for running this lovely event!! <3
Thank you Anonymous Witcher Rarepair Friend for your excellent question!
First for a very technical and overly-literal answer to your question:
When you go to the prompts page (link is here), you can scroll along until you see a prompt that sparks your muse or gives you brain worms or An Craite Derangement Syndrome or whatever, and then you click on the "claim" button like this:

Once you have done that, you can check it out any time you are signed in to AO3 by going to your dashboard and selecting Collections:
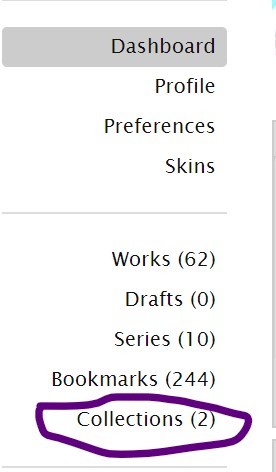
Then click on the title for the Witcher Rarepair Prompt Fest:

And then click on "My Claims" to see your claim(s):

If the prompt you claimed does not say anything in the text of the prompt about word count requirements, then the number of words you produce is up to you.
For people who are submitting prompts (prompting is still open and the prompt submission form is here), you should specify if you have any preferences about minimum or maximum length, but you have a limited number of wordcount options to choose from. They are (a) must be more than 100 words; (b) must be under 100,000 words; or (c) no word count restriction.
Prompting, prompt claiming, and posting your prompt fills will stay open indefinitely, and by "indefinitely" I mean until 2026.
If you decide that you just don't think you are going to get around to filling your prompt, because your life is too hectic, or you've moved on to a new fandom and found new blorbos (blorboes?), or for any other reason, you can go back into My Claims in your AO3 dashboard and click on the "drop claim" button:

This is not like a gift exchange where each participant has to commit to producing something, this is a prompt meme so we are all just making lots and lots of ideas because we hope people will feel inspired and claim a prompt or two, so if you claim one and then later have to throw it back in the pool, don't worry about it!
This is a good time for me to mention that participants can claim more than one prompt, and more than one participant can claim the same prompt.
Finally, I think someone else sent me a specific ask about this, in which case I will answer it twice, but if you get to the part where you have claimed your prompt and written it and now you're ready to post it, you go back into My Claims in your AO3 dashboard again and this time you click on the "fulfill" button:

This takes you to a magical, already-partly-populated version of the AO3 New Work form:
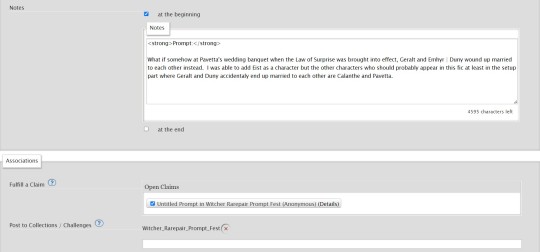
The text of the prompt you claimed is already in the beginning notes box, and your work is set to be added to the Witcher Rarepair Prompt Fest collection when you upload it.
4 notes
·
View notes
Text
I've decided to join the Star Wars OC Quiz bandwagon:
Which Star Wars Blorbo from Eps's Brain are you?
#Uquiz#SW Ocs#clone ocs#kaminoan oc#limited selection because I have a lot of blorbos#here's the options:#mae eppa#Zed Kwinde#Jedi Master Vikerius Kwinde#K-1MB#Clone Trooper Lichtenberg#Clone Trooper Pretty Boy#Riot Trooper Olly Olly Oxenfree#Clone Medic Sponge#Clone Medic Pox#Clone Cadet Tulpa#Sulu Ra#and one surprise entry :D#have fun guys this took forever and it's a super simple quiz
16 notes
·
View notes
Text

hi! i’m user ames tattooine, and i’m gonna go over how to cut footage out of a scene. i’ll talk about rotoscoping—what it is, its history, and how to mask with the rotobrush successfully. i will also briefly go over how to use the pen tool to mask in after effects.
though this is pretty comprehensive and info-heavy already, there are still things i don't go over! but it should be a guide fit for beginner-intermediate after effects users.
YOU WILL NEED:
adobe after effects (minimum version cs5 / anything released after 2010)
basic knowledge of the interface and workflow, including but not limited to: compositions/precompositions, keyframes, and how to use brush tools
time. a lot of it
patience. more of it
also, before you click "read more," please note that this is about 3000 words long. definitely recommend viewing it in your browser. with housekeeping out of the way, let's go!
WHAT IS ROTOSCOPING?
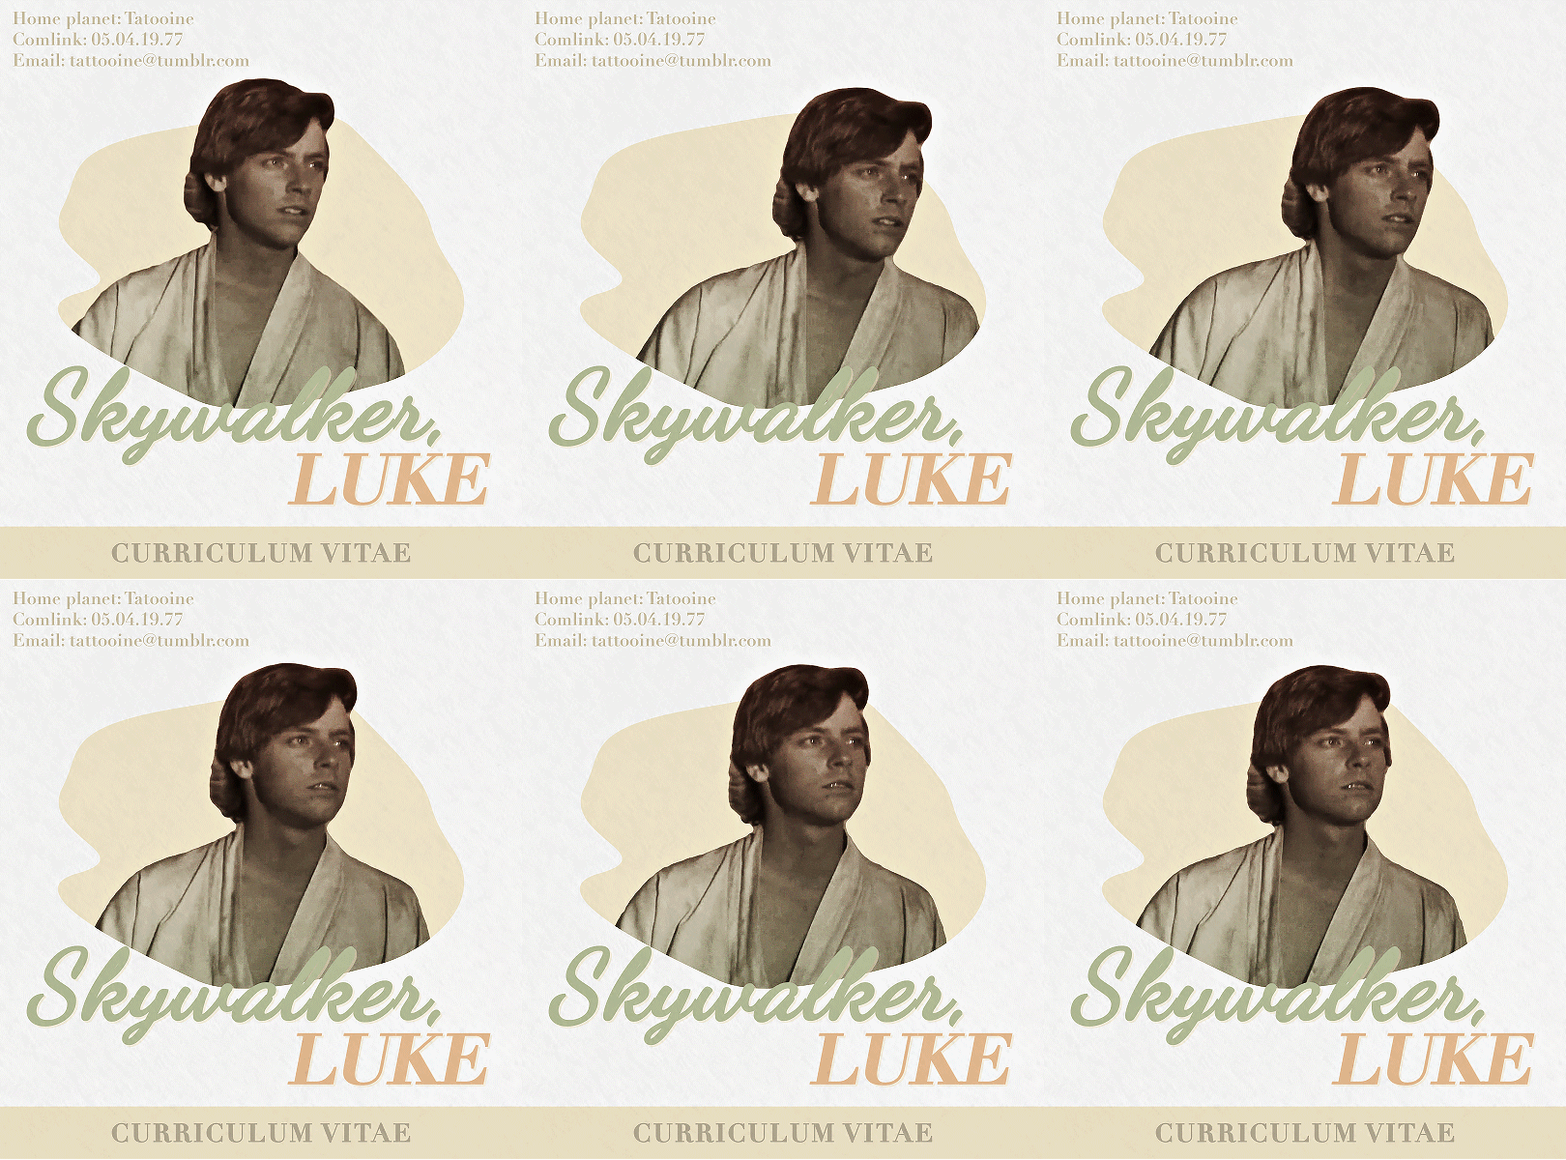
very simply put, rotoscoping is a tracing technique. physically, it’s a little like using a selection tool on video. conceptually, things are slightly different, and that’s due to how it was meant to be used—but like many artistic tools, rotoscoping was transformed by contemporary artists / editors / animators / etc to become the versatile thing it is today. for mainstream giffing and video editing purposes, it is most often used as a way to mask footage out. see:
UNDERSTANDING ROTOSCOPING
the main thing you need to understand is that rotoscoping was meant for animation. not masking, not giffing—hand-drawn animation. in its early days, animation was clunky and generally unnatural-looking; not due to stylistic decisions about motion, but because artists were mostly guessing at how a movement would be divided into frames between point A and point B of any given movement. then, in 1915, two brothers named max and dave fleischer stuck a projector to a table, attached it to a car light, and beamed that light onto a block with tracing paper attached. they’d then take the image produced onto the tracing paper, trace out the figure (in the first case, dave dancing on top of a roof in front of a white sheet), and repeat this frame by frame to eventually trace an entire scene. the animated character would be drawn over / match the traced figures, and bam, animators suddenly had a HUGE shortcut to imitating real life movement in drawn scenes. (or, more accurately, only max and dave did, at least until the patent expired lol)
WHAT DOES THIS MEAN FOR ME??
well, maybe not much if you don’t care to nerd out like i do, but it should absolutely inform the choices you make re: scene selection. dave and max used a white sheet for contrast and added a car light to their apparatus to enhance that contrast when they were tracing. if you try to rotoscope a scene that doesn’t have much contrast to it, you may not come out the other end with much success.
but remember: the tool wasn’t created so that you could cut your blorbo out of a scene, it was so that artists could trace movement for funky and weird animated characters in the 1920s. over time, and as tech advanced, people realized that if they completed half the rotoscoping process, they would have an isolated scene from the original footage. aka, they could mask out background footage. sprinkle in a little web 2.0, accessibility and increasingly easy use of tools from the mid-90s onwards (and the implementation of the rotobrush tool specifically after 2010), and we have a fascinating study of how tools can be transformed from their original use to do things that are different but equally valid. and yeah—2010. it’s mind-boggling to think about the leaps and bounds we’ve made with editing tech in the last 10-15 years alone. i digress.
ROTOSCOPE =/= ROTOBRUSH
so here’s where you might be like, jesse what the fuck are you talking about dot jpg. i’ll try to be concise: rotoscoping is the method. rotobrush is ONE of the tools you can use to rotoscope. i have a little issue about terminology that i won’t get into, but what people want to do in gifsets and video edits with the rotobrush is MASK. they are using the rotobrush to mask away footage, the same as if they used tape to cover up sections of a canvas. it’s easier, however, to think of it in the inverse—taking specific footage out, rather than snipping background away. imagine i have gingerbread dough, and i want to cut it into stars or various shapes. one thing i could do is take a knife and a stencil and physically cut out my shapes; another thing i could do is use a cookie cutter. the rotobrush tool is like a cookie cutter if it was driven by machine learning, involved way too much math and programming for personal comfort, and also was incredibly inelegant. the former method can be done using the pen tool, which is more time consuming, perhaps, but it lends itself to accuracy because it’s all done by you, the artist. i will be going over both methods.
THE ROTOBRUSH METHOD
fucking finally! we’re in after effects! first thing of note: my interface looks like this. yours, unless you also went through a sony vegas envy phase in 2015 and then modified your existing cs6 interface to be as inconvenient as possible, does not. don’t worry about it—the tools you need are located in the same place, and if ever i use a panel you can’t find, just click “window” at the top (both in mac and windows) and click what you need there.
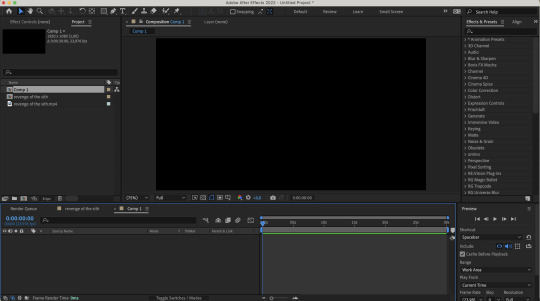
step 1: select your footage, and be selective. and boy, do i mean be selective, or else you are in for a world of irritation. you want a scene that has naturally high contrast between your subject and your background. you want a scene that doesn’t have erratic movement, or if it does, you need to have the frame rate to support that movement. similarly, your background shouldn’t have too much movement either.
(what is erratic movement? well, let’s say your footage is 24 fps, and a character moves their arm between frame 0 and frame 12, or half a second. if the arm is moving incrementally throughout all 12 frames, or every 2 frames, that’s workable! but if you have a still image for frames 0-3 where the character’s arm is in one position, then another still image for frames 4-6 where the character’s arm is in a vastly different position—that’s erratic movement. after effects will not process that easily.)
if you’re masking out footage of a human (or humans), then for your own sanity, choose a scene that doesn’t have a lot of flyaway hair. finally, you probably don’t want a scene that’s too long! for this tutorial, i’ve got this shot of my baby boy.
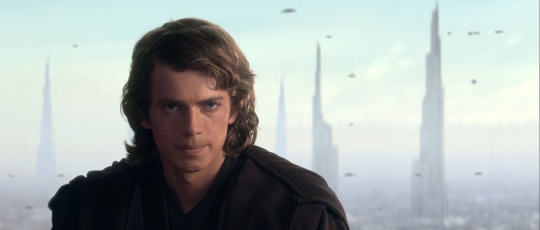
notice how he’s dressed in dark clothing against a very light background? how his hair is mostly flat to his head, and how there’s nothing really that could have erratic movement? the background is a little busy, but it doesn’t seem like anything that’ll mess up the rotobrush’s calculations. as a bonus, the subject is relatively large and details around the edges aren’t too detailed! this is the kind of footage that’ll give you an easier time.
note: when i say “calculations” btw, i really do mean calculations. the algorithm takes the brush tool set to “constant” and predicts “edges” based on things like contrast between pixels, relative position of where the brush was used, etc. this is why it can be really convenient, but also why it can be prone to error. as i said: inelegant.
step 2: isolate the scene in a separate comp, whether that be through creating a separate composition manually or just precomping your existing one. the key thing is to have workable start and end points that automatically pop up when you enter the layer so that you don’t have to wait hours for each unused frame to load. this is what i’ve got now:
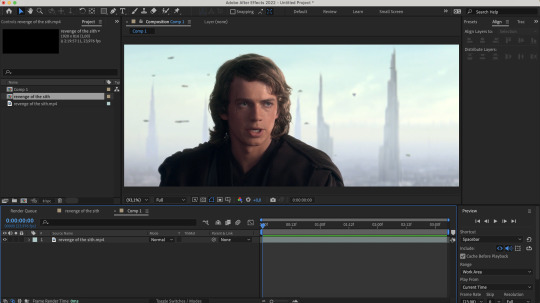
step 3: enter the layer by double clicking it in your timeline. you should see a separate panel pop up at the top here…

and what looks like the entirety of your footage here.

fret not! this is simply how layers work in after effects: they’re non-destructive, so you can add modify it to your heart’s content, and the original footage will not change. kind of like smart objects in photoshop, if you want a comparison. that is to say, yeah, in this layer, you DO have the entirety of your footage; in your composition, however, you’ve cut away all but 3 seconds of it. the point of step 2 will be apparent in one second when you do step 5.
step 4: equip the rotobrush tool. that’s the blue icon here on your tool bar (turns blue when you equip it).

step 5: go to the beginning of your composition and vaguely trace the outline of your subject INSIDE the footage you want by clicking and dragging (like any other brush tool), like so:
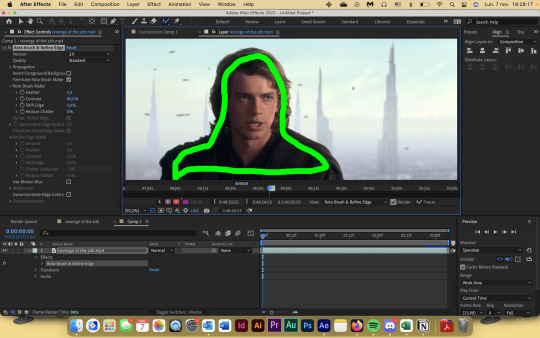
the line doesn't have to connect, mine just does. you’ll notice that the "rotobrush and refine edge" effect is automatically applied, and if you zoom in on the timeline from step 3, you’ll also see that the start and end points of your workspace have been automatically set to fit your composition.
after you release your click-and-drag, you should see a pink outline appear around the selection.

you can change how you view your selection by hitting the buttons down here to toggle different alpha view settings. and if you didn’t know this already, alpha means transparency. i personally like switching between the pink outline and the alpha overlay setting—the former makes it easier to see the smoothness of my selection, and the latter makes it easier to see if i’m missing footage / provides a starker contrast.

step 6: refine the initial selection. if you have experience with tracking, you can think of this as a “master frame” where you’re defining the parameters that will go on to be approximated for the rest of the footage. reminder that you are manipulating an algorithm when you use this tool, so you want to feed it data! this means clicking and dragging to collect any missing footage, or holding option / alt while you click and drag to remove footage. if you see jagged lines (like around his hair here), you can make it smoother by tracing inside the subject around the area and removing footage from the outside around the area—basically, telling the algorithm that This Is Where The Edge Is And I’m Moving Around It.
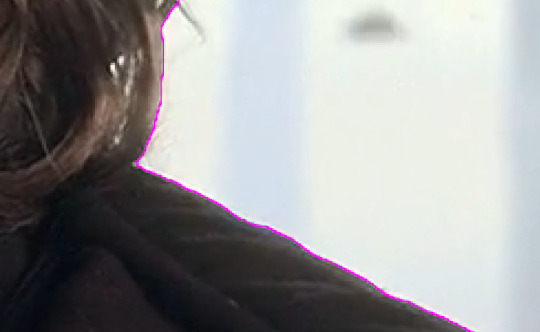
step 7: click play and let footage propagate. once it’s done, it should preview and look something like this:
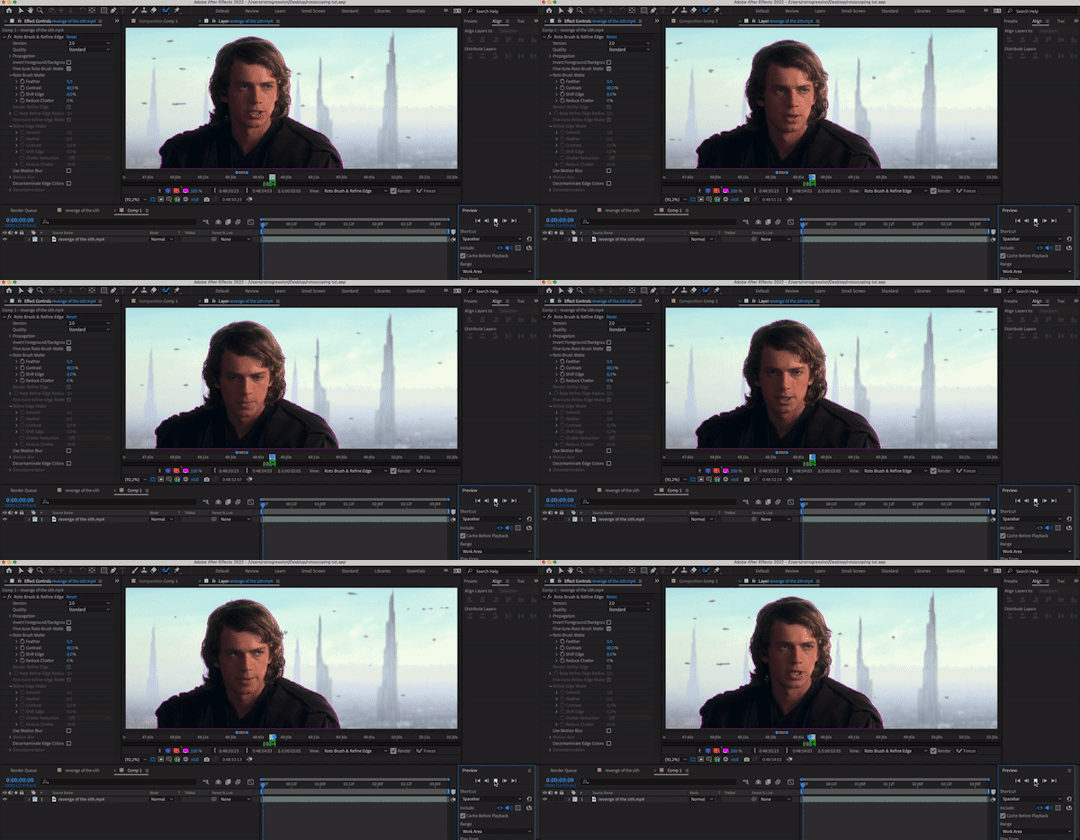
if you’ve done everything right so far, then your outline shouldn’t be jumping wildly around or anything—for the most part, it should stick to a good 80-90% of the footage you want! the more solid foundation you have that doesn’t need (much) fixing, the smoother the mask is going to be.
step 8: refine the “problem” frames. you can click through frame by frame and see where things go off the rails. for me, it’s anakin’s right (so my left) shoulder. basically repeat what you did in step 6 and add / take away footage as necessary to refine the edge. VERY IMPORTANT TO NOTE WHEN REFINING: the algorithm calculates edges FORWARDS. that is to say, if you make a change 2 seconds in, that change is only going to make modifications from that 2 second point onwards. it will not make a change backwards, meaning that if a problem starts to show up, you need to fix it from the root onwards and teach the algorithm that This Is Where The Edge Is. if you don’t do this, then you will end up going backwards frame by frame fixing the same mistake over and over again, and it will look wonky because you will redraw in different places. i have had students do this and spend hours in misery. be patient: work from the start and fix as you move forward frame by frame! don’t jump forwards and backwards if you can help it.
step 9: fiddle with the effect settings. now that you’ve basically gotten your mask as neat as possible, you can play with the actual effect itself. just quickly, i’ll explain what i think to be the most important things (and the other settings, you can experiment with on your own):
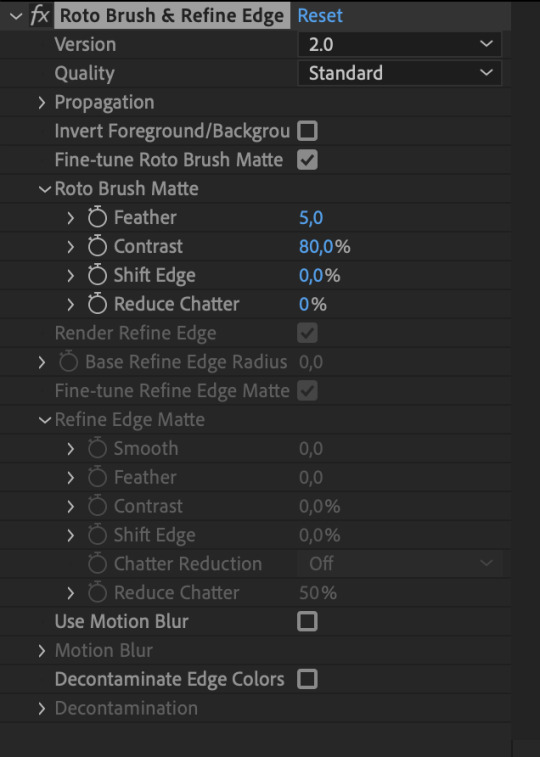
version: 2.0 is their latest and ostensibly “most improved” version from the 2020 update, though if you don’t have the hardware that can take it, you’ll end up propagating frames for Hours. version 1.0 is perfectly adequate, and at times even more efficient than 2.0. up to you!
invert foreground / background: select the footage around your subject rather than the subject itself. can be very useful!
reduce chatter: chatter is the shakiness of your outline from frame to frame. when things get ugly—say, when you use the refine edge tool—is when your outline is jerking around every frame, seemingly unable to find an edge, like so (to the extreme—yours will likely be smaller twitches):
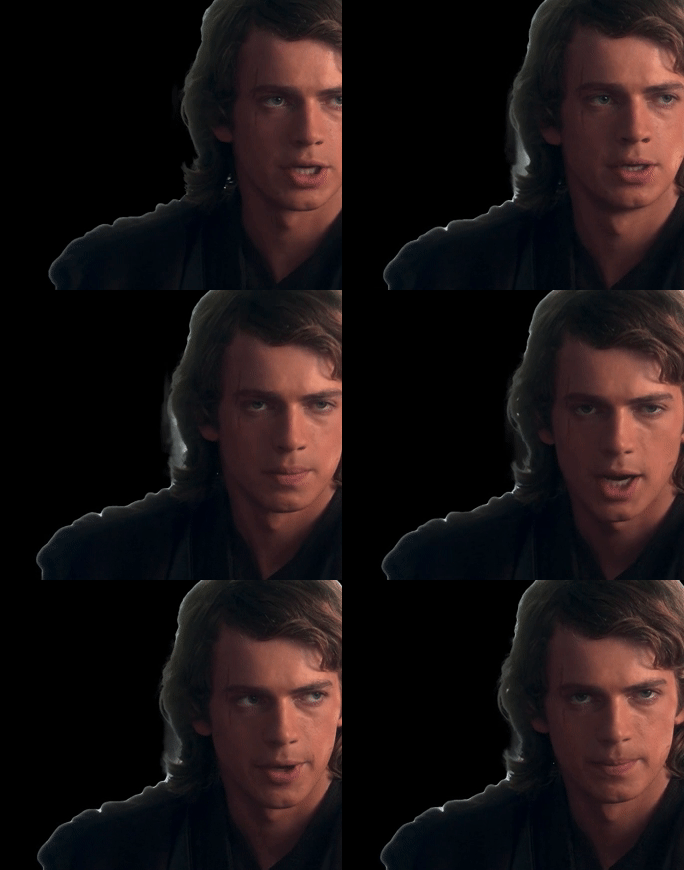
(also, this is me warning you right now. if you use the refine edge tool, you will triple your workload trying to actually refine it, and it will still look weird. if you insist on using it, be sure to work with a tiny brush size and stick as close as you can to the edge of your selection. this thing sucks and does not behave like it does in photoshop. LMAO.)
for the luke gifs, i had my feather at 10, my contrast at 90, my shift edge anywhere between 10 and 40%, and reduce chatter set to 100. these will vary greatly depending on the look you’re going for and also how neat your existing selection is. (at vague claims like this, i often hold a blinking neon sign at my students that says "REMEMBER MARSHALL MCLUHAN? THE MEDIUM IS THE MESSAGE? FORM AND CONTENT ARE INEXTRICABLY LINKED? CONSIDER THAT AND BE PURPOSEFUL IN YOUR DESIGN CHOICES PLEASE")
overall, the effects controls you see are very much like the select and mask feature in photoshop! you can play around with it and see what the other settings do, but those under roto brush matte are the main ones imo. and that’s all there is to it! you can render out your composition, or you can nest it in another composition if you’re working all in after effects, or whatever. for those who are slightly more advanced in ae: i wouldn't recommend using twixtor after masking to slow down the footage (if anything, risk the compression and add twixtor before, then render and import back and mask), but you can definitely adjust the time keyframes without impacting the quality of your selection. or you can sit and admire your genius and the power of c++.
THE PEN TOOL METHOD
this method is less a pain in the ass and more just.. very tedious. also jsyk, it works better with animated content (cartoons, anime, etc) and less so with live action just because of like, hair. i totally recommend being in a discord call with friends while you do this method because it is an absolute vibe and distracts you from how mind-numbing and boring editing actually can be lol
step 1: select your footage, and be selective. maybe not as particular as you had to be for the rotobrush method, but it should still have mostly the same elements. erratic movement isn’t so much an issue. i’m using the same scene as above for convenience.
step 2: isolate the scene in a separate comp, whether that be through creating a separate composition manually or just precomping your existing one. this is mostly for workflow reasons, but some people hate working with a lot of compositions, so it’s up to you if you want to work in the original composition with your whole footage.
step 3: duplicate the layer. you should have something like this now:
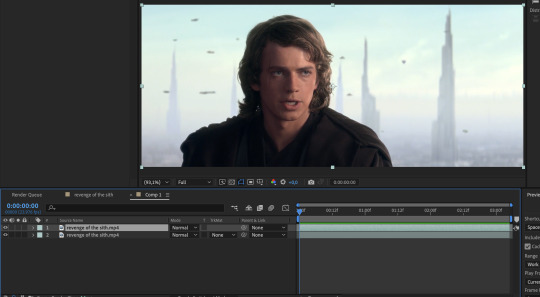
step 4: equip the pen tool, highlighted in blue here (turns blue when you equip it)!

step 5: on the top layer, create a mask around the very edges of your subject, starting from the beginning of your selected footage. you should end up with something that looks like this. i wouldn’t bother with curving your lines, just because it can be harder to move around (especially when you’re making video edits and masking out action sequences and whatnot). if you toggle the visibility off and on your bottom layer, you’ll see that you’ve masked out the rest of the footage, and everything else is transparent. woo!

NOTE: if you haven’t already, go to your preferences and make sure that this is toggled off. you want to be able to add and delete vertices at will without changing the mask path in previous frames!

step 6: hit “M” on your keyboard, or use the dropdowns on the uppermost layer to reveal the mask 1 dope sheet.

step 7: create a mask path keyframe at the first frame by clicking on the stop watch. your station should look something like this:
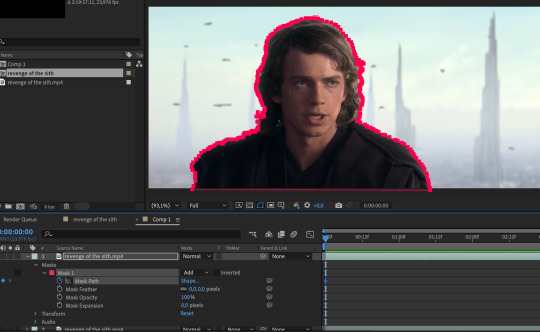
step 8: go forward frame by frame until the image changes. this may be by one frame, two, or sometimes three.
step 9: deselect your layer, then select it again. the mask outline should change from square vertices to circular ones.
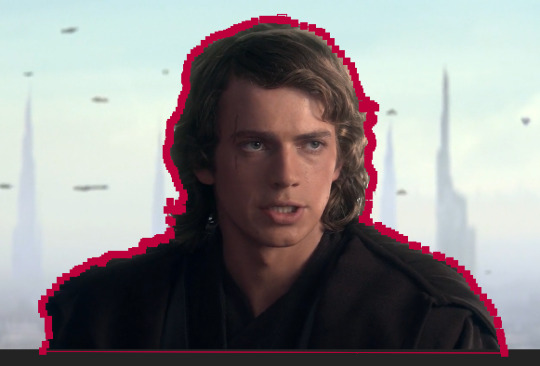

step 10: click and drag to move the vertices so that they align with the edge of your subject again. feel free to zoom in and out as necessary! you’ll notice that keyframes are created automatically when you make changes, so don’t worry about manually inputting them.
repeat steps 8 to 10 until you’ve finished :) this is why it’s time consuming and annoying :))
bonus options: you can shift the edge of your mask by fiddling with mask expansion. mask feather will feather around your mask, and mask opacity will change the transparency of the footage outlined inside the mask. less sophisticated than the roto brush matte settings, but they work great!
annnd 3000+ words later… that’s it! that’s how you cut footage from a scene using after effects. i hope this was informative! if you have any questions, feel free to send an ask to usergif.
xo ames, signing off 🖤
146 notes
·
View notes