#let me know if you want a in depth tutorial on how i gif! i'd be more than happy to help <3< /div>
Explore tagged Tumblr posts
Visit Tumblr Blog
Explore Tumblr blogs with no restrictions, modern design and the best experience.
Last Seen Tumblr Blogs


Fun Fact
69% of Tumblr users are millennials.
Note
hi :) i hope it's okay to ask, i love your colorings especially on your the bear gifs, would you consider making a tutorial for how you colour the kitchen scenes in the show, like the scenes that have a lot of white in the background and are quite bright? i find them really hard to color without making everyone's skin look muddy and i'd love to know how you make yours look so good. no worries if not though!

hellooo! sure, here's a quick tutorial on bright scenes :)
i would recommend checking out my general coloring tutorial here where i talk more in depth about my process as i'm just gonna go through it briefly here. here's my gif right after sharpening:

it's a pretty bright scene with lots of white and it can be tricky to color it properly and not make the skintones washed out. i like my gifs to be crispy and have a lot of contrast, so here's what works best for me:
i always start with layers and curves, they're the most helpful guide for me when it comes to working with literally any scene ever. i explained how i do it in my previous tutorial, so you can check it out, but i basically pick the brightest and darkest parts of the scene with the pipette tool which helps to neutralize the overpowering color if there is one and just makes the scene more natural (e.g. if it's too yellow, it will automatically tone down the yellow). in this case, the scene has a little bit of a blue tint, so it reduces the appearance of the overall blue tone (i really hope it makes sense lol). i usually set the opacity to around 50-30%. here's the result of just two layers: levels and curves:

it's a subtle change but it deepens the shadows and it's always so much easier for me to color after i do this step, so i never skip it lol.
next up, i use a gradient map to bring out the shadows even more just because i think it looks better (especially on the bear scenes, i noticed! or any 4k footage tbh). so i just add a gradient map layer, black to white, set it to soft light and set the fill to 10%:


and since this makes the gif just a little bit darker, sometimes i want to bring back the brightness a little bit because i looove contrast! here are my exposure layer settings:

and here's what we've got:

looking pretty good but sydney's skintone is looking a little bit too orange at this point and we don't want that! there are some wonderful tutorials how not to orange wash poc and i highly recommend checking a couple of them out to see which method works best for you, but i personally like using selective color and toning down the warmth of reds and yellows in the scene. for example, these are my settings for the red color, the opacity of this layer is set to 23%:

i do a similar thing with yellow, just messing around with the settings and seeing what looks best.
and then i add some additional layers like color balance and hue/saturation to bring it all together and that's it!

i put this together pretty quickly but hopefully i was able to help out! let me know if you have any questions, i'd be more than happy to help/ recommend something :)
22 notes
·
View notes
Text
Full giffing process - tutorial (*≧ω≦*)
Due to little demand, i will be going thru my complete process for making gifs. so this will cover all the basics i hope! keep in mind this is just the way I personally do things! please feel free to send me asks or dms if you have any doubts or questions!
☆☆☆☆☆☆☆☆ DISCLAIMER: Everything I know about giffing, I've learned from other tutorials, including the VapourSynth Resources I'll be using in this tutorial so I'll leave links to those tutorials I've used here as well!
In Depth Giffing Tutorial (link here) How to use VapourSynth (link here) ☆☆☆☆☆☆☆☆
(o´▽`o) I'm a windows user so idk if this works exactly the same on mac!
First things first, you will need:
☆ 4k video downloader (download it here!) ☆ Vapoursynth (32bit download / 64bit download) ☆ Photoshop (download it here! -64bit version only)
Okay! The first thing you need to do is make sure you're working with the highest quality material possible to ensure a decent looking gif!
I'd say the minimum quality needed for decent gifs is 1080px. But if you really want to gif that low quality 2 frame milisecond of your fave, i respect that
☆ lives / streams and tiktoks are typically not very high quality ☆ for stage performances such as music shows, ts/tp files are preferred but those can be really hard to get a hold of (this is a whole deeper level of giffing hell and more of an advanced class topic so nevermind this for now!) ☆ those occasional 4k facecams on youtube work fine tho! ☆ for mvs, variety shows etc, you can download the video with good quality from youtube using 4k video downloader
_(:3 」∠)_
Now let's talk about tumblr and it's pre-requisites for a good looking gif post :D
Tumblr can be sooooo annoying about gifs okay.... I find it's best to plan my whole set before I actually start doing anything but hey that's just me. Some things to keep in mind are: dimensions, file size, number of frames and post layout!
☆ Dimensions
You have 3 main options here and it's all about the width!
☆ 1 collumn: single gifs! these should be 540px wide ☆ 2 collumns: split that in half! 268px wide so there's a lil breathing space between the gifs! ☆ 3 collumns: 3's a party! 177px for each gif please
You can go crazy on the height but the width should mostly stick to one of those 3 unless you want tumblr to pull and squeeze your gif around like a piece of gum.
☆ File Size
This is really important because tumblr has a single image size limit of 10mb. Which means that every single gif you make has to be under that size or you won't be able to post it. The other thing about this is that the dimensions, number of frames and ammount of varying colors throughtout your gif will greatly impact on the final file size. Basically, the larger the dimensions and the more frames it has, the bigger the final file will be. Later on I will show you how to check your gif's final size before exporting it!
☆ Number of frames
This has more to do with the length of your gif, the longer it is, the bigger the final file will be. Typically gifs should be under 3 seconds long. So if you are making a set, try to break the moments you want to include in your set by increments of up to 2 - 3 seconds each, otherwise it might not fit all into one single gif. The number of frames is also extremely important when making combined gifs but that's for another tutorial.
☆ Post layout
If you want to make a cool looking gifset (where some gifs are larger in dimension than others, or when you want to have a single gif followed by a line of 2 gifs next to each other), then it might be worth it to plan out the layout before you start making the gifs. This way you ensure you won't have to remake gifs down the line because they don't fit together the way you wanted to.
☆ミ(o*・ω・)ノ
Timestamping
For this step, you will go through the video you want to gif from and you will just write down all the sections you want to use, down to the exact seconds. Example: 02:30 - 02:32.
(^◕ᴥ◕^)
VapourSynth (VS) - Clipping the video
I know VS can look pretty intimidating with it's bare coding and all but I promise it can be your friend. You just have to set it up correctly and pay close attention whenever you're using it. This software is a must for giffing, it will do all your cropping, resizing, sharpening and denoising for you, making sure your gifs look good. It is also indispensable when giffing ts/tp files because it deinterlaces those files so you can clip them.
First, let's set it up. This is the most annoying and difficult part of this tutorial so make sure you pay full attention to every single step!
☆ step 1) download a version of VS here (link).
☆ step 2) unzip the file on your desktop area.
☆ step 3) open the folder and find the file named "vapourscript (drop video file on me)" - make a shortcut of that file and move it to the desktop.
☆ step 4) find the folder named "gifs" - make a shortcut of that file and move it to the desktop.
☆ step 5) drag your video file you want to gif from and drop it on top of the "vapourscript (drop video file on me)" shortcut on your desktop.
☆ step 6) enter the timestamp input, in the first line it will be the starting of your timestamp, in hours format, then hit enter. in the second line enter how long your timestamps lasts, in seconds, also in hours format. then hit enter and let the code run.
☆ step 7) the resizer tab should now load on a web browser, then you will set the dimensions of your gif on the top left corner. you can also adjust the position of your gif within the video screen and zoom in if wanted.
☆ step 8) choose the preprocessor, denoise and sharpening options on the left and tick the boxes on. I usually just stick to the settings i'm using in my video down below.
☆ step 9) now in the VS box, go to file > load, choose the script saved in the gifs folder.
☆ step 10) copy the code from the resizer into the code in the vs screen, under the designated line.
☆ step 11) alter the code exactly like I did in my video down below. save it. this is now your default vs script for clipping your gifs. what you are doing by adding the hastag and the quotation marks is you're disabling those sections of the code. the reason you do that is in case you want to run the preview before exporting. this is because those lines involve some heavy graphic processing which can make the computer slow. I will talk about the script in more detail later on.
☆ step 12) i don't usually use this option but you can also preview your gif and set specific frames to start and end your gif. This is around the 4:30 mark in the video.
☆ step 13) time to export your clip! now you will temporarily remove the marks you added to disable the code and then go to script > encode video. in the popup box, you will select the option "export to MOV", then start so that you can use that video file in photoshop later.
☆ step 14) after you are done exporting, close the encoding box and then close vapoursynth, never agree to save the script when closing it, or that will override your default script.
☆ step 15) now you need to rename the encoded file for your gif. go to the gifs shortcut folder you created on your desktop, then go to output. this is the folder where VS will save all your encoded files. but everytime it saves the file with the same name so you need to come to this folder and change the name for every gif file you encode before you clip a new one, otherwise VS will just replace the previous clip with the new one you just finished.
Here's a detailed walk through of each step in this video tutorial:
youtube
IMPORTANT
After you are done processing your first clipped file, now you have your default script already built in VS, so whenever you run it to clip more videos, this script will already be in your VS screen. So now all you need to do whenever you want to clip more files (to make more gifs) is to adjust the dimensions, positioning and zoom of the video in the resizer screen and then change a few numbers in your script! then run encode to save the clipped file.
☆ To make new clips: go thru steps 5- 7, also do 8 if you want to mess with the denoise and sharpening filters again, but I don't really know much about how those work so I can't help you with this.
Now what you need to alter in the code, each time you are making a new gif: after you run VS and change the settings in the resizer to what you want, you need to change the zoom numbers and the video positioning in the code.
you need to replace the numbers in the VS script on the left so they match the numbers in the resizer on the right.
Do step 12 if you want to set specific frames to clip. Then steps 13 - 15 and you are done! You need to do all this every single time you want to make a new gif.
Now let me talk a bit more about some of the lines in this script:
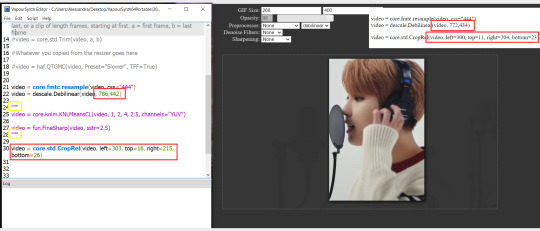
☆ line 14: #video = core.std.Trim(video, a, b) this line is to set specific frames to trim your video section, your final encoded file will be only the frames inbetween the numbers you input here. a = first frame, b = last frame. you will need to run the preview option in VS in order to see every single frame of your clip and select your first and last frame. I usually do this in photoshop later instead so I don't bother with it on VS unless i'm making combined gifs, in which you need all the clips to have the exact same number of frames. the hashtag at the beginning of this line means that the script won't follow this command when executed. so if you want to include it, you need to remove the hashtag before encoding your file.
☆ line 18: #video = haf.QTGMC(video, Preset="Slower", TFF=True) this line is for the preprocessor option in VS, that tool is mainly only used when giffing ts/tp files because you need to deinterlace them before you can use them on photoshop. so you will only need to remove the hashtag and enable it when giffing those types of files. when im giffing those files, i usually always keep it with this setting:

I don't really understand much about this so I never mess with it. If you want to know more, I believe there's more info about it in the tutuorials I linked at the beginning of my post.
☆ line 22: video = descale.Debilinear(video, 786,442) this line is for the zoom of the video screen. you just need to match what you have in your VS script to what you end up with in your resizer.
☆ line 25: video = core.knlm.KNLMeansCL(video, 1, 2, 4, 2.5, channels="YUV") this line is for the denoising filters, in my case I always use KNLM and this is what it's line looks like. I know you can change those numbers to change the filtering settings but I never messed with it so I'd usually just have it like that.
☆ line 27: video = fun.FineSharp(video, sstr=2.5) this line is for the sharpening, in my case I always use FineSharp and this is what it's line looks like. I know you can change the number to change it's settings but I never messed with it so I'd usually just have it like that.
note: lines 25 and 27 (which have to do with denoise and sharpening) are the ones within quotation marks in your default script. I believe the quotations work in a similar way as the hashtag, in which the script only executes the lines when the quotations are removed. Which is what you do everytime you are about to encode your clip, otherwise they stay on. I think you should also remove them if you want to test how they affect your gif in the preview screen but i think these filters also require heavier graphic processing which my computer can't handle well so I never do that.
☆ line 30: video = core.std.CropRel(video, left=303, top=16, right=215, bottom=26) this line is for the positioning of your video screen within the gif dimensions. you just need to match what you have in your VS script to what you end up with in your resizer.
ʕ •̀ o •́ ʔ
Photoshop (PS) - let's make a gif!
Now that we have clipped and preprocessed our video file, it's ready to go to photoshop!
☆ step 1) after you have opened PS, go to File > Import > Video Frames to Layers. Then choose the clipped file you created through VS.
PS should open a box like this:
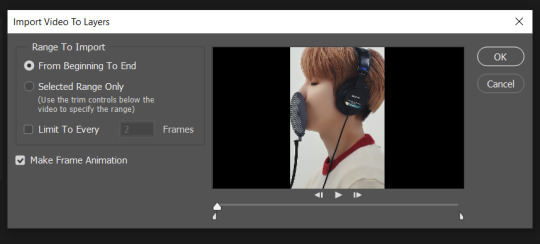
Keep those options ticked and hit OK
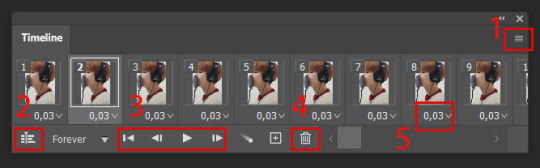
☆ step 2) now you need to go to Window > Timeline to bring up the timeline tool box. This window will always be necessary when making gifs. Let's take a look at it, I've marked down all the important buttons you will need:
timeline menu: there are several commands in here, you will need to use some of them later on.
convert to video / frame timeline
play controls to watch your gif
trash can to delete selected frames. (when deleting frames, first delete them here and then delete it's matching layers which are still there after deleting the frames)
frame delay time: this is where you set the time for how long that frame will be visible in your gif
☆ step 3) remember how I mentioned the preview option in VS and how i don't usually use it to trim the frames of my clip? That's because I usually do that at this step of the process, in PS. Notice how each frame is also a layer, and when a frame is selected, the matching layer has the eye symbol next to it turned on. So now you should play your gif and see if there are any frames you don't want to keep, then delete the frames and it's matching layers.
Since we applied sharpening filters back when we were clipping the video on VS, your clip should probably already look pretty decent even before the next steps, so steps 4 - 9 are optional. The coloring part of my video has been sped up.
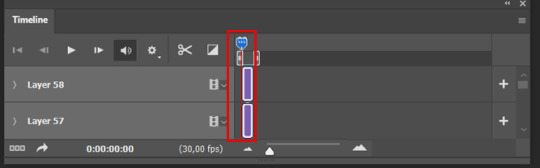
☆ step 4) click on the timeline menu and select "Select all frames", then go to the select menu at the top of the PS screen and select "All layers". Now click on button 2 of the timeline at the bottom left, switching from the frame timeline to the video timeline.
☆ step 5) before you do anything else, make sure the blue holder is at the beginning of the track before you do anything else. Then go to Filter (at the top of PS) and select "Convert for smart filters". This will convert all the layers into one single layer.
☆ step 6) now make sure the layer is selected, then go to Filter > Sharpen > Smart Sharpen. A box will open with several options:
I usually keep the amount to around 30, I don't touch on radius and you can also mess with reduce noise if you think your gif is looking too sharp. Hit OK when you're done.
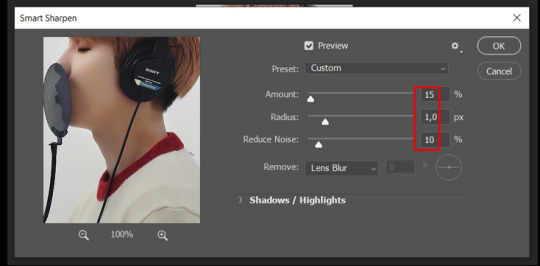
Since this is a filter applied to a smart object (the converted layer that contains all our layer - frames), this means you can turn this filter on or off as long as the layers are in the form of a smart object. You can also go back to it and alter it's settings (like I've done in my video down below)
☆ step 7) now while making sure the blue holder is still at the beginning of the track and the layer is selected, click on the timeline menu that i mentioned above. Then go to Convert Frames, then select Flatten frames into clips.
☆ step 8) again go to the timeline menu, Convert Frames, but now select Make Frames from Clips. Now click on the button at the bottom left of the timeline box, to convert the video timeline back into a frame animation. Then hit continue in the pop up box.
☆ step 9) now you are back to the frame timeline screen from before, but now the first frame is empty. You need to delete that first frame and then check the final frame because sometimes PS also creates another empty frame at the end at this point.
☆ step 10) PS also created a new layer under the layer 0, where the filter is still applied, you can delete this new layer as well. Now for organizational purposes, select all remaining layers (that contain your frames) and group them (you can see how in the video).
☆ step 11) This step is also optional, now I like to add the coloring to the gif. I have a separate tutorial exclusively on this topic. You can check it here:
☆ step 12) This is the time when I also add my signature. This is optional. You need to have the signature layer(s) on top of all the other layers. I usually have it in all black or all white, with lowered opacity of around 40%.
NOTE:
When adding elements (such as a signature) to a gif, it's important to always make sure you have the first frame selected, otherwise PS can move your newly added elements around the canvas on different and random frames. This also applies to anything in the layers pannel that has specific opacities. It's best to already add the elements with the final wanted opacity with the first frame selected.
Exporting + Delay time
☆ step 13) To export: go to File > Export > Save for web (Legacy). PS will open this box:
First I just use the exporting screen to test the delay time of my gif, and to check the gif's final size.
About the size: The final size is displayed at the bottom left. Remember it needs to be under 10mb. If it's above that, then you will have to go back and delete frames and test again until the size is within the limit.
About the delay time: To test the delay time, hit that play button and the gif will play at it's default delay time. If it's too fast or too slow, you will hit cancel and change the delay time (at the next step).
For actual exporting: The highlighted box at the top right of the screen is very relevant now. Make sure the first box has the GIF option selected. At the next box, you can select either perceptual, selective or adaptive. I usually like to use adaptive. At the next box you need to choose either diffusion or pattern. I like to use pattern. Tick the transparency box and then select either pattern or diffusion transparency dither.
Once you are satisfied with all aspects of your gif, hit save to export your final gif.
To fix the delay time: After you have exited the export box, go back to your timeline, click on the menu button at the top right and select "Select all frames". Then, on any random frame, click at the small arrow next to the numbers under the frame. Select the option "Other". That will open a pop up box to alter the delay time. To test it again, use the export box explained above. Once you are satisfied, save your gif! I've also altered the delay time in my video to show you the process.
☆ step 14) After your gif is done and saved, I'd suggest to save your psd file if you added any coloring to it. This is so you can reuse the coloring later in other gifs without having to redo it all. This is useful if mking a set of gifs from the same moment / video.
Here's a detailed walk through of each PS step in this video tutorial:
youtube
I hope this tutorial is helpful! Feel free to send me any asks if you have doubts or need extra help! (つ≧▽≦)つ
188 notes
·
View notes
Note
Hi! Would you share some tips on how to achieve the colouring of this gif set maybe? /720060252150808576/for-pscentral-event-16-pride-colorsand It looks so beautiful! I love how you coloured Buck so much! Have a great weekend!
hi!! first of all, sorry this took a minute. life, you know. anyways thank you so much for your kind words, i'm so glad you liked the set!! and i'm always happy to share techniques and resources so never hesitate to ask!
since you asked for tips and not a tutorial, i'm going to assume you have a handle on the basics and try to keep this fairly general. if you want a more in-depth explanation for anything just let me know!
so most of this was achieved with a combination of adjustment layers (mostly the love of my life selective color) and color/gradient layers, and a whole lot of layer masking. my first tip is use timeline mode and familiarize yourself with the stopwatch controls, particularly the layer mask position stopwatch. i'm just gonna direct you to the first half of this tutorial if you're unfamiliar. this set would've taken me waaaay longer if i'd had to rework the masks frame by frame, since i was moving the masks for multiple layers on each gif
now for the colors themselves, tip #2 is don't rely only on solid color/gradient layers for colorful gifs. it's certainly possible to get something decent with just a base coloring and a fill layer set to blending mode>color, and that may be what you want depending on context (that's exactly what i did with poker buck in the first gif!). but that's gonna be a really stark (heh) effect, and for the brother, babygirl, and bisexual gifs i wanted them to look soft and warm and glowy, so for those i adjusted the backgrounds to fit with my blue/purple/pink palette AND used color fills and gradients on top of that
for example, on the gif of buck and maddie hugging, in addition to my base coloring i have two selective color layers to shift the background from yellow/red closer to pink and bring out the blue in buck's shirt, a violet photo filter to tone down the reds even further, and and pink solid color layer set to soft light at 49% opacity (all of those were masked so that maddie's face wasn't bright pink or whatever)
that's all under the gradient layer that went on top (which is set to hard light, 50% opacity). below on the left is that same gradient set to color, 100% opacity, without any of the other adjustment layers underneath. it certainly doesn't look bad, but it's a very different look to the one on the right, which is the one i went with


this brings me to my next tip, which is play around with blending modes. i'm sure you know they all have wildly different effects, but don't shy away from any of them, cause today might just be the day that hard mix gives you the look you want. like normally when i'm doing a glowy gradient on top of everything i go for lighten or screen, but i happened to mostly use hard and soft light in this set (this video is a godsend for understanding the different blending modes - if you have a free afternoon i definitely recommend browsing this guy's channel. you will learn so much)
the last thing i'll mention is the gradient i used. rather than generating a gradient fill in photoshop i took this texture (which i wish i could link the source to but it's from a pack i downloaded ages and i have no idea where i got it):

made it bi:

and then stretched/rotated it differently in each gif so that there was some variation. having that softness and slight variations in vibrance and luminosity helped with the overall warm glowy feel i was going for, which i don't think i would have have gotten just by using a gradient fill layer
and that's about it for the colorful gifs in that set. as for the others, the first gif really is as straightforward as it looks: a blue->purple gradient set to color on poker buck, and a pink overlay on buck in turnouts, blended so that the colors overlap and mesh together.
the black and white ones were also very simple. this tutorial explains how to do the colorful outline thing if that's new to you. that's all i did for the small b&w gifs. for the baby boy and braincells gifs i used the same technique only instead of using a a black->color gradient map in the group set to lighter color, i used the same gradient as above set to multiply over the black and white gradient map
i hope at least some of that was helpful!! again if i need to elaborate on anything i'm happy to. my 'process' is really more me throwing things at a gif to see what sticks so i may not always be able to give the most coherent explanation but i will try! thanks again for the ask anon and have a great rest of your week 💖
4 notes
·
View notes
Note
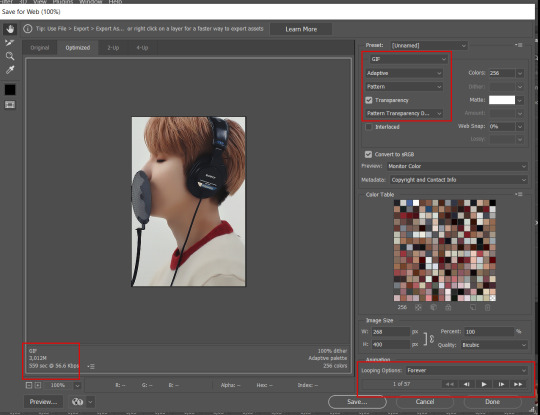
you dont have to answer this, but how do you sharpen your gifs/your base settings for them? and when you export the gifs, what are those settings? bc ive been trying to export it so the gifs turn out smooth, but they always end up grainy :(
hello! it really depends on what kind of scene im giffing but i usually rely on vapoursynth to sharpen and denoise and once i put it into photoshop i add my coloring and if i feel the gif still needs more work ill add one or two filters of smart sharpen + a filter of topaz denoise
this is the code ive been using lately for vapoursynth:

and these are my save for web settings:

i find that pattern really helps to mask imperfections in gifs so maybe try that out if you have a problem with graininess!
#let me know if you want a in depth tutorial on how i gif! i'd be more than happy to help <3#ask#anon#Anonymous
2 notes
·
View notes
Note
Hey, I hope im not bothering you.. but I recently binge-watched semantic error and now my brain cant focuse on anything else than this show and the chemistry between Jaeyoung and Sangwoo ;_; In my search of more content I came across a lot of gifs, yours for example and I was wondering if you could tell me how you create them? Whenever I try to record scenes my mobile screen recorder gets blocked..
If not, then thats totally fine as well ⭐️
Hi! I have no problem sharing my giffing process but this is not the only way to make gifs, it's just how I personally make them!
I make my gifs on a windows laptop with photoshop and vapoursynth installed. The first step is to find a high quality source for the video I want to gif (I don't screen record as I find it to be time consuming and the end result will be lower quality). Youtube clips are easy to download via tools like youtube-dl or 4kvideodownloader, while for kdramas I'd suggest this site.
After I have my video (1080p is the best quality for wide gifs) I use vapoursynth to get the frames I want and sharpen them. This is a tutorial on how to install and use it.
After that I import the result in Photoshop and take care of coloring and any extra effects and then I export the final result. Here is a tutorial I made a while ago, I don't do the first step anymore since I started using vapoursynth but the rest is basically the same.
I am always happy to share my process with anyone who is curious and I'd love to go more in depth and maybe update that tutorial, so if anyone is interested please let me know!
4 notes
·
View notes
Note
hello! do you mind sharing how you did the glitch effect on your header? i tried to go through your ask tag but i only found one for a text effect. it’s so cool btw!! i stared at it for a while that i kinda forgot why i was in your blog in the first place LMAO. thank you 💕
hey! first, thanks so much! it's one of my proudest creations :')
this text effect tutorial is actually the gif tutorial! 😊 the person asked how I did the text, but I showed how to do the whole thing haha 😅 but yeah, you can follow that to do what I did for my header gif! and if you want to do the transition effect (like how helmet din switches to helmetless din), you just need to find 2 scenes where your subject has a similar stance and angle. please let me know if you have any specific questions about any steps though! I'd be happy to help and go more in depth <3
3 notes
·
View notes
Note
Would you ever considering posting gif making tips / a tutorial, or something, because holy cow your color themes are some of the most beautiful I have ever seen, seriously stunning! (Also if you ever happened to make Fear Street gifsets hmu 🤪)
OMG this is incredibly kind, thank you! It seriously means a lot. I'd be happy to! I have a few posted in this tag here, and some more coloring-related ones on my Taylor sideblog here! But as far as color themes, the way I really got into them was spending way too much time on this amazing color palettes site and saving ones that I liked. Once I started getting comfortable with saving the colors and applying them to my gifsets, I started creating some themes of my own. (If you happen to have an Adobe subscription, I'd recommend Adobe Color because it's basically just a more in-depth version of the previous site.)
I pretty much always start with the character/celeb/movie/whatever it may be that I want to gif and then I'll figure out what colors ~inspire me~ and try to screen record clips from that thing that work! And I usually stick to 2-4 colors so it doesn't get too crazy, and I try to make sure all the gifs have the same kind of color cast--so they all lean warm, or all lean cool (color balance is a HUGE help with this! If that's daunting, the Photo Filter tool in Photoshop is awesome as well, especially at a low opacity). I also really enjoy having negative space in my gifs, which is a perfect opportunity to highlight a color! I especially use the multiply, screen, overlay, and soft light color fill layers to do this (depending on how bright the scene is/how intense I want the color to be) and then erasing the subject (if there is one) using a mask. If you want any specific tutorials or tips or like how I made a certain gif/set, please let me know, I'd love to do that for you! And thank you again <3
#sorry this took me a minute to reply to! i hadn't been on desktop and i wasn't able to answer asks on mobile for some reason???#but seriously thank youuu and hmu if you ever want a tutorial or tips seriously#asks#pr#*ps#photoshop#ps asks
5 notes
·
View notes