#it's not even for moving the buttons to a different location in case their default spot is inconvenient to you either!!!
Explore tagged Tumblr posts
Text
~ how to make a fanfiction masterlist on tumblr ~
a detailed guide for folks new to tumblr, or those who just want to use tumblr to link and organize their fanfiction :D
disclaimer: i did this on a PC, and tumblr likes to update and change the layout of everything, so some locations may be different for you. feel free to reply or DM with any questions and i will try my best to help you out!

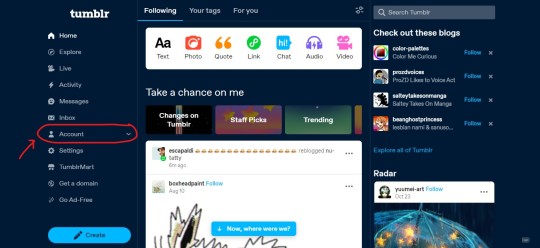
first thing's first! locating your account. this will make it easier to find your posts. when you first log onto tumblr, there is a list of items to the left. find the one that says "account".
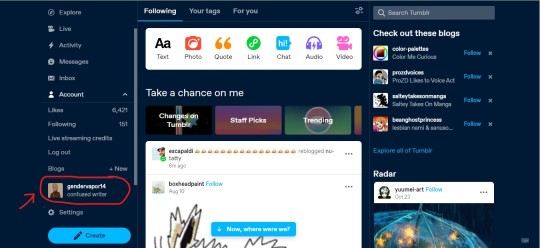
locate your blog. you may have to scroll a little to find it. once you see it, click on it!
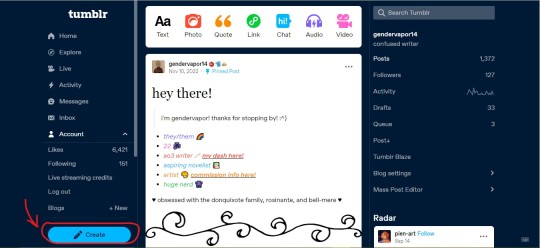
that should open up your posts and reblogs. it's okay if this section is empty! mine displays my intro post, but don't worry, i'll show ya how to make one of those. for now, go ahead and click on the "create" button at the bottom left. (alternatively, there's a bar at the top center you could use. click on "text" if you prefer this option)
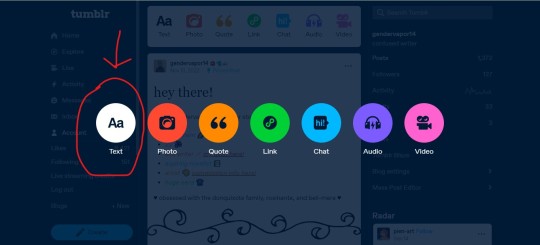
go ahead and select text post!
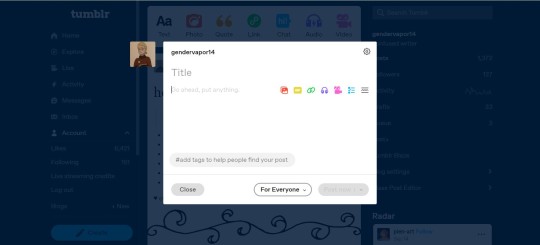
here you will be greeted to a blank text post. there's a space for a title and text. if you don't want a big title, you can just backspace and it'll default to regular text. feel free to experiment a little here. the colorful icons to the right allow you to insert photos, gifs, links, and more. if you type something and highlight the text, you'll find even more options!
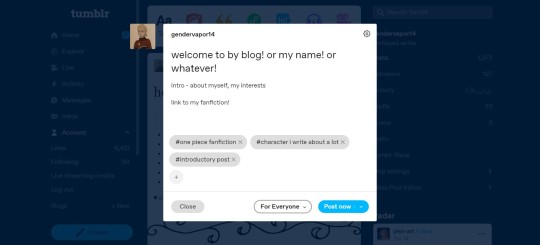
enter whatever you'd like to greet people with if they visit your blog. some sort of introduction. i threw out some random basics here. you certainly don't have to format it like this! get crazy, insert some photos and use colored text if you like. at the bottom of your post, you'll see a section for tags. i recommend using tags relevant to whatever content you'll be posting, so others can find your blog easier. if you're on ao3 or another fanfic platform, i'll show you how to link that to your intro post! for now, just type something like "link to my fanfiction" or "link to my ao3", or whatever tickles your fancy.
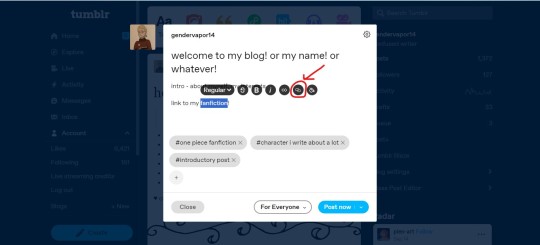
then, highlight whatever part of the line you want to serve as your hyperlink. in this case, in the "link to my fanfiction" line, i highlighted "fanfiction". a small menu should automatically pop up above that. the second to last option looks like a chain link. that will allow you to insert a link on whatever you've highlighted. click on it.
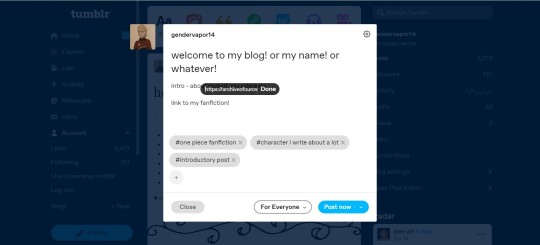
an "http://" option will display. paste your desired link in the display bubble! for instance, i pasted the link to my ao3 dashboard.
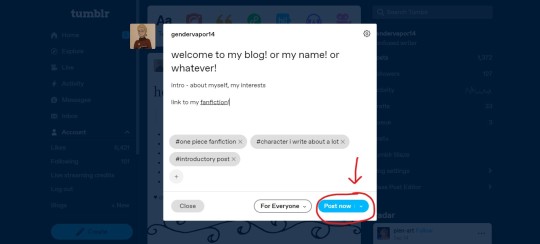
next part is posting! don't worry, your intro post isn't done, i know. in order to move on, we need to make some more posts to link, so for now, we're just going to post this "incomplete" intro. you can always go back and edit posts, so it's no worry! the post button is at the bottom right.
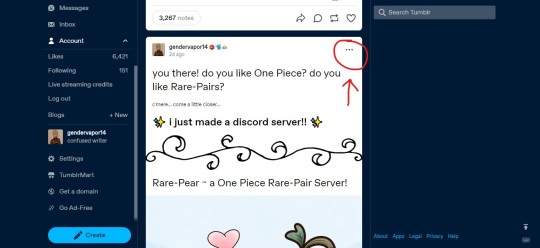
in order to ensure the post stays at the top of your profile, you need to pin it. (i used a random post in my example because my intro is already pinned, but the mechanics are the same.) in the top right of your intro post, there will be three little meatball dots. click on those.
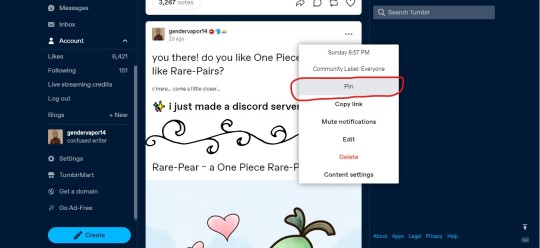
that'll open up a dropdown. click on "pin". then your intro will always remain at the top of your profile, even as you keep posting/reblogging.
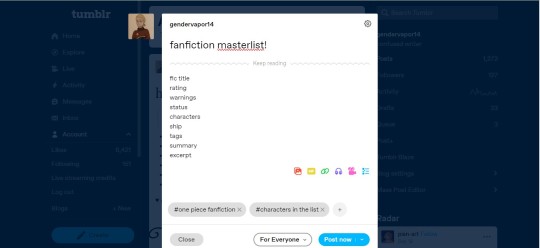
next part is making the actual masterlist! create a new post (button on the bottom left --> text post) and fill it out however you wish! i listed some different things you can include to describe your stories, but i've seen people organize these by characters instead, or themes, or fandoms. basically, you're creating something that will link from your intro to this post. so write up whatever you want someone to be brought to after clicking the hypothetical "my fanfiction masterlist" link in your intro post. if that's just at temporary list of characters without any stories linked to them yet, that works! you can link stories to the masterlist later.

once you posted the masterlist (it's okay if it's incomplete), click on the meatballs for the masterlist post. (again, i'm using a random post here, disregard that)
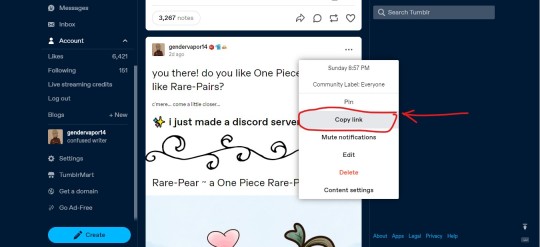
click on the "copy link" option to obtain the link to that post.
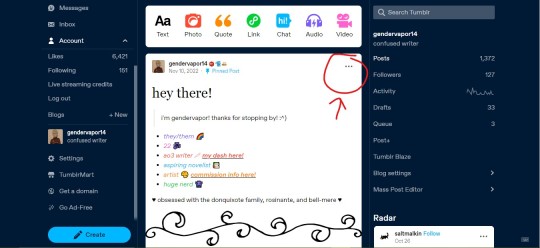
then, find your intro post and click on the meatballs for that!
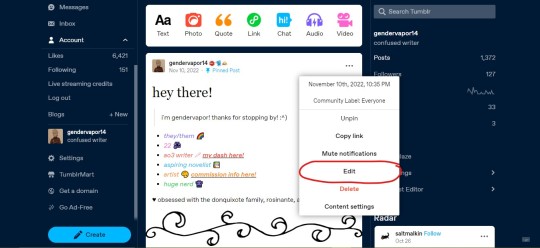
this time, you're going to click on "edit".
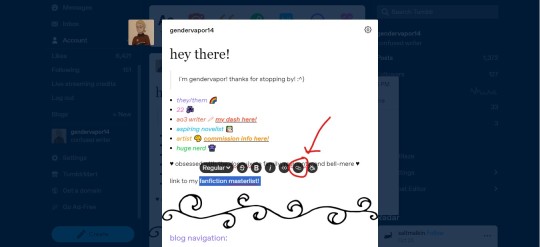
somewhere on your intro post, write up some text that will serve as the source for your fanfiction masterlist post. for this, i used "link to my fanfiction masterlist". then, i highlighted "fanfiction masterlist" to open the additional options menu, and clicked on the chain link to paste the link to my new fanfiction masterlist post! this process of copying links and implementing them into other posts is the foundation of making a masterlist. from here, you can make as many subcategories as you please and link them back to your main masterlist, which is linked to your intro. (or you can just make a few giant masterlists like i do XD)
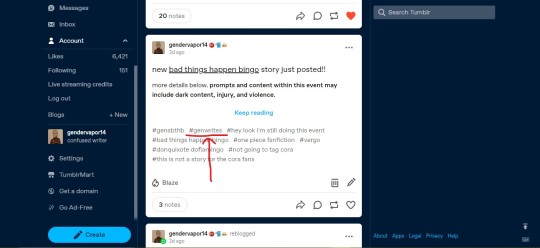
BONUS LESSON: another fun part of tumblr is the tags! you can invent your own! if you're a writer, you can make your own writing tag. i use "genwrites" because it hasn't been used by anyone else, so anyone who clicks on that tag will only see posts of my writing. you can link tags to your intro post as well! i'll show you how.
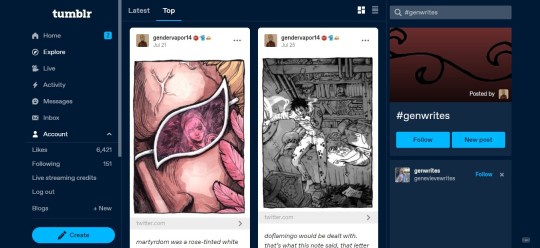
creating a tag is as easy as slapping it on a post, even if tumblr doesn't seem to recognize it. that's a good sign. once you've posted something with the tag, it exists on the website. when you click on the tag, it should open up a page like this. it's alright if your tag page is mostly empty, it'll fill up as you create posts with your unique tag! from here, you're going to copy the URL of the entire page.
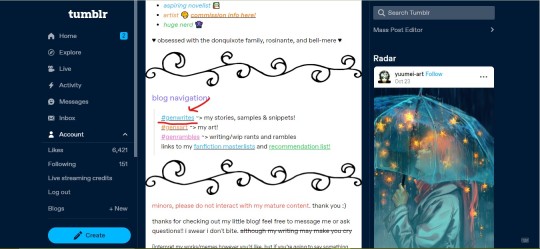
then, the same way you inserted your fanfiction website and your masterlist, you can link the URL of your tag page to your introduction post! linking things to posts on tumblr helps keep everything connected. you can link individual fanfics from their source site to titles on tumblr, link specific reference posts and analyses, and so much more!

this was a rather lengthy post, so it's totally understandable if you get confused or lost along the way. feel free to reach out and i'll try to help out however i can! i'm no master - i learned all this stuff by trial and error. takes some patience , but i hope this guide is at least a little helpful! ♥ happy writing and creating folks ♥
19 notes
·
View notes
Text
Lost (maybe) pony 2D game
For a long time I wanted to ask about help with finding a lost 2D game on the Internet, nowhere else as in tumblr with this excellent help!
I don't know where to ask about this anymore, since reddit gave me a double whammy for trying to put this text there...
So here is the game in this format:

The character sprites are roughly similar to the one shown in this image, but the locations themselves are different.
Okay, I'll move on to a description of what's in the game.
First of all, the game's brightly colored lobby, which, if my memory serves me correctly, has Canterlot Castle on it. I don't quite remember the lobby, as well as the name of the game itself, but I really loved playing it, it was quite interesting, but I can't even one screenshot from this game, as I have completely memorized the locations.
Regarding the locations - there are levels in the game. In terms of, as soon as you click “play” you get a map of the entire canterlot, where there are regular levels, levels with bosses, and bonus levels that were kind of marked with a gold icon. The most memorable bonus level was the level with how you could fly on the Rainbow Dash in the clouds and collect local currency (I don't remember about it, maybe it wasn't currency at all).
Also in the game was the ability to play as multiple characters, you were given the opportunity to unlock someone. The character selection was similar to the harmony tree (the stone version, which showed the pony insignia). The default character naturally is twilight sparkle. And I also remember one bug I found by accident: if you press the attack buttons at the end of a level and pass it, and then choose another character afterward, the magic on your forehead remains, even if it's a pegasus or a regular earth pony (it only charges once).
The first boss, as it should be according to the series itself, is the moon pony (it threw some dark balls), then the discord (the level with him was in the very center of the map, attacks especially his I do not remember), and then.... the very last level was a boss, which was very difficult for me that I didn't even remember what kind of character it was, but the level with him was very red and you had to dodge some platforms.
If there are additional questions, feel free to ask in case I missed something. Maybe you have also played this game and I will confirm that this is the right game! It would be very sad if it was on disks, as I lost some disks and am not sure which one it might be on.... Or maybe we downloaded it from the site, but it's long lost...
4 notes
·
View notes
Text
Unreal Engine: Grid Based Movement
I wanted to explore unique options for a player's movement, and one that interests me for this project is grid based movement. I find this interesting because I think grid based movement systems go hand in hand with slower, maybe turn based gameplay.
Moving in a grid at a base level is pretty simple, requiring few button presses and not requiring complex inputs (like holding keys or pressing multiple). This means that with other accessibility considerations in mind like button remapping and a thoughtful approach to mechanics that require input, games that use these systems can be more accessible and thus playable to a wider audience.
Slower gameplay as an initial design consideration also allows more time between key presses, allowing less dexterous players to keep up with the game. An important distinction here is that it would be an initial design consideration. This isn't the same as tacking on a feature at the end of development that allows the game to be slowed down, because while it may help with accessibility, its a different experience to what was intended.
To actually test this grid based movement, I open a ThirdPersonTemplate in Unreal to experiment in.
I got rid of the default movement code, but still used the default movement IMC to get X and Y action values based on the player's WASD inputs (I would like these to be remappable, though):

Then, with these values, I used two Compare Float node to compare them to 0. Based on the result here, I could tell what directional input my player had inputted, and set their rotation and position accordingly, using two new variables and a Set Actor Location & Rotation node:

The Play Direction variable is used to tell the Set Actor Location & Rotation node how to change the player's location based on their current location.
This was the result:
youtube
Two big bugs here:
I'm moving really fast because it's triggering every frame
I can go through walls
These were easy fixes, though. I changed the IA_Move from triggered to started:

And this helped fix part of the walls problem, but to fully eradicate it I just enabled the Sweep Boolean on the Set Actor Location & Rotation node:

To make this system even better, I changed the camera to be a more fitting top-down view, and aligned the player to the floor, which conveniently was already a grid of 100x100 unit squares.
This was the result:
youtube
I'm happier with this now. I still think it could use some work as there are still some unintended results, like you cant input another action while you're holding a key down, and slopes don't like this movement, but I want to keep my initial investigations and experimentations going so I'm going to park this for now.
If I do come back to this though I'd like to try an approach with the Snap To Grid (Float) node, because that seems to fit my use case:

0 notes
Text
Krunker.io
Io games are expanding, the innovative multiplayer battle noble game is rushing in. You must not miss todays game, because it is a great 3D shooter with minecraft-like graphics -- pixel graphics. Sign up for the game and even combat people from all over the world, enjoy typically the game from initial person (FPS game). You have two weapons you switch between. The video game has several maps that are created at the finish of the round random. Each one particular is unique in addition to sophisticated. Your task is to get rid of as many adversaries as you can and make it through so long as possible. Obtain https://ghostsintheuniverse.org/call-of-duty-modern-warfare-2-graphics-comparison.html and become typically the winner of the particular round. Krunker.io is a sport full of fun that you just enjoy when you like challenges and battle suprême games like squirming. io. Have enjoyable. Krunker customizations Krunker io game sails on a popular say of in-game in addition to character customizations although all is built to be as simple as possible. See a set of our guidelines whatever you can change with a very few minutes time expense: Krunker roadmaps Maps are basic pillar of every game. In Krunker, there is possible to choose from a big selection associated with random-generated maps or maps created either by the creator or a group. Of course, if you do not find any kind of map to be according to your wishes, by use associated with a simple on the internet editor you can easily create and post your own personal map. System sights and game icons, texts and images

Modification associated with sights for weapons and game icons is possible simply by replacing default photos with own or perhaps downloaded images on the internet. This option is definitely available under options button and moving at proper plugs. Krunker Mods Krunker mods are mod packs modifiying arrears view, gameplay or even game features. Gamers can either pick one of pre-created mods, create own modes or weight another mode through url address coming from the internet. Participants using krunker mods still play with common players whilst having the overall game a new bit different depending on used mod which in turn bring nontraditional in addition to interesting options to help make the game interesting still for regular players. Krunker Shop Some points are available for free, many are paid. Krunker shop available regarding logged players allows buying and unlocking new game items. Krunker Consideration Krunker game allows development of user accounts for unlocking rates high, purchases, skins as well as other game adjustments plus features. Developer Krunker io game continues to be developed by Sidney de Vries. Krunker.io unblocked In the event that you have located Krunker. io clogged on your electronic digital device, almost certainly this kind of is due to blocking by community or device manager. To play the overall game in this case you need to change the network or even device you are connecting from, or perhaps find yet not blocked proxy server in your network - try googling for "Krunker. io proxy" or search for more information in order to avoid blocking.
1 note
·
View note
Text
Prizoom Ticket Buying Walkthrough
Have you ever wanted to experience what a cheering screening is like regardless of location, even overseas? How about soundboard hell?
Well you’re in luck because there’s literally nothing stopping you because prizooms are a thing and they aren’t region locked at all!!! And I love them!!!!
I love them so much that I made a whole post just to make the ticket buying process even more easy!!!!
If you’re interested in attending a prizoom, please participate and show your support for kinpri!!!
So to preface, “prizooms” are online King of Prism cheering screenings using Zoom and featuring a soundboard powered by Ainotte. Tickets are sold through RakutenTicket.
My first prizoom was Jin’s! 💙 I posted an impressions post here, in case if you wanted a detailed summary of what a prizoom is like! I also posted about Rei’s prizoom and will be using screenshots from buying tickets for that during this!
~
You’ll need a Rakuten Ticket account before trying to make your purchase, so if you haven’t, go to this link (the Rakuten member registration page) and make an account.
(Actually forgot most of the details for making an account when typing this but I do remember it being decently easy so.... if I’m missing anything it shouldn’t be too hard to figure out ^^;)
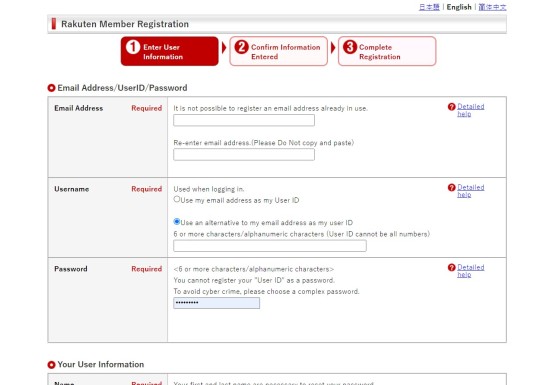
First part is pretty straightforward, they even have an official English translation of the registration page so you don’t have to put it through google translate! Also it doesn’t matter what language you set during registration, your account will work for buying prizoom tickets even if you don’t use the Japanese page.
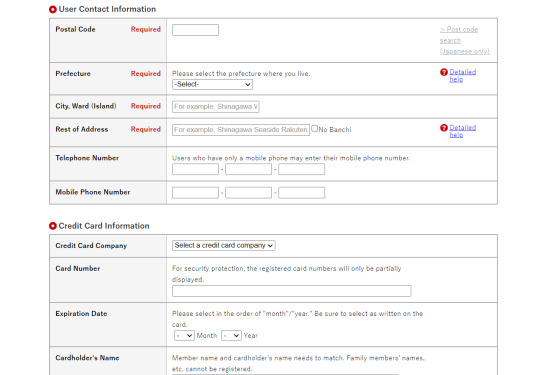
For the address, I just looked up “Japanese postal codes” and put in the first result that showed up and picked the prefecture it came from (Tokyo) just to be safe. Pretty sure you can just put whatever you want though. Forgot what info I used (and can’t figure out how to see my account info to check?) but pretty sure I didn’t type in legit info and it went through anyways.
For the phone number, you can use your actual full phone number, including the country code!
(I forgot if they need to verify your phone number, but I’d suggest to use your real phone number just in case)
After that, confirm your information and create your Rakuten Ticket account!

So first you would go to whatever prizoom you’re interested in’s information page (usually found promoted on the kinpri twitter account) and then click the blue link, which will take you to its Rakuten Ticket page!

Then if you scroll down a bit, you’ll see the different tickets available for purchase! The first and most expensive option is for every showing in the event, the ones below it are specific showings.
Also!!! If you want to skip a showing, you’ll have to go through the purchasing process for each single ticket you want to buy. There isn’t a cart function as far as I’m aware, so I had to pay the service fee twice. It’s kind of a pain but I guess that just gives more incentive for people who just want to do 2+ showings to just go all the way.
(Looking back on it, I regret only doing 2 out of 3 and not just buying an all-inclusive ticket for Jin’s showing since I would’ve loved it...)
I want to attend the screening of SSS part 4, so I’ll click the red button for the 3rd option!
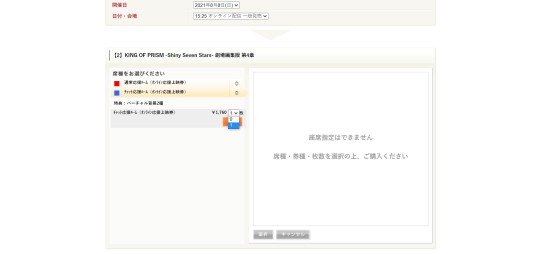
Next screen is where you choose which room you want to participate in! The red option is the cheering room, and the blue is for the chat+soundboard only room. I’ve heard that the cheering rooms are more fun (and a closer experience to an actual cheering screening), but I started out with chat-only rooms and personally REALLY REALLY REALLY enjoyed them! Both rooms use the soundboard, so if you’re interested in cheering through that (seeing as most people using this walkthrough would proooobably not have much experience cheering or be confident enough in Japanese to turn on their mic), it’s okay to attend either room!
I’ll be going to the chat-only room again! So I’ll click that, and then click the dropdown and set it to the only other option so that I can buy one ticket.
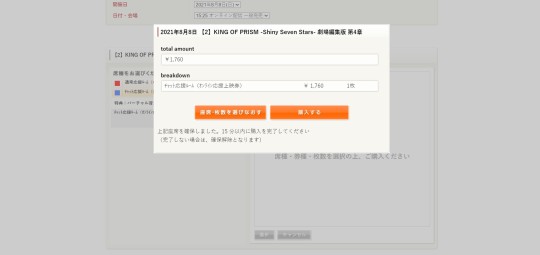
After that, a confirmation screen pops up. The orange button on the left is to cancel/go back, and the one on the right is to confirm.
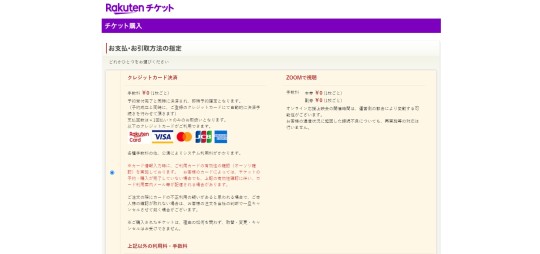
The next section asks how you would like to pay, you’ll probably want to (and most likely can only) pay with a credit/debit card, so just select the first option before scrolling down until you get a bunch of blanks to fill out like below.
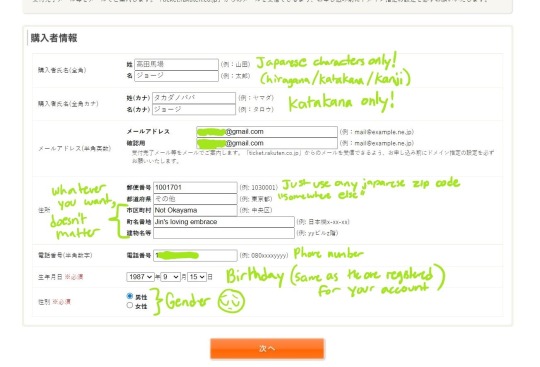
Now here’s the fun part! Putting in some really obviously made up information!
The first line asks for your last name, and the line below that asks for your first name. Don’t bother trying to type in your name in English letters/romaji, the system will only allow Japanese letters. As long as it’s in Japanese, you can put any name you want!
In the section below the first 2 boxes, it asks you to rewrite your name in katakana specifically. If you have trouble with differentiating hiragana/katakana/kanji, you can always just paste something into a katakana converter or go wild with google translate till something works. Though it’d be good for you to learn at least a little bit of Japanese since it makes the whole screening experience more enjoyable.
I just set my name as 高田馬場 (Takadanobaba) ジョージ (Joji) because why not. For the second set of name boxes I put タカダノババ (Takadanobaba in katakana) ジョージ (Joji again, almost every kinpri character’s first name is already written in katakana). If you don’t want to bother with putting in different info then you can just paste that in haha.
For the address, make sure you put in a Japanese zip code! Non-japanese codes won’t work. You can select any prefecture you want, but for the example I put その他 / ”Somewhere else”. For the next few boxes you can type in literally anything you want, it doesn’t matter. It’s just an online event so the only place they send you anything is to your email! (They should just remove the whole address section since it gets tedious to fill out and isn’t used for anything haha...) Your address doesn’t need to be consistent with the info you used to make your account!
ALSO!!!! If you’re running the page through google translate or something and get stuck, make sure you revert it back to its original before filling in your information and hitting the orange button! If you don’t then it keeps switching your birth month to the default 1/January and you won’t be able to move onto the next page. Your birthday needs to match up with the info you used to make your Rakuten account with!
When you’re done, click the orange confirmation button to go to the next page!

Next page just asks if you want to use your RakutenTicket points to discount your purchase. You can only use them if you have at least 50 points.
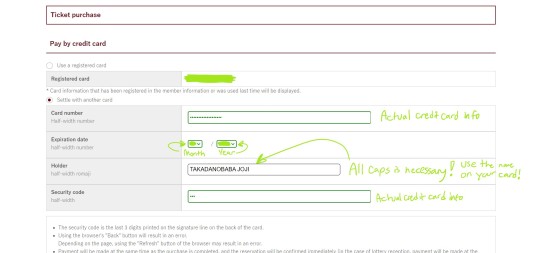
After that, put in your payment information! You don’t need a Japanese credit/debit card and can use the information for any card you want......... as long as it’s valid for you to use! Don’t steal someone’s card info or put in fake information for this. This is a transaction with actual money involved here. ^^;
Putting in the numbers on your card is also straightforward, the most confusing part would probably just be the name. Make sure you type the cardholder name in ALL CAPS otherwise it won’t work.
Should be obvious but I only used “TAKADANOBABA JOJI” for example purposes, if you’re copying my info, don’t actually put that unless if your name is actually Takadanobaba Joji and your credit card really says that. I changed it to my legal information after taking this screenshot so my purchase would go through. Use the actual name on your card!
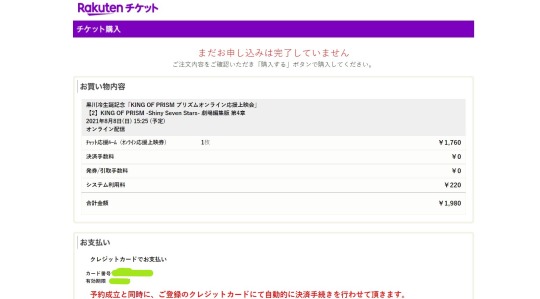
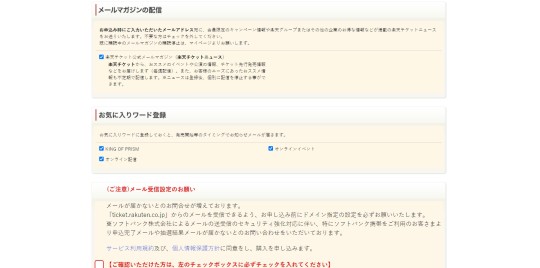
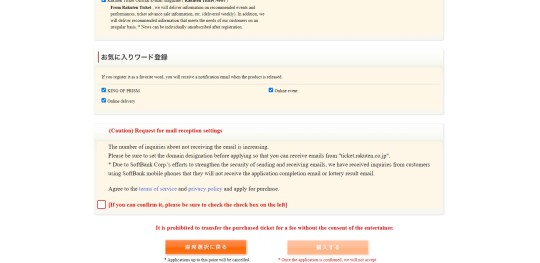
After you put in your payment info and it’s verified, review your purchase, scroll down, and check the box at the end if you want to go through with your order.
The box before that asks if you want to receive email notifications for when events relating to King of Prism and online events have their tickets up for sale.
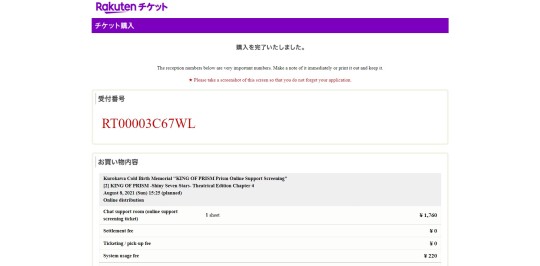
When your tickets are bought, you’ll get an order code like this! (You don’t really need it, this isn’t used in your prizoom ticket)
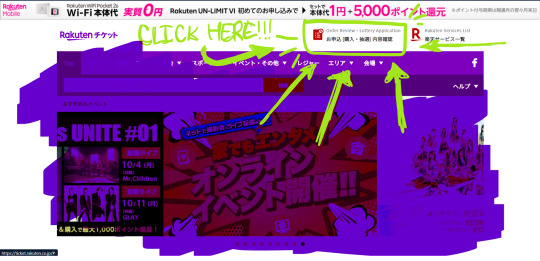

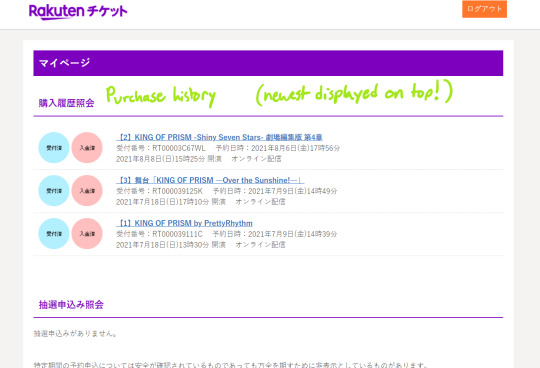
To see your ticket information, you can either check your email or go to the RakutenTicket home page and log into your account to view your purchase history.
When you click whatever ticket you want to see information for, scroll down until you find your “入室用ID” / “Entry ID” information.

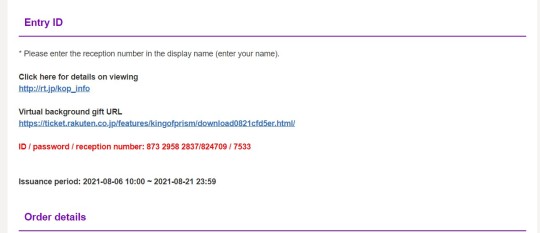
From here, you’ll see your ticket info, alongside a link to the event’s bonus zoom backgrounds right above it!

You will also get an email with your ticket information!

Your ticket info will consist of numbers separated into three sections by slashes like this! The sections in order would be:
1) The Zoom meeting ID code (882 8702 1252)
2) The password to be let into the Zoom meeting (964689)
3) What you need to set your display name to before entering (6703)
(The numbers won’t be the same, also this is from Jin’s first showing so it’s long over and this information is useless outside of providing an example.)
Only one device is allowed per ticket, so don’t try to distribute the same ticket to multiple people to get out of paying for yourself or anything like that!
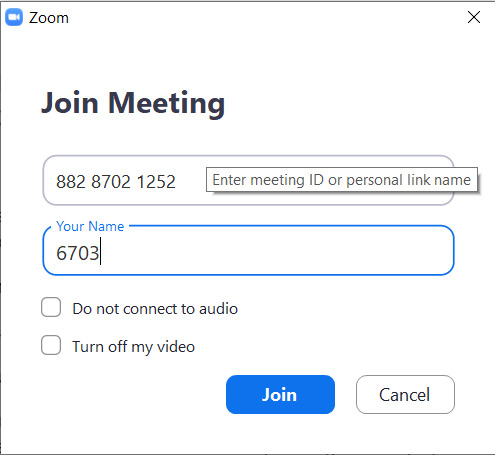
(Assuming you don’t need this guide to tell you how to download Zoom or find the option to join a meeting)
Put in the first number into the first box and the third number into the second box. Then you’ll get a popup asking for a passcode, so the second number.

Then it’ll show you when the event is scheduled for in your timezone! This is helpful for if you haven’t already and want to set an alarm for when it starts but don’t want to fumble through time converters. Though it would be good to double check just in case if the popup is off.
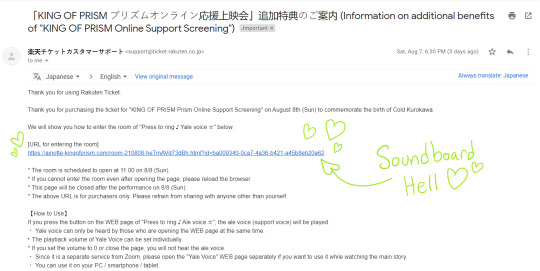
On the day of the event and a bit earlier from the first showing, you’ll get an email with a link for the prizoom soundboard!
The soundboard is the same for all of the event’s showings and both rooms, so please only participate when appropriate so you don’t ruin the experience in showings you’re not attending if you choose to listen in on them!
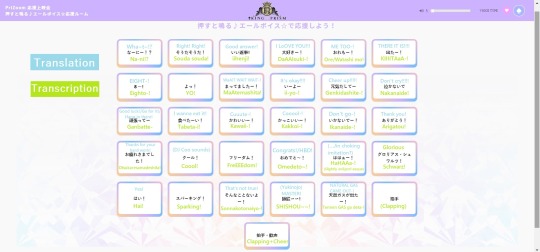
I’ve annotated the buttons for accessibility 💖
The gender/voice options can be switched in the top right corner (it’s set to the female option by default). The volume can be controlled with the sliding bar (the default is 5 which is honestly wayyy too low of a number considering how loud it is)
And with that, you’re all set! Once you’ve done all of the above, all you have to do is just wait for the event to start and then experience the prizoom sparkle! 💖
Shortly after the event ends, you get an email asking for feedback like this!
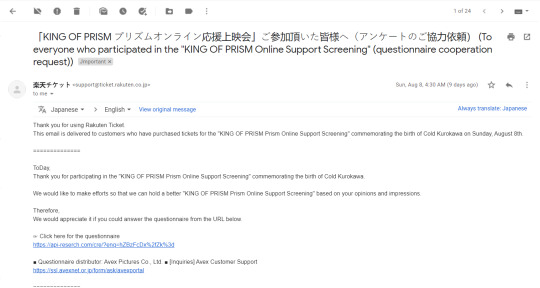
Just click the link and you can also put in any information and comments you want... whether you decide to let the staff know that there’s international interest in kinpri is up to you ^^
If you find that you enjoy prizooms, or just want to help make sure that there’s an opportunity to experience cheering screenings regardless of location, it would be helpful to comment that they should keep holding them in the future! 💖
If there’s any other questions, I’d be happy to answer!
#king of prism#kinpri#prizoom#Me being a prizoom/soundboard hell shill#I'VE JUST BEEN IN A CONSTANT STATE OF I LOVE PRIZOOMS#Prism sparkle brainrot#Can you imagine how crazy I'd get at a proper irl cheering screening#Also made it because I figured that even if someone was interested in attending a prizoom#They wouldn't want to ask me for help#Either because confrontation is scary or people just hate me haha#...... it's a little weird how tumblr lets you see when people who've blocked you like your posts....#Like thanks............ ?#Makes me kinda sorta really upset ahahaaa.... only being good as a source of kinpri content but hated otherwise .....#....Oh well!!!!!!!!!!!!#As long as I spread the prism sparkle!!! :'D
11 notes
·
View notes
Text
VI a. UV_0
(Previous: V. Adding missing body parts / Frankenmeshing / Finishing touches)
As promised, I'll finally talk about uv maps today. About time! Sorry it took so long; I hope at least you'll feel that it was worth the wait.
Generally speaking, uv maps are 2D representations of a 3D mesh. A mesh cut into pieces and made flat. TS4 meshes use two of them, called – very originally – uv_0 and uv_1. You can see them listed if you click the little triangular symbol in the panel on the very right (if you hover over the triangle, it says 'Data').

Why are there two? Because they serve very different purposes. To put it simply, uv_0 is responsible for the texture of your mesh, while uv_1 makes the mesh move with body sliders. Therefore we'll need to discuss them separately. Let's start with uv_0.
As you can see, uv_0 is the one selected by default. If you switch the mesh shading to 'Material' or 'Texture', you're going to immediately see any changes you make to it. The map itself is located in the window on the left – the one which we haven't used so far at all. Let's go into edit mode and then make that window bigger, so that we could see all the icons at the bottom.
Right now nothing is happening there. But let's just try selecting a random part of the mesh...
Important: when you use shortkeys, pay attention to your cursor's position! E.g. if you press b with your cursor in the uv map area, it'll activate the selection tool for the map, not for the 3D mesh.

You can see that a bunch of little dots appeared on the map! Those are your selected vertices.
Now, I don't know why this is the default option for Blender – your vertices being invisible on the uv map unless selected – but you can easily change it, so that you could always see them. You just have to click one of those tiny icons at the bottom. If you hover over it, it says 'Keep UV and edit mode mesh selection in sync'.
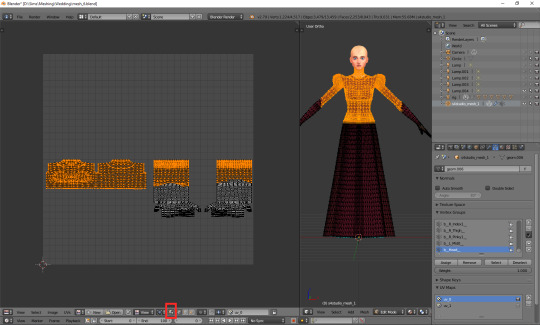
I find it way easier to work with this way: you can see all the vertices, and the ones which you selected are highlighted now, just like in case of the 3D model.
Then there's another important tiny button, right between 'UVs' and 'New'. If you click it, you'll see a list of all texture files associated with your mesh. In my case it's only two basic files: the body texture and the texture of the top I used as a base, but if you're frankenmeshing, that list can get much longer. Let's choose the original diffuse map.

You can see that the map reflects perfectly whatever is going on with the 3D mesh. The parts not covered by any texture use the skin texture instead. Not the whole texture of the top is used, because at the very beginning I cut off the bottom part of the mesh. There's also an abundance of vertices in the waist area, because I extruded the lowest row of vertices to make a skirt; and, as I didn't make any changes to the uv map yet, the new vertices appeared right on top of the original ones. In fact, if you select that lowest line on the uv map, you'll see that the whole skirt gets selected.
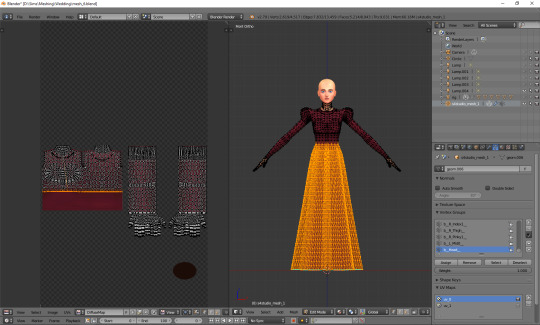
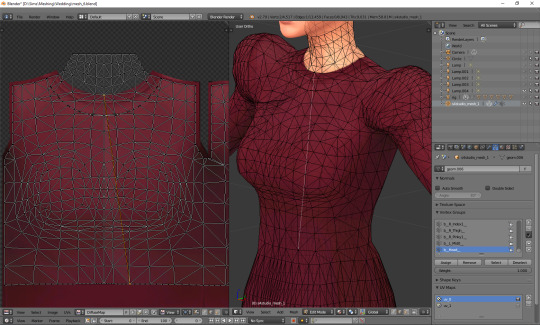
UV maps can also be useful for detecting weird stuff happening to your mesh. I can see that there's some line going across the top. I switched to edge select, selected it and found out it really is some completely useless edge going through my 3D mesh. No idea how it got there, but thanks to the uv map I could spot and delete it.
Just a couple of other tiny icons before we proceed to fixing our uv_0 map. Firstly, there's the little pin, which let's you – unsurprisingly – pin the currently used texture, so that Blender wouldn't switch to any other ones (yep, it likes doing it). Just click it and you're safe.
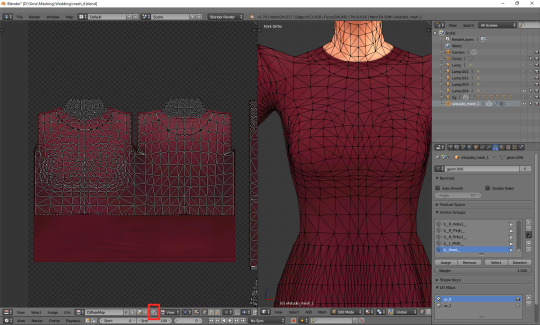
And then, right next to it, there's a little cross. Remember what I said about the list of used textures getting super long if you're frankenmeshing? It can get annoying if you don't need 80% of them, but have to scroll through them all whenever you want to switch from texture A to texture B. If you're sure you don't need a certain texture, select it and then shift-click that little cross. That'll tell Blender that this texture is not used, so it doesn't have to load it. You'll need to save your mesh, close Blender and reopen it for the changes to be applied!
OK. Now that you have an idea what's what, we can finally talk about editing the uv_0.
In case of TS4 diffuse maps, it's very important where you put your texture. Each category has its designated part on the map. It looks like this:
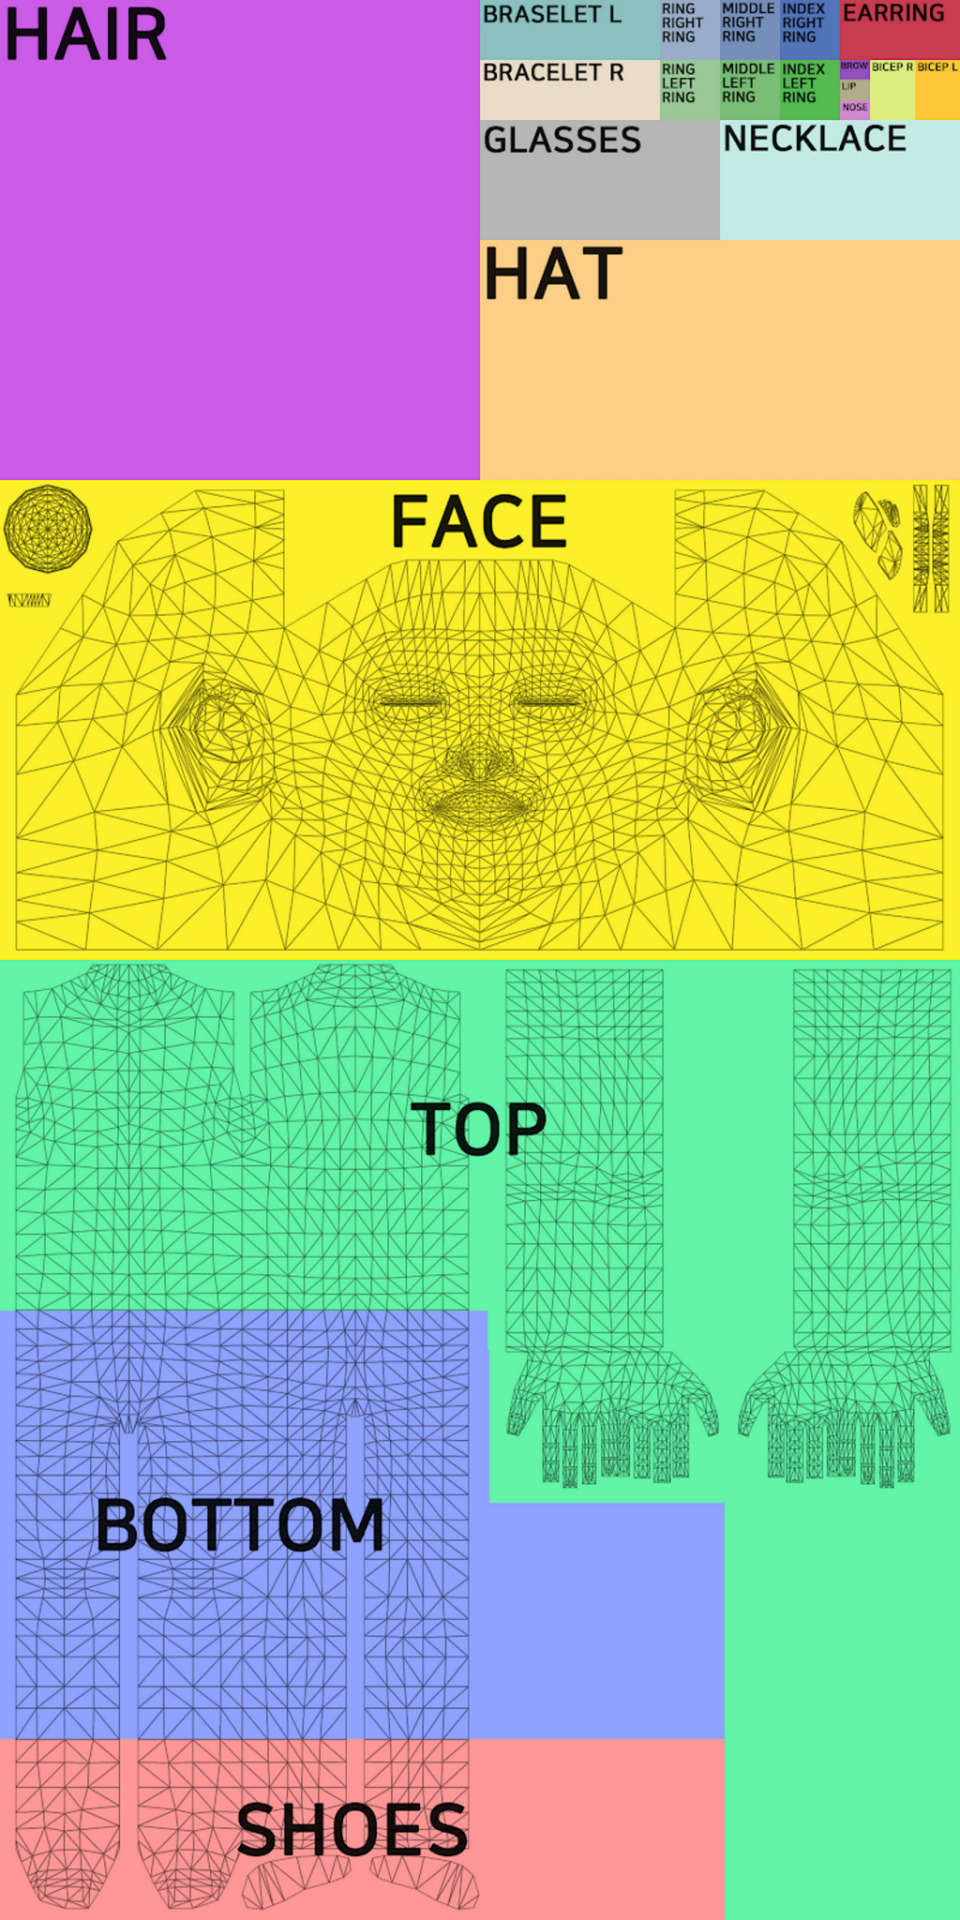
You can download the template in default, EA size (1024x2048) HERE, and a twice bigger one (2048x4096) HERE. In my own creations I always use the 2048x4096 format – it lets me fit in way more details without stuff getting badly pixelated – but that's obviously not a must. Now, at the bottom of the uv window, click 'Image' and then 'Open image'. Find the template you just downloaded and double-click it (or choose 'Open image').
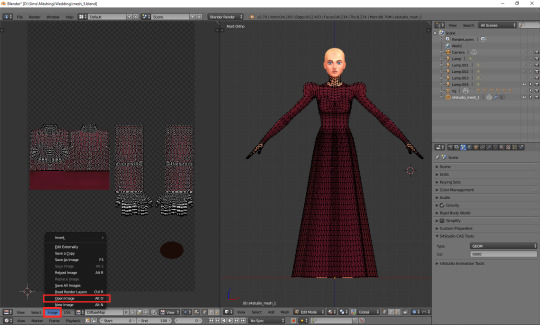
Whatever you do with your uv map, there are two basic rules you have to follow. One, fit the vertices only in the place meant for the category you're working on. If you're making a dress, you can ignore the top/bottom division (although be aware that if you do ignore it, you won't be able to split your dress into separates), but that's the only exception. Don't let your vertices go into the shoes or face area. If you're making a skirt, stick to the area marked as bottom. If you're making a top, fit them all in the area marked as top. It seems obvious, but I've seen sooo many CC pieces which are incompatible with each other, because their textures overlap. Some of them are beautiful and even made by really well-known, established creators. So I think it doesn't hurt to overstress this point a bit. Please pay attention to it!
And two: don't move anything which is supposed to be bare skin. Or half-transparent texture printed on top of the skin (not 3D). It's an absolute no-no. Terrible stuff will happen if you do it. If you accidentally did it, then... Oh boy. You may try to move it back into the right position, but maybe it'd be easier to just delete those parts altogether and just append them anew (as explained in the previous part).
As for the parts which you intend to texture – so, in this case, your dress – you can theoretically put them anywhere you want (that is, as long as you stay in the top/bottom area and don't overlap the bare skin parts). Your map doesn't necessarily have to look like the ones made by EA. However, I think not following the EA style (top on the left, bottom underneath, sleeves on the right, any extra deco in the free slots) may result in your clothing being sunbathing-incompatible. I can't say for sure, as I don't have Island Living, so my sims don't tan, but I suspect the tan lines depend exactly on your uv_0 map. I don't think it makes any difference in case of Victorian dresses, but if you're making something more modern, which could leave some visible tan lines, you probably shouldn't go too wild while making your uv_0 map.
Let's go back to our dress. Because we used the top as a base, half of the work is already done. We only need to 'unwrap' the skirt (and any decorations, if you added them). There are 4 ways in which I usually approach it:
1) Selecting the rows in 3D view and moving them manually (g, y) on the uv map
It's not very practical now, when the skirt is already full of those horizontal lines, but at an earlier stage it would have been very quick and easy. The important thing is, you should do it before adding 'fillers' (i.e. those lines which you don't move, scale or whatever, but just add them and leave them as is). Depending on the size of your dress, you probably achieved the desired shape with 3-5 lines. Move them on the uv map, make sure the proportions look correct (you can always try to open some patterned image for a second, to see if everything looks ok – see part VI b) and only then add the fillers. They'll automatically appear in the right places on the map.
2) Cylinder projection
You can also decide to unwrap the skirt. Select it, either in the 3D mesh or uv map window. Now, with your cursor in the 3D mesh window, press t to unhide the panel on the left and go to the 3rd category: 'Shading/UVs'. In the UVs section you'll see a button called 'Unwrap'. If you click it, a drop-down menu will appear, with different unwrapping styles/options. Choose 'Cylinder projection'. Watch out: your viewpoint matters! Before you unwrap, go to the right side view (num 3).
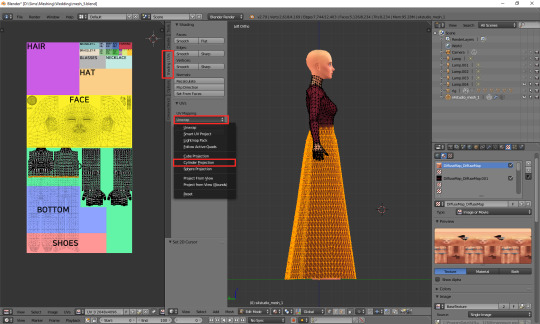
I took the screenshot from the wrong side, please pretend you didn't notice (-.-)
A whole bunch of new vertices should appear on your uv map – in a completely wrong place. We'll have to move them under the top. You'll notice, however, that if you try to move, scale or do whatever else with your skirt, it affects the lowest line of your top as well. That's because the top line of the skirt and the bottom line of the top are actually the same vertices, just duplicated on the uv map. You could select only that one line and edge split it (ctrl + e, in the 3D view), but an easier way around it is simply switching from vertex select to face select. Face select has some special powers when it comes to uv maps: it lets you not only move stuff separately, but also select parts of the mesh with L (multiple select with shift + L). Neither of those things works when in vertex or edge select mode.
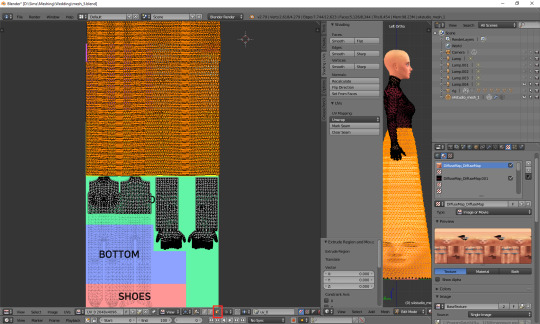
Now you can simply scale the selection down and put it under the top. Adjust it in any way necessary, so that it'd align with the top nicely. Make sure that the faces are in the right places! Select the bottom-left face of the top and then, in the 3D view window (left side view, ctrl + num 3), click the face right underneath it. Is it the top-left one of the skirt on the uv map? If so, perfect! If not, you've got some manual moving to do. Just select any faces which are in the wrong place and move them along the x axis (g, x) till they are placed properly.
It should look fine by default though. That's exactly why we went to the right-side view before unwrapping.
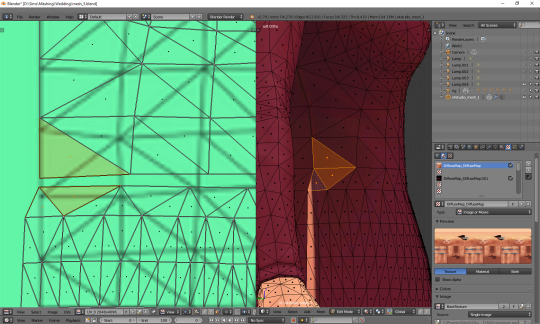
If your skirt goes into the shoes area, scale it down along the y axis! (g, y)
Now the only thing left to do is to weld the vertices and get rid of the gap between the skirt and the top. Go back to vertex select and select the second vertex from the left. You'll see that – just as before – a vertex of the top gets highlighted too. Press W and, from the drop-down menu, choose 'Weld'.
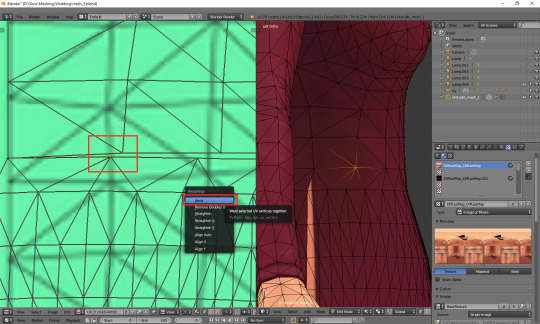
Do the same for all the vertices in that line, except for the first and last one.
What about the first and last one? The problem is, they are all actually the same vertex. If you select any of them, you'll see that the other one gets highlighted as well. Welding them would make them meet in the middle, and that's not something you want to happen. So what can you do? This time there's no other way around it than splitting. Select the whole vertical line (either the left or right one), move the cursor to the 3D view area, press ctrl + e and choose 'edge split'.
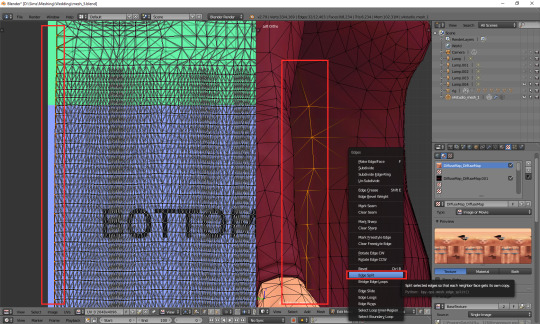
Now you should be able to weld each of those vertices separately. When you're done, select all (a) and (in 3D view) remove doubles (w).
And that's basically it. Of course, if you want to, you can dedicate some more time to your uv map, making sure everything looks absolutely perfect. You can, for example, edit certain lines – or all – and make them perfectly straight. Just select a line, press w and choose 'Align x/y'. It's especially useful for deco parts – you'll see what I mean once you get to texturing.
3) Professional tailoring (marking seams)
This method is quite crazy, but can be very useful in some cases – e.g. if you're making a patterned dress with a huuuuge skirt and want the pattern to look even. To use it, you have to imagine for a second that you're a tailor/seamstress and that your mesh is a real dress, made from real pieces of material. Where would this material be cut and sewn together?
Once you know where the seams would be, go to edge select mode and, well, select those edges. Then press ctrl + e and choose 'Mark seam'. Make sure you really mark all the seams which would be there in case of a real dress!
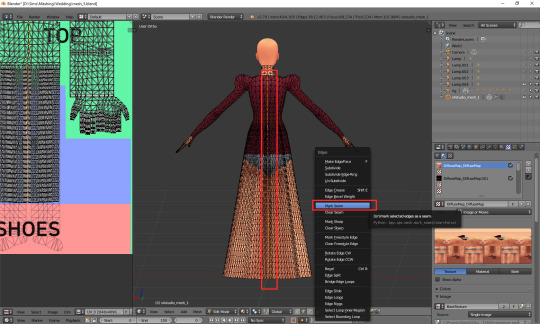
Once you're done, select your whole dress (or whatever it is that you're making). Do not select body parts! Once again go the panel on the left (if it's not there, unhide it with t) and this time simply select 'Unwrap'.
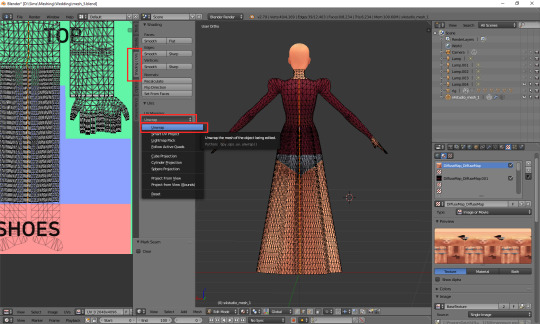
And now just go to face select, scale down the results of your unwrapping and put them anywhere (but in the right category :P). If something looks wrong, that most probably means you forgot to mark some seam. You'll have to go on a search for it. I'll be honest: I have zero idea of sewing, so using this method is quite tricky for me and I'm struggling myself with marking all the right edges as seams. I used it only twice so far, in my last 2 projects. Here's how my 1843 dress looks like after unwrapping:
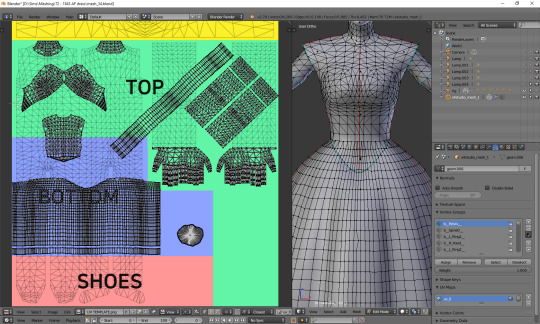
As you can see, the uv map is plain crazy and, as mentioned before, definitely not tanning-compatible, but thanks to it later I didn't have to adjust the pattern to each part of the mesh individually – I could just fill the whole texture with pattern and only had to erase it from the parts which were supposed to be uncovered. It does make your life easier if you make 66 swatches :P.
4) Projecting from view
Yet another unwrapping option, useful mostly for smaller, decorative elements. Or in general: for stuff which you can see properly. I use it mostly for bottoms (I mean... That thing 'closing' the dress at the bottom). Go to the bottom view (ctrl + 7), select the whole bottom part (might be easier to do on the uv map, now that you've unwrapped the skirt!) and, from the unwrap drop-down menu, select 'Project from view'.
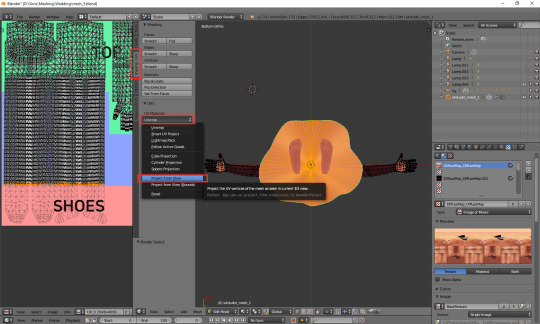
Go to face select, scale the thing down and put it somewhere in the area for decorative elements. For example here:
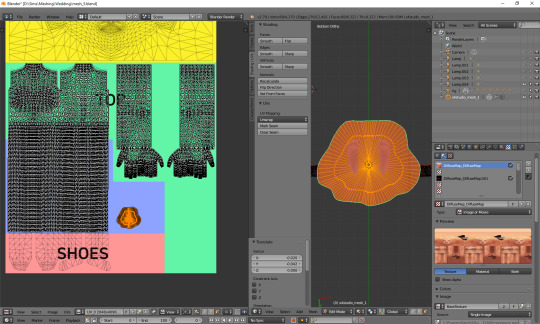
Done!
***
Here's also a small general tip: it's always better to separate clothing parts from body parts on the uv_0 map. I'm thinking especially of the neckline. It's the only way to get a sharp, clear line; if you just paint the neckline in your graphic editor, it'll become blurry in game. It seems that the devs realised it at some point too, as at least some pieces from later DLCs have a gap in the uv_0 between the neck and the collar. Just select the whole top-bottom area, deselect the neck and move the part which should be textured a bit down.
***
Whichever method you chose, your dress has a ready uv_0 map. Now there's only one thing left to do: you should export the uv layout, so that you'll know where to put your texture. At the bottom of the uv map area, click 'UVs' and then choose 'Export UV Layout'.
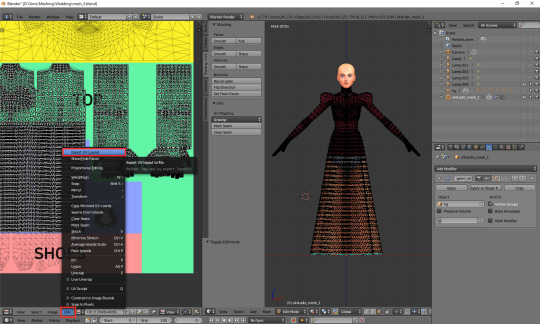
A new window will appear. Save it wherever you want, under whichever name. The only important thing is, you must tick that little box on the left saying 'All UVs'. Then just click the 'Export UV Layout' button.
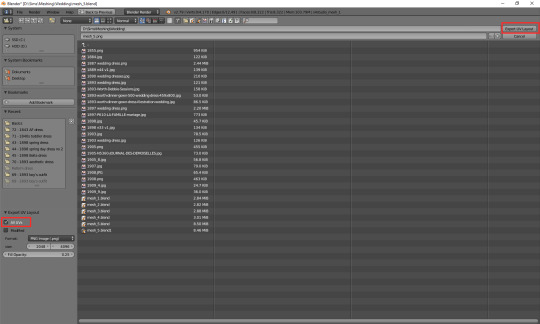
And that's all. Congratulations! You're fully done with your uv_0 map.
(Next: VI b. Changing the texture displayed in Blender)
79 notes
·
View notes
Text
Self-Help Guide: Just How to Repair Your Garage Doors
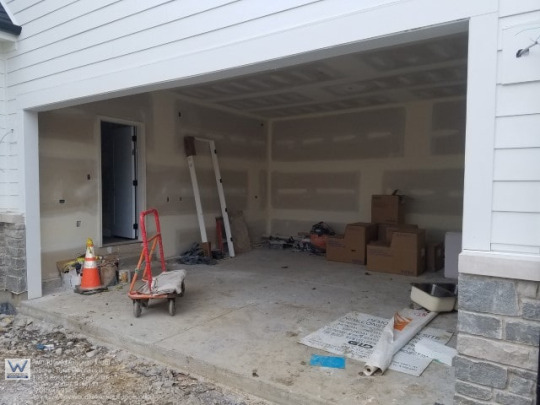
Though typically lots of people open and close their garage doors three to 5 times a day, they have a tendency to take them for granted till something fails. Garage doors allow and also cumbersome, averaging 100 to 180lbs in weight, with plenty of mechanical parts to break down, and also at some point, they will. Nonetheless, with a little TLC, a garage door will have a life-span of in between 15 and also three decades.
Right Here at A1 Garage Door Service, we've seen as well as fixed practically everything that can go wrong with a garage door. While some jobs are entrusted to the specialists, there are many repairs that an owner with some functional DIY abilities can fix without having to call out an expert.
In this overview, we will check out some typical garage door repair service problems and also troubleshoot them. We have actually likewise supplied you with a handy infographic poster that you can print off and also await your garage.
Just how Does a Garage Door Work? The very best area to start is with just how a garage door works and to recognize the different parts that maintain it relocating. Essentially garage doors work by using a counterbalance system that contains either types of springtime.
The most usual of both counterbalance systems uses torsion springtimes. Torsion springtimes are horizontally affixed to a turning shaft that sits over the garage door opening. When the garage door is shutting, the springs wind up producing kept power, and when opened up, the springtimes unwind, enabling the saved energy to raise the door. Torsion springtimes are commonly more expensive than the 2nd alternative of extension springs. However, they are a lot more sturdy, much safer, and also longer-lasting, so they are taken into consideration the most effective option.
Expansion springtimes are attached to the garage door's base with a lift wire that runs a pulley system. When the garage door is shut, the springtimes stretch and also, when opened, pull back. Extension springs are much weaker and more susceptible to damage; they are also thought about much more harmful.
Another important component of your garage door system is the garage door opener. While the springs do all the heavy grunt work, the opener allows you to open as well as close your garage door at the push of a button. You have five alternatives to pick from chain drive, direct drive, belt drive, jackshaft, and also screw drive. They vary in rate, intricacy, and also tranquility, with the chain drive being the less costly however noisiest.
Added elements include; tracks on both sides of the door to keep it abreast when closing and opening up, Rollers to aid the garage door in moving along the track, and wires affixed to the springtimes to help raise the door.
Why Does My Garage Door Open by itself? If your garage door starts opening on its own, after that you could assume it's time to call Ghostbusters! Supernatural goings-on or more rational factors to consider, you'll wish to find the factor fast, leaving it open for prospective burglars or the components might place you in jeopardy of theft or damage.
One of the most common factors is likely to be a blunder made by you or the last member of the family to use the garage, specifically when they remain in a rush. If you press the remote button while driving away, can you make certain it enclosed the starting point? Possibly the first thing to inspect.
The following point to inspect is the safety sensing units designed to ensure the door reverses when closing if something is obstructing its way. Check for debris or even an accumulation of snow or ice. It is additionally feasible for one of the sensors to become misaligned or break down. If so, they will need to be replaced.
One more common factor is that the buttons on the wall opener or the remote have actually come to be stuck down; tidy the controls, and also check the wiring and also connections inside the housing.
A final check you can make is the control wiring; a wire ranges from the opener's motor system in the center of the ceiling tracks to the control switch placed on the wall surface. A short circuit or a bare area can well be the root cause of your garage door opening up on its own.
Why Won't my Garage Doors Close? Just like a garage door that keeps opening by itself accord, a garage door that will not shut might position a danger to the safety of your garage and leave it exposed to the elements.
We have actually currently reviewed the safety sensing units and also how they are designed to open if they detect an object in the garage door course. If either of the photosensors has dirt on them or one is not in accordance with the various other, they can avoid the garage door from closing. Additionally, a cord can have ended up being inapplicable or severed, so inspect the links. Provide the sensors a clean with a cells, and also ensure they are straightened as well as inspect the electrical wiring.
Busted torsion springs are important garage components that permit your garage door to open as well as shut. You'll likely understand the reason for your garage door not closing as the springtime splitting will certainly sound like a gunshot. Luckily, torsion springtimes tend constantly to damage when the door is closed. It's the same for snapped wires; you'll see these quickly; frequently, they will snap when a torsion springtime breaks. These are jobs for somebody with the right devices and also knowledge to embark on.
If the tracks are obstructed or damaged, it can prevent the garage door from closing. In the best-case situation, it will certainly be a clog that can be conveniently eliminated. If the tracks are curved or deformed, you will likely need a replacement track.
When a garage door opener is mounted, limit setups are established as default. These settings can conform time. The garage door will typically quit prior to it gets to the ground or hit the ground, and also believe it has hit an item, it will instantly go into reverse. You'll need to change the limit settings, inspect the garage door opener manual, and change them per the instructions.
Why Doesn't My Garage Door Open? The word annoying doesn't do justice to the feelings you have if you can't get your automobile out of the garage since the door won't open. Normally, all sorts of expletives will certainly surround 'irritating' possibly ideal not explored in this overview! Most of the concerns with a garage door closed additionally apply to it not closing, such as obstructed, distorted, or curved tracks.
If your torsion springtime breaks when the door is shut, you'll need to switch off your opener and manually lift the garage door to get it open. Garage doors can be troublesome, so you may need help to do this. Use a lever to somewhat raise the door and also slide a piece of timber underneath to save any damages to your fingers. Then depending upon your door's weight, you may be able to lift it yourself or need aid to do so. When raised, secure the door with vice holds to guarantee it does not fall back down and also injure someone. Fixing a damaged torsion springtime can be an unsafe job for the uninitiated, so unless you have a lot of Do It Yourself experience and understand the technicians of your door garage, this is a work ideal left for the specialists.
Garage door openers include a cord to draw to disconnect the electric opener so that you can open the door by hand. For instance, you may require to open the garage door throughout a power interruption. Check that the garage door motor hasn't been detached; this is an easy as well as common solution.
Another simple check is to guarantee that it's not an issue with your remote control; it could be that you locked the remote by mishap or the batteries require changing. It could additionally be the antenna; examine it to see if it is damaged or blocked somehow. Ultimately, attempt resetting the remote control.
Finally, tak a take a look at the source of power. Is the opener getting power? Has it come to be unplugged? Otherwise, inspect that the breaker hasn't tripped as well as needs resetting or that a fuse hasn't blown and also requires changing.
Exactly How Can I Make My Garage Door Less Loud? Even if you can live with a loud garage door, it will be most likely that relative or perhaps next-door neighbors can not. Usually, a loud garage door is an easy problem to settle.
The most uncomplicated area to start is with a little lubrication, nine times out of ten, a little oil will certainly be all that is required for quieter garage doors. Making use of silicone or lithium spray lubricant especially created for garage doors, lube all the metal parts such as the springs, tracks, hinges, as well as rollers. When used, use a fabric to remove any kind of extra.
If you have a chain drive opener, the chain should be lubricated a couple of times a year as well. You'll also locate that a chain drive garage door opener is the noisiest of the different kinds you can buy. When it pertains to time to change it, maybe worth buying a belt drive system, which is a great deal quieter.
Examine the garage door, and track supports for loosened or absent screws as well as screws. Replace as well as tighten them with an adjustable or socket wrench, but do not overtighten as this could make issues worse.
After lubricating the steel components and changing or tightening up loose nuts and screws, you still have a noisy garage door; you'll require to inspect the different components for wear. If the roller is grinding or otherwise spinning openly on the shaft after lubricating, it could need replacing; we would certainly recommend selecting nylon rollers over steel.
If the garage springs seem the cause of the sound, be very careful and also don't attempt to adjust or repair them. They will certainly require replacing by preferably a specialist or else a person with a great practical knowledge of garage door mechanics. Without trying to seem melodramatic, the job can lead to death or arm or leg if not executed correctly.
You need to additionally evaluate the joints for wear, search for a much more oblong-shaped opening than round and dirt or steel filings around the pin.
Can Garage Doors Job Without Electricity? Getting locked in or out of your garage, especially the former, can be a troubling experience. Yet there is no requirement to panic, also without power; for instance, in case of a power outage, there is a way to open your garage door manually.
Standard garage door openers have an emergency situation guidebook release cable. You'll see the cable with its red manage positioned on the trolley track in addition to the garage door. When you draw the take care of, you will listen to a click. You can now by hand raise the door by ordering it at the base and raising it all the means up. For security reasons, do not leave the door open and neglected, as there is little in the means of precaution to keep the mechanism in position; even in the result of a strong gust of wind, the door could fall with the possibility of harming someone, specifically if you have pets or children.
Once you have electrical power once again and want to reconnect the electric opener, totally close the door by hand and after that draw the hands-on release cable; once it clicks, the button is re-engaged. Reconnect the garage door with the cart track by elevating it one to two feet It must snap right into location. After that examine the automatic opener to see if it functions properly by opening as well as closing the garage door.
Exactly How are Garage Doors Installed? For an expert garage door specialist, a garage door installment usually can take in between 5 and seven hrs. An expert garage door solution will certainly give you with distribution and setup and also eliminating your old door. The necessary steps are to connect the hinges, mount vertical tracking, attach the panels to the hinges, mount straight tracks, set up the torsion springtime system, and evaluate the door to make certain that it runs properly. In addition, you are likely to call for an automated garage door opener that is straightforward to suitable for your average Do It Yourself fanatic.
Is it Possible to Mount a Garage Door by yourself? If you want to comprehend far better how a garage door's mechanisms work for future maintenance and repair as well as minimize expenses, a Do It Yourself garage door installment could be a superb project for the appropriate person. For most garage door mounts, 2 individuals will be needed as they are hefty and unwieldy, as well as having a person around to pass devices to you when you get on a step ladder, as an example, can cut pause the work. What ought to be understood is that garage door setup can be hazardous; you require to be confident in your ability, educated in Do It Yourself, and also extremely safety and security conscious to take on the job. Thousands of people are harmed installing garage doors each year, so it's not a task to take on lightly.
Last Ideas We hope our guide has provided some valuable ideas for repairing garage door problems. If you maintain your garage doors in good order with normal maintenance and routinely inspecting the elements for indications of wear, they need to last you years. If you are experiencing a concern with your doors, keep calm, and be systematic in your approach. The issue will often be as easy as altering some batteries or eliminating some particles from a sensing unit or track. If you have actually attempted everything you can and also the solution still hasn't occurred, after that it's time to reach out to the professionals at A1 Garage Door Service, that will make certain to have your garage door up and running in no time at all.
Read our blog about Just how to Install a Garage Door
3 notes
·
View notes
Text
New Post has been published on Otaku Dome | The Latest News In Anime, Manga, Gaming, Tech, and Geek Culture
New Post has been published on https://otakudome.com/cyberpunk-2077-patch-1-3-detailed/
Cyberpunk 2077 Patch 1.3 Detailed
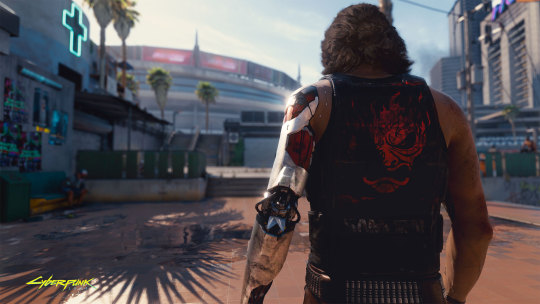
CD Projekt Red has detailed upcoming fixes and content for Cyberpunk 2077:
August 17, 2021 Patch 1.3 is coming to PC, consoles, and Stadia soon! Here is a list of the most notable changes coming in this update.
Please note that the issues listed below did not affect all players.
ADDITIONAL CONTENT
A list of all the free DLCs can be found in the Main Menu under “Additional Content”.
Johnny Silverhand’s Alternative Appearance – can be enabled in Settings in the “Additional Content” tab. Multilayered Syn-Leather Deltajock Jacket, Luminescent Punk Jacket – both available in the stash in V’s apartment after receiving a message from Viktor after completing The Ride. They’re of Rare/Iconic quality by default, Crafting Specs to craft a higher quality will also be unlocked. Archer Quartz “Bandit” – available as a reward or for purchase (depending on choices made by player) after completing Ghost Town and then receiving a message from Dakota or Rogue. If you haven’t received the message, make sure to be in the Badlands area and move further away from Dakota’s workshop. Dakota will also need a couple of days to contact you.
IMPROVEMENTS
Improved the minimap’s zoom level when driving, so that it’s more zoomed out and easier to navigate. Automatic Love – screen with pictures of Skye and Angel will be displayed substantially longer, making it easier to choose between the two. Added a button which allows to reallocate the distribution of Perk points on a character’s skill tree. Increased the number of slots for autosaves from 10 to 20 and for quick saves from 3 to 10 across all platforms. Added Database links to Journal entries. Added an accessibility option for center of screen dot overlay which helps with reducing/avoiding motion sickness. It can be enabled in Settings → Interface → Center of screen dot overlay. Fixers will now message V to offer a car for purchase less often. Improved the Screen Space Reflections effect so that it looks less grainy on consoles and on lower visual settings qualities on the PC . Added a filter for quest items in the Backpack. Quest item tags from miscellaneous Job items will now be removed after finishing associated quests, allowing to sell or drop them. It is now possible to rotate V in the Inventory with a mouse. Players will now properly be able to craft a quickhack even if they once crafted it and then got rid of it. Added a comparison tooltip for cyberware. Improved a notification when buying cyberware and not meeting the level requirements to equip it. It’s now possible to upgrade crafting components in bulk. Added new sleeping spots for Nibbles in V’s apartment. Icon on a disposal crate will now turn red when player picks up a body instead of being grayed out. Landmine icon will now be grayed out after disarming it. It’s now possible to use an elevator while carrying a body. Happy Together – Barry now has an updated, more unique appearance. Base item will now be highlighted green like other components if it’s present in the Inventory when crafting the same item of a better quality.
BALANCE CHANGES
Detection time of enemies now depends on game difficulty. Enemies on Easy and Normal difficulties will now detect the player slower. Enemies on Very Hard difficulty will now detect the player faster. Enemies on Very Hard difficulty (and only that difficulty alone) will now be more aggressive when searching around when they are in the “Alerted” state. NCPD will no longer react and turn hostile because of dead bodies in Open World activities. NCPD will now also react to hitting NPCs with a non-lethal weapon. Adjusted the damaging process when shooting crowd NPCs while in combat depending on distance and the weapon used. (Don’t Fear) The Reaper — improved Adam Smasher’s behaviour during the fight. Play It Safe — improved Oda’s behavior during the fight. Transmission — improved Placide’s behavior during the fight. Transmission — increased Placide’s hacking resistance. Cyberpsycho Sighting: Letter of the Law — improved Cyberpsycho’s behaviour during the fight. Every Breath You Take — improved Red Menace’s positioning and aim. Increased stats of La Chingona Dorada (Jackie’s iconic pistols). The Rescue — increased the number of ammo at the beginning of the quest. Introduced minor tweaks and improved balancing of the Contagion quickhack. Improved the Crafting system, so that items with Random quality scale their quality with player’s Crafting skill — it’s not possible anymore to roll a quality exceeding that of the relevant Crafting skill. The level requirement of items will now increase with each upgrade. Note: the level of upgraded items will be adjusted as a result of this change. The equipped items which exceed the level requirement can keep being used but, if unequipped, will have to wait until the required level is reached. Added more crafting specs for cyberware mods. Added crafting specs for knives (available from the start of the game). Updated the number of components required to craft some items, e.g. Bounce Back, MaxDoc, quickhacks, clothing mods and some weapons. Balancing of crafting specs for clothing mods. Balancing the number of components required to craft clothing. Balancing the number of components required to craft Sandevistan Fragments. Optical Camo cyberware will now be available for purchase from Ripperdocs. Adjusted price of the Sensory Amplifier cyberware mod. Rare Unity crafting spec will now be obtainable only during Suspected Organized Crime Activity: Tygers by the Tail. Changed the price and quality of Kerry’s guitar that can be obtained during Gig: Psychofan.
GAMEPLAY
Fixed an issue where crafting specs from clothing stores were available only during the first visit to a vendor. Fixed an issue which occurred after visiting the Nomad Camp, resulting in being unable to use weapons and quick menu items. Fixed an issue where hacking a neutral target wasn’t counted towards the Christmas Tree Attack achievement. Tutorial windows about skill checks will no longer pop up when the “Unauthorized” prompt is displayed on devices. V will no longer look down after using fast travel.
STABILITY AND PERFORMANCE ACROSS PLATFORMS
This section discusses changes that enter all the platforms but many of them make a bigger difference on last generation consoles and lower performance machines.
Delamain’s image will no longer get stuck on holocalls when V leaves the car too fast after completing Epistrophy: Badlands. Item tooltip will no longer disappear if its content is too long. Fixed various typos in subtitles, shards, quests and weapons’ descriptions. Added a text message received after failing Epistrophy: North Oak by leaving the Delamain cab. Changed back the name of the fast travel point near V’s apartment to “Megabuilding H10”. Removed some items labeled as “None” and without proper icons from the inventory. The on-hover menu with multitude of mods on an item in inventory will now show stats properly. Fixed an issue where male variants of the VR tutorial were in Polish for Brazilian Portuguese language version. Black-Market battery mod description will now display strings with item attributes properly. Fixed an issue where the Contagion quickhack button was missing its icon outside of inventory. Status Effects icon of the “Cold Blood” perk now looks like a snowflake. Punk Duolayer Tank Top will now be visible in the Inventory when equipped. Added a loading screen tooltip informing about Fast Forward settings. Fixed the Galena “Gecko” vehicle’s name next to the “Buy vehicle” prompt. Image in the second message from Nancy Hartley in Holdin’ On/Killing in the Name will now be displayed properly. Adjusted wording of the Crafting skill progression reward related to upgrade cost reduction. The image displaying Mackinaw MTL1 in the “Call vehicle” menu will now match with the car’s model. Removed debug strings from the “The Good, The Bad and The Ugly” perk’s tooltip. Icon grouping artifacts will no longer get detached from their respective locations on the map when zooming in/out. When Stamina Meter is depleted, the appropriate icon will now appear next to the health bar instead of the overload icon. Villefort Alvarado V4F 570 Delegate description will now correctly state that the drive is rear wheeled. The period of the possible occurrence in the description of Synaptic Accelerator in the tooltip will now display a proper value when playing in Polish. Fists description in the weapon wheel will now display an appropriate item type. Fixed text in the shard about Chiba-11 district. Opening Photo Mode and a vendor menu in quick succession will no longer result in freezing the game. Gold iconic loot icons will now be displayed on the minimap. Fixed an instance where hit markers and kill confirmation weren’t visible when destroying enemy turrets. Fixed enemy markers using the incorrect color on unaware enemies – they will now be yellow instead of red. Fixed an issue when RAM Recovery Rate below 0.50 was not displayed correctly. Fixed an issue when the disassemble item button was displayed incorrectly. Fixed an issue where the buttons on switching mods warning were not working as intended. Fixed the non-functional hinted keys when Breaching Protocol. Removed redundant input hints in the Cyberdeck panel.
GRAPHICS, AUDIO, ANIMATION
Reinforced Composite-Lined Rocker Foldtop is now properly aligned with V’s legs. Fixed an issue where the Monowire could slightly dislocate male V’s arms and clip through clothes. Fixed an issue in The Heist where Flathead’s case could float outside the hotel room in Konpeki Plaza, blocking the doorway. Fixed an issue where changing music volume in Sound settings affected car radio alongside with the background music. Fixed an issue where Takemura`s voice was doubled while talking to V in the van in Down on the Street. Fixed an issue where some netrunning suits clipped with female V’s legs and male V’s pants. Fixed an issue with the running animation after jumping on downwards or upwards slope. Fixed dust particles, which were sometimes incorrectly displayed. Characters’ skin will no longer become too bright in dark areas. In The Information, Smasher’s shadow will no longer appear on the elevator’s door after rewinding braindance to the beginning. Fixed Arasaka soldiers spawning on player’s sight when going back upstairs to save Takemura in Search and Destroy.
ENVIRONMENT AND LEVELS
Fixed various map holes in Watson, City Center, Westbrook, Heywood and Santo Domingo. Fixed faulty pathing for vehicles on the City Center ring road. Fixed multiple places where the player’s character could get stuck permanently. Fixed multiple issues with disappearing environments. Fixed multiple issues with objects popping in on player’s sight. GPS in Biotechnica Flats will no longer lead players to unreachable areas.
QUESTS
Rearranged shards into correct categories. Fixed an issue where calls to quest NPCs would abruptly end, making the NPC appear in other calls and potentially breaking other holocalls from the NPC. Fixed an issue where interrupted holocall would resume along with another call, which could make the NPC appear in other calls and break the next holocall from that NPC.
OPEN WORLD
Fixed an issue allowing multiple debrief holocalls from fixers to play at once, which could lead to blocked completion of various gigs (like Gig: A Lack of Empathy, Gig: Fixer, Merc, Soldier, Spy and others). We continue working on visual issues related to gigs stuck in the Journal, note that the latter don’t prevent district achievements from unlocking. Removed redundant loot from the body in the ferris wheel. Fixed an issue where Quadra Type-66 could be destroyed before buying it, blocking the progression of its “Buy Vehicle” quest and possibly the completion of the Autojock achievement. Fixed an issue in a shootout in Wellsprings where enemies were immortal because the trigger area was too small.
CINEMATIC DESIGN
Fixed an issue causing NPCs to not look at V during various scenes. Fixed an exploit where player was granted a Unity Pistol after each save/load. V’s facial animations while looking in the mirror will now be played properly. Fixed an issue where Rogue was spawning next to the player after calling her and asking about Adam Smasher. Fixed an issue where some NPCs could stop performing animations after a longer game session. Fixed multiple issues with NPCs mounting vehicles incorrectly. Fixed various issues where NPCs could be placed incorrectly and clip through objects after loading a saved game. Fixed an issue that could cause NPC animations to be played in the wrong spot in various quests. Fixed an issue where Jackie could spawn before the player’s eyes during the half-year montage. Fixed an issue where NPCs’ appearances got randomized when looking away. Fixed an issue where quests and scenes could progress before the loading screen disappeared.
MISCELLANEOUS
A gift from Judy can now be found in V’s apartment after player receives a text about it after completing her romance side quests. Fixed some story inconsistencies in radio broadcasts. Fixed the blackout effect persisting during Love Like Fire when using certain language settings.
PC-SPECIFIC
Fixed the issue where tutorial tooltips weren’t correctly displayed on 8k screens. Fixed an issue that caused the game to crash if a save thumbnail was corrupted. Fixed toggling Windowed and Fullscreen modes with the Alt+Enter shortcut. It’s now possible to exit locked scanning overlay by pressing TAB. Added a more compact PC version of the mouse cursor.
CONSOLE-SPECIFIC
Inner Dead Zone setting will now be applicable also to the game menus. [PlayStation] NPCs will no longer speak after being killed. Improved streaming of city lights. Overwriting a save game when there’s insufficient memory space will no longer corrupt the save. Masks and tubes inside the barn in The Hunt will no longer be invisible. Rogue will no longer clip through Johnny and will hold the glass correctly in Ghost Town. Fixed an issue in The Rescue where loading a save in front of the police blockade resulted in the NCPD officer not starting dialogue, blocking progress. Fixed an issue on PS4 where the meeting scene with Judy and Dolls in Pisces wouldn’t start properly. [Xbox] Fixed an issue in A Cool Metal Fire where a part of the scene in Cassius Ryder’s clinic could be cut off after the fade out. Fixed an issue where weapons were equipped to a wrong slot when assigning them from the Backpack.
3 notes
·
View notes
Note
since ur answering asks and shit can u explain what u meant by generational differences in communication
Damn it’s like 2015 tumblr when my inbox used to be WET. So if you’re talking about the controversial opinions post, YES, like I totally understand where people are coming from when they say that generational divides aren’t real (because they aren’t, they’re arbitrary) and distract us from real problems and yes they paint past generations as collectively bigoted when Civil Rights protestors in the 60s (who are in their 70s and 80s now) are mirrors to BLM protestors today, who could be of any age, but the most vocal and famous (at least online, especially irt to the founders, like Patrisse Cullors who is 37.
But how we communicate is sooooo different. I really point to the Internet and Social Media as a major influence in how younger millennials (more Tom Hollands and less Seth Rogans—see even there, I feel like there are two different types of Millennials) and Gen Zrs/Zoomers and even Generation Alpha behave and communicate. We live in a world where we grew up either knowing right out the gate or discovering the hard way that what we say and do has permanence, the kind of permanence that prior generations have never experienced until today. The dumb things kids have been saying since forever can now follow them... forever. We have an inherent understanding of how online spaces work. Compare that to, idk, let’s say you posted on your Facebook (for the first time in 18 months) “All these big and bad grown ass Senators going after actual child Greta Gerwig lol ok, you’re so brave for attacking a CHILD over climate change” and then your aunt, who’s turning “forty-fifteen” in May replies to your post with “So happy to see my passionate niece! Much love from us, hope you’re doing well. Paul is doing great, waiting on his screening results. Tell your mom I said we miss her, we need to get together, we forgive her for last Christmas.”
Like... ok there’s a lot going on there, but your hypothetical aunt is oversharing on a publicly accessible post. And even with the most strict of privacy settings, she’s oversharing where your other Facebook friends (which may include classmates, coworkers, etc.) can see. But she’s saying things that would only be appropriate in a 1-on-1 conversation. This Aunt doesn’t have an understanding of such boundaries, she’s not as technologically literate and hasn’t grown up in a world of Virtual Space, she still gets most of her news from TV, she trusts what a reporter on Channel 4 will read off a script more than what actual video footage of an incident might reveal on Twitter, and she has no clue that she’s been sharing her location data with every post she makes.
There’s such a huge difference. I think it even affects how we experience and express stress and frustration. I think growing up partially in online spaces has made me more accustomed to conflict and consequence-free arguing than someone who never had to worry about that. I’ve been exposed so much to harassment and bullying, triangulating and echo chambers in forums and threads, and vastly opposing point of views at such an early age that it’s had an effect on how I see the world. Compare this to a customer I helped two weeks ago who was looking for a specific type of supplement for children. I found it for her, I handed her exactly what she was looking for, even though her description of the product actually matched several different products; to make sure I’d done my job thoroughly and that she leaves happy and satisfied and doesn’t bother me again, I then show her more products that match her description so that she knows she has options. And she proceeds to freak out, saying “NO, NO, I’M LOOKING FOR [X] AND IT HAS TO BE [XYZ]” and when I say freak out, she looked stressed and PANICKED. And being a retail employee wears you down bit by bit, and add COVID on top of it and little shit like this makes you snap, sometimes. So I have to cut her off like “Why are you screaming and freaking out, jfc you’re holding what you said you wanted. It’s in your hands. I gave you what you wanted, I’m just showing you more things.”
That customer is not an exception, she’s not a unique case. She’s representative of a frightening percentage of her generation, the kids who watched Grease and The Breakfast Club and Ghost in theaters when they were originally released. This is how they communicate and process information. She could not, for some reason, register that her need had been fulfilled, and defaulted to an extreme emotional response when given new and different information.
I’ve yet to deal with someone younger than 35 act the same way, the exceptions being the kids of very wealthy people at my new job who reek of privilege I gag when they walk in—but even they are like *shrugs* “ok whatever” and understanding when there’s something I can’t do for them.
Me: “sorry, we are totally out of that one in your size, but I can order it for you, it’s 2-3 day shipping at no cost to you and we ship it straight to your house”
A rich, white, attractive 22-year-old who’s had access to organic food, a rigorous dermatologist, and financial security since she was born: “mmm... sure, I’ll order it”
A 47-year-old of any socioeconomic background, of any race, in the same situation: “AHHHHHHHHHHH”
I just think it’s crazy how three generations of kids and young adults raised in a world where everything moves so much faster, where knowledge and entertainment and communication can be gathered so much faster, are often so much more polite and patient and understanding. Yesterday I told an older man (mid-50s) whose native tongue is the same as mine, as clearly and succinct as possible, that what he’s looking for is “in aisle 4.” He proceeded to repeat back, “Aisle 7?” four time before I dropped everything to show him what he needed in aisle 4, despite his insistence that he didn’t need me to walk him there. 4 and 7 sound nothing alike in English. There’s just something going on up there 🧠 that’s different.
Oh, other generational divides!!! We have different approaches to labor and working. Totally different! I’m a “young” millennial where I’m almost Gen Z, and I’ve noticed an awful trend among my demographic where people actually brag about working 90 hour work weeks. Or brag about how they skip breaks and live on-call to get the job done for “the hustle” like this “hustle, become a millionaire by 30″ culture that’s dominated these kids, idk where tf that came from. Like why are you proud of being a wage slave, getting taken advantage of by your millionaire/billionaire overlords. Compare this to my mother’s generation (she’s a borderline Genius X’er, she and her best friend were a year too young to watch Grease when it came out and had a random older woman buy tickets for her; she went to Prince concerts, took photos of him, then sold the photos on buttons at school, that’s her culture and teenage experience), where she’s insistent on her rights and entitlements as an employee, and these things she instilled me: “whatchu mean they didn’t schedule a break for you and you’re working 12 hrs today? oh no, you’re off, don’t answer your phone cuz you are NOT available!” There are Gen X’ers who entered the workforce at a time that America was drifting toward this corporate world, with more strictly defined regulations, roles, and understandings of labor rights (and also, let’s talk about how the 80s there was so much more attention on workplace harassment, misogyny and gender divides in wage gaps, etc. etc... not that much has changed, but at least it was talked about!). There are young people today who are taken advantage of because they aren’t as informed or don’t feel as secure and valuable enough to claim what belongs to them.
At the same time, those generations (Gen X and older) have a different viewpoint of hierarchies in the workplace and respect irt our direct supervisors. That’s how you get this blurring of boundaries between Work Life and one’s Personal Life that leads to common tropes in media written by their generations, where oh no! I’m having my boss over for dinner and the roast beef is still defrosting :O is such a “relatable thing” for them... meanwhile us younger generations are like I don’t even like that you know where I live, and if I see your 2017 Honda Civic pass my place one day, we’re going to have a problem. I think older generations have a different relationship with the word “Respect” than we do. Like, my grandma, who’s turning 87 (?) this year, and the other seniors in my area, they have a different concept of honor and an expectation of professional boundaries that I, and my mom and her generation, just don’t see (so then there’s something in common with Gen X’ers and the rest of us.) My dad grew up in a world where talking and acting like George Bailey and knocking on someone’s door with a big smile could get you a job, a job that could pay for college and rent no problem. My mom grew up in a world that demanded more prestige, where cover letters and references could get you into some cushy jobs if you’re persistent and ballsy enough. And I grew up in a world where potential employers literally don’t see your face when you apply unless they lurk on any social media profiles you have publicly available and they hold all the cards, and you need all those CVs and reference letters just to make minimum wage... so I feel like I am powerless in the face of such employers.
9 notes
·
View notes
Text
Hotel Nabi | Episode 1
A woman in her mid-40s walked Jackson inside of Atty. Park's office. It's not his first time to be in a place like this, but his instinct gives him a different energy this time. As if the piece of the puzzle he's been trying to solve could be found in the corners of this office.
"Take a sit." Jinyoung said which caught Jackson's attention. He nods at him before he sat down. Another secretary came inside with two cups of coffee.
Both of them are facing each other. Jinyoung's blank expression brought confusion to Jackson. He really doesn't have any idea why he asked for him.
As soon as the secretary left the room, Jinyoung spoke.
"How's Prosecutor Kang's case going?" He started.
Jackson cleared his throat before answering, "I'm afraid I can't tell–"
"I'm asking as Seulgi's friend."
He fell silent. Jinyoung took the chance to continue. "Do you... –do you perhaps believe in spirits? I mean, the ones after they die."
His brows met in confusion. Jackson was about to ask when the latter spoke again.
"Napanaginipan ko si Seulgi kagabi, and it felt too real for a dream."
"That could happen," Jackson said as he rested his back on the backrest of the sofa. "Kasi magkaibigan kayo, and maybe you're still not over with the truth that she's gone."
Jinyoung gave him a nod, "that crossed my mind. But she told me something and it kept bothering me until now."
"May sinabi siya sayo?"
"About her murderer."
Silence. Jackson knew to himself that a dream is only an illusion. And what Jinyoung will tell him in the next moments are all illusions made because of his sorrow for a friend he lost.
"Her boyfriend." Jinyoung said.
That confused him even more. "May kinakasama si Prosecutor Kang?"
He gave Jackson a nod, "Her relatives and friends doesn't know about his secret boyfriend... but I do."
That's it. The missing piece of the puzzle really was inside the corners of this room. No one from the witnesses they have told them about Prosecutor Kang's partner.
But he's still not convinced, and it seems off that this kind of statement came from a professional. It feels absurd.
"I know— It doesn't make sense at all, does it? But I really have a feeling that it will lead us to the conclusion of her case." Jinyoung explained.
"Isa pa," he added. "May nangyari bago siya mawala. And it's connected to him."
"Sino ba 'yang kinakasama ni Prosecutor Kang? I'm certain you know him too." Jackson asked.
Jinyoung stared at him for a while before he said, "He's close by,"
"I know you wouldn't believe me, given that my conversation with her happened inside my dream. Pero, Jackson– it's him."
He's so close to losing his patience. Jinyoung keeps on giving him cliff hangers and he's starting grow annoyed of them.
"One more thing she told me— there's a hidden camera inside her unit. Nakuha niyo ba 'yon while investigating?"
He shook his head, "There's no CCTV inside her unit. Ilang beses na namin chineck yung crime scene—"
"Damn, then she's right."
"Ano?"
"She planted a spy camera located somewhere sa kitchen area, ang sabi niya pa naka-connect yon sa lumang iPad niya na nakatago sa mga gamit niya."
"iPad?" Jackson asked, then he remembered the things he saw in the crime scene. On one of the drawers, there's an iPad that they did not confiscate.
"Meron?" Jinyoung asked in which the latter answered with a certain nod.
"She wanted me to get that and surrender it to the authorities. Pero hindi ako pwedeng pumunta doon dahil on-going pa ang investigation. That's why I called you, since you are the detective handling the case."
Jackson connected the dots on his mind and they are slowly starting to make sense. But it's too skeptical, all these statements are all from a dream. No one would believe that they are real. Heck, they're not even real.
"Ako rin, Jack, naguguluhan." Jinyoung said when he noticed him spacing out. "But I'd rather believe this and shoot my shot. I am that desperate to find the culprit."
Jackson heaved a deep sigh before he stood up. Jinyoung watch as the latter made his way to exit the room.
"I'll call you when I find something." He said before leaving the room.
---
It took half an hour drive from the law firm to Prosecutor Kang's unit. Jackson found himself standing in front of the door of her unit, with disposable gloves on his hand.
He wore them first before he opened the door and wandered his eyes around. It looked decent than it was when he first came here.
He did not wander any further and went straight inside the master's bedroom, turned the lights on and went to the small white cabinet next to the bed. He pulled the first drawer and found an iPad.
He turned it on, and there's no password required. There were only default apps installed on the homescreen but when he slid the screen to the next one, he found an app and clicked it.
His eyes widened up to see the live view of the kitchen. He went over there to check the location and to his surprise, the camera could have met the angle where the crime took place.
There's a button at the upper right of the screen which let's the user view the previous recordings of the camera. He clicked the recordings of the time when the crime took place and clicked the play button.
He regretted it right away.
He couldn't find the courage to even move from where he is right now. As if the air inside the room isn't enough for him to breathe. As if the world betrayed him and he's a little too late to realize.
2 notes
·
View notes
Text
How to login to NETGEAR Orbi Whole Home Mesh-Ready WiFi Router AC2200 (RBR20)?
NETGEAR Orbi Whole Home Mesh-Ready WiFi Router AC2200 (RBR20): gives speeds up to 2.2 Gbps Over 2,000 square feet, No WiFi dead zones, and buffering for super-fast, reliable streaming, and gaming, 2,000 square feet of consistent coverage, speeds up to 2.2 Gbps.
You can expand your coverage with Orbi satellite extenders to create a whole-home mesh WiFi network. Netgear armor includes built-in antivirus and data theft protection for all of your smartphones and computers. Protects your connected home from internet threats. Maintains speed even if more devices are connected to your WiFi at the same time, the difference is tri-band technology, others use dual-band. It is very simple to set up with the Orbi app.
You can create a guest network, run speed tests, and parental access controls right from the app, 2 Ethernet ports provide a wired connection to your gaming console, Smart TV, and more. Smart parental controls allow you to manage screen time and monitor usage on any connected device, anytime, anywhere. You can connect your Orbi router using the Orbi app which makes it easier to set up and log in your router. You can also log in through the Url or default IP address. Type 192.168.1.1 in your web browser.
You can connect to your router’s network, through wifi or ethernet cable. Open a web browser and enter the Url https://orbillogin.net/ to login to Orbi router or use the default IP address http://192.168.1.1 A Login page will appear on your screen. Enter the router username and password. By default, the username is a username and the default password is password. Both the username and password are case sensitive. Now select the login button. The home page will be displayed. Note: if you already have the password use that password instead.
Why does the Orbi login web browser login no longer work in Netgear orbi Whole Home Tri-Band WiFi 6 Mesh WiFi Satellite RBS750?
Netgear Orbi Whole Home Tri-Band WiFi 6 Mesh WiFi Satellite RBS750: It works well with Your Orbi WiFi 6 Router, adds up to 2,500 square feet, speeds up to 4.2Gbps, 11AX Mesh AX4200 WiFi. It works only with Orbi Whole Home Mesh WiFi 6 Systems RBK752, RBK753, or RBR750. It eliminates dead zones. Extends 2,500 square feet of coverage to your existing Orbi Mesh WiFi 6 System to eliminate WiFi dead zones and buffering in hard to reach places.
It provides fast wireless speed, AX4200 WiFi 6 powers up to 4.2 Gbps of streaming HD video, gaming, or Internet surfing and downloads. Move freely around the house, room to room, inside and outside, without losing connectivity.It provides a reliable mesh network, Expands your Orbi Mesh WiFi 6 network covers every inch of your home in fast and seamless WiFi connectivity. A dedicated band between your Orbi router and satellite frees up the other 2 bands for maximum speed to your devices.
2 Ethernet ports provide ultimate flexibility and connectivity for your Smart TV, game console, streaming player. The Orbi app makes it easy to add on an additional satellite. Examine your Orbi router LEDs located on the front to ensure that your router has an internet connection from your internet service provider. If you are not certain which LED represents internet it often looks like you may need to reboot your modem or contact your service provider directly if no internet is shown a loss of wi-fi connection and only certain areas of your home may be caused by a lack of range from your router in which case you may want to consider a range extender or power-line alternatives for old home coverage if possible move your device closer to your router and connect with your router name and password.
If you cannot connect wirelessly or you've forgotten your network password then use an Ethernet port for a wired connection to your router. Updating your router's firmware to the newest version can usually solve network issues and ensure the best functionality. Once connected to your router navigate to http://192.168.1.1 in your browser, when prompted enter the default login credentials that are 'admin' both username and password. Now you can update your router's firmware. Change your router's setting and much more to update the firmware to the latest version. Select the Advanced tab and then administration, click on router update and then check to determine if an update is available for your router. If an update is needed then follow the on-screen instructions to install.
If you are having issues connecting by wi-fi due to losing your network name and password, return to the homepage and select the wireless menu from here. You can view or change your Network settings. Note that routers with multiple bands can change network names and passwords individually. Wi-fi operates on multiple channels, so if you are experiencing slow network speeds while multiple devices are connected to the network, changing your wireless channel and mode may improve performance. Now, if a single computer is having issues connecting then make sure your computer and all the drivers are updated. If you're still experiencing issues then resetting your Orbi wi-fi router to factory default settings may resolve your issues. Note that factory reset will erase all settings you currently have configured on your router.
For More information: https://orbillogin.net/
1 note
·
View note
Text
Macbook Pro Openvpn Connect Download

A VPN protects your internet connection, so you can browse the web safely, enjoy your favorite websites and services, and access geo-restricted content from anywhere. It’s easy to configure a VPN connection on an iPhone, and we’ll show you the fastest way to do it.
OpenVPN is a full-featured SSL VPN solution which can accomodate a wide range of configurations, including remote access, site-to-site VPNs, WiFi security, and enterprise-scale remote access. Free Vpn For Macbook Pro free download - Hotspot Shield, VPN Gate Client Plug-in with SoftEther VPN Client, CyberGhost VPN, and many more programs.
What is a VPN on iPhone?
VPN, a virtual private network, lets you access the internet via a secure encrypted connection. This adds an extra layer of protection to your browsing, so nobody can snoop on your online activity.
There are two main cases when you may want to use VPN on your iPhone:
Protect your data online. VPN is a must while using public Wi-Fi. Such networks are typically unencrypted, so bad guys can easily get access to your passwords or credit card numbers. VPN encrypts your data and makes it unreadable to hackers, so you can safely check your bank account from a local coffee shop. VPN is also useful at home if you don’t want your ISP to snoop on your activity.
Access your favorite music, movies, websites, and services from anywhere. VPN makes your device think you’re in another location, so you can enjoy Netflix, Hulu, Disney+, and any other services that may be restricted for you.
How to set up a VPN on iPhone
The fastest and easiest way to add VPN to your iPhone is by using Documents by Readdle. Documents is the super app for file action. It lets you do what you want with your files, from watching movies to PDF editing. Documents features a built-in VPN service that works across all your apps.
Here’s how to configure a VPN with Documents:
Get Documents for free.
Launch the app and jump to the VPN tab.
Tap the big Start button.
That’s it! Now, you can enjoy safe and private browsing. You can also pick a different server location if you need to bypass certain geo-restrictions. VPN works across all your apps, even when you close Documents.
How to connect and disconnect a VPN on iPhone
Once you’ve added a VPN in Documents, you can quickly turn it on or off in the app:
Open Documents.
Jump to the VPN tab.
Tap Start or Stop.
How to manually set up VPN on your iPhone

We’ve just explored an easy way to add a VPN to your iPhone. Alternatively, you can configure a VPN connection manually in the settings of your device. You’ll want to use this method when you already know all the connection details. For example, your employer can provide this information to let you set up a corporate VPN.
If this is your case, follow these steps:
Open the Settings app on your iPhone.
Tap General.
Scroll down and select VPN.
Tap Add VPN Configuration.
Here, you can select the VPN type and fill in all the required settings.
After adding all the details, tap Done at the top right of the screen.
Once you’ve added a VPN configuration, a new VPN toggle will appear in the iOS settings. Just turn it on to start using the VPN.
If you’re looking for the easiest way to use a VPN on your iPhone, download Documents. Turn on a VPN with just a few taps, enjoy safety and privacy while using public Wi-Fi, and get access to your favorite content from anywhere.
We’ve built Documents to supercharge your iPhone. Documents lets you do what you want with your files, without juggling between multiple apps. Browse the web safely, download anything, watch movies, listen to music, read books, and more.
Download Documents for free and supercharge your iPhone!
Are you experiencing those Wi-Fi problems with your Mac? For example, your MacBook Pro won’t connect to wifi, connected but no Internet or the network speed is super slow, etc.
Our smartphones may be equipped with the latest wireless data capabilities, but our MacBooks definitely aren’t. We rely on WiFi to do our daily work, and when it inevitably experiences an error of some sort, all you want to do is throw your hands in the air.
After all, WiFi frequently seems to be on the more technical end of things, shrouded in mysterious terms like “DNS”, “modem”, and “IP address”. It can be a bit intimidating to try and fix without worrying that you’re either doing nothing or making the problem worse.
But no one likes mindlessly refreshing a webpage and hoping the WiFi fixes itself in the meantime, so in this guide, we’ll show you a few ways you can take matters into your own hands to find a solution.
Do You Know?
You can troubleshoot network connections in the office or at home with WiFi Explorer. It’s an awesome app that shows you what’s going on with your network and helps you fix it when needed. The app offers a range of extensive details about all your Mac networks in the vicinity, including their band, signal quality, range, security status etc.
Your Internet Service Provider (ISP) is what determines your maximum internet speed, but your usage at home is what ultimately determines how well your connection functions. Whatever your provider advertises is always going to be more than the rates you actually get, but you can always make adjustments on your end to get things running faster.
Bandwidth is not the same as Internet speed. The Internet speed is how fast data can travel on your network, whereas your bandwidth determines the volume of information that can travel at that speed. A larger amount of bandwidth means you can request more data at once, which will make your connection seem faster, but it’s not worth paying for if you don’t use your Mac for much beyond Facebook and email.
It’s important to connect to secure networks even if it means using a Virtual Private Network (VPN) or proxy. While it’s tempting to use the free coffee shop WiFi, the lack of protective password puts your computer at risk because malicious users can use the shared network and attempt to break in. If you must use one of these networks, a proxy or VPN can protect your computer by isolating it from the other connections.
Connection Problems
Issue 1: Physical router interference
Cause: A router sends electronic waves, but these can be impeded by thick walls or other large blockages such as a row of metal filing cabinets.

How to Fix: If your router is currently buried behind a file cabinet, in a closet, or otherwise awkwardly placed you should move it to a more open and central location. If your router is already in a fairly clear area, consider where you’re sitting. Can you minimize the amount of distance between you and the router, or otherwise move closer?
Alternatively, consider purchasing an extended if you can’t seem to move the router to a location without too much interference.
Issue 2: Neighborly router interference
Cause: As we said earlier, a router sends electronic waves. These waves occur at certain frequencies and can be interfered with by other electronic devices such as microwaves or your neighbor’s router.
How to Fix: Most routers come pre-calibrated to certain frequencies or contain software that helps them pick the best channel. You can manually change the channel though by following a few steps.
Step 1: Find out your router’s IP address. This is usually printed on the router, but you can also check in System Preferences > Network > Advanced > TCP/IP > Router;
Step 2: Copy the IP address into the address bar of your browser and hit enter. You’ll be directed to your router’s settings;
Step 3: Select the channel you want. Make sure to choose a channel 5 to 7 away from the original, since many frequencies overlap;
Step 4: Use Wireless Diagnostics to monitor which frequencies make the biggest difference in your wireless signal.
You can get open wireless diagnostics by navigating to Spotlight and then beginning to type “wireless diagnostics”. It should be the first option.
Openvpn Mac Download
Open the app and click “Continue” to start diagnosing.
Issue 3: MacBook Pro or router failure
Macbook Pro Openvpn Connect Download Pc
Cause: When there doesn’t seem to any conceivable reason your WiFi shouldn’t work, it’s not your fault. Sometimes the MacBook Pro, the router, or both experience an unexpected error that’s invisible to the eye and impossible to figure out exactly what went wrong.
How to Fix: Your best bet at solving this type of problem comes in two parts: your computer, and your router. Follow these steps:
Step 1: Turn off the wifi on your computer from the menu bar along the top;
Step 2: Turn off your router by physically disconnecting it (or pressing the power button if it has one) so that all the light turn off;
Step 3: Restart your MacBook from the Apple menu in the top left of the menu bar;
Step 4: Once your Mac has restarted, turn the router back on. You’ll need to wait 2-5 minutes for all of the lights to come on and for the signal to begin sending again
Step 5: Turn your Mac’s WiFi back on, and allow it to connect to the network.
While this method isn’t guaranteed to work every time, it often solves mysterious wireless issues and with a little luck, your problem is minor and will be resolved with a bit of restarting.
Problems Once Connected
Issue 4: WiFi connection is spotty
Cause: If we’ve said it once, we’ve said it a million times: your router transmits waves, and when these are weak at your location, you’re going to have connection issues. In this case, you may have been able to connect to the network but now service is patchy at best. The cause is simple — you’re too far away for the frequency you’re trying to use.
How to Fix: There are two different ways you can fix this issue. First, move closer to the router if you can. This is the easiest way to attempt to solve the problem and maybe all you need to do.
The second way is to use a different frequency band than you normally would. By defaults, your router uses the 2.4GHz band, which is weaker than the 5GHz many router models have available. If your router supports 5GHz, you should switch to this instead- it usually appears as a different network in your WiFi list, with a “5GHz” or “5G” as part of the name.
For example:
If you have a large home, an extender might be a more practical solution. It will amplify the signal from your router so that it can reach the areas of your house that usually suffer from poor coverage.
Issue 5: WiFi connection is very slow
Cause: If things have suddenly slowed down, it’s highly likely you can point to another person to take the blame — someone else is eating up your bandwidth! Make sure to check your own computer first though, especially if you’re running multiple programs in the background.
How to Fix: The easiest way to figure out the culprit is by running a quick scan using Advanced Network Care, it’ll show you the connection speed issues found with your current network and fix it if needed. An alternative is a Wifi Explorer as we already mentioned above.
However, you can also fix that manually. Bandwidth refers to the volume of data that can be transmitted over your WiFi connection. Certain apps can require larger bandwidth and thus restrict the data available to everyone else.
If this occurs in your home, the first step is to check your own applications. The most common offenders are multiplayer video games, video-intensive apps, or files that are uploading and downloading. If your Mac isn’t running anything strenuous, then ask the others in the household if they are.
Macbook Pro Openvpn Connect Download Software
While you can’t get more bandwidth without paying for it, you can ask anyone on the network to limit which applications they use at one time. In the worst-case scenario, you’ll need to wait a few minutes while a download finishes or until the other person is done working.
Final Words
WiFi issues on Mac are among the most frustrating issues that can occur on your computer. They’re confusing, bothersome, and significantly slow your productivity. We hope the methods listed above help you resolve any issues you face.
Macbook Pro Openvpn Connect Download Windows 10
Do you use a different method to troubleshoot your wireless network? Tell us about it in the comments below!

1 note
·
View note
Text
Mac Disk Maker

Disk Maker For Mac
Mac Install Disk Maker
Mac Os Boot Disk Maker
Languages: EnglishFrançaisEspañolPortuguêsDeutsch日本語
Since 1998, DiskWarrior has won more awards than any other Mac disk utility. A Macworld Eddy, an Apple Design Award, a PC Mag Editors' Choice Award, a MacUser Magazine Editors' Choice Award and many more from around the world. Check out our Awards and Reviews. Developed just for Mac. Design and print custom CD, DVD or Blu Ray labels and covers with Disketch disc label software. Free to download. Quick to install, easy to use CD label maker software for PC or Mac.
Summary :
Want to format an external hard drive for Mac and Windows PC? Do you know how to do this work easily? This MiniTool article will show you specific methods to make external hard drive compatible with Mac and PC, which are easy and safe to complete.
Quick Navigation :
As we know, external hard drives are widely used to backup data or interchange files among different computers. Well, is there an external hard drive that could be shared between Mac and Windows PC? Of course, there is. Actually, most external hard disks could be compatible with Mac and PC as long as you format them correctly.
Why Need to Format External Hard Drive for Mac and PC
To put it simply, if you want to share external hard drive between Mac and PC, you need to format an external hard drive for Mac and PC.
Currently, hard drives for Windows PC are always formatted with NTFS, while hard disks for Mac are formatted with HFS+. However, when we connect a NTFS formatted disk to Mac, Mac OS X doesn't allow us to write files to the drive neither edit files, though it can read a NTFS drive. Similarly, Windows OS will ask us to format the HFS+ formatted drive when we connecting such a disk, let along edit files saved on HFS+ formatted hard disks unless we resort to third party programs.
But luckily, there are file systems well supported by both Mac and Windows PC, and they are FAT32 (it might be called MS-DOS on Mac) and exFAT. As long as we format the external hard drive to one of these 2 file systems, it can be shared between Mac and Windows.
Further Reading
Both FAT32 and exFAT have advantages and disadvantages.
FAT32: FAT32 works with all versions of Windows, Mac OS, Linux, game consoles, etc.
However, single files on a FAT32 drive can't be larger than 4GB. If your external drive saves files larger than 4GB or you plan to save larger files to this drive, converting to FAT32 is not recommended.
In addition, a FAT32 partition must be not more than 32GB if you create it in Windows Disk Management. Of course, there is free partition manager that can help create a FAT32 volume up to 2TB, which also functions correctly.
exFAT: exFAT has very large file size and partition size limits, which means it's a good idea to format your external hard drive to exFAT.
Nevertheless, a lot of users complained that exFAT is slow, and they highly suggest using FAT32 if you can avoid file size constraints.
Three Options for Accessing NTFS Drives on Mac
Paid Third-Party Drivers
Some paid third-party NTFS drivers for Mac can be used to access NTFS drives on Mac. They work well and they have better performance than the free solutions which will be mentioned in the following part. Paragon NTFS for Mac is such a driver.
Besides, you can also use the paid third-party file system converters to convert NTFS to FAT32 or exFAT which are compatible with both Mac and PC. MiniTool Partition Wizard is one representative.
Free Third-Party Drivers
FUSE for macOS is a free and open-source NTFS driver that can enable write support. But, this solution is slower relatively. And the automatically mounting NTFS partitions in read-write mode can be a security risk for your Mac computer.
Apple’s Experimental NTFS-Write Support
The Mac OS has an experimental support for writing to NTFS drives. Usually, it is disabled by default and needs some messing around in the Mac terminal to enable it.
It doesn’t work properly all the time and could lead to potential issues with your NTFS file system. For example, it had corrupted data before. Thus, we don’t suggest using this tool and we believe it is disabled by this reason.
Here, we recommend using the paid third-party tools since they are easy-to-use and can do good work for you.
Then, we will introduce these three options for you in the following content.
The Best Paid Third-Party Driver: Paragon NTFS for Mac
Paragon NTFS for Mac can write, edit, delete, copy, or move files on NTFS volumes from your Mac computer. It offers a 10-day free trial. If you want to use it all the time, you need to pay for it.
With it, you don’t have to fiddle with terminal commands to mount partitions manually. Additionally, it can mount partitions automatically and safely. More importantly, it can code with the potential corruption. If you purchase a Seagate drive, you can even get a free download of Paragon NTFS for Mac.
All in all, it does its works well and gives you good user’s experience.
The Best Free Third-Party Drivers: FUSE for macOS
FUSE for macOS is a free solution to access NTFS on Mac. But it is less secure.
If you want to make automatically mount NTFS partitions in read-write mode on Mac, you need to temporarily disable the System Integrity Protection and replace one of Apple’s built-in tools with a binary that is more vulnerable to attack. Thus, your Mac is in danger when using this driver.
However, you can use it to manually mount NTFS partitions in read-write mode if you never mind using the Terminal. This will be safer, but you need to do more work. You can go to google the steps and see how complex they are.
Apple’s Experimental NTFS-Writing Support: Don’t Do This, Seriously
Although we mentioned this method in our article, we still don’t recommend it because it is the least tested. It is just for educational purposes, and it is available on Mac OS 10.12 Sierra. Perhaps, it will be unstable forever.
How to Quickly Format External Hard Drive for Mac and PC without Losing Data
Another way to access NTFS drive on Mac is to convert the NTFS/HFS+ to FAT/exFAT. Then, the drive can be used on both Mac and PC.
There should be some important data on the drive. To keep it safe, you can choose this best NTFS/HFS+ to FAT/exFAT converter: MiniTool Partition Wizard.
How to Convert NTFS to FAT32 or exFAT Without Data Loss
To format hard drive for Mac and Windows without data loss, we suggest using MiniTool Partition Wizard and its 'Convert NTFS to FATS32' function. If you are a personal user, you can try its Professional Edition.
Step 1: Run MiniTool Partition Wizard
Download this software to your computer. Then, you can open the software and input the license key to the pop-out window to get its Professional Edition.
Step 2: Convert NTFS to FAT32 with This Software
After running the program successfully, we can see its main interface as follows:
Here, please select the NTFS partition of external hard drive and choose 'Convert NTFS to FAT' feature from the left action pane. If there is more than one NTFS partition, convert all of them one by one.
At last, click 'Apply' button to make the change executed.
When MiniTool Partition Wizard shows it applies the change successfully, the original NTFS will finally become a FAT32 partition.
By this way, you can easily format an external hard drive for Mac and PC without losing any data. Then, you can share external hard drive between Mac and PC
You Can Convert NTFS to exFAT in 3 Steps
However, if you want to convert NTFS to exFAT to make external hard drive compatible with Mac and PC, 3 steps are required.
Step 1: Transfer Data out from External Hard Drive
You can choose to copy and paste those files to other external devices or internal hard disk of Windows, but it will cost much time. Instead, you can use MiniTool Partition Wizard Free Edition to create a copy for your external drive, which is faster.
If there is only one NTFS partition on external hard drive, refer to the tutorial Copy Partition to get instructions. However, if there is more than one NTFS partition, view Copy Disk to get specific operations.
Step 2: Create exFAT Partition with MiniTool Partition Wizard
The Free Edition of this software also enables you to do this job.
Firstly, you need to delete the partition by using this software. Just open the software to enter its main interface. Then, choose the target partition and click 'Delete Partition' from the left action pane. After that, you should click 'Apply' to keep this change.
Secondly, the target partition will become unallocated. Here, you need to choose that partition and click on 'Create Partition' from the left action pane.
Thirdly, you will see a pop-out window. Here, you can choose 'exFAT' from the 'File System' setting option. At the same time, you can also set some other parameters for this partition, including 'Partition Label', 'Drive Letter', 'Size And Location'. After that, please click on 'OK'.
Fourthly, you will go back to the main interface. Then, please click on 'Apply' to save these changes.
Finally, an exFAT partition will be created on your external hard disk so that it could be shared between Mac and Windows PC
Step 3: Transfer Data back to External Drive
If you want to share files that you have backed up between Mac and PC, now please transfer these files back to external hard drive.
How to Convert HFS+ to FAT32 or exFAT without Losing Data
Besides, you can format an external hard drive for Mac and Windows by converting HFS+ to FAT32 or exFAT without losing any data.
Step 1: Backup Data in HFS+ Partition on Mac
Just transfer all useful files out from the external hard drive to other devices on Mac. Of course, if you have a backup already, ignore this step.
Step 2: Create a FAT32 or exFAT Partition on Windows PC
Some people may ask why create such partitions on Windows rather than Mac. That is because there are cases reporting FAT32 (MS-DOS) or exFAT partitions created on Mac did not work well on Windows.
Please skip to Solution 1: Format External Hard Drive to FAT32 to get steps to create a FAT32 partitions or go back to Step 2: Create exFAT Partition with MiniTool Partition Wizard to get operations to create an exFAT partition.
How to Make an Empty External Drive Compatible with Mac and PC
If there is no file saved on your external hard drive, how to make external hard drive compatible with Mac and PC?
It's very easy to share it between Mac and PC and you also need a Windows computer, a Mac machine, and the free partition manager MiniTool Partition Wizard Free Edition.
There are 3 solutions for this case, so please choose the one you like most to format external hard drive Windows 10/8/7.
Solution 1: Format External Hard Drive Windows 10/8/7 to FAT32
Since users are unable to create a FAT32 partition larger than 32GB in Windows Disk Management, they need to use MiniTool Partition Wizard Free.
Note: when you connect an external hard drive which is formatted with HFS+ with computer, Windows may ask you to format the drive. Please choose Cancel.
Please download and install this program on your Windows computer to format an external hard drive for Mac and PC.
Firstly, open the software to enter its main interface as follows. Here, please select the NTFS partition or HFS+ partition of external hard drive, and click 'Delete Partition' feature from the left action pane. If there are multiple partitions on the external disk, please select the disk and click 'Delete All Partitions' feature instead. After that, an unallocated space will be released.
Secondly, you can create one or more FAT32 partitions in unallocated space. Select the unallocated space and choose 'Create Partition' feature from the left side.
Then, you should choose 'FAT32' from the 'File System' option in the pop-out window. Meanwhile, you can set properties for this new partition and click 'OK' to go back to the main window of Partition Wizard.
At last, click 'Apply' button to make all changes performed.
Solution 2: Format External Hard Drive Windows 7/8/10 to exFAT
Firstly, please delete the NTFS or HFS+ partition in either MiniTool Partition Wizard or Windows Disk Management to release unallocated space. Then, you can create an exFAT partition with MiniTool Partition Wizard Free Edition by following steps introduced in the section Step 2: Create exFAT Partition with MiniTool Partition Wizard.
Once a FAT32 or exFAT partition is created on your external hard drive, you can share it on both Mac and Windows PC.
Solution 3: Create One HFS+ Partition for Mac and One NTFS Partition for Windows
Alternatively, you can create 2 partitions on the external hard drive: one is for Mac, and the other is for Windows. As to size for each partition, it depends on your own demands. By this way, you can easily format an external hard drive for Mac and Windows.
Step 1: Create a NTFS Partition and a FAT32 Partition
Please run MiniTool Partition Wizard Free Edition, then delete all the original NTFS or HFS+ partition(s), and create a new NTFS partition as well as a FAT32 partition, and the latter will be formatted to HFS+ in Mac machine.
Then, select the external hard drive and choose 'Delete All Partitions' to create an unallocated space.
Here, select the unallocated space and choose 'Create Partition' feature from the left action pane.
Now, please specify partition label (Windows is recommended), partition type (primary or logical), drive letter, file system (NTFS), cluster size, and partition size (you can change the length of the handle to adjust partition size). Then, click 'OK' to continue.
Now, you can see a NTFS partition is created. Please use the same way to create a FAT32 partition labeled with Mac. At last, click 'Apply' button to make all changes performed.
Step 2: Format the FAT32 Partition to HFS+ Partition on Mac
Please go to Utilities → Disk Utility.
Then, select the external hard drive and click 'Partition' tab on the top.
Now, find the FAT32 partition and format it to OS X Extended (Journaled), which is the desired HFS+. Finally, click 'Apply' button to make all changes performed.
Tip: You may receive the prompt 'The volume 'MAC' is not journaled. As a result it can not be resized'. Just ignore the message and click 'OK' button to continue.
After NTFS partition and HFS+ partition are created on your external hard drive, it can be shared between Mac and Windows PC.
Note: You might be unable to share all files saved on external drive since Windows doesn't support HFS+ partition while Mac doesn't support NTFS partition completely.
Bottom Line
Are you planning to format an external hard drive for Mac and PC? If yes, now try one of our methods to make external hard drive compatible with Mac and PC.
Should you have any problem, just feel free to leave us a message in comment part below or send an email to (email protected).
Format Hard Drive for Mac and PC FAQ
How do I make my hard drive compatible with Mac and PC?
Disk Maker For Mac
If you want your hard drive to be compatible with both Mac and PC, you should format the hard drive to the file system that is supported by both of these two operating systems. FAT32 and exFAT can meet your requirements.
What is the best hard drive format for Mac and PC?
Although both FAT32 and exFAT are compatible with Mac and PC, exFAT is a much better choice because it has fewer limitations. For example, it has a larger file size and partition size limits.
Mac Install Disk Maker
If you formatted your hard drive to exFAT with Apple's HFS Plus, Windows will not recognize the exFAT drive. You can consider using a third-party partition tool to format your hard drive to exFAT.
Mac Os Boot Disk Maker
Windows can only read a Mac hard drive that is formatted to FAT32 or exFAT using third-party software. If the file system of the Mac hard drive is HFS+ or APFS, the drive will become unreadable in Windows.

1 note
·
View note
Note
Im going to need u to explain to me what u said in the tags of the modding post in Simpleton words cause I'm. A fucking idiot when it comes to computer shit and the arm wrestling in TW2 is genuinely the most stressful thing ive ever had to endure in a video game
Also i forgot to mention this in my last ask abt being an idiot— i love u! You're rly cool. That's all ^`^
aw! ilu too anon.
ok first of all: if the arm wrestling is the only thing about w2 that you want to fix you don’t have to fuck about with any of the unpacking nonsense! you do have to be playing on PC. I’m using this mod to always win dice poker/arm wrestling. steps as follow:
download whichever version you want (always win only arm wrestling, always win only dice poker, always win both). the file is a zip folder and you can put it wherever you want.
extract the contents of the zip, also to wherever you want. inside is a README.txt and a file called base_scripts.dzip. you can ignore the readme, it’s just the description of the mod from the nexus site in a text file.
find your witcher 2 folder. if you’re playing on Steam, you’re looking for something like C:\Program Files\Steam\steamapps\common\the witcher 2\CookedPC. if you’re not sure, here’s how to view your Steam installation path. if you’re on GOG it’s usually C:\GOG Games\The Witcher 2\CookedPC. if not, you can find the installation path in the GOG launcher by clicking Witcher 2, then the settings button to the right of the center top bar, then “Manage Installation > Show folder”.
there should be a base_scripts.dzip already in the CookedPC folder—copy it somewhere else for backup or rename it to something like base_scripts_original.dzip
go back to your downloaded mod folder and drag and drop the mod’s base_scripts.dzip into the Witcher 2 CookedPC folder. if it asks if you want to replace the existing base_scripts.dzip say yes (but make sure to have backed up or renamed the original first!)
ta-da! load up W2 and go dunk on some arm wrestlers.
if you want to fix a BUNCH of things about W2 it’s a little harder.
base_scripts.dzip is basically a special kind of zip folder with a bunch of smaller script files zipped into it. so for instance, the arm wrestling mod changes only the minigame scripts, while Conversation Skills Always Succeed changes only the scene_function script. technically, those don’t conflict, except the changed files have been packed up into two different base_scripts.dzip, and you can only have one base_scripts.dzip.
some mods don’t mess with base_scripts.dzip at all. True Encumbrance Remover (sets all item weights to 0 because inventory management sucks) is another one you can just drag and drop right into CookedPC, not even any file replacement required. the way to check if you’re going to need to do some fuckery for nexus mods is on the Files tab; click “Preview file contents” and if you see a base_script.dzip in there, it’ll require some fiddling if you want to use it with other base_script.dzip mods. how to do the fiddling:
you will need:
Gibbed RED Tools
probably a copy of W2 on GOG because Steam’s a little bitch about DRM. if you have it on Steam you can redeem a free GOG copy of W2 here using the CD key you find in the Steam launcher here:
you can try doing this modding process with Steam files, but it’s entirely possible that it’ll throw errors for you talking about file access, and if so... switch to GOG and install Witcher 2 again. i know it’s a pain to have multiple launchers but if you’re willing to fuck around this much with mods it’s not THAT much of a pain.
ok! step 1: getting into base_scripts.dzip with Gibbed RED tools
download Gibbed RED Tools and extract the contents. you can put the resulting unzipped folder wherever you like, just make sure you know where.
open up the windows command prompt—open the start menu, type in “cmd”, right click the program that comes up, and hit “run as administrator”. SCARY BLACK PROGRAMMING BOX. it��s ok all we have to do is type some stuff in! hit enter after every command and be sure to include all the spaces and quotation marks.
hit enter! ok now we’re inside the Gibbed RED Tools folder. we want to tell it where the original base_scripts.dzip is, and what folder it should unpack that file into. create a new folder somewhere for the unpacked files to live and then type in the next command!
first command moves us from the default folder into the folder that contains our Gibbed RED tools. the command structure is:
cd "path to Gibbed RED tools"
so for instance:
cd "C:\Users\laurelnose\Downloads\Gibbed RED Tools"
it should unfurl a whole long list of file names! you can navigate to the folder you told it to unpack to and see all of the little script files that make up base_scripts.dzip. now we’re cooking.
the command structure is:
Gibbed.RED.Unpack.exe "location of base_scripts.dzip" "place to unzip file to"
so for example:
Gibbed.RED.Unpack.exe "C:\GOG Games\The Witcher 2\CookedPC\base_scripts.dzip" "C:\Users\laurelnose\UnpackedBaseScript"
go back to nexus mods and pick out all the base_scripts.dzip mods you want. say, Conversation Skills and Dice Poker/Arm Wrestling. or even more than that, as many as you want! repeat these steps for EACH MOD INDIVIDUALLY:
find out which files they modified. Conversation Skills is nice because they say right in their description that they modified game\scenes\scene_functions.ws . other modders, it’s a little tougher; Poker/Wrestling doesn’t say, so i had to poke around in the “posts” tab until i found a user saying that it modified game\minigames\dicepoker.ws and game\minigames\wristwrestling.ws
download the mod, and extract the contents into a folder. create a new folder wherever you’d like—name it whatever, but you’re going to be making one for each mod so to keep them straight something like ModNameUnpacked might be best.
go back to command line. if you closed it before, repeat the cd command to get back into the Gibbed RED Tools folder, otherwise you can just use the unpacking command again to unzip the mod’s base_scripts.dzip into your ModNameUnpacked folder.
open up the unpacked folder and navigate through the folder structure until you find the file they said they modified. so for Conversation Skills, find scene_functions.ws in the game\scenes folder.
for instance:
Gibbed.RED.Unpack.exe "C:\Users\laurelnose\Downloads\ConversationMod\base_scripts.dzip" "C:\Users\laurelnose\Downloads\ConversationModUnpacked"
pull up your unzipped original base_scripts.dzip from the previous section. move the modified file from the mod folder into the same place in the original base_scripts.dzip folder. so scene_functions.ws goes in game\scenes in your original base_scripts.dzip folder. let it replace/overwrite the original scene_functions.ws.
repeat this for each mod individually. if you’re doing a lot of mods you’re going to end up with a lot of folders! we can delete them later. if by some unfortunate chance you want two mods that modify the same .ws file you’d have to actually figure out which lines each one modified and rewrite your original .ws file to include both, so... idk don’t get yourself into this situation lmao
ok, now that you’ve pulled out the modified scripts from each mod you wanted and put them into your unpacked original base_scripts folder, it is time to pack that sucker up into a regular .dzip again!
back into command line. again if you closed it before, use the cd command to get back to your Gibbed RED Tools folder, otherwise the new command we’re using is:
Gibbed.RED.Pack.exe "location to put the packed folder\base_scripts.dzip" "location of files to pack up"
this time it won’t put out a whole list of files, because it didn’t pull out any files, it packed them up all neatly. check the location you told it to put base_scripts.dzip and if it’s there you’re golden!
so for example:
Gibbed.RED.Pack.exe "C:\Users\laurelnose\base_scripts.dzip" "C:\Users\laurelnose\UnpackedBaseScript"
pull up your Witcher 2 CookedPC folder—if you haven’t already backed up or renamed your original base_scripts.dzip, do that—and move your newly-created base_scripts.dzip full of all your lovely mods into the CookedPC folder!
you can now delete all of the ModNameUnpacked folders you created. if you need to start over, just delete the modded base_scripts.dzip and either move your backup into the CookedPC folder or change the name of the original back to base_scripts.dzip and that should undo all of your changes. worst case scenario you have to uninstall and reinstall, but that shouldn’t happen if you backed up your base_scripts.dzip!
#hopefully this makes sense!#these games are a pain in the ass to mod it rly makes me nostalgic for like... minecraft#also unfortunately i do not think GOG has achievements for W2#i think this is a small price to pay in exchange for having fun playing the game but ymmv#asks#anonymous
6 notes
·
View notes
Text
Jade’s SSO Rambles - 2 Quality of Life (UI Elements)
(Please keep in mind that these are my thoughts and opinions at the time of writing these rambles. I may change my mind in the future.)
By quality of life I’m basically going into small aspects about the game that while certainly not necessary to acknowledge or fix are those little things that really help the overall feel of a game in the background. It’s the difference between having to click between 5 different menus vs 1 or 2 clicks to get to what you want. Yes it’s not necessary to tweak but players/users will often unconsciously greatly appreciate it. Also this may come up again later as I usually have a lot of thoughts regarding UI and HUD. (UI means User Interface and HUD means Heads Up Display. I use them semi interchangeably but HUD is more like your map, exp bar, status ect whereas UI would be more like the chat window or your inventory where you “interact” with it.)
Also if the SSO devs read this and care about me, please please please remove area and global chat notifications. I would love you forever if you did.
Okay now on with the insanely long rambles!
What SSO Has Done Well:
I think the updated store UI was a very long overdue update and I can’t wait for the rest of the stores in the game to get this refresh. I’m glad that the camera has been freed to move around the horse and that we have an option to turn on and off magical mode for our Jorvik Wilds. Using the 3D models instead of icons has been a blessing and makes shopping so much better as I’m not guessing what the object looks like or forgetting where it’s at in the store. I also am glad that we have filter options to select items based on what they are (tops, saddles, accessories ect) or based on colors and so on. The only thing I’d like to see updated is the color/style of the background to match the global store but I’m sure it’ll come in time.
The global store is another feature I greatly applaud and I think was a must for this game. While not everything is available in it I think it really helps even just with planning and testing outfits or tack sets let alone saving time and effort on shopping. I also love being able to look up the price of an item in game and figuring out where it’s located without having to go into my browser or hunt around in game. Overall I think the way the global store is setup is great, I adore all the filters, the ability to manage both my horse and my character’s outfit and see the stats even. I also like that a tutorial is available just in case but isn’t in your face either.
Adding 3D inventory models was again one of the best things the team has done for UI. I can’t stress enough how much better it is for finding what you need or looking for the right color items. It makes organization and finding objects so much better and probably the only thing I would like more is if they were slightly bigger. I also appreciate when items are zoomed into (especially earrings) as it helps make them easier to see and know which one you’re looking at. Personally I also like the updates to backgrounds of items and I can’t wait to see everything else updated from the black jarring background to a more color coordinated one. (My only worry is for people with color blindness though.)
Updating the race UI/HUD, namely in adding buttons that allow you to restart and exit the race. (I began playing the game before this update and was ecstatic to see it implemented.)
Removing the bar on the magical horse changes but leaving sparkles to still give the player a heads up of the change.
Having a bar on the swimming (so the player knows how long they can be in the water and when they are in deep enough water to be teleported out.)
I personally love the newer UI/HUD graphics in general and I feel it looks far more professional and sleek without taking away from the game’s feel and branding. Especially speaking of the updates to the race UI, boards and such. I hope to see the darker blues carried over into the rest of the game’s UI and HUD. I also really love the way the wooden boards look now (especially the western games one) and I hope to see that implemented in things such as stable chores boards.
The quest log update was badly needed and I like the new organization on it. Overall it is a small thing but I think for people still running main quests it’ll help a lot.
Suggestions for Improvement:
Please make everything able to be exited out of by hitting the “Esc” key. Prime examples of where this is missing is namely with the race boards to initiate a high score race, the druid lessons/missions board and the new western games board. (Can’t check the board at the rescue ranch but that might be one too.) While not necessarily UI I also want to mention that things such as dancing (like the disco) or sitting down (like at the cafe) would also be nice to exit via “Esc.”
I think area notifications should either be removed entirely (since we have the compass to update us) or turned off by default (especially since there are several bugs with them turning on despite the muting feature being active.) If they are left on by default then the game should be updated to remember the player’s settings. I personally don’t like to have to turn on the mute setting every time I log in and would love it if the game simply kept my settings saved client side so the only time it refreshes it is on a full reinstall. If none of these are a viable option then at the very least the area notifications should be moved to the top of the screen. They update far too frequently and become rather frustrating especially when either taking screenshots or recording. (Just moving around the circus in Nilmers is a prime example of the area notifications being way too easily triggered.)
Entering and exiting global chat notification should be removed entirely. Personally I don’t understand why it’s only active in certain areas (unless this is something on the back end that makes the game run better then yes that makes a lot of sense.) However if it must stay within only towns/stables then I think the notification is unnecessary. The player should get some kind of mini tutorial at the start of the game explaining how the chat system works. After that then most people old enough to chat will be able to figure it out on their own or use the “say” chat to ask for help. People who already know how to use global will be aware it only functions in towns.
Lower the loading bars and announcements or other notifications not placed in the upper right corner to the bottom of the screen. (Alternatively they could be moved up to the top of the screen.) For example the “Swimming” bar can be moved so it’s across the bottom of the screen instead of the middle and place the warning that it’s too deep in the same spot. Other examples are with the “Ferry Leaving the Quay” and when characters talk in quests outside of dialogue boxes such as cooking instructions. I would also move the druid commands during training like the change lanes as well. In general I would keep any brief info out of the center of the screen as that blocks the player’s view of their character/horse and what they are interacting with.
Add in a way to view your best time on appropriate races. (This is likely a lot of extra work since it only applies to ones you can run multiple times but I would love to know what my previous best time was while running said race.)
Remove the popup for all archaeology digging that causes you to pause and close out of it. Preferably replace it with the standard floating UI you get from races and items flying into your inventory. (I’ll go into this more on the archaeology ramble.)
Combine beating your personal best pop-up with the update on current time and current best time. When you beat your best time it should show 3 times instead of 2, your time on the race you just ran, your new personal best and your previous personal best. I would suggest making the “Congrats” text more noticeable to help avoid causing players interested in seeing these stats to skip it. There is plenty of room in the massive popup we currently have to be able to fit all these aspects and I feel trimming excess popups helps with general quality of life.
Remove the loading bar on most actions and either make them immediately completed or just let animations play. Most things I don’t think really need to have the animations play for so long as well. Prime example would be horse care and stable chores, you don’t need a “grooming loading bar” for example, just play the animation of the player grooming the horse or mucking the stable. The bar I feel just makes it feel less immersive (for as immersive as you can get with mucking) and also makes it feel more like a chore and something you have to wait out. Some things also just feel better being instantaneous like when you refill water or hay with daily chores. (Would love if refilling my buckets was instant too.)
Western games board improvements (I will also bring this up in my discussion about Starshine Ranch and go into some extra detail there.) Please make it so when the board is activated that the horse the player is riding will stop. I’ve found when I come out of the arena after running a race that my horse continues galloping past the board, often into the tables across the way as I’m used to the boards pausing my horse’s movement. As mentioned earlier I also think it should be able to be exited via the “Esc” key.
I don’t think I really need to mention all of the stores that need to be fixed but I do have a few specific details I’d like to list. I really hope the mall gets an update to function more like the newer stores or the global store where I can tilt the camera around my horse and rider. Speaking of the global store I would personally like to see the player/horse preview area increased in size and possibly adjust the lighting so it’s a little better on the opposite side of the horse from the player model. I would also like a way for indoor pet stores to have a means of viewing the pet with your horse. Otherwise I would simply just make it so they aren’t indoors at all. Lastly Farah seems to have a weird bug with the placement of the camera and I dearly hope that her new store is updated as it’s very hard to actually look at my horse and apparel. (Might submit a report on that.)
When you complete caring for your horse it should only pop up in the notification area in the corner. I think the extra popup across the top is pointless.
Small idea for the quest log, I would love to see daily quests (and possibly races and chores) separated per general area. So for example maybe something like Silverglade (Moorland/Fort Pinta/Silverglade/Manor/Valedale/Firgrove,) South Hoof, Harvest Countries (Jarlahiem and such,) Epona, Mistfall, Goldenhills, Dino Valley and so on as new areas are eventually added. Possibly even break central Silverglade down further. Basically this would be nicer for end game users to be able to see what areas have the most quests available that day and is certainly not something I would prioritize.
Other Notes:
With removing the “Okay” button that pauses you before starting a race I was initially on the fence about it. On one hand I think removing it helps when you’re doing a quick run of races because it means less time to get into the race. On the other hand, however I am also one of those people who uses it to pause the game. I think if I were on the team I would end up removing it as it feels pointless, there’s no reason to make the player pause as they already confirmed they want to do the race by selecting it.
I will be going into more depth regarding Starshine Ranch in another post but I did want to add a few of my immediate notes on the UI for the western games/races. Overall I love the board (besides my suggestions earlier) and I really like how you can line up several races via checking the boxes. (And I hope this means we get other barrel/pole/ect setups too later as well as group/friend races.) My main concerns are with how the UI before and after the races is handled. I think the line showing you the path is a great idea but I also feel it grows very tiring to have it before every race. I would think maybe having it as an option in the board menu would be better. Something that works as a “preview” of the race you’re interested in rather than every time you’re about to run it. I think maybe having Josh do a mini intro quest into western games would be a better means of showing players the layout of the course for the first time than having the line show up each time you run the race and can avoid having to code a way for it to only show up the first time a player interacts with the board. I think the number of popups could also be reduced much like the new best time on races. The same info is displayed on both screens (who wins is denoted by a medal instead of text) and therefore the first screen is sorta pointless. I also feel that the reward screen should only show up when you actually are rewarded money/exp and when repeating the races without a reward it shouldn’t show up.
Also, honestly if the team ever wanted someone to go through and find all of the places for suggested adjustments on small things such as removing loading bars on animation I would be happy to do so in my spare time. I care quite a bit about this horse game to probably a ridiculous point but I want to see it succeed even when it comes down to the little things like quality of life updates.
Anyone is free to add their thoughts via reblogs or replies, I’d love to hear what others have in mind regarding my rambles or what they think the game does well or can improve at. I’m also open to asks about my thoughts as well.
I’d like to also mention that I certainly don’t think I know better than the team, these are simply my personal observations on how I think the game could improve. I hope that they can help stir up discussions within both the SSO community and maybe even with the team on how to make the game even better. I want to help promote healthy and constructive critiquing and free shared thoughts in the fandom/community. Please try to keep any additions free of ranting/putting down the game or the team that works on it.
Thank you for reading my extremely long rambling thoughts!
15 notes
·
View notes
Text
How To Download Remote Desktop Connection For Mac

Download Microsoft Remote Desktop for macOS 10.13 or later and enjoy it on your Mac. Use Microsoft Remote Desktop for Mac to connect to a remote PC or virtual apps and desktops made available by your admin. Feb 01, 2016 Download Remote Connections Manager 1.0 for Mac from our software library for free. The unique identifier for this app's bundle is eu.lightnetcom.RemoteConnectionsManager. The application's installer is commonly called remoteconnectionsmanager-1.0.bz2. Our built-in antivirus scanned this Mac download and rated it as 100% safe.
Microsoft Remote Desktop Download Mac
Microsoft Remote Desktop Download Dmg
Microsoft Remote Desktop Mac Dmg
Microsoft Remote Desktop 10 on macOS
Hello everyone, you can now download Microsoft Remote Desktop 10 for Mac and experience quiet honestly the best remote desktop app you can use on your macOS, period. I say this because most of who are using an iMac or Macbook mostly need to remote control our Windows computers but with little effort you can easily manage to control your Linux OS and even ChromeOS computers all with this great software by Microsoft.
Today we will highlight some reasons why we think you should go ahead and give Microsoft’s Remove Desktop 10 a try. This RDP software is crucial to many schools, businesses and even for individual/person usage. Sometimes we just need to use our Windows OS but we might be too far from home or our laptop to access it. MSRD10 can also connect to Windows Servers in case you server administrators were wondering about that. I have been using Microsoft Remote Desktop for the past 3-4 years and I have no complaints so far. It is free and it is well updated and managed by Microsoft and it simply gets the job done. Not to mention it doesn’t use many resources and it is compatible with the last macOS and the previous ones as well. Let us know in the comments if you don’t like it, or maybe it’s missing a feature? Do you love it? Let us know below.
What Is Microsoft Remote Desktop 10
Microsoft Remote Desktop 10 lets you connect to a remote PC or virtual apps and desktops made available by your administrator. The app helps you be productive no matter where you are. Configure your PC for remote access first by download the Remote Desktop assistant to your PC and let it do the work for you.
Microsoft Remote Desktop 10 Features
• Access remote PCs running Windows Professional or Enterprise and Windows Server
• Access remote resources published by your IT administrator
Microsoft Remote Desktop Download Mac
• Connect remotely through a Remote Desktop Gateway
• Secure connection to your data and applications
• Streamlined management of your connections from the connection center
• High quality video and audio streaming
Install Microsoft Remote Desktop 10 on Macbook & iMac
Microsoft Remote Desktop 10 Screenshot
Microsoft Remote Desktop 10 Video
Remember to like our facebook and our twitter @macheatdotcom for more Mac apps and news.
Remote Desktop goes preinstalled with every modern Windows version. All you need to do is to use search in the Start Menu and launch Remote Desktop Connection App. Things are a bit different if you have a Mac or iPad. Obviously, there is no Microsoft Desktop Connection application preinstalled on Mac or iPad, and Apple does not provide built-in remote connection tools. Luckily Microsoft got your back. If you want to use Remote Desktop Connection on Mac or iPad, all you need to do is simply download the Application and set up Remote Desktop Connection. This article is about to show you how to do everything right.
One thing to note: we suppose the Desktop you are trying to connect to is already properly set for a Remote Connection. How to enable remote desktop connections to your Windows PC is a topic of a completely different article. Do note that by default Windows has remote connection disabled and you need to manually enable and configure it.
How to Use Windows Remote Desktop on Mac?
First, you need to download the application form the Mac App Store. Simply open App store and search for “Remote Desktop Connection”. This application is completely free and has no ads. Thanks, Microsoft!
Open Remote Desktop. It will greet you with a big blue button Add Desktop. It will disappear after you add the first desktop. Next time press the button with a plus mark at the bottom of the window. From the drop-down menu select Desktop. A new dialog window will pop on asking you for Desktop details. Now you need to enter Desktop details you want to connect to.
Type Desktop IP address into the PC Name field. If you do not know which IP to use do the following thing: press Win + R on your Windows PC and type cmd. Press Enter and type in ipconfig command. Locate IPv4 Address. This is the IP address you need to type in the PC Name field.
From the User account drop-down menu, you can select Ask me every time or Add a user account. If you leave the first option, then Remote Desktop will ask for credentials every time you try to connect. In the second case, you can save username and password in order not to enter this information every time.
Friendly name field helps you to keep your Remote Desktop connections list tidy. If you leave it blank, then the app will use the IP address as a default name.
Click Add and open the connection you have saved.
Enter Username and Password. An important thing to know: if a Windows user uses a PIN code to log in instead of Microsoft Account password, then you need to enter Microsoft Account password. Authentication using PIN code won’t work. Also, username should be Microsoft Account email address, not something like Johnny McJohnnyface.
You are in.
How to Use Microsoft Remote Desktop on iPad?
The main idea is the same except for the user interface and some options. We will lead you through the process of setting up an iPad Windows Remote Desktop Connection.
Did you know? Windows Remote Desktop app on iPad allows you to transform your iPad into an almost fully-functional Windows 10 tablet with full touch input and native screen resolution support. Just make sure you have a decent Internet connection.
Open App Store on your iPad and search for Microsoft Remote Desktop. Again, this app is completely free.
Open RD Client on your home screen (RD Client stands for Remote Desktop Client).
Press the little plus button at the top-right corner of the screen.
Select Desktop. On the next window tap PC Name and enter the IP Address.
You can leave the User Account option blank. Remote Desktop client will ask you for credentials when you run a connection. If you want to save username and password tap User Account and type in all the necessary information.
Tap Additional Options. This menu allows you to roam device sounds from a Desktop to your iPad, set friendly name, swap mouse buttons or enable admin mode.
Tap the desktop you have set up.
Wait for the connection to initialize and enter your credentials.
Done.
Here are a few things to know about using Remote Desktop Connection on iPad. As we mentioned before this app is a nice way to transform your iPad into a Windows 10 tablet. Remote Desktop app allows you to control remote computer using two methods. Tap the button with three lines at the top of the screen and look to the right of the screen.
By default, the Remote Desktop app uses the Mouse Pointer input method. This method works like a touchpad. Just move your finger on the screen to move a cursor. Tap the screen with one finger to make a left-click and use two fingers to simulate right-click.
If you want to switch to the touch mode, click Mouse Pointer button (it will turn to Touch). Now you have a Windows 10 tablet inside the iPad body.
Microsoft Remote Desktop Download Dmg
Screen resolution is another thing to note. As you probably know, iPad has a nice Retina display with a decent resolution, but by the default Remote Desktop app on iPad scales down screen resolution to pathetic 1024×768. This option is fine if you have a slow Internet connection or weak performance. The downside is obvious—pixelated picture. Luckily you can switch no native iPad resolution.
Microsoft Remote Desktop Mac Dmg
Return to the main menu and press the button with a gear wheel icon at the top-left corner.
Tap Display Resolution.
Select Match This Device or use Custom.
The best option is to use native resolution, but if the PC has problems with performance or can’t provide high-resolution picture—use default or custom option.

1 note
·
View note