#import passwords to chrome android
Explore tagged Tumblr posts
Visit Tumblr Blog
Explore Tumblr blogs with no restrictions, modern design and the best experience.
Last Seen Tumblr Blogs


Fun Fact
Premium Tumblr themes are available from anywhere between $9 to $49.
Text
That was a little more complicated than it should have been.
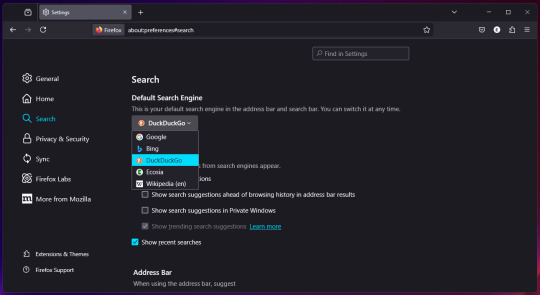
I decided to finally go ahead and move over to a dedicated cross-platform password manager from the one built into Firefox.
Sure, sounds fine. It'll do local encrypted database with optional cloud access, it's available off F-Droid and the AUR among other sources, it'll handle autofill on Android, the interface looks fine, transparency seems good, and the dev is answering questions reasonably over on Reddit.
Only problem is it doesn't seem to support importing from other database formats directly (yet?). But, this person kindly has us covered with a simple enough workaround:
So yeah, if anybody else is looking for a seemingly reliable secure password manager, that's another noncommercial option. Anything that uses the KeePass format and will import .csv files should get you there from either Firefox or Chrome.
5 notes
·
View notes
Text
"I just use xyz browser instead" - Edge, Opera, Brave, Vivaldi, etc, etc are all Chromium-based browsers. Just about every other browser is using Chromium (a Google product) under the hood. Firefox is one of the exceedingly few that does not (uses Gecko). Safari uses Webkit, Apple's proprietary engine.
"I don't want to lose all my bookmarks/passwords" - Virtually every browser will prompt you to import this stuff upon installation, Firefox included.
"It's (visually) clunky" - When is the last time you actually used Firefox? It has effectively the same UI as Chrome. You control whether or not to show the bookmarks bar, which shortcut icons to display in the corner, etc.:

"It can't handle my 239829 tabs" - There countless extensions available for managing large numbers of tabs: Sidebery, Simple Tab Groups, Panorama Tab Groups, and Container Tab Groups, just to name a few. (But also maybe learn how to use bookmarks effectively instead of relying on tabs?? your hardware will thank you)
"I like to have my bookmarks and history synced with my phone/other devices" - Firefox can do that. You just need to create an account with an email and password. That's it. Once you've logged into the browser on a device, it's set-and-forget. You will NOT have to log back in every 30 days or anything like that.
"But the browser search bar does a Google search anyway" - You can configure this. Don't like any of the options? You can add more.
"The performance isn't as good" - By a few metrics, sure. But as someone whose job it is to literally build websites and apps, I can assure you that for the vast majority of people there is no noticeable difference. I use Chrome for one (1) mobile web app where Firefox struggles and that's it.
"YouTube/[insert website here] blocks Firefox" - You can trick any website into thinking you're using another browser with a User Agent Switcher extension.
"But can I do all of this on mobile?" - If you're on iOS, you're shit out of luck. But otherwise, yes. All (or at least most) of these extensions can be added to the Firefox mobile app for android, including our beloved uBlock Origin.
"Firefox sucks" "firefox is clunky" "firefox doesn't work" with all due respect what the fuck are you talking about
33K notes
·
View notes
Text
What is the fastest way to download Damanbet games in 2025?
Do you want to win money while playing entertaining games on your phone? Damanbet is a fun app for this! Many people in India play Damanbet every day. You can play easy games and win cash. But first, you need to download it fast.
We'll explain in this article how to download Damanbet games as quickly as possible in 2025. It’s easy and safe. Let’s start!

What Is Damanbet?
Damanbet is an app with games. Enjoy playing, have a good time, and win real rewards! It has:
Fun games
Fast play
Easy money out (withdraw)
Free rewards
Many people love Damanbet in 2025. You can play it on your phone anytime!
Why Fast Download Is Important
Fast download is good because:
You can play right away
No long wait
No errors or problems
You get the newest version fast
So if you want to play soon, a fast Damanbet game download is best!
How to Download Damanbet Fast (Step by Step)
Here is a simple guide for Android users:
Step 1: Go to our official the Damanbet Website
Open your internet browser. Go to our official Damanbet website.
Step 2: Tap the Download Button
You will see a button that says “Download Now.” Tap it.
Step 3: Allow Unknown Apps
Go to your phone’s settings. Tap “Security.” Turn on “Unknown Sources.” This lets your phone install apps not from the Play Store.
Step 4: Install the App
Tap the downloaded file. Then tap “Install.” Wait a few seconds.
Step 5: Open the App
Open Damanbet. Sign up or log in. Now you can play and win!
Tips for a Faster Download
Want to make the download even quicker? Do this:
Use Wi-Fi or strong internet
Make space on your phone
Close other apps
Don’t use battery saver
Use a new browser (like Chrome)
These tips help your Damanbet games download go fast and smoothly.
Safe Places to Download
Always download from a safe place. Only trust:
our official Damanbet website
A trusted Telegram group
Trusted friends who play the game
⚠️ Don’t download from random websites. These may be fake or unsafe. They can harm your phone.
Fix Download Problems
Is the app not working? Don’t worry. Try these fixes:
Download not starting? Turn internet off and on
Can’t install? Check phone settings
App crashes? Delete and download again
Can’t log in? Reset your password
Most problems are easy to fix. Just follow the steps again.
Is Damanbet Free?
Yes! Damanbet games download is free. You don’t pay to get the app.
You can play some games for free. To win money, you may need to add cash. But don’t worry! New users get bonus money when they join. You can start small and play more later.
Games You Can Play on Damanbet
After you finish your Damanbet games download, you can play:
Color games
Lucky number games
Spin wheel
Card games
Dice games
These games are fun and fast. You can win small amounts quickly!
Final Words
Getting the fastest Damanbet games downloaded in 2025 is very easy. Just follow the steps. Use the real website. Don’t use fake sites.
With Damanbet, you can:
Play simple games
Win real money
Enjoy your free time
Share with friends
Start today and enjoy the fun!
🎯 Want to play now? Go get the Damanbet app today and win real cash!
💬 Need help or download link? Join our Telegram group for tips, safe links, and daily updates: 👉 https://t.me/tchrInAshly
👇 To begin your gaming adventure with Damanbet, tap the link right now!
0 notes
Text
Mastering Bug Reporting in Manual Testing

In software development, even the most brilliantly coded application can falter if bugs are not identified and addressed early. While automated testing has revolutionized how teams validate their code, manual testing continues to play an irreplaceable role — especially when it comes to exploring complex user interfaces, detecting visual inconsistencies, and simulating real-world user behavior. One of the key responsibilities of a manual tester is bug reporting, a process that directly impacts the speed and quality of defect resolution.
This article explores how to master bug reporting in manual testing, why it is critical, and how modern platforms like Genqe enhance the bug reporting process through intelligent test tracking and integration.
What is Bug Reporting?
Bug reporting is the process of documenting software defects found during testing. It involves providing developers with all the necessary information to identify, replicate, and fix an issue. A well-written bug report streamlines communication, reduces turnaround time, and prevents unnecessary back-and-forth between QA and development teams.
Effective bug reporting is not just about flagging a problem — it’s about telling a complete, reproducible story of what went wrong, under what conditions, and why it matters.
Importance of Effective Bug Reporting in Manual Testing
Manual testers act as the first line of defense in detecting usability issues, visual glitches, logical flaws, and unanticipated user flows. Since they experience the product like end-users, they are often the first to uncover issues that automation might miss.
Here’s why effective bug reporting is crucial:
Accelerates Bug Resolution: Clear, reproducible bug reports reduce ambiguity and help developers fix problems faster.
Improves Product Quality: Well-documented issues ensure that nothing slips through the cracks.
Enhances Team Communication: A good bug report acts as a contract between the QA and development team.
Saves Time and Resources: Eliminates unnecessary clarification cycles and rework.
Boosts Credibility of QA Team: Detailed and actionable reports reflect professionalism and expertise.
Using platforms like Genqe, manual testers can streamline bug capture, link bugs directly to test cases, and ensure all relevant details are logged in a central location.
Key Elements of a High-Quality Bug Report
A great bug report is clear, concise, complete, and consistent. Whether you’re using a traditional bug tracker or a modern QA platform like Genqe, make sure your report includes the following elements:
Bug ID or Title A short, descriptive title that summarizes the issue. Example: “Login page crashes when password field is left blank.”
Environment Details Include OS version, browser/device, build number, etc. Example: Android 12, Chrome 118.0.5993, Build 2.3.0-beta.
Severity and Priority Define the impact of the bug and how urgently it needs to be fixed.
Severity: Critical, Major, Minor, Trivial
Priority: High, Medium, Low
Steps to Reproduce A numbered list of exact actions taken to encounter the bug. Example:
Open login page
Leave password field blank
Click “Login”
Observe the crash
Expected Result What should have happened. Example: The system should show a validation error and remain on the login page.
Actual Result What actually happened. Example: App crashes and closes unexpectedly.
Screenshots/Screen Recordings Visual evidence to back the claim. Tools like Genqe allow uploading these directly with the report.
Logs (if applicable) Include console logs, error messages, or backend logs if accessible.
Attachments Supporting files such as test data, config files, or crash reports.
Additional Notes Any other observations, possible related modules, or past occurrences.
Best Practices for Bug Reporting
Be Clear and Precise Avoid vague descriptions like “It doesn’t work.” Be as specific as possible.
Use Simple Language Write in plain English so that developers, managers, and even non-technical stakeholders can understand.
Avoid Duplication Always search existing bugs before logging a new one.
Reproduce Before Reporting Double-check the steps and try to reproduce the bug consistently.
Be Objective, Not Emotional Focus on facts. Avoid blame or emotional language.
Prioritize Strategically Not every bug needs immediate attention. Focus on those that impact functionality or user experience most.
Maintain Traceability Link each bug to its respective test case or requirement. With Genqe, this traceability is maintained automatically.
Tools and Platforms for Bug Reporting
While traditional tools like JIRA, Bugzilla, and Mantis have been widely used, platforms like Genqe provide a more integrated approach:
Genqe’s Smart Bug Logging: Allows testers to generate bug reports directly from failed test cases, pre-filling details like test environment, step history, and even AI-suggested causes.
Visual Logging: Capture screenshots or videos in real time.
Seamless Collaboration: Assign bugs to developers and track status without leaving the test suite.
AI Assistance: Genqe suggests related test cases and predicts severity based on issue patterns.
By incorporating bug tracking into the QA workflow, Genqe reduces the need for juggling multiple tools and streamlines the entire reporting process.
Common Mistakes in Bug Reporting
Even experienced testers can fall into these traps:
Incomplete Steps: Leaving out critical details that prevent replication.
Ambiguous Titles: Making the bug hard to find later.
Mislabeling Severity: Overstating or understating the seriousness.
Ignoring Regression Links: Not checking if the bug is related to a past fix.
No Visual Evidence: Failing to attach proof when the issue is visual.
Avoiding these mistakes improves the credibility and effectiveness of your testing team.
The Role of Genqe in Enhancing Manual Testing and Bug Reporting
Genqe is not just an automation platform — it supports hybrid testing and manual workflows, making it ideal for testers who focus on manual testing and reporting. Here’s how Genqe adds value:
Plain English Test Authoring: Easily create and execute test cases without writing code.
AI-Based Suggestions: Helps identify patterns in reported bugs and automates similar cases in the future.
Integrated Bug Tracker: Eliminates the need for switching between QA and bug tracking tools.
Real-time Collaboration: Developers and testers can interact, comment, and resolve issues inside the platform.
Analytics Dashboard: View defect density, resolution time, severity distribution, and more.
By using Genqe, teams can ensure that their bug reports are not just accurate, but also actionable and traceable across the entire SDLC.
Conclusion
In manual testing, the value of a tester is often judged not just by how many bugs they find, but how well they report them. A good bug report is like a well-documented case file — it must be clear, complete, and conclusive.
Mastering bug reporting involves attention to detail, communication skills, and an understanding of both the product and the people who will resolve the issues. Tools like Genqe significantly improve the efficiency and clarity of bug reporting by automating repetitive logging tasks, providing visual evidence, and integrating directly with testing workflows.
As software products become more complex and user expectations rise, mastering the art and science of bug reporting is not just a nice-to-have — it’s a necessity. Equip your team with the right skills, processes, and tools like Genqe, and you’ll ensure that no bug goes unnoticed or unresolved.
0 notes
Text
What Should You Look for in a Trusted Private Instagram Story Viewer?

In a world where digital privacy is becoming more important than ever, tools like a private Instagram story viewer have gained massive popularity. These tools allow users to view Instagram Stories from private profiles without being detected—offering a level of discretion the official app doesn’t provide.
But with dozens of platforms claiming to offer “anonymous” access, how do you separate the trustworthy ones from risky, scammy services? Whether you're conducting research, keeping an eye on trends, or just protecting your identity, it’s crucial to know what to look for in a trusted private Instagram story viewer.
Let’s explore the must-have features, red flags to avoid, and how to make a smart, safe choice.
Why Use a Private Instagram Story Viewer?
Before diving into the selection process, it helps to understand why people use private Instagram story viewers in the first place.
These tools allow you to:
View stories anonymously without being listed in the viewer list
Access private stories without needing approval from the account holder
Avoid logging in, which helps protect your own profile identity
Monitor competitors, influencers, or trends discreetly
But because these tools deal with private content, trustworthiness and safety become top priorities.
1. No Login Requirement

A trusted private Instagram story viewer will never ask for your Instagram credentials. The moment a tool requests your username and password, consider it a red flag. Providing your login could lead to account hacking, shadowbanning, or unauthorized access.
Look for viewers that let you watch IG Stories completely anonymously and without requiring a login. This helps protect your identity and reduces the risk of violating Instagram’s terms of service.
2. Strong User Reviews and Reputation
One of the easiest ways to gauge the credibility of a tool is by checking real user feedback. Search for reviews on platforms like Reddit, Trustpilot, or tech blogs. A trusted private Instagram story viewer will have a solid track record and a base of satisfied users.
Avoid sites with no reviews or overly polished testimonials that seem fake. Transparency and a good reputation are key indicators of trust.
3. Clear Privacy Policy

Any legitimate service should have a visible, easy-to-read privacy policy that explains:
How they collect and use data
Whether any user information is stored
What steps are taken to protect user anonymity
A missing or vague privacy policy is a huge warning sign. You’re using the tool to stay private—don’t compromise that by handing over your data unknowingly.
4. Web-Based Over App-Based
The safest and most convenient private Instagram story viewers are web-based tools. They require no downloads, installations, or permissions—meaning less risk to your device or personal information.
Many app-based viewers, particularly those not found in official app stores, can contain malware or intrusive tracking—similar to some risky tools used for viewing a YouTube community post. For better security and a smoother experience, it’s safer to use platforms that operate directly through your browser without requiring downloads.
5. Fast and User-Friendly Interface

You shouldn’t have to deal with endless pop-ups, ads, or confusing steps to use a simple tool. A trustworthy viewer will:
Load quickly
Allow direct profile entry
Offer smooth navigation
Deliver results instantly
While extra features like story highlight viewing or anonymous message options are a bonus, the core experience should be hassle-free.
6. Compatibility Across Devices
Whether you're browsing from your phone, tablet, or computer, a good private Instagram story viewer should work seamlessly across all devices. Look for tools that are:
Mobile-responsive
Compatible with both iOS and Android
Easy to access on major browsers like Chrome, Safari, and Firefox
Accessibility is part of what makes these tools useful—don't settle for one that’s limited to desktop or unstable on mobile.
7. No Hidden Costs or Fake "Free" Tools
Many tools advertise as "free" but will quickly hit you with a paywall or force you into endless surveys. A trusted private Instagram story viewer will be upfront about any fees or limitations.
If a tool is truly free, it should deliver basic functionality without tricks. If it's paid, it should offer real value like advanced features or ad-free usage.
You can also watch: How To Auto Unlike Media On Instagram Using Socinator
youtube
Final Thoughts
Using a private Instagram story viewer can be incredibly useful, especially if you want to stay anonymous while browsing stories. But with privacy tools, the stakes are high—you need to choose wisely.
Here’s a quick recap of what to look for:
No login or app required
Positive reviews and online reputation
A clear, trustworthy privacy policy
Easy, secure, web-based interface
Compatibility with all devices
Transparent pricing and no shady practices
When you find a viewer that checks all these boxes, you can browse Instagram Stories from private accounts with peace of mind—anonymously, safely, and effortlessly.
0 notes
Text
Life today massively depends on the online transactions and information sharing. Each of such undertakings of confidential information is protected with separate passwords. We are vulnerable in keeping track of all the passwords and require a sophisticated mechanism to manage our authoritative details safely, securely and sagaciously. One which is user-friendly, accessible from anywhere, provides active sync up, backup/restoration if required. Password managers are common on a desktop, however, the need on mobile has increased exponentially in recent years. Especially when you want to create a very secure password that may also be easy to remember. This need has prompted developers to make some of the most advanced applications. Below listed are a few of the best Android apps on google app store. If you are an iPhone user, we have similar password management apps list here. Keeper Password Manager This application provides private digital vault on Android, iOS, Mac and PC platforms that are encrypted and unbreakable. It uses the highest levels of privacy and security (256 bit AES, PBKDF2). Other features include password generator, power sharing, secure file manager, autofill login and password, vault to vault sharing, two-factor authentication, internal controls, Keeper for groups and enterprise. It comes in free and paid versions. Reneph Password Safe Password Safe encrypts stored data securely using 128 bit AES and gives single access only. It doesn’t have any access to the internet. Key functions include categorization of entries, password generator widgets, backup and restore, customized user interface, auto backup,* .csv import/export. Pro version has entry elements reordering facility, encryption up to 256 bit, import/export to excel, auto lock, backup to encrypted CSV, self-destruction. No sync up feature is available on this. LastPass Password Mgr Premium Mobile version of LastPass password manager securely syncs your passwords across all browsers and devices. Essential functions include auto-fill for Android 4.1+ and Chrome (Android 4.3+), earlier versions have “copy” options; auto fill login and forms, biometric authentication (using Samsung S5’s fingerprint reader), password generator, add, update and delete sites, secure notes and form fill, redesigned UI. It offers 14 days free trial and later $12 for a yearly subscription. MSecure - Password Manager Comes with some of the most advanced features, mSecure’s New 3.5 Version of the password manager includes Tablet support, Auto-Login, Auto-sync and more. It is ultra secure, simple & smart and uses 256bit Blowfish encryption. Key features comprise of an auto lock, password generator, sync cloud data protection architecture, auto back on SD and e-mail, user-friendly customized options, categorization of data; sharing via email, SMS or clipboard, auto capture weblog in, can import data from competitor products. 30 days trial and then for $14.99. Dashlane Password Manager Free password manager & secure digital wallet for Android and other devices. By using 256bit AES encryption, it provides firm security to your data, backup/restoration, strong security vault with security breach alerts, password generator, auto fill on Dashlane browser and auto-login for your apps with Dashlane keyboard. Premium version offers features like sync up of all devices; cloud backup, priority user support. Other features are an auto lock after inactivity. The application works in English, Spanish and French. SecureSafe Password Manager SecureSafe protects your passwords and documents from malicious hackers and unauthorized access, using AES-256 and RSA-2048 encryption. Essential functions are one login for all platforms, data sharing between SecureSafe and you is over HTTPS only, additionally encrypted passwords, 24/7 monitoring, data inheritance function if something happens to you, a single login for all devices, offline access to passwords, comes as iPod/iPad app and web app.
Advanced version with premium features comes in PRO, SILVER and GOLD account types. Android Wallet Password Manager aWallet Password manager has features like build in the editor; backup to the Android USB device, CSV format unencrypted data export and auto lock. Professional version contains password generator and CSV Import functions. Security features include user-friendly categorized encryption using AES and Blowfish algorithms with various key sizes. Triple DES with key sizes of 168 and 112 bits. Combinations of multiple criteria to decrypt the data, “Salt” combination with a master keyword to prevent theft, auto-destruction after failed unlocks. It has no internet access permission, however, the only permission it has is to access to the USB device to backup/restore the data files in case your phone is lost. Reneph Password Safe By using AES 128 bit based encryption, Reneph Password Safe doesn’t require permission to access the internet; widgets lets you copy passwords to your clipboard from your home screen. Categorized entries, single master password access, password generator, backup and restore the encrypted database, customized user interface, automatic clearing of the clipboard, auto back up, CSV- import/export and no unnecessary Android rights are some of its key functions. In professional version, entry elements can be defined and reordered, the definition of encryption key size up to 256bit, import/export from/to excel table, auto-lock, encrypted CSV-files, auto-backup to encrypted CSV and self-destruction. It doesn’t have sync up feature. Fasino Password Keeper This app is free. It allows you to store passwords for your accounts safely and securely on your devices. You can export the data and protect them with passwords import from the simple text files. Er.mo My Passwords A simple to use application with AES data storage, multi-window support, strong password generator, backup, restoration of the encrypted database and an offline operating facility to safely store substantial passwords and numbers encrypted. PasswdSafe - Password Safe PasswdSafe is a port of the Password Safe application to Android. Users can sync up the password files from cloud services too by installing the PasswdSafe Sync app. In case of bugs, it is advised to maintain a known good backup NS Wallet This application uses AES cipher algorithm and offers most reliable, secure, theft free and FREE data vault to the users. Works on “privacy are priority” principle, NS Wallet is a fully offline solution. All you need is a master password to it. With “ NS sync” backups in the cloud can also be created. Premium features include various themes, fonts and search criteria. Rhythm Hexise Password Safe Application ensures data privacy without internet permission, auto lock, SD card backup, customized password records on demand, dynamic support, different formats, creating records from pre-defined and new templates, password record management, 90+ icons to categorize, quick search, import/ export data using *.csv file for data exchange with other apps and multi-language support; Password Safe uses 256 bit AES algorithm for encryption. Safe In Cloud Password Manager Facilitates protection to your delicate data with unique and secure passwords, “SafeInCloud” uses 256 bit AES for complete password management. It comes as Free Desktop Application + Mobile Application for Phones and Tablets. Essential functions include strong encryption, cloud sync, password generator and strength analysis, browser integration, cross platform and automatic data import. DataVault Password Manager Ideal app and with unmatched features like multiple data views, flexible template management, on-device backup, password generator, security time out, maximum login attempts and synchronization with DataVault for Mac and DataVault for Windows (sold separately). The interface is optimized for mobile devices & desktop environments. Also, facilitates customized options, SD backup,
sync-ups, smart access control, password hints, online troubleshoot FAQs and personalized settings Ilium E-wallet- Password Manager eWallet application by Ilium software keeps important/authoritative and sensitive details secured behind the 256-bit military-grade AES encryption. PC version eWallet helps sync between multiple eWallets over Wifi. Customize your eWallets with cards, backgrounds, and categories. It auto locks detecting inactivity
0 notes
Text
Keka Login Portal: Secure Access to Your Payroll and Attendance

In today's fast-paced business environment, managing human resources efficiently is crucial for organizational success. Keka is one of the leading HR and payroll management software solutions designed to streamline employee data, attendance, payroll, and performance management. If you are looking for keka login instructions, tips, or troubleshooting help, this guide will walk you through everything you need to know.
What is Keka?
Keka is an all-in-one cloud-based HR and payroll software that helps companies automate core HR processes, including attendance tracking, leave management, payroll processing, employee onboarding, and performance appraisals. It is widely used by startups, SMEs, and large enterprises due to its user-friendly interface and robust features.
Why Is Keka Login Important?
To use Keka's powerful features, employees and HR administrators must access the platform through a secure login portal. The keka login process allows users to:
Access payslips and tax documents
Apply for leaves and view leave balances
Track attendance and work hours
Update personal information
View company announcements and policies
Without proper access, you won’t be able to leverage these benefits, making the Keka login portal essential for day-to-day HR activities.
How to Perform Keka Login: Step-by-Step Guide
Follow these simple steps to log into your Keka account:
Visit the Official Keka Login Page Open your preferred web browser and navigate to the official Keka login portal at https://login.keka.com.
Enter Your Registered Email or Username Use the credentials provided by your HR department or during your onboarding process.
Input Your Password Enter your password carefully. If this is your first time logging in, use the temporary password sent to your registered email.
Click on the “Login” Button Once your credentials are entered, click “Login” to access your dashboard.
Two-Factor Authentication (If Enabled) For added security, you might be prompted to enter an OTP or authentication code.
Troubleshooting Common Keka Login Issues
Sometimes users face login problems. Here are solutions to common issues:
Forgot Password: Click on the “Forgot Password?” link on the login page to reset your password via email.
Account Locked: Contact your HR administrator if your account is locked due to multiple failed login attempts.
Browser Compatibility: Ensure you are using an updated browser like Chrome, Firefox, or Edge.
Network Issues: A slow or unstable internet connection can prevent successful login.
Keka Mobile App Login
Keka also offers a mobile application for both Android and iOS devices, allowing employees to manage HR tasks on the go.
How to Login on the Keka App:
Download the app from Google Play Store or Apple App Store.
Open the app and enter your registered email and password.
Use the app to check payslips, attendance, leave requests, and more.
Benefits of Using Keka HR Software
Automated Payroll Processing: Accurate salary calculations and tax deductions.
Leave & Attendance Management: Easy tracking and approvals.
Employee Self-Service: Employees can update information without HR intervention.
Performance Management: Streamlines goal setting and reviews.
Compliance Management: Keeps your company aligned with labor laws.
LSI Keywords Used in This Article
Keka HR software login
Keka employee login
Keka payroll login
Keka attendance portal
Keka login password reset
Keka mobile login app
How to access Keka portal
Keka login help
Keka user dashboard
Final Thoughts
The Keka login process is straightforward but crucial for accessing your HR and payroll information quickly and securely. Whether you are an employee checking your payslip or an HR professional managing the workforce, Keka simplifies these tasks through a centralized platform. If you encounter any login issues, follow the troubleshooting steps or reach out to your HR team for assistance.
Stay connected, stay productive with Keka
0 notes
Text
How to Log in to Microsoft Office 365 Using Different Devices?
In today’s fast-paced digital world, the need for seamless access to work tools across multiple devices is more crucial than ever. Microsoft Office 365, now part of Microsoft 365, has revolutionized productivity by enabling users to access Word, Excel, PowerPoint, Outlook, and other tools from anywhere, on any device. Whether you’re on a desktop, laptop, tablet, or smartphone, logging in to Office 365 is simple — once you know how.
In this comprehensive guide, we'll walk you through how to log in to Microsoft Office 365 using different devices, with a particular focus on the microsoft365 portal login process. Whether you're a student, professional, or small business owner, this blog will ensure you're always connected to your digital workspace.
Why Access Office 365 from Multiple Devices?
Before diving into the step-by-step login methods, it’s important to understand why you should access Office 365 across various devices:
Work on the go: Stay productive while traveling or during your commute.
Collaboration: Real-time collaboration from different devices boosts team efficiency.
Continuity: Pick up where you left off, whether switching between your laptop and smartphone.
Remote work: Easily manage your files and communication while working remotely.
The ability to log in to your account from any device gives you flexibility and convenience — key pillars of modern productivity.
What You Need Before Logging In
To log in to Office 365 from any device, ensure you have:
A valid Microsoft 365 account (work, school, or personal).
Your email address and password linked to the account.
Two-factor authentication (2FA) if your organization has it enabled.
Internet connection.
The login process will always begin at the Microsoft365 portal login page:
Visit portal.office.com website
Now, let’s break down the login process by device type.
Logging in from a Desktop or Laptop (Windows/macOS)
Accessing Office 365 from a computer offers the full feature set and best experience, especially when working on documents or managing Outlook.
Step-by-Step Guide:
Open Your Browser: Launch Chrome, Firefox, Edge, or Safari.
Go to the Microsoft365 Portal Login Page: Enter portal.office.com website in the address bar.
Enter Your Email: Use your Microsoft 365 email (e.g., [email protected]) and click "Next."
Enter Your Password: Input the correct password and click "Sign In."
Two-Factor Authentication (If Enabled): Enter the code sent to your device or authenticate via the Microsoft Authenticator app.
Access Your Dashboard: Once logged in, you’ll see the Office 365 apps like Outlook, Word, Excel, Teams, and OneDrive.
🔁 Bonus Tip:
To stay signed in on trusted devices, check “Keep me signed in” during login.
Logging in from a Smartphone (iOS/Android)
Whether you're an Android or iPhone user, Microsoft offers dedicated apps for a better mobile experience. You can access Office 365 apps via browser or by installing the official apps.
Option 1: Using a Mobile Browser
Open Your Browser (Safari or Chrome):
Visit the Microsoft365 Portal Login Page: Navigate to portal office com website.
Login Using Your Credentials: Enter email > password > authenticate (if needed).
Use Mobile-Friendly Dashboard: Access apps like Outlook or OneDrive optimized for mobile.
Option 2: Using Microsoft Office Apps
Download these apps from Google Play Store or Apple App Store:
Microsoft Outlook
Microsoft Teams
Microsoft Word
Microsoft Excel
Microsoft PowerPoint
Microsoft OneDrive
How to Log In via the App:
Install the App (e.g., Word).
Open the App and Select “Sign In.”
Enter Your Microsoft 365 Email and Password.
Complete Authentication (2FA).
Start Using the App.
You’ll only need to sign in once per app — Office remembers your credentials across all integrated Microsoft apps.
Logging in from a Tablet (iPad/Android Tablet)
Tablets offer a hybrid experience: portability of a phone with the utility of a PC. Microsoft’s tablet apps are touch-optimized and allow document editing, email access, and cloud storage.
Steps to Login:
Open a Web Browser or App: Either go to Microsoft Office 365 website or use the dedicated Microsoft apps (same as for smartphones).
Sign In with Microsoft 365 Credentials.
Use Split Screen Mode: Great for multitasking — edit documents and answer emails side-by-side.
🔄 Sync Feature:
Microsoft 365 apps sync automatically, meaning changes you make on your tablet are reflected in real-time on your other devices.
Logging in via Microsoft Office Installed Apps (PC or Mac)
If you’ve installed Microsoft 365 (Word, Excel, PowerPoint) on your computer, logging in activates the premium features.
Steps:
Open an Office App (e.g., Word).
Click “Sign In” at the top right corner.
Enter Your Microsoft365 Portal Login Credentials.
Authenticate and Activate: Your app is now connected to your Microsoft 365 account.
Once signed in, you get:
Access to recent files from any device
Auto-save feature via OneDrive
License validation and full-feature access
Troubleshooting Microsoft365 Portal Login Issues
Sometimes, login issues can arise due to expired credentials, browser cache, or misconfigured settings.
Try These Fixes:
Clear Cache & Cookies: Use incognito mode or clear browser history.
Check Caps Lock: Passwords are case-sensitive.
Reset Password: Use the “Forgot Password?” link on the portal.
Update Browser: Older versions may block portal scripts.
Use Microsoft Authenticator: Helpful for two-factor authentication issues.
Switch Devices: Sometimes switching to a different device resolves browser-based login issues.
If you’re still stuck, contact Microsoft 365 support or your organization’s IT admin.
Securing Your Microsoft Office 365 Account
Security is key when accessing your data from multiple devices. Here’s how to stay protected:
Enable Two-Factor Authentication (2FA)
Sign Out from Shared Devices
Use Strong, Unique Passwords
Monitor Login Activity via Security Settings
Use Microsoft Defender or Antivirus Software
Never share your Microsoft365 portal login credentials and avoid public Wi-Fi without a VPN.
Accessing Files via OneDrive
OneDrive is the built-in cloud storage solution with Office 365. Once logged in, you can:
Access recent files
Share documents securely
Sync files across all devices
Backup your work automatically
You can access OneDrive from:
The portal.office.com dashboard
The OneDrive app (desktop or mobile)
File Explorer on Windows (after sign-in)
Final Thoughts
Logging in to Microsoft Office 365 from different devices is straightforward once you understand the steps. With your microsoft365 portal login credentials, you can unlock a world of productivity from your browser, smartphone, tablet, or desktop app.
Whether you're in the office, at home, or on the move, staying connected to your digital workspace has never been easier. Don’t forget to prioritize security and explore all the tools Microsoft 365 has to offer — from Teams and Outlook to OneDrive and SharePoint.
0 notes
Text
Internet Security for Seniors: Staying Safe Online

The internet offers seniors a wealth of opportunities, from connecting with loved ones to managing finances and learning new skills. However, navigating the digital world also brings risks like scams, malware, and identity theft. For seniors, understanding and practicing internet security is crucial to enjoying a safe online experience.
This guide outlines essential tips and practices to help seniors stay secure and confident while using the internet.
Why Internet Security Is Important for Seniors
1. Protects Personal Information
Prevents unauthorized access to sensitive details like Social Security numbers, banking information, and medical records.
2. Reduces the Risk of Scams
Helps seniors recognize and avoid common online scams, such as phishing and tech support fraud.
3. Prevents Identity Theft
Minimizes exposure to cybercriminals who may misuse personal information for fraudulent purposes.
4. Builds Confidence Online
Empowers seniors to navigate the internet safely and independently.
Common Online Threats Targeting Seniors
1. Phishing Scams
Fraudulent emails or messages trick seniors into revealing personal or financial information.
2. Tech Support Scams
Scammers pose as technical support agents to gain remote access to devices or demand payment for fake services.
3. Malware and Ransomware
Malicious software infects devices, often leading to data loss or ransom demands.
4. Identity Theft
Cybercriminals steal personal information to commit financial fraud or open accounts in the victim's name.
5. Fake Online Stores
Fraudulent websites offer deals that seem too good to be true, taking payments without delivering goods.
Essential Internet Security Tips for Seniors
1. Use Strong and Unique Passwords
Create secure passwords to protect online accounts.
Tips for Strong Passwords:
Use at least 12 characters, including letters, numbers, and symbols.
Avoid using personal details like names or birthdays.
Use a password manager to store and manage passwords securely.
2. Enable Two-Factor Authentication (2FA)
Add an extra layer of security to online accounts.
How 2FA Works:
After entering your password, a secondary code (sent via text or app) is required to access the account.
3. Beware of Suspicious Emails and Messages
Be cautious of unsolicited communications asking for personal or financial information.
How to Spot a Scam Message:
Generic greetings like "Dear User."
Urgent requests to act immediately.
Spelling or grammar errors.
Tip: Never click on unknown links or download unexpected attachments.
4. Install Antivirus Software
Protect your devices from viruses, malware, and other online threats.
Recommended Antivirus Programs:
Norton 360
Malwarebytes
Bitdefender
Tip: Keep antivirus software updated to stay protected against the latest threats.
5. Use Secure Wi-Fi Connections
Avoid using public Wi-Fi for sensitive transactions like online banking.
How to Stay Secure Online:
Use a Virtual Private Network (VPN) to encrypt your connection.
Connect only to password-protected Wi-Fi networks.
6. Shop Safely Online
Ensure online purchases are made securely.
Tips for Safe Shopping:
Look for “https://” and a padlock icon in the website’s URL.
Use credit cards for online transactions instead of debit cards.
Avoid deals that seem too good to be true.
7. Keep Software and Devices Updated
Regular updates patch security vulnerabilities and improve performance.
What to Update:
Operating systems (Windows, macOS, iOS, Android).
Browsers (Chrome, Firefox, Edge).
Apps and antivirus software.
Tip: Enable automatic updates for convenience.
8. Be Cautious on Social Media
Protect your privacy and avoid sharing sensitive information.
Best Practices:
Set profiles to private and limit who can view your posts.
Avoid sharing personal details like your address or phone number.
Be cautious about accepting friend requests from strangers.
9. Back Up Important Data
Regularly back up files, photos, and documents to protect against data loss.
Backup Options:
External hard drives.
Cloud services like Google Drive, OneDrive, or iCloud.
10. Educate Yourself About Internet Safety
Stay informed about the latest online threats and how to avoid them.
How to Learn More:
Attend community workshops or webinars on internet security.
Follow trusted sources like the AARP Fraud Watch Network.
Creating a Safer Online Environment for Seniors
1. Use Simple Security Tools
Make use of tools that are easy to navigate, like:
Password managers.
Browsers with built-in privacy features, like Brave or Firefox.
2. Involve Family Members
Encourage family members to help set up devices and educate seniors about online safety.
3. Set Up Alerts
Enable account notifications to detect unusual activity, such as unrecognized logins or transactions.
4. Limit Access to Unnecessary Apps or Features
Simplify devices by uninstalling unused apps or disabling risky features, like location sharing.
What to Do If You Suspect a Scam
Stop Communication: Discontinue contact with the scammer immediately.
Change Passwords: Secure any affected accounts.
Run a Security Scan: Use antivirus software to check for malware.
Report the Scam: Notify local authorities or organizations like the Federal Trade Commission (FTC) or your bank.
Benefits of Internet Security for Seniors
Peace of Mind: Confidence in navigating the internet safely.
Enhanced Privacy: Protection of personal and financial information.
Empowerment: Independence in using online services for communication, shopping, and learning.
Conclusion
Internet security is crucial for seniors to enjoy the benefits of the online world without falling victim to cyber threats. By practicing good habits, using the right tools, and staying informed, seniors can navigate the digital landscape with confidence and peace of mind.
Start implementing these tips today to create a safer online environment for yourself or the seniors in your life.
FAQs
1. What is the safest browser for seniors? Browsers like Firefox or Brave offer strong privacy features and are easy to use.
2. How can seniors avoid tech support scams? Be cautious of unsolicited calls or pop-ups claiming to fix device issues. Contact trusted professionals for technical support.
3. Are public Wi-Fi networks safe for seniors? Public Wi-Fi should be avoided for sensitive activities unless paired with a VPN.
4. What should seniors do if they receive a suspicious email? Delete the email without clicking on any links or downloading attachments.
5. How can families help seniors with internet security? Assist with setting up devices, explaining online threats, and providing easy-to-use security tools.
0 notes
Text
BT Mail Login: A Complete Guide for Hassle-Free Email Access

In today’s digital world, BT mail login is an essential part of staying connected, whether for personal communication, business interactions, or managing subscriptions. BT mail login is one of the most reliable email services in the UK, known for its robust security features, user-friendly interface, and seamless accessibility across devices. Whether you’re logging in to check emails, send important documents, or organize your inbox, the BT mail login process is straightforward and secure. This guide will walk you through the login process, common issues you might encounter, and tips to enhance your BT Mail experience, ensuring that you stay connected without any interruptions.
How to Access BT Mail Login
Accessing your BT Mail login is straightforward and allows you to stay connected to your email account from any device. Whether you’re using a desktop, mobile app, or email client, here’s a step-by-step guide to help you access BT Mail effortlessly.
Accessing BT Mail on a Web Browser
Follow these steps to log in via a desktop or laptop browser:
Open a Web Browser: Use your preferred browser (Chrome, Firefox, Edge, or Safari).
Visit the BT Mail Login Page: Type mail.bt.com in the browser's address bar and press Enter.
Enter Your BT Email Address and Password: In the login fields, input your BT ID or email address (e.g., [email protected]). Type your password carefully, ensuring it is case-sensitive.
Click on ‘Sign In’: After entering your credentials, click Sign In to access your BT Mail inbox.
Troubleshooting: If you’ve forgotten your password, click ‘Forgotten your login details?’ to reset it. Ensure your internet connection is stable for a smooth login process.
Common Issues with BT Mail Login
BT Mail login is usually smooth, but like any online service, users might occasionally encounter issues. Here are some of the most common problems along with solutions to help you regain access to your account.
Forgotten Password
Problem: You can’t log in because you’ve forgotten your BT Mail password.
Solution:
Visit the BT Mail Login Page.
Click on “Forgotten your login details?”.
Enter your BT email address and follow the prompts to reset your password.
Create a new, strong password and use it to log in.
How to Recover Your BT Mail Account
Losing access to your BT Mail account can be frustrating, but recovering it is straightforward with the right steps. Whether you’ve forgotten your password, lost your login credentials, or suspect your account has been hacked, here’s a comprehensive guide to help you regain access.
Recovering a Forgotten Password
If you’ve forgotten your password, follow these steps:
Visit the BT Mail Login Page: Go to BT mail login.
Click on “Forgotten your login details?” This option is below the login fields.
Enter Your BT Email Address or BT ID: Provide the email address or username associated with your account.
Follow the Verification Process: BT may send a verification code to your registered phone number or backup email.
Reset Your Password: Create a new, strong password. Use a mix of upper and lower-case letters, numbers, and special characters.
Log in with Your New Password: Access your account using your updated credentials.
FAQs
Q1. How Can I Reset My BT Mail Password? Visit the BT Mail login page, click on "Forgotten Password," and follow the instructions to reset your password securely.
Q2. Can I Use BT Mail on My Mobile Device? Yes, BT Mail is accessible on both Android and iOS devices through web browsers or email applications.
Q3. What Should I Do If I Can't Login to BT Mail login? Ensure your internet connection is stable, verify your login credentials, and clear browser cookies. If the issue persists, contact BT Mail support.
Conclusion
BT Mail login makes email management simple and secure. By following the steps and tips shared in this guide, you can ensure a smooth BT Mail login experience every time. Stay connected, organized, and worry-free with BT Mail login as your trusted email service.
0 notes
Text
[ad_1] Enter metamask tumb—an progressive device designed to reinforce your anonymity whereas navigating the blockchain ecosystem. This information will stroll you thru the whole lot it's essential to find out about downloading and utilizing Metamask Tumbs successfully. Whether or not you’re a seasoned crypto fanatic or simply beginning out, sustaining your privateness ought to be excessive in your agenda. With rising considerations about knowledge breaches and surveillance, understanding the right way to shield your self on-line is important. Get able to unlock a brand new stage of safety as we discover the ins and outs of Metamask Tumbs! Benefits of utilizing Metamask Tumb for Privateness Utilizing Metamask Tumb enhances your on-line privateness in vital methods. It permits customers to masks their transaction historical past, making it difficult for prying eyes to hint again actions on the blockchain. One other benefit is its user-friendly interface. Even these new to cryptocurrency can simply navigate and optimize their privateness settings with out feeling overwhelmed. Moreover, using a glass helps forestall undesirable monitoring by mixing your transactions with others. This makes it tougher for anybody to pinpoint which pockets belongs to you. Furthermore, the added layer of anonymity fosters higher confidence when interacting inside decentralized networks. Customers can interact freely with out concern of exposing delicate data or belongings. Metamask Tumbs helps a number of cryptocurrencies, offering flexibility whereas sustaining sturdy privateness options throughout varied digital belongings. Step by Step Information on Methods to Obtain Metamask Tumb Downloading Metamask Tumbs is an easy course of. Begin by visiting the official Metamask web site or your machine’s app retailer. Make sure you’re on the reputable website to keep away from any safety points. As soon as there, find the obtain button particularly to your working system—be it Chrome, Firefox, Android, or iOS. Click on on it and comply with the prompts that seem. For browser extensions, set up will occur routinely after clicking “Add to Browser.” When you’re utilizing a cell machine, faucet set up and grant mandatory permissions when prompted. After downloading finishes, open Metamask Tumbs and create an account in case you don’t have one but. Comply with the setup directions rigorously to safe your pockets with a robust password. Be certain to again up your restoration phrase safely; this step is essential for accessing funds later. As soon as arrange, you’re able to discover enhanced privateness options! Suggestions for Utilizing Metamask Tumb Successfully To maximise your expertise with Metamask Tumb, begin by securing your pockets. Use a robust password and allow two-factor authentication for an added layer of safety. Familiarize your self with its options. Understanding the right way to navigate the person interface could make transactions smoother. Discover all settings to customise privateness choices in line with your wants. Keep knowledgeable about transaction charges. Gasoline costs can fluctuate drastically, so timing your transactions can prevent cash. All the time test present charges earlier than sending any funds. Think about using a number of wallets for various actions. This technique helps in distributing danger and enhances privateness. Regulate updates from Metamask’s official channels. Common updates typically enhance performance and safety measures, guaranteeing a safer expertise when you use the tumbler service successfully. Potential Dangers and Precautions When Utilizing Metamask Tumb Utilizing Metamask Tumb can improve your privateness, however it’s important to concentrate on potential dangers. One vital concern is safety breaches. All the time make sure you’re utilizing the most recent model and hold your machine protected. Phishing assaults are one other menace. Be cautious about clicking hyperlinks or offering data
on unfamiliar websites. Scammers typically mimic reputable platforms to steal credentials. Moreover, whereas tumbler companies enhance anonymity, they don’t assure full security from blockchain evaluation methods. Perceive that some stage of traceability may nonetheless exist. Contemplate your web connection as effectively. Public Wi-Fi networks can expose you to hackers; use a VPN for added safety when accessing delicate transactions. Familiarize your self with native legal guidelines concerning cryptocurrency tumbling companies. Compliance helps keep away from authorized issues down the road and ensures you’re working inside protected boundaries. Conclusion: Unlocking your privateness with Metamask Tumb can change the way you work together on-line. The flexibility to anonymize transactions is invaluable in at the moment’s digital world. Understanding the nuances of this device empowers customers to guard their monetary data successfully. As you navigate by its options, keep in mind that information is your greatest ally. The extra acquainted you change into with its functionalities, the higher geared up you’ll be in sustaining management over your digital footprint. Keep knowledgeable about potential dangers and hold up-to-date with greatest practices for safety. Embrace the journey in direction of enhanced privateness and discover all that Metamask Tumb gives with out hesitation. FAQ’s What's Metamask Tumb? Metamask Tumb is a privacy-focused device designed to reinforce your anonymity whereas utilizing the Metamask pockets. It helps obscure transaction trails, making it troublesome for anybody to trace your crypto actions. Is downloading Metamask Tumb protected? Sure, downloading Metamask Tumb might be protected if you make sure that you’re getting it from trusted sources. All the time test for official hyperlinks and person critiques earlier than continuing with any obtain. Can I exploit Metamask Tumb on cell units? At present, there are variations out there for each desktop and cell platforms. Be certain to comply with the particular tips for every machine kind when downloading. The put up Unlocking Privateness: A Full Information to obtain metamask tumb appeared first on Vamonde. [ad_2] Supply hyperlink
0 notes
Text
Password Manager Google Rises Passkey Support to Desktop
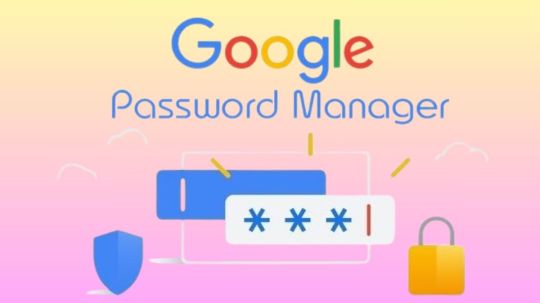
Password Manager Google
Google Password Manager
On any device, logging into your preferred websites and applications ought to be as simple and quick as opening your phone. This is when passkeys are useful. It getting closer to a pass wordless future with these safer and more user-friendly alternatives to passwords. You can securely sign in to apps and websites using your fingerprint, face, or screen lock.
Only passkeys for Password Manager Google on Android could be saved up till now. Though you would have to use your Android handset to scan a QR code in order to use them on other devices.
Organize passkeys in Chrome
With a passkey, you may quickly and safely log in using a fingerprint, facial scan, or screen lock. Without the need for a password app, passkeys are an easy and safe method to access all of the websites and applications you care about in addition to your Google Account. To increase the security of your account, you might be required to generate or use a passkey while logging in to a website.
Recommendation: Since passkeys are based on industry standards, you can utilize them on numerous platforms.
Password manager
Further information on passkeys
Passkeys are cryptographic key pairs; this is how they differ from passwords. A website-specific key pair is used. Half of the information is stored on your device or password manager, while half is shared with the website. Instead of using a password that could be forgotten or stolen, websites and applications authenticate your access with a code that is created securely.
Passkey advantages include:
You won’t need to commit a string of characters, digits, and letters to memory.
Accounts can be accessed via facial or fingerprint recognition technologies.
Passkeys work with both websites and apps, and they are compatible with a variety of browser ecosystems and operating systems.
Passkeys are protected from hacker attempts because they are powerful enough to never be guessed or reused.
Because passkeys are linked to the app or website for which they were intended, you will never be duped into logging into a phony app or website with your passkey.
Password Manager Google passkeys are compatible with all Android applications.
Make use of passkeys
Passkeys are stored on your devices. The procedure varies depending on the operating system and might not be accessible on all of them.
Keep passkeys in Windows storage
Passkeys are available for use if you have Windows 10 or later. You need to configure Windows Hello in order to store passkeys. Passkeys are only saved to your PC because Windows Hello does not presently support synchronization or backup. Passkeys are lost if you lose your computer or reinstall the OS.
You must have Windows 11, version 22H2 or later on your PC in order to use passkey management and passkey auto-fill.
Passkeys can be kept on an Android device
Important: Your device has to be running Android 9.0 or higher and have the screen lock enabled in order to save passkeys.
Passkeys are kept in your Password Manager Google and used on your Android smartphone. Your Android devices securely sync and backup your passkeys.
Keep passkeys on an iPad or iPhone
Passkeys are available in iOS or iPadOS 16+. The iCloud Keychain syncs them with iOS, iPadOS, and macOS devices. Passkey auto-fill is not available in iOS.
Securely keep passkeys on a key
To keep your passkeys safe, you can utilize a security key.
Important: There is no backup for passkeys kept on security keys. You cannot get your passkeys back if you misplace or reset the security key.
It releasing changes today that further simplify the use of passkeys across all of your devices. Passkeys for Password Manager Google can now be saved from Windows, macOS, Linux, and Android; ChromeOS is also available for beta testing. After they are saved, they will sync automatically across all of your devices, so all you have to do to log in is scan your fingerprint.
Google releasing a new Password Manager Google PIN that will allow you to generate passkeys and access saved ones across all of your devices. This PIN provides an extra degree of protection to guarantee that your passkeys are completely encrypted and inaccessible to anybody not even Google.
You will need to know your Android device’s screen lock or your Password Manager Google PIN when you first use passkeys on a new device. You may safely retrieve your previously saved passkeys and sync fresh ones between your Android devices and PCs with these recovery factors.
For well-known websites and applications like Google, Amazon, PayPal, and WhatsApp, passkeys are already available. You may also start using Password Manager Google right now without downloading any additional apps because it is a feature that is incorporated into Chrome and Android devices.
Is Google Password Manager Safe
In general, Password Manager Google is regarded as secure. Google uses robust encryption to safeguard your credentials, and they have a security staff on hand to keep an eye out for any threats. Like any internet service, there are some risks involved.
Here are some important things to think about:
Your Google account and security are linked
Your passwords may be at risk if your Google account is hacked.
Although Google offers local encryption,
It is not activated by default. Local encryption is therefore optional. This implies that in the event of a data breach, your passwords are kept on Google’s servers and may be accessible.
No master password
Google Password Manager does not necessitate a separate master password, in contrast to certain specialized password managers. This implies that your saved passwords are directly accessible to anyone who manages to access your Google account.
To improve your safety
Turn on Google account two-factor authentication (2FA). This adds another level of protection.
Though Google Password Manager is handy, you might find that a specialized password manager is a better option for people who require high levels of security because it frequently provides more sophisticated security features.
Read more on Govindhtech.com
#Google#passwordmanager#googlepasswordmanager#passkeys#news#govindhtech#technologies#technology#technews#technologytrends
0 notes
Text
Koala Wallet Extension
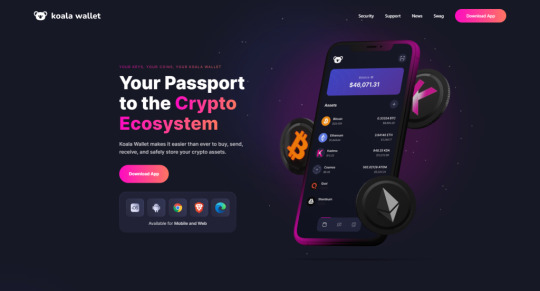
Koala Wallet’s emphasis on user control and security is one of its most notable characteristics. Users maintain ownership over their money and private keys with our non-custodial approach. As a result, users are able to fully own and control their cryptocurrency holdings. Ethereum (ETH), Kadena (KDA), and ERC20 tokens are among the several blockchains that Koala Wallet supports. In terms of managing their cryptocurrency assets, this gives customers a plethora of possibilities.
Download and Install Koala Wallet
To download and install Koala Wallet, you can follow these steps:
Download Koala Wallet For Android Users:
Open Google Play Store: Open the Google Play Store on your device to access the app store.
Search for Koala Wallet: Search for “Koala Wallet” in the search field and hit Enter.
Download the App: Find the correct application in the search results; it’s usually the first one. Click “Install.”
Open the App: After installation, hit the app’s icon to launch it from your home screen or app drawer.
Set Up the Wallet: To set up your Koala Wallet, follow the steps displayed on the screen. Creating a new wallet or importing an old one, choosing a robust password or PIN, and storing your recovery phrase are typically included in this.
Download Koala Wallet For iOS Users:
Open the App Store: Open the App Store on your iPad or iPhone.
Search for Koala Wallet: Launch the search by entering “Koala Wallet” into the search bar.
Download the App: From the search results, choose the app and click “Get” or “Install.”
Open the App: Once the app has been installed, tap its icon to launch it from your home screen.
Set Up the Wallet: Follow the in-app instructions to finish the setup, which include importing or creating a wallet, establishing a PIN, and safely storing up your recovery phrase.
Download Koala Wallet For Browser Extension:
Open Your Web Browser: To install the extension, open the web browser that you want to use. The browsers that Koala Wallet most likely supports are Chrome, Firefox, Brave, or Edge.
Visit the Official Extension Store: For Chrome or Brave, go to the Chrome Web Store.
For Firefox, visit the Firefox Add-ons Store. For Edge, visit the Microsoft Edge Add-ons Store.
Search for Koala Wallet: Go to the extension store and type “Koala Wallet” into the search field.
Download and Install: Look through the search results for the official Koala Wallet extension. Select “Add to Chrome/Firefox/Edge” or click “Install.”
Confirm Installation: To add the extension to your browser and confirm, follow the instructions.
Open the Extension: Once installed, the Koala Wallet extension can be used by clicking on its icon next to your browser’s address bar.
Set Up the Wallet: To import an existing wallet or create a new one, follow the on-screen directions. Create a strong PIN or password, and make a secure backup of your recovery phrase.
Start Using the Wallet: Once configured, your browser extension will allow you to directly manage how much cryptocurrency you have.
How to Send and Receive assets into Your Koala Wallet
Receiving
Each asset you have listed in Koala Wallet has its separate balance and comparable value displayed below your final balance on the main screen. To obtain an asset, first choose the desired asset from the list, then click the “Receive” option.
You will see a QR code representing that asset along with your address right away. Anyone you wish to receive something from can have your address and preferred chain or QR code shared with them. In a few seconds, the transaction will show up in your wallet once the assets have been delivered to your address.
You can choose which chain and how much you wish to receive by going to the Receive area of Kadena Assets. Any changes you make to those settings will update the QR code, causing a wallet to scan it and immediately apply those changes when handing you assets. In the end, it makes no difference whether the chain number is utilized to receive it; this feature is merely for added convenience when dividing your funds between chains.
Sending
Choose the asset you wish to send from the list and click the “Send” button after that.
Put the recipient’s address and chain in the fields at the top of the screen. Click the “Contacts” option and choose the recipient from Koala Wallet’s contacts if you have the recipient saved there. Press the “Scan” button to load the data from the recipient’s QR code, if you know it.
You can paste the receiver’s address in the recipient section if you received it as text. We advise against manually entering the address and instead utilizing the options listed above to prevent errors.
Make sure to choose the chain that the recipient needs to receive when transmitting Kadena assets. In order to prevent them from having trouble identifying the transaction, please get in touch with the beneficiary if they fail to notify you of the chain. When sending on blockchains other than Kade, this option is hidden.
Choose the chain you wish to send from on the bottom side of the screen. Your balance will be visible to you on each. To be able to send, you need to have enough balance on each individual chain. If the source and destination chains differ, Koala Wallet will take care of the appropriate conversions for you; you can learn more about that here. For blockchains other than Kadena, this option is hidden.
Lastly, input the amount you wish the recipient to receive. If Koala Wallet knows the price, it will display the corresponding dollar amount beneath it. In the event that you do not utilize the “Max” button, transaction costs will be deducted from the amount you have left.
When everything is ready, click “Continue” to view a summary of the transaction. Then, click “Confirm” to send the information after verifying with your PIN or biometric.
Conclusion
It’s crucial to have a trustworthy wallet like Koala Wallet as the cryptocurrency industry grows. Strong security features, support for several currencies, and an easy-to-use interface make it a reliable entry point into the fascinating and dynamic world of virtual currencies. Koala wallet is a great option for your digital wallet needs, whether you want to trade cryptocurrencies, keep your assets safely, or just learn more about the world of cryptocurrency.
0 notes
Text
End-to-End Testing: Ensuring Comprehensive Software Quality

In the world of software development, ensuring that an application works as intended from start to finish is crucial. End-to-end (E2E) testing plays a vital role in this process by validating the flow of an application from the user’s perspective. This article explores the concept of end-to-end testing, its significance, methodologies, popular tools, and best practices.
Understanding End-to-End Testing
End-to-end testing involves testing an application’s workflow from beginning to end to ensure that the integrated components work together as expected. It simulates real user scenarios to validate the system as a whole, covering aspects like database interaction, network communication, and external integrations. Unlike unit or integration testing, which focuses on individual components, E2E testing verifies the entire application flow.
The Importance of End-to-End Testing
User Experience Validation: E2E testing validates the application’s behavior from the user’s perspective, ensuring a seamless user experience.
Integration Testing: It verifies that different components of the application, including third-party services, work together correctly.
Regression Testing: E2E tests help catch regressions by validating that new changes do not break existing functionality.
Confidence in Release: Thorough E2E testing provides confidence in the software’s quality, reducing the risk of issues in production.
Methodologies in End-to-End Testing
Black Box Testing: Testers do not need to know the internal workings of the application. They focus on the inputs and expected outputs based on user requirements.
Automated Testing: Automation tools execute E2E tests to simulate user interactions, ensuring consistency and saving time.
Manual Testing: Testers manually perform E2E tests to validate complex user scenarios that might be challenging to automate.
Popular End-to-End Testing Tools
For Web Applications
Selenium:
Description: Selenium is a widely-used open-source tool for automating web browsers.
Features: Supports multiple programming languages (Java, C#, Python), cross-browser testing, and integration with CI/CD pipelines.
Example:
python
Copy code
from selenium import webdriver
from selenium.webdriver.common.by import By
driver = webdriver.Chrome()
driver.get("http://example.com/login")
driver.find_element(By.ID, "username").send_keys("user")
driver.find_element(By.ID, "password").send_keys("pass")
driver.find_element(By.ID, "login").click()
assert "Dashboard" in driver.title
driver.quit()
Cypress:
Description: Cypress is a modern E2E testing framework for web applications.
Features: Fast, reliable, and easy to set up, with real-time reloading and debugging capabilities.
Example:
javascript
Copy code
describe('Login Test', () => {
it('should log in successfully', () => {
cy.visit('http://example.com/login');
cy.get('#username').type('user');
cy.get('#password').type('pass');
cy.get('#login').click();
cy.title().should('include', 'Dashboard');
});
});
Puppeteer:
Description: Puppeteer is a Node.js library for controlling headless Chrome or Chromium browsers.
Features: Provides a high-level API to control browser actions, making it suitable for web scraping and testing.
Example:
javascript
Copy code
const puppeteer = require('puppeteer');
(async () => {
const browser = await puppeteer.launch();
const page = await browser.newPage();
await page.goto('http://example.com/login');
await page.type('#username', 'user');
await page.type('#password', 'pass');
await page.click('#login');
await page.waitForSelector('#dashboard');
const title = await page.title();
console.log(title);
await browser.close();
})();
For Mobile Applications
Appium:
Description: Appium is an open-source tool for automating mobile applications on iOS and Android platforms.
Features: Supports multiple programming languages and allows for cross-platform testing.
Example:
javascript
Copy code
const wdio = require("webdriverio");
const opts = {
path: '/wd/hub',
port: 4723,
capabilities: {
platformName: "Android",
platformVersion: "10",
deviceName: "Android Emulator",
app: "/path/to/app.apk",
automationName: "UiAutomator2"
}
};
async function main() {
const client = await wdio.remote(opts);
const field = await client.$("~username");
await field.setValue("user");
const field2 = await client.$("~password");
await field2.setValue("pass");
const button = await client.$("~login");
await button.click();
await client.deleteSession();
}
main();
Espresso:
Description: Espresso is a native testing framework for Android applications.
Features: Provides fast and reliable testing with simple APIs.
Example:
java
Copy code
@RunWith(AndroidJUnit4.class)
public class LoginTest {
@Rule
public ActivityScenarioRule<MainActivity> activityRule =
new ActivityScenarioRule<>(MainActivity.class);
@Test
public void testLogin() {
onView(withId(R.id.username)).perform(typeText("user"));
onView(withId(R.id.password)).perform(typeText("pass"));
onView(withId(R.id.login)).perform(click());
onView(withId(R.id.dashboard)).check(matches(isDisplayed()));
}
}
XCUITest:
Description: XCUITest is a testing framework for iOS applications.
Features: Integrates with Xcode and supports writing tests in Swift or Objective-C.
Example:
swift
Copy code
import XCTest
class LoginTest: XCTestCase {
let app = XCUIApplication()
override func setUp() {
continueAfterFailure = false
app.launch()
}
func testLogin() {
let usernameField = app.textFields["username"]
usernameField.tap()
usernameField.typeText("user")
let passwordField = app.secureTextFields["password"]
passwordField.tap()
passwordField.typeText("pass")
app.buttons["login"].tap()
XCTAssert(app.staticTexts["Dashboard"].exists)
}
}
Benefits of End-to-End Testing
Comprehensive Coverage: E2E testing covers the entire application flow, ensuring that all components work together seamlessly.
Improved User Experience: By simulating real user interactions, E2E tests validate the user experience and help identify potential usability issues.
Increased Confidence: Thorough E2E testing provides confidence that the application will function correctly in production.
Detection of Integration Issues: E2E tests can identify issues that arise from the interaction between different components and services.
Reduced Risk: By catching issues before they reach production, E2E testing reduces the risk of costly defects and downtime.
Best Practices for End-to-End Testing
Prioritize Critical Paths: Focus on testing critical user journeys and high-risk areas of the application.
Automate Repetitive Tests: Automate tests that are run frequently to save time and ensure consistency.
Maintain Test Environments: Use stable and consistent test environments to avoid false positives and negatives.
Mock External Services: Use mocking or stubbing to simulate external dependencies, ensuring tests are isolated and reliable.
Run Tests Regularly: Integrate E2E tests into the CI/CD pipeline to ensure they run frequently and provide continuous feedback.
Keep Tests Maintainable: Write clean and maintainable test code to make it easier to update and manage tests as the application evolves.
Balance Between Different Types of Tests: Combine E2E tests with unit and integration tests to achieve comprehensive test coverage without compromising test execution time.
Conclusion
End-to-end testing is a critical component of a comprehensive testing strategy, ensuring that an application works as intended from the user's perspective. By validating the entire application flow, E2E tests help ensure a seamless user experience, detect integration issues, and provide confidence in the software's quality. Leveraging tools like Selenium, Cypress, Puppeteer, Appium, Espresso, and XCUITest, along with adhering to best practices, developers can effectively implement E2E testing and deliver high-quality software products.
0 notes
Text
How to Download Cricut: Installation Guide for Computer/Phone
Are you looking to learn how to download Cricut? Look no further than this guide. Cricut Design Space is an important software if you want to use your Cricut machine. When I first purchased my Cricut, I had a lot of tasks to do, such as downloading the Cricut app, setting up my machine, and connecting it to my desktop or smartphone.
After years of use, I also started assisting many novice crafters using my online platform, which I used to guide them regarding Cricut. I provided details for the Cricut setup and troubleshooting issues. Hence, I am doing the same thing here with this write-up. Let’s get into it and learn how to download the Cricut software on your operating system.
How to Download Cricut on a Computer?
You can easily download the Cricut software on the computer, whether you have to download it on Windows or Mac. So, if you want to download the Cricut Design Space for Windows and Mac, you have to follow the steps below:
For Windows
In the beginning, power on your Windows PC.
You have to click on the Start menu from the taskbar on your taskbar.
Then, you will have to type Chrome or another internet browser name. I use Google Chrome, but you can choose any browser you want.
Also, navigate to the browser search bar and type the URL design.cricut.com.
After that, you need to hit the Enter key on your keyboard.
Next, you will go to a page where you should navigate to a checkbox and click on it.
Now, you must click on the Download tab and begin downloading the software right away.
Once you have downloaded the app, you need to navigate to the Downloads folder.
There, find the downloaded file and double-click on it to install it.
Afterward, you will be asked whether you trust the application. Select Yes to accept.
Wait for the installation and sign in with your Cricut ID and password.
For Mac
To start, you have to open the Chrome browser on your Mac computer.
Then, you will be required to enter the link design.cricut.com on the browser’s search bar.
Once you reach Cricut’s page, you will need to click the checkbox.
Hit the checkbox, and it will enable the Download tab.
Further, you click on the Download tab and start downloading the Cricut app on your Mac.
Once it is downloaded, go to your Downloads folder and find the .dmg file.
Then, double-click on the .dmg file and begin to install the software.
To start the installation process, you will need to drag the Cricut icon to the Applications folder.
How to Download Cricut on a Mobile Device?
Cricut Design Space is easy to download on mobile phones as well. This easy-to-download software is used to operate the Cricut Design app and can help you setup your Cricut machine. To download and install the app on iOS and Android devices, follow the steps given below:
For Android
First, switch on your Android smartphone.
After that, you will need to find the Google Play Store icon on your device.
In the search bar, you will need to type Cricut Design Space software.
Now, you will need to look for the apps offered in the given result below.
Once you find them, you need to click on them.
And then you will need to press the Install button and begin installing the software.
Once your Cricut app has been installed, you will notice your software is available on your home screen.
For iOS
First, navigate to the App Store on your iPhone/iPad device.
Next, you should type Cricut Design Space in the search bar.
Now, look for the app and select the Cricut app from the visible results.
Here, you need to hit the Get tab to install the app on your iPhone or iPad.
If asked, you will need to verify the download using an iTunes password.
Once you start your Cricut machine, you will need to set it up in no time.
You might have understood how to download Cricut on various platforms, like Mac, Windows, Android, and iOS. Download the software and create wonderful, intricate designs that capture everyone’s attention.
FAQs
Question 1: Why is my Cricut Design Space not working?
Answer: There are various reasons that can hinder your Cricut software from working. The reasons are:
Unmet minimum system requirements.
Unstable internet connection.
Damaged or corrupted cache files.
Outdated versions.
However, you can easily fix them by cleaning the app cache, installing the application that is compatible with your OS, resetting the Cricut account password, and forcing the application to be reloaded.
Question 2: Why do I need Cricut Design Space?
Answer: Cricut Design Space is used to setup a Cricut machine. Therefore, users need to install it on their systems or devices. Besides, the software is mainly used to create, edit, and modify the design you want to cut on the machine. Therefore, you will need a Cricut software.
Question 3: How to download Cricut Design Space on an ASUS laptop?
Answer: Go through the steps below to download the Cricut app on an ASUS laptop:
First, you will need to launch an internet browser.
After that, visit design.cricut.com.
Now, you should agree to the Terms of Use and Privacy Policy.
Then, you have to click on Download.
Here, double-click the downloaded file downloaded into your Downloads folder
Lastly, you have to follow the on-display steps to install the Cricut Design app.
Source: how to download Cricut
Visit here For More Information: Cricut.com/setup
Pinterest
0 notes
Text
How to Download Cricut Design Space on HP Laptop: Full Guide
Gratitude to all my beloved readers! I know you have missed me a lot since I haven’t been able to post a blog for the past few weeks. These days, most of my readers ask how to download Cricut Design Space on HP laptop. If you have any creative ideas and are willing to give them a proper shape, then you needa Cricut machine and its designing software. Also, the app runs smoothly with all Cricut models and supports PCs and smartphones.
Design Space is Cricut-registered software that operates with the Cricut machine. This easy-to-use app unlocks doors to new opportunities, encouraging you to step out of your cocoon and show the world what you’re capable of. Besides, Design Space comes with a library containing a different set of images, fonts, and customized projects.
Follow this blog post, as it will guide you through the system requirements, getting the app, and creating the Cricut account.
What Are Cricut App System Requirements for Laptops?
Cricut Design Space is free software that works with the Cricut machine. This design software runs smoothly with Windows, Mac, iOS, and Android devices. Before beginning with how to download Cricut Design Space on HP laptop, you need to ensure that your devices are fulfilling the basic system requirements. Below are the system requirements that your HP laptop must have to make the app run on the system:
Your device must come with Windows 10 or an upgraded version with Intel Dual-Core or a similar processor. Apart from that, it must have 4GB RAM with 2GB free disk space with the availability of a USB port and built-in Bluetooth. Furthermore, your screen resolution should be a minimum of 1024px x 768px. In addition, the device must have 2-3Mbps speed while downloading and 1-2 Mbps for uploading the file on the app. Also, the Cricut Design app runs smoothly without an internet connection.
After encountering the basic requirements, it’s time to make progress and take the app download process on board.
How to Download Cricut Design Space on HP Laptop?
HP laptop supports the Windows operating system, meaning you must follow the steps below to get this Cricut app. By referring to these pointers, you will find starting and finishing the download process a lot easier. Pay special towards the details given below:
First, turn on your HP laptop and open the search engine (Chrome, Firefox, or other).
After finalizing the search engine, move to the Cricut Design Space setup page (design.cricut.com).
Next, agree to the Cricut Terms of Use and Privacy Policy by ticking the box.
Following this, click the Download button and wait until the download process progresses.
After downloading, open the browser or go to your device’s Downloads folder.
Now, double-click the downloaded, and a small pop-up window will suddenly appear on your screen.
At this point, choose I trust the application option, and a window will display the installation status.
Equally important, open the installed app, and the Cricut sign-in official page will open.
If you are a new Cricut user, you must create an account using your login details.
Now, right-click the icon > select Pin to Taskbar, and the shortcut will be within easy reach.
Finally, you can enjoy using the Cricut Design app and make uncountable designs.
By referring to the above-said steps, you can quickly finish how to download Cricut Design Space on HP laptop without having any serious errors.
How to Create a Cricut Account on a Laptop?
After getting this Cricut software on your respective system, you need to create a separate account. With the account, you will be able to give physical form to your ideas as you choose. Have a look at the total number of steps you need to take while creating an account:
Start the process by opening the Cricut Design app and then click the Create a Cricut ID option.
After that, you will get connected to the new web page.
Now, enter your email address, password, first name, last name, and country.
Next, cross-check the details and hit the box on the left side of the Terms & Conditions.
At this point, your Cricut account will be created by clicking the Create Cricut ID.
Conclude the process by opening the Cricut app and creating new canvas projects.
This tutorial has made it clear that Cricut software plays a crucial role for all DIYers. A user with incomplete information about how to download Cricut Design Space on HP laptop might need help to create their favorite designs. Also, they will need more time to connect their cutting machine model with the app before the cutting process.
Frequently Asked Questions
Question: How Can I Install Cricut Design Space on My Mac?
Answer: Get to know about the steps that need to be taken while getting the app on a Mac system are:
First, open the Safari search engine and visit the Cricut app’s official portal.
Next, press the Download option and choose the folder where you want to get the app.
At this point, when the download is complete, double-click the downloaded file.
Afterward, move the Cricut software to the Applications folder and launch it.
Finish the process by installing the app, creating your account, or signing in.
Question: How Do I Purchase Items From Cricut Design Space?
Answer: The Cricut Design Space app permits the DIYer to buy images, fonts, and pre-customized projects from the library. The user can get these items by subscribing to Cricut Access and choosing the monthly or yearly plan. Moreover, they will also enjoy a 30-day free trial and learn about the benefits of this subscription.
Question: How to Download Cricut Design Space on Android?
Answer: With the help of the below steps, you can easily install the Cricut Design app on Android devices:
First, open the Google Play Store and start looking for the Design Space app.
Next, press the Install button inside the green box on the right-hand side of the page.
With the installation of the app, sign in or create your Cricut ID with the login details.
Source :- https://designaccessoriesmart.wordpress.com/2024/04/24/how-to-download-cricut-design-space-on-hp-laptop-full-guide/
design.cricut.com/setup
cricut maker 3 accessories
cricut explore air 2 accessories
cricut new machine setup
0 notes