#im open for advice as well if yall have any more tips and tricks pls share <3< /div>
Explore tagged Tumblr posts
Photo

hi its me so this is a shoutout to @abysims cause if it wasn’t for them i wouldn’t be making a tutorial
FIRST of all I have adobe photoshop 2020 and use the NVIDIA GeForce Experience to record but tbh ANY recording software will do the job.
I also use reshade in game, heres another shoutout to @simgguk and her amazing preset.
~~~~~~~~~~~~~~~~~~~~~~~~~~~~~~~~~~~~~~~~~~~~~~~~~~~~~~~~~~~~~
before we start just know that ALL of my graphics settings are set on the highest options
--->>> pls go here and download avidemux which we will be using to trim the video
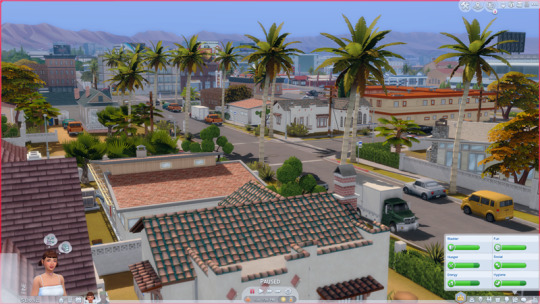
1. Go in game and find SOMETHING you want to record tbh anything! **make sure you are in tab mode so it looks nicer**

2. Once you have recorded what you want to turn into a GIF, open up Avidemux and drag your video file into Avidemux (it should look like this)

3. Now that your video is ready to be trimmed, we are going to be using the start marker and the end marker. THESE ARE AMAZING because you just click the A wherever you want your video to start and the B for wherever it ends. I recommend to set the A-B to be a duration of about 5 seconds or less.


4. SO now that we have our video trimmed and ready for photoshop we have to save it, before saving pls make sure the output format is set to MP4 MUXER. Save it somewhere you won’t forget! and name it something you dont forget.

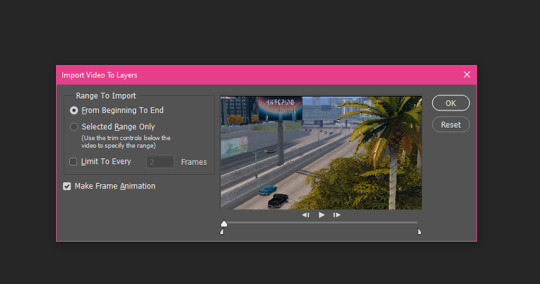
5. Open up photoshop and go to File -> Import -> Video Frames to Layers...

6. Select your TRIMMED video file and a pop up like this should show up. The settings should automatically show up like these but just double check it looks the same.

Once it loads it should look like this! (DON’T BE AFRAID OF ALL OF THESE LAYERS, IT SHOULD LOOK LIKE THAT)

7. As you can see the image isn't as bright as I would like it to be (depends on what preset you use) so I make a new group by clicking the folder button and under that folder you CAN DO ANY ADJUSTMENT you want to achieve the aesthetic you want! Make sure you select the top layer before clicking the make new folder cause if not this will become a mess! 🙃 So the enhancements folder needs to be at the TOP

8. When you have your gif looking just how you want it to look then its time to resize it, I resize it so that the width is at 1080 pixels, the height i just let it do its own thing **the limit for gifs on tumblr is 10mb and sometimes a lil more if you’re lucky so if 1080 is too big of a file you can always resize it to a smaller width size**

to resize go to image --> image size...
After that you are TECHNICALLY done and you can crop it however you’d like and if thats the case JUMP to STEP 13 if not please continue to the next step
9. I have recently started to use @aliennooboo‘s amazing post templates! So I use the 1080px width ones as my gif templates as well. Open up the PSD of your desired size and then DUPLICATE the layer of the template to your gif psd. Just right click the template layer and click duplicate layer...

(I do this because i usually would drag the template layer and plop it on top of my gif psd but when i would playback the gif, i noticed that the layers would move because of me putting the template on the EXACT spot where I wanted it to be, but then i realized if i just duplicate and afterwards SELECT ALL THE LAYERS and move it how i wanted it then i didnt see that issue)

it should look like this! as you can see the template layer is above all the layers and what we want is to be UNDER all the layers so drag it in layers tab until its under LAYER 1. **don’t worry about the positioning yet**
10. After you have the template layer under layer 1, go ahead and shift select layer 1 up to the last layer of the gif (DO NOT SELECT THE ENHANCEMENT GROUP OR THE TEMPLATE LAYER)

then go ahead and right click while having all the GIF layers selected and click create clipping mask

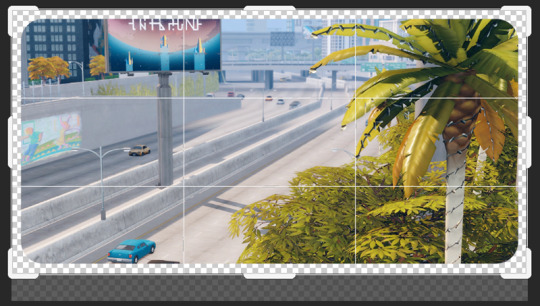
your pic should look like this!

11. WE ARE SO CLOSE TO FINISHING! So with the GIF LAYERS selected you can move the gif around to fit the template just how you would like it! I didn’t move it because I liked how it looked so I just went ahead and cropped the excess blank space to make it look like this.

IMPORTANT**** after you crop it we need to play it back ONE TIME just to make sure everything is looking correct plus so all the layers render (or something like that i just know you gotta play it once) so click the play button at the bottom of the timeline and let it reach the last layer and you should be good to go

BONUS STEP BEFORE SAVING (which i just learned how to do; i’m telling you this is a forever learning process)
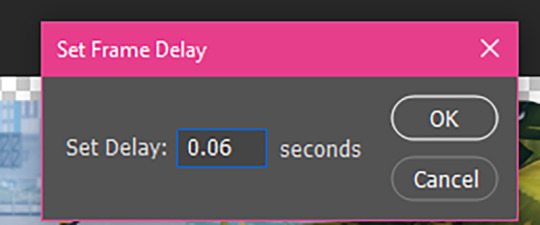
as you can see from my previous gifs they go super fast? but i learned that you can create a delay so that they go at a more slower but not so slow pace just select all the layers in the TIMELINE so shift click 1 to the last number. Then right click on the timeline where the 0.02 is at and a pop up like this should show up! All you have to do it click other... and set the frame delay to 0.06 (i recommend this for like scenery type gifs, but you can play around with this) and press OK.


12. YOU MADE IT TO THE FINAL STEP! SAVING YOUR BEAUTIFUL GIF!
save your gif under save for web or ctrl+shift+alt+s
make sure where the arrows are pointing that it says pattern or noise (whichever you prefer for your gif) for my first couple of gifs i used diffusion but sometimes it can make the file super BIG and we are trying to at least stay under 10mb, as you can see mine is 8mb.

CLICK SAVE AND NAME IT WHATEVER YOU WANT! now give yourself a pat in the back and look at your amazing gif!

hope this has helped and if you have any questions my inbox is ALWAYS open~💗
#sims 4 tutorial#gif tutorial#IM STILL LEARNING BUT just wanted to share what i have learned so far#forever a learning process#okay bye love u#conchita tutorials#im open for advice as well if yall have any more tips and tricks pls share <3#tutorials
104 notes
·
View notes