#i. may or may not have accidentally deleted my user folder from my computer like a goddamn idiot
Explore tagged Tumblr posts
Text
Download these brushes & color sets here
This is a folder of stuff I have on my computer MADE BY OTHER PEOPLE that was deleted from Clip Studio Paint for whatever reason, usually because the brush was deleted for violating the CSP guidelines.
If you see your brush here and you ACTUALLY want it deleted, message me & let me know. Sadly, I don't have a record of who made what, I just have the brush itself. Message me if you already reposted it & I'll link that instead.
If you're wondering how to keep your material from being deleted from CSP, here's a guide:
WHY WAS MY MATERIAL DELETED FROM CSP ASSETS?
You CANNOT Use any default material aside from the round pen, and you CANNOT use any material belonging to someone else, even if it's public domain.
No kidding:
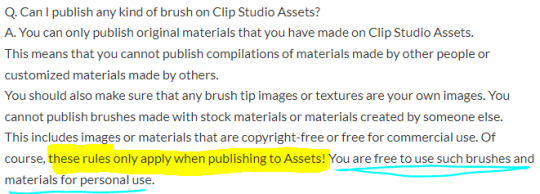
If I were to guess, it is because CSP doesn't want the same 5 material flooding into the CSP asset store and doesn't want to deal with copyright claims. Something may be public domain in one country, but not in another. It's a headache all around.
As CSP said, this only applies to their asset store. If you're deleted but still want to share, feel free to just repost on gumroad, deviantart, etc. for free. Here's one I love:

You can also post material using the basic material CSP comes with & sell it elsewhere. You can make some great brushes, but you have to distribute or sell them off the CSAssets store.
You cannot use real people as your brushes.
Even if you or your friend says "Yes, you can use me as a brush!", Clip Studio Paint doesn't have a system in place that verifies that you are you. Someone could upload a photo of their ex, claim that the photo is them, and then the ex wouldn't realize it until they saw their face randomly somewhere and that'd just give everyone a headache.
I know you can post parts like eyes, just don't do photographs of whole faces.
You cannot use fanart in your preview images
The only way to get away with this is to pick something super obscure to the moderators & other users. It can be whatever you want as a preview, from a dog to your OC to a flower to a doodle/painting of someone you know, just nothing that is owned by others.
Thanks, have a good day, enjoy brushes & sharing material. Let me know if I accidentally uploaded something you want off.
#clip studio paint#clip studio#clip studio paint brush#clip studio paint brushes#clip studio brush#brushes#NOT MINE
60 notes
·
View notes
Text
PSA for Mac Users! If you accidentally do this your content will be gone forever!
Hey everyone, so I just had the absolute worst thing happen to me as a writer, and I’m not sure how many people this will reach or will apply to, but I’m going to put it out there, because if it helps one person that will be enough.
So, to explain. I have two mac computers I use, one a desktop that I rarely use, it’s ancient and I inherited it from my grandparents, and one my personal computer. However the biggest thing I use the desktop computer for is to back up my work, because it has much more hard drive space than the laptop.
So yesterday I needed to make room on my laptop and since I knew I wasn’t going to be writing much for a while because I just picked up a second job I decided to go ahead and delete my stories folder, since it was backed up on the other computer, and of course to clear space you also have to empty the trash and erase it forever from that computer, which I did.
However when I logged on to the desktop computer later in the day my stories folder was no where to be seen. Needless to say I panicked and searched for it frantically, but nothing came up no matter what I tried. I then got in touch with Apple Support.
It turns out if you save anything on your desktop and are logged in with your apple ID it saves it to iCloud. If you then delete something, guess what? It deletes it everywhere you’re logged in with your apple ID. What that meant for me was, when I stupidly deleted my stories folder it deleted from my laptop and the desktop backup computer, and the iCloud SIMULTANEOUSLY and there is no way to stop that besides logging out of your apple ID on one of the computers. There is also no way to get it back without buying expensive recovery software that may or may not actually work, which I confirmed with apple support. I was told this applies to anything stored in iCloud, so it could technically apply to things like phones as well if you have an iPhone and Mac laptop.
Luckily I do have some pieces of it backed up in places untouchable by iCloud, like Google Drive, but I’ve lost a good chunk of things I’m not going to get back and it seriously sucks. Basically I guess the message is back up your work somewhere iCloud can’t touch otherwise you might accidentally lose it.
#public service announcement#psa#warning#mac#laptop#icloud#this sucks#don't do this#my luck is terrible
6 notes
·
View notes
Text
Hunkering down but making plans.
(Tumblr has decided to bury the newest posts on some users blog unless you have them on your dashboard, so I am going to pin a link to this to the top of my blogs so it is easy to find)
People are asking me what I doing in preparation for the 17th of December.
My answer?
Working.
I am kind of used to losing my art and gallery to forces beyond my control (being kicked from DA, accidentally deleted folders, and two crashed computers) but it is quite stressful nonetheless.
I am glad though I have a week to make preparations, but I hate the fact this is happening around my birthday and the holidays.
I can rebel and voice my opinions here, but I am backing everything up and looking for a new site to settle down in.
Part of the reason I liked being here (been here since July 2011) was that not only you were part of a group of like-minded people, but you also had a chance to explore the other things they liked and check out other communities and fandoms.
This is what I will miss the most.
I have met, chatted with, and made friends with many people I normally would not have ever met.
I have seen art from all over the world and met artists who have inspired and showed me how to be a better artist.
And lets not forget the creative fans who are always entertaining and enthusiastic. Even infectious.
I am an old soul who really doesn’t like change and if possible I may keep a couple of my blogs here going (if they let me) as a kind of milestone of a another place I have lived and maybe tell stories of Tumblr past.
Now for the stuff people have been asking about.
Blogs I am hoping to still have after the 17th.
CallMePo (totally SFW and within the new guidelines)
FerdIsANerd (my nerdy stuff goes here)
PinupSushiDeux (the sequel!) *NEW*
Blogs which do have NSFW stuff (better see it before they go people)
PinupSushi (pinups and such)
Creemfild (does your mother know you look at this stuff?)
Twitters
callmepoart (paired with the CallMePo blog and totally SFW)
secretbookofcmp (brand spanking new for the more NSFW stuff)
Furaffinity
Ferdkat (rarely used but they allow adult art and is not strictly furry stuff)
If I create any more sites I will keep you up to date.
322 notes
·
View notes
Text
New Display Tablet Time (Huion Kamvas Pro 16 Review + Manga Studio 5/Clip Studio Paint Troubleshooting)
Hi there! I was asked to make a review for my friend so here it is. I might make a video in the future containing this information, but otherwise take it as you will!
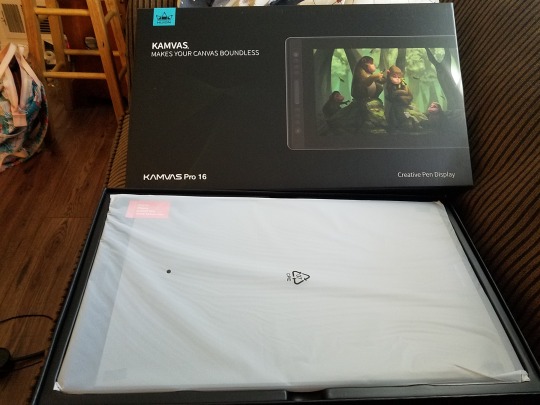
Few days ago, I bought the Huion Kamvas Pro 16 to replace my Intuos pro tablet (2013, old model), and I want to impart some insight if you ever happen to get it. If you have windows 10 and/or currently using Manga Studio 5 and you want to upgrade to the most recent display tablets, this review might be more relevant to you. I’ll be focusing more about the drivers and program troubleshooting than on other specs. Though if you want to hear a more general oversight about this tablet, check out Brad Colbrow’s and Teoh Yi Chie’s review videos since they covered a lot of ground work on its functionality and performance.
Installation
Out of the box, the kamvas pro 16 comes with the tablet monitor, a small box containing information about driver downloads and start-up guide, a glove, a cleaning cloth, the pen itself, and a donut holder that contains extra pen nibs with a handy nib remover. There’s also a USB-C cord that connects to the tablet to your computer or laptop. The cord splits into 3 different ports: hdmi port, usb port, and a port that connects to the power cord. The stand was not included with my kamvas, but you can get both as a set on the huion site or amazon. Otherwise you have to buy it separately.
Before using your tablet, make sure you uninstall any tablet drivers then install the drivers from the Huion site. Follow the prompt, and you’re ready to plug it in.
But which drivers? hmm….
Huion Drivers

For both Windows and MacOS, there's two drivers listed under the Kamvas Pro 16. For convenience, I called the may 24th driver as the stable version, and the July 10th one as the beta or recent driver. There’s some differences with these two versions, and depending on what you choose may or may not affect your drawing habits or performance.
From opening the driver menu, there’s four options:
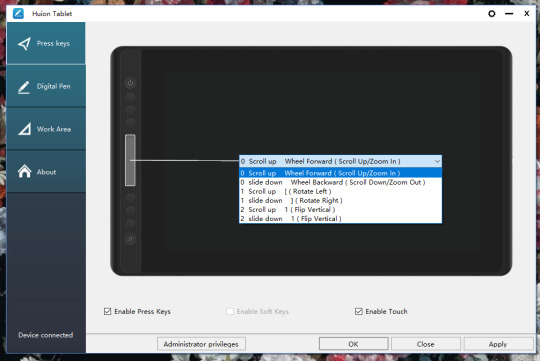

Press keys! You can customize up to 6 buttons. The stable version doesn’t allow you to customize your touch bar/function button. Thankfully, the most recent beta download allows the option to do so (demonstrated above).

Pen buttons are also customizable. Though you can’t edit the pressure curve like wacom tablet options, I find it’s pretty good. Make sure you deselect windows ink if you don’t want it to interfere with your daily tasks. I had to do it when using my intuos and I assume the same for huion as well. I heard it’s optional from some folks and they had no issue with it. I still recommend turning it off.
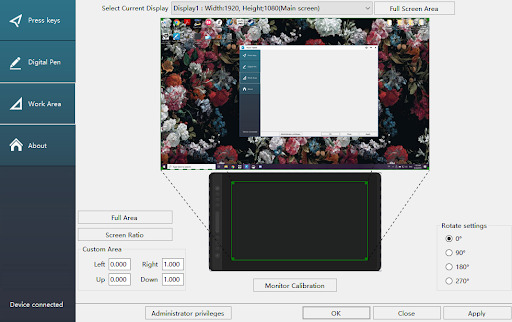
Work area is where you can set up your kamvas pro into a mirrored monitor if you like. Out of the box, the monitor is initially set as a second display. For me, the resolution was off so I have to change it in my display settings. Also it’s nice that the monitor is already calibrated so no need to fiddle with it.
Lastly, the about page, where you automatically land on when opening the driver options. I recommend saving once in a while.. You’ll be able to pull it up in sequential updates via import. And it saves you time and frustration if you accidentally delete the driver off your computer.
Oh, forgot to mention! There’s a little gear on top to open up another menu.
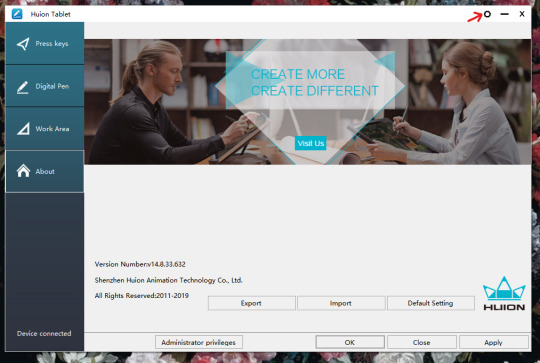

The most recent driver includes the “add app” option and you can customize your buttons depending on the program you use. OSD settings is the same thing when you press the function button for 3 seconds, but pops up as window box with common options for most users (such as screen brightness, contrast, and adjusting RGB levels). Hotkey option is just opening the driver menu using a keystroke, and updates are as expected.
You could also make changes with the administrator settings, but so far I don’t see much of a difference from non-administrator setup.
If you want to customize your touch bar and button layout for different programs, download the beta driver for this feature. It’s a similar experience when working on my wacom intuos pro, and I thought it was lacking on its default till I downloaded it.
Manga Studio 5 troubleshooting
There was one issue I found that wasn’t directly at fault from Huion, but with Manga Studio 5. When using my kamvas on the program, the cursor sometimes lags and the pen automatically makes straight lines, to much of my annoyance. I found out after checking the settings that Manga Studio 5 is outdated. Really outdated. I wasn’t aware of its recent updates since 2014, and while it worked fine when using my intuos and the pen sensitivity was really great, it was impeding my drawing performance. I have to update it to Clip Studio Paint Pro. So here are the steps if you have your old license key, otherwise you might as well buy another copy.
You go to the clip studio download site -> https://www.clipstudio.net/en/dl
Then go to download previous versions.
Choose version 1.5.4.
Open/unzip the folder for its setup, and install CSP.
After installation, open the program then an option pops up for a license key. Type in your MS5 License key and you’re all set.
Your workplace, any custom brushes or settings, will be transferred to CSP and it will work like before. You can go a step further by installing its most recent updates, but otherwise I’m pretty happy and I’m able to draw without worries.
I’m not sure applies newer tablets post 2015, but to be safe, test the current version you have with new tablet hardware and if there’s a problem, updating the program may be your best bet.
Also check your preferences! Under tablet, there’s an option for tablet service. Go click wintab, and click the checkmark that says “Use mouse mode in setting of tablet driver” too. Your settings may be different from mine so test it out how it works with yours and make changes accordingly.

Ending Thoughts
Overall, I think the kamvas pro 16 is worth it. The size was easy to get used to, the pen’s comfortable to hold, the tablet build is sturdy and color accurate to my monitor too. I find it pretty solid for its features at an affordable price. To make use for all its functions, again, I recommend you download the most recent driver.
Some cons upgrading from a wacom intuos pro is the lack of an eraser button at the end of the pen. But after a while, I got used to it and relied more on the custom button settings for erasing. There was also a lack of pop up menu reminders, so you have to rely on your memory on which button does if you customized your programs with different functions (this doesn’t apply to the function button). Also you might feel some heat from this display. I felt it close to the top right, a little above where the usb-c port. But it goes away after a while. Other than that, I haven’t run into any issue with this tablet.
It’s a good choice for those who work digitally, for a hobby or professionally, and can’t afford a cintiq at its price point. So if you can afford it, get it. It’s good.
I hope this information about the drivers helped you a bit about its functions and with Manga Studio 5 / Clip Studio Paint if you happen to come across the same issues I had. Thank you for reading~
#blog post#review#tablet review#huion#huion kamvas pro 16#huion kamvas pro#manga studio 5#clip studio paint#troubleshooting#driver
3 notes
·
View notes
Text
How To Turn Why Did The Cash App Close My Account? Into Success
Have you asked yourself: "why did the Cash App close my account?" or "why was my account closed?" If so, this article can help you figure out the answer. If the app has closed your account due to suspicious activity, you can recover your account by following the steps below. Here are some of the most common reasons why your account may have been closed:

Why Cash App Closed My Account?
If you are wondering "Why Cash App close my account with money in it," this article is for you. Cash App can temporarily ban users for different reasons, such as if you have an account with fraudulent activities. You can get your account back if you follow the steps below. You must verify your identity to make sure your account was closed. Then you can deposit Bitcoin into your account. However, you cannot withdraw money from your Cash App account if it has been temporarily banned. To unblock your account, follow the steps below.
There are many reasons why Cash App would close your account, and you don't want to acknowledge this. Here are some reasons that may have caused the account to be closed: violation of Cash App's terms of service. Violations can range from not following Cash App's privacy guidelines to fraud. It is also possible to be banned for impersonating someone. To reactivate your account, you must uninstall the Cash App from your mobile device.
Why Cash App closed my account for suspicious activity?
You're likely wondering what to do if you've just received a notification that Cash App closed my account due to suspicious activity. Several reasons can lead to your account being closed, including unethical activities, impersonation, expired bank details, etc. To prevent this, you'll need to contact Cash App's customer support and file a complaint. In the meantime, you should check your junk mail folder and delete all emails from the Cash App. Afterward; you'll have to reactivate your account.
In some cases, Cash App closed your account due to a violation of the user terms and conditions. However, this is often the result of an innocent mistake. The system may have flagged you as suspicious if you've repeatedly entered the wrong password, logged into your account on multiple devices, or entered incorrect information. To get your account back, contact the company's customer support and follow the instructions they have provided you
How do I recover my closed Cash App account?
If you accidentally deleted or locked your Cash App account, recovering it is not difficult. The Cash App will re-open your account after 24-48 hours. You can now withdraw money from an ATM or transfer funds to your linked bank account. You can contact the Cash App customer support team to recover your closed Cash App account. They will be more than happy to assist you with your problem.
In the worst-case scenario, your Cash App account closed for gambling, but you can recover it by following these steps: You must log out of your Cash App account from your phone or computer. Then, you need to get a new debit card and account details. Contact Cash App support to learn how to reactivate your cash app account. You will need to provide your account details, but it is worth mentioning that you must use a verified account.
0 notes
Text
How do I recover my closed Cash App account?
Have you asked yourself: "why did the Cash App close my account?" or "why was my account closed?" If so, this article can help you figure out the answer. If the app has closed your account due to suspicious activity, you can recover your account by following the steps below. Here are some of the most common reasons why your account may have been closed:
Why Cash App Closed My Account?
If you are wondering "Why Cash App close my account with money in it," this article is for you. Cash App can temporarily ban users for different reasons, such as if you have an account with fraudulent activities. You can get your account back if you follow the steps below. You must verify your identity to make sure your account was closed. Then you can deposit Bitcoin into your account. However, you cannot withdraw money from your Cash App account if it has been temporarily banned. To unblock your account, follow the steps below.
There are many reasons why Cash App would close your account, and you don't want to acknowledge this. Here are some reasons that may have caused the account to be closed: violation of Cash App's terms of service. Violations can range from not following Cash App's privacy guidelines to fraud. It is also possible to be banned for impersonating someone. To reactivate your account, you must uninstall the Cash App from your mobile device.
Why Cash App closed my account for suspicious activity?
You're likely wondering what to do if you've just received a notification that Cash App closed your account due to suspicious activity. Several reasons can lead to your account being closed, including unethical activities, impersonation, expired bank details, etc. To prevent this, you'll need to contact Cash App's customer support and file a complaint. In the meantime, you should check your junk mail folder and delete all emails from the Cash App. Afterward, you'll have to reactivate your account.
In some cases, Cash App closed your account due to a violation of the user terms and conditions. However, this is often the result of an innocent mistake. The system may have flagged you as suspicious if you've repeatedly entered the wrong password, logged into your account on multiple devices, or entered incorrect information. To get your account back, contact the company's customer support and follow the instructions they have provided you.
How do I recover my closed Cash App account?
If you accidentally deleted or locked your Cash App account, recovering it is not difficult. The Cash App will re-open your account after 24-48 hours. You can now withdraw money from an ATM or transfer funds to your linked bank account. You can contact the Cash App customer support team to recover your closed Cash App account. They will be more than happy to assist you with your problem.
In the worst-case scenario, your Cash App account closed for gambling, but you can recover it by following these steps: You must log out of your CashApp account from your phone or computer. Then, you need to get a new debit card and account details. Contact Cash App support to learn how to reactivate your account. You will need to provide your account details, but it is worth mentioning that you must use a verified account.
#cash app closed my account with money in it#cash app closed my account due to violation#cash app account closed with money in it#cash app account recovery#my cash app account is closed#cash app account closed
0 notes
Text
Backup Tumblr Blogs - 2017
There are a lot of methods here. I’ve used the wordpress method but with that you get EVERYTHING after days of waiting with not much control. The method that gives the most control (and is so far the fastest) is tumblr-utils by bbolli on github. It can be daunting for those who aren’t familiar with command line, however. They do have a Windows guide (tumblr_backup_for_beginners) which walks you through step by step on setting it up and getting it started.
Below is my version of the guide with some helpful tips not mentioned in the original guide. Under read more for length.
1. Install Python
Key step do NOT skip, even if you already have python you may be using an outdated version and it requires 2.6 or 2.7 to run.) If you are using Windows, download the x86 MSI installer (unless you KNOW you have a x64 system that can handle that version. If you’re unsure, stick with x86)..
You may need to check “Copy Python” when installing in Windows or step 4 will not work.
Note: there are downloads for Mac OS. I don’t have a Mac to test this on, but it should work just as well as on Windows.
2. Download tumblr-utils.zip
Extract it somewhere safe that you know will not accidentally delete it. Do NOT extract it to Desktop or Downloads as directed in the original guide, especially if you like to clean your download folder every now and then. I installed it on my D:/ drive but you can probably get away with putting it in your Documents somewhere. Just remember where you put it.
3. Set up the PATH variable (optional but recommended)
The reason we set up the PATH is to make it more convenient to run the backup code in command line. If the path isn’t set, you have to type in the full address to the script file every time you run it. With the path, all you need to do is specify the file itself and your computer will know where it’s at.
If you’re running this on a Mac, you don’t need to specify PATH (although you can) All you need to do is drop tumblr_backup.py into /usr/local/bin using Finder and it should do the same thing.
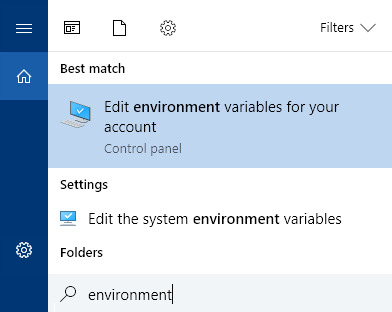
For Windows 10, use the taskbar search “environment” and click on “Edit the system environment variables”. Click on “Path” and click “Edit...” add a New variable and type in the path to wherever you extracted tumblr-utils.
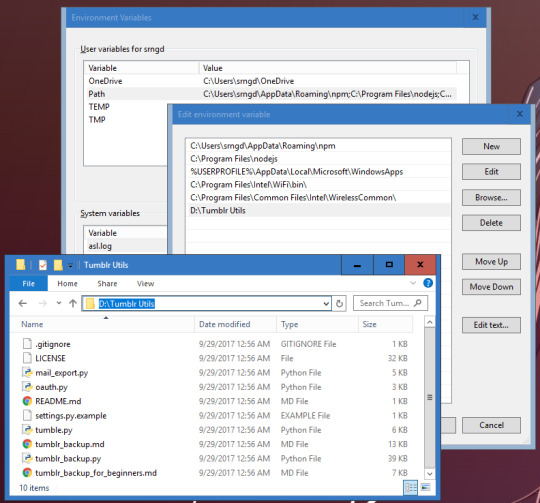
Note: You can easily grab the url path from windows explorer by clicking on the address bar and copy/pasting.
If you’re not running Windows 8 or 10, there’s a guide here for getting to the PATH environment variable. For Windows 7 / Vista / XP, make sure you separate existing information in the PATH from your new address with a semicolon. (see the first window in the screenshot above).
4. Create Your Backup Folder
I would suggest making a new folder called “Tumblr Backups” on a separate drive from C (D, etc, or even better on a flashdrive or external), but feel free to put it somewhere you have easy access to or will remember well (such as in your My Document’s folder). Again you’ll want to remember the address to it and how to get there from windows explorer. You can always move or copy this folder somewhere else after you’ve backed it up.
5. Navigate to Tumblr Backups in Command Line
For the next step we need to use Command Prompt (or Terminal on Mac/Linux). To open up Command Prompt in Windows 10 you can simply hit the Windows button + X and then C for Command prompt or search for it via taskbar (Here is a guide for opening it on other Windows versions). On a Mac, you open Terminal with Ctrl+Alt+T. You shouldn’t need admin privileges for what you’re about to do. In fact, it’s probably better if you don’t.
When you open command prompt in Windows it will be set to C:\Users\[your username] (the same place Windows Explorer automatically opens to). We want to navigate to where you want to store your backup. If it’s in Documents, then type:
cd Documents/Tumblr Backups
hit enter and the prompt (the text in front of your cursor) will change to that directory. If you want to go up a folder type:
cd ../
If you set it up on a different drive in Windows, type the drive letter (capitalized), followed by a colon and hit enter and then change directory using cd

On a Mac, you also use the cd command to change directory in Terminal, but to change drives, all you need to do is type:
cd /Volumes/
ls
The ls command (LS lowercase) lists all the files and folders within the directory you’ve currently navigated to. The /Volumes/ directory is where all your drives are located and you can navigate from there to your Tumblr Backups folder. NOTE use quotation marks around files/folders that have spaces!
cd ‘Tumblr Backups’
6. Run tumblr_backup.py
Once you’re in your Tumblr Backups directory, you’re ready to backup your posts!
If you want a complete backup of your blog as-is, type the following (replacing yourblog with the blog you want to backup) and hit enter:
tumblr_backup.py yourblog
It may take some time, but even for 18,000+ posts it should take no longer than 30 minutes depending on connection speed. On the next line it will give you a real-time update of how far it is to completing the backup. If it is interrupted, it will process what it’s pulled so far and generate a backup folder anyway. Note that you can backup multiple blogs at the same time by adding more than one blog name at the end, separated by spaces.
Don’t worry about pulling posts twice or accidentally doing the same command. It won’t add any duplicates.
This also works for side blogs and for backing up blogs run by others that you wish to keep in case it gets purged or leaves Tumblr.
If you only want your own content:
tumblr_backup.py --no-reblog yourblog
--no-reblog (that’s two dashes in front) tells it to only backup posts that you’ve made yourself, including reblogs where you’ve added new content.
If you’re only interested in backing up photo posts:
tumblr_backup.py -T photo yourblog
-T photo tells the script to only backup photo posts. Make sure to capitalize the T!
If you only want to backup posts with specific tags:
tumblr_backup.py -t tag1,another_tag_with_spaces yourblog
Separate each tag with a comma. Tags with spaces use underscores instead. Make sure the -t is lowercase!
If you have an unstable internet connection, break it up into multiple requests.
tumblr_backup.py -n 100 yourblog
tumblr_backup.py -n 100 -s 100 yourblog
tumblr_backup.py -n 100 -s 200 yourblog
-n 100 tells it to only count 100 posts, starting from the last post you made. -s 100 tells it to skip the first 100 posts or checks (which are the last posts you made).
You can find many more flag filters in the documentation that can help you fine tune your backup depending on what you want to keep and how you want the backup to be displayed. You can also get information on these options by running tumblr_backup.py --help (with two dashes).
If you are getting image missing errors, don’t worry. It’s usually just avatar images of deleted blogs that are no longer accessible.
If you get 503 messages and aren’t pulling posts, it could be you’re requesting too frequently and the server locked you out. I’ve had that happen with my stats project while testing. In that case you just have to walk away for a bit and wait it out Double-check that you spelled the blog name you want to pull from right and maybe try again in a couple hours or so.
7. Profit

If you look into Tumblr Backups afterwards, you should find a folder with your blog name. In it is a website hierarchy with each post in the posts folder modified by the originally posted date with all of your tags included. Images are in media, monthly archives in archive, and there is an index.html that allows you to navigate and view everything via your favorite browser.

If you want to use a custom CSS file, call it custom.css, put it in the backup folder and do a complete backup. This forces the pages to all use the new styling.
The CSS of your blog’s original theme css and avatar is always saved in theme/style.css.. Note that it does not save any javascript you may have had on your theme and you should back that up separately. This also does NOT backup pages.
802 notes
·
View notes
Text
Clear Cached Files Memory Mac

Step-by-Step Guide On How To Clean Cache On Mac
Cached Files Memory Mac
Apr 04, 2020 How To Clear Cache On Mac Manually Source: DiskDrill. Cleaning cache files will increase more memory in your Mac hard drive and below are the steps to clear cache files from Mac manually, follow them. Stop any effectively open Mac applications. Press and hold down the Shift key or Option / ALT key and select “Go” from the Finder.
Shortcuts make the process of clearing your Mac 's cache extremely fast and easy. Here's how to do it: 1. Press shift-command-G with your Finder window open. Citrix workspace for mac. The File Cache is created by OS X as a quick store for loaded applications and processes and their support files. The more you run the more goes into that cache. It does not slow down RAM. Your RAM never runs slower. The computer will, however, if you start running out of available RAM for the number of concurrently running applications.
All my homebrew SEGA Saturn games and demos are located on a single Saturn CD called The Rockin'-B All Stars. Go download that one. Added Feb 22, 2015, Under: Sega Saturn Saturnade by Sebastian Mihai is a Sega Saturn homebrew game inspired by a popular game featuring an avian flapping its wings to pass through the opening between vertical pipes. In Saturnade, the concept is reversed a bit. In fact, Sega Saturn console is a difficult to understand (see documentation). This is why there are only very few homebrew and most emulators wasn't stable for a long time. That's why I decide to create a simple game engine so that everyone can develop on the Sega Saturn. Sega saturn homebrew.
In today’s world of gadgets, computer, and internet, billions of users use Facebook, make some purchases over the internet, do some internet banking transactions or roam around the internet for the sake of fun. All these actions, amongst others, require the flow of a lot of data over the internet. Some of this is absorbed or hold on by your browser; in other words, it stores information. Sorting, filtering, and clearing of this data are important to increase your system’s or device’s performance and to maintain security.
Sky pfe 9009. This worked for me, thank you. This website uses cookies Cookies help us give you a better service e.g. Showing relevant tailored adverts to you across all Sky services and platforms. Betreff: Sky Go Fehlercode PFE 9009 Als neu kennzeichnen; Lesezeichen; Abonnieren; RSS Feed abonnieren; Kennzeichnen; Drucken; Per E-Mail an einen Freund senden; Beitrag melden 18:34. Nach mehrmaligen Strarten meldet er jetzt. Fehlercode PFE 4002. Help with the new Sky Go app, including how to set up Sky Go, watch Sky Go, fix a problem or manage devices and settings. You can watch all your favourites while on the commute or travelling for leisure, in fact, you’ll never be bored again with the Sky Go app giving you endless hours of content. Check the spelling. I was trying to call an executable but had the name misspelled and it gave me the exited with code 9009 message. Follow answered Jun 6 '12 at 20:17. 1,555 3 3 gold badges 25 25 silver badges 48 48 bronze badges.
Step-by-Step Guide On How To Clean Cache On Mac
For the powerful performance and great design, the Mac computer gains a lot of fans. But they may find that their Mac goes slower and slower after months. Why? Because there are full of system cache, browser cache and temporary files on their Mac/MacBook Air/MacBook Pro/Mac mini/iMac. In this article, you’ll learn about what cached data is and how to clear or manage cache files on Mac?
What Is Cached Data?
To put it simply, cached data is information that originates from the website you visit or an application installed on Mac. Atom python not found. These may be in the form of images, scripts, files, etc. and they are stored in a defined place in your computer. This data is cached or withheld so that when you visit that website or application again, data is readily available.
It tends to speed up things when repeated attempts to access the website or application are made. This cached data uses up space, and therefore it is very important to clean all the unnecessary data from time to time to keep your system or Mac’s performance at par.
How to Clear Cache on Mac in One-Click
Mac Cleaner is a powerful Mac Cache Removal app to clear all cache, cookies and logs on Mac. It is compatible with all systems, from OS X 10.8 (Mountain Lion) to macOS 10.14 (Mojave). With the help of Mac Cleaner, it works with a Safety Database and knows how to clear cache fast and safely. As if that wasn’t enough it will also remove more junk than manual methods.
Cached Files Memory Mac
Step 1. Install Mac Cleaner Firstly, download and install Mac Cleaner on your Mac.
Step 2. Scan Cache Secondly, select “System Junk” and scan cache files on Mac.
Step 3. Clear Cache After scanning, clean the cache files on Mac.
How to Clear Cache on Mac Manually
Clear User Cache
User cache is mostly consisting of DNS cache and app cache. A good cleaning of user cache will probably save you GBs in data and boost the system’s performance. You will need to perform the following actions to clear user cache on your Mac. · By selecting “Go to Folder” in the Go menu after opening “Finder window”. · Write ~/Library/Caches and press enter. · You can then enter each folder and delete data manually. · After all the data is deleted or cleaned, the next step is to clear the trash. You can do this by clicking on the Trash icon and by selecting “Empty Trash”.
It is advised only to remove the data or files and not the folder itself. As a precautionary measure you should copy data that intent to delete in a separate folder, this data can be deleted after you clean the source data.
Clear System Cache And App Cache
App cache is the files, data, images, and scripts downloaded by the applications installed on your Mac to work faster when you use the application in the next time. System cache is mostly files that are hidden and are created by apps you use or the websites you visit. It is astounding to know how much space system cache and app cache take out of total storage. Let’s assume it is in GBs; you would want to clear this up to have more space for your important stuff. We will guide you to the process but make sure to create a backup of the folders. You can always delete this back up once the original task is done successfully.
You can clear up app and system cache in the same way as you deleted user cache. You need to delete the file inside the folder by the app name and not the folders themselves. Backing up system files is important because your system may function abnormally if you delete the data necessary to run the system.
Clear Safari Cache
Most people would just go to history and clear all the history to relieve the headache of cached data. But to do it manually or to look into the files you are deleting then you would have to follow these steps. · Enter the “Safari” menu then Go to “Preference”. · Choose the “Advanced” tab. · After enabling “Show Develop” tab, you need to go to “Develop” area of the menu bar. · Press on “Empty Caches”. There you go, following these easy steps you are in full control of the files you delete.
Clear Chrome Cache
Chrome is one of the most popular browsers for Mac. It means a lot of data can be stuck up in Chrome’s cached memory making your browser slower and hard to cope up with. Additionally, there may be a lot of data saved from a website that you have accessed once and are not planning to access in some near future. We can relieve you from this problem by making you follow some easy steps. Here are these: · Go to Chrome’s “Settings”. · Go to “History” Tab. · Press “Clear Browsing Data”. Success! You have deleted all unnecessary cached files in Chrome successfully. Just make sure you tick mark “all cached images and files” and select “the beginning of time” option.
Clear Firefox Cache
Firefox is another popular brand in the list of browsers that a lot of people prefer to use. Like any other browsers, this browser also stores files and images to use them if the website is visited the next time. Here is the simple way to clear all the files from the cache memory.
· Go to the “History” menu. · Then go to “Clear Recent History”. · Select “Cache”. · Press “Clear now”. It will clean your browser of unneeded cache files and do the job.
Conclusion
Clearing caches and useless files can do marvels for Mac because all this data tend to stack up as time passes and if you don’t clean it periodically, it might slow down your Mac. Causing more harm than good. Through this article, we have tried to make sure you get all the information you need to get the job done.
If you are deleting the files manually, you need to make sure that you clear the “Trash” later as well to wipe the target clean completely. It is always recommended to “Restart” the Mac after you are done deleting cached files and folders to refresh the system.
Amongst all these, the riskiest cached file is the system cache file which if deleted accidentally may cause your system to perform abnormally. Still, clearing caches regularly are very important to keep the system running smoothly.
Shazam for pc reddit. 4.9m members in the pcmasterrace community. Welcome to the official subreddit of the PC Master Race. In this subreddit, we celebrate and promote the.

0 notes
Text
Access Mac Library Folder

Mac Os X Access Library Folder
Mac Vm Folder
Dec 12, 2016 And remember, the system level /Library folder is different from the user level /Library. How to Access User Library in MacOS Mojave, macOS Catalina, and MacOS Sierra. If you don’t need to constantly show the /Library folder on the Mac, you can just access it when needed by using the “Go” menu. May 17, 2019 Within the Library folder are a lot of pretty critical files that apps on your Mac need to operate. Since Mac OS X Lion and Mountain Lion, the Library folder has been hidden, to avoid people accidentally deleting critical folders and applications. You just need to do the following: Open the Finder. Go to your Macintosh HD folder (access this from Devices in the left column). Hold down Cmd + Shift +. All the hidden files will become visible. (dot) a second time to hide the files again. Mar 12, 2020 Terminal commands. Open Terminal from the Applications Utilities folder or using Spotlight. Copy and paste or enter the following commands, on separate lines,. Jul 22, 2011 Use “Go To Folder” and Open /Library/ Directly All you need to do is hit Command+Shift+G from the Mac desktop (or Finder Go Go to Folder) and type in /Library to temporarily access the Library directory in the Finder. When you are done, close this window and it will no longer be visible.
Just like the Windows operating system, the MacOS operating system has a hidden Library folder full of settings you shouldn’t really touch. Deleting some or all of these settings will at best force you to reinstall certain apps, and at worst, cause the whole system to collapse and require a complete reinstall.
But there may be times when accessing the Library folder is necessary. For example, many apps put backups in the Library folder and you may want to back up the backup. Or you might be customising your Mac, which will need access to certain library folders.
Here is how to get there and not cause your Mac to collapse in a cloud of dust in the process.
What Is The Library Folder On MacOS?
The library folder is the area of your MacOS computer where app settings are stored. When you install a program, a folder is created in the Library for all of the essential settings. This can be anything from plugins, preference files and log files.
It’s hidden because basically some people are just plain clumsy and quite often don’t know what they are deleting. It’s only when it’s too late when they realise that something they just deleted should have been kept.
So you could say that Apple is protecting you against your own worst impulses!
How To Find The Hidden Library Folder On MacOS
There are two ways to get to the hidden Library folder if you are confident enough of not triggering a nuclear apocalypse. But the second way is only really feasible when you know where to look.
First Method (The Easiest)
Go to Finder and drop down the “Go” menu. You’ll see that the Library folder is not listed.
To make the Library folder appear, press the “Alt” key (also known as the Option key) at the bottom left of your keyboard. The Library folder will now appear.
Click on the Library folder option to be taken straight to the folder.
The problem though with this method is that this is very temporary. As soon as you take your finger off the alt key, the Library folder will disappear again.
Second Method (Not Difficult)
Once you know the path to the folder (by following the previous method), you can then use the path to go directly to the Library folder.
At the top of the Library folder, you will see the exact path (location) of the folder on your computer.
I have covered over my username in the screenshot, but the path is :

With that in mind, go back to Finder’s Go menu and at the bottom, you’ll see this option :
Choosing “Go to Folder” will bring up a box where you can type the path to the Library folder. Hitting the “enter” key will then take you straight there.
Even better, until you input the path to a different folder, the path to the Library will remain in the “Go to Folder” box.
When it is gone, dropping down the menu arrow on the right hand side will show you a list of previous folders you went to, and the Library one will be there too.
Conclusion
There used to be a way to keep the Library folder showing permanently. But as of High Sierra, the Terminal command no longer seems to work.
However, keeping the folder permanently visible isn’t a good idea since you might delete a system-critical file. Besides, as you have just seen, it is not difficult at all to go to the folder when you need it.
You may need to access content in the user Library folder to troubleshoot problems with your Adobe applications. The user Library folder is hidden by default in macOS X 10.7 and later releases. Use one of the following methods to make the user Library content visible.
Hold down the Alt (Option) key when using the Go menu. The user Library folder is listed below the current user's home directory.
Note: After you open the Library folder, you can drag the Library icon from the top of that window to the Dock, sidebar, or toolbar to make it readily accessible.
For more information, explanations, and ideas, see 18 ways to view the ~/Library folder in Lion and Mountain Lion.
More like this
Mac Os X Access Library Folder
Twitter™ and Facebook posts are not covered under the terms of Creative Commons.
Mac Vm Folder
Legal Notices | Online Privacy Policy

0 notes
Text
2tb My Passport For Mac

Discuss: WD My Passport for Mac WDBP6A0020BBK - hard drive - 2 TB - USB 3.0 Sign in to comment. Be respectful, keep it civil and stay on topic. We delete comments that violate our policy, which we. WD - My Passport Ultra for Mac 2TB External USB 3.0 Portable Hard Drive with Hardware Encryption - Silver. Model: WDBKYJ0020BSL-WESN. User rating, 4.6 out of 5 stars with 170 reviews. (170) Price Match Guarantee. $89.99 Your price for this item is $89.99.
Wd Mac External Hard Drive
Wd 2tb My Passport For Mac Portable Hard Drive
Summary: Let’s figure out how to format your WD Passport on macOS & Windows. In this blog post, we will walk you through the formatting process and share instructions to format an external drive on macOS & Windows. But before you proceed, understand that formatting carries a risk of hard drive corruption and data loss. So, in case, if you had accidentally lost your data due to drive formatting or corruption, we also recommend a data recovery software that can rescue data from your HDD. Take a free trial to evaluate the software now.
Professional Photographers and videographers have their hands laid upon various digital devices. Usually, their arsenal includes a cutting-edge Windows 10 desktop, the latest and the magnificent MacBook Pro, DSLR & SD-Cards of-course and the trusted & loved external drives such as the WD My Passport. The role of the WD My Passport drive is crucial since the individual will leverage the portable media to safely store their collection of pictures, videos, audio, and docs. But despite the best of the best device specifications; there remains one small glitch to rectify.
We know, Macs and Windows have their native file systems such as the new APFS or HFS and the NTFS. A WD My Passport formatted with Mac file system will be a dud on the Windows and vice-versa. Thankfully, MS-DOS FAT32 and ex-FAT formats have survived to date, and these are the file system to make your WD My Passport work with a Mac and a Windows PC simultaneously. In the next 5 minutes read, you will master yourself in formatting a WD My Passport safely and in a manner best suited for sharing your digital files between a macOS and Windows OS.
Wd Mac External Hard Drive
To format a Western Digital My Passport external hard drive in ex-FAT or FAT32 format, you can bank on built-in applications of Mac & PC. However, while doing this, there are things you have to keep in mind and follow the correct steps. Here you will get to know about the process to format your “My passport” portable drive in FAT32 and ex-FAT file system in both Windows and Mac platforms.
In Windows Platform:

1. Connect your Western Digital My Passport hard drive to your Windows PC through the USB cable. Wait till the Windows detects the external hard drive and configure it as an expansion drive automatically.
2. Now, click the Start button and select ‘This PC’. A new Windows Explorer window opens, on the left side of the screen; you will see a list of installed drives and their drive letters.
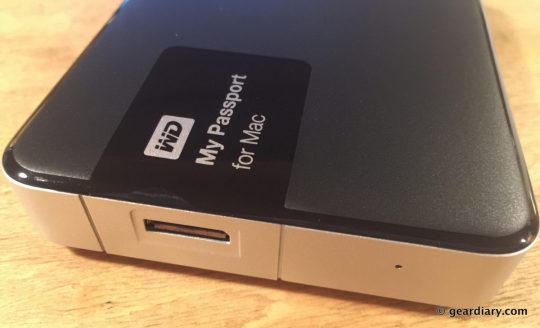
3. Locate the icon assigned to Western Digital My Passport drive and Right-click the connected drive icon and click ‘Format’ in the pop-up menu.
4. Select the ‘File System’ from the drop-down list, which is available in the format expansion and choose either ‘ex-FAT’ or ‘FAT32’.
5. Enter a relevant name in the ‘Volume Label’ field. This name will represent your drive when you connect it with Windows Explorer or Mac and will be mentioned above the drive letter for the My Passport drive. Therefore, enter a descriptive name.
6. Now, again select a ‘Quick Format’ option, then click ‘Start’ option, wait for a few minutes to get your drive reformatted with the FAT32 file system, so that you can use it. After successful formatting, you can directly save or move files to it like any other external hard drive.
In macOS / OS X Platform
Connect your Western Digital My Passport drive to Mac computer, and let the OS detect and mount the drive for use. Now, a new hard drive icon will appear on the desktop.
On macOS Dock, select Finder. When the Finder window opens, on the menu bar, select ‘Go’ and then ‘Utilities.’ After that, you will be able to see /Applications/Utilities folder in Finder. From the Utilities folder window, select ‘Disk Utility’ application.
When the Disk Utility opens, choose the Western Digital hard drive icon from the sidebar.
Click ‘Erase’ on the Disk Utility file menu. Now, the Erase dialogue window appears, here select the ‘Volume Format’ drop-down list and choose ‘MS-DOS (FAT)’ or ex-FAT File System.’ Note: ex-FAT is a better choice for formatting WD My Passport on Mac.
Now, click the ‘Erase,’ button and wait a few minutes and let the macOS erase data on the drive and reformat it by FAT32 or ex-FAT format.
Once formatting is done, you can use the drive in macOS or OS X as a regular hard drive.
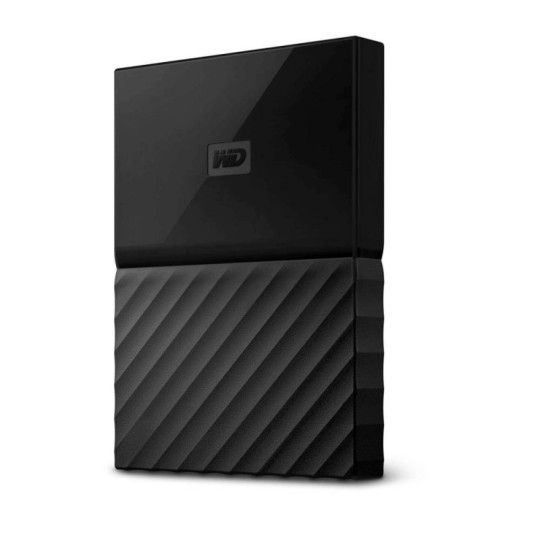
Wd 2tb My Passport For Mac Portable Hard Drive
Window’s Disk Management and Mac’s Disk Utility applications are secure platforms to erase your WD My Passport easily. You don’t require any third-party software to format your WD My Passport with FAT or ex-FAT.
Caution: Avoid Formatting your WD My Passport without Backup
We can’t rule out the possibilities of human errors resulting in the accidental formatting of the WD My Passport external drive. A silly man-made mistake will permanently remove all of the contained pictures, videos, audio files, and docs instantly from the WD My Passport. Hence, fasten your seat-belts and backup your WD My Passport before erasing. If you have already joined the data loss club unwillingly, then try running D-I-Y applications to recover data from Mac and Windows.
Tips for Effective Formatting
Format your Western Digital My Passport external hard drive to FAT32 or ex-FAT format so to transfer the data between a Mac and Windows system conveniently.
There are specific third-party systems, like Digital Camcorders, and Sony PlayStation 3, which need the drives to be formatted in either FAT32 or ex-FAT format to perform read from and write operation. Check it before selecting a file format.
Due to some limitations FAT32 format is not useful for every type of user, and also affects both Mac’s and PC’s performances. Therefore, it is better to choose ex-FAT instead.
Ex-FAT supports maximum volume size up to 128 PiB, and its supported maximum file size is 128 PiB.
Like FAT32, ex-FAT is not a very commonly used file system, due to which its support may vary among third-party devices.
The corruption chances of the external drive increases, if it is used on both Mac and PC systems regularly. Therefore, it is better to take backup of your important photos and videos before sharing them between both the computers.

0 notes
Text
Imazing For Mac

You may have come across a time when you accidentally drop your phone into the toilet, drop it from the third floor of a building, or drop it into the gap between the train and the platform. And then, you realize that you haven’t backed up your phone since you bought it.
So, you buy a new one from the Apple Store and restore everything from scratch with just your bare hands. Life shouldn’t be that difficult and complicated. That’s why iMazing is here to help.
What is iMazing?
iMazing is an iPhone data manager that lets you easily transfer stuff back and forth between your iPhone, iPad, iPod Touch, and Mac and Windows PC, as well as backing up your old iDevice and restoring the data to your new one.
IMazing is a file manager for iPod, iPhone, or iPad. It can transfer any type of files between any device and any computer, Mac or PC, via a high-speed USB or Wi-Fi connection. IMazing sports a.
IMazing 2.12.2 Crack + Activation Key Free 2020 Mac+Win iMazing 2.12.2 Crack is the final word iOS gadget supervisor with capabilities far past what iTunes provides for you. Subsequently, This is a strong and supreme iPhone to laptop switch software program which helps iPhone 6s and each iPhone, iPad & iPod.
IMazing is an iOS device management utility designed as an alternative to iTunes. IMazing doesn’t sync files in the traditional sense, but rather acts as a conduit for transferring files between desktop computers and iPhone, iPad, or iPod devices. If you are an owner of an iOS based device then iMazing is for you.
IMazing for mac (was DiskAid) is the ultimate iOS device manager with capabilities far beyond what iTunes offers. With iMazing and your iOS device (iPhone, iPad, or iPod), you can: Copy music to and from any iOS device (even from one iOS device to another!), regardless of what Mac or PC the device is already synced to.
Besides, iMazing puts lots of other meaningful features into its box to manage your iOS devices well, like Data Eraser, Ringtones Maker, App Manager, Data Printer, and so on.
How to Use iMazing
Then how to use iMazing? Below are the simple steps you can follow to use the basic features of this program.
1. Installing iMazing
iMazing works on a computer, fully compatible with all PC and Mac. You can get this app installed through its official website. (This app is not listed on any app stores.)
To download iMazing to your Mac,
Go to iMazing.com to download the app. If you are on a Mac, wait for the iMazing installer to download.
When the download is finished, go to your Downloads folder and double click on the “iMazing2forMag” file. This opens the desk image that contains the iMazing app.
Drag the iMazing icon to the Applications folder.
Double click the app to launch it.
A small window that said “‘iMazing’ is an app downloaded from the Internet. Are you sure you want to open it?” Just click “Open”.
To download iMazing to your Windows PC,
Go to iMazing.com,
Click Download for PC,
Click Save and wait for the iMazing installer to download.
When the download is finished, click View Downloads,
Click “iMazing2forWindows” and follow the instruction to set up iMazing.
When the installation is finished, double click the iMazing shortcut on your destop to launch the app.
After setting up iMazing, you can now transfer stuff between your iDevice and computer. As well as backing up your old iDevice and restoring the data to your new one.
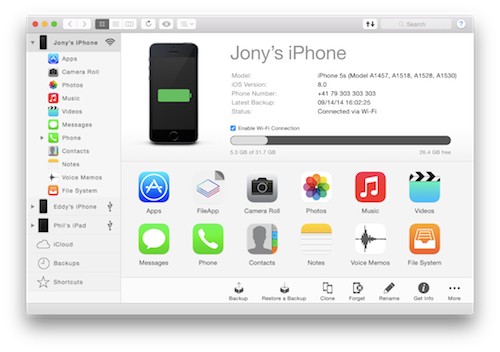
2. Transferring Data
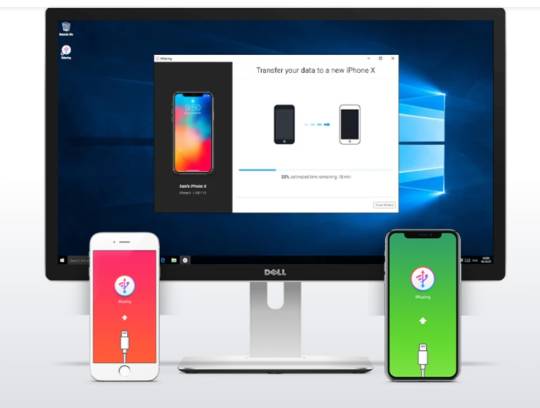
To transfer music between your iDevices and computer,
Launch iMazing and connect your iDevice with a cable. If you have connected your iDevice to your computer before, your iDevice can connect to your computer wirelessly with Wi-Fi.
Select your iDevice on the iMazing sidebar and click Music.
Select the song on your Mac or Windows PC and drag it to the iMazing window, iMazing copies the song to your iDevice, so you can listen to it.
You can also copy an entire album or all the songs from an artist from your computer to your iDevice. You can also click Import from iTunes to copy music from your iTunes Music Library.
To transfer files between your iDevices and your computer,
Launch iMazing and connect your iDevice.
Select your iDevice on the iMazing sidebar and click Quick Transfer.
Drag a file or a folder of files to the iMazing window.
iMazing displays apps that are compatible with that file type on your phone. Click the app that you want to accept the file and click Transfer.
To transfer files from your iDevices to your computer even faster, just drag the file onto the image of your iDevice on the right side of the iMazing window.
To add ringtones to your iDevice from your computer,
Launch iMazing and connect your iDevice.
Select your iDevice on the iMazing sidebar and click Ringtones.
Drag a song from your computer to the iMazing window. iMazing supports MP, AAC, ALAC, FLAC, WAV and AIFF formats.
Launch Settings on your iDevice
Tap Sounds and Haptics,
Tap Ringtones,
Select the ringtone that you want to hear when getting a phone call.
3. Back Up and Restore
Imazing For Mac Crack
To back up your iDevices to your computer,
Download iMazing Mini from iMazing.com to your computer,
Launch the iMazing Mini app,
Click Next on the bottom right corner of the app,
Connect your iDevice with your computer using the charging cable,
Tap Trust on your iDevice to allow your computer to connect to it,
Click Backup on the bottom right hand corner of the iMazing Mini app,
Click Backup again and iMazing will start to back up your iDevice.
When the backup process is completed, click Done to complete the backup.
Note that,
You can set the backup schedule daily, every 2 days, every 3 days, weekly, every 2 weeks, every 3 weeks, and monthly.
You can set a specific time to back up your iDevices.
You can set to back up your iDevice only when it’s at a certain battery percentage.
You can set a password to encrypt your backups. Make sure you remember your password or you’ll be logged out of your data forever.
You can choose a backup location: your computer, an external hard drive or a custom location.
You can set the archive deletion to a month, 2 months, 3 months, 4 months, 5 months, 6 months, and a year.
All these configurations can be set before backing up your iDevices.
To restore the backup to your new iDevices,
Launch the iMazing app and connect your new iDevice using the charging cable,
Select your new iDevice on the iMazing sidebar and click Restore backup,
Select the backup that you want to restore to your new iDevice.
Click Restore backup.
My Personal Take
For my testing, the ability to add ringtones to my iPhone from my MacBook Air with iMazing is awesome. In the past, if you want to have your custom ringtones, you have to download Garageband and Documents by Readdle from the App Store, download the song you want using Documents by Readdle, shorten it using Garageband and select it as your ringtone in Settings. Now, all I have to do is download the song I want, save it to my MacBook Air, drag it into iMazing and That’s it!
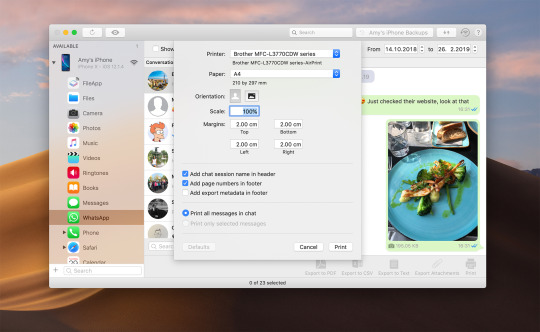
However, for transferring items between my iPhone and MacBook Air, I prefer AirDrop as I’m in the Apple ecosystem. I can transfer photos, videos, texts, websites, notes, files and more with just a tap. No need to connect iPhone or drag and drop items. Plus, the process takes less than 10 seconds. And, AirDrop is built into every Apple device running iOS 7 or later.
As for Backing up and restoring backups, the process is pretty much the same as iTunes. Except for one thing: the price. iMazing is a paid app. Below are the configurations:
Single Plan: US$45
Universal Plan: US$50
Family Plan: US$70
Honestly, when you can basically do everything with a built-in app called iTunes, why would you pay for a third-party app, plus it isn’t cheap.
Conclusion
To sum up, I would say iMazing is a great alternative to iTunes because it’s simpler, easier to use, and more efficient. However, I’m in Apple’s ecosystem so AirDrop is better for me. And, I won’t recommend Windows users to try it, because you can easily download iTunes from the Windows Store and it’s free. Again, why will you pay for another app that does the same thing?
iMazing 2.12.6 Crack Mac is the ultimate powerful IOS device management application. You can control your Apple devices using this simple software easily and accurately. Provides you the complete control over the IOS device. Moreover, it has the features that iTunes provides. You have to jailbreak your device to get complete control over the device. But using Digidna iMazing Crack for Windows you don’t need to jailbreak of your device.
Additionally, it is the extraordinary software which allows the users to transfer their files among IOS device easily. So, Now you will face no trouble while sharing your files. Therefore, Users can also make the backup of their data to their device. it will make a replica of your device. Which later can be restored. Moreover, it also has the built-in function for an automatic backup of the device. Also, you can restore your device if you have lost it. Further, you can add data from old IOS to New IOS easily. Hence, Download iMazing Crack Serial Key from here.
The Latest Version compatible with all Windows & Apple devices like IOS and Mac. So, it can be used on any OS. Thus this makes it the widely used software than other software. There is trouble when you have to share your data from Windows to Apple devices. But, iMazing Crack Windows Download solved this problem. Now, you can share the data without any limitations.
Data is More Secure With iMazing Activation Number Reddit
The secure transfer of data is very important. it has the most secure system to share data without any risk. Provides full security and keeps safe from unauthorized access to your device. Therefore, your backup will also secure. Using this software you just have to click then your data will automatically backup and restore.
You can transfer all types of data among all types of OS With iMazing Activation Number for Windows. It has an attractive interface. it has the easy to use interface. So, anybody can use this software. You can share your Pictures, Text messages, Contacts, and every file on your device. Approaching all tools with an attractive interface, it is all in one platform for the IOS device to share data.
With the iMazing Activation Code, you can provide better security to your transmissions as well as backups. You encrypt data for transmission or backup. This allows you to save and transfer data without risk of any unauthorized use. Furthermore, it offers features to archive your phone data such as voicemail, text messages, contacts and multimedia messages. As a result, I suggest you use This Software.
Also, Download iMazing Crack For Windows
Key Features:
Transfer all types of Files:
it allows sharing all types of files on the IOS device.
Backup & Restore:
you can make a backup and then restore easily.
iPhone, iPod & iPad File Transfer To Mac & PC:
share data between the phone to your PC.
Multiple OS Supports:
iMazing Crack 2019 supports all OS.
Copy, Save, And Manage iPhone Data & Pictures:
Copy music to and from any iOS device (even from one iOS device to another!), regardless of what Mac or PC the device is already synced to. Music transfer is done right, without limitations or restrictions.
Transfer All Media, Data & Settings to a New iPhone:
Make the replica of one device then copy it to the new device.
What’s New in iMazing 2.12.6 Crack 2020?
Version 2.12.6:
The performance of this software has optimized
With one click, the user can transfer GBs of data within a few minutes from here to there
Fixed a crash when restoring .imazingapp files
Added some new features
iMazing Serial Number:
F5MU-T994-PIJV-OFFY
I8XJ-44LB-VBGE-QJW0
DLFS-RMSS-T6HQ-MAPS
X2V1-I2AB-XN3M-9U8E
X9ER-S8NM-PVLW-I60J
Moular
Download Imazing
iMazing Crack + Activation Number Keygen [Latest Version]
5
iMazing Crack + Activation Number Keygen [Latest Version]
Download Imazing For Iphone
Mac
Imazing For Mac Review
MacOSX

0 notes
Text
TS4 CC Basics 101
😍 😍 😍 😍 “Oooooooohhhhh look at that. That’s perfect/pretty/gorgeous!!! I must have this in my game!!”
If you are a simmer that uses custom content, you’ve said this at least once. 😋 If you’re like me, you say this at least once a day. 😝 To avoid cc blunders & problems with your game as a result of using cc, below are some things that, I hope, any cc user can find useful. (under a read more due to length)
✪ Right click & open in new tab when following links to download content. Just clicking on a link alone can result sometimes in a ‘not found URL’ or something of that type of error by mistake. 👌
✪ The only file type that should be going into your mods folder (with the exception of MC Command and Whicked Whims files~follow the installation directions given by those mods creators) are .packages. No matter the amount of, or the type of, files a creator included in their .zip folder, .packages are the ONLY ones that should make their way into your mods folder. EVER. Adding unnecessary files to your mods folder results in longer than usual loading times as your game is taking more time to read files it doesn’t needs to work. 👌
✪ Any folder you download that ends in .zip, .7z, or .rar, should be unzipped, or unpacked, before placing into your mods folder. Most recent computers already come equipped with an unzipping program. If not, or if you prefer not to use what your comp came equipped with, you can download programs like 7zip or WInZip, for free. A google search can be your best friend in this instance for either a program or how to unzip a folder. 👌
✪ Its always a good idea, & safer for your game, if you direct your comp to download files to either your download folder (your PC name > Downloads) or another folder you have specifically for your downloads, & not directly to your mods folder. Its always a good idea to “test” out any new cc you download, be it one day or one week at a time, in order to weed out any cc that isn’t showing up for lack of not downloading meshes that were noted as required, or because it conflicts with other content already installed in your mods folder. Its always a good idea to keep this new or new-to-you content in a testing folder, that way you know exactly where it’s located for easy removal, if need be. If you test out the new cc & you’re satisfied with its performance, you can then move it into your mods folder along side your other installed content. 👌
✪ Its always a good idea to organize your mods folder. & by organize I mean, categorize your content in some way, shape, or form, so its easy, or easier, to find if & when you need to. Most simmers will categorize something along the lines of how the game categorizes content (ex. CAS vs. Build/Buy, Female clothes vs. Male clothes, Clutter vs. Comfort). Some categorize according to the date they’ve downloaded it. Find a method that works for you & stick with it. It’s never too late to organize your mods folder. 👌
✪ The Sims 4 already comes with a mod folder installed in your game folder (Documents > Electronic Arts > The Sims 4 > Mods), unlike previous versions of the game. & it also comes formatted for you to use subfolders within your mods folder. If it does not, instructions on how to add them can be found in this post here. It comes formatted to go up to 5 subfolders deep, but it’s been found that most content will only work when its 2 folders deep, ex Mods>CC Folder 1. Going any deeper can result in the game being unable to read the content, which results in it not showing in game. 👌
✪ Take time to read what the content creator is writing in their download post. In it they will, 99% of the time, note if you need anything else for their content to function &/or show in your game. This can range from what pack the content may require, to what mesh is needed for their recolor to show. Please don’t just go and click download all willy nilly. You could potentially be ignoring important information. This is not the case for all content, but it is the case for most. Taking your time to read what is written will pay off. 👌
✪ Sometimes a contents poly count matters when speaking about loading times & lag experienced in game. Poly count refers to the amount of polygons being rendered per frame. Example of low poly content is mm (maxis match) content, although not all mm content is low or lower poly but most is. Example of high poly count content are some curly alpha hairs. Having said curly alpha hairs in game won’t cause lag specifically, but having said hair on your sim, & every townie, & then they’re all at a place of business together, for example, well you could very well experience lag because of that. High poly build/buy content will also have the same effect. If you have a lot of it in one room or on one lot, then you may experience lag. How do you avoid this you ask? Just don’t use a lot of it at one time. How does one tell what the poly count is? Easiest way to tell if a piece of content is high or higher than usual poly, is to check how big the file is. You can find that by opening up the folder its located in, & in its file size column it will say it, or you can right click on the file, & select properties. It will tell you its file size. You can also check the poly size by opening up the .package with Sims4Stuido & navigating to the meshes tab. Anything above 5-10K polys, or 10K in file size, in my opinion, can be considered high poly. The better your comp is, the better equipped it is in rendering the high poly & the less lag & loading times you should experience. 👌
✪ When a patch or new EA content is released, your best course of action is to completely move your mods folder, your save folder, and your tray folder out of your Sims 4 folder before making the update. This is to ensure that nothing happens to it, in the off chance that some new or updated code EA releases doesn’t destroy it. The likely-hood of this happening is slim, but to save your self stress & headache, just move your mods folder before an update or install new EA content. After you’ve installed the patch or new EA content, open up your game and start a new bullshit save. You can trash this save once you are done. Its only purpose to verify your game is running smoothly without cc installed. Once you’ve run your game after the update/new content install, & you’ve ensured you can move around CAS &/or any world with a new save, & you have zero problems, you can then exit the game & move your mods folder back & resume your current save. 👌
✪ Once you’ve updated your game, while your testing out the same fresh bullshit save from above, don’t forget to go into the game options & TURN BACK ON YOUR MODS & SCRIPT MODS. If you don’t do this, you will not be able to see your installed cc once you start the game up again with your previous save. If you do forget to do this, & you accidentally save over your old save, you old save will now be cc free, & you’ve ultimately ruined your previous save. 👌
✪ Deleting your localthumbcache.package (located in your Sims 4 folder) periodically can help in seeing new content that should show in game. The localthumbcache is responsible for storing your thumbnails. It’s perfectly okay to delete this file as a new one will be regenerated once the old one is deleted. Keeping its size at around 80K-100K is ideal. 👌
✪ Merging cc can help reduce load times & in game lag. My preferred method of merging cc is through Sims4Studio. There’s a video explaining how it’s done here. Its logical to me to merge like items together, but again, stick with whatever system works for you. Its best to keep the pre-merged files amount to under or around 200mb, or you can risk items not showing in game. Why this happens, I don’t know. And always, always, ALWAYS keep a back up copy of whatever content you’ve merged, clearly labeled somewhere (another folder on your comp, a cloud drive, an external drive) if you can, so you know what came from where in the instance that you have to remove from or add to that merged package file. 👌
CC Basics 102 coming soon? Feel free to contact me with any questions, or suggestions. 👍
Happy Simming!

198 notes
·
View notes
Text
CLIP STUDIO Workspace Setup for Painting
🇹🇭 แสดงภาษาไทย
Hi, guys! This is my first time doing a tutorial. I started using CLIP STUDIO PAINT in the past 3 months and just love it! So I decided to share the tips and tutorials for beginners.
การตั้งค่า CLIP STUDIO เบื้องต้น สำหรับงาน paint สวัสดีจ้า นี่เป็นครั้งแรกที่ทำ tutorial ค่ะ เรื่องของเรื่องคือ เมื่อต้นปีที่ผ่านมามีโอกาสได้ใช้โปรแกรม CLIP STUDIO PAINT แล้วก็ชอบมากกกก ก็เลยอยากจะแชร์เทคนิคในการใช้โปรแกรมเบื้องต้นให้กับเพื่อนๆ ค่ะ หวังว่าจะมีประโยชน์กับคนที่เพิ่งหัดใช้โปรแกรมนะคะ
tutorial นี้มีเนื้อหาเหมาะสำหรับมือใหม่ที่เริ่มต้นใช้ CLIP STUDIO PAINT ค่ะ เพื่อนๆสามารถเปิดโปรแกรมแล้วค่อยๆ ทำตามไปทีละสเตปได้เลยนะคะ ^u^
Workspace Setup
I couldn’t agree more that efficient workspace help me improve my productivity. I simply optimize my workspace by bring out the frequently used tools and get the rarely used tools away. Then move all panels to the right side of the screen.
You can easily drag and drop the panels to rearrange them as you’d like. The picture below is the workspace I use.
จัด Workspace ในการทำงาน ยิ่งจัดพื้นที่ในการทำงานให้ดี ก็ส่งผลให้ทำงานได้มีประสิทธิภาพมากขึ้นค่ะ วิธีการง่ายๆ คือ เอาพวกเครื่องมือที่ไม่ค่อยได้ใช้งานออกไป แล้วเลือกเอาเครื่องมือที่ใช้บ่อยๆ มาวางไว้แทน
เราจัดให้เครื่องมือไปกระจุกอยู่ฝั่งขวาให้หมดเลย จะได้ทำงานสะดวก เพราะเราถนัดขวาค่ะ (เพื่อนๆ ที่ถนัดซ้าย ก็วางเครื่องมือไว้ทางซ้ายแทนนะคะ)
ใครใช้แถบเครื่องมือไหนบ่อยๆ ก็ลากมาวางได้เลยค่ะ สำหรับการทำงานสายเพ้นท์ เราจะใช้เครื่องมือเท่าที่เห็นในภาพด้านล่างค่ะ พอกำจัดพวก tool ที่ไม่จำเป็นออกไปแล้วดูโล่งขึ้นเยอะเลย

Lock Your Workspace
You can lock the workspace to prevent it from being accidentally moved while using. To lock your workspace, go to Window > Palette dock > Fix the width of palette dock.
ล็อค Worspace ไม่ให้ขยับ เรานี่เป็นประจำเลยค่ะ เวลาทำงานแล้วมือเผลอไปกดโดนแถบเมนูด้านข้าง จน Workspace ที่จัดไว้เลื่อนไปหมด เพื่อป้องกันปัญหานี้ เราสามารถล็อค Workspace ได้ โดยไปที่ Window > Palette dock > Fix the width of palette dock ค่ะ

Command Bar Setup
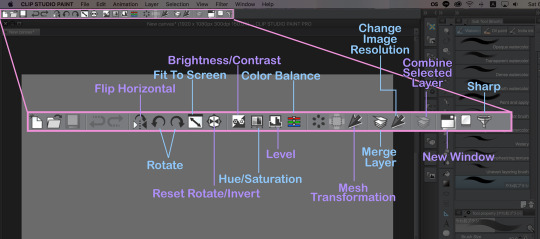
I rly love the Command Bar! It makes me work the way faster by one click to go to command. Here are the command that I recommend to put in.
ตั้งค่า Command Bar Command Bar คือเจ้าแถบเล็กๆ ด้านบนของโปรแกรมค่ะ เป็นส่วนที่เราชอบมากเพราะทำให้เราทำงานได้เร็วขึ้นด้วยคำสั่งที่สามารถคลิกได้ในครั้งเดียวเลยค่ะ แล้วเรายังสามารถเลือกได้ด้วยว่าจะนำคำสั่งไหนมาใส่ไว้ตรงนี้ ส่วนจะมีอะไรที่ควรจัดเข้ามาอยู่ใน Command Bar ดูได้จากภาพด้านล่างได้เลยจ้า
To set up the Command Bar, go to Command Bar Settings menu as the picture below.
การตั้งค่า Command Bar ทำได้ง่ายๆ ดังนี้เลยค่ะ 1. คลิกที่ CLIP STUDIO PAINT > Command Bar Settings... 2. เลือกคำสั่งในช่องด้านล่าง แล้วกด "Add" 3. คลิกและลาก icon ในช่อง Preview ด้านบน เพื่อจัดวางตำแหน่งที่ชอบ 4. คลิกระหว่าง icon เพื่อทำการแบ่ง section ของคำสั่ง 5. ตั้งค่าเสร็จแล้วกด "OK" ได้เล้ยย

You can find the location of each command from this list.
✦ Flip Horizontal : View > Rotate/Invert > Flip Horizontal ✦ Rotate : View > Rotate/Invert > Rotate Left/Right ✦ Fit To Screen : View > Fit To Screen ✦ Reset Rotate/Invert : View > Rotate/Invert > Reset Rotate/Invert ✦ Brightness/Contrast : Edit > Tonal Correction > Brightness/Contrast ✦ Hue/Saturation : Edit > Tonal Correction > Hue/Saturation ✦ Level : Edit > Tonal Correction > Level Correction ✦ Color Balance : Edit > Tonal Correction > Color Balance ✦ Mesh Transformation : Edit > Transform > Mesh Transformation ✦ Merge Layer : Layer > Merge Layer ✦ Change Image Resolution : Edit > Change Image Resolution ✦ Combine Selected Layer : Layer > Combine Selected Layer ✦ New Window : Window > Canvas > New Window ✦ Sharp : Filter > Sharp > Sharp
Shortcut Setup
Easy-to-use shortcut will help you speed up your work. I locate the essential shortcuts to my keyboard on the left side. So I can use just single hand to press hotkey.
ตั้งค่า Shortcut shortcut หรือก็คือคีย์ลัดนั่นเองจ้า คีย์ลัดที่ใช้งานง่ายเป็นอีกหนึ่งตัวช่วยให้การทำงานรวดเร็วยิ่งขึ้น เราตั้งค่าคีย์ลัดที่สำคัญและใช้งานบ่อยๆ ไว้บนด้านซ้ายของคีย์บอร์ดค่ะ ทีนี้เวลากดใช้ก็ใช้เพียงมือซ้ายข้างเดียวกดได้สบายๆ เลย ตอนแรกที่เปลี่ยนมาใช้ระบบนี้ ค่อนข้างปวดหัวทีเดียว แต่พอจดจำปุ่มต่างๆ ได้แล้ว บวกกับการใช้งานจนชิน ก็ทำให้การทำงานเร็วขึ้นได้จริงๆ ค่ะ
✦ TIPS ✦ หลังจากตั้งค่าใหม่แล้ว พยายามใช้คีย์ลัดบนคีย์บอร์ดด้วยมือข้างเดียวให้คล่อง ใช้งานบ่อยๆ ก็จะจำได้เองตามอัตโนมัติเลยค่ะ

You can set your own shortcut by going to Shortcut Settings.
วิธีการตั้งค่า shortcut ทำได้ตามนี้เลยจ้า 1. คลิกที่ CLIP STUDIO PAINT > Shortcut Settings... 2. เลือกคำสั่งที่ต้องการ 3. คลิก Edit Shortcut หรือ Add Shortcut 4. กดคีย์บอร์ดที่เราต้องการตั้งให้เป็นคีย์ลัด 5. ตั้งค่าเสร็จแล้วกด “OK”

To set the "decrease and increase brush size" shortcut, you have to change Setting area from "Main menu" to "Option" then click on "Brush size palette" as shown in the picture below.
ส่วนคำสั่ง “decrease and increase brush size” ซึ่งเป็นการเพิ่มหรือลดขนาดหัวบรัช เราต้องเปลี่ยนช่อง Setting Area จาก "Main menu" ให้เป็น "Option" ก่อนนะคะ แล้วจึงคลิกที่หัวข้อ “Brush size palette” เพื่อทำการตั้งค่าคีย์ลัด ถ้าใครงง สามารถดูตัวอย่างได้จากภาพด้านล่างนะคะ

Here are other shortcuts you may need.
✦ B : Brush ✦ B (2 times) : Air Brush ✦ B (3 times) : Decoration ✦ P : Pen ✦ P (2 times) : Pencil ✦ E : Eraser ✦ J : Blend ✦ O : Operation (Select Object) ✦ D : Operation (Select Layer) ✦ G : Gradient ✦ G (2 times) : Fill ✦ K : Move Layer ✦ M : Marquee ✦ R : Rotate
Save Your Workspace Setting
After setting up your workspace, you can save your setting. Palette setting, shortcut settings, commandbar settings and unit of length will be kept. To save your workspace setting, go to Window > Workspace > Register workspace...
บันทึกการตั้งค่า Workspace หลังจากตั้งค่าอะไรเรียบร้อยแล้ว เราสามารถบันทึก Workspace ของเราได้ด้วยค่ะ พวกการจัดวางอุปกรณ์ คีย์ลัด การตั้งค่า Command Bar และหน่วยวัดที่ใช้ ก็จะถูกบันทึกไว้ด้วย ไม่ต้องมาตั้งค่ากันใหม่บ่อยๆ เหมาะสำหรับคอมพิวเตอร์ที่มีผู้ใช้งานหลายคน หรือคนที่อยากจะเซ็ทค่า Workspace ให้แตกต่างกันออกไปตามลักษณะงานที่ทำ เช่น สำหรับ animation เซ็ทนึง สำหรับ painting อีกเซ็ทนึง
วิธีการบันทึก Workspace ทำตามนี้ได้เลยจ้า 1. เข้าไปที่ Window > Workspace > Register Workspace... 2. ตั้งชื่อ Workspace ของเรา 3. เสร็จแล้วกด "OK"

To choose your workspace, simply click the workspace in the list. If you'd like to delete, rename or change it to default, please follow the command in the picture below.
ส่วนเวลาเราจะเลือก Workspace ขึ้นมาทำงาน ก็แค่คลิกไปที่รายชื่อ Workspace ที่เราตั้งไว้ได้เลยค่ะ หรือถ้าอยากจะลบ เปลี่ยนชื่อ และรีเซ็ทการตั้งค่า กดเข้าไปตามเมนูในภาพด้านล่างนี้นะคะ

Migrate Setting to Other Computers
If you have to format your computer or work with another computer, please follow this steps to migrate your setting.
1. Find the folder name "CELSYS_EN" from the destination I gave below. Then Copy it to the thumb drive. ✦ Mac : Macintosh HD/Users/(your username)/Documents/CELSYS_EN ✦ PC : C:\Users\(your username)\Documents\CELSYS_EN
ย้ายการตั้งค่าไปยังคอมพิวเตอร์เครื่องอื่นๆ
ถ้าจะต้อง format คอม หรือย้ายไปใช้ CLIP STUDIO PAINT ในคอมพิวเตอร์เครื่องอื่น การย้ายการตั้งค่าไปยังคอมเครื่องใหม่นั้นทำได้ง่ายๆ ตามนี้เลยค่ะ
1.ตามหาโฟลเดอร์ที่ชื่อ "CELSYS_EN" ตามที่อยู่ของโฟลเดอร์ที่เราเขียนไว้ด้านล่างค่ะ หลังจากนั้น copy โฟลเดอร์นี้ใส่ไว้ใน thumb drive เลยค่ะ ✦ Mac : Macintosh HD/Users/(your username)/Documents/CELSYS_EN ✦ PC : C:\Users\(your username)\Documents\CELSYS_EN

2. Install CLIP STUDIO PAINT on your new computer
2. ติดตั้ง CLIP STUDIO PAINT ลงในคอมพิวเตอร์เครื่องใหม่ที่จะใช้งาน
3. Connect your thumb drive to the new computer and paste (replace) the folder "CELSYS_EN" to the same destination in your new computer.
3. copy โฟลเดอร์ "CELSYS_EN" จาก thumb drive ไปวางในตำแหน่งเดียวกับในคอมเครื่องเก่าค่ะ ให้วางแบบ replace ทับของที่มีอยู่ไปเลยนะคะ
4. Relaunch CLIP STUDIO PAINT and click Window > Workspace > choose your workspace.
4. เปิด CLIP STUDIO PAINT ขึ้นมาใหม่ แล้วคลิกไปที่ Window > Workspace > แล้วเลือก Workspace ที่เราต้องการค่ะ
5. There'll be a window pop up. You can choose what you'd like to import then click "OK". All settings, brush and shortcut had already been migrated to the new computer!
5. จะมีหน้าต่างเด้งขึ้นมาเต��อนเรื่องการ Import workspace เลือกสิ่งที่ต้องการ import แล้วกด "OK" แค่นี้ก็เรียบร้อยแล้วจ้า การตั้งค่าทุกอย่าง รวมถึงคีย์ลัด และหัวบรัชเดิมที่เคยใช้อยู่ ก็ย้ายมาอยู่ที่นี่แล้ว!

That's all of my tutorial about Workspace in CLIP STUDIO! There are so many things left to share with you guys next time. Please, stay tune! Lastly, if my words had any mistakes, don't hesitate to let me know. Any critics and comments are very appreciate! THANK YOU 💝
ทั้งหมดนี้ก็คือ tutorial ในส่วนของการจัดการกับ Workspace ใน CLIP STUDIO PAINT ค่ะ โปรแกรมนี้ยังมีเทคนิคในการใช้งานอีกมากมายเลย ซึ่งเราประทับใจมากๆ ในโอกาสหน้าหวังว่าจะได้มาเล่าสู่กันฟังอีกนะคะ สุดท้ายนี้ ถ้าบทความของเรามีข้อผิดพลาด หรือเพื่อนๆ มีข้อเสนอแนะอะไร สามารถฝากข้อความไว้ได้ที่ช่อง comment ด้านล่างนะคะ ขอบคุณจ้า ^u^
30 notes
·
View notes
Text
How to recover formatted data from USB Flash Drive or Pendrive?

Description: Know various techniques to recover formatted data from pendrive efficiently. Learn about the smart and reliable solution to retrieve deleted files from formatted flash drive. Quick Solution to Recover Formatted Data From Pendrive "Yesterday, I saved some important files related to my project on USB/Pendrive. But, I accidentally formatted my Pendrive while trying to move them on my laptop. I know these formatted files are not stored on recycle bin. Can anyone suggest me an optimal and efficient solution to recover formatted data from pendrive quickly? Nowadays, data loss has become a very serious problem. Sometimes, you may accidentally format your Pendrive. While in some cases you have to format your USB drive because you are not able to use that device normally without formatting. However, USB/Pendrives are very important storage device used to store essential files, photos and videos. These devices are also used to transfer and take backup of most important data. Most of the times, the formatted pendrive contains very essential data that users do not wanna lose. Therefore, in this blog, we will discuss how to retrieve data from formatted pendrive safely. Reasons for Data Loss From USB/Pendrive As everyone knows, it is very difficult to remove data from a pen drive. Simply, when the data is deleted it is not stored in the Recycle Bin because it is permanently deleted. This is known as the deletion of 'Hard Data'. Some of the reasons for the deletion of data from USB/Pendrive are discussed below: Unnecessary/ Accidental Deletion of data Unintentional Formatting of Pendrive Unplugged USB drive during file transfer Insufficient power supply to USB port The file gets corrupted due to improper shutdown Virus Attack may corrupt or encrypt the data Loss of files during cut/paste operation Methods to Retrieve Data From Formatted Pen Drive There are two methods to recover files from the formatted Pendrive which are discussed below: Using Manual method Using a Third-Party Tool Manual Approach to Restore Data From Formatted Pen Drive There is a built-in management application in Windows, Command Prompt that helps to recover files from a formatted pendrive. Here is a complete solution to recover data from formatted USB drive: Connect your formatted pendrive with your computer system Click on the search icon and enter cmd In Command Prompt, type chkdsk F: /f and press enter (Replace F with the drive letter of your formatted Pendrive) Next, enter Y and drive letter of your formatted pen drive Type F: \ >attrib –h –r –s /s /d *.* and press Enter key Check your pendrive and you will find that CMD recovered all your files perfectly. After completing this process, users will get all the formatted files on a newly created folder on the USB/Pendrive. Limitations of Using CMD to Recover Formatted Pendrive It is a very complicated and lengthy process during recovery. Recovery of selective formatted files is not supported. If you skip any step during this process you will lose your data permanently. Professional Approach to Recover Files From Formatted Pendrive To overcome the limitations of the above stated method, user can take help of a reliable Third-party tool named Pendrive Recovery. This tool is a powerful and safe solution to retrieve data from formatted Pendrive. It is capable enough to recover corrupted, loss and permanently deleted data from the USB drive without any hassle. It supports recovery from various formatted external storage drives like exFAT, FAT, and NTFS. The software is user-friendly, therefore, can be utilized efficiently. Some of the benefits of this tool are mentioned below: Advantages of Using Pendrive Recovery Utility Recover corrupted and permanently deleted data from USB drive It is capable to detect multiple external devices at a time Allows extraction of selected files and folders from Pendrive Advance search option to find desired files and folders It has a simple, easy to use and user-friendly interface Compatible with all versions of Windows OS without any limitations Complete Steps to Retrieve Formatted Data Using Third-Party Tool Download and install Pendrive Recovery Utility on your system After installing the software, a list of all attached pendrive or memory cards will appear on the screen. Select the device from the list and view its basic details on the right panel. Now, the software will display two options- Scan and Formatted Scan. You can choose Formatted scan option to retrieve formatted data from USB drive. Next, you have options to either retrieve selected files or complete data. Provide the location to save the resultant files and press the OK button. Wrapping Up Sometimes, users have deleted their files from pen drive by mistake. At that time, they want to recover formatted data from pen drive or USB. Thus, in this article, we have discussed manual method to recover formatted data from Pendrive. Along with this, we have suggested a trusted third-party utility named as Pendrive Recovery to retrieve formatted data from USB drive. It is a remarkable tool designed to retrieve permanently deleted files from pen drive without any trouble. Read the full article
0 notes
Text
Undelete Video
This tutorial article includes a step-by-step instruction to undelete videos that are deleted by mistake and you can follow this guide to easily and quick recover deleted, lost or formatted video files from computer, external hard disk, flash drive, memory card, Android device or iPhone. Free download the video recovery software and start undeleting videos now.
Overview on undeleting video
Deleting important videos by accident can be an annoying experience and many of us must have suffered from similar problem. Videos are very common and useful file format, for they can help us record important moments better than photos. Smartphones, digital cameras and many other devices can create and store video for us. However, if you do have keep any backup, you are likely to encounter data loss issue, for example, you may delete file by mistake, format memory card accidentally. What can you do to restore deleted video files?
“Hello everyone, I’m look for free and effective tool to restore deleted videos from my digital camera. The other day, my kid just deleted a folder when viewing files on the camera, and the deleted folder contained around ten videos which haven’t been transferred to my PC. All of them are family videos and I really need to recover from. It’ll be great if there is any freeware to undelete all videos. What’s your suggestion?”
Here you can find undelete video recovery software and how to get back deleted videos via simple steps.
Undelete video recovery software free download
Eassos Recovery Free provides an effective & free solution to undelete videos & photos from PC and other devices. This undelete video recovery software will perform a deep and complete scanning from the device in Windows 10/8/7 and effectively locate recoverable videos, photos, documents, emails and other data from drives formatted in NTFS, exFAT, FAT32, FAT12 and FAT16 file system. More features on undeleting video files:
It supports undeleting videos in various formats, such as AVI, MOV, MP4, M4V, 3GP, 3G2, WMV, MKV, ASF, FLV, SWF, MPG, RM/RMVB, MPEG, etc.
Once deleted videos are found during or after scanning, you can preview them to check if they are damaged or not.
It provides four recovery modes with which you can undelete or unformat data, recover lost partition, recover data from damaged disk, etc.
Eassos Recovery Free comes with a clean and user-friendly interface which helps both non-technical and advanced users to complete recovery process step by step.
If you are facing complicated data loss issue, you may need to use advanced data recovery software. DiskGenius can be your option when you want to deal with difficult data loss problem.
Free download the undelete video recovery software and restore lost video now.
Undelete video guide 1: recover deleted videos from SD card
Eassos Recovery is able to undelete 1GB files free of charge and you can recover unlimited amount of data if you upgrade it to the full edition via entering a license code. The free edition works the same as the registered edition when searching for lost files, thus you can test the software and check if it meets your requirement with the free edition.
Connect the SD card where you want to undelete video files to the computer which runs Windows system. Then install and launch Eassos Recovery Free from your computer. Note: do not install the recovery software to the device where lost files were stored.
Below is the step-by-step guide to restore deleted video files.
Step 1: Select recovery mode.
From the main interface, you can see 4 recovery options and a lucid introduction under each option. You can easily make the choice since you want to restore deleted videos, i.e. Recover Deleted Files.

Step 2: Choose the device to start scanning.
In this step, you need to select the device, more specifically the SD card, and click Next button. Then Eassos Recovery Free starts to scan the device and look for any recoverable files.

Step 3: Preview and recover files.
Eassos Recovery Free provides file preview feature and it is very useful to find out what you need and check if files are recoverable.
Choose files and folders you want to restore and click Recover button, after which you can set a location from your computer to save recovered data.

Undelete video guide 2: recover deleted videos from Android device
This guide includes steps of undeleting videos from Android devices. Recovering deleted videos from Android needs specialized recovery software which is able to recognize the internal or built-in storage space from Android device. Here is the detailed guide:
Step 1: Root your Android device to get proper permission.
You can easily find and download software which can root Android device from the Internet. Just follow its guide and get your device rooted.
Step 2: Install and launch Eassos Android Data Recovery from your Windows computer.
Click Refresh Device button to let the software recognize your device and click Next button to continue.

Step 3: Select the storage device and click Next button to start scanning.
Storage space on some Android device includes internal memory and SD card, and you need to select the one which needs recovering data.

Step 4: Preview and recover data.
During scanning, you can see recoverable files listed in the software and you can preview files you need.
When scanning completes, you can choose files you want to restore from the Android device and click Recover button. Then you can save recovered to computer and get files recovered.

Conclusion
This tutorial guide, we talked about how to undelete video from SD card and Android devices. Please choose proper video recovery software to troubleshoot your issue. If you encounter issue when you recover deleted or lost videos, you can contacting our customer support team to seek help.
Related articles
Video deleted recovery
SD card video recovery
Video file recovery: how to recover deleted videos?
How to undelete partitions?
from Eassos Blog https://www.eassos.com/blog/undelete-video/
The following blog post Undelete Video is available on http://thomasalwyndavis.com
from Thomas Alwyn Davis - Feed https://thomasalwyndavis.com/2019/05/06/undelete-video/
0 notes
Text
How to recover deleted photos from an SD card
That SD card may still be holding pics you thought long gone. That's a good thing and a bad thing, depending of what kind of photo you're talking about. (Luca Lorenzelli via Deposit Photos/)
There are few things more soul-crushing than losing that last photo of grandma, or videos of your child’s first steps. But SD cards can be fussy, and occasionally those photos can get corrupted or accidentally deleted. And it’s not like you can just recreate those photos after the moment’s passed.
The good news is that if you still have that SD card, you still have hope.
How file recovery works
This may come as a shock to you, but when you delete a file from an SD card (or hard drive, or flash drive) that data isn’t erased right away—instead, your computer just marks that space as available for re-writing. Even though you can’t see the files, they’re still there until your camera (or computer) overwrites them with something else. That means that if you haven’t taken too many new photos, you might be able to get those old ones back.
So if you lost or accidentally deleted files off an SD card, the first thing you must do is stop using it. Don’t take any more pictures—remove it from your camera and set it aside. If you keep snapping away, you might overwrite the photos you’ve lost, and then you really won’t be able to get them back.
Be ready to pay a little money if things get tough. We’ll go through two free recovery programs here, but if they can’t find what you’re looking for, it may be worth trying a paid one instead—sometimes one program will find files that others missed. You’re not going at it blind, though—most paid programs will let you scan the drive for free, at which point you can pony up to actually recover the files. A few bucks is usually a small price to pay for those irreplaceable family photos.
Let’s get started.
Windows: Recover your files with Recuva
As long as they have not been overwritten, your files might still be in there. (Whitson Gordon /)
Recuva is a free tool that can be a little finicky, but it’s a good place to start. Install Recuva like you would any other Windows program and start it up. If, for some reason, it doesn’t launch, it may be conflicting with a driver on your PC or an antivirus program—this is a somewhat common issue, and I was able to get it to launch by booting into Safe Mode. (Just hold Shift while restarting the computer, head to Troubleshoot > Advanced Options > Startup Settings, and restart into Safe Mode with Networking.) I also had to plug my SD card in using a USB card reader, rather than my laptop’s built-in SD card slot, though your mileage may vary.
Recuva’s Wizard will attempt to make the scan a bit speedier by asking you what you’re looking for. The first time you go through, I recommend choosing Pictures on My Media Card or iPod, but you can choose All Files from All Drives if you prefer to catch everything humanly possible—it’ll just take longer.
Recuva will then present you with a list of files it found. In my case, it found about 13 deleted photos I’d taken for work a couple years ago, and I was able to recover all but one of them (which had probably been partially overwritten with new data at some point). If the software found a lot of files, note that checking each box can be a tedious task, so I recommend selecting the first photo, holding Shift, then selecting the last photo to highlight them all. Then, right-click on a photo and choose Check Highlighted to mark every photo for recovery. Click the Recover button to find a place for them on your computer’s hard drive. Do not recover them to the SD card, or you may overwrite the files before they can be recovered.
If you don’t find everything the first time, try re-running Recuva and doing a Deep Scan—it’ll take longer, but you might get lucky. When I ran a deep scan, Recuva found about 35 photos from years ago that it didn’t find in the initial scan.
Mac: Recover your files with LazeSoft Mac Data Recovery
If you want to really dive into the depths of your SD card, make yourself a cup of coffee and go for the deep scan. (Whitson Gordon /)
If you’re a Mac user, I recommend starting with a freeware program called LazeSoft Mac Data Recovery. It isn’t pretty, but it’s completely free, and worked remarkably well in my tests. Install the program as you would any other, then start it up and select either a Fast Scan or a Deep Scan. (A deep scan will find more, but will take longer.) Select your SD card when prompted, and let it do its thing.
When LazeSoft is done scanning, you’ll have a list of folders in the left sidebar you can browse through. It doesn’t show thumbnails, so it can take some time to find the photos you’re looking for. Once you do, you can check them off and click on Save Files along the top to recover them to your hard drive. Again, remember not to recover them to the SD card, or you may overwrite the files before they can be recovered. Be sure to check through all the folders in the sidebar to make sure you catch every photo that’s available for recovery.
What to do if you don’t find what you’re looking for
Free file recovery programs will only get you so far. To find everything there is to find on your SD card, you'll have to pay. (Whitson Gordon /)
Here’s the thing: the above programs are great first efforts, but they’re free for a reason. If you aren’t finding everything you want to recover, it’s time to try something a bit heftier, like Disk Drill ($89, for Windows and Mac), EaseUS Data Recovery Wizard ($70 per month or $100 per year, for Windows), or Ontrack EasyRecovery ($79 per year, for Windows and Mac). When I tested these programs, I found 200 photos—a far cry from the 51 found in Recuva’s deep scan—plus a couple of videos, taken so long ago I barely remembered them. All three options will scan your drive for free, but will only recover between 500MB and 1GB of data before you have to pay. Honestly, that’s a pretty good deal. Try one or all of them before you pony up to make sure you get the maximum amount of recovered photos possible.
If they still can’t do the trick, you may be out of luck. But if those lost photos are incredibly important to you, a data recovery service like DriveSavers or LC Technology may be able to recover files that consumer-level software can’t—at a cost of hundreds or even over a thousand dollars. So you’ll have to decide if recovering those photos is actually worth potentially spending that amount of money.
Whether you’re able to recover your photos or not, remember that the story doesn’t end here—you’ll also want to do everything in your power from preventing this in the future. Copy your photos to your PC early and often, properly eject your SD card before removing it from your PC, and have a good backup strategy in place, so those photos never disappear.
from Popular Photography | RSS https://ift.tt/2RqaTMe
0 notes