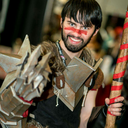
#i think the 268px side by side ones work better?? idk
Text

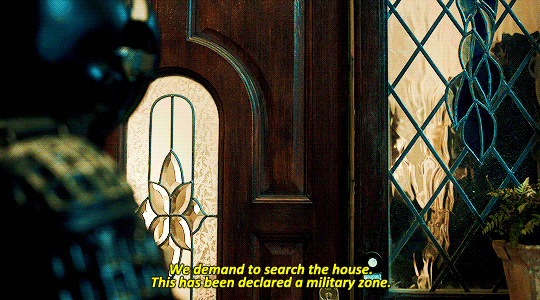
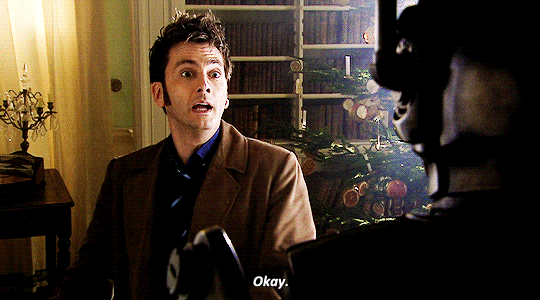
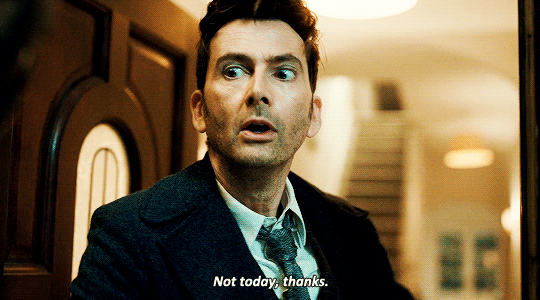

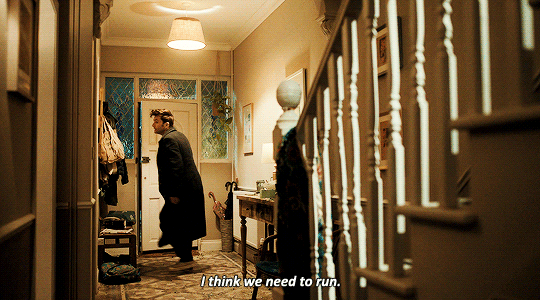
#mine#doctor who#dwedit#david tennant#dw spoilers#i can finally sit down and make some gifs let's gooooo!!!!#also idk if i like making parallel gifsets like this#i think the 268px side by side ones work better?? idk
2K notes
·
View notes
Note
hi! sorry if this is a bit out of nowhere but i love your gifs! they're so clear and crisp! and i was just wondering if you had any tips on how to achieve the quality that your gifs manage to have?
ooh thank you so much. nonnie! i’ll leave some tips under the cut. if you’re ever interested in a full tutorial, please lmk! i always thought about doing one, but there are already 5 million on this site... but so many are different from each other, so hey, who could it hurt. anyways here’s some stuff i thought of :)
1. ALWAYS use 1080p. Others say 720p or 1080p, but I don’t think i’ve ever used 720p unless the show/movie is literally not available in 1080p. you can see the difference! i’ve used 2160p as well, but that’s not necessary at all, and you’ll only find that on much newer stuff.... besides, 1. most computer monitors/phone screens only go up to 1080p anyway, and 2. once you resize the gifs to tumblr dimensions, there is literally no difference between those two)
2. know your sharpen settings! for me, it’s almost always .3 radius, 500%, gaussian blur & more accurate. however, once in a while, this can change, depending on the camera used when filming the show/movie (i.e. an indie film with a lower quality cam) or the quality of the file itself. for example, for my recent set here, i had to do that setting, and then an extra, lighter smart sharpen layer on top of that, because it still wasn’t crisp enough, due to the lower-budget camera quality. ALSO: PLEASEEEE DON’T OVERSHARPEN! equally, don’t skip sharpening. it is probably the base essential component, and your gifs will look amateur if you don’t have it, no matter how good you are at coloring :)
3. don’t be afraid to experiment. even if you think something will be too dark, too bright, too dull, too vibrant... try it! every show/movie is vastly different to color and edit, so always try out new things. ALSO a really good method is to upload the gifs you made into a new post, and save it as a draft. this will show exactly what the gifs will look like when posted, which is always quite different than what you see in your photoshop workspace. this will allow you to know your gifs are at the quality you want before posting
4. always upload every frame of a recording. don’t only capture every other frame, and definitely don’t skip two or more frames in between. this makes the gif jerky and definitely seem lower quality. i see this a lot with newer gifmakers. just use every frame, and make the giffed clip shorter if it’s over the size limit! better to have a smoother, shorter gif than a long, jerky one, any day. ((some people may argue that deleting every other frame doesn’t make a difference, but if you want a smooth gif... trust me, it does).
5. 98% of the time, my time delay between frames is .05. a lot of people say .06, but i find this a bit too slow, unless the gif is very small, in which case the frames move faster, so they need a slower delay (idk the logic okay just work with me!!). also, i’ve noticed a trend (esp in the pale community, even though i’m not a part of it anymore), is to put a lower frame delay, so the clip moves really quickly. i don’t like this personally, as i find it super distracting to watch gifs move at a fast forward pace, but it’s your choice. .05, i’ve found, moves closest to the natural pace of the source material, if not the TEEEEEENIEST bit slower, but in a very nice, natural way, and barely noticeable at all (.04 is just too fast imo).
6. this one is a complete and total preference thing, and you don’t at all need to follow it. but if you’d like an insight into how i like to make my gifs... i always like the coloring of the gif to be naturalistic and just slightly bright. meaning: i don’t make my gifs overly vibrant, i like to keep my colors natural. this isn’t to say i don’t change the coloring up from the original scene - if a someone is lit very blue, or red, or too much of any color, i like to try to adjust the colors so their natural skin tone shines through more. if a scene is extremely pale, i like to bring up the vibrance a bit - not unnaturally so, but so there is more color tone to look at. and in terms of the ‘slightly bright’ part, i like to up my exposure/levels/curves/brightness (the combos of those four change with every set... some gifs look Bad with adjusted levels, some look washed out with higher exposure, etc) so it pops a little bit more on the dash. again, not in an unnatural way.
7. in #6, remember when i said if something is lit too much of a certain color, i like to try to get natural skin tones back (if it’s a shot of a person)? sometimes, this isn’t possible. in this case, embrace your colors! for example, if a scene takes place in a darkroom with the intense red light on, your not getting any skin tone out of that... so embrace those reds! up the vibrance a bit, get your red selective color layer out, make the red pop. it’ll look lovely in a set!
8. very similarly, if a scene is extremely dark, a lot of the time it will diminish the quality if you try to brighten the whole thing up. embrace those darks, while finding the light areas to bring up. for example, that same gifset i linked above. there is a gif in there where he is standing in complete darkness, with only one side of his face lit up. not only is this a symbolic shot and there is a reason for one half of his face being in darkness, even if you did try to brighten the whole thing, alllll of that black space will become gross and pixel-y, and the light spots on his face will be overexposed. instead, what i did was take that black space and make it even blacker, while using curves to keep that area dark and bring up the brightness in his face, which gives it a lovely contrasting effect. i love this look in gifs... dark vs. light!! embrace what the scene gives you!
9. this may be obvious, but know tumblr’s dimensions. if you upload a gif at the wrong size, it will either shrink or stretch it, completely ruining the quality. (my most used dimensions are 540px for single gifs rows, and 268px for double gif rows)
10. always put a final BLACK selective color layer at the end of your layers, and up the blacks slightly until they are True Black. this will make sure everything has a good level of contrast, and appear as smooth and hq as possible!
hmmmmm i think this is all i can think of for now.... there is some other more subjective stuff as well i guess, but most of it doesn’t have to do with gid “quality” or “crispness”, so they’re prob beside the point. these are the important points i can think of. if you need anymore specific help, feel free to shoot me another ask/message!
28 notes
·
View notes
Note
Can I ask you how you make your gifs/edits? Lol
hi!! haha i’m flattered you would like to know, but i’m by no means an expert on either mediums 🙇♀️ @realstraykids has a really good general intro post on how to make gifs which you can find here 💖 personally, i don’t use everything listed in that post because giffing is a form and style of art and everyone has their own spin on it so i’ll just list a few things i do under a cut ✨
i get my videos differently depending on which platform i know the source is from (youtube, vlive, twitter, etc.) and i tend to download the videos in the highest resolution option available.when actually making my gifs, i only use photoshop since i’m a simpleton and like keeping things on one application/software.
so firstly, go to file ↠ import ↠ video frames to layers and then select the video you want to gif. you’ll then have a menu in which you have a few options;

depending on how long your video is, you’ll mostly only want to import a selected range and you can use the sliders on the right hand side to select when and where in the video to gif.
once you have your frames ready, you can take this time to polish up on the range of the gif by deleting or adjusting the frames in the timeline and cropping it to the size of your liking.this is also the time where you get to personalize your gif by adjusting the speed of the frames and adding your own/a colouring to it.
for me, i like to slow down my gifs just a tad little bit just because i like the look of them (and sometimes you can catch certain things better when slowed down). whatever the timing for the frames are set at, i’ll double it (ex. default speed is 0.03 seconds, i’ll change it to 0.06 seconds)


once i’m done with cropping and the speed, i’ll resize the gif respectively to how many i’ll have in a row or for whatever gfx project i’m working on. again, you can personalize the sizing as well, but there are some sizes that works best on tumblr than others:
if you want 1 gif per row ↠ 540px
if you want 2 gifs per row ↠ 268px
if you want 3 gifs per row ↠ 177px
these dimensions varies on the crop and the way you want to arrange them in a post, but these are the ones that works best in 2018/2019 (hopefully they don’t decide to change it or else i’ll throw my laptop)
after that’s done, i’ll convert the frame animation timeline into a video timeline with the sequence icon at the bottom left (i’ve boxed it in red)


and convert all the layers from the right side menu into a smart object (select all the layers and then right click them and you’ll open a menu that’ll have convert to smart object or you can go under layer ↠ smart objects ↠ convert to smart object)
this will compress your layers into one which can make it easier if you want to use the filter options such as adding noise, blurring, sharpen or anything as such to add onto the gif. another option is to use the adjustments to add character to your gifs and really change them up from your standard frame by frame animation! @hwangs has made a very in depth and complex gif tutorial which you can find here and i suggest reading her other tutorials here!
in terms of colouring, you don’t necessarily have to feel obligated to use or make them, but they can help make your gifs stand out and give them character/personality, example:

ver.

for starters, you can easily find psd on tumblr and on deviantart, but if you are going to be using someone else’s premade psd remember to give them credit somewhere in your post, with a link to the source
finally, once you’re happy with everything, you simply just have to export your gif (file ↠ export ↠ save for web) and make sure that it’s under 3MB or else you won’t be able to view them (if it’s a little over 3MB, mobile tumblr will still be able to view them as gifs, but not on desktop)
and i think that’s everything in terms of gifs goes! idk, i feel like em did a really good job with her post so this is like a less informative one and nicolle does such interesting gifs in terms of colouring and creativity goes. in terms of gfx, i’m not quite sure what kind of style you would want an explanation for, but i’m opened to making a beginner’s guide sort of post in the future if anyone would like!
3 notes
·
View notes
Last Seen Blogs

crimsonhawkecosplay
Crimson Hawke Cosplay
different-kinds-of-man-funk
General pit stuff

xliberatorofsoulsx
Lightning's Lounge
titanlights-moved
Light Up The Titans