#i remembered to watermark this let’s gooo
Explore tagged Tumblr posts
Visit Tumblr Blog
Explore Tumblr blogs with no restrictions, modern design and the best experience.
Last Seen Tumblr Blogs


Fun Fact
After the announcement of the deal with Yahoo!, there were 170K signatures of unhappy Tumblr users petitioning to prevent the sale in 2013.
Text

abby!!!
#if you don’t like abby i don’t like YOU#as a former weird little autistic girl i think abby is great weird little autistic girl rep and i would kill for her#also her unparalleled drip like what???#she dresses just like every real life nine year old i love it her costuming was so good#she needs two thousands minutes of screen time in the next movie#fnaf#fnaf movie#my art#abby schmidt#abby fnaf#five nights at freddy's#fnaf movie 2#pre fnaf movie 2#fnaf fanart#i remembered to watermark this let’s gooo
19 notes
·
View notes
Text
hello gamers @canidrook was interested in how i made this gifset so here’s a (hopefully not too long) tutorial under the cut :^)
this won’t cover how to make gifs, just the rest of the process, and i guess there’s also a couple of photoshop tips in here too okay let’s gooo
i started with the two gifs of chief, then both gifs went into their separate 540px panels with dark gray backgrounds (resized and put together in one gif for the purposes of this tutorial). i recommend sharpening the gifs at this (or any time after this) point because starting at 540px and scaling down will cause the gif to lose its sharpness. i did not do this myself because i was too lazy to correct my error lol
coloring came next, i used clipping masks to affect the coloring of only the gifs. honestly you probably won’t be using clipping masks a lot when making gifs, but for anyone interested and/or unaware, clipping masks are layers that alter and are visible only on the layer below it
for example, if i were to create adjustment layers without clipping masks, the canvas and layer tab would look like this
however, by clipping the adjustment layers to the layer directly below it, the coloring affects only the Gif group. you can create a clipping mask from any layer by right clicking the layer in the Layers tab and selecting “Create Clipping Mask”, or by holding down ALT and clicking the bottom border of the layer

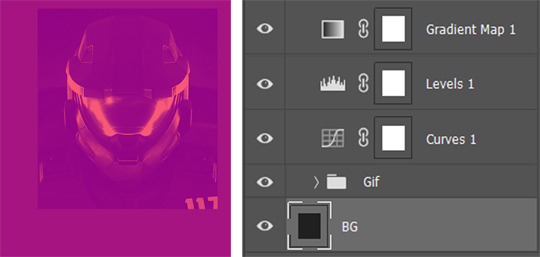
here’s the canvas and Layers tab with clipping, where there are now little arrows inside the adjustment layers on the left to indicate that they are clipping masks

of course, there are other ways of achieving this same effect, but i find clipping masks to be faster. and again, not always applicable for making gifs, but i do use it often when painting or editing
here are the colored gifs
then i moved on to adding text. i used two fonts, Couture which is the bigger, chunkier font and Avenir LT Std (not actually the exact link where i downloaded it from because i can’t remember anymore, but i think it’s close enough) which is the smaller, skinnier font
the default settings of Couture weren’t wide enough for my liking, so i edited the vertical scaling through the Character tab (found in Window -> Character)
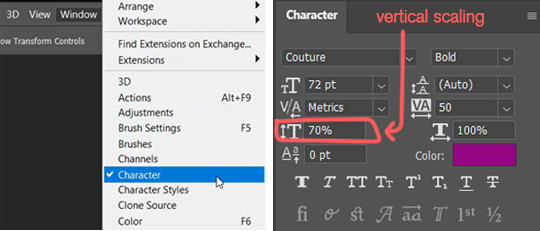
the left is 100% vertical scaling, the right is 70%. i kept this setting for Couture for the whole gifset
a lot of fonts (~*technically*~ they’re called typefaces if you wanna be TECHNICAL) have variations included within its family, e.g. italic, bold, light. some fonts have an outline variation as well, but since Couture does not, i had to do it manually. i won’t go over how i did it though because... it’s kind of a dumb method LMAO
honestly i would just find a font that already has this outline variation included, it’s way easier. the Swiss 721 typeface has this, which might be a default font already installed? also i would have used this Outer Sans font, but i found it after i posted this gifset rip
anyway these are the gifs with all the text included
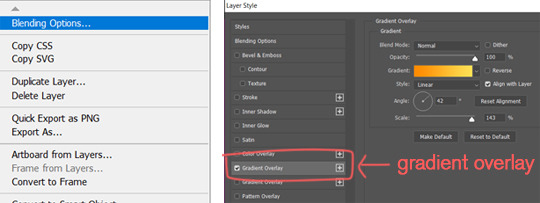
there’s also a purple to pink gradient on top of the tiny text on the bottom of the first gif. to add gradients to text layers, right click on the layer in the Layers tab -> Blending Options -> Gradient Overlay
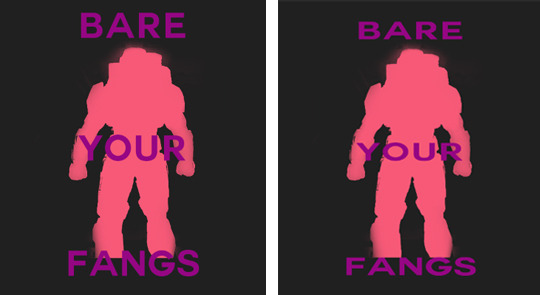
the last thing i’ll go over is that little animated soundwave (it’s not really a soundwave but Whatever) in the first gif, which is basically just overlayering a gif on top of one another. it’s actually stock footage that i cropped to get rid of the watermark lol shoutout iStock
1. is a screencap of the original video, 2. is the cropped portion that i used

i won’t go over how to overlay gifs, so here’s a tutorial on how to do it. no i did not specifically choose this link because it’s of destiel, but it does use the same method of gif-making as i do, which is the frame animation timeline. it’s just a thousand times funnier that it happened to be a destiel gif
at this point, the soundwave gif should be layered on top of the original gif, and the Layers tab should also be grouped similarly to this (as the above tutorial suggests)
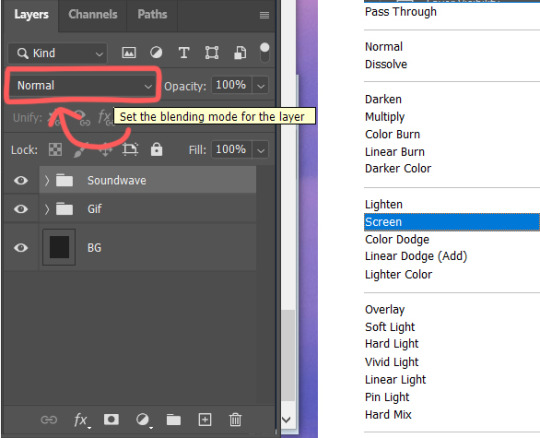
it’s actually important that the Soundwave frames are grouped because it’s how i changed the group’s blending mode to screen, which will make the black background turn transparent. to change the blending mode, click the necessary group, navigate to the menu next to Opacity in the Layers tab, and switch to Screen
the black should now be transparent, and the gif will look like this

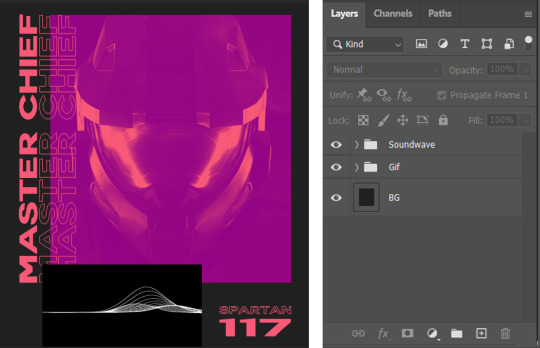
to make the waves purple, i added a gradient map and clipped it to the group, at which point the gif and Layers tab should look like this

there are some other shapes like the plus signs and the colored squares and stuff, but you don’t really need reference pictures for that. one last tip is to use ruler guides to make sure everything is lined up with each other. you can access the ruler with CONTROL + R, then dragging from the ruler out to the canvas, which should create a cyan line that runs infinitely. you can also snap objects to it to make lining up elements like shapes or text that much easier
and that’s it :^) save that bad boy and post it on tumblr dot com !
i apologize if this was confusing, too short, too long, or otherwise incomprehensible, so if anything was unclear/if there are any questions, you can always message me or send an ask! good luck!
#i hope i was concise... i either explain too much or too little lmao#and i hope this helped#btw thank you so much to those who wrote nice things in the tags on this set!!!#it was very sweet of all of you 🥺
8 notes
·
View notes