#i really should re-organize my mods folder
Explore tagged Tumblr posts
Visit Tumblr Blog
Explore Tumblr blogs with no restrictions, modern design and the best experience.
Last Seen Tumblr Blogs


Fun Fact
Tumblr Inc. is funded by 13 investors.
Note
Hi Bella :) following in the footsteps of the anon commenting on your 2024 simming goals, I wanted to second the hope that you might make more videos on the topic ^^ I'd basically be interested the your whole process! Like will you be starting from scratch or are do you have a certain set of essential mods, that you will be keeping? Could you explain how you deal with conflicts? Oh god, tumblr asks are too short x_x I have to many questions :D should I send them via discord-channel or -dm?
Hello, thank you! That's so great to hear🥰 I will definitely make more videos on it. So I will still be roughly following my mod list plus a load of mods I left in a 'test' folder I never got around to adding to the list, but I will be re-downloading and re-organizing everything from scratch to make sure I have the latest updates, and name & organised in the most optimized way and handle conflicts better as I go. I will also be re-making my mod list on a brand new website coming soon. I will try to do a video about conflicts where I show several examples as it's really situational so there's no one-size-fits-all rule for conflicts. I am able to go more advanced with making compatibility patches and edits in some cases, but as advice for the general user I would just say check conflicts using the HCDU+, bare in mind not all conflicts are problems (you can have hundreds of mod conflicts and never have an issue in your game - I had hundreds last time) and a lot of conflicts are deliberate and actually resolve the potential problems too, just load your conflicting mods with the ones you'd prefer/prioritize last by sticking a 'z' on the front of the filename or something. BCON & STR conflicts are often simple to fix imo, but BHAVs can be much more complicated, but hopefully I can show at least an example of each kind in a video soon. I will also make many mod showcase videos. Feel free to ask questions where you'd prefer, though I always think if it's in a place where other people can see too like Discord then we may also be able to help others along the way😊
13 notes
·
View notes
Note
I've decided to do it, I don't know if this is ea problem but lately my game crashes or ends in an endless loading screen when I try to place, visit or bulldoze lots. It's not even specific, for example, a lot I've been able to visit successfully just started crashing when I try now. So I resetted my electronic arts folder and I'm actually going to organize my mods folder. All 200gb of it. I know it's not my computer because I spent a lot of money on building it to handle a lot of games and this problem really just started this year. Or maybe I should just bite the bullet and do the dx 11 batch fix and switch? I wanted to ask if your mods folder is organized and if you've done the dx 11 switch. If you have how was it?
Yeah, I've switched, and it's alright, it looks crisper ig, also here's how my mods folder looks.

Hard to say what could be causing your issues exactly, but if you've updated recently, it's likely what's behind your crashes. Having 200gb of mods/cc is a lot, but if you can try and move your mods folder to your desktop for a bit then run TS4 and see if your problems persist, if not, then it's definitely something in your folder that needs updating, or removing until it's updated.
Regarding DX11, if you have updated, and your computer supports DX11, the game will automatically enable it. So if your cc isn't patched to work with it, this could also be a huge contributing factor to your crashes, esp since they seem lot related.
You can either go into the settings and re-enable DX9, which I would suggest anyway to see if it's just your cc specifically causing the crashes, and not your mods or installation, or you can go ahead and patch your cc through Sims 4 Studio, which considering all the cc you've got might take a while. I would suggest organizing your cc like mine, esp wallpapers into smaller seperate folders, then path the patcher to each one to minimize wait times.
My only other suggestion if you've done all of this, and it's still crashing, is to repair your game through EA App. Sometimes things just go weird when we update, and repairing or reinstalling is the only way to mend it.
3 notes
·
View notes
Text
Audio Editing Process
Hey all, just thought I'd make regarding the process I used to make the new audio for the Northstar Client mod I'm working on.
Really quick here are some helpful sites
First, the software. You'll need to download
Audacity
Northstar Client (NC. Also I'm using the VTOL version)
Steam
Titanfall 2
Legion+ (from same site as NC)
Titanfall.vpk (also from NC)
Visual Studio Code(for making changes to .json files if necessary)
And that should be about it for now. Feel free to use whatever audio program you want. I just audacity cuz it's free and easy to use.
NOTE: if you want to skip a lot of headache and cut out the use of Legion+ and Tfall.vpk you can download a mod from Thunderstore.io and then just replace all the audio files with your new ones
This makes pulling a copy of an original unedited file for changes (if necessary) super easy, as well as making the exported file easy to find
Step 1.
First you'll want to get organized. Create a folder for all your mod assets, existing or otherwise and try to limit any folders within to a depth of one to make them easier to navigate/find stuff.
Example being:
<path>/mod_folder
|-->voicelines_raw (place all your audio in here)
|-->voicelines_edited (export to this folder)
|-->misc (add however many folders you need)
Above is an example of a folder with a depth of 1
First select your audio from the file you created earlier and import it into Audacity
Step 2.
Put any and all audio into their proper folder and open Audacity.
For my project I need to have some voicelines made seperately for when inside the titan, and when outside.
These instances are prefaced with a file tag "auto" and looks like this
diag_gs_titanNorthstar_prime_autoEngageGrunt
Inside "audio" in the mod folder you will see a list of folders followed by .json files. WE ONLY WANT TO CHANGE THE FOLDERS.
Open an audio folder and delete the audio file within, or keep it as a sound reference if you're using Legion+ or Titanfall vpk.
Step. 3
Edit your audio
Click this button and open your audio settings to make sure they're correct. REMINDER 48000hz and on Channel 2 (stereo)
As you can see I forgot to change this one to channel two but as another important note you'll want to change the Project Sample rate with the dropdown and it's pictured and not just the default sample rate.
In this example I needed to make the voiceline sound like it was over a radio and I accomplished that by using the filter and curve EQ. This ended up being a scrapped version of the voiceline so be sure to play around and test things to make sure they sound good to you!
Afterwords your audio may look like this. If you're new, this is bad and it sounds like garbage when it's exported but luckily it's an easy fix!
Navigate to the effects panel and use Clip Fix. play around with this until the audio doesn't sound like crap.
Much better! Audio is still peaking in some sections but now it doesn't like it's being passed through a $10usd mic inside a turbojet engine.
Next you'll need to make sure you remove any metadata as it will cause an ear piercing static noise in-game if left in. Find it in the Edit tab.
Make sure there's nothing in the Value field and you're good to go!
Export your project as a WAV and select the dedicated output folder
Keep your naming convention simple and consistent! If you're making multiple voicelines for a single instance then be sure give them an end tag_01 as demonstrated in the picture above.
Step 4.
You're almost done! Now you can take audio from the export folder and copy+paste it right into the proper folder within the mod. You can delete the original audio from the mod folder at any time.
Also you won't need to make any changes to the .json files either unless you're creating a mod from scratch
NOTE: As of right now i have not resolved the issue of audio only playing out of one ear. I will make an update post about this once I have found a solution. Further research leads me to believe that the mod I am using is missing some file but recreating those is really easy once you know where to look. Hint: it's in the extracted vpk files
#modding#mods#titanfall#titanfall 2#titanfallmoddy#audio editing#northstar client#northstar#vpk#legion+
2 notes
·
View notes
Photo


🌸🌸🌸
#Sims 4#ts4#photoshoot#my edits#cleanview#i haven't posted or played with berry sims in a while#so i thought it was time i changed that!#recently i can't get enough of anto's alpha hairs#and so i decided to try this one out on fairy#and i really dig how it looks#i'm still sticking with clay hairs for berries tho because i do NOT want to have#20+ swatches for one alpha hair#i don't have a death wish vdjfnkl;'a#actually i might just have since i currently have 64gb of cc#i really should re-organize my mods folder#but i also really don't want to ;-;#anyways enough of me rambling in the tags#i finally got photoshop so it's time i worked on some simblr content ~!
42 notes
·
View notes
Note
Hello! I was wondering, how long does it usually take for the “Sort CAS CC Alphabetically” script to start organizing your cc? When I try using it, it’s always stuck processing the first file for a really long time. I can’t tell if it’s just supposed to take a long time or if it’s just frozen and there’s a problem :/
Heya! Unfortunately, I've never had that problem; it should start working almost immediately if it's all set up properly.
It sounds like you're not the only person with this issue, though; there are some folks in the comments section of the Utility's MTS page that mention the same thing. Unfortunately, the original poster hasn't responded since those comments were made, so I'm not sure how to help you out here. :(
I'll put a tutorial, some thoughts, and my general use-cases for this utility under the cut, hopefully this will help some people out! (It's likely to be very long and rambly, so be warned! I'll try to make it as easy to understand as possible, however!)
If you're having trouble making the "Sort Custom Content in CAS Alphabetically" Utility by barteke22 work, read on!
First of all, you need to download AutoHotKey; the utility won't function without it.
Then you need to unzip the "SortCAS_AHK_V2.2.zip" download and place the folder in a safe place (I have it in my documents folder with all my other Sims 4 Modding Programs/Utilities/Tools).
Next you need to open the SortCAS 2.2.ahk file by right clicking on it and choosing "Open with… > Notepad" (or whichever simple text editor you prefer).
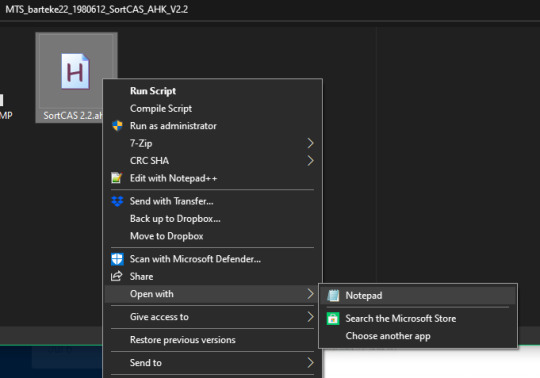
When you open it for the first time, you need to configure it, so the utility can find the folders and programs it needs. Look below:

(Feel free to enlarge, then right click on the image and open in a new tab to see a larger res version. This goes for all other images in this post.)
So what you're looking at is the .ahk file open in a text editor (in my case, notepad). The Configure section is clearly marked by the dotted lines.
You'll need to replace the "FolderPath" with the path to folder you want to sort (In the image above it's set to sort my "Eyelashes" folder). Be sure to read the notes right next to it: The folder path must end with a backslash(\) for the utility to work properly.
You can easily copy & paste the path to the folder you need by opening it and right clicking on the address bar at the top of the window, and selecting "Copy address as text".
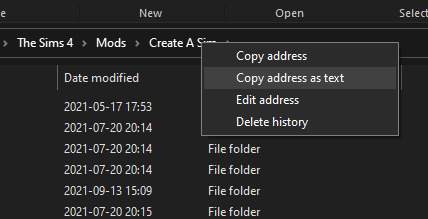
Just paste it in that section, replacing what was already there. Make sure it ends with a backslash(\), and make sure you don't remove any spaces before or after the Folder Path.
You'll need to do the same for your CASTools.exe file location, just below where you edited your folder path.
If all you're doing is sorting one big folder per CAS category, you're all set! Just place that folder path in the "FolderPath" line and you're golden.
----------------------------------
However, if you're like me, and you have a bazillion extra subfolders for one CAS category, like a separate subfolder for every different CC hair creator, you'll want to move on to the next step: Editing the orderCAS number.
Scroll down in the .ahk document in Notepad until you find this line:
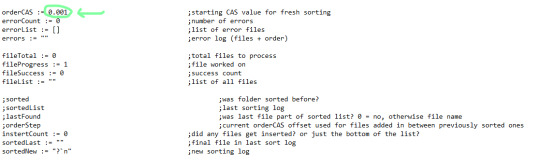
(You can find it more easily if you Ctrl+F and type in "orderCAS".)
This is the number you want to change to get unique CAS sort numbers in your various folders. If you don't change this number, the utility will give every folder you sort with it the same sort numbers as all the others.
If two CAS items have the same sort numbers, they'll appear randomly near each other. So if all your hundreds of CC have the same sort numbers 0.001-0.052, then all the items with the same numbers will group together randomly; it'll be the same kind of chaos in-game as before you ran the utility.
So! To make sure the numbers don't overlap in the same category, you need to change this setting, giving each folder it's own set of numbers.
To make it easier on myself, I created a .txt file with the names of my subfolders, and the numbers I've given them to serve as a handy reference. Here's an example:
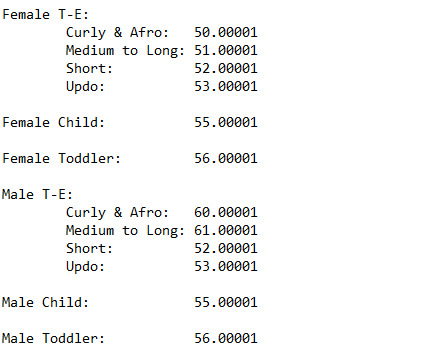
(These numbers refer to hairs; Female T-E hair, Female Child hair, etc. These are how they're organized in my mods folder.)
So I assign each folder it's own unique sorting number, and make sure to change the "orderCAS" value to that number before running the utility when I want to sort that folder.
[Please disregard the number of digits after the decimal point in my reference; my programmer husband helped me edit the .ahk file to give me more digits with which to sort to. The original .ahk file will only sort to three digits past the decimal, hence the starting value of "0.001". Try not to use any more digits than that, as the program will not sort to that degree of granularity.]
Make sure you save the file after you edit any of it! (And make sure it still saves as a .ahk file, not a .txt!)
----------------------------
So! You've got it all set up and all the numbers filled in… then what happens? How does it actually work?
It will first remind you that your mouse will be blocked while the utility is running, and also that F9 will allow you to stop the utility and gain control of your mouse at any time.
It will then bring up a progress bar window while in the background it opens CASTools to start sorting your files. If everything's been set up correctly, it should then start working.
The utility works by taking control of your computer's mouse for a while, and doing all the opening, clicking, changing values, and saving for you. It does that by using pixel coordinates; it moves your cursor to the right spot in the CASTools.exe window using the coordinates, clicks to activate that point (such as the "Order in CAS" box in CASTools), enters the sort number, moves the cursor to the "Commit Changes" button, clicks, then to the "Save" button, clicks, then back up to the "Select" button at the top to click and open the next package file in the folder to do it all over again.
So it does make your computer unusable, because it takes control of your mouse, so you can't do anything while the program runs. If you ever need to stop it for whatever reason (whether you need your computer again, it freezes, or it comes across an error it can't move past), you may do so by pressing F9 (or Fn+F9, however your keyboard is set up). This will immediately stop the script and it will ask you if you want to continue; click "No" to exit. (I don't think there's any point this program can stop that will harm any of your package files, so don't be afraid of doing it if you need to!)
If it freezes at the "Processing File 1 of XX…" dialogue with nothing happening in the background, I'm unsure how to help you, other than to make sure all the set-up is correct and try again. Download a fresh .ahk file if you need to to make sure you haven't accidentally changed anything you weren't supposed to.
(If you still can't get it progress at this point, send me another ask/message with as much detail as you can about the problem, maybe with a link to the copy of the .ahk file you're working with, and I'll do what I can to help you troubleshoot! Keep in mind, I am not an expert, so I might be just as confused as you are. ^^; )
So with all of this, the utility still might not work perfectly, and this is because of the nature of Sims 4 CC: over the course of many years of development, and many different creators, and many different standards for how CC is made, some of the files you open, especially older files, might throw errors in CASTools. In my experience the most common one is a "FlagValue" Error:
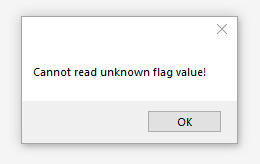
The Sims 4 has updated and changed so much over the years, adding more and more features, that sometimes old .package files just doesn't have the information the game wants, such as proper Occult tags for later expansion packs.
This is what the CASTools window looks like when you open a package in it:
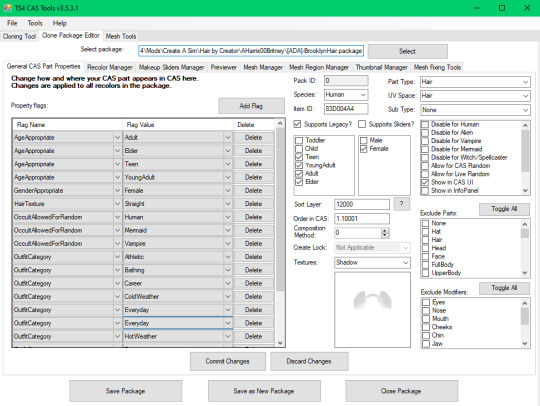
See that list of Property Flags in grey on the left? Sometimes the "Flag Value" will have a bonkers thing listed in it: the one I saw all the time was "*High Chair*" under an "OccultAllowedForRandom" flag. 🤨 This is the result of old CC using outdated flags that now point to something different in the game (I'm not entirely sure of the mechanism here), and CASTools does not like it.

If the .ahk utility opens an old package file in CASTools with this issue, CASTools will throw up an error about an improper flag value or something. The .ahk utility is not set up to deal with these kinds of errors, so it will stop and be unable to continue if it encounters one.
The only way I've found to fix this is to edit the package manually to fix the cause of the error before proceeding. Press F9 (or Fn+F9) to stop the utility, click "No" in the dialogue box that opens to close it completely, and edit the improper Flag Value in CASTools manually to something that won't make CASTools scream. (If it's an "OccultAllowedForRandom" flag the right one will probably be one of: Mermaid, Vampire, or Witch. Choose whichever one isn't already covered by the other flags.) Depending on the error CASTools throws that makes the .ahk utility pause, it may be a different fix; use your best judgement for how to proceed!
Once you've made the edit, click "Commit Changes", then "Save Package" to save it, then exit CASTools. After that, return to the .ahk utility to run it again. It will probably ask you if you want to skip already sorted files; choose whichever option you prefer.
Hopefully, it'll get to that file in the list and sort it successfully with no errors this time. X)
Because the Sort Utility is such a basic, hacky sort of thing, it's not set up to deal with the wide range of errors possible in the years of Sims 4 CC making and game updates. It's smart enough to click "ok" past "Missing Mesh" errors and the like in CASTools, but some other errors that require manual intervention will need just that before the program can sort them correctly.
You'll also need to pay attention to the resolution info in the description of the original MTS post: Because it uses mouse coordinates to work, it can only work with a certain screen resolution, otherwise the pixel coordinates will be off. Make sure your resolution is 1920x1080 (and that your taskbar is at the BOTTOM of your screen) before running the utility; otherwise the mouse clicks will be off, and it's not likely to do anything it was meant to.
[If you have the knowledge you can edit the .ahk file to suit your own screen resolution, but it will require changing the mouse coordinates to whatever matches what appears on your screen. It shouldn't be too hard to figure out if you have the time/ability to learn and suss it out, but I won't be able to help you with it. ^^;]
Man, this sounds like such a lot of faff… honestly, though, it's not that much work. You edit the Folder and CASTools paths in the Config section, you put in the numbers you want it to sort to, then you run it. That's it. If everything's working fine it should do all the work for you.
It does help to have an idea of what it's doing, though, so you can more easily diagnose problems. It took me a little bit of trial and error to get it working the first time around. Make sure you read all the instructions on the original download page and in the .ahk file carefully and it should work out.
Again, you're still having problems, feel free to send me an ask with as many details as you can about your error, and I'll see if I can help! But as I say above, I am not an expert, so I may not be able to do any more than what I've said here. X)
Anyway, this utility has saved me SO MUCH WORK, and made my game SO MUCH MORE organized since I started using it, so I think it's incredibly useful and valuable for anyone who cares about such things. Good luck, take care, and happy simming! <3
#ask#Rheall Replies#anonymous#Sort Custom Content in CAS Alphabetically by barteke22#Ooof I need to eat something after typing all that out…#SortCasAHK by Barteke22
39 notes
·
View notes
Text
Kat’s Massive To-Do/Wishlist
Learn how to convert meshes to different bodyshapes (ts2)
Clean out my WIP folder
Redo old preview pictures
Dig out my old (kathcberg91-era) cc backups and see what’s in there, fix mistakes, give them new thumbnails, and put them up for download (I may or may not have broken the links)
Fix links on my old blog (I think the theme is broken too)
Find a new theme (?) and profile picture
Figure out a good way to take family tree pics for my legacies
Finish my characters page for the decades challenge (and also maybe Breckenridge)?
Set all of my cc to show up in one place (in order in CAS)
Reorganize my projects folder
Learn how to shoeswap things
Learn how to make separates (preferably for categories other than casualwear)
PUT THE SECOND PART OF MY MEDIEVAL HAIR DUMP UP FOR DOWNLOAD (ya’ know, the one I’ve had finished for like half a year now but am just too lazy to bin and take preview pics for???)
A few “mini defaults” for ts2 (e.g. separating the “extra” parts from sunni’s medieval ui defaults)
Figure out mesh-making (I’ve been making renders in blender and playing with the physics engine and it’s really fun so far!)
Convert some ts4 terrain/terrain paint as a default terrain for ts2
Maybe figure out a way to make custom roads reference your default terrain rather than needing to edit the textures individually
Default replace all of the careers, cards, etc. in ts2 with they/them/non-gendered pronouns bc I learned how to edit in-game text the other day and I like to torture myself with long-term projects, apparently
“Finish” my genetic skin setup and put it up for download (the kinda-current version is on my “WIPs folder of doom” page, but I still want to add more, clean up the swatches, find a better way to organize it, etc.) + edit the sortindex numbers
Re-organize & compress my dl folders (again)
Figure out a way to quickly make new packages (I’m currently working with MacroRecorder, which works well, but the free version only allows for 10 repetitions, which isn’t ideal)
Figure out a way to quickly change the sortindex value of a package so you can arrange cc in a certain order without having to edit each individual package file
And now for the wishlist (ts2):
Color wheel (like I said, a girl can dream, right?)
Batch edit for simPE so I don’t have to spend ages editing each individual file whenever I do...anything, really (WITHOUT having to merge files), I should probably post something on mts about this
Less hideous lot imposter textures
A lighting mod that is basically @dreadpirate’s edit to gunmod’s lighting mod, but with the indoor brightness of spookymuffin’s/@dreadpirate’s mm lighting mod, which can be switched back and forth between almighty-hat’s “a world lit by fire” edits (a function of @dreadpirate’s edit of gunmod’s mod)
Figuring out why CAS lags with lots of accessories, makeup, etc. while Bodyshop doesn’t (and if it can be fixed, I’ve double-checked and it’s apparently a known issue, even if you only have a little cc and your computer is capable of handling it)
64-bit version of ts2 (c’mon EA. I’m waiting.)
6 notes
·
View notes
Text

@rebelvakarian
Hey! Sorry for the late reply this is going to be long lol so I wanted to be on PC so I can put it under a cut!
In short, DA:I is a little more frustrating to mod mostly because you can’t add new meshes to the game you can only replace them (although there’s been a lot of new developments lately but I’ll get to it later!). So most mods are replacements of existing things in-game so if say you want two hairs but both of them replace the same mesh you can’t have both of them (boo).
Also in DA:I you can’t just copy and paste mods into an override folder you have to use either DAI Mod Manager or Frosty Mod Manager . Both of these are different and will only load different file types individually but they can be used together (I will show you how you how later onto this post)
Using DAI Mod Manager
Most mods for DA:I are daimods which means you use DAI Mod Manager to load them.
First, install DAI Mod Manager. If you use the link I gave you, install the Tools Suite then you can download and boot up the manager from there.
Then, make a folder somewhere where you will put all the mods for DA:I. You can name this anything you like. I name mine’s “DAI Mods” lol
You download it and if it’s a zip/7z/rar you extract it (7z and rar files can be extracted using 7zip).
Open DAI Mod Manager and it will ask you for the path, so that’s where your DA:I game is located. For me it’s in C: > Program Files > Origin Games > Dragon Age Inquisition. If you use Origin it’s most likely there. Then select the game:

Once it’s loaded, it will ask for the mod path so select the folder you extracted all your files in:

The mods should all load and then hit merge! It’ll tell you if any conflict and if it does you can disable the mod the conflicts with the other.
Again most descriptions will tell you what will conflict with what so you’ll know before downloading.
If you want to change mods you have to disable the one you don’t want and re-merge again before loading that certain playthrough or starting the game.
So if you have multiple quizzies like me lol, it could get tedious to go up the list and disable a mod you don’t use for a certain quizzie or if two quizzies use two hairs that replace the same mesh so what I do to keep them organized is I make separate folders for each quizzie with the mods they use like this:

So when you want to switch characters, just load that character’s folder in the mod path for DAI Mod Manager and it’s all there.
Now the downside of using DAI Mod Manager is that the mods usually don’t work in DLCs. So you will have to disable them when entering Trespasser, Jaws of Hakkon and The Descent.
There’s a few workarounds, though they aren’t perfect. For Trespasser there are a list of hairs that will work and which certain races they’ll work for here. Complexions in that don’t mess too much with the specular could work in Trespasser, so this means complexions that don’t take away the shine will have a better chance of working (unfortunately if you dislike the shine your quizzie will have to look sweaty in Trespasser lmao). A lot of mod makers have included Trespasser friendly versions of their complexions.
For The Descent I found that if you turn mods off when you enter, then save at the first camp, exit the game, then turn the mods on, they’ll work for the rest of the DLC.
I don’t know much about Jaws of Hakkon, that DLC tends to be testy with mods, but do know for a fact that the Tight Curls hair mesh works there (for female elves anyway).
Using Frosty Mod Manager
Frosty loads fbmod files. There’s less mods for Frosty but it tends to be more DLC-friendly and Frosty Mod Maker can do more things.
So download Frosty Mod Manager and when it’s done, load it up. It will ask for a configuration and you just select the game again from the installation path like with DAI Mod Manager:
Just like with DAI Mod Manager, download your fbmods and make a folder for them just to keep them organized. As always the description will let you know if it’s for Frosty specifically.
When you have them ready open up Frosty Mod Manager and hit import mods:

Select the mods you want and they’ll show up on the left side:

To apply a mod, select it and click apply mod:

And you can see on the right side that there’s a conflicts tab so you can click it and check to see if what you’re using will conflict with a mod!
Then hit launch and the game will load through Frosty. So if you want to use the Frosty mods, you have to load the game through it or else it won’t show up.
One thing I like about Frosty is that you can make multiple profiles on the program itself, so it’d be easier if you have multiple quizzies:

You can load daimods using Frosty as well. I personally have not tried it yet but my sister has and it’s worked for her - especially when it comes to hair meshes and I think it’ll have them work in DLCs too for the most part. However, I won’t recommend loading daimod complexions through Frosty because it tends to glitch for some reason and gives your quizzie this weird pixelated skin tone.
Using Both Frosty and DAI Mod Manager
Since there’s both pros and cons with each methods so I use them together. This method can be tedious but it’s not as complicated as it seems it’s just an extra step or two.
So if you want to use both, you start with DAI Mod Manager. Load your mods and merge as usual. When it’s done go to the game’s installation path (usually Program Files > Origin Games > Dragon Age Inquisition). Then, click the update folder.
These two folders are what you’re going to be working with:

What you do is you take the Patch folder and rename it into something. I usually rename it as “Patch do not delete” so I remember that it’s the original patch folder. Then you rename the Patch_ModManagerMerge as just “Patch”.
So it should look like this:

Then you load up Frosty, apply your mods and launch! If you did it right everything should load successfully. If not there could be some conflicts and unfortunately you just have to turn mods on and off to see what’s causing it.
The reason why I advise to name the original folder as “Patch do not delete” is because if you want to change mods you have to re-do the whole process again (which lol, I know blaaah). And before you open up DAI Mod Manager again you have to delete the Patch folder and rename “Patch do not delete” to Patch again (I know this is confusing ;-; lol if you need more clarification please let me know).
Then you go back up to the main Dragon Age Inquisition folder and find the ModData folder and delete it:

And finally you can load up DAI Mod Maker and switch out your mods then do the process again.
It can be daunting and it requires a little getting used to, but once you get the hang of it and get a feel for what will work and what won’t it shouldn’t be too hard.
And I highly recommend learning how to use Frosty because there’s been some awesome developments with what you can do. With making hair you can’t really add or delete faces/vertices so custom hair is usually just people editing what’s already there and working with what they have (and there are a lot of talented people who made it work SO WELL and made beautiful creations.)
But now there’s a beta tool for the newest version of Frosty Mod Maker (currently Patreon release only) and it allows you to load meshes, so people who have this have been able to port hair from Sims as well as make hair from scratch so there’s going to be more hair options in the future! (Although we still can’t load new meshes we have to replace existing ones).
Here are some of the gorgeous hair your can now use through Frosty (I use one for my Imryll too):
https://www.nexusmods.com/dragonageinquisition/mods/2808 https://www.nexusmods.com/dragonageinquisition/mods/2839 https://www.nexusmods.com/dragonageinquisition/mods/2835 https://www.nexusmods.com/dragonageinquisition/mods/2844 https://www.nexusmods.com/dragonageinquisition/mods/2800
I hope this helped! If there’s anything unclear or something that needs more clarification feel free to DM me or send me an ask!
22 notes
·
View notes
Text
Here’s my little Fallout New Vegas modding guide
Modding new vegas is a bit more tricky than some other stuff because it recquires some very specific out of date stuff and manual handling sometimes. Remind yourself that sometimes if a mod isn’t 100% working it’s because the rar file came with a loose file you need to specifically put in the folders rather than just using a mod manager to load it.
Important things to install:
FOMM - I learned the hard way that NMM although more accessible is very weak, FOMM is strong and overwrites permissions, actually being able to install mods properly, sometimes NMM won’t even install textures because it didn’t get all of the permissions or something.
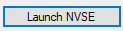
NVSE - It’s a way to extend the limited engine of New Vegas, it is an exe file and loader that opens New Vegas, if you have it extracted to your Data folder you’ll have FOMM have a “launch NVSE” in it. You’ll need this to practically run anything.
Mod Configuration Menu - Neccessary to configure many mods, sometimes other mods overlap with this by trying to insert their own version of MCM, just fix that by re-activating this mod in the end.
Anything else will probably be recommended by Nexus before you download something.
Mods I recommend:
Solid Project - Do you like Fallout 4′s little tweaks but like a sane person know it’s a badly designed and paced game? Well There’s something called “Solid Project” that does a lot more than that, it adds a few Fallout 4 mechanics but most importantly goes well with “enhanced camera” and gives you animations of going out to open doors, climb ladders and pick up things with your hands!
It also has a super useful weapon wheel (that you activate with mouse3) that you equip each slot with R and a quick inventory you can leave with K, the little item menu reminds me of Tomb Raider for PS1. Oh and each special item you pick up spins around in 3D, there’s a lot more too like the dynamic quest markers from Fallout 4 but unlike Fallout 4 you cannot un-mark a quest so you’ll have to get a empty quest mod called “The Quest” in case you don’t want “300meters afar” always on your screen.
All it’s missing is the quick menu from Fallout 4 which is found seperate but is a must-have to anyone wanting some more fast gameplay: Fallout 4 Quicklook
Roleplayers Alternative Start - Start in a shed where you can customize your character a little more quicker and even give them some backstory that can give some extra stats. It might be a bit weird because the pacing of New Vegas is specifically done in such a way that makes you start in Doc Mitchell for your own good, it might put you somewhere where you are underleveled but if that bugs you, you can practically start in the same place rather than randomly.
FOOK - The only overhaul mod I seem to use fully, it changes the little things in games such as making items change their stats, it’s not too unfair, the changes are fairly little and it’s usually stuff like “why does this item not do this” and this game does it, it also fixes a lot of bugs, adds a few items and changes the texture for the stimpack.
As far as overhaul mods go, this one’s fairly simple and runs well with all of the other mods I ran, unlike other overhaul mods where you can only run them alone for a seperate playthrough. It’s important to note that this overhaul mod comes in 2 files, you need the esm file and the data file, run both or else you’ll have missing textures and a lot of issues.
Project NEVADA - The most recommended overhaul one, keep in mind that after installing you have to manually activate the esm files. In terms of immersion it gives you that cool visor vision that might annoying for many, and it does kind of make the HUD stuff stuck in place which nullifies aHub a little bit (talk about later), but it does improve stuff like FPS mechanics like a grenade button (G).
I dissagree with the re-balance esm file though so I recommend disabling it since I’m too used to everything New Vegas. If you add this mod and realistic headshots, the slowmo function where you press C to slow down time gets REALLY fun and challenging, changes the whole game into a more strategic FPS game rather than a RPG one.
NVEC Complete - Considering how finnicky New Vegas is sometimes when it comes to adding a lot of mods without them clashing and overloading the engine, NVEC Complete is a easy way to just bundle everything toghether. It’s a exe file that installs a compilation of some of the best user-made mods that you can turn off in the mod configuration menu. There is a lot to cover here but it includes most famous quest mods.
Blind - Wanna make New Vegas look like more of an RPG? How about numbers popping out showcasing how much damage you make? If some specific numbers coming out of specific places annoy you, you can just disable them in the MCM. I don’t like the “heal” effects, I just want the damage numbers on enemies, I never knew my fists only did 1 HP of damage towards radscorpions before this.
Textures and other aesthetics:
NMCs_Texture_Pack - Honestly this has probably been used by about everyone, it is THE texture pack everyone uses, comes in 3 big 1gb files, takes a while to load them in FOMM but they do make everything look nice.
Wasteland Flora Overhaul - Based on an actual study of the flora of Vegas, and considering New Vegas is nuclear missile hit free, it’s realistic that New Vegas would actually look like this. Also the textures are very nice and I really like the plants.
A Familiar Friend - Pip-Boy 2500 - This really makes the pip boy more interesting and it makes me feel more connected to the classic Fallouts, in fact a lot of the replacements or additions I have in textures is making the game feel like more of a original Fallout and that Fallout 3 never happened, stuff like: Classic Adobe Buildings is great because it’s more true to the lore.
Fonts:
Fallout Classic Fonts To spice up your new experience you may want a new font because Fallout’s New Vegas font is kind of ugly after a while, I use “Fallout Classic fonts”, keep in mind that you do have to follow extra instructions on how to set a new font, you need to go to Fallout.ini in your “my games” folder and edit the [Fonts]. Usually there’s a text file to help this process, also I’m pretty sure most font mods can only be loaded through FMM.
HUD:
aHud is a must (Or it’s upgraded counterpart if you want more: One HUD - oHUD that includes more features), you can organize your hud that way, you can get some custom huds, the one I use is cellHUD which is a bit finnicky because one of the versions of that HUD is the main file needed for the second version (install the non-icon version then icon if you want the icon version).
Also I’m pretty sure (or at least mine) custom HUDS do not erase text such as “HP” or “AP”, you'll need to edit \Steam\steamapps\common\Fallout New Vegas\Data\Textures\Interface\interfaceshared0.dds ...A dds file is something you can edit like an image. Nevermind you will never get the HP text out of your hud apparently?
Animations:
Get Enhanced Camera, seriously, it’s very cute to always look down and see your body, it sometimes clashes with other animations but just keep your head up if you are doing common FPS things like the pick up animation from Solid Project.
I use Weapon Animation Replacers - Enhanced Camera compatibility pack, it makes me feel as if I’m in the game or something. (The Mod kind of is broken combined with other mods that use animations) It’s not everyone’s cup of tea in FPS games because the weapon is realistically low and cannot be seen all the time unless you are aiming down it’s scopes. Be sure to copy NVSE_EhancedCamera.ini in the rare towards the NVSE plugins folder in New Vegas’s data and you won’t have a wonky body with no arms. If anything follow the good instructions on their page.
ENB:
If you got a PC that can run Nier Automata in it’s lowest settings chances are you have a PC that can run a pretty neatly modded beautiful New Vegas that adds modarn things like better shadowing, a fancy depth of field. I recommend installing an ENB for last because some say that it might cause issues while you are configuring mods and cause them all to crash?
So your ENB only starts working when you see in the corner your graphic card information at the start, to be able to do this you gotta follow instructions very clearly (usually each ENB you get has it’s own easy to follow install instructions), and be sure to get d3d9.dll from the latest version: enbseries_falloutnv_v0322, or else your ENB won’t work.
Add to enblocal: in my case it is “VideoMemorySizeMb=8192″ (the ENBlocal should be the ENB pack you installed from Nexus or something, unless it won’t have this option), you can put your graphic card ram in there or just put 0 if you want to skip this entirely?
Important: Go into the New Vegas Launcher and turn off anti-aliasing and anisotropic filtering, HDR needs to be checked, go into Advanced and turn off Depth of Field, Water Displacement off, you need to do this because the ENB reprograms this things, now when you use the new vegas launcher your fallout.ini file becomes read only again, so do the fallout.ini stuff (like the fonts).
You’ll know you’ve hit your limit when certain mods just do not respond anymore. The most obvious sign would be lack of custom HUD if you are using one. Considering New Vegas loads fairly fast, it shouldn’t be that painful to test each mod individually.
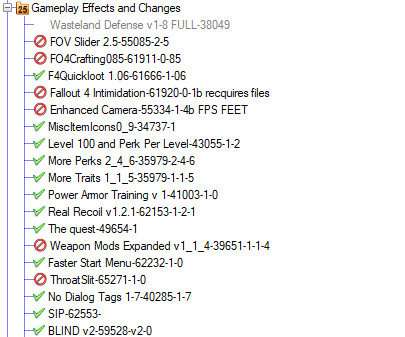
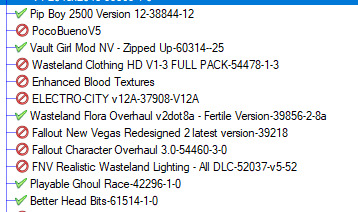
Anyways I got kind of lazy with this post so I’m just going to show a list of my mods since the rest is fairly obvious:
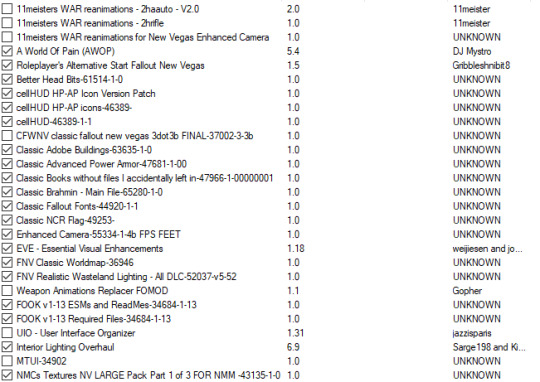

Some Stuff I had in NMM which might be the reason why they’re not 100% working unlike the ones I put in FOMM.
8 notes
·
View notes