#i considered cropping out the toolbar for this video
Text
GIF Tutorial: Video Timeline Method
In this tutorial, I will show you how to make a GIF using Photoshop’s ‘video timeline’ method (as opposed to the standard ‘import video frames to layers’ method). The end result will look something like this:

As always, if you find this tutorial helpful, please like/reblog and consider donating to a good cause over < HERE >
What You’ll Need:
Mac
Photoshop CC 2019 (or Photoshop version that allows opening video files)
Movie, Video or Clip that you want to GIF!
Step One: Open Up Photoshop
Well, that was easy right? Promise I’ll be as thorough as possible and make this quick and painless!
Step Two: Load Up Your Video
Pretty easy to do in Photoshop. Either press the Command Key + O at the same time, then find and select your video file. OR use the top bar (File > Open... > Find & Select Your Video File). The video file will automatically open up in Timeline mode! It should look something like this:

Note: Depending on the size of the file, it could take some time to load up, but no worries!
Step Three: Clip Your Video
Say you opened up an entire episode (which is what I did) or entire movie, but you only want to GIF one specific person and one specific action. Ok, well in order to do that, you need to clip the video. This is where the Timeline bar (the bar at the bottom of the screen) AND the Layers side bar (right side of the screen) come in.
If you need to cut out opening credits or extra stuff from the beginning of the video, follow these:
#01. You’re going to click and drag the blue marker in the Timeline to the beginning of what you want to GIF.
Tip: Use the Timeline’s zoom to help pin point a start point. It’s the slider next to the horizontal scrollbar.
#02. Once you’ve done that, click the scissors on the Timeline bar. It’ll automatically split the clip.
#03. Repeat #01, but look for the end of the GIF you’re making. Repeat #02 to clip the end.
By now, your Timeline should have 3 split clips (the beginning of what you don’t want, the GIF you’re making, and the end stuff that you don’t need). You’ll notice that the Layers sidebar has generated some new layers because of the splits.
#04. From the Layers sidebar, select the layers you want to delete and then click on the trash can on the bottom right corner of the sidebar. You should be left with the Video Group and only ONE layer (the GIF) in it.
If you have an exact clip of what you want to GIF, skip the steps I just mentioned above.
Step Four: Edit Your GIF
First thing is first, you’re gonna go up to the top bar and click Filter > Convert For Smart Filters. This will allow the Timeline and Layer to be edited for sharpening, coloring, cropping, and timing!
To Crop: press the C key or click on the crop tool on the left toolbar.
I like to use the W x H x Resolution option when it comes to cropping. You don’t have to use my sizes, so feel free to experiment with your own! Here are my sizing preferences for that:

Click and drag the crop box on the GIF to your liking. Looks like this for me:

Press Enter on your keyboard to crop. It’ll automatically resize to what ever sizes you put in.
For coloring, do the same you normally do. If you’re making/using your own PSD, experiment away! If you’re using someone else’s PSD, duplicate the coloring adjustment layers OVER the GIF layer. Don’t forget to credit the original PSD creator.
For Sharpening, you’re gonna want to go to the top bar, click Filter > Smart Sharpen. Edit to your liking.
I’m gonna stop right here and show you what I’ve made.
The original GIF (pre-any editing):

The GIF post coloring & sharpening:

Step Five: Speed
I thought the GIF was moving a little faster than I’d like. There’s TWO different ways to change the speed.
#1: If you still have the Timeline open, you’re gonna click on the small options menu on the right end of the Timeline bar. It looks like this:

The following menu will open up. Select Set Timeline Frame Rate. I changed mine to 10 fps.

And ended up with a slightly slower GIF.
Method #2. My usual preference is to save the GIF as is and then open it up in photoshop. Select all frames by clicking the first frame, holding the SHIFT key and clicking the last frame of the GIF. It’ll highlight all the frames in between #1 and the last one. Like so:

Now click that carrot ( v ).

Select the speed preference.
Step Six: Save Your GIF
What ever option you chose, you still need to save your GIF. You can do so by pressing the CMD key + Option key + SHIFT key + S. OR by going to the top bar and selecting File > Export > Save For Web. A pop up will appear with a ton of options. Here’s a screenshot of my preferences (ignore the Color Table portion since that changes depending the GIF coloring):

VOILA, you’re d-o-n-e ! Please like/reblog if you found this helpful.
Consider donating a little something on Ko-fi? Please & Thank You!
#tutorial#rph#photoshop tutorial#dearindies#gif making help#gif makers#gif making#( mine. )#( my resources. )#( my tutorials. )
29 notes
·
View notes
Text
Compress Images In Powerpoint

To apply compression to an image that you inserted into your presentation, click on the image and then click on the Compress Pictures icon. After clicking on Compress Pictures, the Compress Pictures dialog box appears on the screen. Make the appropriate selections and then click on the OK and Apply buttons. First, select an image on your PowerPoint slideshow. Once you select an image, a new Format tab called Picture Tools will appear. Select this tab and click on Compress Pictures. This will open the Compress Pictures tab. From here, you can select whether to compress only the selected image or compress all images on the PowerPoint presentations.
Compress Images In Powerpoint 2020
Compress Images In Powerpoint 365
Compress Images In Powerpoint 2013
Compress All Images In Powerpoint At One Time
Compress Images In Powerpoint Mac
Compress Background Images In Powerpoint
In order to decrease the size of a PowerPoint file (and in Canvas your course quota), you can decrease the resolution of the images. PowerPoint images can make your presentation file size quite large, especially if you have embedded high-resolution images and photos. Follow these instructions to optimize your images and photos.
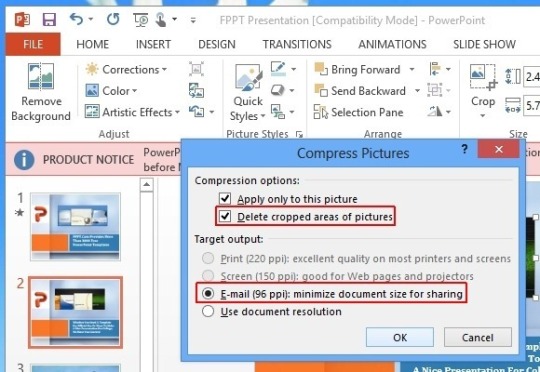
STEPS TO COMPRESS IMAGES: WINDOWS - MICROSOFT POWERPOINT
Open your PowerPoint file.
Select a slide that contains an image or picture.
Select the image or picture.
Click the Picture Format ribbon at the top of the screen.
Click Compress Pictures.
Select the checkbox to Delete cropped areas of pictures option to reduce the size of the image or picture in the presentation.
Choose Email (96 ppi): minimize document size for sharing.
Uncheck Apply only to this picture if you want all of the pictures in the entire presentation to be compressed so you will have a smaller file size.
Click OK.

STEPS TO COMPRESS IMAGES: MAC - MICROSOFT POWERPOINT
Open your PowerPoint file.
Select a slide that contains an image or picture.
Select the image or picture.
Click the Picture Format ribbon at the top of the screen.
Click Compress Pictures (to the right of the Transparency icon).
Click the Picture Quality drop down and choose Best for Sending in Email (96 ppi).
Select the checkbox to Delete Cropped Areas of Pictures to reduce the overall size of the image or picture in the presentation.
Apply to all pictures in this file is default and recommended for a smaller file. If you only want to delete the currently selected picture, uncheck that.
Click OK.
If you have more questions, email [email protected] or call 864-656-3494.
Summary :
A PowerPoint presentation will be attractive and intuitive if it is media-rich with images, videos, etc. However, these media would enlarge the file size. If you need to reduce PowerPoint file size, this post from MiniTool Partition Wizard might be helpful for you.
Quick Navigation :
About PowerPoint
Microsoft PowerPoint, a part of the Microsoft Office suite, is a presentation program released on April 20, 1987.
The PowerPoint software allows users to create dynamic slideshows with texts, tables, charts, videos, audios, images, etc. It is suitable for projectors or big-screen TVs. Therefore, a lot of religious, corporate, and educational organizations prefer to use this tool to introduce visual information to groups or individuals. Some companies even regard it as a basic market skill.
Although you can make PowerPoint presentation interesting and powerful by inserting images, audios, and videos, it could be annoying that these media files would make your PowerPoint file larger. It takes up more disk space and might reduce playback performance. In addition, users might fail to send an email with a PowerPoint file as an attachment due to exceeding the file size limit.
In the following contents, you can learn about some tips on how to reduce PowerPoint file size.
Tip 1: Use PPTX Format for Your PowerPoint File
PPTX format was released by Microsoft in Office 2007. It has replaced the PPT format which was used by Microsoft PowerPoint previously, and it becomes the default format when users create a file with modern versions of PowerPoint. PPTX format compresses all the content within the PowerPoint file and it makes the file smaller than that using the PPT file type.
If your PowerPoint file is of PPT format, you should convert it to PPTX format to reduce PowerPoint file size. You just need to:
Open the target file and click File from the top menu.
Select Save as and select a location.
In the pop-up window, select PowerPoint Presentationfor Save as type Then your PowerPoint file will be saved in PPTX format.
Tip: You can check the format of your file by clicking the file and selecting Properties.
In my example, I convert my file to PPTX format and the file size is reduced by 1695KB. This should be an easy way to reduce PowerPoint file size, but the file size is depended on the contents inside the file eventually. If the PPTX file is still too large or your file has been created with PPTX format already, here are more tips that you might need in the following parts.
Tip 2: Insert Your Pictures Instead of Copying and Pasting
The JPG (Joint Photographic Experts Group) format is a lossy compressed file format for pictures. Usually, a picture of JPG takes less storage space than that of BMP (Bitmap) and PNG (Portable Network Graphic).
When you copy a picture and paste it to a PowerPoint file, the picture might be reformatted to BMP or PNG, which makes your PowerPoint file larger finally. So, you’d better add the picture to PowerPoint with the insert function which maintains the original format of the involved pictures.
When you save an image, you need to select an image format for it. If you choose between the PNG and JPG, learning the difference on PNG vs JPG is vital.
Tip 3: Do Not Edit Images in PowerPoint
Before inserting a picture in PowerPoint, you’d better make sure you don’t need to make any further edits for it. Any edits for the picture within the PowerPoint file will be saved as a part of the file, which means that a lot of extra stuff would be stored.
For example, when you change a colorful picture to black and white, PowerPoint retains the full-color image at the same time.
Therefore, if you need to edit a picture, please use an image editor and then insert it in PowerPoint. This could help you to reduce PowerPoint file size.
Tip 4: Compress Images in PowerPoint
Another method to reduce the picture size in a PowerPoint file is to compress the picture. You can compress images in PowerPoint one at a time or all at once. To compress all the images in the PowerPoint file, you need to:
Tip: The detailed steps might be different for different versions of Microsoft PowerPoint.
Step 1: Click File from the top toolbar and select Save As. Then select the folder where you want to save the compressed file.
Step 2: Click the Tools option which is next to Save button. In the pop-up menu, select Compress Pictures.
Step 3: In the pop-up window, select “E-mail (96 ppi): minimize document size for sharing” under Resolution section. Then click OK to confirm that you want to compress pictures in PowerPoint.
Tip: As you are operating for all the pictures in the PowerPoint file, you are unable to select Apply only to this picture option here.
Step 4: Click Save to save the compressed PowerPoint file.
If you want to compress a specific picture, you just need to select the picture in PowerPoint. Then click Format from the top toolbar and select Compress Pictures.
Compress Images In Powerpoint 2020
Tip 5: Remove Personal Information
Microsoft Office stores your personal information and hidden properties of your PowerPoint file, such as the author name, document properties, etc. Remove them could also help you to reduce file size in PowerPoint. Here are the detailed steps.
Step 1: Click File and select Info.
Step 2: Click Check for Issues. In the pop-up menu, select Inspect Document.
Step 3: The Document Inspector window will pop up, and you should make sure the “Document Properties and Personal Information” option in the list has been checked. Then click Inspect.
Step 4: In the following window, click Remove all for “Document Properties and Personal Information”.
Then save the file and it should be smaller. This could also help you when you need to prevent others from viewing your personal information for confidentiality.
If you find this doesn’t reduce the file size, please move on to the next tip.
Tip 6: Do Not Store a Thumbnail
PowerPoint allows you to save the thumbnail image so that you can preview the file when you search it in File Explorer. It is a useful feature to help you find the PowerPoint file you want quickly when there are many files with similar names, but this could increase the PowerPoint file size.
To disable the feature, you can:
Step 1: Click File > Info.
Step 2: On the right-hand side, click Properties and select Advanced Properties.
Step 3: In the pop-up window, switch to Summary tab. Then uncheck the option Save preview picture.
Step 4: Click OK to save the changes. Then save the PowerPoint file.
In my case, the file size is reduced by 10KB for me after I disable the thumbnail preview feature. It’s a pretty small save and might not help you. But if you have tried all the other tips and you are still unsatisfied with the PowerPoint file size, you can try this method.
Tip 7: Upgrade Your Storage Device
If it is hard for you to reduce PowerPoint file size and your disk is running out of space, which makes you unable to store more data on the disk, you might need to upgrade your disk to a larger SSD or HDD.
Tip: If you don’t have another SSD or HDD, you can consider buying one. Here are some recommended SSDs and you can have a look: Best 1TB SSD Internal Hard Drive for Laptop and Desktop PC.
To replace your old disk with a larger one, you’d better transfer all the data. MiniTool Partition Wizard should be a helpful assistant. Here is how to migrate all the data on the old disk to the larger one with it. Please connect the larger disk to your PC and follow the steps below.
Step 1: Download MiniTool Partition Wizard by clicking the button below. Then install and launch it. To copy the system disk, you need to pay for the Pro Ultimate edition.
Step 2: When you get the main interface, click Migrate OS to SSD/HD Wizard under Wizard section in the left action panel.
Step 3: In the pop-up window, select Option A and click Next.
Tip: If you want to copy the operating system only, you can select Option B.
Step 4: In the following window, select the larger disk you prepared as the destination disk to store the copied data and click Next to continue.
Step 5: After selecting the destination disk, you can modify the Copy Options and Target Disk Layout. For an SSD, you’d better check Align partitions to 1MB. Then click Next.
Compress Images In Powerpoint 365
Step 6: Read the pop-up note carefully which reminds you how to boot from the larger disk. Then click Finish. When you go back to the main interface, click Apply to execute the pending operations.
After copying the data, you can install the larger SSD or HDD to your PC and boot from it. You should get a lot of free space and you don’t need to reduce PowerPoint file size to save storage space now.
Further Tip: Extend the Drive Where the PowerPoint File Is Stored
If you prefer to store your PowerPoint files in a specific drive, it might be annoying when the drive is running out of space and you can’t save your PowerPoint files. Fortunately, you are able to extend the drive to get more free space if there is free space on other drives of your disk.
You can also use MiniTool Partition Wizard to achieve the goal and it’s totally free.
Tip: If you need to extend the system drive, please create a bootable USB drive via MiniTool Partition Wizard at first, and then boot from the USB drive to extend it.
Step 1: Launch MiniTool Partition Wizard and get its main interface.
Compress Images In Powerpoint 2013
Compress All Images In Powerpoint At One Time
Step 2: Right-click the involved drive and select Extend.
Step 3: Follow the pop-up wizard to finish the operation. Remember to click Apply to make the changes to take effect.
Bottom Line
Compress Images In Powerpoint Mac
Here are some sweet tips if you need to reduce PowerPoint file size. Some of them might not help a lot. If you need more storage space to store your PowerPoint files, you can consider extending the involved drive or upgrading your disk.
Compress Background Images In Powerpoint
If you have better ideas or suggestions, you can leave a message in the following comment zone. For any problems with MiniTool software, you can ask help via (email protected)
0 notes
Text
Simple Free Video Editing Software For Mac

If you are looking for the best green screen applications for Mac computer, then you’ll LOVE this guide.
Picture Editing Software Free Mac
Simple Free Video Editing Software For Mac Editing
Free Mac Video Editing
Pdf Editing Software Free Mac
I personally tested and reviewed over 20 free and paid tools.
Free vs paid video editing software. There are some free video editing solutions out there. Programs such as DaVinci Resolve and Shotcut are free downloads, and iMovie comes preloaded on every new Mac computer. While these products may be good for small projects and advanced users, they're not ideal for beginners and they often lack features.
Filmora is Wondershare’s standard, simple, high-quality video editing offering; but Wondershare also offers FilmoraGo (for mobile editing) and Filmora Scrn (for screen recording and editing). The design is intuitive and easy to use, and comes replete with filters, overlays, motion elements, transitions, and a small selection of royalty-free.
Free Video Editor is a software designed for editing video files and creates videos with various visual and audio effects. The simple and user-friendly interface allow you to edit video with negligible efforts. So get this non-linear video editing tool downloaded and make your video editing work quite easy and effective.
And you can filter through the following top 5 list to find the best software for editing green screen on Mac.
Check it out:
1. Best Overall: Movavi Video Editor
Mac users who only need a simple video editor will find that Apple iMovie is the best free video editing software, because of its strong integration with Apple's operating system and easy-to-grasp.
Operating system: Mac, PC
Supported Input Formats: It offers support for most media formats including image, audio and video
Supported Output Formats: Support for most output media formats including video, image and audio
Price: $39.95/lifetime
With the Movavi video editor it’s easy to build fun videos even if you’re a beginner with video editing. You can drag and drop all of the media files into the timeline just as you would in any other simple editing tool. Unlike other types of video editors you can also make quick changes to the clips by rotating, cutting and trimming them away from the timeline.
This software is one of the best ways that you can add multiple transitions, stickers, titles and effects for any type of video.
By shooting a video against a green or blue backdrop and then using the editor to remove the backdrop from the area, you can add in background video clips and then have professional editing tools available right on your desktop.
The picture-in-picture tool also makes it easy to freeze the video at any location and add effects as necessary. You can send out video cards and formats that can be enhanced through the effects onboard. Whether you’d like to adjust the contrast, saturation or brightness in the video this can all be done with a simple toolbar.
Reducing motion distortion and improving stabilization are also available in the program.
Advantages:
The big advantage of using Movavi starts with the sheer amount of tools that you can use as a beginner. The program offers 4K video support, 14 languages, a simple interface for use and even improvements for hardware acceleration support.
Drawbacks:
A view of the UI elements that are found within the program could use a bit of work and the controls are somewhat limited for effects. This is a program that is really tailored towards beginners.
2. Runner-up, Best Overall: Filmora
Operating system: Windows, Mac, iOS, Android
Supported Input Formats: Support for most input media formats (including video, image and audio)
Supported Output Formats: Support for most output media formats (including video, image and audio)
Price: $59.95/lifetime
Wondershare Filmora is a program that’s available for iOS, android, Windows and Macintosh. It offers support for most types of media formats including image, audio and video and it can also export in many compatible sources. For $59.95 for the license code, you can make sure that you can continue using the program for amateur filmmaking and more.
Filmora has two different modes depending on your comfort with video editing software. Users can jump in with the easy mode or the full feature editor to unlock the full focus of the program.
Picking out the videos and audio that you want to use can also be made easy through the theme focus. There are a series of features and effects which can complement various themes and this can be helpful for improving transitions or for finding various effects in the program without having to go rooting around.
The preview mode and the music tracks that are available from the themes also make it easy to enhance your video.
The full feature mode can give you access to even greater levels of control, this is where Filmora seems much more like an actual video editor. You can drag images, sound, and more into different tracks as well as perform advanced effects.
The full feature mode delivers on the chance to use green screens, premade filters for color correction, cropping, cutting, splitting and combining with simple tools and more. The full feature editor also comes with an audio mixer and equalizer as well as the chance to burn your items to a DVD, Facebook, Vimeo and more.
Advantages:
It can be a program that’s easy to master even if you have never used a video editing program before. There’s plenty of visual effects and premade effects that can help you make a great looking video within a few minutes. The 4k video support is also helpful.
Drawbacks:
it does lack a few advanced features like the option for motion tracking, multi-camera support and assistance with 360° videos.
3. Best FREE: iMovie
Operating system: macOS
Supported Input Formats: .mp4, .mov, MPEG-2, AVCHD, DV/HDV
Supported Output Formats: .mov, JPEG, DV and AIC, AAC
Price: Free
The apple imovie system actually has some history to it. The software has been available since the year 1999 and it released alongside the iMac DV. In a way this has been an entry-level moviemaker for nearly 20 years.
The latest version of iMovie is a much more professional and powerful application that’s also completely free to download and use. Apple has worked at regularly updating the application to keep up with the latest in advances as well as to make sure that they can handle the best in new camera formats too. From UHD to modern iphones recording in 4k, the latest version of iMovie can keep up with these formats with ease.
IMovie today also comes with a chromakey green screen tool that makes it easy to work with this effect.
Advantages:
The biggest advantage to using this program is that it’s always been designed for beginners. It has simple interfaces as well as abundant tools that can be used for making professional looking, theater quality videos. The program also supports 4K movie making and a series of sharing solutions for its users.
Drawbacks:
It does lack some support for multicam, 360° features and more. It also has limited output controls as part of its use.
4. Runner-up, Best FREE: DaVinci Resolve
Operating system: Windows, Mac
Supported Formats for Importing: .mov, .mp4, .mts, .avi, .ari, .mxf, .dng
Supported Formats for Exporting: MPEG files, H.264 and more.
Price: Free
Davinci Resolve actually has two versions including a full studio version which is available for $299. The free program actually has a surprising number of features from this program by some of the professional tools like team collaboration and video noise reduction cannot be applied without the full license. Most of the features that are on board the free version will work just fine for professionals and hobbyists.
The Davinci Resolve program is considered to be a professional grade editor Ed does offer some advanced tools like exporting, audio mastering, color correction and more. The program can also work especially well for arranging audio clips and video and for its wide selection of effects and filters. The extra color correction and adjustments that are available here can also help with HDR support and getting more professional results when working with RAW data from the camera.
Davinci Resolve is also known for one of the finest color grading programs. With the chromakey tools that are available, the results on video can be extremely powerful. With the quick tutorial that’s on board, it doesn’t take long to actually figure out how use this effect.
Advantages:
Multicam editing, pro audio, precise controls and a series of intuitive features that can improve editing time will all lead to improvements with using this program.
Drawbacks:
The big drawbacks with this video is that there are no features for 360° video editing, it can be somewhat complex for many novices and the program currently offers no 4k support.
5. Best Green Screen Editor Online for Mac: Wevideo
Price: starts at $4.00/mo, billed annually.
With a price of just four dollars a month this is a program that features massive compatibility with nearly 20 different input and output formats. Most of the common input and output formats like NT 4.0, avi, 3gp and more are well represented.
If you are planning on doing green screen options online and you don’t want to install any software to access a full-featured video editor, this could be one of the best alternatives for you.
WeVideo stands as a cloud-based solution that extremely powerful and very simple to use as a video editor. There is a real reason why it’s one of the most popular online video editors available. There are options on board for this for photo animations, clip transformations, voiceovers and more. You can also work in enhancing your video with a series of premium features for screen casting, custom branding, and a wide range of free tracks that you can use with copyright free music.
It’s simple to control almost everything in videos with this online editor from motion effects, the green screen technology to scene transitions.
Advantages:
This is a multiplatform video editor that works with intense compatibility online. You can use it on almost any device. The interface is also quite simple and it has some tools that are used by the pros as well as a format that most people can easily understand.
Picture Editing Software Free Mac
There is a full licensed library of songs with over 100 tracks you can use royalty-free. The cloud storage also ensures that you can pick up a project on any device that you won’t. Cloud access anywhere gives you more time for efficiency and handling your workload.
Drawbacks:
The program only currently supports 720 P resolution in some of the cheaper plans and there’s limited minutes allowed with editing if you are only going to use the trial free plan.
You may also like:
Hey, My name is Paul – nice to e-meet you 🙂 I’m a freelance video editor who has over 4 years experiences of making all types of videos. I founded this website to provide step-by-step and easy-to-follow instructions to first-time editors or beginners like you who want to start their journey in video editing.
If video isn’t already an important part of your content marketing strategy, odds are it’s about to be. Web content is taking a turn toward video whether SEOs and content marketers like it or not. Nearly 50% of marketers are adding YouTube and Facebook channels for video distribution in the next year; one third of online activity is spent watching video; and video itself is projected to account for more than 80% of all internet traffic by 2019. 80%!
For those looking to continue to grow their organic traffic, that means one thing:
Not an expert? Don’t know how to edit videos, have a video studio, or have a bona fide video specialist to shoot and cut your features? That’s alright! The goal of today’s blog is to show you that with the right video editing software, you too can churn out sleek, professional video content—regardless of experience—and keep your content strategy ahead of the curve.
Let’s dive in! Here are our recs for the top 10 best pieces of video editing software or video editing apps for beginners—from cheapest (i.e. free!) to most expensive.
1. Apple iMovie
Ok—so to those of you working with PCs, this one won’t really apply; but we’d remiss to leave it off the list. If you’re looking for simplicity and elegance, it doesn’t get much better than Apple iMovie. iMovie’s ten high-fidelity filters are some of the classiest in the video editing game; and if you’re shooting on your iPhone, or have been editing a project on your iPad, you can use AirDrop to wirelessly and seamlessly transfer your project over to your Mac.
One of iMovie’s most coveted features is its green-screen, or “chroma-key” tool, which allows you to place your characters in exotic locations—Hawaii, say—at a moment’s notice. Want to overlay the scene with “Somewhere Over the Rainbow”? iMovie ties directly in with iTunes and GarageBand, so you can easily implement custom tracks and sounds. When your movie’s finally ready to ship, release it into the wild using iMessage, Facebook, YouTube, or any other of iMovie’s succinctly connected platforms.
Standout Features: Seamless Apple product integration; green-screen; audio and social platform integration
Pricing: Free with the purchase of a Mac
>>Up your game with our all-star playbook to online advertising. Get it here free<<
2. Lumen5: How to Edit Videos Without Much Technical Ability
We’ll put this more in the category of a video editing “tool” than video editing software, but for social media marketers who want to create fun, flashy social promos in the blink of an eye, Lumen5 is a no brainer. Here’s a short little feature we made for a recent blog post, 14 Fun & Festive Holiday Marketing Ideas for 2017:
Lumen5 markets itself as a tool that turns blog posts into social promos. While the process isn’t perfect, and you’ll likely have to do some tinkering to get your blog content looking just the way you want it, the rest of the video creation process is a cinch. Merely refine some copy that teases your blog post; drag and drop some gifs, screengrabs, or video clips; add some music; and your engaging social video will be ripe for Facebook and Twitter.
Standout Features: Blog-to-social-promo creation; drag-and-drop interface
Pricing: Create as many 480p videos as you want with the free version; or, for $50 per month, upgrade to 1080p HD.
3. Nero Video
One of the cheaper options around ($49.99), Nero Video holds its own on this list—it comes well-stocked with a lot of the tricks and effects you’ll find among other products vying for video editing supremacy, and as far as software for beginners, you can certainly do worse. If you’re going to spend money learning how to edit videos, however, you might want to steer clear. Nero just doesn’t have the speed and functionality of some of the other products listed here, and if it’s value proposition is its price, $50 is still not all that cheap.
Standout Features: Low pricing
Pricing: One-time payment of $49.99
4. Corel VideoStudio
Corel VideoStudio has all the characteristics of the other top-of-the-line products on this list, including 360-degree VR and 4k support, but it also has the distinction of being the first piece of consumer video editing software to offer motion tracking—which, if you’re not already familiar, is a feature that allows you to track specific objects throughout your cut (if you wanted, say, to point an arrow at one of your characters, blur out his face, or bestow him with a funny hat). Most of the products on this list come equipped with motion tracking, but VideoStudio still boasts one of the best motion tracking systems around.
One of the knocks on VideoStudio is its speed, which lags notably behind some of the faster systems on this list, like CyberLink PowerDirector and Pinnacle Studio. Still: for a one-time payment of $51.99? You can do much worse.
Standout Features: Motion tracking
Pricing: One-time payment of $51.99
5. Filmora from Wondershare
When it comes to video editing software, Filmora is about as multi-faceted as they come. Filmora is Wondershare’s standard, simple, high-quality video editing offering; but Wondershare also offers FilmoraGo (for mobile editing) and Filmora Scrn (for screen recording and editing). The design is intuitive and easy to use, and comes replete with filters, overlays, motion elements, transitions, and a small selection of royalty-free music. Here are a few more of the “basics” Filmora offers:
4k and gif support are boilerplate features for most video editing products today, but one thing Filmora does particularly well is titles. Title tools are trending in video software, and while Filmora’s doesn’t have the functionality of say, an Apple Final Cut Pro X, which can superimpose 3D titles over your videos and rotate them on three axes, it nonetheless has some snazzy titling features for the money you’re spending.
Another Filmora feature beginners to video editing will find attractive is “Easy Mode,” which allows you to create fun, polished edits by merely dragging and dropping clips, choosing a theme, and selecting music.
Standout features: Title tool; mobile and screen editing; “Easy Mode”
Pricing: Starts at $59.99 for a lifetime license; or, $39.99 for a year.
6. CyberLink PowerDirector
So—we stretched the meaning of “software” a bit earlier; now, we’re going to stretch the meaning of “beginner.” We included CyberLink PowerDirector on this list because its interface is, at the end of the day, pretty straightforward. Head to the product page, run through the tutorials, and you’ll be alright. There is within the interface, however, an embarrassment of options and effects. If you’re not willing to invest the time in learning all of them, it can get a bit overwhelming.
Don’t be scared of CyberLink’s extra features; just be wary of your commitment level!
In terms of rendering, PowerDirector is regarded as one of the fastest video editing systems around. It also operates consistently in the sphere of the innovative and cutting edge. PowerDirector led the charge in the switch to 4k, and today, it’s one of the first systems to support 360-degree virtual reality footage.
Price: you get what you pay for! $79.99 gets you unlimited access to one of the most capable pieces of video editing software around.
Standout Features: Lightning-fast rendering; comprehensive suite of effects
Pricing: One-time payment of $79.99
7. Adobe Premiere Elements
We include Premiere Elements on the list mostly because it’s been an industry leader in the video editing game for some time. And $79.99 is not egregious, but we’re here to say that at that price, you’re mostly paying for the name. In the time since Premiere Elements’ inception, too many other products have surpassed it in speed and capability for us to place it among the cream of the crop. That’s to take nothing away from Premiere Elements’ usability, though—specifically for beginners.
The Guided Edits feature makes Adobe Premiere a particularly attractive option for beginners, as it allows them to take on both quick edits and advanced projects with substantial assistance from the software.
If you’re not entirely sure what you’re doing, don’t sleep on Guided Edits!
So while Premiere Elements lags behind the competition in terms of speed, 3D editing, multi-cam, and some other advanced features, it’s still a great choice for the beginner looking for a comprehensive suite of effects, and some guidance on how to implement them.
Standout Features: Guided Edits; simple interface
Pricing: One-time payment of $79.99
Simple Free Video Editing Software For Mac Editing
8. Pinnacle Studio
At the higher end of the Corel product line is Pinnacle Studio—which, at $129.95 (the amount you’ll need to pay to edit 360-degree and 4k content with the “Ultimate” version), costs more than twice as much as VideoStudio. What do you get for the extra money? Well, not only does Pinnacle come readily equipped with all the features you’d expect from an upper-echelon product—motion tracking, 360-degree VR support, 4k support, multi-cam, etc.—but you’d be hard-pressed to find a faster product on the market in terms of rendering.
For all of its features, Pinnacle’s interface is still as user-friendly and intuitive as anything on this list. Thus, is you have the need for speed, and you don’t mind shelling out a few extra bucks for it, Pinnacle might be the product for you.
Standout Features: Top-of-the-line rendering speeds; full range of features and support
Pricing: One-time payment of $129.95
9. Adobe Premiere Pro
With a virtually unmatched suite of features, 360 VR and 4k support, and a newly implemented ability to store, organize, and share assets online with a team, Adobe Premiere Pro is perhaps the most complete piece of video editing software around. Here’s a recent video promo for our free AdWords account structure guide we cut using Premiere Pro.
One of the more dazzling of Premiere Pro’s tools is the Lumetri Color tool, which offers color adjustment and manipulation on par with that of a Photoshop. The multi-cam feature is also a winner—whereas most systems allow you to work with a limited number of camera angles, Premiere Pro’s latest iteration allows for an unlimited amount.
Throw in a wealth of titling options, readily connected ancillary apps (like Photoshop and After Effects), and a flexible, easy-to-use interface, and Premiere Pro is a no brainer.
Standout Features: Multi-cam and coloring options; title tool; easy integration with Adobe Products; straightforward interface
Free Mac Video Editing
Pricing: $19.99/month
10. Apple Final Cut Pro X
For the most advanced, least fiscally prudent of beginners, there’s Apple Final Cut Pro X. $299.99 might be a little steep for a product you may well have a difficult time understanding; but for those among you who enjoy a challenge, and who aspire to some level of professionalism in video editing, why not go for it? Apple has made the transition from iMovie to Final Cut Pro more painless than ever—so if you’re the kind of guy or gal who enjoys him/herself an Apple product, and has worked with iMovie to the point of mastery, it might be time to splurge on Final Cut Pro. The power is still daunting; the interface, significantly less so.
Standout Features: Magnetic Timeline; Touch Bar support
Pricing: One-time payment of $299.99
Pdf Editing Software Free Mac
Some Final Thoughts
Are you a content or social media marketer looking to get in the video editing game for the sake of keeping up with the growing video trend? Don’t stress! Any of the above software apps would make a fine choice for a beginner.
Think about your budget, your current level of expertise, and how much time you’re willing to devote to learning a new skill. Whether you're looking for the best video editing software for YouTube, or the responsibility has simply fallen on you to get your team’s video marketing strategy up to snuff—don’t wait around deliberating! Get invested in one of these video editing products, and make it yours.
0 notes
Text
Must Software For Mac

If you are looking for the best green screen applications for Mac computer, then you’ll LOVE this guide.
I personally tested and reviewed over 20 free and paid tools.
And you can filter through the following top 5 list to find the best software for editing green screen on Mac.
Check it out:
Luminar is one of the best picture editing software for Mac and it comes at the price of $67.00. You are guaranteed to get your money back if you decide against using this software further before 30 days expire. Allows working with RAW files. . Set missing software architecture. Set any description and compatibility notes you see incorrect or missing! We're looking for a working copy of:. Albert's House (for Macintosh, not Apple II) (around 1987). Mac OS 7.6a4c2/bc Beta (around 1997). Mac OS 7.6b2c2 Beta (around 1997). Mac OS 7.6b4 Beta (around 1997). 30 free macOS apps every Mac user should have From useful utilities to handy archivers and transcoders, here are 30 free yet powerful macOS apps you can download today.
1. Best Overall: Movavi Video Editor
Operating system: Mac, PC
Supported Input Formats: It offers support for most media formats including image, audio and video
Supported Output Formats: Support for most output media formats including video, image and audio
Price: $39.95/lifetime
With the Movavi video editor it’s easy to build fun videos even if you’re a beginner with video editing. You can drag and drop all of the media files into the timeline just as you would in any other simple editing tool. Unlike other types of video editors you can also make quick changes to the clips by rotating, cutting and trimming them away from the timeline.
This software is one of the best ways that you can add multiple transitions, stickers, titles and effects for any type of video.
By shooting a video against a green or blue backdrop and then using the editor to remove the backdrop from the area, you can add in background video clips and then have professional editing tools available right on your desktop.
The picture-in-picture tool also makes it easy to freeze the video at any location and add effects as necessary. You can send out video cards and formats that can be enhanced through the effects onboard. Whether you’d like to adjust the contrast, saturation or brightness in the video this can all be done with a simple toolbar.
Reducing motion distortion and improving stabilization are also available in the program.
Advantages:
The big advantage of using Movavi starts with the sheer amount of tools that you can use as a beginner. The program offers 4K video support, 14 languages, a simple interface for use and even improvements for hardware acceleration support.
Drawbacks:
A view of the UI elements that are found within the program could use a bit of work and the controls are somewhat limited for effects. This is a program that is really tailored towards beginners.
2. Runner-up, Best Overall: Filmora
Operating system: Windows, Mac, iOS, Android
Supported Input Formats: Support for most input media formats (including video, image and audio)
Supported Output Formats: Support for most output media formats (including video, image and audio)
Price: $59.95/lifetime
Wondershare Filmora is a program that’s available for iOS, android, Windows and Macintosh. It offers support for most types of media formats including image, audio and video and it can also export in many compatible sources. For $59.95 for the license code, you can make sure that you can continue using the program for amateur filmmaking and more.
Filmora has two different modes depending on your comfort with video editing software. Users can jump in with the easy mode or the full feature editor to unlock the full focus of the program.
Picking out the videos and audio that you want to use can also be made easy through the theme focus. There are a series of features and effects which can complement various themes and this can be helpful for improving transitions or for finding various effects in the program without having to go rooting around.
The preview mode and the music tracks that are available from the themes also make it easy to enhance your video.
The full feature mode can give you access to even greater levels of control, this is where Filmora seems much more like an actual video editor. You can drag images, sound, and more into different tracks as well as perform advanced effects.
The full feature mode delivers on the chance to use green screens, premade filters for color correction, cropping, cutting, splitting and combining with simple tools and more. The full feature editor also comes with an audio mixer and equalizer as well as the chance to burn your items to a DVD, Facebook, Vimeo and more.
Advantages:
It can be a program that’s easy to master even if you have never used a video editing program before. There’s plenty of visual effects and premade effects that can help you make a great looking video within a few minutes. The 4k video support is also helpful.
Drawbacks:
it does lack a few advanced features like the option for motion tracking, multi-camera support and assistance with 360° videos.
3. Best FREE: iMovie
Operating system: macOS
Supported Input Formats: .mp4, .mov, MPEG-2, AVCHD, DV/HDV
Must Have Mac Programs
Supported Output Formats: .mov, JPEG, DV and AIC, AAC
Price: Free
The apple imovie system actually has some history to it. The software has been available since the year 1999 and it released alongside the iMac DV. In a way this has been an entry-level moviemaker for nearly 20 years.
The latest version of iMovie is a much more professional and powerful application that’s also completely free to download and use. Apple has worked at regularly updating the application to keep up with the latest in advances as well as to make sure that they can handle the best in new camera formats too. From UHD to modern iphones recording in 4k, the latest version of iMovie can keep up with these formats with ease.
IMovie today also comes with a chromakey green screen tool that makes it easy to work with this effect.
Advantages:
The biggest advantage to using this program is that it’s always been designed for beginners. It has simple interfaces as well as abundant tools that can be used for making professional looking, theater quality videos. The program also supports 4K movie making and a series of sharing solutions for its users.
Drawbacks:
It does lack some support for multicam, 360° features and more. It also has limited output controls as part of its use.
4. Runner-up, Best FREE: DaVinci Resolve
Operating system: Windows, Mac
Supported Formats for Importing: .mov, .mp4, .mts, .avi, .ari, .mxf, .dng
Supported Formats for Exporting: MPEG files, H.264 and more.
Price: Free
Davinci Resolve actually has two versions including a full studio version which is available for $299. The free program actually has a surprising number of features from this program by some of the professional tools like team collaboration and video noise reduction cannot be applied without the full license. Most of the features that are on board the free version will work just fine for professionals and hobbyists.
The Davinci Resolve program is considered to be a professional grade editor Ed does offer some advanced tools like exporting, audio mastering, color correction and more. The program can also work especially well for arranging audio clips and video and for its wide selection of effects and filters. The extra color correction and adjustments that are available here can also help with HDR support and getting more professional results when working with RAW data from the camera.
Davinci Resolve is also known for one of the finest color grading programs. With the chromakey tools that are available, the results on video can be extremely powerful. With the quick tutorial that’s on board, it doesn’t take long to actually figure out how use this effect.
Advantages:
Multicam editing, pro audio, precise controls and a series of intuitive features that can improve editing time will all lead to improvements with using this program.
Drawbacks:
The big drawbacks with this video is that there are no features for 360° video editing, it can be somewhat complex for many novices and the program currently offers no 4k support.
5. Best Green Screen Editor Online for Mac: Wevideo
Must Download Software For Mac
Price: starts at $4.00/mo, billed annually.
With a price of just four dollars a month this is a program that features massive compatibility with nearly 20 different input and output formats. Most of the common input and output formats like NT 4.0, avi, 3gp and more are well represented.
If you are planning on doing green screen options online and you don’t want to install any software to access a full-featured video editor, this could be one of the best alternatives for you.
WeVideo stands as a cloud-based solution that extremely powerful and very simple to use as a video editor. There is a real reason why it’s one of the most popular online video editors available. There are options on board for this for photo animations, clip transformations, voiceovers and more. You can also work in enhancing your video with a series of premium features for screen casting, custom branding, and a wide range of free tracks that you can use with copyright free music.
It’s simple to control almost everything in videos with this online editor from motion effects, the green screen technology to scene transitions.
Advantages:
This is a multiplatform video editor that works with intense compatibility online. You can use it on almost any device. The interface is also quite simple and it has some tools that are used by the pros as well as a format that most people can easily understand.
There is a full licensed library of songs with over 100 tracks you can use royalty-free. The cloud storage also ensures that you can pick up a project on any device that you won’t. Cloud access anywhere gives you more time for efficiency and handling your workload.
Drawbacks:
Must Have Software For Mac
The program only currently supports 720 P resolution in some of the cheaper plans and there’s limited minutes allowed with editing if you are only going to use the trial free plan.
You may also like:
Download Software Mac
Free Music Software For Mac
Hey, My name is Paul – nice to e-meet you 🙂 I’m a freelance video editor who has over 4 years experiences of making all types of videos. I founded this website to provide step-by-step and easy-to-follow instructions to first-time editors or beginners like you who want to start their journey in video editing.
0 notes
Text

so yesterday i got an ask requesting a gif-making tutorial and i know some of my friends have asked me to help them with gif-making so here’s a tutorial that i hope you guys consider easy to follow. definitely message me for any further help if you need it.
so, before we can start anything at all, you’ll need to download programs to be able to capture the frames and then turn those frames into an animated gif. i use km player to capture the frames and gimp to animate those frames into a gif. both programs are free and a good alternative for if you can’t afford photoshop or any one of those other pricier photo/video-editing programs. to download them, go to the linked download websites and click the green “safe download” button on the top for km player and the orange “download directly” button for gimp.
once you’ve got everything set up, open up km player and open a video file. it can be a personal video, a show, a movie, whatever you have on your computer that you’d like to gif. i’ll use the video i used for my recent naiads edit which includes text which i’ll also show how to add to gifs later on. go to the bottom left-hand corner of km player, click on the gear button.

a small black window should pop up. click on the fourth widget to the right on the top-hand corner, it looks like three rectangular lines.

once you click it, you should see those “capture, video, frame, audio” buttons you see on the above picture. click on the button that says “more...”

which should bring you to a second window which is what you’ll use to actually capture the frames.

the first time you open the frame extraction window (the new white window), you’ll have the default options picked but you’ll have to change a few options to be able to properly capture frames to later animate into a gif. change the “formate” to “jpeg (middle)”, the “method” to “with msg, subtitles”, the “numbers to extract” to “continuously”, the “size to extract” as “original size” (you could change it to a specific size but you can also change the frame size on gimp while you’re editing the gif so don’t worry too much about it right now), and the “frames to extract” to “in 1 sec.” with 20 frame(s) (you’ll have to manually change the number of frames per second to be 20). on the top corner, you can change the folder the frames are sent to when they’re extracted, but i personally just send it directly to my “capture” folder inside of the “km player” folder which is the default.
once you’ve got all of those options for frame capture changed, you can begin capturing frames. the way it works is that once you have found the scene or clip you’d like to gif, you click the “start” button on the frame extraction window and click “play” on the km player window. you can also begin frame extraction as the video plays, it will still capture the frames. if you pause the video but you haven’t stopped the frame extraction, no frames will be captured until you press play on km player again. (sorry my gif is so fast and doesn’t show my mouse, the screen recorder i used isn’t the best.)

after you’ve got your frames captured, you can go and check out the frames in the folder you saved it in and delete any frames you don’t want, move them around to organize the different frames for different gifs, play around with it as much as you want. i know i like to go back into the folders and delete extra frames and organize my frames into separate folders so that when i go in to gimp and begin choosing the frames i’m going to use to make a gif i can just find them in one place and go from there.
anyway, now open up gimp so that you can open up your frames (in gimp, frames are called layers, just in case there’s any confusion as i sure know i was confused about that at first). to open up your layers, you go to the upper-left hand corner in the toolbar, click the “file” button.

then, in the drop options, click on “open as layers”.

note: if you don’t open as layers and just click “open”, each frame/layer will open up in individual windows instead of in one window where they will be layered one on top of the other.
after clicking “open as layers”, a new window will pop up where you will open the folder your frames are on and click and drag down/up all of the frames you need for your gif.
then click “open”.

opening all of the layers will take some time depending on how many layers you chose. the more layers you have, the longer it’ll take to open up all of the layers. but don’t worry, the longest i’ve ever taken was a minute for an 80-frame gif so you won’t need to wait too long.
after all of the layers open up, you can start playing around with your layers. i recommend always looking at the layers animated first to see whether you need to remove/add any layers, crop the layers, change the size of the layers, etc etc. to look at the layers in animation (which is basically showing you how they would look once they’re giffed) you go to the toolbox on the upper corner of gimp and click on “filters”.

in the drop-box options, hover over “animation”.

that should bring you to a second drop-box option where you’ll click on “playback”.

clicking on “playback” should bring you to a new window where you’ll see the layers stacked together and be able to play as if it were a gif. to play the layers, you press “play” in the upper left-hand corner. you also have the option to rewind and step.

note: when the window opens, it’ll open at the same size as your layers. if your layers are 640 x 280, for example, then the window will option at that size. if your layers are 1200+ x 700+ like my example is, it’ll open up and take up the majority of your screen like it does for me.
if you want to play with the sizes of the layers, you can go to the upper toolbox and click on “image” where the “canvas size” and “scale size” options will be available.

if you want to add text to the layers like i did for my edit, then continue on. if you’d rather just save your gif as is, i’ll have this section divided by dashes so you can scroll down to the end of the section and skip to the saving as a gif portion.
to add text, i know there are quicker ways to add text to all layers, but i personally like to do it the long way as i have more control with each layer and the text and it’s easier to control dialogue for giffing scenes with dialogue, especially when the dialogue changes within the gif.
to add text, you go to the toolbar once again and click on “tools”.

in the drop-box options, go down to “text” and click on it.

clicking on “text”, you’ll get the text-mouse and a small window to edit the size, font, coloring, etc of the text will pop up.

once you add the text and edit around a bit, if you’d like to further edit, such as the centering of the text, the text box type, etc and you don’t already have the large “toolbox - tool options” window open on either side of your screen (as the “layers” toolbox window is open on the right side of my screen), go back to the toolbar on the top of your gimp screen, click on “windows”.

then hover over the “recently closed docks” option (the first option) which will give you the gimp windows you’ve recently closed. if you don’t have “toolbox” or “layers” open, you’ll see them there and be able to click on them like below.

once you’ve got the toolbox window open, go to the text image and click on it for the different text-editing options.

after you play around with that and you want to change the alignment of your text box, look for the image that looks like four black arrows facing in different directions of an empty box in the middle of the third row.

after you’ve played with the alignment, the way to add text to each layer, you move over to the “layers” window and go over to the layers to start duplicating and merging the text layers with the regular background layers.

there, you want to click on the first layer which will be your text layer.
note: because of the way the layers are stacked, the top-most layer would be the last layer of your gif with the bottom-most layer being the first layer of your gif. so if you want to move around text and change it around a bit with each layer, you’ll have to keep in mind that the way you view the layers on the window is the opposite of the way you’ll view it animated.

when you click on the text layer you’ll be able to duplicate it so that the text layer will be the exact same for each background layer and you won’t have to make a new text layer for each background layer. after you’ve clicked the text layer, go to the bottom of the scroll bar where the widgets are and click on the one that looks like two small frames stacked on each other. if you want to change up each layer a bit, you can just create a new text layer for each frame.

once you’ve duplicated a layer, you can click the downward green arrow which will drag the layer down or if you’d like to just manually drag the layers down, you can do that too. to make sure that each text and background layer is seen properly, in the scroll bar make sure that the pattern is text, background, text, background, etc or vise versa as you can see a bit of in the below picture.

now, to properly add the text to the layers, you’ll have to merge the layers down. if you want to go for that continuous text throughout the gif that remains in the exact same position, you’ll just click “merge down”. if you want a flashing gif where the text flashes, you’ll leave the text as is in between each background frame. below is an example of what the text would look like if you don’t merge it and you want that flashing text look.

if you don’t want that flashing text look, what you’ll do is right-click on the upper layer and merge it down. my suggestion is to start from the top and make your way down. so if your top layer is the background layer and right below it is your text layer, you’ll right-click on the top layer, which so happens to be the background layer in this example, move up to “merge down”, and click on it for the text to merge over the background layer.

once you’ve merged your text layers with the background layers, you can go back to “animation” and play it back to see how it would look. you’ll end up getting a fixed text throughout the gif, like this:

now that we’re done with the layering and adding text and doing anything else that we wanted to do with the layers, it’s time to turn them into a proper gif.
first, you’ll go to the top toolbar and click on “file”, then you’ll go down to the “export as” option. you don’t want to click “save” or “save as” because gifs don’t save properly that way.

once you click “export as”, a new window will pop up. you can pick whichever folder to save it in and you’ll be able to name it, but when you’re naming it, change the file type to gif. i can’t emphasize enough how you need to save it as “.gif”. if you don’t save it with that file type, then your layers won’t save as a gif. once you’re satisfied with your folder and file name, click “export” at the bottom.

when you click export, a new window will pop up. you’ll have to mark “loop forever” to make sure that when the gif saves it’ll be on a constant loop. after you click “loop forever”, click “export”.

it’ll take a few minutes for it to export. don’t turn off the program if it says “program not responding”, it’s just trying to save on to your computer.
and then you’re done! you’ve now learned how to gif and you can post your completed product(s) on tumblr. hope this helped. have fun giffing!
19 notes
·
View notes
Text
14 PowerPoint Presentation Tips to Make More Creative Slideshows [+ Templates]
I like to think of Microsoft PowerPoint as a test of basic marketing skills. To create a passing presentation, I need to demonstrate design skills, technical literacy, and a sense of personal style.
If the presentation has a problem (like an unintended font, a broken link, or unreadable text), then I’ve probably failed the test. Even if my spoken presentation is well rehearsed, a bad visual experience can ruin it for the audience.
Expertise means nothing without a good presentation to back it up. For starters, grab your collection of free PowerPoint templates below, and use the tips that follow to perfect your next presentation.
No matter your topic, successful PowerPoints depend on three main factors: your command of PowerPoint's design tools, your attention to presentation processes, and your devotion to consistent style. Here are some simple tips to help you start mastering each of those factors, and don't forget to check out the additional resources at the bottom of this post.
PowerPoint Presentation Tips
Don't let PowerPoint decide how you use PowerPoint.
Create custom slide sizes.
Edit your slide template design.
Make sure all of your objects are properly aligned.
Use "Format Menus" to better control your objects' designs.
Take advantage of PowerPoint's shapes.
Create custom shapes.
Crop images into custom shapes.
Present websites within PowerPoint.
Embed your font files.
Save your slides as JPEGs.
Embed multimedia.
Bring your own hardware.
Use "Presenter View."
PowerPoint Style
1. Don’t let PowerPoint decide how you use PowerPoint.
Microsoft wanted to provide PowerPoint users with a lot of tools. But this does not mean you should use them all. Here are some key things to look out for:
Make sure that preset PPT themes complement your needs before you adopt them.
Try to get away from using Microsoft Office’s default fonts, Calibri and Cambria. Using these two typefaces can make the presentation seem underwhelming.
Professionals should never use PPT’s action sounds. (Please consider your audience above personal preference).
PowerPoint makes bulleting automatic, but ask yourself: Are bullets actually appropriate for what you need to do? Sometimes they are, but not always.
Recent PPT defaults include a small shadow on all shapes. Remove this shadow if it's not actually needed. Also, don’t leave shapes in their default blue.
2. Create custom slide sizes.
While you usually can get away with the default slide size for most presentations, you may need to adjust it for larger presentations on weirdly sized displays. If you need to do that, here's how.
In the top-left corner, choose "File."
Select "Page Setup."
Type the height and width of the background you'd like, and click "OK."
A dialogue box will appear. Click "OK" again.
Your background is resized!
Tip: Resize your slides before you add any objects to them or the dimensions of your objects will become skewed.
3. Edit your slide template design.
Often, it's much easier to edit your PowerPoint template before you start -- this way, you don't have design each slide by hand. Here's how you do that.
Select "Themes" in the top navigation.
In the far right, click "Edit Master," then "Slide Master."
Make any changes you like, then click "Close Master." All current and future slides in that presentation will use that template.
4. Make sure all of your objects are properly aligned.
Having properly aligned objects on your slide is the key to making it look polished and professional. You can manually try to line up your images ... but we all know how that typically works out. You're trying to make sure all of your objects hang out in the middle of your slide, but when you drag them there, it still doesn't look quite right. Get rid of your guessing game and let PowerPoint work its magic with this trick.
How to align multiple objects:
Select all objects by holding down "Shift" and clicking on all of them.
Select "Arrange" in the top options bar, then choose "Align or Distribute."
Choose the type of alignment you'd like.
How to align objects to the slide:
Select all objects by holding down "Shift" and clicking on all of them.
Select "Arrange" in the top options bar, then choose "Align or Distribute."
Select "Align to Slide."
Select "Arrange" in the top options bar again, then choose "Align or Distribute."
Choose the type of alignment you'd like.
PowerPoint Design
5. Use "Format Menus" to better control your objects' designs.
Format menus allow you to do fine adjustments that otherwise seem impossible. To do this, right click on an object and select the "Format" option. Here, you can fine-tune shadows, adjust shape measurements, create reflections, and much more. The menu that will pop up looks like this:
Although the main options can be found on PowerPoint’s format toolbars, look for complete control in the format window menu. Other examples of options available include:
Adjusting text inside a shape.
Creating a natural perspective shadow behind an object.
Recoloring photos manually and with automatic options.
6. Take advantage of PowerPoint's shapes.
Many users don’t realize how flexible PowerPoint’s shape tools have become. In combination with the expanded format options released by Microsoft in 2010, the potential for good design with shapes is readily available. PowerPoint provides the user with a bunch of great shape options beyond the traditional rectangle, oval, and rounded rectangle patterns, unlike even professional design programs like Adobe Creative Suite or Quark.
Today’s shapes include a highly functional Smart Shapes function, which enables you to create diagrams and flow charts in no time. These tools are especially valuable when you consider that PowerPoint is a visual medium. Paragraphing and bullet lists are boring -- you can use shapes to help express your message more clearly.
7. Create custom shapes.
When you create a shape, right click and press "Edit Points." By editing points, you can create custom shapes that fit your specific need. For instance, you can reshape arrows to fit the dimensions you like.
Another option is to combine two shapes together. When selecting two shapes, right-click and go to the "Grouping" sub-menu to see a variety of options.
Combine creates a custom shape that has overlapping portions of the two previous shapes cut out.
Union makes one completely merged shape.
Intersect builds a shape of only the overlapping sections of the two previous shapes.
Subtract cuts out the overlapping portion of one shape from the other.
By using these tools rather than trying to edit points precisely, you can create accurately measured custom shapes.
8. Crop images into custom shapes.
Besides creating custom shapes in your presentation, you can also use PowerPoint to crop existing images into new shapes. Here's how you do that:
Click on the image and select "Format" in the options bar.
Choose "Crop," then "Mask to Shape," and then choose your desired shape. Ta-da! Custom-shaped photos.
Learn more about creating images for your marketing channels in the video below.
youtube
9. Present websites within PowerPoint.
Tradition says that if you want to show a website in a PowerPoint, you should just create link to the page and prompt a browser to open. For PC users, there’s a better option.
Third party software that integrates fully into PowerPoint’s developer tab can be used to embed a website directly into your PowerPoint using a normal HTML iframe. One of the best tools is LiveWeb, a third-party software developed independently.
By using LiveWeb, you don’t have to interrupt your PowerPoint, and your presentation will remain fluid and natural. Whether you embed a whole webpage or just a YouTube video, this can be a high-quality third party improvement.
Unfortunately, Mac users don’t have a similar option. Agood second choice is to take screen shots of the website, link in through a browser, or embed media (such as a YouTube video) by downloading it directly to your computer.
PowerPoint Process
10. Embed your font files.
One constant problem presenters have with PowerPoint is that fonts seem to change when presenters move from one computer to another. In reality, the fonts are not changing -- the presentation computer just doesn’t have the same font files installed. If you’re using a PC and presenting on a PC, then there is a smooth work around for this issue. (When you involve Mac systems, the solution is a bit rougher. See Tip #11.)
Here’s the trick: When you save your PowerPoint file (only on a PC), you should click Save Options in the "Save As …" dialog window. Then, select the "Embed TrueType fonts" check box and press "OK." Now, your presentation will keep the font file and your fonts will not change when you move computers (unless you give your presentation on a Mac).
11. Save your slides as JPEGs.
In PowerPoint for Mac 2011, there is no option to embed fonts within the presentation. So unless you use ubiquitous typefaces like Arial or Tahoma, your PPT is likely going to encounter font changeson different computers.
The most certain way of avoiding this is by saving your final presentation as JPEGs, and then inserting these JPEGs onto your slides. On a Mac, users can easily drag and drop the JPEGs into PPT with fast load time. If you do not use actions in your presentation, then this option works especially well.
If you want your presentation to appear "animated," you'll need to do a little tinkering. All you need to do is save JPEGs of each "frame" of the animation. Then, in your final presentation, you'll just display those JPEGs in the order you'd like the animation to appear. While you'll technically have several new slides in place of one original one, your audience won't know the difference.
An important consideration: If your PPT includes a lot of JPEGs, then the file size will increase.
12. Embed multimedia.
PowerPoint allows you to either link to video/audio files externally or to embed the media directly in your presentation. You should embed these files if you can, but if you use a Mac, you cannot actually embed the video (see note below). For PCs, two great reasons for embedding are:
Embedding allows you to play media directly in your presentation. It will look much more professional than switching between windows.
Embedding also means that the file stays within the PowerPoint presentation, so it should play normally without extra work (except on a Mac).
Note: Mac OS users of PowerPoint should be extra careful about using multimedia files.
If you use PowerPoint for Mac, then you will always need to bring the video and/or audio file with you in the same folder as the PowerPoint presentation. It’s best to only insert video or audio files once the presentation and the containing folder have been saved on a portable drive in their permanent folder. Also, if the presentation will be played on a Windows computer, then Mac users need to make sure their multimedia files are in WMV format. This tip gets a bit complicated, so if you want to use PowerPoint effectively, consider using the same operating system for designing andpresenting, no matter what.
13. Bring your own hardware.
Between operating systems, PowerPoint is still a bit jumpy. Even between differing PPT versions, things can change. One way to fix these problems is to make sure that you have the right hardware -- so just bring along your own laptop when you're presenting.
14. Use "Presenter View."
In most presentation situations, there will be both a presenter’s screen and the main projected display for your presentation. PowerPoint has a great tool called Presenter View, which can be found in the "Slide Show" tab of PowerPoint 2010 (or 2011 for Mac). Included in the Presenter View is an area for notes, a timer/clock, and a presentation display.
For many presenters, this tool can help unify their spoken presentation and their visual aid. You never want to make the PowerPoint seem like a stack of notes that you use a crutch. Use the Presenter View option to help create a more natural presentation.
Pro Tip: At the start of the presentation, you should also hit CTRL + H to make the cursor disappear. Hitting the "A" key will bring it back if you need it!
With style, design, and presentation processes under your belt, you can do a lot more with PowerPoint than just presentations for your clients. PowerPoint and similar slide applications are flexible tools that should not be forgotten.
Want more? Read 20 Great Examples of PowerPoint Presentation Design.
0 notes
Text
5 Reasons I'm Thrilled With ON1 Photo RAW 2018
What a week this is shaping up to be! I'm about to hit the road for the Oregon Coastal Adventure workshop. And ON1 Photo RAW 2018 officially released, too! I've been using the beta version for the last several weeks and it is excellent. ON1 has packed a lot into this new release. Among the features and improvements, there are 5 that bubble to the top for me. Let's run them down.
1. Luminosity & Color Range Masking
Luminosity masks are easier than ever to create. The masking area for the Effects filters and Local Adjustments now has a Lumen button. The knockout punch is the new slider controls to fine tune the masks:
Density: The overall strength of the mask. If you want to mask a complex area at partial strength, do it at 100% with the Perfect Brush. Then, dial back the density.
Feather: Soften the transition of all your masking brush strokes with a single slider.
Levels: Like an old-school levels control, but for the mask. You can define what's considered deep shadows, bright highlights, and the transition between them. It's great for fine tuning luminosity masks.
Window: Fine tune the tonal range of a mask by shrinking the tonal "window" the mask effects. This is another control perfect for luminosity masks. If you've been waiting for controls to home in on very specific tonal zones, here ya go.
The Levels and Window sliders give results similar to the blending options - and those still work, too, by the way! I think the Window control makes it easier because you can visualize the adjusted luminosity mask with the mask overlays.
Oh... and if that wasn't enough, you can mask based on color tones, too! Effects filters and Local Adjustments now have a color picker. Select a color tone from your photo, dial in the range, and quickly generate color-based masks.
I have already been putting these features to use. I have also added several videos to my Mastering Light And Shadow In ON1 Photo video course explaining these features in detail.
2. Panoramic Merge
I am shooting more panoramas since investing in a leveling base. Panoramic merges is a welcome addition to ON1 Photo RAW. The preview image takes just a few seconds to render. The screenshot here is a merge of 7 photos. Each frame is a 36MP RAW file from a Sony A7R. The preview took about 3 seconds to appear. That fast preview lets me quickly decide whether or not to proceed with stitching. After all, stitching together monster panos will take time.
The merge preview offers controls to crop or warp fill the edges (or do nothing). I like the option of sending the resulting merge to Develop or Effects for further processing. You can also use the Add Panoramic Metadata so shared to sites like Facebook let a user pan around the scene.
3. Photo Versions
I think we all try out various treatments and styles on our photos. Versions make this easier - and it saves storage space. Versions in ON1 Photo RAW 2018 work like virtual copies in Lightroom or Versions in Aperture. In a non-destructive workflow, changes to your photo are tracked as instructions against your original image. When you view a photo in Browse, Photo RAW replays those instructions against your unmodified original photo and displays the results.
Versions allow you to have multiple sets of instructions for the same, single original photo. Creating versions is very fast - you are only copying the settings, not duplicating the original photo. That also means you're not eating up megabytes of disk space with each variation of your photo. As a photo educator, I find this especially useful. When teaching in workshops and private lessons, it is much easier to play "what-if" games and explore ideas with a minimal impact to workflow.
4. Blur And Chisel Are Non-Destructive!
The return of old favorites! Long time ON1 users know the Blur Tool and Chisel Tool from the Layers module. Now these tools are full members of a RAW, non-destructive workflow.
What do these tools do? The Chisel Tool shaves pixels at the edges of masks. It is excellent for fine tuning the mask at hard edges. It's the tool you grab to help tone down halos. The Blur Tool softens the edge transition of a mask. I use the Blur Tool to selectively feather areas of a mask, or where my brush strokes overlap.
5. User Interface Refinements
These are the spit-and-polish improvements. Honestly, these are the features that set apart good software from great software. You might spend a lot of time in your photo editing software, and the better the interface, the more time you spend thinking about your photo. That's what photography is all about, really.
ON1 Photo RAW has made subtle changes to the UI that might go unnoticed at first. For example, the longer slider controls in Develop, Effects and Local Adjustments allow for finely controlled changes. Also, customizing the accent color of selected photos and filters is nice. Why? You can choose a cooler, subtler color that doesn't draw away from the photo you are working on. I also appreciate that the tool controls are centered in the toolbar above my photo. Almost always it means less "mousing around" to change a tool setting - and that's more time I'm working on my imagery.
UI improvements may not jump off the Photo RAW 2018 feature list. However, when you spend healthy amounts of time in any piece of software, thistype of attention to detail matters.
Of course, there are many more features in ON1 Photo RAW 2018. HDR merging, new camera support, new lens support, selective noise reduction and mobile photo sync - just to name a few. And I've only talked about the processing features. Photo RAW is also an asset manager with excellent metadata support, curated albums, metadata-driven albums and fast indexing of your favorite sets of images. ON1 has put forth a very well featured and very compelling piece of photo software.
ON1 Photo RAW 2018 is more than worth a test drive. You can learn more about how Photo RAW works on my ON1 Learning Center.
0 notes
Text
Demystifying the Design Process with Sketch
For non-designers, there is often a level of mysticism around the way we work. In your job, it may well be your responsibility to brief a designer, but as for what happens in between that stage and finally seeing the fruits of their labour – well, this may be rather alien. While it’s not necessarily important to know the ins and outs of this (in a similar way that I can’t claim much knowledge for what our developers do code-side), this post aims to demystify the process and shed light on one of my favourite design programs at the moment, and equip you with good reason to convince any digital or web designer you work with to pick it up if they don’t use it already. Not to mention that having a top-level overview of design software makes it a whole lot easier to communicate with those that do use it.
If the above doesn’t quite apply to you, don’t click off just yet; there is still value to be had if you are:
A designer – learn how this program and accompanying tools can improve the way you work.
A jack-of-all-trades – discover how you can improve the design aspect of your role
A manager – as if by magic find out how to streamline your team and processes
Still here? Great, let’s begin.
Disclaimer: This is not an advertorial.
While it would be nice to have been sponsored to write this post, it’s worth clarifying first of all that any hints of sales chatter that may ensue should just be read as pure enthusiasm for the product.
So, to cut to the chase, my most-recommended piece of design software at the moment is Sketch. It’s my partner in design if you will. I started using it around two years ago and haven’t looked back since. Before getting on to the ‘why?’ and ‘how?’ though, let’s briefly touch upon what it actually is (and isn’t) for those in the dark.
Sketch? What’s that?
On paper Sketch is a ‘proprietary vector graphics editor’. From a user perspective though, it’s essentially a blank canvas in which you can design and create anything from a macro website right down to the nitty-gritty aspects of a user-interface.
Rather than just rattle through more points about what Sketch is and what it’s capable of, I want to throw in a quick lowdown as to what it isn’t:
It isn’t anything to do with SketchUp (which happens to be a 3D graphics modelling programme) so best not to get them confused.
It isn’t an illustration, photomanipulation or text-setting tool – these are best left to Adobe Illustrator, Photoshop and InDesign, respectively.
It isn’t going to work in Windows/Linux etc. – sorry! It’s an Apple macOS-only program; though the benefit of this being that it’s incredibly well-designed and intuitive for Mac users.
It isn’t going to break the bank! Sure, it was the free trial that roped me in to give it a go, but it was the very reasonable price tag that converted me to a paying user.
Life before Sketch
Before Sketch came along, my go-to design programme had always been Adobe Illustrator. Illustrator and I go way back, to my teen years, before I ever thought of myself as a designer. Over the years I’ve built up a bank of knowledge and can convincingly say that I now have a pretty good understanding of its features, and am more than happy to sing its praises over the likes of Photoshop. Similarly, when I joined Distilled, the other designers here were also keen advocates of Illustrator, and so it never occurred to me to question the process. Until one day I was chatting with a designer from another company, and on finding out our process, looked at me with incredulity and asked: “You use Illustrator for web build design?!” To be fair to us, there are plenty of designers who did, and still, do this. But importantly, this set the wheels in motion for me to look beyond our tried and tested tools. After some research it seemed a lot of people in the design community were raving about Sketch – this relative ‘new kid on the block’; so I set myself the task of using it for the next project I was assigned to.
I was immediately sold; and here are three reasons why you should be too.
1. Designed for digital, with a kickass online community to match
Unlike Illustrator, Sketch is designed for digital-first use cases in mind. With that comes an understanding that us digital folk want things done fast, we want them now. The time it took for me to go from deciding to try it out, to downloading, installing and opening the app, was less than five minutes. Anyone who has ever tried to get Illustrator on their machine before can relate to how amazed I was at the speed. That’s not a surprise, considering the app itself comes in only at 45.2mb, in comparison to Illustrator CS6 at 259.8mb.
Sketch’s UI is laid out in a clean, modular fashion, with no potential for toolbars to become unwieldy and disparate (which I’m definitely guilty of in Illustrator), and this ease of use if further reflected in the way the programme operates:
No matter how intuitive a tool is, questions are bound to crop up when you start doing more complex things. Luckily I quickly learnt what a great online community Sketch has fostered. My favourite forum is sketchtalk.io where you can generally expect pretty fast response rates.
Not only is this community great in sharing knowledge on a case-by-case basis, there are also those who eagerly contribute by writing plugins (often open source and free to use) which enhance the capabilities of Sketch. For example, just the other day I came across AnimateMate, allowing users to create simple animations. This is just one example amongst many. Usually, if I know something I specifically want to do that isn’t natively built into Sketch, I’ll consult Google – ‘[blank] plugin for Sketch’. Or, I might occasionally browse directories like this and this to discover new goodies.
All in all, the payback far outweighs the minimal learning curve of familiarising yourself with slightly different keyboard shortcuts.
2. Save time (and money) by streamlining the route from design to development
Prior to Sketch, my process from taking a design into development typically looked like this:
Create layouts in Illustrator.
Write up a detailed spec document for the developer, including aspects such as font weights and sizing, and hex code colours to name but a few.
Export a series of flat image or PDF from Illustrator for the dev and manually save any assets they might need, e.g. icons, images or logos.
Dev then goes away and uses the above to code and build by eye to match the design.
Expect a few feedback rounds on getting sizings, padding etc spot on.
Instead, my process is cut pretty much in half and now consists of just three steps:
Create layouts in Sketch.
Export layouts into Zeplin (third party plugin) project.
Invite developer to the Zeplin project (which literally just takes seconds).
Zeplin is my second most favoured tool when it comes to design. Its saved me hours by eliminating the need to do a write up a spec, manually export assets and cuts down the back and forth with developers by a mile. In fact, it almost deserves another post all to itself, but in the meantime, they’ve got the ground covered in a couple of quick overviews as to how Zeplin is good for designers and also developers.
If I still haven’t convinced you yet, just know that a lot of these new time-saving tools only support Sketch and not Illustrator ;-)
3. Work with a tool that’s as agile and iterative as you
Sketch is an app that’s constantly improving and pushing out updates. There’s even a part of their site dedicated to showcasing the latest changes. From a user perspective, I love this – it shows that I’m getting a product that’s at the forefront of technologies. And of course, it’s not cumbersome to update, no machine restarts etc. The majority of them are done in the time it takes to go make a brew. Given that there’s not a single day in which the digital landscape isn’t changing, it’s great to know that the tool you’re working with is also changing and improving with it.
In fact, as much as it is about delivering the best user offering, it is a market as competitive as any other. As well as die-hard Illustrator and Photoshop fans to try and lure away, there are others trying to steal market share, for example, Adobe XD and soon-to-be InVision Studio. The Sketch folk know they can’t rest on their laurels, and I’m looking forward to another year of great updates fuelled by a dose of healthy competition.
Closing thoughts
To summarise, Sketch has revolutionised the way I approach design, forcing me to think more about the power of automation and in turn benefiting from that with shortcuts that don’t compromise on quality. I urge anyone working with designers to get them to give it a go. And with a one-month free trial, there’s really no excuse.
Demystifying the Design Process with Sketch was originally posted by Video And Blog Marketing
0 notes
Text
10 Great PowerPoint Changes You Probably Don’t Know About
PowerPoint is the iconic leader in slideshow-type digital tools. It’s considered the most feature-rich, flexible, and diverse of all presentation tools and where everyone goes first (or wants to go first) to create presentations. Though the alternatives are loud and boisterous, over 500 million users choose PowerPoint, 6 million of them teachers.
For years, new iterations of PowerPoint included tweaks and extensions of what already was there, but Office 365 changed that. In a nod toward the reality that lots of people use PowerPoint for much (much) more than presentations, they’ve made it easier to use for a wide variety of new purposes such as screencasting, lesson planning, and the design of marketing materials. Here are ten of my favorites:
Add-ins
This isn’t new to PowerPoint 2016, but if you haven’t upgraded in a while or simply didn’t know add-ins are available to Microsoft Office, you’ll love these. They are like the add-ins you download to your browser but work within PowerPoint. The first time I ran into these was with a link checker called AbleBits.com to find dead links in my tech ed books. For a small fee, the AbleBits add-in became a tab on my menu bar that I could use anytime to check whether the hundreds of links I had were still working.
Now, the add-ins available has exploded. Here’s a link with dozens of them that let you use popular programs within PowerPoint. This includes DropBox, Google Drive, Poll Everywhere, Camtasia, and Adobe Stock. Depending upon the add-in, it will require some or no installation. Some are mini-programs that work within the slide while others are robust added functionality. I’ve called out a few in this list (like Khan Academy and Mix) because they are exceptional. You won’t want to miss them. Most of them, you’ll find in the MS Store. Simply click Add and it’ll download to the program.
Closed captions for video and video narrations
You can add closed captions to PowerPoint slides that will open your presentation to a larger audience. These are similar to the popular option available on YouTube videos.
Designer Tool
As you add images to your slides, you can invoke PowerPoint’s built-in Designer function to get suggestions on attractive layouts. It will provide alternatives to text box placements, image cropping, and professional-looking masks.
Note: This does require access to the MS server so you can only use it where WiFi is available.
Export Presentation as a video
Worries about packing a PowerPoint mini-program in case wherever you plan to show the slideshow doesn’t have PowerPoint are over. Now, you simply save it as a video and play. This is great for flipped classrooms or auto-generated lesson plans that students can play, pause, and rewind as needed for their learning style.
Ink Equations
This feature also shows up in Word and Excel 2016. Select Insert > Equation. Then, choose one from the library or select Insert > Equation > Ink Equation, and manually write one with a stylus, mouse, or your fingers on the popup drawing board. Office will then convert it to text. Options on the drawing board include Write, Erase, Select/correct, and Clear.
Khan Academy
This add-in will integrate a preview of Khan Academy’s free videos and exercises into your Office Mix lesson (see Mix below–the next item). Topics include math, science, biology, chemistry, physics, finance, history, and more.
This is great for teachers who use PowerPoint for flipped classrooms, snow days, subs, or other lesson planning.
Mix
This free add-in gives you all the tools you need to create interactive videos, including:
voice, video, screencasting, and digital ink
polls and interactive elements
insights and analytics
It’s like a program within a program and is available to all PowerPoint 2013 and up users. Surprisingly, most people don’t know about it. For more detail, here’s a review I did on it.
New charts
PowerPoint has five new chart layouts to show off your numbers: Treemap, Box and Whisker, Sunburst, Pareto, and Waterfall. Just click Insert > Chart, then select one from the list. When the spreadsheet or table pops up, enter the chart data and watch the image change right before your eyes.
Real-time co-authoring
Work on a presentation with colleagues by inviting them to participate and providing them with the level of permission you want them to have, from viewing to editing. You can even view their work–as they work–on a slide.
Screen recording
This Mix option provides screencasting functionality within PowerPoint. You can select the entire screen or a portion, with or without audio, and with or without the pointer showing. Once the screencast is completed, it can be played from within PowerPoint or saved as a freestanding video file, operable without PowerPoint.
PowerPoint 2016 is required for this feature.
***
For instructions on adding a PowerPoint add-in or loading one you’ve already added, click this Microsoft Support link.
If you still use PowerPoint simply as background for presentations, take another look. In this familiar program, there’ll be a shallow learning curve and lots of new options. Let me know how it goes.
–published first on TeachHUB
More on Microsoft:
Twelve Slideshow Tips You Don’t Want to Miss
Speed up MS Office with Quick Access Toolbar
Digital tools to create slideshows
Jacqui Murray has been teaching K-8 technology for 20 years. She is the editor/author of over a hundred tech ed resources including a K-8 technology curriculum, K-8 keyboard curriculum, K-8 Digital Citizenship curriculum. She is an adjunct professor in tech ed, CSG Master Teacher, webmaster for four blogs, an Amazon Vine Voice reviewer, CAEP reviewer, CSTA presentation reviewer, freelance journalist on tech ed topics, and a weekly contributor to TeachHUB. You can find her resources at Structured Learning. Read Jacqui’s tech thriller series, To Hunt a Sub and Twenty-four Days.
10 Great PowerPoint Changes You Probably Don’t Know About published first on http://ift.tt/2xZuhEK
0 notes
Text
10 Great PowerPoint Changes You Probably Don’t Know About
PowerPoint is the iconic leader in slideshow-type digital tools. It’s considered the most feature-rich, flexible, and diverse of all presentation tools and where everyone goes first (or wants to go first) to create presentations. Though the alternatives are loud and boisterous, over 500 million users choose PowerPoint, 6 million of them teachers.
For years, new iterations of PowerPoint included tweaks and extensions of what already was there, but Office 365 changed that. In a nod toward the reality that lots of people use PowerPoint for much (much) more than presentations, they’ve made it easier to use for a wide variety of new purposes such as screencasting, lesson planning, and the design of marketing materials. Here are ten of my favorites:
Add-ins
This isn’t new to PowerPoint 2016, but if you haven’t upgraded in a while or simply didn’t know add-ins are available to Microsoft Office, you’ll love these. They are like the add-ins you download to your browser but work within PowerPoint. The first time I ran into these was with a link checker called AbleBits.com to find dead links in my tech ed books. For a small fee, the AbleBits add-in became a tab on my menu bar that I could use anytime to check whether the hundreds of links I had were still working.
Now, the add-ins available has exploded. Here’s a link with dozens of them that let you use popular programs within PowerPoint. This includes DropBox, Google Drive, Poll Everywhere, Camtasia, and Adobe Stock. Depending upon the add-in, it will require some or no installation. Some are mini-programs that work within the slide while others are robust added functionality. I’ve called out a few in this list (like Khan Academy and Mix) because they are exceptional. You won’t want to miss them. Most of them, you’ll find in the MS Store. Simply click Add and it’ll download to the program.
Closed captions for video and video narrations
You can add closed captions to PowerPoint slides that will open your presentation to a larger audience. These are similar to the popular option available on YouTube videos.
Designer Tool
As you add images to your slides, you can invoke PowerPoint’s built-in Designer function to get suggestions on attractive layouts. It will provide alternatives to text box placements, image cropping, and professional-looking masks.
Note: This does require access to the MS server so you can only use it where WiFi is available.
Export Presentation as a video
Worries about packing a PowerPoint mini-program in case wherever you plan to show the slideshow doesn’t have PowerPoint are over. Now, you simply save it as a video and play. This is great for flipped classrooms or auto-generated lesson plans that students can play, pause, and rewind as needed for their learning style.
Ink Equations
This feature also shows up in Word and Excel 2016. Select Insert > Equation. Then, choose one from the library or select Insert > Equation > Ink Equation, and manually write one with a stylus, mouse, or your fingers on the popup drawing board. Office will then convert it to text. Options on the drawing board include Write, Erase, Select/correct, and Clear.
Khan Academy
This add-in will integrate a preview of Khan Academy’s free videos and exercises into your Office Mix lesson (see Mix below–the next item). Topics include math, science, biology, chemistry, physics, finance, history, and more.
This is great for teachers who use PowerPoint for flipped classrooms, snow days, subs, or other lesson planning.
Mix
This free add-in gives you all the tools you need to create interactive videos, including:
voice, video, screencasting, and digital ink
polls and interactive elements
insights and analytics
It’s like a program within a program and is available to all PowerPoint 2013 and up users. Surprisingly, most people don’t know about it. For more detail, here’s a review I did on it.
New charts
PowerPoint has five new chart layouts to show off your numbers: Treemap, Box and Whisker, Sunburst, Pareto, and Waterfall. Just click Insert > Chart, then select one from the list. When the spreadsheet or table pops up, enter the chart data and watch the image change right before your eyes.
Real-time co-authoring
Work on a presentation with colleagues by inviting them to participate and providing them with the level of permission you want them to have, from viewing to editing. You can even view their work–as they work–on a slide.
Screen recording
This Mix option provides screencasting functionality within PowerPoint. You can select the entire screen or a portion, with or without audio, and with or without the pointer showing. Once the screencast is completed, it can be played from within PowerPoint or saved as a freestanding video file, operable without PowerPoint.
PowerPoint 2016 is required for this feature.
***
For instructions on adding a PowerPoint add-in or loading one you’ve already added, click this Microsoft Support link.
If you still use PowerPoint simply as background for presentations, take another look. In this familiar program, there’ll be a shallow learning curve and lots of new options. Let me know how it goes.
–published first on TeachHUB
More on Microsoft:
Twelve Slideshow Tips You Don’t Want to Miss
Speed up MS Office with Quick Access Toolbar
Digital tools to create slideshows
Jacqui Murray has been teaching K-8 technology for 20 years. She is the editor/author of over a hundred tech ed resources including a K-8 technology curriculum, K-8 keyboard curriculum, K-8 Digital Citizenship curriculum. She is an adjunct professor in tech ed, CSG Master Teacher, webmaster for four blogs, an Amazon Vine Voice reviewer, CAEP reviewer, CSTA presentation reviewer, freelance journalist on tech ed topics, and a weekly contributor to TeachHUB. You can find her resources at Structured Learning. Read Jacqui’s tech thriller series, To Hunt a Sub and Twenty-four Days.
10 Great PowerPoint Changes You Probably Don’t Know About published first on http://ift.tt/2x0Vr0e
0 notes
Text
10 Great PowerPoint Changes You Probably Don’t Know About
PowerPoint is the iconic leader in slideshow-type digital tools. It’s considered the most feature-rich, flexible, and diverse of all presentation tools and where everyone goes first (or wants to go first) to create presentations. Though the alternatives are loud and boisterous, over 500 million users choose PowerPoint, 6 million of them teachers.
For years, new iterations of PowerPoint included tweaks and extensions of what already was there, but Office 365 changed that. In a nod toward the reality that lots of people use PowerPoint for much (much) more than presentations, they’ve made it easier to use for a wide variety of new purposes such as screencasting, lesson planning, and the design of marketing materials. Here are ten of my favorites:
Add-ins
This isn’t new to PowerPoint 2016, but if you haven’t upgraded in a while or simply didn’t know add-ins are available to Microsoft Office, you’ll love these. They are like the add-ins you download to your browser but work within PowerPoint. The first time I ran into these was with a link checker called AbleBits.com to find dead links in my tech ed books. For a small fee, the AbleBits add-in became a tab on my menu bar that I could use anytime to check whether the hundreds of links I had were still working.
Now, the add-ins available has exploded. Here’s a link with dozens of them that let you use popular programs within PowerPoint. This includes DropBox, Google Drive, Poll Everywhere, Camtasia, and Adobe Stock. Depending upon the add-in, it will require some or no installation. Some are mini-programs that work within the slide while others are robust added functionality. I’ve called out a few in this list (like Khan Academy and Mix) because they are exceptional. You won’t want to miss them. Most of them, you’ll find in the MS Store. Simply click Add and it’ll download to the program.
Closed captions for video and video narrations
You can add closed captions to PowerPoint slides that will open your presentation to a larger audience. These are similar to the popular option available on YouTube videos.
Designer Tool
As you add images to your slides, you can invoke PowerPoint’s built-in Designer function to get suggestions on attractive layouts. It will provide alternatives to text box placements, image cropping, and professional-looking masks.
Note: This does require access to the MS server so you can only use it where WiFi is available.
Export Presentation as a video
Worries about packing a PowerPoint mini-program in case wherever you plan to show the slideshow doesn’t have PowerPoint are over. Now, you simply save it as a video and play. This is great for flipped classrooms or auto-generated lesson plans that students can play, pause, and rewind as needed for their learning style.
Ink Equations
This feature also shows up in Word and Excel 2016. Select Insert > Equation. Then, choose one from the library or select Insert > Equation > Ink Equation, and manually write one with a stylus, mouse, or your fingers on the popup drawing board. Office will then convert it to text. Options on the drawing board include Write, Erase, Select/correct, and Clear.
Khan Academy
This add-in will integrate a preview of Khan Academy’s free videos and exercises into your Office Mix lesson (see Mix below–the next item). Topics include math, science, biology, chemistry, physics, finance, history, and more.
This is great for teachers who use PowerPoint for flipped classrooms, snow days, subs, or other lesson planning.
Mix
This free add-in gives you all the tools you need to create interactive videos, including:
voice, video, screencasting, and digital ink
polls and interactive elements
insights and analytics
It’s like a program within a program and is available to all PowerPoint 2013 and up users. Surprisingly, most people don’t know about it. For more detail, here’s a review I did on it.
New charts
PowerPoint has five new chart layouts to show off your numbers: Treemap, Box and Whisker, Sunburst, Pareto, and Waterfall. Just click Insert > Chart, then select one from the list. When the spreadsheet or table pops up, enter the chart data and watch the image change right before your eyes.
Real-time co-authoring
Work on a presentation with colleagues by inviting them to participate and providing them with the level of permission you want them to have, from viewing to editing. You can even view their work–as they work–on a slide.
Screen recording
This Mix option provides screencasting functionality within PowerPoint. You can select the entire screen or a portion, with or without audio, and with or without the pointer showing. Once the screencast is completed, it can be played from within PowerPoint or saved as a freestanding video file, operable without PowerPoint.
PowerPoint 2016 is required for this feature.
***
For instructions on adding a PowerPoint add-in or loading one you’ve already added, click this Microsoft Support link.
If you still use PowerPoint simply as background for presentations, take another look. In this familiar program, there’ll be a shallow learning curve and lots of new options. Let me know how it goes.
–published first on TeachHUB
More on Microsoft:
Twelve Slideshow Tips You Don’t Want to Miss
Speed up MS Office with Quick Access Toolbar
Digital tools to create slideshows
Jacqui Murray has been teaching K-8 technology for 20 years. She is the editor/author of over a hundred tech ed resources including a K-8 technology curriculum, K-8 keyboard curriculum, K-8 Digital Citizenship curriculum. She is an adjunct professor in tech ed, CSG Master Teacher, webmaster for four blogs, an Amazon Vine Voice reviewer, CAEP reviewer, CSTA presentation reviewer, freelance journalist on tech ed topics, and a weekly contributor to TeachHUB. You can find her resources at Structured Learning. Read Jacqui’s tech thriller series, To Hunt a Sub and Twenty-four Days.
10 Great PowerPoint Changes You Probably Don’t Know About published first on http://ift.tt/2gZRS4X
0 notes
Text
14 PowerPoint Presentation Tips for Building More Creative Slideshows[+Templates]
I like to think of Microsoft PowerPoint as a test of basic marketing skills. To create a passing presentation, I need to demonstrate design skills, technical literacy, and a sense of personal style.
If the presentation has a problem (like an unintended font, a broken link, or unreadable text), then I've probably failed the test. Even if my spoken presentation is well rehearsed, a bad visual experience can ruin it for the audience. Expertise means nothing without a good presentation to back it up.
No matter your topic, successful PowerPoints depend on three main factors: your command of PowerPoint's design tools, your attention to presentation processes, and your devotion to consistent style. Here are some simple tips to help you start mastering each of those factors, and don't forget to check out the additional resources at the bottom of this post.
PowerPoint Tips: Style
Step 1: Don't let PowerPoint decide how you use PowerPoint.
Microsoft wanted to provide PowerPoint users with a lot of tools. But this does not mean you should use them all. Here are some key things to look out for:
Make sure that preset PPT themes complement your needs before you adopt them.
Try to get away from using Microsoft Office's default fonts, Calibri and Cambria. Using these two typefaces can make the presentation seem underwhelming.
Professionals should never use PPT's action sounds. (Please consider your audience above personal preference).
PowerPoint makes bulleting automatic, but ask yourself: Are bullets actually appropriate for what you need to do? Sometimes they are, but not always.
Recent PPT defaults include a small shadow on all shapes. Remove this shadow if it's not actually needed. Also, don't leave shapes in their default blue.
Step 2: Create custom slide sizes.
While you usually can get away with the default slide size for most presentations, you may need to adjust it for larger presentations on weirdly sized displays. If you need to do that, here's how.
In the top-left corner, choose "File."
Select "Page Setup."
Type the height and width of the background you'd like, and click "OK."
A dialogue box will appear. Click "OK" again.
Your background is resized!
Tip: Resize your slides before you add any objects to them or the dimensions of your objects will become skewed.
Step 3: Edit your slide template design.
Often, it's much easier to edit your PowerPoint template before you start -- this way, you don't have design each slide by hand. Here's how you do that.
Select "Themes" in the top navigation.
In the far right, click "Edit Master," then "Slide Master."
Make any changes you like, then click "Close Master." All current and future slides in that presentation will use that template.
Step 4: Make sure all of your objects are properly aligned.
Having properly aligned objects on your slide is the key to making it look polished and professional. You can manually try to line up your images ... but we all know how that typically works out. You're trying to make sure all of your objects hang out in the middle of your slide, but when you drag them there, it still doesn't look quite right. Get rid of your guessing game and let PowerPoint work its magic with this trick.
How to align multiple objects:
Select all objects by holding down "Shift" and clicking on all of them.
Select "Arrange" in the top options bar, then choose "Align or Distribute."
Choose the type of alignment you'd like.
How to align objects to the slide:
Select all objects by holding down "Shift" and clicking on all of them.
Select "Arrange" in the top options bar, then choose "Align or Distribute."
Select "Align to Slide."
Select "Arrange" in the top options bar again, then choose "Align or Distribute."
Choose the type of alignment you'd like.
PowerPoint Tips: Design
Step 5: Get more control over your objects' designs using "Format" menus.
Format menus allow you to do fine adjustments that otherwise seem impossible. To do this, right click on an object and select the "Format" option. Here, you can fine-tune shadows, adjust shape measurements, create reflections, and much more. The menu that will pop up looks like this:
Although the main options can be found on PowerPoint's format toolbars, look for complete control in the format window menu. Other examples of options available include:
Adjusting text inside a shape.
Creating a natural perspective shadow behind an object.
Recoloring photos manually and with automatic options.
Step 6: Take advantage of PowerPoint's shapes.
Many users don't realize how flexible PowerPoint's shape tools have become. In combination with the expanded format options released by Microsoft in 2010, the potential for good design with shapes is readily available. PowerPoint provides the user with a bunch of great shape options beyond the traditional rectangle, oval, and rounded rectangle patterns, unlike even professional design programs like Adobe Creative Suite or Quark.
Today's shapes include a highly functional Smart Shapes function, which enables you to create diagrams and flow charts in no time. These tools are especially valuable when you consider that PowerPoint is a visual medium. Paragraphing and bullet lists are boring -- you can use shapes to help express your message more clearly.
Step 7: Create custom shapes.
When you create a shape, right click and press "Edit Points." By editing points, you can create custom shapes that fit your specific need. For instance, you can reshape arrows to fit the dimensions you like.
Another option is to combine two shapes together. When selecting two shapes, right-click and go to the "Grouping" sub-menu to see a variety of options.
Combine creates a custom shape that has overlapping portions of the two previous shapes cut out.
Union makes one completely merged shape.
Intersect builds a shape of only the overlapping sections of the two previous shapes.
Subtract cuts out the overlapping portion of one shape from the other.
By using these tools rather than trying to edit points precisely, you can create accurately measured custom shapes.
Step 8: Crop images into custom shapes.
Besides creating custom shapes in your presentation, you can also use PowerPoint to crop existing images into new shapes. Here's how you do that:
Click on the image and select "Format" in the options bar.
Choose "Crop," then "Mask to Shape," and then choose your desired shape. Ta-da! Custom-shaped photos.
Step 9: Present websites within PowerPoint.
Tradition says that if you want to show a website in a PowerPoint, you should just create link to the page and prompt a browser to open. For PC users, there's a better option.
Third party software that integrates fully into PowerPoint's developer tab can be used to embed a website directly into your PowerPoint using a normal HTML iframe. One of the best tools is LiveWeb, a third-party software developed independently.
By using LiveWeb, you don't have to interrupt your PowerPoint, and your presentation will remain fluid and natural. Whether you embed a whole webpage or just a YouTube video, this can be a high-quality third party improvement.
Unfortunately, Mac users don't have a similar option. Agood second choice is to take screen shots of the website, link in through a browser, or embed media (such as a YouTube video) by downloading it directly to your computer.
PowerPoint Tips: Process
Step 10: Embed your font files.
One constant problem presenters have with PowerPoint is that fonts seem to change when presenters move from one computer to another. In reality, the fonts are not changing -- the presentation computer just doesn't have the same font files installed. If you're using a PC and presenting on a PC, then there is a smooth work around for this issue. (When you involve Mac systems, the solution is a bit rougher. See Tip #11.)
Here's the trick: When you save your PowerPoint file (only on a PC), you should click Save Options in the "Save As " dialog window. Then, select the "Embed TrueType fonts" check box and press "OK." Now, your presentation will keep the font file and your fonts will not change when you move computers (unless you give your presentation on a Mac).
Step 11: Save your slides as JPEGs.
In PowerPoint for Mac 2011, there is no option to embed fonts within the presentation. So unless you use ubiquitous typefaces like Arial or Tahoma, your PPT is likely going to encounter font changeson different computers.
The most certain way of avoiding this is by saving your final presentation as JPEGs, and then inserting these JPEGs onto your slides. On a Mac, users can easily drag and drop the JPEGs into PPT with fast load time. If you do not use actions in your presentation, then this option works especially well.
If you want your presentation to appear "animated," you'll need to do a little tinkering. All you need to do is save JPEGs of each "frame" of the animation. Then, in your final presentation, you'll just display those JPEGs in the order you'd like the animation to appear. While you'll technically have several new slides in place of one original one, your audience won't know the difference.
An important consideration: If your PPT includes a lot of JPEGs, then the file size will increase.
Step 12: Embed multimedia.
PowerPoint allows you to either link to video/audio files externally or to embed the media directly in your presentation. You should embed these files if you can, but if you use a Mac, you cannot actually embed the video (see note below). For PCs, two great reasons for embedding are:
Embedding allows you to play media directly in your presentation. It will look much more professional than switching between windows.
Embedding also means that the file stays within the PowerPoint presentation, so it should play normally without extra work (except on a Mac).
Note: Mac OS users of PowerPoint should be extra careful about using multimedia files.
If you use PowerPoint for Mac, then you will always need to bring the video and/or audio file with you in the same folder as the PowerPoint presentation. It's best to only insert video or audio files once the presentation and the containing folder have been saved on a portable drive in their permanent folder. Also, if the presentation will be played on a Windows computer, then Mac users need to make sure their multimedia files are in WMV format. This tip gets a bit complicated, so if you want to use PowerPoint effectively, consider using the same operating system for designing andpresenting, no matter what.
Step 13: Bring your own hardware.
Between operating systems, PowerPoint is still a bit jumpy. Even between differing PPT versions, things can change. One way to fix these problems is to make sure that you have the right hardware -- so just bring along your own laptop when you're presenting.
Step 14: Use "Presenter View."
In most presentation situations, there will be both a presenter's screen and the main projected display for your presentation. PowerPoint has a great tool called Presenter View, which can be found in the "Slide Show" tab of PowerPoint 2010 (or 2011 for Mac). Included in the Presenter View is an area for notes, a timer/clock, and a presentation display.
For many presenters, this tool can help unify their spoken presentation and their visual aid. You never want to make the PowerPoint seem like a stack of notes that you use a crutch. Use the Presenter View option to help create a more natural presentation.
Pro Tip: At the start of the presentation, you should also hit CTRL + H to make the cursor disappear. Hitting the "A" key will bring it back if you need it!
Conclusion
With style, design, and presentation processes under your belt, you can do a lot more with PowerPoint than just presentations for your clients. PowerPoint and similar slide applications are flexible tools that should not be forgotten.
Editor's Note: This post was originally published in 2013 and has been updated for accuracy and comprehensiveness.
0 notes
Text
CloudApp: Screen Recording Software on Steroids (With a Simple UI)
As an editor, writer, web designer, and developer, being a good communicator is a must-have skill for me. While it certainly is a boon to my job that I have strong English skills, that's often not enough.
That's why there are tons of screen capture tools available on both Mac and Windows that allow people like me to express ideas, concepts, and problems in a visual way. After all, it's a pretty well established fact that many people understand things better with visuals instead of words alone.
In this post, I'm going to introduce you to a screen capture tool that I wish I'd been introduced to a long time ago: It's called CloudApp and I'll show you how it can be used to communicate bugs, features, and workflow steps that come up in a typical developer workday.
What is CloudApp?
In a nutshell, CloudApp is a visual communication platform with a ridiculously easy-to-use interface that allows you to create, save, and share annotated screenshots, animated GIFs, and screen recordings remotely.
Need to point to a specific feature in an app or on a website? Want to describe a step-by-step process? Need to highlight where a piece of content can be found on a page, while blurring out sensitive information? Or maybe you just need to explain a layout bug in a visual way. The features of CloudApp make accomplishing these tasks as quick and painless as possible.
CloudApp can be downloaded and installed natively on Mac or Windows, and can be integrated with a number of well-known tools including Trello, Zendesk, Slack, and Google Docs.
When you install CloudApp on your Mac, it looks like this, installed in your menu bar:
It's similar on Windows, placed conveniently in your system tray.
A Single Tool to Replace Many
I'm almost ashamed to admit what my current setup is for doing screen shots and recordings to provide feedback, answer questions, and issue bug reports to clients, co-workers, and others.
I use a native app for screenshots, another one for annotated images, a large bloated piece of software for screen recording, and a couple of different utilities for doing animated GIFs. I've also used a few web-based apps for some of these tasks. None of the aforementioned tools is overly complicated, and they all do an adequate job, but it's not ideal to have to open a different app for each of those tasks.
Enter CloudApp, which does all of this and more in a single, powerful, and easy-to-use tool.
CloudApp's five primary buttons are visible with one click of the CloudApp icon:
The buttons do the following:
Take a screenshot
Create a GIF
Record your screen (video in HD with audio input option)
Take a screenshot and annotate
Upload from computer
All these options also have keyboard shortcuts for even quicker access. Additionally, you'll notice the three dots next to the primary buttons. This opens more options that include:
Record webcam video
Upload from clipboard
Take delayed screenshot
As you can see, there are quite a few features packed into a smart and clean interface.
How Can Developers Use CloudApp?
Although a developer's primary job is to write and execute code, there's a lot more to being a developer. If you're like me, you've probably had to do many, if not all of the following at some point in your career:
Process a bug
Explain a specific feature in an app
Demonstrate a set of steps or explain a workflow
You can try to do those things with words alone, or with static, unedited images. But what if you could accomplish those tasks in a speedy, productive manner using animated GIFs, screencasts, and annotated images?
Let's consider the three things just mentioned and how CloudApp makes them easier.
Pointing Out a Bug
As a developer you've probably had the "that's not what I see" experience when dealing with how a design looks or how a certain feature works (or doesn't work) in a particular browser. The client (or maybe someone else on your team) sees a bug that you don't see. Or maybe it's the other way around. Whatever the case, being able to quickly create a screenshot and annotate it is a huge time saver.
The first option in the CloudApp toolbar (the camera icon) is the screenshot tool. The fourth option, however, lets you take a screenshot and annotate prior to saving it. When you click the annotate screenshot button, you'll see the following window:
In this case, I've taken a screenshot of the search box on scotch.io on Safari 10 for desktop, so I can point out an alignment problem with the magnifying glass that appears inside the box. As many developers have discovered, Safari is the new IE in terms of bugs and incompatibilities. So a tool like CloudApp can come in handy when doing testing on Safari.
In the annotation window you'll have access to lots of features including a line tool, arrow tool, shape tools, colors, crop tool, pixelate tool, and spotlight tools. In this case, I used the Oval Tool to indicate where the bug is:
Once you hit "save" in the annotation window, the link is copied to the clipboard and you're ready to share the URL and get feedback. In fact, for every piece of content that gets created or added to CloudApp, you automatically get a URL that uses the 'cl.ly' link shortener copied to your clipboard, which you can then share with anyone.
Let's look at another handy way to use CloudApp.
Explaining a UI Feature
One thing that I've often had to do in my work is explain a feature in an app's interface, maybe something not so easy to find. As an example, let's use the Chrome DevTools and let's say I had to describe to my QA team how to test certain parts of a web page with pseudo-states enabled or disabled. Of course, they could do this by simply using a page as a typical user would, but there could be an edge case where doing this via the DevTools can speed things up.
Here's a GIF I created with CloudApp that demonstrates how to find this feature in the DevTools:
As mentioned, when you create a screenshot or recording with CloudApp, the app will automatically add a link to that piece of media to your clipboard. The URL itself will take you to a page that looks like this:
Notice the right sidebar area that allows for comments. This allows me to send a screenshot, GIF, or video to a colleague and they can add their questions, feedback, etc. Much more useful and productive than a run-of-the-mill screen grab tool!
Sharing a Workflow
As a developer, you probably love to share your productivity and workflow tips with others. Or maybe you just want to show a series of complex steps in a single recording without the need to take multiple, annotated screenshots. CloudApp's video recording feature is great for this.
Easy HD recording is just a couple of clicks away. In the video shown below, created with CloudApp, I'm demonstrating how to use Chrome's DevTools to view a minified script, prettify it using a somewhat obscure feature of the DevTools. I then use a breakpoint to step through a JavaScript function:
Check out the screen recording here
And once again, as with GIFs and screenshots, the media page for the video allows comments. In this example, I've added a comment to explain how I did a "find" inside the script, which might not be obvious when playing the video.
That screenshot is annotated with CloudApp, and the annotated file is itself available for comments and feedback from anyone who views the link as a logged-in user of CloudApp.
While I'm on the subject of workflow, one practical way CloudApp can be used is sharing workflows in a terminal window. So if you're trying to share with a colleague something that's supposed to happen as the result of a terminal command, a quick GIF can do the trick. In the GIF below, I'm installing Yeoman, the popular front-end scaffolding tool:
Thus, CloudApp allows me to create a video or GIF demonstrating the command being executed along with the result in the terminal. The person I send the link to can now run the same command and compare the results, ensuring there are no mysterious error messages or other problems. I'm sure you can see great benefit to this, especially when you're dealing with much more complex workflows and terminal commands.
This sort of thing can also be a great benefit when doing presentations. So whether you're presenting something in a meeting at work or at a conference or local meetup, CloudApp becomes your one-stop app for creating all your screenshots and animated GIFs.
Lots More Features
I have to admit, I'm really impressed with the UI for CloudApp. There is no clutter and somehow the CloudApp team has been able to include so many extra features that I haven't even discussed here. It's actually been a pleasure examining and learning all the ins and outs of the app while putting together this article.
Here's a quick summary of some of the other features I didn't cover:
Access to "My CloudApp", a web dashboard where you can search, sort, and organize your media.
Ability to "drop" just about any kind of file into CloudApp, all of which becomes part of "My CloudApp", allowing you to share, organize, sort, etc.
Access to analytics for all your "drops", including file history, number of views, and more.
Ability to drag a file directly onto the CloudApp icon in the menu bar for an instant "drop".
Conclusion
As the examples in this article have demonstrated, there's a ton of stuff you can do with CloudApp to help you improve communication on your team and with your clients.
CloudApp truly is screenshot software on steroids, and as easy to use as the simplest of screenshot tools.
CloudApp's free plan is used by millions and there's also multiple individual and team paid plans that you can upgrade to that offer more features including security, custom branding, and more. I highly recommend you at least try it out and fiddle with the different features I've discussed here. I'm sure after just a few hours of use you'll consider adding it to your team's productivity and communication toolset.
via Scotch.io http://ift.tt/2tYSxW5
0 notes
Text
Conventional Wisdom vs. Delivery Reality
We were fortunate to get in on the desktop editing and motion graphics revolutions at the very beginning. One of the ways we kept our ahead above water in those turbulent earlier years was by making sure we studied technical delivery issues, as both video and film’s requirements were so different than the way computers normally handled and displayed images.
You would think that by now, life would be easier: non-square-pixel D1 and DV video have all but gone away; delivery for theatrical release is almost an entirely digital rather than chemical process these days; heck, the computer itself is even one of the major delivery platforms.
Despite this, you could make the argument that it’s actually harder to know how to deliver content these days: Instead of one video standard per country or dense little handbook on how to handle film, now you have a lot more gray areas to navigate when deciding what you ultimately need to render to – be it your own content, or when helping guide a client through the modern media landscape. Here are a few of the issues we’ve found ourselves grappling with over the last few years:
Big Screen, or Small?
A lot of viewers see your content on a low-resolution mobile device. It’s easy to look at the statistics that say only a third of teen viewers (supposedly the most tech-savvy and mobile-friendly) are watching movies and television shows on their mobile devices. But that ignores the other media outlets they probably consumer more often: YouTube, Facebook, and more.
YouTube freely states that over half of their views come on mobile devices; well over 50% of Facebook users (and over 80% of their ad revenue) are mobile-centric. Just as another data point, Chris runs a video-heavy music-centric educational website, and over 70% of his visits are from screen resolutions smaller than a 1920×1080 HD video frame.
In short: While the headlines might be saying you need to create more 4k content, in reality delivering, say, 1280×720 might be more in line with the devices many or most of your consumers will be using.
Also, you really should consider making titles, lower thirds, and infographics larger and more legible that you might otherwise have thought. Just keep asking yourself: Would I be able to read this on my cell phone? If not, your client’s story or message won’t be getting properly conveyed to a large swath of their potential consumers. (Fun fact: Chris shoots 4k video but delivers 720p for his own content; he uses the extra pixels to allow him to re-frame shots to zoom in whenever possible, so the viewer can see more of what’s important – especially at lower resolutions.)
High Frame Rate, or Lower?
A lot of headlines were made and arguments started when Peter Jackson made the decision to shoot The Hobbit at 48 fps. Today some are experimenting with shooting theatrical material at 60 fps (progressive, not interlaced). Yet in the meantime, we shoot most of our material at 23.976 fps these days (and we used to advocate shooting at 30 fps progressive).
There are certainly technical reasons for using a higher frame rate: lower rates like 24 fps can strobe badly with fast motion and pans; higher frame rates like 48 fps are said by Peter Jackson and others to greatly reduce eye strain potentially caused by the 3D viewing experience. (Fun fact: Peter Jackson decided it was necessary to soften his second 48 fps feature to make it more filmic.)
And, there are certainly psychological reasons behind which frame rate you choose: We’ve seen demonstrations of the old theory that the brain treats content projected at ~48 fps and over (that includes interlaced “30” or “29.97” fps video, which in fact is projecting at 60 or 59.94 fps) as being more “real,” and content under that rate as being more “dreamlike.”
But the real reason why we’ve personally dropped down to a lower frame rate comes down to delivery: Much of the content we generate these days will be compressed and delivered streaming over the internet or a cell network. As hinted above, our material tends to have a lot of detail that we want the viewer to be able to read, so we want to use as much of the available bandwidth as possible on each frame to reduce the negative side effects of compression. (An alternative strategy would be keeping the data per frame the same, and using the lower frame rate to reduce the amount of bandwidth required to deliver your content, meaning streaming video fills the local buffer faster, data charges go down, etc.)
Full Frame, or Inset?
We’ve talked a lot in the past about preserving safe areas, shooting “protected” so important content doesn’t get cut off by the bezel of the screen, etc. The general assumption is that the move to LCD and LED TVs – where the image size does not change with the age of the set – was the first step toward not having to worry about safe areas any more, and the move to desktop and mobile consumption where the image is fully inside the bezel – maybe even with text around it – was the second blow that finally killed the safe area beast. Alas, not true.
For one, modern flatscreen TVs still “overscan” the image by default so that some of it is cut off by the monitor’s bezel – you have to go into their settings and try to find a usually hidden parameter to not overscan the image, and show you the entire frame. How many consumers do you think have done that? Yes, it’s true that the area cut off is much smaller than the old 5/10% recommendation for safe areas, but a couple percent of the image is still lost.
Second, an increasing amount of content created originally for the computer and mobile screen is also appearing on ordinary television sets. For example, YouTube has a Roku channel. YouTube has taken some steps to avoid unintended cropping in this scenario, yet there are still occasions where part of their user interface get cropped off by the bezel.
Although YouTube videos themselves are displayed without cropping on our Roku-enabled TV, some parts of the custom YouTube interface – such as the duration stamps for the thumbnails along the bottom of the screen – still get partially chopped off.
Similarly, online training juggernaut Lynda.com/LinkedIn Learning also has a Roku channel, and is also shown in such settings as inflight video – both of which often includes TV-like safe area cropping. Our Roku-enabled smart TV seemed to take this into account, but on an older high-def TV with a standalone Roku box attached, any content that assumed a full-frame viewing experience – such as computer software training, with the typical layout of menu bar along the top, and software toolbars an edge such as the left – has issues with cropping when played back in a broadcast setting.
With normal TV cropping of a computer screen capture, the user can’t see which menu item was clicked to cause this menu to appear.
So as tempting as it may be to use the entire image frame – particularly if your delivery target is the desktop rather than the TV – know that you cannot completely control how and where your content will be viewed, so it might be better to play it…safe.
Start At The End
Do we have you in despair yet? There’s no need to give up hope; you just continue to need to be diligent. Our advice has always been: Before you start a project, ask how it’s going to end – find out what you ultimately need to deliver. Then base your workflow toward achieving that goal. You also have a chance to be a hero by thinking about the potential customer ahead of time, and suggesting to your client some potential alternatives to make sure their story or message gets across in the best possible light.
The post Conventional Wisdom vs. Delivery Reality appeared first on ProVideo Coalition.
First Found At: Conventional Wisdom vs. Delivery Reality
0 notes
Last Seen Blogs

insertive-not-assertive
"I missed you. I called for you and in my heart i shouted,"

tea-feel
Царский уголок

modudesigns
MODU Designs

anonymouslylovesyou
Reblog my friends art cowards 🔫

asminelektronik-blog
Asmin Bilişim Elektronik