#i also finally put these vinyl decals up on one of the walls and it looks soooo nice
Explore tagged Tumblr posts
Visit Tumblr Blog
Explore Tumblr blogs with no restrictions, modern design and the best experience.
Last Seen Tumblr Blogs


Fun Fact
Forty percent of Tumblr users are between the ages of 18 to 25.
Text
yesterday:
me: want… milk tea treat
my brain: you do not need a milk tea treat, you had donuts this morning
me: milk tea treat because i have been so good and run so many errands and made an appointment to take my car in and replaced the kitty litter and cleaned out my car a little??
my brain: well… maybe a little milk tea treat for being a good fish
#i also finally put these vinyl decals up on one of the walls and it looks soooo nice#i was suuuuch a good productive fish yesterday#today i'll be taking my car in but that's about the only thing i have to do
9 notes
·
View notes
Text
Know More About The Fifth Wall Graphis Used As Signage As Business
Floor graphics are equally important for any business and that attract the views of the clients visiting the physical store for a message. A designed floor graphic is a great way to make your customers grab the view and walk over the graphics to the point of sale. So, signs have taken up another wall and that is the fifth wall- the floor. Sign installation Mt. Pleasant is offering this latest way of putting up signs and it has gained a lot of demand after the pandemic.
Types of Floor graphics
Well, talking about the pandemic situation, floor graphics for distancing is compulsory. Most of the businesses started contacting the sign installation at Mt. Pleasant for making up the mark for physical distancing while customers are visiting them. And with that idea, the floor graphics have also been encouraged showing different messages in this fifth space for signs installation.
While talking about the floor graphics we can come over some of the types of sign installation:
Ø Floor decals are the right type of graphic which you can use for the purpose. they are self-adhesive and are made up of vinyl and obviously slip-resistant too. the floor decals are for indoor purposes and also cannot be installed on any carpeted floor.
Ø Carpet stickers are the right one if you have carpeted floors. They are specially made which will stick rights to any carpets and rugs easily. Like the former one, this is also anti-slip vinyl, self-adhesive stickers which are meant for carpets and rugs.
Ø Outdoor floor graphics are the one which is used for marking the spots for physical distancing, showing you the route for any shop or store, or counter.
In End,
Finally, these stickers are great for floor signage and they are the new trend in the sign installing industry. Try them out for your business.
2 notes
·
View notes
Text
How To Install A Removable Wallpaper Mural
We’ve been eager to try a wallpaper accent somewhere in the duplex, and last week we finally installed not one, but two, removable wall murals! And I can’t begin to describe how much easier and cheaper it was than we expected, plus it turned out like ten times better than we had even hoped.
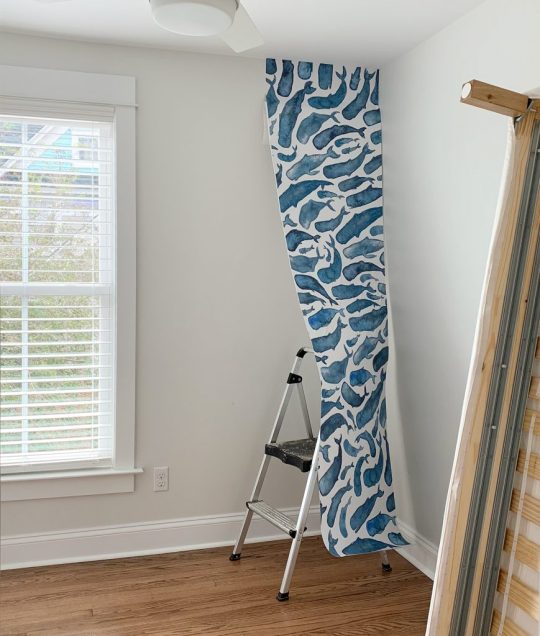
If you’ve listened to our podcast recently, you may recognize this space as one of the small sleeping nooks on each side of the duplex. The rooms are only about 8′ x 8′ and our goal is to turn them into fun bonus sleeping spaces. So they felt like natural candidates for a bold injection of color and pattern.
We had our eyes on a few wallpapers, but then we stumbled across these removable wall murals on Society6. They’re effectively the same as wallpaper, except that their patterns can’t be repeated indefinitely (most are 8′ wide but some are 12′) so they’re perfect for smaller walls like ours. A few other things that we liked were:
there were some nice large-scale patterns and images compared to most wallpaper in our price range
they’re extra convenient to use – no glue, easy to restick if you don’t line them up right the first time, etc.
they have a demo video right on the site when you’re shopping to give you an idea of what to expect when you hang them
they’re made from a strong/durable material (almost like a thick flexible vinyl decal with fabric fibers woven through it) so it’s very substantial, whereas some wallpaper feels more delicate
*This isn’t sponsored – we bought them with our own money & found them on our own – just figured I should put that out there since clearly I’m gushing.
We liked a lot of the ones that we found on their site, like these below:

1 / 2 / 3 / 4 / 5 / 6
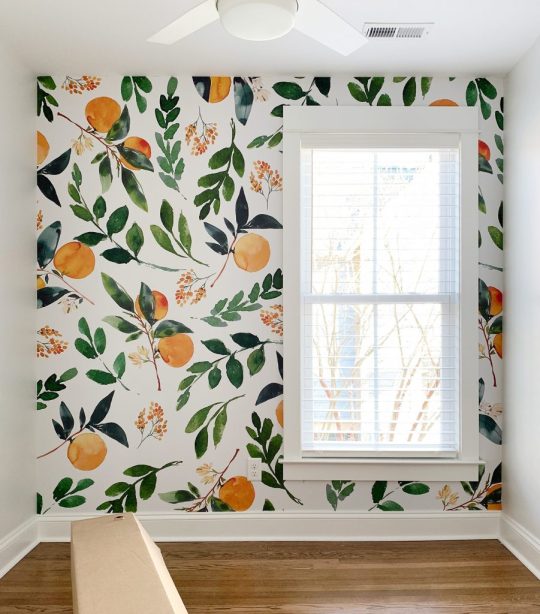
But after a lot of debating, we ultimately decided on two painterly patterns: these whales (seen below) and these oranges (seen in the first photo of this post).
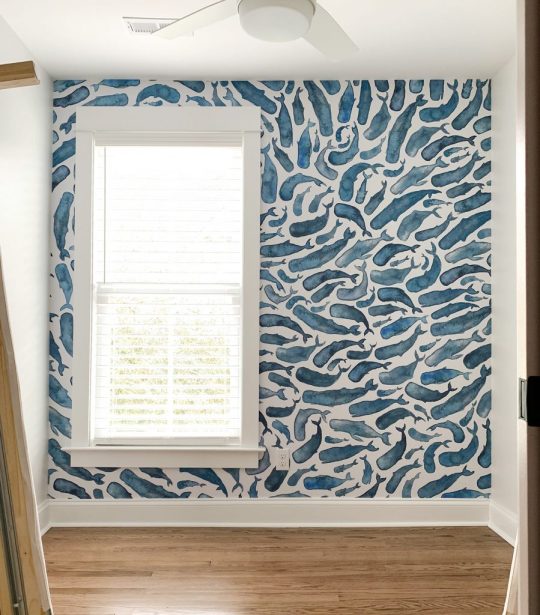
The colors fit well on each side where we used them. We paired the blue watercolor-looking whales with the side of the duplex with the pink doors (they’re White Truffle by Sherwin Williams by the way)…
…and the leafy oranges with the side of the duplex with the greeny-blue doors (which are Oyster Bay by Sherwin Williams).

Plus, we snagged them during a 30% off sale at Society6, so we saved nearly $100 off their usual $299 price tag.
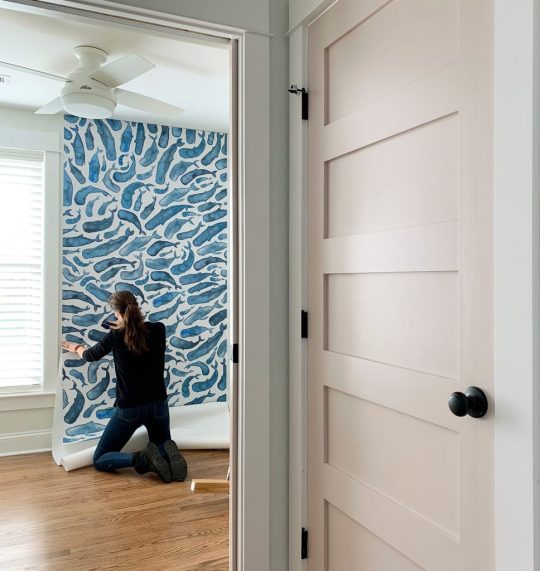
As for installing them, here’s how it all went down (er, up?). Again, it was surprisingly straightforward to do – but it does require a bit of patience and care. The first one took us around three hours to complete, and the second one only took about two hours, so once you get the hang of it, it’s much less intimidating and goes a lot faster.
Tools & Supplies Needed
You can install wallpaper or a wall mural like this with very few tools, but having the following will make it easier:
Step ladder
Level
Pen or pencil
Ruler or tape measure
Flathead screwdriver
Scissors
Utility knife or other sharp craft knife
Smoothing tool
An extra set of hands (this is much easier as a two person job)
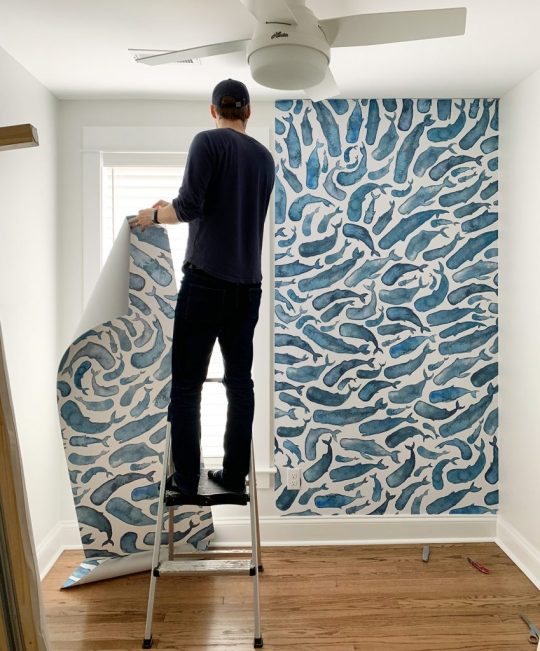
Step 1: Organize Your Panels
The 8′ wide murals come with four 2′ wide removable panels all rolled together. Since the pattern isn’t repeating, be sure to identify the order in which your panels need to be hung! It would be a nightmare to hang one on the right side of the room only to realize it should have been hung on the left side for the other three panels to line up. We loosely unrolled ours in a nearby room and laid them across the bed to double-check that we were working in the correct order.
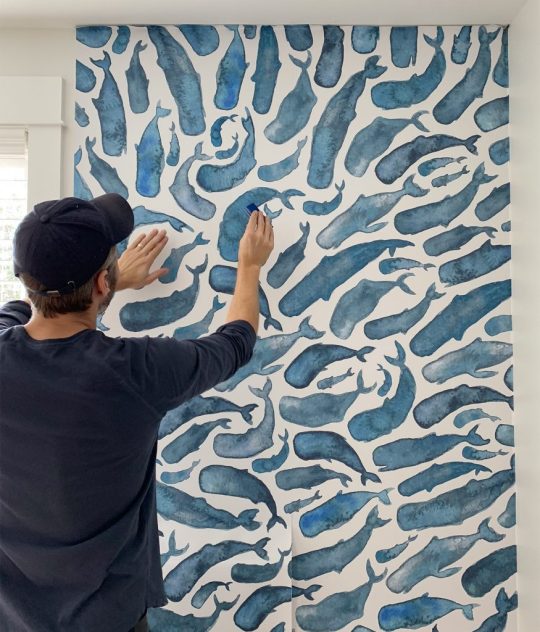
Step 2: Carefully Position The First Panel
Each wallpaper panel has a removable backing that easily peels off. Again, you don’t need any glue or paste to install these. So throughout the installation, you’ll want to peel back small sections at a time. We started by peeling back the first foot-ish of the first full panel (you can see it folded down behind the top part of the mural that we had stuck to the top corner of the wall in the photo below:
Not to psych you out, but getting this first panel hung correctly is a big part of the success of this project. The good news is that these panels are VERY FORGIVING. Seriously, we probably hung and rehung this first section 4 or 5 times while we figured out the best system. It didn’t lose any of its adhesion strength each time that we stuck, unstuck, and restuck it – and it didn’t wrinkle (even if we accidentally stuck it to itself a few times, we could carefully peel it off and it was fine).
You’ll be tempted to use your ceiling or wall as your level reference point for this first panel. DON’T. Most rooms – including ours – aren’t perfectly straight, so relying on your first corner to be completely square could lead to crooked panels which, even worse, could lead to gaps at the top or sides of your mural as your ceiling or wall bows in or out slightly.
Instead, you’ll want to mark a vertical line using a level to give you a reference point for the outer edge of your first panel. You could do this all the way down the wall, but we found that doing just a couple of feet at the top was enough to get us started.
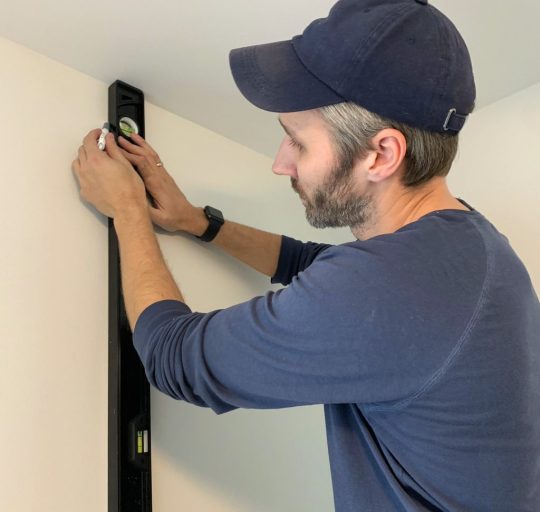
We marked ours about 23.5″ inches from the corner, so that our 24″ panel would overlap the side wall a smidge (again, to make sure we didn’t see gaps anywhere that the wall bowed out). We’ll show you how we cut off all of the overlap a little later.
Then we hung the panel along that vertical line but made sure that it overlapped the ceiling by about an inch as well. Even though our ceilings and the panels are both 8ft tall, we could spare this inch since the baseboards make the actual wall space around 7’6″ – and again, most ceilings aren’t perfectly level all the way across, so we wanted to make sure we had excess to bridge any gaps if the ceiling is slightly higher a little further down the wall.
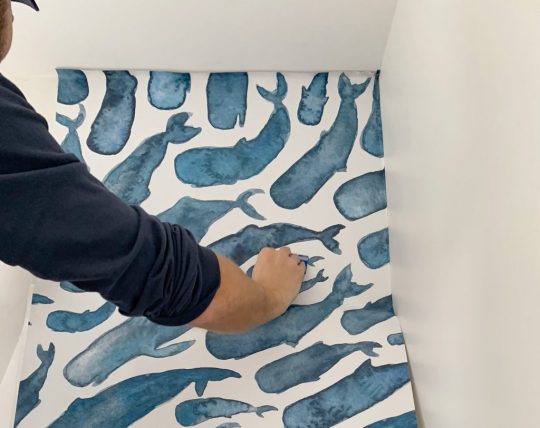
Step 3: Peel, Stick, and Smooth
Once you feel good about the position of your first panel, you can begin the process that you’ll rely on most for this wallpaper installation: peeling off a bit more backing, sticking it to the wall with your hand, and then smoothing out the bubbles. You can see the slight ceiling overlap we mentioned in the photo below, which we will take care of later on.
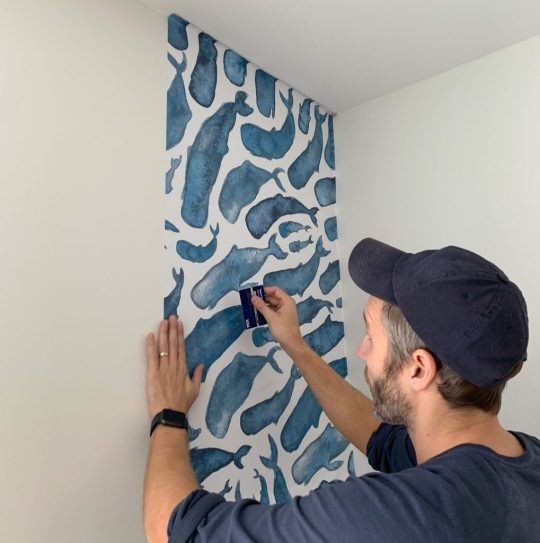
You can buy a smoothing tool meant for this task, but we forgot to bring one with us to the beach, so we pulled a credit card out of my wallet and it did the job just fine.
Our main tip here is to work from the middle out toward the edges, both when you’re sticking things with your hand and when you’re smoothing things afterwards. Also, don’t be afraid to peel it off and restick it if you’re not happy with your placement or if it’s starting to wrinkle. Remember, this particular material is VERY FORGIVING.
Continue to apply the first wallpaper panel in this manner until you get to the baseboard at the bottom. We’ll trim that later as well.
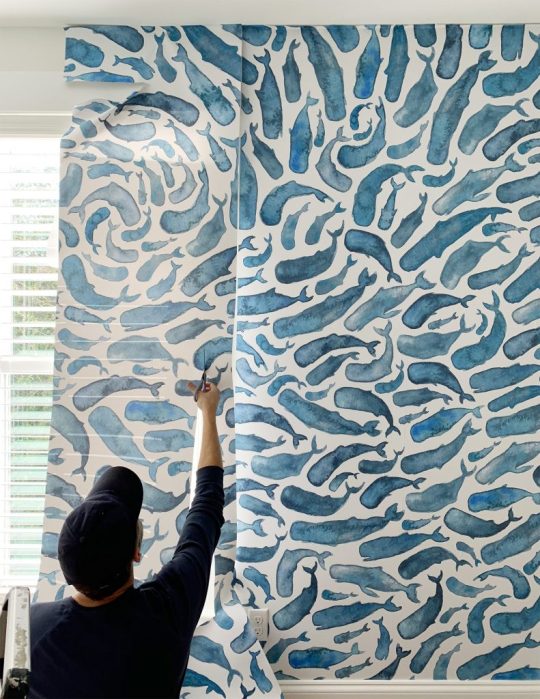
Step 4: Line Up The Pattern On Your Second Panel
If you’ve carefully placed your first panel, this part shouldn’t give you any trouble. These designs aren’t printed with an overlap, so you’ll be butting the second panel up along the edge of the first panel. Just peel a small section of backing off and take your time aligning the pattern. You can peel it off and restick it as many times as you need to get it just right so they line up pretty seamlessly, like you see below:

We did notice that the material has a little stretch to it, so as you smooth it down the wall, it can cause your pattern to travel a bit – meaning your pattern alignment may seem “off” as you go down the wall if you’re pulling and stretching one panel more than the other one.
We combatted this by trying NOT to pull or stretch the material with too much force. And just by generally being vigilant the whole way down. If we didn’t like how anything lined up, we just peeled it back up and tried again.
Step 5: Cut Around Small Obstacles Like Outlets & Switches
If you run into an obstacle like a light switch or wall outlet, don’t worry – it’s super easy. Just turn off the power to that switch or outlet, and once you’re ready to stick the wallpaper around it, use a flathead screwdriver to remove the cover plate. Then loosely stick the wallpaper panel OVER the outlet (if it’s a traditional switch that protrudes a lot, you may need to cut a small slit to allow the switch to peek out so the wallpaper can sit flatter against the area).
You should be able to feel the outline of the obstacle through the paper, so use your utility knife to carefully cut along the edges – being careful not to cut any areas that won’t be covered by the switch plate or outlet cover.

It doesn’t have to be a flawless cut, just be sure to remove enough that the outlet or switch could be easily removed if/when needed. Then just smooth the area down and screw the cover back on so it looks polished and finished (you can see the finished outlet in the picture below).
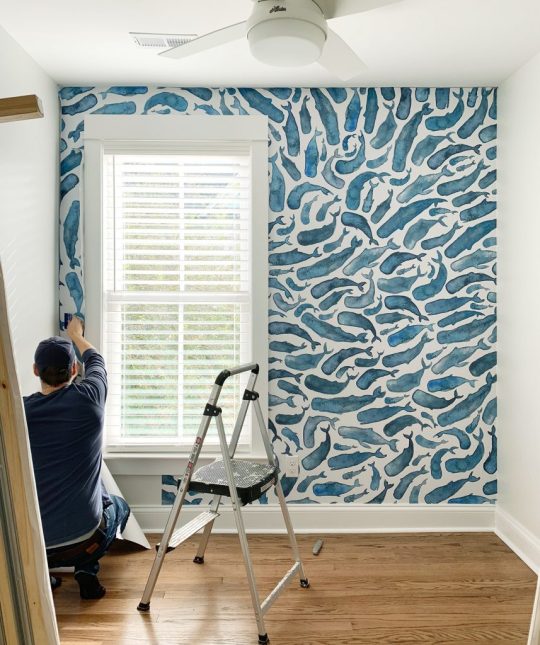
Step 6: Cutting Around Large Obstacles Like Windows & Doors
Hanging our last two wall mural panels presented the added challenge of cutting around a large window that would interfere with significant sections of the pattern.
We started each one of them the same way we did the full panels – peeling back a small section at the top and aligning the pattern. But once the window trim preventing the panel from hanging flat, we broke out the scissors and roughly cut out the area that would have covered the window.
We were VERY CONSERVATIVE in doing this, leaving 3-4 inches of excess, and trimming more as we felt more confident we weren’t cutting off too much. It’s a little tricky getting around corners (you kinda have to cut a diagonal slit in it).

Once enough is trimmed off so that you can press it flat onto the wall, then it’s just a matter of (say it with me!) peeling, sticking, and smoothing. You’ll still have some excess overlapping the trim, but just like the excess along your baseboard, side wall, and ceiling, it’s just fine. You’ll trim it off later.
Step 7: Finishing Your Final Wallpaper Panel
I’m not gonna lie: aligning that final part under the window was a little tricky. But I’ll show you how we cheated to keep ourselves from going crazy.
Because of the window, we hung our fourth panel (which was pretty much just a tiny strip between the window and the wall) without being able to align it with the pattern on the previous panel. So by the time we got to the bottom, it didn’t perfectly match up. And if we did match it up – it always left a big bubble or wrinkle, no matter how many times we stuck or restuck it. We tried unpeeling, shifting and resticking it half a dozen times, but with minimal improvement.
So we decided the main priority was aligning the pattern under the window so the vertical seam disappeared. Then we actually sliced the panel apart (gasp!) at a narrow spot between the window and the wall where there was mostly white space. That way, instead of a big wrinkle, we had a smooth, barely-visible overlap.
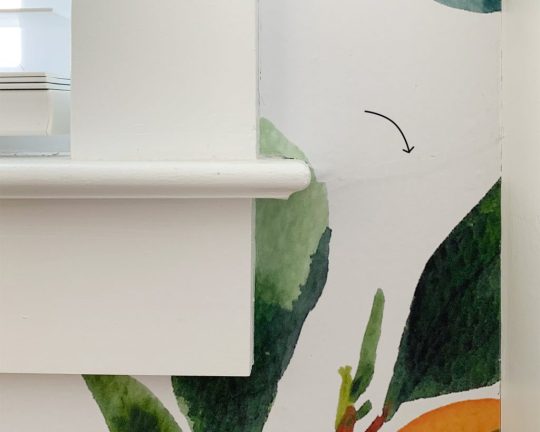
I forgot to take a picture of the overlap on the whale side, but you can see it above on the orange side. It’s suuuuuper subtle (and will be completely blocked by a bed anyways) but we wanted to show you so you didn’t stress yourself out about getting things absolutely flawless.
And again, here it is from further away – you’d never notice that small imperfection in the scheme of the entire room, even if it weren’t covered by a bed.
Step 8: Cut Off The Excess With Your Knife
You don’t actually have to wait until the end to trim off all of your excess wallpaper around the ceilings, end walls, and baseboards, but doing it last is a nice insurance policy in case you have to do any major repositioning (we didn’t – but it still felt smart to play it safe). Once you cut it, you can’t un-cut it ;)
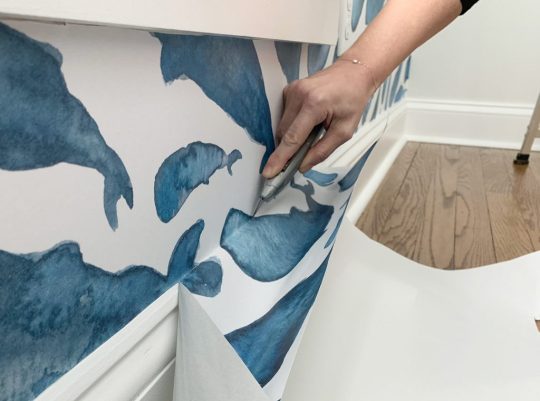
Sherry and I had different techniques for this part. She smoothed everything really well one more time, almost forcing a crease into the edge, and then freehanded the cut along the crease.
I felt a little better smoothing and then actually pressing my smoothing tool (aka credit card) into the crease as I cut, almost using the card as a guide. I think my method worked better in “softer” corners like along the ceiling, but Sherry’s worked speedily along “harder” edges like where the baseboard met the drywall.
Step 9: Repeat!
Okay, not really. Most of you will not have to repeat the process in another room like we did. Unless you were so wowed by the result that you’re already planning another project. It is kind of addicting…
In all seriousness, we’re so happy with how these turned out AND how painless the installation was, we ARE trying to figure out if there’s another spot we could install one in the beach house or our own house.
And as for these rooms, they still need to be fully furnished. We’ve built the two twin bed platforms in each space (they’re these from Ikea), the mattresses are coming, and we’re currently looking for some bedding to finish them off.
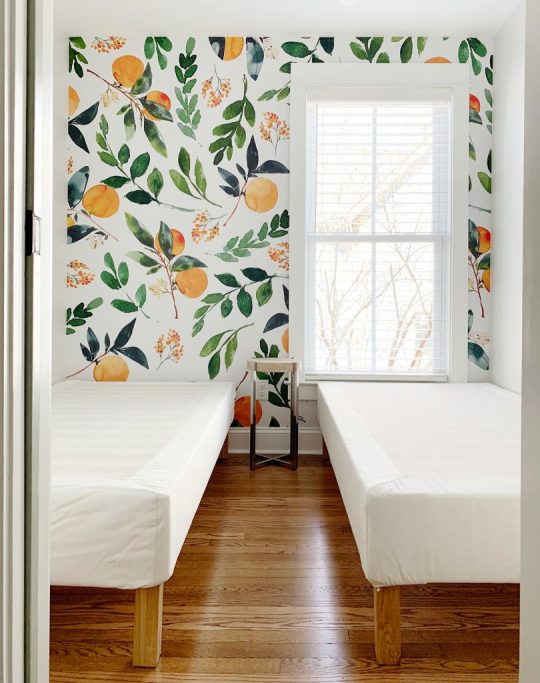
You can see in the above photo that we’ve placed a temporary side table in there, just to get a sense of the layout (the aisle isn’t as small as we feared after all, which is great news).
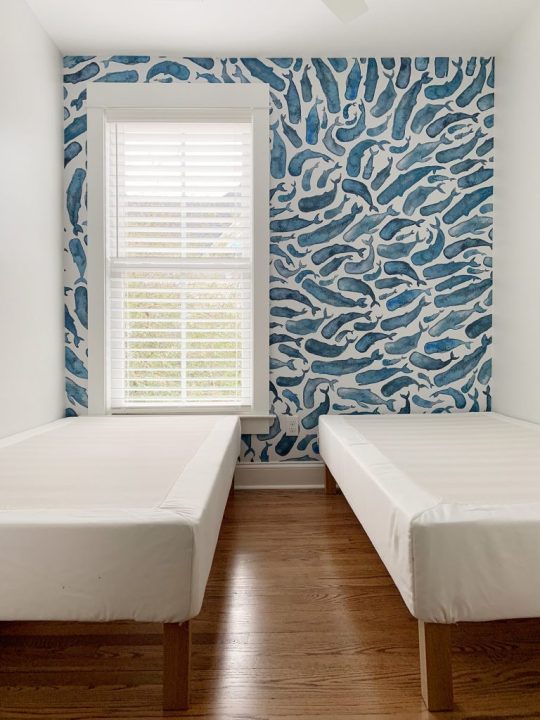
More on these rooms to come! But for now we’re just enjoying how a few hours spent sticking these murals up on each side completely changed how they look. They’re a lot closer to charming little bonus sleeping nooks than they were last week!
P.S. To see other projects that we’ve done at the duplex, here’s how we started laying down rugs & building the kitchens, how we tiled 6 rooms, how we hung operable shutters, and here’s the entire duplex category on our blog if you want to look back on all of our progress.
*This post contains affiliate links*
The post How To Install A Removable Wallpaper Mural appeared first on Young House Love.

How To Install A Removable Wallpaper Mural published first on https://landscapingmates.blogspot.com
0 notes
Text
First Drive: 1967 Shelby GT500 Super Snake Continuation
GARDENA, California — I’d like to think I’ll someday come to terms with the fact that there are cars I will never get to drive. No amount of gladhanding, schmoozing, and chance encounters are going to score me a seat in uber-rare cars like the McLaren F1, 993 GT2, or Mercedes-Benz CLK GTR. Add to this a tablespoon of “one-of-one” with two cups of “historical significance,” and I can forget about even riding shotgun without a thick envelope of cash.
Hope is a tenacious bug, and just as I round the corner toward recovery, I drive something neat, and the cycle of self-destructive daydreaming begins anew. My most recent relapse was at the hands of the 1967 Shelby GT500 Super Snake, a car that didn’t technically exist in production form until earlier this year.
Maybe “exist” is the wrong term. The history of the ’67 Super Snake is certainly real, a tale widely circulated among Shelby faithful in the fifty years since the prototype was built. In 1967, Carroll Shelby was tapped by Goodyear tires for an exhibition aimed at drumming up publicity for its new Thunderbolt tires. Shelby sales manager Don McCain saw this as an opportunity, and convinced Shelby to create a one-off prototype GT500 fitted with a herculean 427 (7.0-liter) V-8 plucked from the Ford GT40 racing program.
This hyper-rare heart was decked-out with Le Mans hardware, including aluminum heads, aluminum water pump, uprated rods, and forged crankshaft. Compared to other big-blocks, this lump liked to rev-out, designed to handle climbs to 6,000 rpm for the duration of Le Mans in the back of a Mk. II GT40. Along with an industrial-grade rear-axle, transmission and an external oil cooler, stiffer shocks and springs were installed on the passenger-side for the five-mile oval at the San Angelo test track.
Shelby himself took the Super Snake up to 170 mph with a journalist in the passenger seat, as the legend goes. Shortly after, a Shelby test driver crushed 500 miles around the oval, averaging 142 mph and successfully demonstrating the reliability of the new Thunderbolts. Demo over, the Super Snake sat in the showroom of Mel Burns Ford as McCain petitioned for a limited run of 50 cars. With a projected price running double a regular GT500, the program was scrapped and the prototype was sold into private ownership.
50 years later, the Super Snake has returned–in a sense. In Shelby American’s words, it’s just completing Carroll Shelby’s “unfinished business” by producing ten blue-over-white ’67 GT500 Super Snakes for public consumption. Before his passing, McCain was an enthusiastic advocate for the program, burnishing ten of the traditional commemorative dash plaques with his signature.
Each “new” Super Snake begins as a real 1967 Mustang, which gets stripped down to the metal and refinished with the appropriate bodywork and Shelby regalia, including the tri-pronged blue racing stripe that was exclusive to the prototype. You can source a legit period-correct 1967 Shelby fastback for the conversion if you’re so inclined, but please don’t do that.
The market isn’t exactly lousy with Le Mans-ready mid-riser 427 FEs, so the SS’ 427 thumper comes from the aptly-named Carroll Shelby Engine Company, available in both aluminum and iron block. A riotous 550 hp is sent through the four-speed Top Loader manual transmission, backed by a nine-inch Detroit Locker with a 3.89 gearset.
I arrive at Shelby’s Gardena office park just as acrid smoke clears from the corner of the empty lot. Chunks of rubber and dark patches litter the concrete, the freshest of which were provided at the hand of Shelby president Gary Patterson. I’m fairly certain the ten forthcoming Super Snakes are consigned to sleep between the padded walls of glossy, Americana-adorned garages, so it’s nice to see some abuse before the Shelby-branded kid gloves come out.
The 427 sounds mighty in a way modern muscle just can’t seem to crack, spitting out a baritone metallic chop that resonates in your chest. Even fresh from the workshop, the presentation commendably vintage, incorporating as little modernization as possible. This means leaf springs and rear drums, put to pavement by Shelby five-spokes wrapped in thick Goodyear Eagle GTs. The fit and finish is as you might expect it from the factory fifty years ago, replete with exposed screws, vinyl coverings, and applied decals. Don’t interpret this as any sort of derision–in a sea of tedious and alarmingly similar restomods, the originality of the Super Snake is charismatic.
Horror stories and somber warnings follow classic cars around like some sort of unshakable miasma and so far, I’ve yet to fall for a jumpscare. You’ll hear that 1970s Lamborghinis drive like trucks in traffic (they don’t), that vintage 911s are out to kill you (they aren’t), and the legendarily reviled Peugeot-Renault-Volvo V-6 is an awful engine, no matter the market (it isn’t). You’ll also hear that clutch springs on vintage big-block bruisers are hewn from bedrock, and that pedal effort is so great that you might as well try to leg press a bus.
Chalk it up to undisclosed modernizations, but the Super Snake’s third pedal was butter. The same can’t be said for the Toploader shifter, which had a long and balky throw. No problem–this is authentic experience, after all. The steering was light and surprisingly responsive, at least for some Detroit iron with five-decades under its belt. Once considered stiff, the ride is now supple in an age of hunkered-down track specials.
Of course, like all muscle cars worth their carb floats, it’s all about the engine. With 550 naturally-aspirated horsepower on reserve, the Super Snake is tremendously fast while its agricultural suspension setup and skinny high-profile tires turns the throttle into unexploded ordinance. In other words, be careful–especially when turning. I suspect that even with tackier rubber out back, it would still dance, as power is both immediate and vicious. Contemporary tests of the regular GT500 saw high 13s in the quarter mile–the Super Snake feels a second or two off of that.
There’s a final part to the Super Snake legend I didn’t mention. After changing hangs multiple times over the decades, the car sold at auction in 2013 for a heavy $1.3 million. In contrast, the continuation Super Snakes sticker for $249,999. Surely, that’s a lot of cash, but for just nineteen percent of the cost, you can have one hundred percent of the fun without worry of horrendous depreciation and loss of originality.
IFTTT
0 notes
Text
Tips on how to Apply Decals on Particular Surfaces
What Varieties of Surfaces Can the Wall Decals Be Utilized to? Earlier than software, it's best to remember the fact that a Wall Decal can solely be utilized to sure surfaces. The surfaces should be climate resistant, clean and spotless. It will need to have little or no contamination. You ought to be cautious to keep away from closely textured surfaces. Keep away from setting up on surfaces like focus block, suede paints, stucco, and paints and bricks. Read about great avengers wall decals design

The place Can You Put Decals within the Toilet? There are a lot of issues to think about earlier than placing decals in your lavatory partitions. The primary is the temperature. Plus, it's important to be sure your partitions are fully dry and never humid so it may well go well with the vinyl. You may also take into account including the vinyl to restroom tiles and bathe surfaces for a finer design.
Do Wall Decals Stick with Wooden Paneling? The wall decals follow painted and plaster partitions. It is going to crumble in the event you apply it to cracked partitions and crumbling areas.
Are There Surfaces the Decals Will Not Work on? Wall decals are designed to be suitable for many surfaces so long as they're clean and lightweight textured. Surfaces like flat metals, glass, and painted partitions are very best. The decal was not designed to stay on tough or uneven surfaces. Tough surfaces like stucco, porous aluminum, cinder block and brick usually are not suitable. The partitions should be freed from grime to keep away from pointless peeling.
Can Wall Decals Be Put in Over Wallpaper? It's important to know wall decal may be utilized to sure sort of wallpaper. Most occasions, it's power to take away wall decals from wallpapers.
Can Decals Be Used Outside? So long as the floor is clear and dry, then you should use it nearly anyplace. You'll be able to see an instance of out of doors us by taking a look at some automotive and mailboxes. You need to be mindful although that this received final so long as the interiors. It is because it might be uncovered to all climate situations. Examine for a premium vinyl for a long-lasting exterior.
I Have Textured Partitions in My House; Will This Wall Decals Work for Me? You can also make use of our wall decals on nearly any flat and lightweight textured floor. It can be utilized for home windows and tiles. Stickers won't keep properly for tough partitions. So long as for exhausting textured, it received work so properly.
A decal additionally has options like an atypical sticker. It's normally advisable to strive a standard sticker on your wall. If it sticks, it's probably that your decal would stick too. Ensure you watch for the required interval earlier than making use of stickers on newly painted partitions.
Do Wall Decals on Glass Tiles? Since glasses are clean surfaces, they're among the finest locations to use a wall decal.
Will the Wall Decals Harm My Wall? Though there isn't a harm when the wall decals are eliminated, it's best to be mindful the potential dangers of 1. When eradicating them, a blow dryer needs to be used to keep away from harm.
I Know All Decals Are Detachable. Nonetheless, I Do not Know Tips on how to Take away Them Without Eradicating the Paint. Eradicating a decal is simple. Simply peel up an edge along with your fingernails. You need to observe that it wouldn’t make the floor any higher. It may need some chipping and would possibly want further work to cowl it up. The extra rigorously you take away the decal, the extra your surfaces will look intact. As said earlier, a blow dryer would assist loads in the case of loosening the wall decal.
Do Wall Artwork Stickers Come Off? As said earlier, the easiest way to take away stickers is by utilizing a blow dryer. Whether it is achieved too quick, it would find yourself damaging the wall. It needs to be achieved in a sluggish and delicate trend.
How Arduous Is It to Take away Wall Decals? Hairdryers may help if you end up making an attempt to take away an adhesive vinyl. All it's important to do is to direct the warmth in the direction of the sting of the decal. As soon as it's heat sufficient, you possibly can gently peel it off beginning on the edge. You'll be able to repeat this heating course of severally till you’re achieved.
How Do You Take away Vinyl Wall Decals? Apply warmth on the realm you need to begin with and maintain it on till you’re achieved eradicating the stickers. You may also strive soapy water or nail polish remover if there are residues.
Scraping the Decal Off From a Window Use a razor blade and a plastic card to scrape off decals from partitions. Don’t overlook too, first; loosen it up with a hairdryer.
How Do You Take away Stickers From Your Wall? First, it's important to refill a bucket with sizzling water. Get a washcloth and soak deeply in the water. When there may be sufficient warmth within the washcloth, maintain it towards the glue. The warmth of the washcloth would slowly loosen the glue. When the warmth is gone, take away the fabric and begin wiping the partitions down with a scouring pad. You'll be able to repeat as a lot as you need.
When My Wall Decals Are Eliminated, Will Residue Stay on My Wall? If Sure, How Can I Take away It? Usually, wall decals don't go away behind residues on any floor. The one exception is when it has stayed too long. You can also make use of isopropyl alcohol or different removers if you wish to take away this residue. Nonetheless, when you comply with the directions, you wouldn't have to fret about doable harm.
youtube
0 notes
Text
Rare Finds: 20-Year Search Turns Up Dream Car, a 1977 Pontiac Trans Am W72 4-Speed
“I asked him, ‘What does it take to buy the car right now? I am not going to play around with the bidding or whatever.’ And he said he would take six grand for it. I said, ‘I’ll tell you what I’ll do. I’ll be out there tomorrow by noon with the six grand and a trailer.’”
Rod Sheffar of Indiana County, Pennsylvania, could not believe he had found a factory W72 four-speed Trans Am, a muscle car he had been hunting now for almost 20 years. He says, “I had just sat down at my computer, and a guy in Wadsworth, Ohio, had just put it on eBay. My wife said it was meant to be.”
Is this Pontiac a muscle car? A 1977 model? Sheffar thinks so. He’s a Vietnam veteran and went through the muscle car years, but 1977 was “still my era, too,” when Pontiac’s Trans Am was hot.
Sheffar called the seller and began to talk seriously. He learned the car was real but rough. It had been parked in a storage unit for the last 13 years.
After Smokey and the Bandit hit theaters in May 1977, Pontiac’s Special Edition Trans Am, like the one Burt Reynolds and Sally Fields drove in the movie, got superhot.
“Every young person in the country wanted a Smokey and the Bandit Trans Am, the black one, or some type of Trans Am,” Sheffar says.
He didn’t hop on the Trans Am wagon until 1998, when he and his wife test drove several different Corvettes at a new car dealership. The Vettes “sat low and were very rough riding. The owner said he had a ’77 Trans Am he just took in on trade. My wife and I took it out for a ride and fell in love with the handling and performance. It was a Buccaneer Red Trans Am.”
Sheffar won 24 trophies with that Pontiac, which he sold for a blue 1975 Trans Am with a 455 that “didn’t do anything” at car shows. He owned six different Trans Ams before he found his dream one. “I used to tell everybody, if it just was a 1977 W72, Buccaneer Red with T-tops and a four-speed, I’d have what I wanted.”
Finding a car by chance is luck. Finding a specific car takes perseverance. That’s why Sheffar asked the seller to take the car off eBay. “I told him, ‘If I don’t buy it I’ll pay you to put the car back online and give you 200 bucks for your trouble.’ I say what I mean and I mean what I say.”
About three minutes later Sheffar noticed the Pontiac was offline. He called up his friend Mike Cribbs, who has a diesel pickup and also owns a Trans Am, a 1978. The two car friends arrived in Ohio the next morning, and the owner took them to the storage unit to see the Trans Am.
Sheffar recalls finally seeing the car as “a happy moment” that turned into high stress. He says, “We had already strapped the car on the trailer when [the owner’s] wife came out of the house and said she could not find the title. I said, ‘Hey buddy, I am not buying this without a title.’”
Sheffar might have lost the deal except Cribbs’ wife called on the cellphone. “She said, ‘How long did you look for this car? You better settle down and get your thinking hat on and get the deal done.’”
Sheffar had time to think while the owner’s wife turned the house upside-down looking for the title. He thought there had to be a way. They checked with the local DMV and found out they could print out a duplicate title right then and there.
Problem solved, Sheffar and Cribbs drove back home with their prize. Six grand was a good deal, but since then Sheffar has put $35,000 into a concours restoration and is back on the show circuit winning trophies with his dream car.
The quarter-panels were “all rusted,” as was the rear window around the stainless trim.
Rod Sheffar bought a rust-free panel to replace the Trans Am’s tail, which showed the typical rust.
The hood was resting against a wall in the storage unit.
The vinyl bucket seats were torn, but the interior was complete, including the four-speed stick with the very desirable Hurst shifter.
The shaker for ram air carried “T/A 6.6” decals, indicating a Trans Am with 6.6 liters, or 400 ci. These cars were wildly popular in the late 1970s and have experienced a great resurgence of interest.
Sheffar and his buddy Mike Cribbs jacked up the Trans Am to check the engine and transmission numbers to make sure everything matched and was real. Some people call the W72 High Performance Package the last muscle car engine of the classic era.
The build sheet was a bonus to find. Jim Mattison at Pontiac Historic Services (PHS) also has information by VIN.
The post Rare Finds: 20-Year Search Turns Up Dream Car, a 1977 Pontiac Trans Am W72 4-Speed appeared first on Hot Rod Network.
from Hot Rod Network http://www.hotrod.com/articles/rare-finds-20-year-search-turns-dream-car-1977-pontiac-trans-w72-4-speed/ via IFTTT
0 notes