#howtousecricutmugpress
Explore tagged Tumblr posts
Visit Tumblr Blog
Explore Tumblr blogs with no restrictions, modern design and the best experience.
Last Seen Tumblr Blogs


Fun Fact
1,644 Tumblr posts in 1 second.
Text
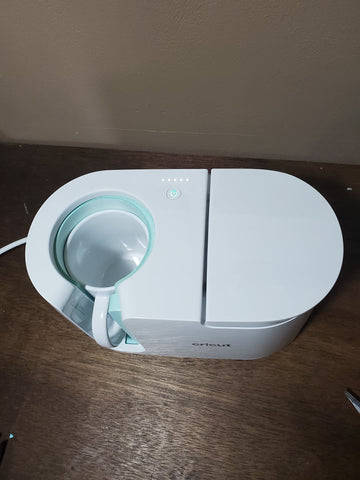
How to Use Cricut Mug Press (Complete Guide)
Hey, Crafters! Are you here to learn how to use Cricut Mug Press? Today, I am going to cover an important topic on Cricut Mug Press. In this tutorial, I will make a project that will be useful for everyone.
Recently, one of my customers wanted to buy a huge number of mugs for their employees. Prior to that, they asked me to create one sample so that they could see the quality of the mug. Then, I started making a simple mug, and I will share all the steps that I used to create that mug. To me, customer satisfaction is a priority, and I always try my best to give them my best.
So, get ready with all the items required to make this mug. Once you have all the items, you will make mugs that will look excellent. Are you ready to create a mug for yourself or a loved one? If yes, then let’s visit this blog to learn more.
How to Setup Cricut Mug Press on a Computer?
Before setting up the Mug Press, I used some Cricut Mug Press accessories. These items are as follows:
Cricut Mug Press
USB cable
Design Space software
Compatible Windows/Mac computer (with Type A port)
After gathering these items, I moved to set up my Mug Press:
First, I connected my Mug Press to my computer using the USB cable.
Further, I visited the website cricut.com/setup to download the Design Space software to my computer.
After installing the app, I launch the Design Space.
Using my Cricut credentials, I logged into my account. If you haven’t created the Cricut ID yet, then create one.
After successfully signing in, a Welcome screen appeared where I selected the Heat Press and then the Cricut Mug Press.
Now, I followed the displayed instructions to complete the activation.
Once the activation was complete, I clicked on the Get Started tab.
Here, my setup procedure is done.
How to Use Cricut Mug Press for the First Time?
Now, I will show you how I create a sample mug for my customer. For this, I used supplies such as Cricut Joy, Mug Press, StandardGrip or LightGrip mat, Mug Blank, Infusible Ink Transfer Sheets, and heat-resistant tape. Let’s start with the first step, where I will show you how to create a design with step-by-step instructions.
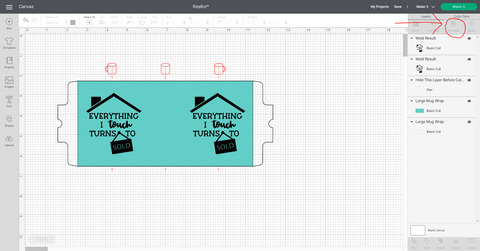
Step 1: Choose or Create a Design
First, I am going to select the best design on Design Space. For this, I will click on the Projects icon given on the left side in the Cricut Design Space. Once you click on the Project icon, you get so many options for designs. Here, I chose a simple project called Mug Design Setup.
On the next screen, I was informed about the size of the mug. Further, I clicked on the Customize tab.
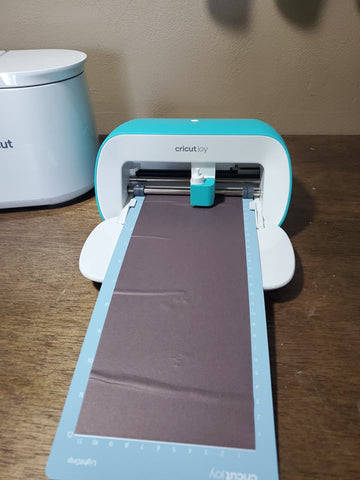
Step 2: Cut & Weed Out Vinyl
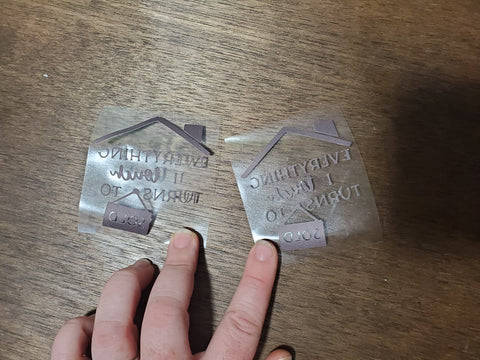
Step 3: Apply Your Design on Mug
Now, I am going to place those cut vinyl on my mug. To secure it, I used heat-resistant tape.
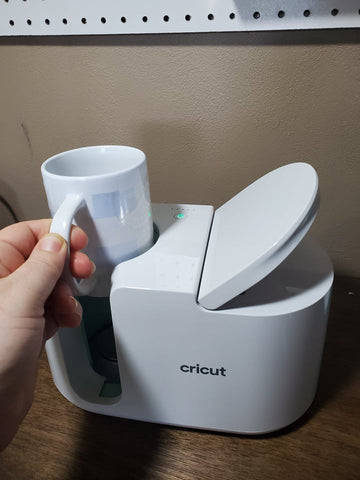

Now, lift up the liver to remove the mug. Next, let it cool off, and then remove the tape and transfer the sheet. Finally, my mug is done!
So, through these 3 steps, you might have learned how to use Cricut Mug Press. Now, create a similar project with these easy steps.
FAQs
Question 1: Can I use the Cricut Mug Press without a computer?
Answer: You will only need a computer when you have to activate your Mug Press and update the firmware. For these two reasons, you will need a computer. In other words, you won’t need it throughout the process. So, if you want to set it up, then use the computer to set it up using Cricut Design Space and computer.
Question 2: How do I setup my Cricut Mug Press on my phone?
Answer: No, you can’t set up Mug Press on the phone. Hence, you will need to use a computer with Design Space installed in it. Here are the steps you need to follow:
Visit Cricut’s site, cricut.com/setup.
Then, you have to download the Design Space.
After that, install the software and click on Setup/Activate.
Next, you will need to sign in to your Cricut credentials.
On the next screen, you will need to select a Heat Press > Mug Press.
Now, perform the instructions to finish the setup process.
Question 3: Do I need to use ink for Cricut Mug Press?
Answer: Not necessarily! It depends on the type of project you are going to make. In simpler terms, your Cricut Mug Press machine is compatible to be used with Infusible Ink products. So, you have the option to use the Cricut pens on your Cricut mug. It works really great when you use it with patience and accuracy.
Conclusion
In this blog, I first started with Cricut Mug Press full setup, as without this setup guide, you can’t make anything on Mug Press. Therefore, setting up the Mug Press and registering with your Cricut ID is essential. So, once you have done the setup, you can start learning how to use Cricut Mug Press. In this post, there are three steps explaining the steps to create a sample mug project. You can follow the same steps for any type of similar project.
Source URL :- how to use Cricut Mug Press
#completeguide#cricutmachinesetup#cricutmugpress#howtouse#howtousecricutmachine#howtousecricutmugpress#setupcricutmachine
0 notes