#how do I make my Cricut mat sticky again
Explore tagged Tumblr posts
Note
Hi, just wanted to say your binding of "Faces In The Dust" looks gorgeous!!! Could I ask, how did you make the title + decoration and apply it to the front cover? :O
Hello! The cover designs are cut from vinyl with a cricut machine. In this book's case I used permanent vinyl. Which is essentially very sticky vinyl. There is also HTV(heat transfer vinyl) which you cut out and then adhere to the material via heat (such as an iron). I tend to use cricut to design and then cut most of my covers. The cricut is a cutting (and other things) machine that has a digital design space I run on the computer to help me design covers.
I typically like to start by 'making the case' out of colored blocks in the space that are the size of my actual cover so I can know what things will look like when I put it all together. I also color my items to match as close as possible to the colors I plan to cut them from as well. I mostly do this because I have aphantasia so I need the literal imagery in order to see what the design will look like. These steps are by no means necessary and if you can visualize what you want then you can just add the images/text in however you like.
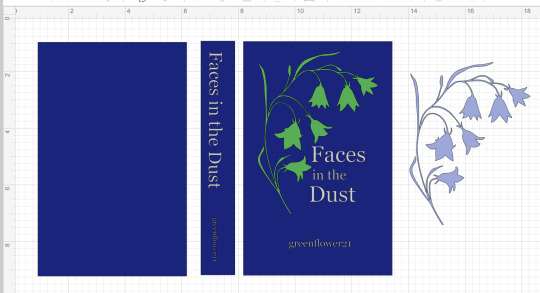
The vinyl is a plastic-y sheet or roll of vinyl in a given color. Because I wanted to have the flowers be one color(lavender) and the stem (green) another I needed to cut two sections and take the parts I wanted from each. I could have also edited the images so that each of the two only had the parts I wanted from it so it would only cut them. But it wasn't that much of a difference and if I just copy pasted a second one of the same image and changed the color then I would know they were the same size and everything would fit together.
Once the design is done I move to the cutting phase. The colors you pick determine which pieces are cut together.
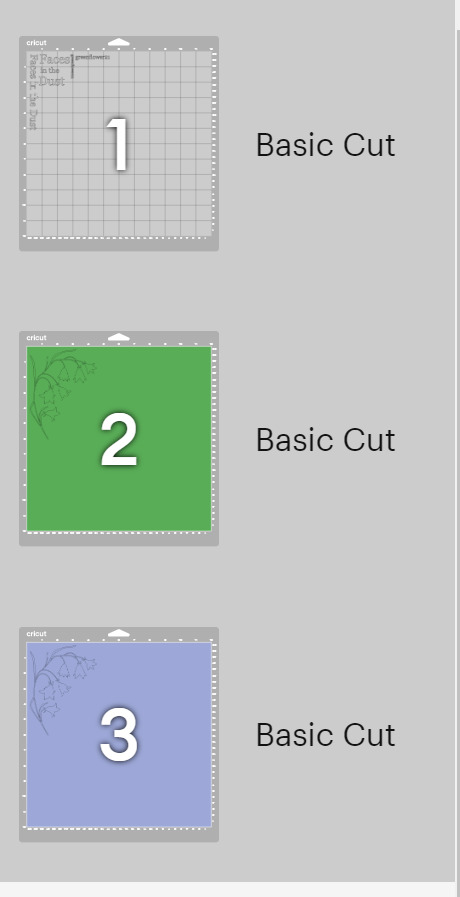
You load each sheet of vinyl in on a mat and it cuts the image out. When it is done you cut out around the section you just cut the image on and then use tweezers to remove the vinyl you aren't using around the image. This is called weeding. In the flowers & stem's case I also then used an exacto blade to cut off the flower heads from each of the cut outs so I could combine the two colors of vinyl to create my final version of the image.
Once it is all weeded you are ready to transfer it to the book case. You do this with transfer tape. It is a clear plastic sticky sheet that you place on your vinyl to 'pick it up' off of the backing it started out on.
Again in this instance to combine the colors I picked up the green vinyl on the tape and then lined up the purple flowers and pressed down to get them stuck to the tape as well. With it all now collected I placed the transfer tape on my book and pressed the vinyl into the case of the book. Smoothing it down with my bonefolder or anything else that helps make sure it is flat so it is really adhered and there are no air bubbles.
I do the same with all the titling and ta-da! A Book!
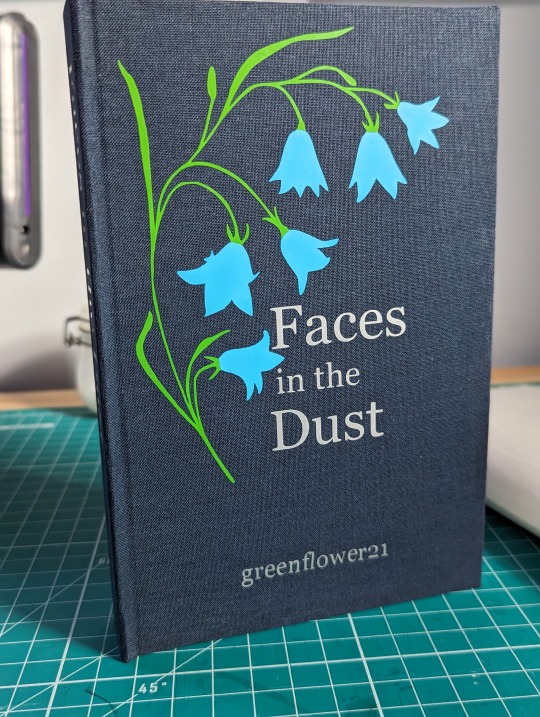
There are tons of ways you can title/design your book covers. I just got my hands on foil quills this past weekend so I hope to try making a cover with them in the not too distance future. Some folks I know use paint pens, or cut out stencils and use regular paint, or just free hand paint if you want to show off your skills of an artist. Hope this was helpful and not too rambling. Sorry I don't have pictures for all the steps, I can make a point to take pictures the next time I make a cover in cricut if that is something folks would want to have. Feel free to reach out if you have any more questions.
45 notes
·
View notes
Text
What is the Best Way to Clean Cricut Mat: 3 Different Methods
Are you tired of searching for the best way to clean Cricut mat? Then don’t worry at all because I have got your back. If you are a crafter, you will agree that the Cricut cutting mat is crucial in creating something new. Crafters use this crafting supply to stick their materials together when making DIY projects. They also come in 4 different ranges and colors.
The mat starts losing its stickiness at a certain point due to an excess amount of dirt, debris, and leftovers. To extend its life, users should know how to clean them. No doubt, cleaning mats can be a little of a tedious task, and doing it by yourself will save you money. Besides, you will also learn new things you weren’t aware of, and that can help you create unique crafts.
This blog will teach you about different methods that will instantly bring back the shine to your Cricut cutting mat.
Method 1: Light-Duty Cleaning
If you are making simple projects out of scrapbook paper, vellum, or sticker paper, then referring to these methods will be your best choice. You can use them after finishing every project to ensure that the mat doesn’t lose its stickiness. Take a look at the below section, and you might find the best way to clean Cricut mat:
Scraper Tool
You can use this tool to remove the leftover pieces of materials after the cutting process is complete. To properly clean the mat, you need to pull its edges over its surface, and it will instantly scrub away the unwanted materials from the mat. Apart from removing the material, many DIYers use this crafting item to stick the material correctly on the surface of the mat.
Lint Roller
Apart from the scraper tool, the DIYer can also use a lint roller as one of the hacks to clean the Cricut cutting mat. Just grab the roller handle and start rolling over the mat, covering the entire area. Most crafters prefer the lint roller to remove small materials such as hairs, fuzz, etc.
Baby Wipes
Besides a scraper tool or a lint roller, the crafter can use baby wipes to clean the mat. It is the best way to clean Cricut mat as it is simple and complete within a few minutes. First, you need to take a piece of wipe in your hands and gently move your hands, covering the entire area of the mat. After doing that, repeat the same step, ensuring you don’t put too much pressure on the mat.
Method 2: Medium-Duty Cleaning
If you make any customized project using medium-weight material like heavy cardstock, adhesive vinyl, or HTV, then you need to clean the mat using dish soap and a sponge. Go through the below steps and learn how to dislodge the remaining pieces of medium-weight materials from the Cricut mat:
Method 3: Heavy-Duty Cleaning
In case you are making any craft out of leather, wood, or other fabric, then there is only one way for you to clean the mat, i.e., awesome spray. It will surely be the best way to clean Cricut mat. To make you look new again out of this item, then have a look at the below steps:
As a result of the best way to clean Cricut mat, you have all the methods that will make your Cricut cutting mat look new again.
Frequently Asked Questions
Question: How Can I Extend My Cricut Mat Life?
Answer: To extend your Cricut cutting mat’s lifespan, clean the mat regularly. Besides, you should use the correct method while cleaning it, such as a scraper tool, lint roller, and baby wipes. Keep the mat inside the plastic sheet after cleaning it and protecting it against dirt or debris. You can also increase the mat life by using it with compatible cutting machines & materials.
Question: How to Clean Cricut Fabricgrip Mat?
Answer: Most crafters choose the Fabricgrip cutting mat when making any project out of any fabric, such as leather or cotton. This Cricut mat is a little delicate, so softly removing the material is essential. To remove the material, gently use tweezers, lift the small pieces, and sleep them at the corner of the table.
Question: How to Make Cricut Mat Sticky Again?
Answer: Read the following steps to make your mat sticky again:
Visit: cricut.com/setup www.cricut.com/setup login cricut design space app cricut explore air 2 download design.cricut.com/setup install cricut design space app
Source: https://cricutdesignapp.wordpress.com/2024/03/02/what-is-the-best-way-to-clean-cricut-mat-3-different-methods/
#install cricut design space app#cricut.com sign in#setting up your cricut maker#cricut new product setup#cricut explore air 2#design space setup#digital design#cricut.com/setup explore air 2 setup#cricut.com/setup#cricut maker 3 bundle#cricut explore 3#design space cricut#download cricut design space#cricut design space app#cricut.com/setup mac#www.cricut.com/setup login#cricut design space setupp#cricut design space login#cricut design space download#cricut design space for mac#cricut design space setup#install cricut explore air 2#cricut explore air 2 setup#inctall cricut explore air 2#install cricut explore air 2 setup#design.cricut.com/setup#design.cricut.com
0 notes
Text
How to Make a Cricut Mat Sticky Again: A Comprehensive Guide
Do you want to learn how to make a Cricut mat sticky again? This guide will show you how to clean your mat and get its stickiness back. I remember the day one of my friends, Alex, called me and asked me to help him regain mat stickiness. I said, “We have to meet so that we can figure it out.” When he finally came to my home with his mat, I helped him clean it. I also advised him to use cleaning agents and scrapers wherever required. In addition, I told him to use a Cricut scraper to remove the scraps after every project.
Well, I have known Alex since childhood, so I am not sure whether he will follow my tips or not as he is kind of a lazy person. But I believe you are not like him, so it would be better if you do something that helps your mat restore its stickiness. There is nothing much to do, just simple tips that I will be sharing in this write-up. Let’s get started!
3 Tips to Protect Cricut Mat Stickiness
Do you think we can permanently restore the stickiness? The answer is No. The Cricut mat can withstand up to 50 cutting uses. However, I would like to share some tips so that you can understand how to make a Cricut mat sticky again.
So, there are basically three tips I have mentioned below:
1. Clean Mats Using a Lint Roller/Scraper
Here, you can use a Cricut scraper or an older credit/debit card. A plastic gift card will also work so that you can remove the scraps from the mat easily.
2. Frequently Replace the Plastic Protector Sheet
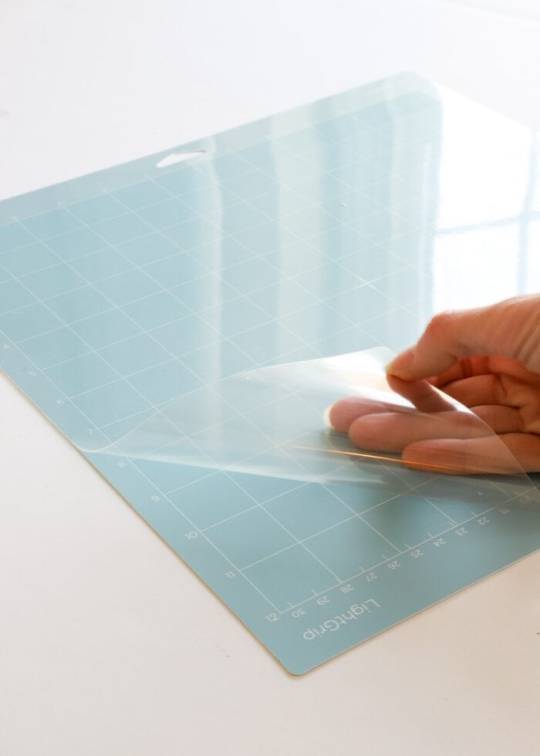
Cricut mats come with a transparent protective sheet that you can remove while using them and then reapply on the mat after every use. This protective layer protects your mat from dust and debris when not in use.
3. Use the Right Mat With the Suitable Material
Using the right materials is a must. Simply put, you should use the LightGrip mat for delicate papers and the FabricGrip mat for clothes or fabric. Plus, StrongGrip should be used for heavy-duty materials only.
How to Clean Cricut Mat With Baby Wipes or a Lint Roller?
Now, let me teach you how to make a Cricut mat sticky again. To teach this, I will give you the instructions step-by-step. Let’s first start gathering the supplies:
Step 1: Gather Supplies
Here are the essential supplies that you will need for cleaning your mat. Make sure you collect all of them to get your mat stickiness back:
Lint Roller
Plastic Cricut Scraper Tool
Dish Brush
Dawn Dish Soap
La’s Awesome Cleaning Spray
Alcohol-Free Baby Wipes
Step 2: Clean After Finishing Your Project
Whenever I do a project on my Cricut cutting mat, I always ensure that I clean it after every use. As a result, my mat lasts longer. So you can also clean it using the Cricut scraper.
Using this tool, you can take off the small pieces of extra materials, fuzz, and hairs.
3. Use the Right Mat With the Suitable Material
Using the right materials is a must. Simply put, you should use the LightGrip mat for delicate papers and the FabricGrip mat for clothes or fabric. Plus, StrongGrip should be used for heavy-duty materials only.
How to Clean Cricut Mat Using Dish Soap and Awesome Spray?
Don’t worry if the above methods don’t work for you! I have another two methods below. To learn the procedure of how to make a Cricut mat sticky again, try the below-mentioned methods carefully:
Method 1: Using Dish Soap
In this method, I use dish soap and warm water. I like to use mild dish soap such as Blue Dawn for better results.
First, you need to clean the mat using a scraper.
After that, you have to lay the mat on a flat surface.
Then, take a dishcloth or soft brush to rub the surface gently.
Now, rinse in warm water and leave it in the air for a while to dry.
Method 2: With Awesome Spray
Follow the steps below to clean the mat with awesome spray:
Spray the liquid.
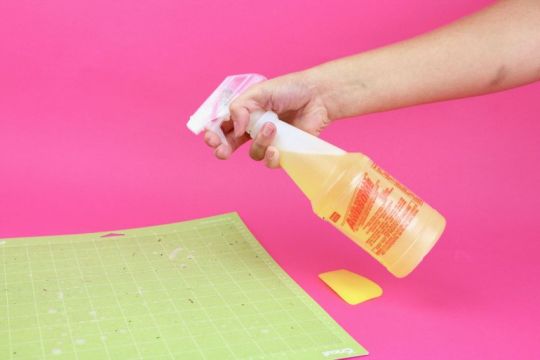
Then, leave it for a while.
Also, use the scraper to remove the extra material from the mat surface.
Rinse with warm water and let the mat dry in the air.
Final Words
In this write-up, I am explaining how to make a Cricut mat sticky again in a simple manner. All the stepwise methods will help you clean your Cricut mat. Be it a light grip mat or a strong grip mat; you should always start from the scraper and then move accordingly to the last steps to use dish soap and awesome spray.
FAQs
Question 1: Why is my Cricut mat losing its adhesive ability?
Answer: It is because you are not cleaning it, or maybe it has been used more than required. Repetitive use and debris can reduce the mat’s stickiness over time. However, you can extend the life of your mat; all you need to do is clean it using the right materials. To clean, you have to use a cleaning agent and a Cricut scraper.
Question 2: What is the lifespan of a Cricut mat?
Answer: Your Cricut mat can be used up to 50 times, meaning you can cut anything on it 50 times. Meanwhile, you should regularly clean your mat after every use. The better you keep it clean, the more sticky the mat will be. Also, sometimes, it depends on the materials that you have cut on it. For example, felt materials always leave some debris, and removing that is a tedious task.
Question 3: What glue can I use to make my Cricut mat sticky again?
Answer: If you want to regain the stickiness of your mat, you should use the Zig 2 Way Glue Pen. You can also use removable tape, such as painter’s blue or washi tape. Ensure the tape is wide enough to cover the outer edges of your cutting mat.
Source Url :- how to make a Cricut mat sticky again
Visit here for more Information :- Cricut Design Space
cricut explore air 2
cricut accessories
cricut heat press
cricut joy app
cricut explore 3
#Cricut Design Space#cricut explore air 2#cricut accessories#cricut heat press#cricut joy app#cricut explore 3#cricut explore air 2 accessories#cricut design space not working
0 notes
Text
How to Clean Cricut Mats: Easy Ways to Restore Stickiness
Hey, Cricut enthusiasts! Are you looking for an easy guide on how to clean Cricut mats? Here, I will explain everything about cleaning Cricut cutting mats in a few simple steps. When I first noticed debris or dirt on my mat, I was unsure about cleaning methods. I didn’t really know how to clean a mat. Also, there are 4 types of mats: LightGrip (Blue), StandardGrip (Green), StrongGrip (Purple), and FabricGrip (Pink). But do you know that we can’t clean all mats with the same methods? Yes, it’s true!
In other words, you cannot clean the FabricGrip mat using soap or any other cleaning agent that you use for mats. Hence, it is essential to understand the cleaning methods for each. Cleaning your cutting mat is really crucial as it can save you money from buying a new one. And who doesn’t save money, so it becomes mandatory to take care of your mat.
Check out this blog, where I will show you how to clean all types of Cricut mats.
What Will You Need for Cleaning Cricut Cutting Mats?
So before we shift our focus to how to clean Cricut mats, we need to gather some supplies or tools. These supplies are most important for cleaning the mats. So, look at the following items I will use throughout the cleaning process.
Here are the items to clean the mats:
Plastic Cricut Scraper Tool
Alcohol-Free Baby Wipes
Dawn Dish Soap
Dish Brush
Lint Roller
La’s Awesome Cleaning Spray
Ensure you have all these essential items before proceeding further.
How to Make Cricut Mat Sticky Again: Top 3 Methods
Okay! So, here comes the next topic where I am going to teach you how to clean Cricut mats. So, before I take you through each step of cleaning the mat, you should know the type of cleaning methods.
Advertisement
There are three cleaning methods that we will be talking about. They are light-duty, medium-duty, and heavy-duty cleaning methods. So, let’s start with the first method of cleaning – light duty.
Method 1: Light-Duty Cleaning Method
I always prefer this method after every project. As a result, it prevents my mat from losing its stickiness, making it more durable. Now, the question is, what do I need for light-duty cleaning?
To know the answer, refer to the below points carefully:
You will need a scraper tool to scrape off the large pieces or debris of spare materials.
You will also want to use a lint roller to remove the smaller pieces of leftover materials.
Since baby wipes are cheap, you can also try them, but you have to clean the mat in a circular motion.
After cleaning it, let it dry before using it.
Method 2: Medium-Duty Cleaning Method
Then comes the medium-duty cleaning method, which I use when the above method doesn’t work! So, let’s see how to clean mats with dish soap:
Take some mild dish soap and warm water.
Then, use the scraper tool to remove excess material adhered to your mat.
After that, take a soft dish brush and rub the surface gently in a circular motion.
Finally, after cleaning, you need to let it dry in the air.
Method 3: Heavy-Duty Cleaning Method
Let me show you how to clean Cricut mats with heavy-duty methods. I will use Awesome Spray, a cleaning agent.
Let’s see how to use this spray for cleaning mats:
First, you have to spray the mat with cleaning spray.
Now, leave it for 5 to 10 minutes to make it dry.
After that, you should use the scraper tool to remove the extra vinyl or materials.
Rinse your mat with lukewarm water.
Next, leave it to dry.
The above methods will be helpful in cleaning your cutting mats. However, you can start with the light-duty cleaning method and then proceed head accordingly until the mat is fully cleaned.
Conclusion
Now, I have explained how to clean Cricut mats, so you can start from the gentlest method to the heavy-duty cleaning methods. Clean until your mats get cleaned. There are many tools for cleaning, such as a scraper, lint roller, baby wipes, dish soap, awesome spray, and more. Start with the scraper, remove the large amount of excess materials, and then move on to using cleaning agents. Ensure your mat doesn’t lose stickiness while cleaning it vigorously. Be gentle while cleaning.
FAQs
Question 1: How to make Cricut mat sticky again?
Answer: If you are cleaning Blue LightGrip, Green StandardGrip, and Purple StrongGrip mats, then you need to start with tools like a scraper, lint roller, and baby wipes to clean them. You must use advanced cleaning methods if these tools do not help you. For this, you will have to use dish soap, Awesome spray, and other cleaning agents. Whereas, for the pink mat, never try the above methods because pink mat adhesive is quite delicate. However, you can use tweezers to remove the larger pieces.
Question 2: How can I clean my Cricut FabricGrip mat?
Answer: While cleaning your pink Cricut mat, do not try to scratch it with a scraper or other tools. Since its adhesive is delicate, do not use heavy-duty cleaning methods. Instead, I recommend using the tweezer tool to remove a large piece of material. In short, the pink mat has its own different method.
Question 3: How do I clean felt off from a Cricut mat?
Answer: Cleaning felt materials from a cutting machine is tough due to its fuzzy texture. In addition, it leaves a lot of lint and debris on your mat. No matter how you cut the material, it will surely get some debris. To clean felt from the mat, you must try backing the felt sheet aligned with freezer paper and then stick the paper down onto your mat. This will prevent your field from sliding and protect your mat from links and debris. Lastly, when you have done the cutting, you can peel the freezer paper off.
Source :- https://designaccessoriesmart.wordpress.com/2024/02/05/how-to-clean-cricut-mats-easy-ways-to-restore-stickiness/
0 notes
Text
How to Clean Cricut Mats and Make It Adhesive Again
Often Cricut cutting mat gets dirty and loses its stickiness after several uses. Frequently using a Knife blade causes more dust or debris that will likely stick to the adhesive on your cutting mat. In most cases, it makes users wonder whether they should clean Cricut mats or buy a new one. So if you find that your mat is losing its stickiness, then keep patience! You don’t need to throw it away anywhere. However, you need to follow some steps to get rid of these dirty Cricut mats.
Through this post, we will cover some tips for cleaning your Cricut mats.
How to Clean Cricut Mats?
Generally, Cricut mats have a sticky surface that assists in holding the material on while going through the Cricut machine. However, there are 4 different types of Cricut mats, and each comes with a different level of stickiness. Plus, the mat should last for 40-50 uses before it wears out.
You might be surprised that the cutting mats do not last forever. And it will indeed lose its stickiness and start to wear out after several usages. But don’t worry; you can increase the life of the Cricut mat by cleaning it while taking care of it between uses.
How to Extend the Life of Cricut Cutting Mats?
The best way to extend the life of your cutting mats is to keep clean Cricut mats whenever possible. Given below are some simple methods to keep the Cricut cutting mats always clean.
Using a Scrapper or Lint Roller
There are many alternatives to the Cricut Scraper tool that you can use, such as an unused credit card or plastic gift card, to remove the scraps from your mats. You just need to drag the edge of the card across the mat’s surface to remove all the scrap pieces.
Choose the Right Mat for the Suitable Material
You should always use the LightGrip mat with delicate papers, the StrongGrip mat with heavy-duty materials, and the FabricGrip mat with fabric.
Replace the Plastic Protector Sheet
Although Cricut mats have a clear protective sheet, you should always keep your mat clean by covering the mat with the sheet between projects. And in case you find your sheet dirty again, then wipe it off with a wipe or Windex.
We hope the above 3 steps will help you extend your Cricut mats’ life.
Should You Clean Cricut Mats Regularly?
It depends on the uses; for example, if someone crafts with Cricut mats every day, they will need to clean mats more frequently than someone who makes designs once a week. However, most Cricut mats require you to clean cutting mats after 2 to 4 cuts, which also depends on the type of materials you use. But we recommend you clean the mat whenever you notice the material is not sticking as earlier.
Similarly, you should clean Cricut mats when you see a lot of debris, denim, glitter vinyl, leather, etc. Also, when you cut wood material with a knife blade, it is essential to clean it. Whereas, if you are working on smooth material like vinyl and cardstock, then less cleaning will be enough.
Conclusion
In short, the cleaning process for Cricut cutting mats is easy and doesn’t cost as much as buying a new one. In addition, you should use the Cricut cutting machine until it loses its adhesive completely. However, there are many items available in the market that you can use to clean Cricut mats. We have mentioned those items in this article, including the tips to extend the life of Cricut cutting mats.
FAQs
Question 1: How do I clean my Cricut mats?
Answer: You will need these things to clean the Cricut cutting mats.
Plastic Cricut Scraper tool
LA’s Awesome Cleaning spray
Warm water
Once you have these items:
Then, spray the mat with LA’s Awesome Cleaning agent
And let it sit on the mat for 5-10 minutes.
Use the Cricut scraper tool to scrape the residue off the mat’s surface.
Rinse the mat with warm water and hand vertically to dry.
See, how does it look now? You just renewed your Cricut cutting mats and also got your stickiness back! Now you are ready to reuse it.
Question 2: Which is the best sticky mat for Cricut?
Answer: Blue-LightGrip is one of the best mats as it comes with a stronger grip. The advantage of using a mat with a stronger grip is that the adhesive remains so strong that no one can remove it quickly. Moreover, material like printer paper, sticker paper, cardstock, and standard vinyl provides the best cut with Light Cricut cutting mats.
Question 3: Are Cricut cutting mats reusable?
Answer: Yes, the reusable mats are designed to meet all the crafting requirements and provide flawless cuts every time. In addition, the Cricut Maker and Cricut Explore machines are compatible with these mats, and the clear film present on the mats guards them against dust and any residue scraps, providing a better and longer life.
Visit – Cricut.com/setup design.cricut.com www.cricut.com/setup Cricut.com sign in
#CRICUT MATS#CRICUT MACHINE SETUP#CLEAN CRICUT MATS#HOW TO CLEAN CRICUT MATS#Cricut.com/setup#cricut new machine setup#cricut design space login#design.cricut.com#cricut explore air 2#cricut design space#cricut.com/setup mac#cricut.com/setup windows
0 notes
Text
How to Use Cricut Maker for DIY Crafting Magic?
Again, I am ready with my new tool, Cricut Maker. Using this machine, I am going to teach you how to use Cricut Maker to create your own shirt in a couple of minutes. At one time, I was also a beginner, and it was not easy for me to learn it. Somehow, I learned it from the internet. However, it took me a lot of time to gain practical expertise on this tool but believe me, it was worth learning.
Moreover, the machine is very easy to use, and it has a simple setup process, which I have already covered in this blog. My intention in writing this blog is for beginner crafters who have just bought the machine and want to learn how to use it from the beginning. So, are you ready to join me on this journey of learning about the Cricut Maker from the ground up? If yes, let’s get started!
The Process to Setup a Cricut Maker Machine
When I got my new Maker machine, I was too excited to unbox it. But after unboxing, I had to set it up. In the beginning, I was nervous as hell! I really didn’t want to make any mistake that would cause a technical problem. But the Cricut’s guide finally helped me. In addition, the setup is also easy for different platforms like Windows, iOS, Mac, and Android.
To learn how to setup Cricut Maker on computer and mobile device, follow the instructions given below:
First of all, plug the power cable into the back of the machine and connect it to the power source.
Next, you have to connect the machine to the computer. Here, you can either use a USB cord or Bluetooth feature.
Now, open a browser such as Chrome and search for cricut.com/setup.
On the next page, you will need to download the Design Space and then install it.
Here, you can simply follow the instructions available to you on the screen and set up your account.
Finally, you will be notified about the completion of the Cricut setup.
As soon as we complete our setup, we are always prompted to perform a test cut. This is easy, and you can do it by following the steps given to you on the screen.
What Supplies Will I Need to Make a Custom Shirt?
Before I teach you how to use Cricut Maker, let’s discover some of the essential Cricut supplies needed for making a shirt. Here is what you need to make your own shirt on Maker:
Iron-on Vinyl Material
Cotton Blank T-shirt
Cricut Maker (or any other cutting machine)
LightGrip cutting mat (or Standard Grip mat)
Weeding tools
EasyPress
EasyPress Mat
I have specifically chosen the cotton shirt, which has smooth textured and high-quality cotton. It really works well with Iron-on vinyl.
Important Note: I would recommend pre-washing your blank shirt before applying the vinyl on it. In this way, your vinyl won’t crack if the shirt shrinks. In addition, pre-washing will help you remove the dirt or any impurity that can hinder the ability to adhere to vinyl on the shirt.
How to Use Cricut Maker for the First Time?
So, are you ready to learn the process of making a shirt on the Maker machine? If yes, follow the steps one by one:
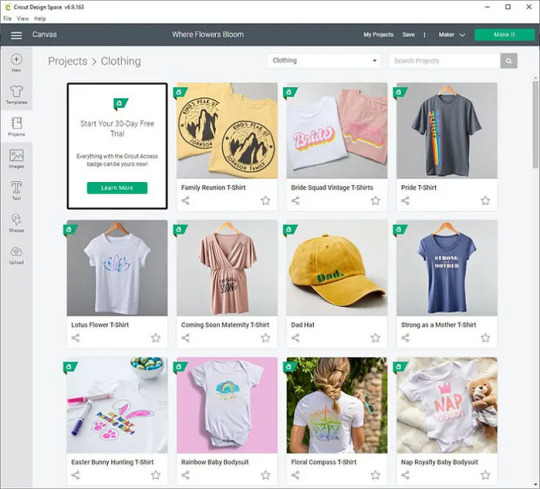
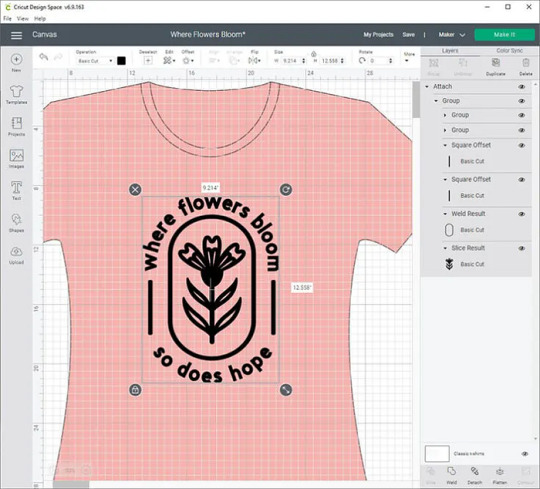
Step 1: Create a New Design or Upload
Step 2: Load the Vinyl and Cricut Mat
Now, you need to place the material on the mat for cutting. For this, you need to load the vinyl onto the mat. Make sure you are using the mat that has lost its stickiness a little bit. After that, you have to use the brayer tool to flatten and adhere the vinyl to the cutting mat.
Remember: The shiny side of the vinyl should be facing down. For patterned vinyl, the pattern side should be down.
Once done, you are ready to tap on the Load button to start the loading process of the cutting mat into the Maker machine. Next, you will need to send your design to the Cricut Maker.
Step 3: Send Your Design to the Cricut Machine
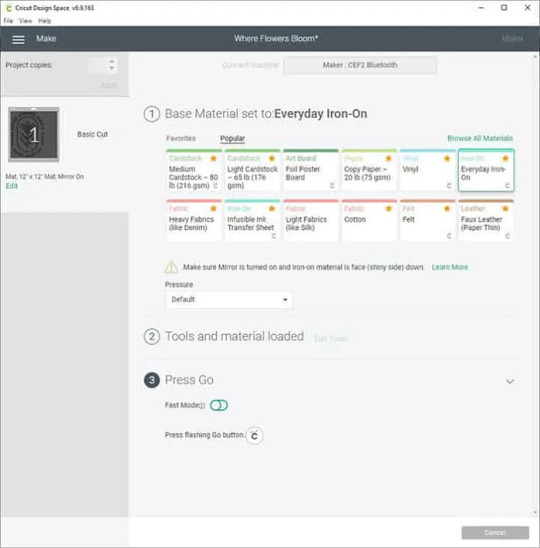
Navigate to the Cricut app and click on the Make It button in the top-right corner.
Next, select the toggle button to turn on the Mirror.
Afterward, you will be moved to the next screen, where you need to choose the base material. Choose the Everyday Iron-on from the list.
Step 4: Cut and Weed Out the Design
After choosing the material, you need to load the Fine-Point blade and the mat.
To start cutting, you need to press the Go button to cut the design.
Once cutting is done, unload the mat and weed the design using the weeding tools.
Step 5: Transfer Your Design
This is the step where your EasyPress comes into play. Preheat the blank shirt and then place your design on it. After that, set the recommended temperature and press gently on the design.
Wrapping Up
In this blog, I have explained to you how to use Cricut Maker along with the full setup process. This guide not only explores the setup process but also how to make a shirt using it. The process is easy for both setup and shirts. However, this guide can also help you if you want to add your design to a tote bag or any other fabric. The process will be almost the same for every project.
FAQs
Question 1: How to use smart vinyl with Cricut Maker?
Answer: Smart Materials doesn’t require you to use a cutting mat, making it easy to use. Below are the steps given that explain the usage of vinyl.
First, you need to load the material and ensure a 10-inch gap behind the machine.
Next, try to position the material. For example, keep the color side facing up.
Then, feed the material into the guides.
Now, you have to press the Load button and gently push the material forward.
Finally, it’s time to apply the vinyl on the clean, blank surface.
Question 2: How to use Cricut Maker for stickers?
Answer: Find the steps below to create amazing stickers using the Maker machine.
First, you need to create a sticker design on Design Space.
After that, print the image using a compatible printer.
Once you have printed the image, set the materials on the Cricut app.
Next, you should load the mat into the cutting machine.
After that, press the Go button to cut stickers.
Once the sticker is cut, unload the mat and remove the stickers.
Question 3: How to use pens with Cricut Maker?
Answer: In order to use the pens with Cricut Maker, you have to follow the instructions provided below:
First, you need to place the laser copy paper on a LightGrip mat and then load it.
On Design Space, create the design that fits your blank and assign a Cricut pen color.
Also, you must Mirror your design.
Then, browse all materials and then choose Copy Paper.
Insert your Infusible Ink Pen into Clamp A and hit the flashing Go button.
Once the design is done, you can unload the mat.
Read more: install cricut design space app
how to setup cricut maker
Cricut Design Space Login
Source: how to use Cricut Maker
#how to use Cricut Maker#Cricut Design Space Login#cricut design space#cricut.com/setup#cricut.com/create#how to setup cricut maker#install cricut design space app#cricut new machine setup#cricut.com sign in#www.cricut.com/setup login#cricut setup
0 notes
Text
How to Make Cricut Mat Sticky Again?
Cricut Mats are essentials for crafting that are necessary to use when you are cutting any projects. Using Cricut mat allows users to cut designs with extreme accuracy and get desired results. Like any other tool, it also gets damaged with time and loses its stickiness.
However, one can increase its lifespan by taking care of it. If you also have a Cricut mat, it can be beneficial to learn how you can get the most out of it by using it for a long time. Thus, the following blog post will walk you through an easy guide on how to make Cricut mat sticky again.
Things You Need to Clean the Cricut Mat You need to have some essentials before you jump right into the process of cleaning your Cricut Mat. Here is the list of things you should have to clean your mat. But you are not required to use all the products at once.
How to Clear Cricut Mats if They Are Mildly Worn Out? As we know, Cricut mats are sticky, but they start to wear out with every use. So, you can use the method below if your mat is at the first stage when they have very little dust/debris.
With baby wipes Baby wipes are generally available in every household. So, here is how you can use them to clean your mat.
With scrapping tool
If there is large size debris on your Cricut mat, you can use the scrapping tool to clean it. You need to move the tool over the mat’s surface to remove any particles from it. Also, if you do not have a scraping tool, you can use any plastic card as an alternative.
With a sticky lint roller Using a stick lint roller is another great option you can use to clear the mild dust on your Cricut mat. It will stick all the dust or unnecessary particle from your mat. You need to move the lint roller on the mat. Also, a lint roller can pick a variety of particles, such as silver, pieces of paper, glitter, and others. In addition, this can be the best method to clean the mat if you are using pink Cricut fabric mats.
How to Clear Cricut Mats If They Are Heavily Dirty? If you use your Cricut mat more frequently or you have used it for an extended period of time, then chances are the mat has been very dirty. Also, the stickiness of the mat also may have been tremendous. In this case, the follow-up methods can help you clean the mat. With the help of Dish soap Dish soap is a commonly used product and is available in every household. Here are the steps you can use the soaps for clearing your Cricut Mat.
How to Clean the Mat Using a Cleaning Spray? Here are the steps you can follow to clean your mat with cleaning spray.
Which Spray Adhesive is Best for Cricut Mats? You can use various types of spray to make your Cricut mat sticky again. Here are two of the most beneficial spray adhesives you can use for the Cricut mats. So, you can use the Painter’s Tape, also known as masking tape. In addition, different types of spray adhesive are also great options to use for your Cricut mats.
Conclusion Above, you got to know the various methods on how to make Cricut mat sticky again. You can use any of the methods based on the condition of your mat. Apart from that, you can use them around 50 times before they start to wear out. However, taking a little extra can help in keeping your mat in the best working condition for a longer time. So, you can use this information to clear the Cricut mats to regain their stickiness.
FAQs Can I use a glue stick on my Cricut mat? If you want to design to be cut accurately and adequately, then you need to ensure that your mat is sticky. So, the material will not move from its place when the machine is cutting the fabric. You can use any high-quality glue stick to make your Cricut mat restick again with the help of the glue stick, the Cricut mat.
How many times can you clean a Cricut mat? It is necessary to clean your mat after using it. You need to clean the Cricut mat after one or two use. Also, if there is so much debris on the mat after cutting any material, then you are required to clean the mat after every cut. On the other hand, if you are using the materials like paper or vinyl to cut, then it is not necessary to clean the mat quite often.
Can I use tape for the Cricut mat? Yes, you can use the tapes to stick materials on the Cricut mat. It is beneficial to use blue painter’s tape or masking tape. Although the mats come with a powerful adhesive that helps materials stick to them and get perfect results while cutting the design, tapes hold the material more firmly when the pressure is so high.
Source: https://firstcricut.wordpress.com/2023/05/03/how-to-make-cricut-mat-sticky-again/
0 notes