#here I draw them like this because i'm too lazy to draw the gray shades and stuff
Note
Are you black and white? Do you have any colours?
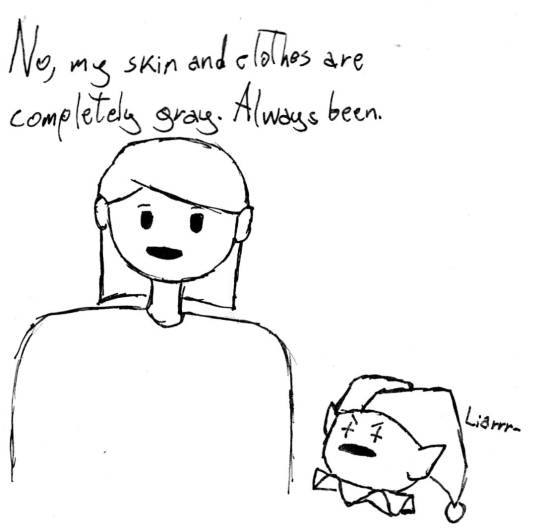
#undertale#ut#utau#utmv#sam the human#ask sam the human#jevil#jevil deltarune#apply-neo#Sam has no colors now but they once used to be colored#like- a LONG time ago#here I draw them like this because i'm too lazy to draw the gray shades and stuff#but in the reference sheet you can see all their grayness#i should probably put the refs in the pinned post#Update: i just noticed how damn big Sam's eyes are here#jezzz they usually are almost lines#and here they are huge...#oh well it happens
2 notes
·
View notes
Text
Ein's Art Log #1
@lixenn!! Here's the timelapse I recorded for my rarepair week submission! I'm just gonna start this log series because I wanna study art more and take notes of it here in this blog. And maybe it will help people with their drawings? I'm putting my notes below ↓↓↓
Draft & Lineart
First, for this art, I used a base made by Ging (깅). Using bases like these are always useful for a lot of things and it also forces me to draw things (like poses, hands, etc) I wouldn't normally draw by myself (if its up to just my hand with zero braincell input, I would just draw the characters facing 3/4 to the left over and over). Also a lot of them are just so *chef kiss*, god bless Korean artists. They're so good, especially with how they do the figures and anatomy!
I just adjusted the base a bit to match the characters' heights, since Kurumi is taller than Chrome by like 6cm.
Then when making the drawing a draft layer over the base, I usually use bright colors like green, red or blue (most often green). I usually don't think about the draft too much even if it turns out ugly, I think it's actually better that it turns out ugly and messy.
Otherwise, if the draft looks slightly more decent than expected, then I'd become too lazy to draw a more proper lineart. Whenever I remember to do so, I also use a gray-colored background so it's easier on my eyes, especially since I drew this after work.
For the "lineart", I used a brush called 촉펜 (MTL says it's "Touch Pen" in English; Content ID: 2050169). I recently started using this for doodles/sketches, it feels nice. It was free when I downloaded it, but it costs 10 Clippy now.

Anyway, I used a little bit more braincells for the "lineart" now after the draft, but then I didn't really try that hard to make it look clean, since I'm rushing to finish it as fast as I can. I just made sure that the outside lines are connected just enough for easier selection & coloring later.
Coloring & Shading
The coloring is where my experiment actually started! I usually go ahead and color them one-by-one per each color and part, but to be quicker, I used the Magic Wand selection tool to select the area outside the background, then inverting it so now the selection is at the characters *except* the background.

I then used the the bucket tool to fill the selection with the color I use as the base skin color. I still keep the selection there for further coloring purposes.

Just from here, I added another layer on top for the shading of the skin! For the shading, I used a brush called Yuri Watercolor (Content ID: 1889385). This one's really a paid brush, but I liked it a lot so I got it hahaha.

I do plan on replicating on doing this on IbisPaint one of these days! My plan so far is to use the free watercolor brush there, lower the brush opacity to around 60-70% and then draw the shading on a clipping layer set to the Multiply layer effect.

After shading, it looks like this now! I didn't mind the colors bleeding through the non-skin parts (except for two parts: the neck shading that would bleed to the face and thigh shading that would bleed to the skirt). I also used this brush to color Chrome's eye. Huhu I can't remember how I did it, helpskjfbjsbf
Then for the coloring of the hair and clothes, I just used the soft airbrush! I tried using the Yuri Watercolor brush for it too, but I couldn't quite grasp it yet on how to use it for coloring/shading those parts. I guess I know what to study next hahaha
When coloring the hair (and clothes), I did color the middle parts but didn't really full-on color till the edges to make that fading effect at the edge.


For the shading, I added clipping layers above and used the watercolor brush again!
For the hair highlights, I used the soft airbrush again. I just used a white color on a Soft Light layer effect to add a faint highlight on their hair (showed on picture on the left). Afterwards, I added another layer above with the Add/Glow effect and turned down the opacity to around 50%, to put more shine to it (showed on picture on the right).


Additionally, I also added a paper texture layer at the bottom! I also grouped up all the lineart and color layers into one folder and set the layer effect to Linear Burn.
Finally, after a bit color corrections/adjustments, blur filters (post-processing stuff, maybe for a different post?) and adding some decorations, the drawing is finally done! KuruKuro my beloved 💖

That's the process I'm playing around with so far, but I think I can still improve on it. I'm also planning on making a page on my wiki to compile my resources, references and such (maybe some free to use assets too). But anyway, that's all for now!
7 notes
·
View notes
Last Seen Blogs


musicistheair-blog
Music Is The Air
satyrradio
starting T in 4 months !!
linkingnightvale
Linking Together Night Vale
