#flush wall mount brackets
Explore tagged Tumblr posts
Visit Tumblr Blog
Explore Tumblr blogs with no restrictions, modern design and the best experience.
Last Seen Tumblr Blogs


Fun Fact
In 2020, Tumblr had 29.4 million users in the US.
Text
Out of Sight Mounting specializes in innovative TV mounting solutions that create seamless, clutter-free environments. Our expertly designed and installed hidden TV mounts provide a sleek, modern look for homes and businesses alike. We use high-quality, durable mounts that combine functionality with aesthetics, ensuring a perfect balance of style and practicality. Whether you're enhancing your living room or upgrading a conference room, our team delivers a flawless finish every time.
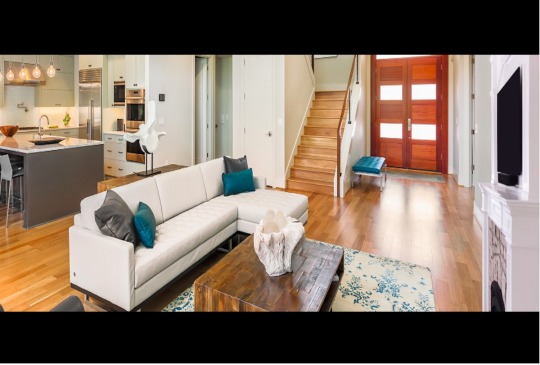
#best tv mount above fireplace#flush wall mount brackets#ultra flush mount#fireplace mantel mount#drop down brackets#tv mounting on fireplace
0 notes
Note
Oooooh! Could you show how you mounted the skull on the wall with the lower jaw? I have some deer skulls I would like to display that way but all the euro mounts and brackets I've seen are for the top only. I think that misses out on a lot!
Hi! First you need some sort of skull mount that has a peg going into the foramen magnum (hole in the back of the head where the brain comes out) and then something like a cross that cradles the occipital condyles (right outside the foramen magnum.)
Here is the one in the last video just called Skull Hooker flush mount. They’re $10 or so (+ shipping) and there are different kinds. This one is only big enough for a deer or ram but it has a hole in the center so maybe you can put something in to help it hold something bigger. Hence this long screw thing.
I might not keep the bull there, but I’m glad I installed this into a stud. The bull is heavy but the ram is fine.

Because of the angle you can fit the mandibles, like so:
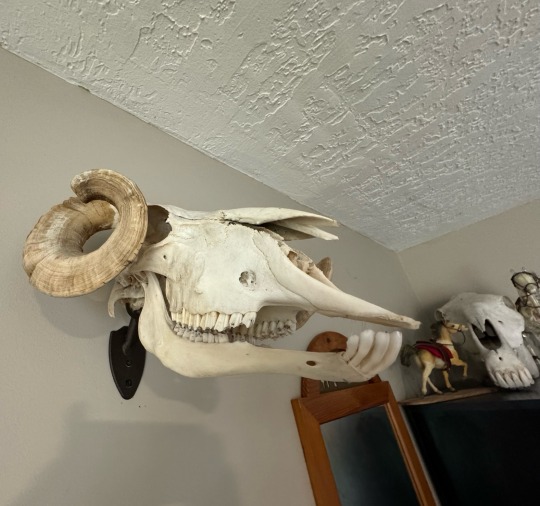
There are many ways to attach mandibles to a skull (not the mount.) I used white thread and tied the (lower, only) incisors to the upper (only) incisive bones.
Then the back of the jaw is tied where they would attach in life (behind the zygomatic arches.) Fishing wire would probably be better.
Gluing might be hard. Drilling holes to improve the string attachment might help.
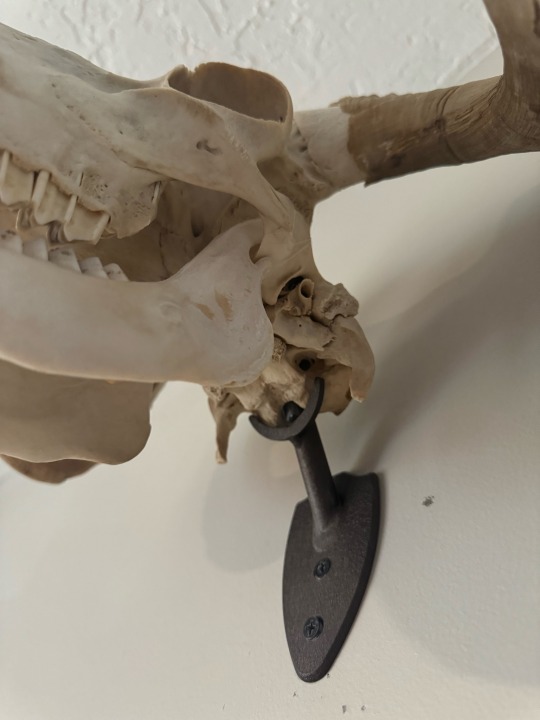
Good luck!
42 notes
·
View notes
Text
Effortless Elegance: Choosing the Perfect Picture Hanging Solution for Your Home
Decorating your walls with stunning artwork, cherished family photos, or unique decorative pieces can transform your living space into a true reflection of your personality. However, finding the right way to securely and elegantly display these treasures is often overlooked. The right tools can make all the difference between a seamless presentation and a haphazard setup. This is where investing in a quality picture-hanging kit comes into play. You can ensure your walls exude charm and professionalism with the right hanging solutions.
Why the Right Hanging Solution Matters
Many homeowners underestimate the impact of proper picture wall hangers. A poorly installed hook or bracket can damage your walls, cause your artwork to hang unevenly, or cause the piece to fall and break. Beyond the practicalities, the correct hardware also contributes to visual appeal. Whether you’re hanging lightweight prints or heavy mirrors, the appropriate hanging solution ensures durability, safety, and aesthetic alignment.
Additionally, not all walls are created equal. The material of your walls—drywall, plaster, or brick—dictates the type of hanger you’ll need. A comprehensive picture hanging kit offers flexibility with various hooks, nails, and brackets for different wall types. You can avoid unnecessary repairs and protect your walls and decor by understanding these nuances.
Features to Look for in a Picture Hanging Kit
When shopping for a quality picture-hanging kit, there are a few essential features to keep in mind:
Weight Capacity: Ensure the kit includes options for various weight limits. Adjustable solutions, such as lightweight canvases or heavy frames, prevent mishaps.
Wall Compatibility: Look for kits with hardware suitable for various wall materials, such as drywall anchors, masonry nails, and plaster hooks.
Ease of Use: The best kits provide clear instructions and simple tools, making installation a breeze even for beginners.
Durability: To prevent corrosion and ensure longevity, opt for kits made of high-quality materials like stainless steel or brass.
Extras: Kits with a built-in level, measuring tape, or picture wire can conveniently create a polished display.
By prioritizing these features, you can save time, effort, and frustration while achieving a polished result.
For a seamless and professional wall-decorating experience, PicGenie123 is an excellent choice. They provide a comprehensive picture hanging kit that includes pre-installed marking tabs, eliminating the need for measuring. This kit can support up to 75 lbs and comes with durable zinc hangers, nails, screws, drywall anchors, and a built-in level. Whether you are a beginner or an experienced decorator, PicGenie123 makes it simple to achieve perfectly aligned frames while ensuring your decor remains secure in high-traffic areas.
Types of Wall Hangers and Brackets
Wall hangers for pictures come in various forms, each suited for different needs. Understanding these options will make you feel informed and prepared for any home decor project. Here are some popular options:
Nail-and-Hook Systems: Ideal for lightweight items, these systems are simple yet effective.
Adhesive Hooks: Perfect for renters or those who prefer not to drill holes, though their weight capacity is limited.
Sawtooth Hangers: Commonly used for smaller frames, these provide stability without the need for a wire.
D-Rings and Picture Wire: Best for medium to heavy frames, offering flexibility in placement and alignment.
French Cleats: A robust option for heavy artwork and mirrors, these brackets provide a secure, flush mount.
The key is selecting the right blend of tools for your specific needs. Investing in a comprehensive kit ensures you have the flexibility to handle any type of project.
Tips for Perfect Picture Hanging
Even with the best tools, achieving a flawless display requires some planning. Follow these tips to get it right:
Plan Your Layout: Before picking up a hammer, lay your frames on the floor to visualize the arrangement. Use painter’s tape on the fence to map out dimensions and placement.
Use a Level: Uneven artwork can distract from your decor. A built-in level or standalone tool ensures precision.
Measure Carefully: Symmetry is key, especially when hanging multiple pieces in a gallery wall arrangement.
Test Weight Limits: Avoid caution if unsure about a hook’s capacity. Using a more robust solution is better than risking damaging your wall or frame.
Protect Your Walls: To prevent scuffs and maintain alignment, use rubber bumpers or felt pads on the back of frames.
The Importance of a Reliable Hanging Bracket
For heavier artwork and mirrors, a sturdy wall hanging bracket is indispensable. These brackets are designed to evenly distribute weight and provide a secure mount, even on challenging surfaces. A high-quality bracket is functional and minimizes the risk of accidental damage, making it a wise investment for valuable or oversized pieces. With a reliable hanging bracket, you'll feel secure and confident in displaying your valuable or oversized pieces.
Conclusion
Choosing the right tools for hanging your decor is as essential as selecting it. A quality picture hanging kit, paired with well-designed wall hangers for pictures and a reliable wall hanging bracket, provides the foundation for a stunning and secure display. By investing in these essentials, you can elevate the aesthetics of your home while protecting your cherished pieces.
Your walls can become a gallery of memories and artistry with the right hanging solutions. Every detail matters when creating a home that inspires and impresses.
0 notes
Text
How to Make Small Spaces Look Bigger with the Right Hardware
In today’s world, urban living often means making the most of smaller spaces. The challenge of creating a comfortable, functional, and stylish interior within limited square footage can be daunting. However, with the perfect hardware and thoughtful planning, small spaces can feel expansive and visually appealing.
At Flybird Hardware, we specialize in providing innovative solutions that cater to modern living. From sleek knobs to space-saving profile handles, our products are designed to combine aesthetics and functionality, ensuring that every corner of your home exudes style and utility. In this article, we’ll explore how using the best interior design ideas and selecting the right hardware can make small spaces appear larger while highlighting the premium offerings of Flybird Hardware.
Why Hardware Plays a Crucial Role in Small Spaces
When designing small spaces, every detail counts. Often overlooked, hardware such as cabinet handles, mortise handles, and sofa legs can significantly impact the overall look and functionality of a room. Here’s why hardware is essential:
Visual Impact: Minimalist and elegant hardware can make a space look less cluttered and more refined.
Functionality: Space-efficient hardware ensures maximum utility without compromising style.
Customization: Choosing the right hardware allows homeowners to personalize their interiors, enhancing the visual appeal of their living spaces.
Top Tips to Make Small Spaces Look Bigger with the Right Hardware
Opt for Sleek and Minimalistic Hardware
In compact spaces, bulky or ornate hardware can overwhelm the design and make the room feel cramped. Instead, choose slim and modern designs, like the profile handles offered by Flybird Hardware. These handles fit seamlessly into cabinets and drawers, creating a clean and uncluttered appearance.
Best Options:
Profile handles for wardrobes and kitchens.
Sleek knobs for cabinets and drawers.
Flush-mounted mortise handles for doors.
By incorporating such perfect hardware, you’ll create a streamlined look that enhances the openness of the room.
Embrace Reflective and Metallic Finishes
Metallic finishes such as chrome, brass, or polished aluminum can add a touch of elegance while reflecting light, making the space feel brighter and larger. For example, Flybird Hardware’s brass mortise handles or aluminum profiles can amplify the aesthetic appeal while contributing to an airier ambiance.
Key Suggestions:
Use brass or chrome handles on cabinets and doors.
Incorporate reflective materials in fixtures and accessories to maximize light dispersion.
Go for Space-Saving Designs
Compact living spaces demand smart solutions, and Flybird Hardware excels at offering products that prioritize efficiency. Space-saving hardware such as sliding door handles and foldable brackets can free up valuable floor and wall space.
Examples:
Sliding wardrobe handles to eliminate the need for extra space required by hinged doors.
Foldable shelves with sturdy supports for multipurpose use.
Match Hardware to Your Interior Design Theme
Consistency in design creates a harmonious and cohesive look, making small spaces feel organized and less chaotic. Flybird Hardware offers a wide range of finishes and styles to complement any interior design theme, from modern minimalism to industrial chic.
Styling Ideas:
For modern interiors, choose matte black or brushed steel finishes.
For classic or vintage interiors, go for brass or antique bronze hardware.
Use Hardware to Define Zones
In small apartments or studio setups, defining functional zones is crucial. Hardware can play a role in separating spaces visually without adding bulky dividers. For instance:
Install different handle styles for kitchen cabinets and living room storage to create subtle differentiation.
Use distinctive knobs for bathroom cabinets to set them apart from other areas.
Pair Hardware with Multi-Functional Furniture
Small spaces benefit from furniture that serves multiple purposes, and the right hardware can enhance their usability. For example, sofa legs from Flybird Hardware can support convertible sofas that double as beds, while sturdy cabinet handles can be installed on movable storage units.
Recommendations:
Adjustable legs for sofas and tables.
Handles for foldable cabinets or extendable dining tables.
Flybird Hardware: Your Partner for Perfect Hardware Solutions
As a leading manufacturer of furniture fittings and hardware, Flybird Hardware prides itself on delivering products that meet the demands of modern homeowners. Whether you’re designing a compact apartment or enhancing a small office, our range of premium hardware is tailored to suit all needs.
Why Choose Flybird Hardware?
Innovative Designs Our products are crafted with both form and function in mind, offering solutions that align with the latest interior design trends.
Premium Quality Flybird Hardware ensures durability and longevity, using high-quality materials such as brass, aluminum, and stainless steel.
Wide Range of Options From knobs and mortise handles to sofa legs and bathroom accessories, we offer a comprehensive selection to cater to all preferences.
Eco-Friendly Approach We are committed to sustainability, offering eco-friendly finishes and materials.
Affordable Luxury Our hardware strikes the perfect balance between affordability and luxury, making it accessible for homeowners and designers alike.
The Role of the Best Interior Design in Small Spaces
While hardware plays a pivotal role, it’s equally important to incorporate smart interior design strategies. Here are a few design tips to pair with Flybird Hardware’s products:
Light Colors and Reflective Surfaces
Use light-colored walls and furniture to create an illusion of space. Pair these with Flybird’s reflective metallic hardware for a cohesive look.
Vertical Storage Solutions
Maximize vertical space by installing shelves and cabinets that reach the ceiling. Use our sturdy and stylish cabinet handles to add functionality and flair.
Functional Layouts
Plan your furniture layout to ensure smooth movement and accessibility. Use Flybird Hardware’s compact and ergonomic hardware to optimize functionality in tight spaces.
Conclusion
Making small spaces look bigger is an art that combines smart interior design and the right choice of hardware. By selecting perfect hardware from Flybird Hardware, you can create a home that feels spacious, functional, and stylish.
Our extensive range of products—from sleek profile handles to space-efficient sofa legs—is designed to enhance your living spaces while meeting modern design demands. Whether you’re renovating a compact apartment or designing a new home, Flybird Hardware is your ultimate partner in achieving the best interior design for small spaces.
Elevate your interiors with Flybird Hardware and experience the difference that high-quality, stylish hardware can make. Visit our website today to explore our premium collection and transform your home with ease!
0 notes
Text
About Shoreline Shutters | Shoreline Shutters

Vero Beach, located along Florida’s Atlantic coast, is known for its beautiful beaches and tropical climate. However, this region is also susceptible to powerful hurricanes and tropical storms that can cause severe damage to homes and properties. Installing Storm Panels Vero Beach is an essential step in safeguarding your home against these unpredictable weather events. Whether you're a first-time homeowner or looking to upgrade your current storm protection system, understanding the importance of storm panels and how to properly install them is key to ensuring your safety and minimizing damage.
What Are Storm Panels?
Storm panels are protective barriers designed to shield windows and doors from flying debris, wind, and rain during a storm. These panels come in various materials, including steel, aluminum, and polycarbonate. They are an affordable and effective alternative to hurricane shutters or impact-resistant windows, offering excellent protection at a fraction of the cost.
Why Storm Panels Are Essential for Vero Beach Homes
Living in Vero Beach means dealing with the risk of hurricanes, especially during the Atlantic hurricane season from June to November. Storm panels are one of the best ways to protect your home from the high winds and debris that come with these intense storms. They are designed to withstand hurricane-force winds, preventing windows and doors from breaking and minimizing the risk of structural damage.
Additionally, storm panels are more durable and cost-effective than some other storm protection options, making them a great choice for homeowners who want reliable and affordable protection.
Step-by-Step Guide to Installing Storm Panels in Vero Beach
Preparation and Planning Before you start Installing Storm Panels Vero Beach, it’s essential to plan ahead. Identify all the windows and doors that need protection. Measure each opening carefully to ensure the panels will fit properly. Check local building codes and regulations, as some areas may have specific requirements for storm protection. If you're unsure about the regulations, consider consulting with a professional contractor in Vero Beach.
Gather the Necessary Tools and Materials Depending on the type of storm panels you choose, you’ll need the appropriate tools and materials. Common tools include a drill, screws, anchors, and a level. If you’re using panels with pre-drilled holes, it’s important to have a screwdriver and the correct size screws. You may also need a ladder for higher windows or doors.
Install Mounting Tracks or Brackets Many storm panels are designed to be attached to mounting tracks or brackets, which should be installed around your windows and doors. Mark the positions for the tracks or brackets, ensuring they are level and aligned correctly. Secure the tracks or brackets to the wall or frame using screws and anchors. Make sure the brackets are installed firmly, as they will support the weight of the storm panels.
Attach the Storm Panels Once the tracks or brackets are in place, you can start attaching the storm panels. Align the panels with the mounting tracks or brackets and secure them using the provided screws. Depending on the design, you may need to use a drill or screwdriver to tighten the screws. Be sure the panels are flush against the window or door to provide a tight seal. If you’re installing polycarbonate storm panels, be extra careful not to overtighten the screws, as this can cause cracking.
Check for Proper Fit and Security After securing all panels, double-check that each one is properly fitted and securely fastened. Test the stability of the panels by gently pushing on them. They should not shift or feel loose. If there are any gaps or weak spots, address them before the storm hits.
Store Your Storm Panels When Not in Use Storm panels can be heavy and cumbersome to install, so it’s essential to store them properly when they’re not in use. Most panels are designed to be easily removed and stored in a garage or shed. Be sure to label or organize them for quick access when a storm is approaching.
Maintaining Your Storm Panels
Regular maintenance is crucial to ensuring your storm panels remain effective for years to come. Inspect the panels at least once a year to check for any signs of wear and tear. Look for cracks, rust spots, or other damage that may affect the integrity of the panels. Clean the panels periodically to remove dirt, salt, and debris, which can cause corrosion if left unchecked.
Conclusion
Installing Storm Panels Vero Beach is an important investment in protecting your Vero Beach home from the unpredictable power of hurricanes and storms. With the right preparation, tools, and proper installation, storm panels can provide peace of mind knowing your windows and doors are protected from flying debris and high winds. Regular maintenance will ensure that your panels remain in top condition for many years to come. Whether you're a resident or just moving to Vero Beach, don't wait for a storm to take action—installing storm panels is a smart, proactive step to safeguard your home and loved ones.
Professional Help vs. DIY Installation
If you're not comfortable installing the storm panels yourself or lack the necessary tools, consider hiring a professional. Many contractors in Vero Beach specialize in storm protection installation and can ensure the job is done safely and efficiently. While it may cost more, professional installation can provide added peace of mind and ensure that the panels are securely attached to withstand even the most powerful storms.
By preparing your home with the proper storm protection, you'll be able to weather any storm that comes your way. Stay safe, and make sure your home is ready to face whatever nature throws at it.
0 notes
Text
Price: [price_with_discount] (as of [price_update_date] - Details) [ad_1] Flush TV Wall Mount Bracket For SAMSUNG Model UN43TU700DFXZA The Easy Mount is designed for LCD, Curved, OLED & Plasma flat-panel TVs from 37" to 102" with weights up to 165 lbs (75kg). The slidingbracket design allows horizontal adjustment for perfect screen placement(even after installation). The Easy Mount for TVs meets most of wall mounting needs in a simple and affordable design. It will safely secure your precious big screen TV to any wall. It features large rectangular shaped access holes for easy cable routing and wiring access. The Easy Mount comes with bubble level for easy installation, safety screws for anchoring TV rail to wall bracket to limit shifting and movement. This TV wall mount is the perfect accessory to free up your floor space and to compliment your big screen with a clean, sleek and professional touch. The Low-profile design allows close installation of TV to the wall. Once installed TV stays 1.4 inch away from the wall. Flush Mount Features: Heavy Duty Steel Construction Securely Holds your TV Safety Screws Holds TV Securely to Mount Ensure Your TV is Properly Mounted with the Included Bubble Level Fully Assembled Perfect for Use in Your Kitchen, Living Room, or Any Room in Your Home or Office Extra Low 1.4” Profile Design Will give Flush Appearance on Wall 3 Easy Steps to Install Max VESA 800x400 Weight Capacity 165lbs 75kgs Fits 37”– 102” TVsPackage Contains: Mount Hardware Bubble Level Instruction ManualInstall in 3 Easy Steps:1. Attach Wall Plate to Wall2. Attach Bracket to TV3. Attach TV to Wall PlateKnowledge is Power – Be confident when knowing your TV is Secure! CONFIRMED FIT: Guaranteed to Mount and fully support UN43TU700DFXZA. FASHION: The Low Profile Design will give the Silk, Modern look you Desire. PERFECT-VIEW: Seamless and Comfortable visibility from your sofa, kitchen table, or bath tub. USER-FRIENDLY: Easy to install and simple to adjust. SECURE: Made with Strong, Tough, and Sturdy Steel Material. [ad_2]
0 notes
Text

Welcome to Out of Sight Mounting, your premier destination for all your flat screen TV mounting needs! We specialize in providing affordable yet highly designed solutions for mounting flat screen TVs. Whether you prefer the sleek look of an ultra flush mount, the convenience of a drop-down bracket, or the simplicity of a flush wall mount, we have the perfect solution for you. Say goodbye to cluttered spaces and hello to seamless entertainment with our range of mounting options.
#best tv mount above fireplace#flush wall mount brackets#ultra flush mount#fireplace mantel mount#drop down brackets#tv mounting on fireplace
0 notes
Text
Professional TV Mounting Services in Alpharetta, GA
Mounting a television may seem like a straightforward task, but ensuring it is securely installed while achieving the best viewing experience requires expert precision. In Alpharetta, GA, there are professional TV mounting services that take the hassle out of the process, ensuring a sleek, safe, and perfectly positioned television for any space.
Why Choose Professional TV Mounting?
While mounting a TV on your own can be tempting, especially with DIY kits available in many stores, professional TV mounting services offer several advantages:
Safety and Security: Mounting a TV improperly can lead to disastrous consequences. A TV that is not securely fastened to the wall can easily fall, posing a danger to family members, especially small children. Expert technicians ensure the television is mounted safely, preventing accidents and ensuring the longevity of the equipment.
Proper Tools and Techniques: TV mounting experts Alpharetta GA come equipped with the right tools and equipment to complete the job efficiently. Whether it’s handling drywall, concrete, or brick surfaces, they know the best methods to use to avoid damaging walls and cables.
Optimal Viewing Angles: One of the key aspects of mounting a TV is ensuring that it’s placed at the perfect height and angle for comfortable viewing. Professional installers take into account room layout, seating arrangement, and lighting conditions to determine the best position for your TV, ensuring a perfect line of sight.
Cable Management: One of the most frustrating aspects of TV installation is dealing with messy cables. Experts not only mount the TV but also offer clean and efficient cable management solutions. This ensures that unsightly cords are hidden, giving your room a modern, clutter-free appearance.
What to Expect from TV Mounting Experts in Alpharetta
Residents of Alpharetta, GA, looking to mount their TV should expect nothing less than excellence from local experts. Here's what you can look forward to:
Consultation and Assessment: Before mounting, professionals assess your space to determine the best wall for installation, evaluate the type of wall material, and review other structural elements that could affect the process. They also help choose the best mounting style based on your TV size and the room’s layout.
Seamless Installation: Once the assessment is complete, the team proceeds with mounting. Using top-quality brackets and fixtures, they ensure the TV is securely attached and level, providing peace of mind that it won’t budge.
Integrated Setup: TV mounting services often extend beyond just installation. Many experts also connect devices such as soundbars, gaming consoles, or streaming devices, ensuring a smooth and integrated entertainment experience.
Post-Installation Support: Reputable TV mounting Milton GA companies provide aftercare services such as fine-tuning the positioning or adjusting cable management as needed. Some may even offer warranties on their services for added reassurance.
Types of TV Mounts and Installation Options
There are several types of TV mounts that professionals use depending on customer preference and the layout of the room:
Fixed Mount: This mount keeps the TV flush against the wall, offering a clean and simple look. It's ideal for rooms where the TV will stay at a fixed height and angle.
Tilting Mount: A tilting mount allows the TV to angle up or down slightly, making it useful for installations where the TV is positioned higher than eye level.
Full-Motion Mount: A full-motion mount offers the most flexibility, allowing the TV to swivel and extend from the wall. This is perfect for larger rooms where viewing from different angles is necessary.
0 notes
Text
Ceiling Fans: A Breeze of Fresh Air
As the heat of summer sets in, staying cool at home can feel like heaven.

Luckily, a ceiling fan can be your best ally, it provides a soothing breeze. It helps to beat the heat and keeps your space cool. A ceiling fan is an easy, effective way to create a breeze. It helps you stay comfortable, no matter how high the temperature rises. — it’s a soothing, natural way to keep your home comfortable and cozy.
But do you know how ceiling fans work? Let’s look at how ceiling fans blend beauty with practicality in the simplest way. This article explains how ceiling fans work all year.
What is Ceiling Fan

Components Of Ceiling Fans

Motor : At the ceiling fan’s core, the motor transforms electricity into motion. This vital component drives the blades, propelling air through the room. Its silent conversion of power to spin forms the essence of the fan’s cooling function.
Fan Blades: The fan blades are responsible for moving the air. Their shapes, sizes, and materials vary. These factors can affect airflow and the fan’s look.
Blade Arms (or Brackets) These connectors attach the blades to the motor housing. They ensure the blades are positioned for optimal airflow.
Mounting System: The mounting system attaches the ceiling fan to the ceiling. It includes a downrod for high ceilings or a flush mount for lower ones. Additionally, it has a canopy that covers the hardware.
Capacitor: The capacitor controls the fan’s speed. It boosts the motor to ensure smooth operation.
Control System: Ceiling fans can be controlled via a wall switch, remote control, or pull chain. More modern fans may have smart controls, allowing you to adjust settings using an app.
Ball Bearings: They are in the motor. They reduce friction between moving parts. This helps ensure smooth, quiet operation.
Types Of Ceiling Fans Available in Market
Ceiling fans come in various types and styles to suit different needs and preferences. Here are some common types available in the market:
Standard Ceiling Fans These are the most common and widely used. They come in various sizes and designs and typically feature a pull chain or wall switch for operation.
Low-Profile (or Hugger) Fans Designed for rooms with low ceilings, low-profile fans have a compact design that hugs close to the ceiling. They provide effective airflow without hanging too low.
High-Vaulted Ceiling Fans These fans are designed for rooms with high or sloped ceilings. They often come with a longer downrod to ensure proper airflow and balance.
Dual-Motor Ceiling Fans Featuring two separate motors, these fans allow for dual blades or a dual-blade configuration, offering customizable airflow and enhanced cooling.
Smart Ceiling Fans Equipped with technology that allows for control via smartphone apps, voice assistants (like Alexa or Google Assistant), or remote controls. They often include energy-saving features and programmable settings.
Outdoor Ceiling Fans Designed for use in outdoor spaces like patios and porches, these fans are built with weather-resistant materials to withstand moisture and outdoor conditions.
Industrial Ceiling FansThese heavy-duty fans are used in large industrial spaces, warehouses, or commercial buildings. They are designed to move large volumes of air and are built to be more durable.
Ceiling Fans with Light Kits These fans come with integrated lighting, combining a ceiling fan and light fixture in one unit. They are ideal for adding both cooling and illumination to a room.

Function and Benefits
Air Circulation: Ceiling fans circulate air in a room. This cools it in warm weather and improves heat distribution in cooler months.
Energy Efficiency: They can cut energy bills by using less air conditioning and heating. Using ceiling fans in conjunction with HVAC systems can increase overall energy efficiency.
Comfort: Fans create a breeze that can cool a room. It enhances evaporative cooling on the skin.
Choosing the Right Fan
Room Size: Select a fan size appropriate for the room’s dimensions. Larger rooms may need larger fans or multiple units.
Blade Pitch: The angle of the blades affects airflow. A greater pitch generally results in more air movement.
Style: Match the fan’s design with the room’s decor. Fans come in various styles, from sleek modern designs to traditional or ornate looks.
Features: Also, consider features like remote controls, dimmable lights, and reversible motors. They help for seasonal use.
Choose Your Perfect Fans With Vashi Integrated Solution Your Trusted Partner
Energy Efficiency and Environmental Impact
Efficiency: Ceiling fans use less energy than air conditioners. They can lower utility bills.
Sustainability: Ceiling fans reduce reliance on HVAC systems. This lowers the environmental impact of energy use.
Ceiling fans are versatile appliances that provide both practical and aesthetic benefits. Knowing their parts, types, and upkeep can help you. It can help you choose the right fan and keep it running well for years.

1 note
·
View note
Text
The Ultimate Guide to Disk Light Flush Mounts: Installation, Benefits, and Style Tips
When it comes to modern lighting solutions, disk light flush mounts are quickly becoming a favorite choice among homeowners and designers alike. Their sleek, minimalistic design and efficient lighting capabilities make them a versatile option for various spaces. In this guide, we’ll explore everything you need to know about disk light flush mounts—from installation tips to the benefits they offer and styling advice to elevate your space.
What is a Disk Light Flush Mount?

A disk light flush mount is a contemporary lighting fixture that sits snugly against the ceiling, providing a streamlined look. Typically round and flat, these lights are designed to offer a clean, unobtrusive appearance while delivering bright and even illumination. They are an excellent choice for rooms with low ceilings or where a subtle lighting option is desired.
Benefits of Disk Light Flush Mounts
Sleek and Modern Design: Disk light flush mounts offer a minimalist aesthetic that complements a variety of interior styles, from contemporary to industrial. Their low-profile design makes them less intrusive compared to traditional ceiling fixtures.
Even Lighting Distribution: These fixtures are designed to provide consistent, widespread illumination, which helps reduce shadows and highlights the beauty of your space. This makes them ideal for areas where uniform lighting is essential, such as kitchens, bathrooms, and hallways.
Space-Saving: Since disk light flush mounts are installed directly against the ceiling, they are perfect for rooms with low ceilings where hanging fixtures might feel overwhelming or obstructive.
Energy Efficiency: Many disk light flush mounts use LED technology, which is known for its energy efficiency and long lifespan. This not only reduces your energy bills but also minimizes the frequency of bulb replacements.
How to Install a Disk Light Flush Mount
Gather Your Tools: You’ll need a screwdriver, wire nuts, a voltage tester, and possibly a drill. Make sure to turn off the power at the circuit breaker before starting.
Remove the Old Fixture: If you’re replacing an existing light, carefully detach it from the ceiling and disconnect the wires.
Install the Mounting Bracket: Attach the provided mounting bracket to the electrical box in the ceiling. Ensure it is securely fastened.
Connect the Wiring: Connect the wires from the fixture to the wires in the ceiling. Typically, this involves connecting the black (or red) wires to each other, the white wires to each other, and grounding the green or bare wires.
Attach the Disk Light: Once the wiring is connected, align the disk light with the mounting bracket and secure it in place according to the manufacturer’s instructions.
Test the Fixture: Turn the power back on and test the light to ensure everything is functioning correctly.
Styling Tips for Disk Light Flush Mounts
Choose the Right Finish: Disk light flush mounts come in various finishes such as brushed nickel, matte black, and polished chrome. Select a finish that complements your room’s decor and other hardware.
Consider the Size: Ensure the size of the disk light flush mount is proportionate to the size of the room. Larger fixtures work well in spacious areas, while smaller ones are ideal for compact spaces.
Mix and Match: Disk light flush mounts can be paired with other lighting elements like wall sconces or pendant lights to create a layered lighting effect.
Highlight Architectural Features: Use disk light flush mounts to accentuate architectural elements in your room, such as built-in shelves or artwork.
Disk light flush mounts offer a stylish and practical lighting solution for any modern space. Their sleek design, even lighting distribution, and energy efficiency make them a standout choice for contemporary interiors. By following the installation tips and styling suggestions in this guide, you can enhance the ambiance of your home and enjoy the benefits of this versatile lighting option.
0 notes
Text
Installation And Maintenance Tips For Heat Pump Hot Water Cylinders

The heat pump hot water cylinder are increasingly popular due to their energy efficiency and environmentally friendly operation. They work by extracting heat from the air or ground to heat water, making them a sustainable alternative to traditional water heaters. Proper installation and maintenance are crucial to ensuring optimal performance and longevity of these systems. This guide provides essential tips for both installation and maintenance of heat pump hot water cylinders.
Installation Tips
Site Selection: Choosing the right location for your heat pump hot water cylinder is critical. The unit should be placed in an area with sufficient airflow and minimal obstructions. Ideally, it should be installed in a well-ventilated space, such as a utility room or a garage. Outdoor units should be positioned away from prevailing winds to prevent unnecessary heat loss and noise issues.
Ground or Wall Mounting: Decide whether to mount the unit on the ground or on a wall. Ground-mounted units require a solid, level surface to avoid vibration and noise issues. If wall-mounted, ensure that the wall can support the weight of the unit, and use appropriate mounting brackets.
Insulation: Proper insulation of the water cylinder and associated pipework is essential to minimize heat loss. Insulate both the cold water inlet and the hot water outlet pipes to ensure the system’s efficiency.
Electrical Connection: Ensure that the electrical connection complies with local codes and regulations. A dedicated circuit should be used to prevent overloading. It's advisable to hire a licensed electrician for this part of the installation to guarantee safety and compliance.
Plumbing Connections: Connect the heat pump to the water supply according to the manufacturer's instructions. It’s crucial to ensure that all connections are secure and leak-free. Incorporate a pressure relief valve to prevent pressure buildup and potential damage to the system.
Commissioning: After installation, the system needs to be commissioned properly. This involves checking for leaks, verifying electrical connections, and ensuring that the unit operates as intended. Follow the manufacturer’s commissioning procedure to avoid any operational issues.
Maintenance Tips
Regular Inspections: Conduct regular visual inspections of the heat pump and associated components. Check for any signs of wear, leaks, or corrosion. Early detection of issues can prevent major problems and costly repairs.
Clean the Filters: Most heat pump hot water cylinders have air filters that need to be cleaned or replaced periodically. Dirty filters can reduce efficiency and cause the system to work harder, leading to increased energy consumption and potential damage.
Check the Anode Rod: The anode rod inside the water cylinder helps prevent corrosion. Inspect the rod every year and replace it if it is heavily corroded. This simple maintenance task can significantly extend the life of your hot water cylinder.
Flush the Tank: Sediment buildup can occur in the water cylinder, reducing efficiency and potentially causing damage. Flushing the tank once a year helps remove any accumulated sediment. Turn off the power supply and drain the tank before flushing to ensure safety.
Test the Pressure Relief Valve: The pressure relief valve is a critical safety feature that prevents excessive pressure buildup. Test the valve annually to ensure it operates correctly. Lift the valve’s lever to release some water and ensure it closes properly without leaking.
Monitor System Performance: Regularly monitor the system’s performance, including the temperature and pressure readings. Unusual readings may indicate a problem that needs to be addressed. Keeping a log of performance metrics can help in diagnosing issues early.
Professional Servicing: Schedule annual professional servicing to ensure that the heat pump hot water cylinder is in optimal condition. A qualified technician can perform comprehensive checks and maintenance tasks that are beyond the scope of typical homeowner upkeep.
Software Updates: If your heat pump hot water cylinder includes a digital controller, ensure that the software is up to date. Manufacturers may release updates that improve efficiency or address known issues. Refer to the user manual for update instructions.
Conclusion
Installing and maintaining a heat pump hot water cylinder requires careful attention to detail and adherence to best practices. Proper installation ensures the system operates efficiently and reliably, while regular maintenance prolongs its lifespan and enhances performance. By following the tips outlined in this guide, you can enjoy the benefits of a heat pump hot water cylinder, including energy savings and reduced environmental impact. Investing time and effort into proper installation and maintenance will pay off in the long run, providing you with a consistent and efficient hot water supply.
Contact Us:
Hot Water Solutions
3d Tait Place, Auckland
Email: [email protected]
Call Us: 0800 HWSOLU (497658)
Google map: https://maps.app.goo.gl/weuxr8LohUEv2ooj6
Social Links:
https://www.facebook.com/Hot-Water-Solutions-100885308035357/
https://www.instagram.com/pete_hotwatersolutions/?hl=en
https://www.youtube.com/@HotWaterSolutions_NZ
0 notes
Text
Price: [price_with_discount] (as of [price_update_date] - Details) [ad_1] Flush TV Wall Mount Bracket For TCL TV Model: 50S421 The Easy Mount is designed for LCD, Curved, OLED & Plasma flat-panel TVs from 37" to 95" with weights up to 165 lbs (75kg). The slidingbracket design allows horizontal adjustment for perfect screen placement(even after installation). The Easy Mount for TVs meets most of wall mounting needs in a simple and affordable design. It will safely secure your precious big screen TV to any wall. It features large rectangular shaped access holes for easy cable routing and wiring access. The Easy Mount comes with bubble level for easy installation, safety screws for anchoring TV rail to wall bracket to limit shifting and movement. This TV wall mount is the perfect accessory to free up your floor space and to compliment your big screen with a clean, sleek and professional touch. The Low-profile design allows close installation of TV to the wall. Once installed TV stays 1.4 inch away from the wall. Flush Mount Features: Heavy Duty Steel Construction Securely Holds your TV Safety Screws Holds TV Securely to Mount Ensure Your TV is Properly Mounted with the Included Bubble Level Fully Assembled Perfect for Use in Your Kitchen, Living Room, or Any Room in Your Home or Office Extra Low 1.4” Profile Design Will give Flush Appearance on Wall 3 Easy Steps to Install Max VESA 800x400 Weight Capacity 165lbs 75kgs Fits 37”– 95” TVsPackage Contains: Mount Hardware Bubble Level Instruction ManualInstall in 3 Easy Steps:1. Attach Wall Plate to Wall2. Attach Bracket to TV3. Attach TV to Wall PlateKnowledge is Power – Be confident when knowing your TV is Secure! CONFIRMED FIT: Guaranteed to Mount and fully support TCL TV Model: 50S421. PERFECT-VIEW: Seamless and Comfortable visibility from your sofa, kitchen table, or bath tub. FASHION: The Low Profile Design will give the Silk, Modern look you Desire. USER-FRIENDLY: Easy to install and simple to adjust. SECURE: Made with Strong, Tough, and Sturdy Steel Material. [ad_2]
0 notes
Text

Mount A Flat Screen Tv ; We provide affordable and highly designed Ultra flush mount, Drop Down bracket and Flush Wall Mount Brackets for flat screen tv.
0 notes
Text
Install Over The Range Microwave Oven: A Step-by-Step Guide
Installing an over-the-range microwave oven can be a convenient and space-saving solution for your kitchen. Not only does it provide efficient cooking capabilities, but it also clears up valuable counter space. However, proper installation is crucial to ensure safety and functionality. In this guide, we'll walk you through the steps to install an over-the-range microwave oven correctly.

1. Choose the Right Location: Before you begin the installation process, determine the best location for your microwave oven. It should be positioned within reach of an electrical outlet and ideally above your stove or range. Make sure there's sufficient space between the top of the stove and the bottom of the microwave, as specified by the manufacturer.
2. Prepare the Space: Clear the area where the microwave will be installed. Remove any cabinets or shelves that may obstruct the installation. Ensure that the wall behind the microwave is sturdy and capable of supporting its weight. If necessary, reinforce the wall with a mounting plate or additional support.
3. Mounting Bracket Installation: Most over-the-range microwaves come with a mounting bracket that attaches to the wall. Follow the manufacturer's instructions to securely install the bracket. Use a level to ensure that it is straight and properly aligned.
4. Electrical Wiring: If you're replacing an existing over-the-range microwave, you may be able to use the existing electrical connection. Otherwise, you'll need to install a new outlet near the installation site. If you're not comfortable working with electrical wiring, it's best to hire a qualified electrician to handle this step.
5. Ventilation Installation: Over-the-range microwaves typically have ventilation systems that exhaust smoke, steam, and cooking odors to the outdoors. Install the ventilation duct according to the manufacturer's instructions. Make sure it's properly connected and securely fastened to the microwave and the exterior vent.
6. Mount the Microwave: With the help of a friend or family member, lift the microwave onto the mounting bracket. Make sure it's level and flush against the wall. Secure the microwave to the bracket using the provided screws or bolts.
7. Test the Microwave: Once the microwave is securely installed, plug it in and test its functionality. Make sure all the features, such as the turntable and exhaust fan, are working correctly. Test the ventilation system to ensure proper airflow.
8. Final Adjustments: After testing the microwave, make any necessary adjustments to ensure it's properly aligned and functioning as intended. Double-check that all screws and bolts are tightened securely.
By following these steps, you can successfully install an over-the-range microwave oven in your kitchen. However, if you're unsure about any aspect of the installation process, don't hesitate to seek professional assistance. Proper installation ensures not only the functionality of your microwave but also the safety of your home.
0 notes
Text
A Definitive Guide to Mastering Light Fixture Installation Methods

Introduction :
Embarking on the journey of light fixture installation can be both exciting and rewarding. This definitive guide aims to provide comprehensive insights into various light fixture installation methods, empowering you to master the art of illuminating your space with confidence. Whether you're updating existing fixtures or exploring new lighting solutions, understanding the intricacies of different installation techniques is key to achieving a polished and professional result. Join us as we delve into a step-by-step exploration of diverse methods tailored to different fixtures and locations.
Ceiling-Mounted Fixtures :
Ceiling-mounted fixtures, including flush mounts, semi-flush mounts, chandeliers, and pendant lights, offer versatility in design. The installation process involves careful planning, assembling the mounting bracket, connecting wires, and securing the fixture in place.
Recessed Lighting : Sleek and modern, recessed lighting requires thoughtful layout planning, precise hole cutting, wiring, and securing fixtures. This method offers a seamless integration into the ceiling, providing both ambient and focused illumination.
Wall Sconces : Wall sconces add a touch of elegance to walls and require meticulous planning for placement, installation of a wall box, wiring connections, and secure mounting. Understanding the interplay of light and shadow is crucial for optimal placement.
Under-Cabinet Lighting: Enhancing kitchen functionality, under-cabinet lighting involves selecting the right fixtures, planning the layout, mounting fixtures, and connecting them to a power source. This method adds both task and ambient lighting to your culinary space.
Track Lighting : Versatile and adjustable, track lighting installation encompasses attaching the track to the ceiling or wall, mounting individual fixtures, connecting wires, and securing the track. This method offers flexibility in directing light where needed.
Outdoor Lighting : Outdoor lighting is essential for curb appeal and security. Installation involves choosing weather-resistant fixtures, mounting, burying underground wiring, or using outdoor-rated extension cords. This method adds an inviting ambiance to outdoor spaces.
Ceiling Fan with Light Kit : Combining functionality, a ceiling fan with a light kit requires turning off power, assembling the fan, mounting it to the ceiling bracket, wiring both the fan and light, and thorough testing. This method provides comfort and illumination in one.
Smart Lighting Fixtures : Integrating technology, smart lighting fixtures require careful selection, connecting to a smart home hub or Wi-Fi network, and configuration through a mobile app or voice control. This method adds a layer of convenience and customization to your lighting setup.
Conclusion :
Mastering light fixture installation methods is not just about technical proficiency; it's about transforming your space with a perfect blend of aesthetics and functionality. This definitive guide has provided in-depth insights into various methods, ensuring you are well-equipped to embark on your lighting projects with confidence. Whether you are a seasoned DIY enthusiast or a novice, following these comprehensive steps will elevate your space, creating an atmosphere that reflects your style and enhances your daily life. Illuminate with confidence as you bring your vision to light through expertly mastered installation methods.
0 notes
Text

Welcome to https://outofsightmounting.com/, where innovation meets elegance in home entertainment solutions. Our pioneering technology ensures that your large flat-screen TV sits seamlessly flush against your wall, chimney, or bookcase, creating a sleek and modern aesthetic. Say goodbye to unsightly wires and bulky brackets with our fully concealed design, allowing your custom cabinetry or fireplace design to take center stage. With Out of Sight Mounting, you can enjoy the ultimate viewing experience with the ability to lower your TV to a comfortable height, ensuring optimal enjoyment for every movie night or gaming session.
#best tv mount above fireplace#flush wall mount brackets#ultra flush mount#fireplace mantel mount#drop down brackets#tv mounting on fireplace
0 notes