#exportaduserspowershell
Explore tagged Tumblr posts
Text
How exporting User Lists from AD Server with PowerShell Magic

Introduction
This guide helps system administrators handle user data in an Active Directory (AD) Server. It explains how to use PowerShell to export user lists from the AD Server in a simple step-by-step process. With PowerShell cmdlets, administrators can easily get, filter, and export user information without using additional software.
Pre-requisites
Before embarking on the user list export journey, ensure you have the necessary permissions to access the Active Directory and execute PowerShell commands. Additionally, confirm that PowerShell is installed on your system.
How to Install PowerShell on a Windows Server
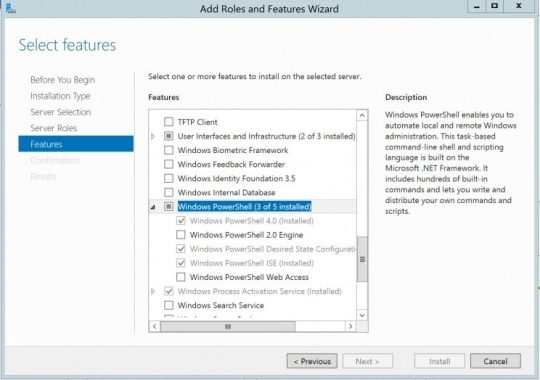
If you don't have PowerShell installed in your system just follow the below steps and install Powershell features.

- Open the "Server Manager" on your Windows Server. - In the Server Manager dashboard, locate and click "Add roles and features." - In the "Add Roles and Features" Wizard, click "Next" until you reach the "Select features" page. - Scroll down and find "Windows PowerShell" under the "Features" section. - Check the box next to "Windows PowerShell" to select it. - Continue clicking "Next" until you reach the "Install" button. - Click "Install" to start the installation process. - Once the installation is complete, you'll see a confirmation message. - You can now access PowerShell by searching for it in the Start menu or launching it from the taskbar.
Step to export user list and understand the command line
Now we are going to know how to export the AD user list from the domain server and understand the command line of Powershell Understanding Command Line The key to unlocking your user list lies in two powerful PowerShell cmdlets: Get-ADUser: This retrieves user objects from AD, allowing you to select specific users or filter based on criteria. Export-Csv: Transforms the user data into a tidy CSV file, accessible by spreadsheets and analysis tools. Let's assemble your command lineup: Basic Export: Get-ADUser | Export-Csv -Path "C:usersyouadusers.csv" This simple code grabs all users and dumps them into a CSV file named "adusers.csv" on your user directory. However, for targeted operations, we have some handy tricks up our sleeve: Filtering by Specific Users: Get-ADUser-Identity "JohnDoe", "JaneDoe" | Export-Csv -Path "C:usersyoufiltered_users.csv" This command pulls only JohnDoe and JaneDoe, sending them to "filtered_users.csv." Filtering by Criteria: Get-ADUser -Filter * -SearchBase "OU=Marketing,DC=contoso,DC=com" -Properties Name,EmailAddress | Export-Csv -Path "C:usersyoumarketing_users.csv" This code grabs all users from the Marketing OU, retrieves their names and email addresses, and exports them to "marketing_users.csv." Bonus Tip: Customize your exported data by specifying desired properties after Get-ADUser. For example, -Properties Name,LastLogin,City select those specific attributes. Step-by-Step Guide: A Journey through PowerShell Prompts Open PowerShell: Launch the PowerShell application as an administrator from the Start menu. Craft your Export Command: Choose the appropriate combination of Get-ADUser and Export-Csv based on your desired user set and data. Execute the Command: Press Enter and watch PowerShell work its magic, retrieving and formatting your user data. Locate your CSV File: The specified path in your command will guide you to the freshly minted CSV file, ready for further analysis.
Conclusion
In conclusion, using PowerShell to export user lists from an AD Server is a powerful and efficient method for system administrators. This guide provides the necessary skills to retrieve user information easily, simplifying administrative tasks without the need for third-party software. Read the full article
#exportactivedirectoryuserstoexcel#exportadusersandgroupmembershiptocsv#Exportaduserslist#exportaduserspowershell#exportaduserstoanotherdomain#exportaduserstocsvpowershell#exportaduserstocsvwithallattributes#exportaduserstocsvwithallattributespowershell#exportaduserstoexcel#exportaduserswithallattributesexportaduserstocsv#exportaduserswithattributestocsv#exportaduserswithgroupmembership#exportalladuserstocsv#howtoexportuserlistfromactivedirectorypowershell
0 notes