#edited on lightroom
Explore tagged Tumblr posts
Visit Tumblr Blog
Explore Tumblr blogs with no restrictions, modern design and the best experience.
Last Seen Tumblr Blogs


Fun Fact
25% of US internet users with an annual income of $80-100K use Tumblr.
Text

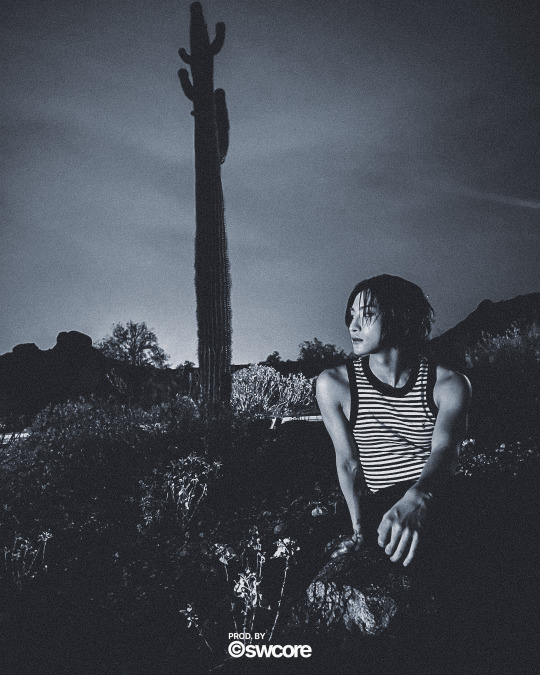
#ellie williams#skin: santa barbara#the last of us#tlou#tlou part 2#ellie the last of us#ellie tlou#the last of us part 2#tlou ellie#ellie williams the last of us#photomode#ps5#photo editing#photoshop#lightroom#the last of us 2#ellie williams x reader#ellie x reader#ellie x fem reader#ellie williams x female reader#ellie williams smut#lesbian#virtual photography#tlou 2#tlou part two#the last of us part two#ellie williams tlou#the last of us photomode#tlou photomode#lockscreens
1K notes
·
View notes
Text


#bosnia#edit#fotografia#my edit#my photos#photo#photoblog#photographers on tumblr#photography#photooftheday#brcko#photo edit#editorial#adobe lightroom#nature photos#trees and forests#black and white#monochrome#balkan#dark clouds#dark grunge#grunge#eastern europe#winter#dark aesthetic#aesthetic#photograph#photoshop#vuyrvlyer#mine
836 notes
·
View notes
Text


MANNY JACINTO for Square Mile Magazine (2024)
#manny jacinto#mannyjacintoedit#mjacintoedit#flawlessgentlemen#tgpgifs#tgpcastedit#swcastedit#starwarscastedit#theacolyteedit#swedit#starwarsedit#mandapine#userairam#userjen#usernik#*#of course the only weekend i don’t take my laptop with me a photoshoot drops lmao. typical clown shit#i had to borrow my friend’s computer to DL those pics and edit them on my phone on lightroom 😭
1K notes
·
View notes
Text


caleb: “the hat stays on, okay? okay.”
#l&ds caleb#love and deepspace#caleb edit#lnds caleb#caleb lads#love and deepspace caleb#caleb love and deepspace#glint photobooth#lads caleb#caleb#lightroom#love and deepspace glint
278 notes
·
View notes
Text


une Jules à Paris, #1
#paris#photography#lightroom#urban photography#spring#beauty#nikonphotography#nikon#nikon d3100#edit#unejules#noia#compagnia#architecture#notre dame#france#french#sunlight#nature#retro
92 notes
·
View notes
Text

The little Dawn Fox is so cute with a bow ٩(๑˃̵ᴗ˂̵๑)۶
#infinity nikki#nikkiverse#infinikki#nikki#nikki games#nikki series#dress up game#cute#cozy#infinity nikki photography#infinity nikki pictures#infinity nikki screenshots#lightroom edit#infinity nikki dawn fox#dawn fox with a bow
73 notes
·
View notes
Text


aespa Hot Mess, 2024
#aespa#aespainc#femaleidolsedit#femaleidol#femadolsedit#kgoddesses#ggnet#99#09#edits#*e#*#okay my first try at editing through the ios editor... might have to try lightroom next#also love these teasers! remind me of gg-forever 1 or rv-queendom#that kind of plasticky vibe#aespaedit
314 notes
·
View notes
Text


240908 _starhwa_
#seonghwa#ateez#atzsource#seonghwanet#cheytermelon#blueberryshay#tuseral#forbelleseyes#lunanuggets#jonghomies#rinblr#userbexrex#usertheos#lavandulacosmos#userlinnea#usertsu#hwa🌷#ann.gfx#dont expect fancy wizardry its just a quick lightroom edit while im lying down on ny bed wanting a nap
213 notes
·
View notes
Text

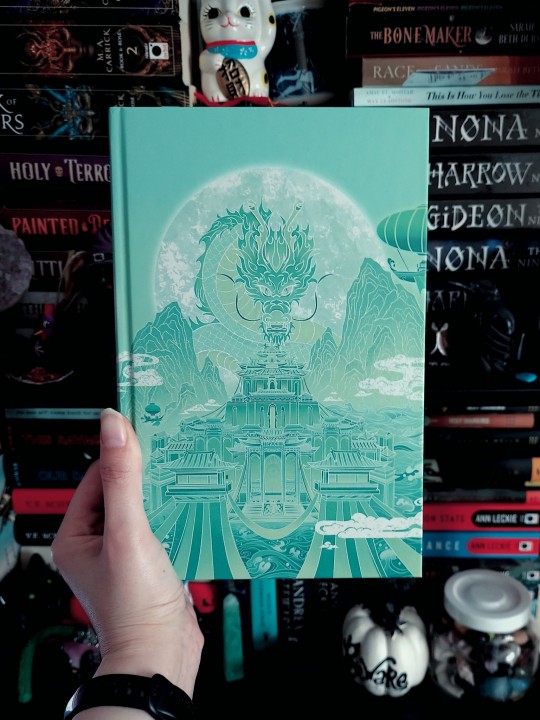
CURRENTLY READING JUNE 2025
Of Jade and Dragons by Amber Chen
Did I forget I was doing this photo series? Maybe. But In my defense I didn't read a lot of my own books last month. So here we are again! An Illumicrate edition this time! I've started it already and it's fun so far! So I have good hopes it'll be better than my last read :)
#bookbird babbles#snapshots#of jade and dragons#amber chen#books#booklr#book photos#book photo#book photography#25 in 2025#idk how im gonna edit my photos now#every editor is full of ai slop#lightroom might be the less of the evils idk#ANYWAY. this is cute so far#basic but cute#which is gr8 because phoenix keeper sucked and id like IC to be somewhat worth it 💀#thoigh i havent gotten many boxes this year#ive skipped a lot :(#i also find it slightly annoying theyre throwing romance into the mix when they have a romance specific box lol
36 notes
·
View notes
Text


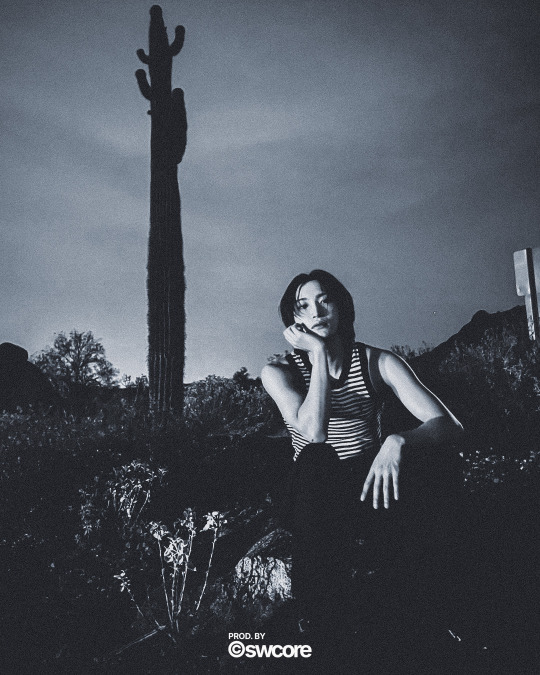
#ellie williams#skin: santa barbara#the last of us#tlou#tlou part 2#ellie the last of us#ellie tlou#the last of us part 2#tlou ellie#ellie williams the last of us#photomode#ps5 photomode#game photography#lesbian#virtual photography#ps5#tlou 2#ellie williams tlou#ellie williams x female reader#ellie x reader#ellie x fem reader#ellie williams x reader#ellie williams smut#ellie smut#the last of us ellie#lightroom#tlou photomode#the last of us photomode#photo edit#the last of us 2
607 notes
·
View notes
Text

train bridge to croatia
#bosnia#fotografia#my photos#photo#photographers on tumblr#photography#photooftheday#my edit#vuyrvlyer#balkan#bosnia and herzegovina#bridge#train#train bridge#croatia#south slavic#slavic winter#winter#eastern europe#slavic#adobe lightroom#viral#trending#photo of the day#snow#dark aesthetic#aesthetic#edgy aesthetic#dark clouds#dark picture
133 notes
·
View notes
Text

Girlypop Miku acquired! 🥹🩷
#I got Fortnite crew last month because I knew Miku was coming!#Also I just edited my locker in Lightroom it’s not really purple sadly lol 😭🩷#hatsune miku#miku#fortnite#fortnite miku#chelly plays games#Chelly rambles#not pink
137 notes
·
View notes
Text


this lighting is my fav now
#love and deepspace#glint photobooth#lads photobooth#lads#sylus#sylus love and deepspace#sylus l&ds#sylus lnds#sylus edit#lightroom
284 notes
·
View notes
Text
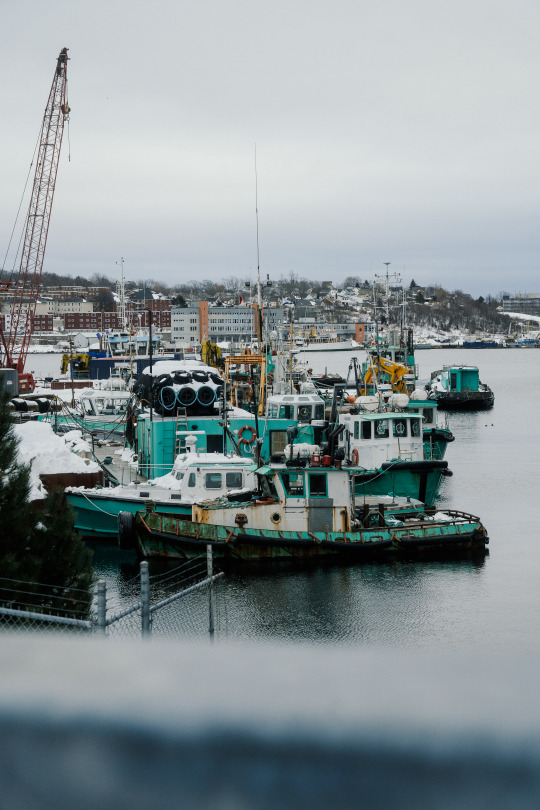
Dartmouth, Nova Scotia | 2024
#photography#travel#travel photography#original photographers#photographers on tumblr#photographer#cameras#film photography#Film#film emulation#Lightroom#lightroom presets#lightroom edits#Nova Scotia#Canada#Dartmouth#Halifax#Dock#Ocean#Sea#street photography
67 notes
·
View notes
Text
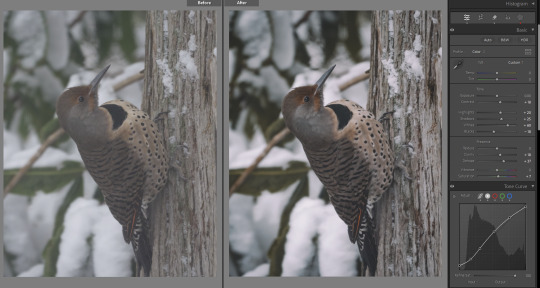
quick & easy lightroom walkthrough or: shooting through dirty double-paned glass, and other hardships.
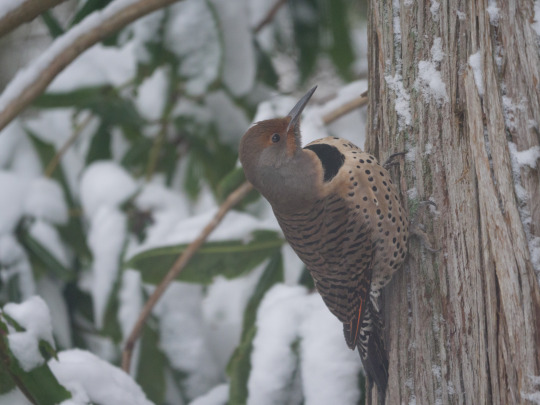

I'll tell you! (Original post here.)
✱ KIT Panasonic GH5 + LEICA DG 100-400 with rubber hood for shooting through windows.* ✱ SHUTTER 1/125 sec ✱ APERTURE f/6.3 ✱ ISO 1600
*I use this one. It works for me, but it's a little tricky. It was a gift, and I think if choosing for myself I'd find something easier to get on and off.
WHAT'S ALL THIS, THEN? It was cold outside, obviously. And the flickers bolt if I try to open the back door, so sometimes I'll post up in front of my dining room window and just get the best shot I can. I do this less and less these days, now that my arthritic hands and I have heated gloves. The 'after' photo is a brand new re-edit using better tools than were available when this was shot. I was never happy with how it looked, before now.
under the cut: EDITS
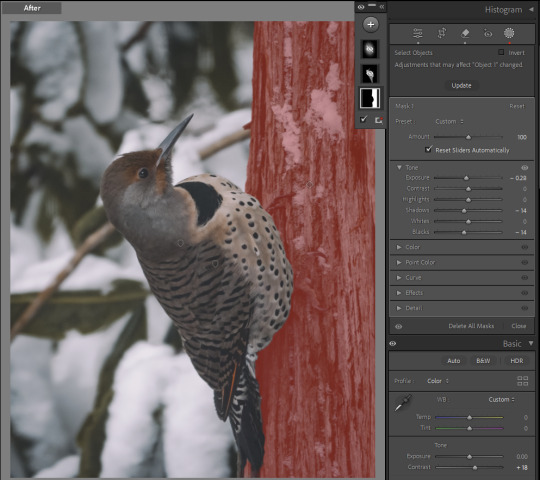
✱ Detail: Sharpness & Noise Reduction My main problem here is sharpness. The photo is in focus, but because I'm shooting through a thick storm window, I've lost that tack-sharpness I really want, and I have a whole bunch of noise to contend with. This would always be the case, but worse depending on the camera you're using, and in my case this was two generations ago - the GH5. I have tested window shots with the GH7, and they're a lot cleaner.
That being said, the trick is to always, always, always use masking along with sharpening. Like, a lot of masking, just so much masking, so that you avoid sharpening an already-noisy background. In Lightroom, you can hold down down the ALT key while using the masking slider to visualize exactly what is being sharpened.
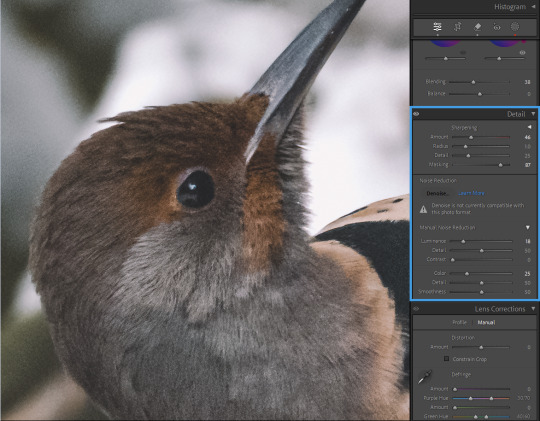
I'm choosing to leave the background noisier than I prefer, because even if I mask out the background, as I increase noise reduction, I lose detail in the edges. Leaving some noise in the feathers also preserves that sense of sharpness, generally.
This is a matter of personal preference and priority in your edits. I've had students absolutely hammer their photos with denoise and like it that way, and that is totally their call. I like it sharp.
Note: you could also do the sharpening/noise reduction at the end, after all your other edits, so that you have a better sense of how much you still need after toning. That's often my preference. I probably went backwards here only because I've edited this image before and had it pre-loaded in my brain.
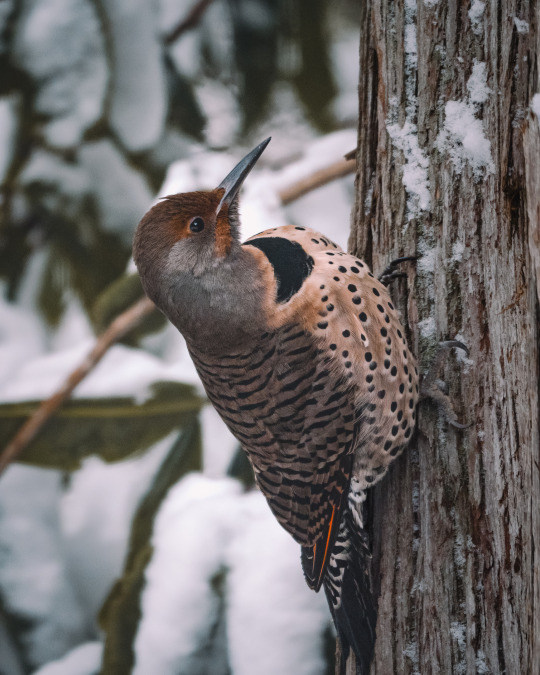
✱ Tone Dehaze is the real MVP here. You could go even harder than I have on -blacks/+clarity/+dehaze, for a dramatic, crushed look. I decided to strike a balance between the soft darks I prefer but the clarity absolutely needed to make this look less smooshy. And my curve is pretty gentle.
Before toning and after:
(You can see that I've also done some color grading. But because that part is entirely personal preference, I'm skipping it here.)
✱ Selective Adjustments With a photo as flattened as this one, I always want to add some depth to it with masking. I have just three masks in this case:
1. The tree was blown out, detracting from my subject and looking, frankly, unrealistic. So I've darkened this on its own, so that my subject will stand out.
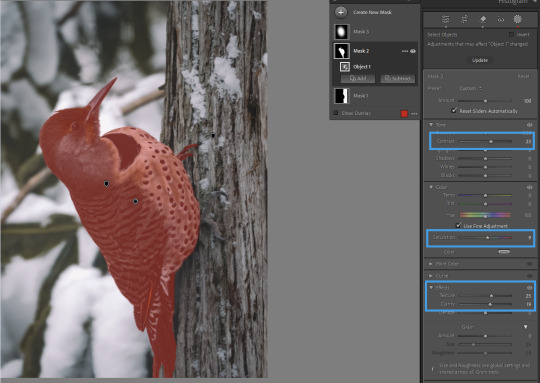
2. Contrast, texture, and clarity to bring out the detail in the feathers; a touch of saturation because the global color grading I wanted took away slightly from the bird's natural coloring. I want this on a mask, and not globally, because I do not want to exacerbate the noise in the background, or the texture of the leaves and snow.
And 3., to make the flicker really pop, I've got a 'spotlight' mask
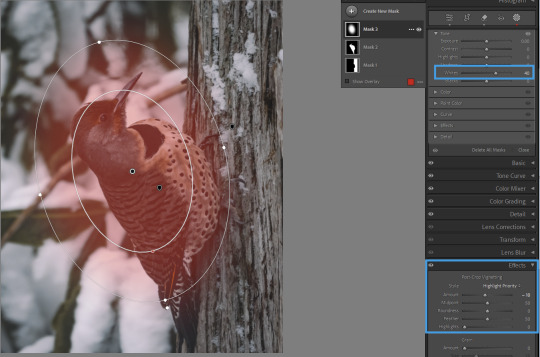
...which is working together with a light vignette to draw the eye to the subject. You could also create an asymmetrical vignette with an inverted -exposure mask, if you needed to.
All together now...
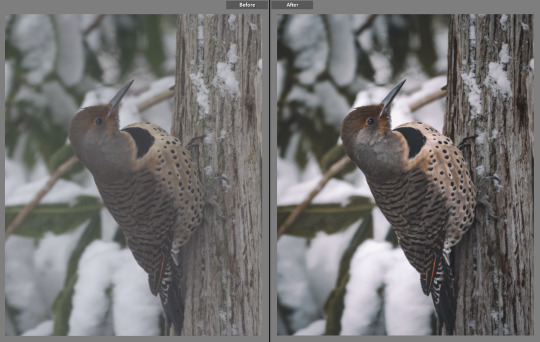
And that's it!
As always, please feel absolutely free to send any questions to my ask box. I try to watch for comments and questions in the tags, but sometimes they get missed. And if there are any other edits you'd like to see, let me know!
Find my other walkthrough here.
#on photography#photography#pnwander edits#lightroom classic#editing tips#photography tips#pacific northwest#pnw#nature photography#wildlife photography#photographers on tumblr#lensblr#how to#lightroom#original photographers#naturecore#photoshop#mine: photos
50 notes
·
View notes
Text

Raw photo.

2. Darken background w/ masking (focusing on blacks and darks, leave highlights alone because it will get rid of the delightful little bokeh on the water surface. Also popped the saturation & warmed up white balance)

3. Run De-noise (not necessary per-se, but pulls some details back into some of the feathers and I'm a recovering pixel peeper.)

4. Final touches: open in photoshop and dodge/burn the particles in the water, and around the backlit feathers to pull a little more contrast/saturation. Also took a little saturation out of the lightest feathers of the ducklings bc they pulled too orange for me, and knocked the white balance a little more green - the whole image was feeling a little too pink for me.


Full-size before and afters.
This is pretty much the exact process I follow with backlit images. I try to keep most of my edits "true to life" - but there is a lot of subjectivity in that statement lol.
Image Deets:
Nikon z7ii x. 180-600.
600mm
F 6.3
1/800 (handheld/propped up on a tree root)
ISO 2000

The usual set up. I often lose the tripod bc it doesn't get low enough for me most of the time. So I end up balancing my camera on my feet, or a root, or something.
#behind the image#behind the scenes#lightroom tutorial#how to lightroom#making of an image#photography tutorials#how its made#photography nerd shit#wildlife photography#postprocessing#photo editing#my photos#image editing#adobe photoshop#lightroom#nature#birding#nikon#bird watching#birds#ornithology#oc#bird#bird photography#animal#animals#wild#wildlife#wild animals#wild birds
27 notes
·
View notes