#driveway resin kit
Text
What Safety Precautions Should DIYers Take When Working with Resin and Aggregates for a Driveway?
When undertaking a DIY project involving resin and aggregates for a driveway, it's important to prioritize safety to protect yourself and others involved. Working with resin and aggregates requires careful handling and adherence to safety guidelines. In this article, we will discuss essential safety precautions that DIYers should take when working with resin and aggregates for a driveway project. By following these precautions, you can ensure a safe and successful project.
Personal Protective Equipment (PPE)
Wearing appropriate personal protective equipment is crucial when working with resin and aggregates. Make sure to wear the following:
Safety goggles or glasses: Protect your eyes from splashes, dust, and debris.
Respirator mask: Prevent inhalation of harmful fumes or dust particles.
Gloves: Protect your hands from chemicals and rough materials.
Protective clothing: Wear long sleeves, long pants, and closed-toe shoes to protect your skin.
Ventilation
Working with resin and aggregates often involves the use of chemicals that emit fumes. Ensure proper ventilation in your work area to prevent the buildup of potentially harmful vapors. Open windows or doors, use fans, or work in an outdoor area to allow fresh air circulation.
Read and Follow Instructions
Before starting your project, carefully read and understand the instructions provided by the manufacturers of the resin and aggregates. Follow their guidelines regarding application techniques, mixing ratios, curing times, and any specific safety precautions mentioned.
Mixing Resin Safely
When mixing resin and aggregates, follow these safety tips:
Work in a well-ventilated area.
Wear appropriate PPE, including gloves and a respirator mask.
Follow the recommended mixing ratios specified by the manufacturer.
Mix resin and aggregates thoroughly, ensuring a consistent blend.
Use appropriate mixing tools, such as a paddle mixer, to ensure proper dispersion.
Safe Handling and Storage of Materials
Proper handling and storage of resin and aggregates are essential for safety:
Store resin and aggregates in a cool, dry place, away from direct sunlight and heat sources.
Keep them out of the reach of children and pets.
Follow any specific storage instructions provided by the manufacturer.
Dispose of any unused or expired materials responsibly, following local regulations.
Read more: Create a Welcoming Entrance: Revitalize Your Norwich Property with a Gravel Driveway
First Aid Preparedness
Accidents can happen, even when taking precautions. Be prepared by having a well-stocked first aid kit readily available in your workspace. Familiarize yourself with basic first aid procedures and know how to handle common incidents, such as cuts, burns, or chemical exposure. In case of a serious injury, seek medical assistance immediately.
Clean-Up and Disposal
After completing your project, properly clean up your work area and dispose of any waste materials according to local regulations. Use appropriate containers for disposal, and avoid pouring chemicals down drains or onto the ground.
Seek Professional Assistance if Needed
If you are unsure about any aspect of working with resin and aggregates or if your project involves complex techniques, it's advisable to seek professional assistance. Consulting with experts in the field can ensure the safety and success of your project.
Conclusion
When working with resin and aggregates for a driveway project, prioritizing safety is paramount. By following the essential safety precautions outlined above, DIYers can minimize risks and ensure a safe working environment. Remember to wear appropriate personal protective equipment, maintain proper ventilation, follow instructions, handle and store materials safely, and be prepared with first aid resources. By taking these precautions, you can confidently complete your project while keeping safety at the forefront.
0 notes
Text
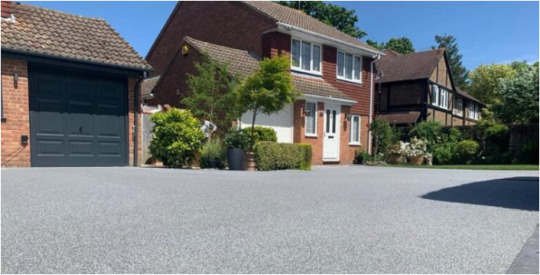
Transform Your Property with Resin Driveways
Making external improvements to your home can greatly improve both its look and use. One of the most popular options is a resin driveway. This modern paving solution offers numerous benefits that make it a great choice for both residential and commercial applications.
What is a Resin Driveway?
A surface created by combining aggregate stones with resin is called a Resin Driveway. This blend is applied to a prepared base to create a smooth, durable surface. The result is a visually appealing driveway that performs exceptionally well in various conditions.
Benefits of Resin Driveways
Durability and Low Maintenance: Resin driveways are well known for their durability. They can handle heavy traffic and harsh weather without showing significant wear and tear. Additionally, they require minimal maintenance—typically just a sweep or an occasional pressure wash is needed to keep them looking their best.
Eco-Friendly: Resin driveways are environmentally friendly. They are designed to be permeable, allowing water to drain through the surface and reducing the risk of flooding. Some resin driveways also use recycled materials, contributing to a more sustainable environment.
Aesthetic Appeal: Available in a range of colors and aggregate sizes, resin driveways can be customized to match any property. Whether you’re looking for a sleek, modern look or something more traditional, there’s a resin option to suit your needs.
Permeability: The permeability of resin driveways is a significant advantage. The surface allows water to drain through, which helps prevent puddles and reduces surface water runoff. This feature is especially helpful in places where there is a lot of rainfall.
Installation Process and Costs
The installation of a Resin Driveway typically involves:
Preparation: The existing base, whether concrete or tarmac, needs to be clean, dry, and level.
Mixing: The aggregate and resin are mixed on-site to ensure a uniform coating.
Application: The mixture is then spread over the base and finished with trowels for a smooth surface.
Costs can vary based on several factors, including the size of the area, type of resin, and any additional work required such as excavation or edging. Generally, installing a resin driveway on an existing solid surface can cost between £50-£80 per square meter, while full excavation may range from £120-£150 per square meter.
Maintenance and Longevity
Resin driveways are designed to last, often exceeding 25 years with proper care. They are low maintenance, requiring just occasional cleaning with a pressure washer or stiff broom. For those who prefer a DIY approach, smaller projects can be managed with DIY resin kits, but larger areas are best handled by professionals to ensure a smooth and durable finish.

Why Choose Resin Driveways?
A driveway made of resin provides all three qualities: beauty, toughness, and usability. It not only enhances the appearance of your property but also provides a practical, low-maintenance solution. With its eco-friendly design and aesthetic versatility, a Resin Driveway is a smart investment for any property.
For more information or to get a quote, consider contacting a professional service that specializes in resin driveways. They can help you understand the options available and guide you through the process of transforming your property with this excellent paving solution.
#Resin Driveway#Best Resin Driveway#Resin Bound Driveway#Resin Bound Patio#Resin Bound Paving#Permeable resin driveway#Resin Driveway London#Best Resin Driveway London
0 notes
Text
Step-by-Step Guide to Resin Driveway Installation
A resin driveway offers a stylish and durable alternative to traditional paving options, transforming your home's curb appeal and enhancing its functionality. While hiring professional installers is often the recommended route, understanding the installation process can provide valuable insights and empower you to make informed decisions. This comprehensive guide provides a step-by-step breakdown of resin driveway installation, from initial preparation to final finishing touches.

1. Planning and Preparation: Laying the Foundation for Success
Design and Measurement: Before embarking on the installation, carefully plan the design of your driveway. Consider the size, shape, and overall aesthetic you desire. Measure the area accurately to determine the required materials.
Site Preparation: A well-prepared base is crucial for a durable and long-lasting driveway. This involves removing existing surfaces, excavating the area to the desired depth, and ensuring proper drainage.
Sub-Base Installation: A sub-base layer, typically composed of compacted aggregate materials, provides stability and drainage. The sub-base should be compacted to achieve the desired density and prevent settling.
Edging Installation: Install edging materials, such as concrete or plastic edging, to define the perimeter of the driveway and prevent the resin from spreading beyond the designated area.
2. Resin and Aggregate Preparation: Choosing the Right Materials
Resin Selection: Choose a high-quality resin specifically designed for driveway applications. Consider factors such as durability, UV resistance, and color stability.
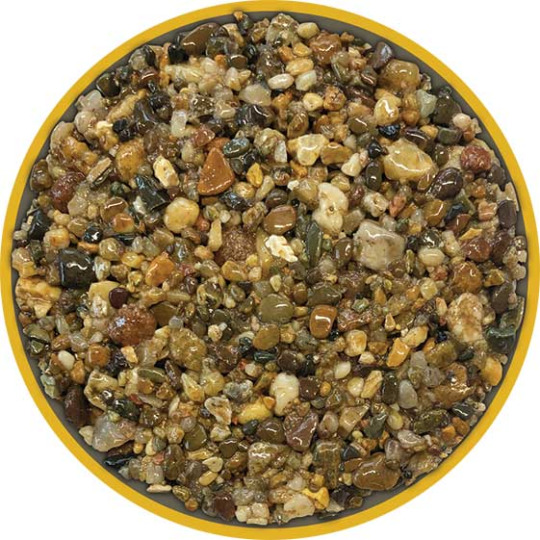
Aggregate Selection: Select aggregate stones that complement your desired aesthetic and provide the desired texture and grip. Consider factors like size, color, and durability.
Material Mixing: Follow the manufacturer's instructions carefully when mixing the resin and aggregate. Ensure a consistent mixture for a uniform and durable surface.
3. Resin Application: Creating a Seamless and Smooth Surface
Base Preparation: Prepare the sub-base by applying a primer or bonding agent to improve adhesion between the resin and the base.
Resin Layering: Apply the resin mixture in layers, spreading it evenly across the prepared base. Use a trowel or squeegee to ensure a smooth and consistent surface.
Aggregate Embedding: Immediately after applying the resin, embed the aggregate stones into the resin mixture. Use a rake or broom to distribute the stones evenly and ensure they are fully embedded.
4. Curing and Finishing: Ensuring Durability and Aesthetics
Curing Time: Allow the resin to cure completely according to the manufacturer's instructions. This typically takes several days and involves avoiding traffic and heavy rainfall.
Surface Finishing: Once the resin has cured, use a broom or brush to remove any loose aggregate stones. You can also use a pressure washer to clean the surface and remove any debris.
Sealing (Optional): Applying a sealant can enhance the durability and water resistance of the resin driveway. Follow the sealant manufacturer's instructions carefully.
5. Maintenance and Care: Keeping Your Resin Driveway Looking Its Best
Regular Cleaning: Sweep or hose down the driveway regularly to remove debris and prevent dirt buildup.
Weed Control: Use a weed killer specifically designed for resin surfaces to prevent weed growth.
Repairing Minor Damages: Small cracks or chips can be repaired using a resin patching kit. Follow the manufacturer's instructions carefully.
Tips for a Successful Resin Driveway Installation:
Consider the Weather: Avoid installing a resin driveway during extreme temperatures, heavy rainfall, or high humidity.
Use Protective Gear: Wear appropriate safety gear, including gloves, eye protection, and respiratory protection, when working with resin and aggregate.
Follow Manufacturer's Instructions: Always adhere to the manufacturer's instructions for resin and aggregate mixing, application, and curing.
Seek Professional Advice: Consult with a resin driveway expert for any questions or concerns you may have during the installation process.
Conclusion:
Installing a resin driveway is a rewarding project that can enhance your home's curb appeal and functionality. By following this step-by-step guide, you can gain a comprehensive understanding of the process, from preparation to completion. Remember, while DIY installation is possible, hiring professional installers is often the best approach to ensure a durable, aesthetically pleasing, and long-lasting driveway. With careful planning, meticulous execution, and proper maintenance, your resin driveway will provide years of enjoyment and enhance the value of your property.
0 notes
Text
Title: Renewing Your Driveway: A Comprehensive Resurfacing Guide
Introduction:
Your driveway serves as both an essential pathway and a significant aesthetic element of your home. However, weathering and wear can detract from its appeal over time. Thankfully, driveway resurfacing offers a comprehensive solution to refresh its appearance and structural integrity. In this guide, we'll explore the essentials of driveway resurfacing, including its advantages, the optimal timing for the process, various resurfacing options, the procedural steps involved, cost considerations, and the decision-making process between DIY and professional services.
Why Resurface Your Driveway?
Aesthetic Enhancement: Freshly resurfaced, your driveway instantly boosts your property's curb appeal, leaving a memorable impression on visitors and enhancing its overall attractiveness.
Value Addition: Beyond aesthetics, investing in driveway resurfacing elevates the market value of your home, providing a tangible return on investment.
Safety Improvement: By addressing cracks and uneven surfaces, resurfacing ensures a safer environment for vehicles and pedestrians, reducing the risk of accidents.
Preventive Maintenance: Timely resurfacing prevents minor issues from escalating into major structural problems, saving you from costly repairs in the future.
When to Resurface Your Driveway:
Visible Deterioration: If your driveway shows noticeable cracks, potholes, or general wear, resurfacing becomes essential to restore its integrity and appearance.
Fading and Discoloration: Sun exposure and weathering can cause your driveway to lose its original color or appear faded, indicating the need for resurfacing to rejuvenate its visual appeal.
Drainage Issues: Poor drainage can lead to water accumulation and erosion, hastening deterioration. Resurfacing can address these concerns and enhance longevity.
Age-Related Wear: As driveways age, they naturally deteriorate. Signs such as surface damage or crumbling edges signal the need for resurfacing to prolong their lifespan.
Types of Driveway Resurfacing:
Asphalt Overlay: Adding a new layer of asphalt provides a smooth, durable finish, ideal for driveways with minor imperfections.
Concrete Resurfacing: Using a polymer-modified overlay, concrete resurfacing offers a long-lasting solution to revive stained or discolored driveways.
Resin-Bound Surfacing: Mixing aggregates with a clear resin binder creates a decorative, permeable surface suitable for environmentally conscious homeowners.
Gravel Resurfacing: Applying a fresh layer of gravel adds a rustic charm while improving traction and drainage.
The Resurfacing Process:
Preparation: Thorough cleaning and repairing of existing damage are crucial before resurfacing begins.
Priming: Applying a primer ensures proper adhesion of the new resurfacing material.
Application: The selected material is applied evenly using specialized equipment.
Finishing Touches: Sealing or line striping may complete the process, enhancing durability and aesthetics.
Cost Considerations:
The cost varies based on factors such as driveway size, chosen method, and additional repairs. On average, expect to invest between $3 to $10 per square foot for asphalt or concrete resurfacing, while resin-bound surfacing may range from $40 to $100 per square foot.
DIY vs. Professional Resurfacing:
While DIY kits are available, professional services ensure quality results and save time and effort. Professionals possess the expertise and necessary equipment for a durable finish.
Conclusion:
Driveway resurfacing is a valuable investment that enhances your home's aesthetics, safety, and value. Whether you opt for asphalt overlay, concrete resurfacing, or another method, renewing your driveway breathes new life into your property. Don't delay—take the initiative to restore your driveway today and enjoy the benefits of a rejuvenated and inviting entrance to your home.
0 notes
Text
Discover the Magic of Resin Bonded Kits: Transform Your Outdoor Spaces with Ease!
Unleash the power of your outdoor spaces with a touch of magic! If you want to transform your drab and dull driveway, patio, or walkway into something remarkable, look no further than resin-bonded kits. These incredible kits are easy to install and offer a wide range of benefits that will leave you wondering why you didn’t discover them sooner. So, let’s dive in and explore the enchanting world of resin-bonded surfaces together!
Resin Bonded Kits
What is Resin Bonded?
What exactly is resin bonded? It’s a fantastic solution for rejuvenating outdoor surfaces and adding a touch of elegance to your home. Resin bonded, or resin bound or scatter coat, involves applying a layer of clear wax on top of an existing surface, such as concrete or asphalt.
The magic lies in combining high-quality natural aggregates mixed with clear polyurethane resin. This creates a stunning finish that enhances the appearance and provides durability and strength. The result is a seamless, slip-resistant surface that withstands heavy foot traffic and vehicular use.
One of the great things about resin-bonded kits is their versatility. They can be used on driveways, patios, pathways, pool surrounds, and commercial properties like hotels or shopping centers. With an extensive range of colors available, you can choose a shade that perfectly complements your property’s aesthetic.
Another advantage is its low-maintenance nature. Once installed, resin-bonded surfaces require minimal upkeep compared to traditional paving methods. A simple sweep or pressure wash now and then will keep your outdoor spaces looking pristine year-round.
In addition to its visual appeal and ease of maintenance, resin-bonded surfaces are porous, which allows water to drain through quickly. This helps prevent pooling or flooding during heavy rainfall while reducing the risk of ice formation during winter months.
So whether you’re looking to revamp your tired old driveway or create an eye-catching patio space for entertaining guests, consider embracing the magic of resin-bonded kits!
The many benefits of Resin Bonded
Resin Bonded kits offer many benefits that can truly transform your outdoor spaces. Whether you have a driveway, patio, or walkway that needs an upgrade, resin-bonded surfaces are the perfect solution.
One of the most significant advantages of resin bonded is its durability. Resin-bonded surfaces are solid and resistant to cracking and damage. This means they can withstand heavy foot traffic, vehicle weight, and even harsh weather conditions without deteriorating.
Additionally, resin-bonded surfaces need to be higher maintenance. Unlike traditional paving materials such as concrete or asphalt, which require regular sealing and repairs, resin bonded only requires occasional cleaning to keep it pristine.
Another benefit of using resin-bonded kits is their versatility in design options. With a wide range of colors and aggregates available, you can create a unique look for your outdoor space that perfectly complements your home’s aesthetic.
Furthermore, installation is quick and easy with resin-bonded kits. The process involves applying a layer of specially formulated adhesive onto the existing surface before spreading the chosen aggregate on top. Once dried and set, you’re left with a stunning finished product lasting years.
In conclusion, consider using resin-bonded kits if you’re looking for an affordable yet high-quality way to enhance your outdoor areas. Their durability, low maintenance requirements, and design flexibility make them ideal for homeowners who want both functionality and beauty in their outdoor spaces!
How to install resin-bonded
Installing resin-bonded kits is a straightforward process that can transform your outdoor spaces quickly. Here’s a step-by-step guide on how to install resin bonded:
1. Prepare the surface: The first step is to ensure that the surface you’ll apply the resin-bonded kit is clean, dry, and free of debris or loose materials. Sweep or power wash the area to remove dirt and grime.
2. Repair any damages: If there are cracks, holes, or uneven areas on the surface, it’s essential to address them before applying the resin-bonded kit. Fill in shots with a suitable filler and level out any rough spots.
3. Apply primer: Depending on the manufacturer’s instructions, you may need to apply a primer coat before proceeding with the resin bonding. This helps improve adhesion and ensures better results.
4. Mix and apply resin binder: Follow the instructions provided with your resin-bonded kit to mix the binder correctly. Pour it onto one section of your prepared surface and spread it evenly using a trowel or squeegee.
5. Scatter aggregate chips: While the binder is still wet, scatter decorative aggregate chips evenly over its entire surface area until no more binder is visible beneath them. Use enough aggregate chips to achieve your desired appearance.
6. Compact and cure: Once all of the aggregate chips have been scattered, use a roller or tamper tool to compact them into place within 30 minutes of application while ensuring an even distribution throughout.
7. Allow curing time: The final step is allowing sufficient curing time for best results - usually around 24-48 hours, depending on weather conditions such as temperature and humidity.
These steps will help you install a stunning resin-bonded finish for your outdoor spaces!
Resin Bonded Kits offer incredible benefits, from durability and longevity to aesthetics! Their versatility in design options and ease of installation make them an excellent choice for transforming outdoor spaces.
0 notes
Text
The Most Common Resin-Bound Driveway Issues and How to Solve Them
Resin-bound driveways are popular for their aesthetic appeal, durability, and low maintenance requirements. However, like any other surfacing medium, resin-bound driveways can develop issues over time. Understanding the common issues with resin-bound driveways and identifying ways to address them is crucial for keeping your driveway in pristine condition. This blog post aims to discuss the most common resin-bound driveway issues and how to solve them.
The first issue that homeowners often encounter with resin-bound driveways is cracking. Resin-bound driveways experience cracking due to a range of factors, such as improper installation, excessive foot traffic, and temperature changes. The second issue is the accumulation of moss, weeds, and algae, which can be unsightly and cause slipping hazards. Finally, the loss of color and gloss is also a common issue, which can occur due to exposure to UV rays and harsh chemicals.
Fortunately, there are solutions to these issues. By sealing and regularly maintaining your resin-bound driveway, you can prevent the formation of
Cracks in the resin surface and how to fill them with a DIY kit or professional help
One of the most common issues that occurs with resin-bound driveways are cracks in the surface. Fortunately, there are options available to address this problem. If the cracks are small and superficial, they can be filled using a DIY kit that is specifically designed for repairing resin surfaces. These kits typically contain a clear resin and a hardener that, when mixed together, create a strong adhesive that can bond with the existing surface. However, if the cracks are deeper and more severe, it may be best to seek professional help. A qualified contractor will have the expertise and equipment necessary to clean and fill the cracks properly, which will ensure a more permanent and effective solution. In either case, it's important to address cracks as soon as possible to prevent them from growing and causing more extensive damage to the surface.
Fading of the resin surface and how to restore it with a UV-resistant coating
Fading of the resin surface is a common problem with resin-bound driveways, especially those that are exposed to direct sunlight. The UV rays in sunlight cause the resin surface to lose its color and become dull over time. However, this problem can be easily resolved by applying a UV-resistant coating on the surface. This can be in the form of a clear sealant, which not only protects the surface from UV rays but also adds a layer of waterproofing, preventing water from seeping through the surface and causing damage. Applying a UV-resistant coating is a simple task that can be done by a trained professional or a competent do-it-yourselfer. It is important to choose a high-quality coating to ensure maximum protection for the resin surface and to follow the manufacturer's instructions carefully for best results.
Read more: What regulations must be met when installing a resin bound surface in the UK?
Drainage issues and how to improve the drainage system to prevent waterlogging
Drainage issues are one of the most common resin-bound driveway issues that can lead to waterlogging, flooding, and damage to the driveway. Poor drainage can be caused by various factors, such as the slope of the land, the presence of adjacent structures, and the type of soil. To improve the drainage system and prevent waterlogging, several solutions can be implemented. One effective method is to install French drains, which involves digging a trench filled with gravel and a perforated pipe to redirect the water away from the driveway. Another solution is to use permeable pavers, which allow water to flow through their permeable surface and into a drainage system. Additionally, regular maintenance of the drainage system, such as cleaning out debris from gutters and downspouts can help prevent clogs and keep water flowing smoothly. By addressing drainage issues, homeowners can improve the function and longevity of their resin-bound driveway.
Weed growth and how to prevent it by using a weed barrier membrane and regular maintenance
Weed growth is a common problem that can occur with resin-bound driveways. Weeds can quickly take root and grow through the porous surface, causing unsightly blemishes and undermining the strength of the driveway. Fortunately, there are several ways to prevent weed growth and keep your driveway looking pristine. One effective method is to use a weed barrier membrane, which can be installed beneath the resin-bound surface during the construction process. This membrane acts as a physical barrier, preventing weeds from penetrating the surface and taking root. In addition to this, regular maintenance is essential to prevent weed growth. This includes removing any debris or plant matter that may have accumulated on the surface, as well as regularly sweeping and power-washing the driveway to remove any dirt and dust that could provide a fertile environment for weeds to grow. By taking these preventative measures, you can ensure that your resin-bound driveway remains weed-free and continues to provide a durable and attractive surface for many years to come.
Uneven surface and how to level it with a resin binder or DIY repair kit
Uneven surfaces are a common problem with resin-bound driveways. Thankfully, there are solutions available to level the surface including resin binders and DIY repair kits. When it comes to resin binders, make sure to choose a high-quality product that will provide long-lasting results. First, prepare the surface by removing any loose debris and cleaning the area thoroughly. Once the surface is clean, apply the resin binder to the uneven area and wait for it to dry. With DIY repair kits, follow the instructions carefully and ensure that the kit is appropriate for the size and type of damage to the driveway. It is important to address uneven surfaces promptly to prevent further damage to the driveway and ensure the safety of those using it.
Conclusion
In conclusion, resin-bound driveways are a great investment that can significantly enhance the curb appeal of your property. Although these driveways are highly durable and require minimal maintenance, they are susceptible to a few issues that can detract from their overall appearance. By taking preventative measures and addressing issues early on, you can avoid costly repairs and keep your driveway looking its best for years to come. With the proper care and maintenance, a resin-bound driveway can be a long-lasting and stylish addition to any home or business.
0 notes
Link
0 notes
Text
How Professionals Do Build A Resin Driveway

A resin driveway is a great way to add value to your home, but it's important to choose the right one. There are many options available. You may want to consult with a professional to determine which option is right for you. Besides, it's a big investment, so you want to make sure you get your money's worth.
A resin-bound drive is a good choice for many homeowners. It can be installed on top of existing concrete or tarmacadam. Unlike some types of material, it is a durable material that won't need a lot of maintenance.
One of the best reasons to opt for a resin-bound driveway is its affordability. Typically, you won't spend thousands of dollars on a new driveway. However, you should still keep it well maintained to ensure it lasts as long as possible. Cleaning your new driveway regularly is a good start, but you should also consider pressure washing your driveway as needed.
In fact, cleaning your resin-bound drive is easier than you think. Most moss and algae can be removed by simply wiping them off with a stiff broom. Another benefit of a resin-bound surface is that you can install it quickly, so you won't have to wait weeks for your new driveway to dry.
There are many more advantages to a resin-bound drive, but that's not to say you won't have to do some work yourself. In fact, most people prefer the convenience of hiring professionals to do the dirty work.
Although the sand and gravel road is considered a novelty in most parts of the country, it's also a very effective way to get the job done. On the flip side, it can be hard to keep up with the clean up. To prevent any nasty accidents, you might want to invest in a couple of rakes.
If you're unsure about the most effective way to do the job, you might want to consider a DIY kit. These kits come with all the components you need, including the tools you need to complete the task. And if you're on a tight budget, this may be the route to go.
Having a resin-bound driveway will be a worthwhile investment for years to come. But the installation process can be a pain. Keep in mind that the most efficient solution involves having two or three people doing the work.
0 notes
Text
Choosing The Best Colour For Resin Driveway

When it comes to choosing the perfect colour for your resin driveway, you have several options.
Choosing a sandy hue is a good idea, and you can also choose a darker hue, such as anthracite. If you prefer a neutral hue, try Aspen (UV). This colour is a good match for any dull property.
Amber is the best resin colour for driveways
If you want a warm, welcoming driveway, amber is the resin colour for you. It comes in different shades, including golden and silver tones. You can also mix it with white marble for a modern, clean look.
Amalfi is ideal for a sandy-looking driveway
Resin bound driveways can be finished in a range of colours, including the light-toned Amalfi and the darker Anthracite. The lighter shades are perfect for sandy-looking driveways, and they work well with a wide range of properties.
For a darker look, choose the Anthracite colourway, which blends the low-maintenance nature of resin with the smooth look of tarmac. Both colourways complement traditional and modern-style properties and are suitable for use in residential and rural areas.
Anthracite is perfect for a darker look
If you want to create a darker look for your resin driveway, you might want to try the shade Anthracite. This darker shade is a perfect contrast to lighter shades and goes well with many colours. This grey also goes well with both matt and glossy surfaces. It is a great choice for outdoor and indoor areas, and complements many different shades of stone and wood.
Aspen (UV) is a neutral hue that makes it a perfect match for a dull property
If you're looking for a paint color to match a particular piece of furniture, you can use a neutral hue for the walls. This neutral hue is perfect for rooms with wood tones. This neutral hue will allow you to mix wood tones with bold accent colors on the accessories. It's the most common neutral for walls and will make a perfect backdrop for wood tones.
Starlight is a new shade for resin driveways
Resin driveways can now be made in a variety of different colours. The new UV-cured Starlight colour has a classic concrete finish and is available in 7.5kg and 6.5kg kits. It's an excellent complement to darker shades of resin-bound aggregate.
Aspen is a good match for a traditional, dark driveway
Aspen is a light colour that complements the dark colour of the resin driveway. It's a good match for traditional and modernised properties alike. Its closed knit structure provides fantastic compression and a durable surface. It's also a good match for resin pathways and patios.
1 note
·
View note
Text
Driveway resin kit in UK – which one is best for your home?

Driveway Resin Kits in UK is a popular choice for homeowners looking to upgrade their outdoor living space. Resin driveways are an attractive, durable and low-maintenance option that can add value to your home. With so many different resin kits available on the market, it can be difficult to know which one is best for your property.
The key factor when choosing a driveway resin kit is whether it will be able to cope with the natural elements such as rain, snow and ice. Durability should also be taken into consideration, as some kits may need more frequent maintenance or repairs than others. Different types of resin come in various thicknesses and textures, so you'll want a kit that fits the style of your home perfectly.
Advantages of a Resin Driveway
A driveway is a key feature of any home and one of the most important decisions you can make as a homeowner is which driveway material to choose. Resin-bound driveways are becoming increasingly popular, thanks to their many advantages over traditional asphalt.
Resin-bound driveways are made from natural aggregates such as gravel, stones or marble that are bound together using resin. The result is an attractive surface that looks like stone but has the strength of concrete. It's low maintenance, weatherproof and can be installed quickly without too much disruption, making it ideal for all types of properties in the UK.
Its surfaces provide excellent drainage, which makes them suitable for both domestic and commercial use.
Factors to Consider when Choosing a Kit
When it comes to choosing a driveway resin kit in the UK, there are several factors that homeowners should consider before making their purchase. Firstly, one must assess the amount of traffic and wear and tear on the driveway they’ll be expecting. If the area is going to get a lot of use, then a thicker resin may be necessary to protect against cracking or other damage over time. In addition, you should also take into account your budget for this project as some kits can be relatively expensive depending on their size and quality level.
Secondly, you will want to make sure that your chosen kit includes all of the necessary accessories such as an edging strip or paving fabric which is important for keeping weeds from growing up around your new driveway.
Popular Resin Driveway Kits in UK
Popular Resin Driveway Kits in the UK are becoming increasingly popular for home owners looking to enhance the curb appeal of their property. Resin driveways provide a number of benefits over traditional concrete or tarmac surfaces, including greater durability and a more attractive finish. With so many different driveway resin kits available on the market for homes in the UK, it can be difficult to decide which one is best for you and your property.
Driveway resin kits differ significantly from traditional surfaces as they are typically made from a mixture of highly compacted stone aggregate and high-grade resins, creating an incredibly durable surface that is ideal for driveways and areas with heavy foot traffic. The kit will also usually come with an edging kit which helps add strength to the perimeter of your driveway, allowing you to create an attractive border around your new driveway.
Installation Process
The driveway resin kit in the UK is becoming increasingly popular as a way to create a stylish and modern look in any residential or commercial property. Homeowners across the country are opting for this easy-to-install solution, with many companies now offering an installation process that can be done quickly and efficiently.
The quality of the installation process is of utmost importance when it comes to ensuring that your new driveway looks great and lasts for years to come. That's why experienced professionals should always be consulted before undertaking any kind of project, as they will ensure that everything is done correctly from start to finish. They will also have all the necessary tools, materials and expertise needed to get an excellent result every time.
For those who prefer to take care of their own installation, there are plenty of DIY options available too.
Conclusion
The decision to choose the best driveway resin kit for your home in the UK can be a daunting task. With so many different styles and designs available, it is important to consider all factors when deciding what will work best for you and your home. After researching the market for driveway resin kits in the UK, it is possible to come to a conclusion on which one is right for your home. There are several important considerations when making this choice, such as cost, ease of installation, durability, style and maintenance requirements. For those looking to upgrade their existing driveway or install a new one completely from scratch should opt for a resin-bound system that offers an attractive finish with very little required maintenance over time.
1 note
·
View note
Text
Everything You Need To Know About Resin Driveways
If you are considering a resin driveway for your property, you will want to know a few things about them. Resin driveways are SUDS-compliant, durable, and cost-effective.
Here are some tips to help you make the best choice for your property. SUDS-compliant resin driveways are the most popular choice for homes in disadvantaged areas, and they can be used for many applications.

Resin driveways are SUDS-compliant
Resin driveways are one of the most environmentally friendly types of paving available. They are available in a wide variety of colours and blends, and are permeable, allowing water to drain to the sub-base. Unlike other types of paving, resin driveways are SUDS-compliant.
They are durable
Resin driveways are made of a hard material that is durable and low-maintenance. Depending on your location, resin driveways can withstand extreme temperatures. However, they may not be suitable for cold winters. In such cases, resin driveways may crack. In addition, they may melt in hot summers. Other disadvantages include that they are not easy to clean. In fact, they may become dirty and stained easily. To avoid these problems, you should hire a professional to install your resin driveway.
They are SUDS-compliant
Resin driveways are a good SUDS-compliant alternative to paving. They come in a wide range of colours and blends and are designed to absorb and drain water away from the top surface and sub-base of the driveway. The use of resin is good for the environment and is a smart choice for those who want a new driveway that is low maintenance and looks great.
They are cost-effective
The initial cost of resin driveways is relatively low. Resin is a porous substance, which means that it can allow water to percolate through. Resin driveways do not need to be re-sanded or re-applied every year. However, resin driveways do require some maintenance, such as regular cleaning and brushing away debris.
They are permeable
A permeable driveway encourages water to soak into the ground instead of running off into the drainage system. These driveways are available in a variety of materials and approaches.
They can be installed over existing driveways
Resin driveways can be installed over existing asphalt or concrete driveways. The first step in this process is to prepare the surface thoroughly. The driveway should be clean and have no holes or cracks. It should also be permeable and stable. If the surface is damaged, crack repair kits and a new coating can be laid.
They can show tire marks
Resin driveways are not immune to the appearance of tyre marks. The heat from the friction between the tyre and the surface of the resin makes the marks even more noticeable.
To get rid of these marks, clean them with a household cleaner. However, if the marks are particularly stubborn, try using a plastic snow shovel instead of a metal one. Metals can damage the resin, so always test the product before you use it on your driveway.
0 notes
Text
Durability A Major Criterion When Selecting Your Driveway Materials
Installing a new driveway or replacing an existing driveway is a very expensive project. You should therefore make the right choices so that you would not be forced to frequently change your driveway. You are likely to be selecting your driveway material based on a number of factors. Not all of them will serve you as long as you would expect it to serve. If you want to get the best value for your money, you must select a driveway material that lasts long.
Durability of the driveway material will be a very important factor to be taken into account. If you are interested in paving a new driveway or replacing your existing driveway, you should check whether the materials you choose has the capacity to last long. In this regard, resin driveway will prove to be a very good choice. Resin bound driveway can withstand the wear and tear and also the extreme environmental conditions.
You should order your resin driveway kits from the most dependable suppliers so that the quality of the driveway is good. Unlike the other driveway supplies, you will be able to get the maximum benefit out of your driveway material even if you are installing it yourself. This is one of the reasons why homeowners that like to install their own driveways opt for resin driveways. It can be installed by someone without any prior experience too and get almost the same level of professional finish. This is because it is easy to work with resin bound driveway supplies.
When buy your resin bound patio DIY kits you should check whether the product comes with any guarantee on its lifetime. You will be putting out a considerable amount of money and if that is the case, then you need to make sure that the brand you choose is a trustworthy brand. We know that resin bound driveway and patio paving supplies are highly durable but it also depends on the brand you choose. If the gravel ratio happens to be higher than the prescribed ratio then the drive will be weak. Similarly, if the resin supplied with the kit is not of good quality then it will have poor durability, as it will not be able to withstand the environmental extremes. Therefore you should make sure that you select the most trusted brand too when you are ordering your resin driveway kits.
1 note
·
View note
Text
Resin Bound Kits
https://www.theresinbondedslabcompany.co.uk/resin-bound-kits
The Resin Bonded Slab Company has the best driveway company for resin bound driveway installation. We are Resin Bound Aggregate suppliers and can either have your project done by us or your preferred contractor. Or, you could do it yourself.
1 note
·
View note
Text
What is the best way to prepare the area before laying the resin in the UK?

When it comes to laying resin in the UK, preparation is key. Without taking the time to properly prepare the area, you risk running into issues down the line that can be costly and time consuming to fix. To help ensure the success of your resin project, it is important to understand the best way to prepare the area before laying the resin. In this blog post, we will discuss what exactly needs to be done, and the reasons why these steps should not be overlooked.
1. Ensure the surface is clean and dry
Before laying resin in the UK, it is important to ensure the surface is clean and dry. This will help ensure a successful outcome. Make sure to remove any dirt, dust, or debris from the surface before applying the resin. If the surface is wet, use a cloth to remove the moisture so it is completely dry before you begin. Taking these steps will help ensure the resin is laid properly and will provide the best possible results.
2. Prime the area to ensure adhesion
Before laying the resin, it is important to prepare the surface area to ensure adhesion. This involves priming the area with a suitable sealant and allowing it to dry for at least 24 hours. The sealant should be applied in a thin coat over the entire surface and should be free from dust and debris. Once the sealant has dried, any dust and debris should be removed from the surface and the area should be wiped clean with a damp cloth. This will help ensure that the resin adheres to the surface properly and will reduce the risk of the resin cracking or bubbling.
3. Measure the area to be covered
Before laying the resin in the UK, it is essential to accurately measure the area to be covered. This will ensure that the amount of resin needed is properly calculated, and also allow you to consider any obstacles that may affect the laying process. Whenever possible, it is recommended to measure the space both in length and width, and double-check the measurements to make sure everything is accurate. When measuring, it is important to take into account any drops or slopes, which may require additional material to fill.
4. Remove any loose material from the area
Before you lay the resin in the UK, it is important to prepare the area by removing any loose material that may be present. This includes any dust, dirt, gravel, wood chips, or other debris that could interfere with the adhesion of the resin to the ground. Additionally, it is important to check the area for any sharp objects that could puncture the resin while it is being applied. Once you have removed any potential hazards, the area is ready to be prepped for resin application.
5. Inspect the area for any defects prior to resin application
Prior to applying the resin, it is important to properly inspect the area. This should include checking for any visible defects, such as cracks, holes, gaps, or other irregularities. Any such defects should be filled and sealed before applying the resin. It is also important to ensure that the surface is clean and free from dust, dirt, and any other foreign matter. Additionally, any loose material should be removed and the surface should be lightly sanded to ensure a good bond between the resin and the surface. Once the area has been inspected and prepared, the resin can be applied.
In conclusion, preparing the area before laying resin is an essential step. This includes cleaning and prepping the surface, making sure it is level and stable, and ensuring that the area is well-ventilated. The right combination of these steps will ensure a successful resin installation that is strong, durable, and looks great. With the right preparation, you can be sure that the resin will set quickly and correctly, creating a lasting and beautiful finish.
Check out: how to lay resin driveways
Related Post:
Resin Bound Kits: The Best Choice for UK Landscapes
0 notes
Last Seen Blogs

lifes2eazy
£azy

notseungri
Untitled 1990

asseater34
Untitled

namwhanzaa
NamwhanZaa น้ำหวาน

totalmosta
ugayigaywefags