#docs and word will place a blank footnote on the bottom just for you as a nice reminder when you finish
Explore tagged Tumblr posts
Visit Tumblr Blog
Explore Tumblr blogs with no restrictions, modern design and the best experience.
Last Seen Tumblr Blogs


Fun Fact
Celebrities use Tumblr as well.
Text
you will never meet an english major who's a bigger mla hater than me. that bitch is why i struggle so much with my fucking essay, you know what you did >:(
#gonna be a hater rn#ignore me its my process#everyone deserves better than mla can give you#why should i interrupt a solid string of thought with a fucking citation#why must i include this monstrocity on my paper#what about footnotes#heaven's beautiful creation#footnotes my beloved come back to me#you just place a number and mov on its that simple#docs and word will place a blank footnote on the bottom just for you as a nice reminder when you finish#mla???? you don't get that luxury#good luck trying to remember which things are citations and your own thought#fuck you
16 notes
·
View notes
Text
How I Use Scrivener
Wrote this up for a friend, figured I’d post here in case it helps anyone else!
If you haven’t heard of it, Scrivener is a writing program that’s great for organizing long works. It’s what I use to write anything that has more than one chapter. It has a tonne of features, and honestly I don’t even use half of them. This is how I use it to write though.
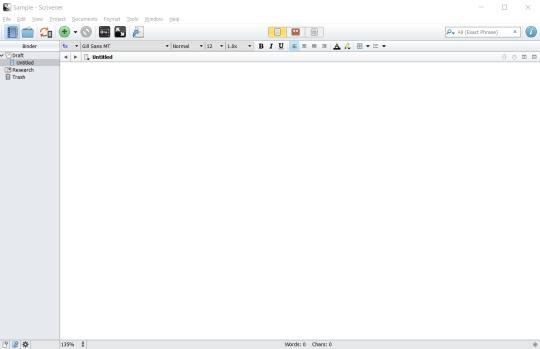
Ok, so this is basically what the interface looks like:

You write in the middle. Documents and files are stored in the left, and the window on the right is for toggling things within the scene, jotting down notes, and some other cool things. Lots of things. Let’s break this shit down:
First: how to just write shit without worrying about all the neat features. When you first start Scrivener, go to New Project and get a box like this:
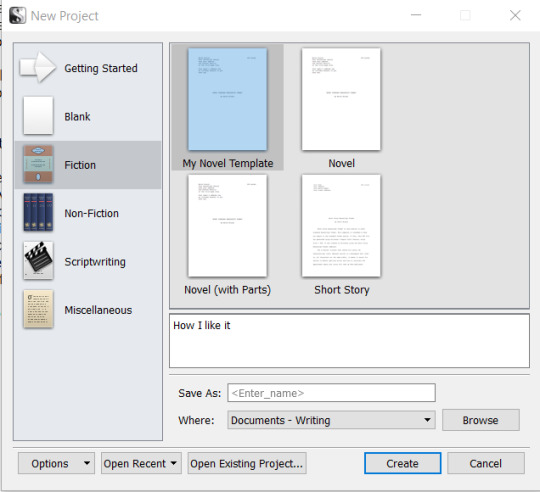
This is showing you all the templates you can choose from. I have a personal template that’s set up for how I use it. I’ve never used the non-fiction or scriptwriting ones (Like I said, I haven’t used half the features this baby has). It doesn’t really matter which one you use because you can change it all later anyway. If you aren’t sure, just go for blank.
Select blank, type your project name and where to save it, and then click create. (Tip: The project will create an entire folder with sub-documents. I like to make a folder for each project, and then put the scrivener folder in that folder, because you can’t import images that are already in the scrivener folder.) You’ll get this screen:
You can just start writing here. I’ll show you how I organize it though.
I like to make one folder for each chapter. Then, each scene gets its own page. You can create a new folder by click on the arrow next to the big green plus sign.
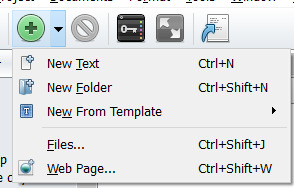
If you just click on the plus sign, it will create a new document. You can also change folders to documents and vice versa by right-clicking on them later. Create a document for each scene - basically, anywhere you’d put a page break, create a new document. They line up in order in all your folders like this:
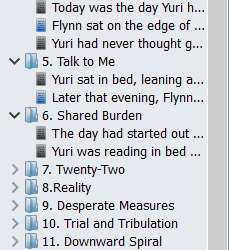
I name the folders with the chapter title. You can either name you individual scenes (i.e., “Yuri goes to the store”) or let it auto-generate a title from the first sentence of the scene. This is what I usually do. Or, if you write out of order, you could create place-holder scenes and title them with what generally will happen there once you write it.
The cool thing about this is that you can move these scenes around easily. If, for example, you decide to end a chapter earlier and want to move the last scene to the start of the next one, just click and drag it into position.
Click and drag and hover over another scene (rather than between them) to nest your document within another one. This lets you use documents as folders of their own. I usually use this for notes rather than the manuscript itself (like, one page outlining a city, and then sub-documents for neighbourhoods within it).
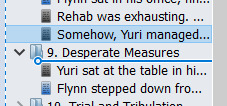
At any time while writing, your entire list of scenes and chapters is available at the side. Need to double-check what someone said five chapters ago? Easily find the exact scene you need to re-read by finding it in the list rather than scrolling up through thousands of words in one big document.
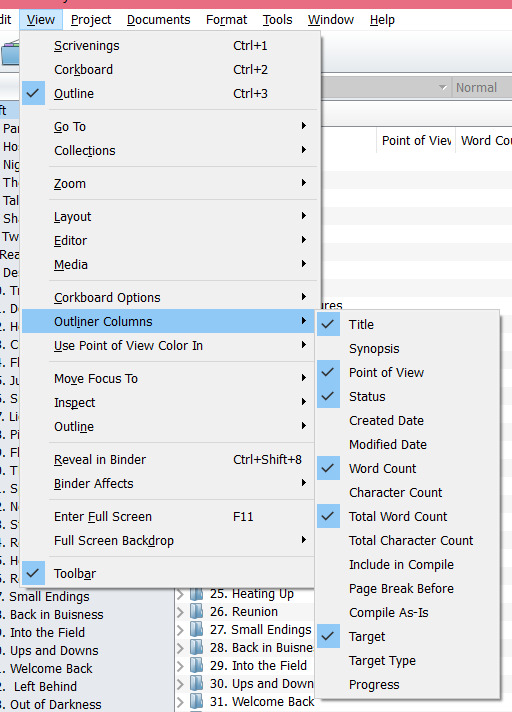
I like to colour-code my scenes my point of view. Yuri is black, Flynn is blue, Estelle is pink, etc. You can do this over on the right window, in this box:
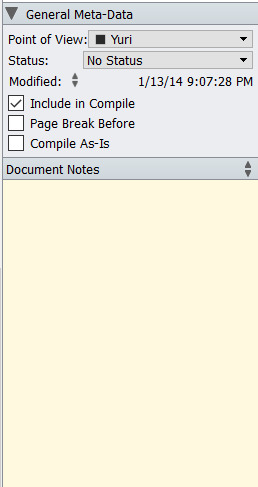
When you open a blank project, the top box there won’t say Point of View. It just says Label and will have different coloured boxes. Click the arrow and then hit “Edit...” to get to this box

Change the title of the label and create custom colour labels here. You don’t have to use this for Point of View; it’s just what works best for me.
Then, to get the colour to show up in the binder (the right bar where all your folders are listed, hit F6. That will toggle the little doc icon being coloured. F5 will toggle the colour appearing over the entire title, like this:

The Status box is for giving docs stamps - things like “DONE” or “TO DO”. It’s mostly useful in the corkboard view.
The Document Notes box is where you can write things down that pertain to just that scene. I use it to jot down a list of information that needs to be delivered in a conversation, for example, or I stick sentences I’m moving around over there until I find a better place for them. Use the arrows at the far right side to switch to Project Notes, which is like that but for the entire project and will be the same in every document.
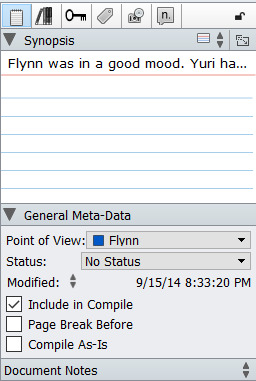
The index card at the top is where you can write a summary of the scene if you need a reminder, or if you haven’t written it yet.

The camera icon takes you to the snapshots. This is for if you’re going to make some edits but you aren’t 100% confident in them. Take a snapshot before you start and it will save the document as it is. At any time, you can go back and check your previous version of the document and use Roll Back to bring it back again. There’s a little folded corner icon on any document that has snapshots.

I never use the other tabs in the inspector here. I think they’re mostly for non-fiction writing (References, footnotes, meta data, etc). And hit the I at the top to toggle the inspector open or closed.

“Include in Compile” and related check boxes are for when you’re compiling everything into one document at the end. Don’t worry about this for fanfiction; I find it easier to just copy and paste from scrivener.
Moving on from writing, you can also keep all your research and reference notes within Scrivener so that they are easy to refer to while-writing. I put mine in the Research folder.
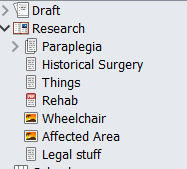
You can create documents to write things up just as you would in the Draft folder, or import image files, pdfs, even entire web pages.
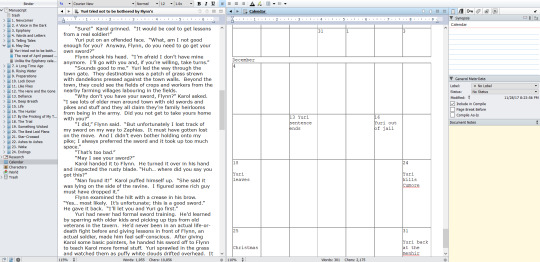
Something I like to do is create a calendar. It makes it easier to keep track of the passage of time in long fics. Create a regular document, then insert a table with 7 columns and 4/5 rows. It can be as elaborate as you want. Right click on the document within the binder and go to “Change icon...” to make it stand out.

I usually don’t use the Characters or World folders for fanfic, but for original stories that’s where I put all my worldbuilding notes, character profiles, histories, etc.
These three buttons at the top control the mode you’re in. The place document is just writing mode. That’s the default. Then there’s Corkboard mode, which is how I often do outlining. Create a new folder outside of the Manuscrupt, label it “Outline” (and change the icon if you want), and then create a document for each point on your outline. If you’re in Corkboard view, creating a new document will create a new index card (which turns into a document if you go back to Editor view).

This is where those Status labels I mentioned earlier come in. I mark a thing Done on the outline to check it off. The cool thing about it is that all documents are automatically index cards. Here’s my draft showing all the folders as individual index cards:

If I move cards around on the corkboard, they automatically move around in the binder as well. So I could spread out my entire story, scene by scene, on index cards and stamp them with completeness, label the PoV character, and summaries of the contents, and then shuffle them around right here.
The last mode is Outline mode. I’m more of a visual person so I don’t use this as much. I just use it to show me how many words a chapter has because it’s the quickest way to get that info.
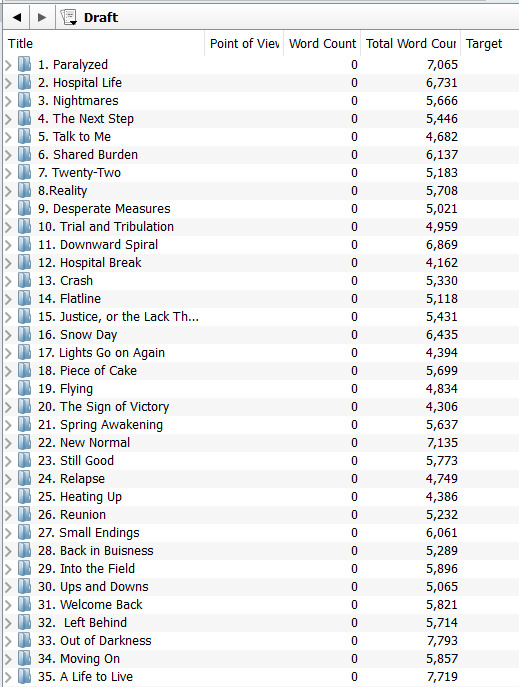
You can toggle what columns you want visible on this screen. Total Word Count isn’t there by default; you have to tell it to show that.
Other cool things:
The built-in Name Generator found under Tools

Go to Tools > Options to change the fonts, colours, sizes, appearances etc.
Press F11 (this button)

To enter fullscreen mode. You can change the appearance of this under Options but it lets you write in a customized fullscreen view to help concentration.

Press ctrl+shift+’ to enter split screen view. This lets you write in one window and have reference material (or another scene) open in another. ctrl+’ takes you back to one screen.
The last important thing is Typewriter scrolling. This makes it so that when you hit enter, the lines shift up and keep your writing centred on the page. You never hit the bottom of the screen, you never have to scroll up to re-centre yourself. It’s great. I only turn it off if I’m editing because then if you fix a type near the bottom of the page it snaps that to the middle and can be annoying. I always forget how to turn this on but here it is:

Honestly this is just an overview of the most important features to me. This program is huge. I’ve been using it for almost 10 years and I’m still discovering new things about it (maybe because I am a person who never reads manuals and just figures shit out as it comes up but shhhh). I love it a lot and feel free to ask me how to do a thing because I can’t write without it now.
39 notes
·
View notes
Text
19 Google Doc Features You Didn't Know Existed (But Totally Should)
A few years ago, as I was scrolling mindlessly through my Facebook News Feed, I found an article that told me I was using paper ketchup cups all wrong.
It turns out you're supposed to fan out the sides of the cup to increase ketchup capacity, like this. Who knew? Well, I recently applied that sense of adventure to another thing I love -- Google Docs. And what I found was just as life-changing.
Sure, you may have been using Google Docs for years, but just as I found, there are likely several useful features you have yet to uncover. For example, did you know you can look at a document's entire revision history to figure out what was changed and when?
Here are 19 sweet features Google Docs has to offer that aren't on many people's radar.
19 Hidden Google Doc Features
1. Add Fonts
When you create a new document, Google Docs starts you off with nearly two dozen native fonts you can choose from using the dropdown list on your top editing toolbar. But, there are dozens more fonts and typefaces available to you in that same dropdown.
To add additional Google Doc fonts, open your document and click the fonts dropdown third box from the left on your editing toolbar. Your default font should be Arial, as shown in the screenshot below.
When your starting font list appears, click the "More fonts..." option -- the first option down, as shown in the screenshot above. This will open a window of additional fonts, as shown below.
From the window that appears, shown above, check off the fonts you want to add to your starting dropdown list of fonts. Then select "OK" at the bottom. You can even explore new fonts by their general theme and appearance using the "Show" dropdown.
When you return to your document view, you should see your selected fonts included in the fonts dropdown.
2. Templates
Why start from scratch when you could use a template? Whether you're using Google Docs to write your resume, draft a project proposal, craft a business letter, formalize meeting notes, or design a brochure, you can bet there's a template for that. In fact, there are templates for almost all your business needs. And for every category, you'll find multiple templates to choose from.
This feature isn't exactly hidden, but it's often overlooked. You'll find all these templates at the top of your Google Doc homepage. Click More at the top right to browse through all the options.
3. Table of Contents
Writing a long document with a lot of subsections that readers may want to jump to? The handy "Table of Contents" add-on automatically creates a navigation sidebar. Simply click through the headers and subheaders in the sidebar to easily jump from place to place in your document. It can be a little slow if your document's really long, but it does the trick -- and it's still better than scrolling.
To find the add-on, click here or open your document and click Add-ons from the menu at the top of the page. Choose Get add-ons... and search for "Table of Contents."
4. Create or Remove Header
Headers and footers are particularly useful when creating a Google Doc that has many pages. You can create a header that includes the document title, each page number, or both on every page all at once.
To Create a Header
To create a header on Google Docs, double-click on the very top of one of your pages and begin typing your header text. You can also select "Insert" from the top navigation toolbar, then hover your cursor over "Header & page number" for a slide-out option that allows you to order your pages by increasing numerals.
Using either process, you'll create a header that looks like the screenshot below. This will appear on every page.
To Remove a Header
But removing this header once you've created it isn't as obvious of an option. To remove a header from Google Docs, simply remove the text included in the header, then click out of the header space and back into the document's body text.
To Change the Header Size
To shrink the size of a header from a Google Doc and use this space for more body text, change the margins of the page. To do so, click "File" in your top navigation bar, then "page setup..."
From here, you can narrow the page margins to a custom size, or using a preset "Paper size" from the options shown in the screenshot below. This will enable you to pull in or push out the header margins to your liking.
5. Clear Formatting
If you've ever pasted text into a Google Doc from another location, you've probably encountered formatting issues. It can happen for a variety of other reasons, too. Instead of editing that text manually to fit into the correct formatting, you can simply highlight the offending text and go to Format > Clear Formatting right in the toolbar. Boom: It'll format the foreign text to fit with the rest of your document.
6. Create a Folder
Because Google Drive stores your documents on the cloud, multiple people often use the same Drive account for sharing files with one another. Over time, this can make it difficult to organize your own documents. To store them all in a neat, safe place, make a Google Docs folder just for you or your team.
To create a new folder for your Google Docs, select the blue "New" button on the top left of your Drive account. This is also where you go to create a Google Doc, as shown below.
From the options that appear, select "Folder" and title your folder with a label you'll remember. This folder will then appear under the "Folders" section of "My Drive," as shown below.
7. The Research Tool
The Research tool is a godsend for anyone writing something in Google Docs that requires online research. Why? It allows you to research and refer to information and images online without every having to leave the document. That means no more clicking back and forth endlessly between tabs.
You can open the Research tool on a computer in one of three ways:
Open your document and open the Tools menu at the top of your screen, then click Research from the dropdown menu.
Right-click on a specific word and select Research.
Use the keyboard shortcut Ctrl + Cmd + Shift + I (Mac) or Ctrl + Alt + Shift + I (PC).
Here's what it looks like when I right-click the phrase "Welsh corgi" in my document:
When I choose "Research 'Welsh Corgi,'" the Research tool appears on the right-hand side of my document. It looks like this:
When you first open the Research tool, it might show you topics related to what it thinks you're working on based on what you've written already. You can either research those suggested topics by clicking on them, or you can type in your own search terms in the search bar.
You can also choose what type of content you want the tool to spit back when you search a term. Use the dropdown menu next to the search bar to see the different types of information for that topic.
Here's what each type means, according to Google Support:
Everything: Text and images related to your topic from any source.
Images: Images related to your topic found on the web.
Scholar: Educational information related to your topic that you can read, add to your file, or cite in a footnote.
Quotes: Quotes related to your topic that you can add to your file.
Dictionary: Definitions, synonyms, and antonyms related to your topic.
Personal: Results from your personal documents, spreadsheets, presentations, and photos that you can open, cite, or link to from your file.
Tables: Data presented in tables related to your topic that you can open, cite, or export.
Right now, the Research tool is only available on computers and Android mobile devices. (Learn how to use the tool on Android devices here.)
8. Suggesting Mode
While the capability to edit and make changes in a document is great, there are times when you only want to suggest changes -- without actually making any. That's where "Suggesting" mode in Google Docs comes in handy.
It works a lot like Comments in Microsoft Word. First, switch from "Editing" mode to "Suggesting" mode by clicking the pencil icon at the top right of an open document, and then choosing "Suggesting."
From there, anything you add, delete, or otherwise change will show up as colored marks in the document, accompanied by details on the righthand side such as the name of the suggestor and a timestamp.
Image Credit: Google Support
9. Comments
If you want to ask questions about, make notes in, or highlight changes you've made in a Google Doc you're working on, you can leave comments directly in the document. The comments can act as a conversation thread, as people can reply to them and carry on a conversation. You can close the comment thread when it's done. You can also edit or delete your comments at any time, or others' comments if you own the document.
To add a comment, highlight the text or image you'd like to comment on. Then, choose Insert from the menu at the top of your screen, and choose Comment from the dropdown menu.
From there, a blank comment will appear on the right-hand side of your screen.
Tag People in Comments
Want to comment on a document and get a specific person's attention? You can do that by tagging them in your comment. All you have to do is add an @ or a + sign, and then begin typing their name or email address. Google Docs will give you a couple options based on your Gmail contacts, and once you've submitted the comment, it'll notify that person you mentioned by sending them an email.
If that person doesn't already have access to the document, you'll be asked to choose permission levels for them.
10. Footnotes
Footnotes are quick and easy things to add to your Google Docs, but not many people know about them. To add a footnote, put the cursor in the part of the document you want the footnote to appear, and go to Insert > Footnote. From there, simply type in to your footnote whatever you'd like, and click onto the document to save it.
11. Find and Replace
Did you ever want to locate multiple instances of an error in a text document and correct them all at the same time? Google has heeded your call with this nifty shortcut.
If you've ever used "Find and Replace" in Microsoft Word, you're in luck: Google Docs makes it just as easy.
To find something specific in your document, select "Edit" in your top navigation bar and click "Find and replace" at the bottom of the dropdown menu. You can also type Command + F on an Apple keyboard (or Ctrl + F on a Windows keyboard), then click the "..." icon in the box that appears to the top right of your Google Doc.
Either process will call up the window shown below, where you can type in the text you'd like to find and replace it with corrected text. If the error appears more than once, click "Replace all."
12. Revision History
Speaking of revising content ... have you ever wanted to see all of the changes you (or someone else) made in a Google Doc? Better yet, have you ever wanted to go back in time and revert to an earlier version of your document? Thanks to the Revision History feature, you can. And it's awesome.
All you have to do is open the document and go to File > View Revision History. A panel will appear on the right-hand side of your screen showing an overview of who made changes and when. For a more in-depth view of the changes that were made, click the detailed revisions button below the overview list.
13. Voice Typing
Have Google Chrome as your browser? Have a working microphone either built in to your device or connected externally? Then you can "type" in a Google Doc using just your voice. To indicate a punctuation mark, simply say the name of it out loud, like "period," "comma," "exclamation point," or "question mark." To begin a new line or a new paragraph, say "new line" or "new paragraph" out loud.
To get to voice typing, open a document and click Tools from the menu at the top of the page. Choose Voice typing... from the dropdown menu. When you're ready to speak your text, click the microphone or press Cmd + Shift + S (on a Mac) or Ctrl + Shift + S (on a PC) to begin recording.
Want to voice type in Google Docs on your phone? Voice typing only works for computers, but many iOS and Android mobile devices have built-in microphones you can use with a document.
14. Keyboard Shortcuts
There's something so satisfying about knowing the keyboard shortcuts for whatever application you're using, and Google Docs has a ton of them to choose from. A lot of them are the same as in other applications, such as Cmd + C (Mac) or Ctrl + C (PC) to paste, or Cmd + B (Mac) or Ctrl + B (PC) to bold something. But it has a few unique ones, too. Here are a few of my favorites:
Shift + T = Create a new document.
Ctrl + Alt + M = Insert a comment.
Alt + I (in Google Chrome) or Alt + Shift + I (in other browsers) = Open the "Insert" menu.
Hold Ctrl + Alt, press N then H = Move to the next heading.
See the full list here.
To display the list of commonly used shortcuts while you're working in a document, press Cmd + / on a Mac, and Shift + / or Ctrl + / on Chrome OS or Windows. You can also just click the gear icon in the upper left hand corner of your screen and choose "Keyboard Shortcuts" from the dropdown menu.
15. Create Your Own Shortcuts
Google Docs may have a lot of shortcuts available to us, but what if we want to make a few of our very own? To create custom shortcuts, go to Tools > Preferences > Automatic Substition. You might find there are a few in there already (like changing 1/2 to ½), but feel free to add in some of your own.
16. Conference Calls
Google Docs is a collaborative platform -- and the "UberConference" add-on makes it even more collaborative by letting you conduct an audio conference call right from the document. All you have to do is turn on the add-on and invite your friends or colleagues. When they accept, everyone will be able to view and edit the document while participating in a conference call.
To find the add-on, click here or open your document and click Add-ons from the menu at the top of the page. Choose Get add-ons... and search for "UberConference."
17. Image Editing
Once you've inserted an image into your document, you can still edit it within the document. Click the image in your document, and the toolbar at the top will change to all the tools you can use to edit your image. Crop it, mask it, add borders to it ... there are a lot of possibilities in there.
Below are two examples of great image editing tricks: cropping and adding a border. (And if you ever want to reset an image back to its original form, simply select the image and click the "Reset Image" icon in your toolbar.)
Cropping Tool
Select an image in your document and click the crop icon in your toolbar. From there, drag and drop the blue handles until you've cropped the image to your liking. To save it, click "Enter" on your keyboard or just click back into your document.
Borders
To add a black or colored border to any image, select the image and click the line color icon in your toolbar (which looks like a pencil). Select the color you want the border to be, and voilà! To save it, simply click off of the image.
18. Dictionary
Ever written a word and wanted to double-check you're using it correctly? What about writing a word that you want to find a synonym for? Instead of opening up a new browser window, you can look up the definition for that word right inside your document -- as well as get synonym suggestions.
All you have to do is highlight the word, right-click on it, and choose Define. The Research tool will look up the word on the internet for you, and its definition will appear on the right-hand side of your screen.
19. Language Accent Buttons
Gone are the days of memorizing accent shortcuts (and getting them wrong), opening up international keyboards and clicking keys manually, and copy/pasting from other documents. If you ever find yourself writing in a language other than English, the "Easy Accents" add-on could save you a lot of time. It lets you insert accents for 20 different languages directly from a sidebar in your document.
To find the add-on, click here or open your document and click Add-ons from the menu at the top of the page. Choose Get add-ons... and search for "Easy Accents."
I'll bet you didn't know at least a handful of these ... Now that you do, put them to good use in your next Google Doc. Want more ways to use Google to create an effective marketing campaign? Download the free guide below.
0 notes