#diy nautical
Text

Lighthouses have always been one of my obsessions 😍 so while working on this, I felt a bit of pressure and responsibility to make it as good and cute as possible! 🥰 There were several versions before I settled on this final one. From what you’ve seen so far, which character from the Lighthouse Island pattern is your favorite? 😊
Crochet pattern for amigurumi Lighthouse Island 🦭 is available in English, German, French, Spanish, Italian and Dutch here -> https://etsy.me/4ctnkOP 🤗
#aradiyatoys#olka novytska#adorable#cute#crochet pattern#amigurumi#crochet#handmade#diy#kawaii#lighthouse#lighthouse island#amigurumi pattern#aww#nautical#decor#nautical decor
65 notes
·
View notes
Text
20 notes
·
View notes
Text

Ahoy mateys! Just conquered the high seas and completed this epic Flying Dutchman 3D wooden puzzle! This intricate pirate ship was a true test of patience (and rum-drinking skills ) but the final result is a treasure to behold.
#worth the challenge#3d puzzle challenge#wooden craftsmanship#flying dutchman#pirate ship#diy project#model building#adult puzzle#satisfying completion#nautical decor#historical replica#home decor#gift ideas#makers gonna make#weekend project#wooden puzzles#laser cut#mindful building#stress relief#crafts of instagram#show off your skills
3 notes
·
View notes
Text
DIY Sea Glass Bottles
This sea glass DIY requires only two things: Krylon Sea Glass Spray Paint and a glass bottle or jar. That’s it. I bought the paint on Amazon but it is available at any craft or hardware store.
You can use any clear glass bottle or jar you want. Mason jars like these, bottles from the thrift store, dollar store, or even empty jars and clear wine bottles from the trash!! All clear glass decorative accents you might have laying around are good candidates. (warning: you’ll be tempted to use this on them all so you may have to reign yourself in)
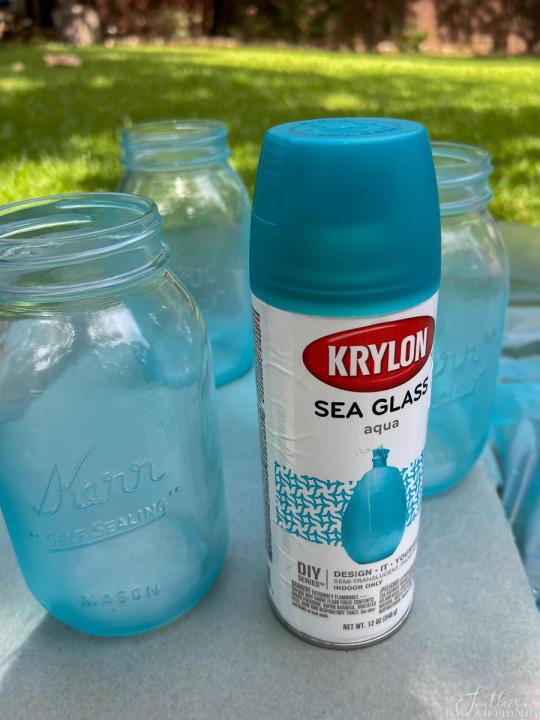
I’ve used the sea glass spray in “aqua” but it also comes seven other colors including amber as well as just a frosted clear finish. I can’t wait to try out the “seafoam” which makes gorgeous green sea glass. I’m on the lookout for a project to use it in and will share when I do!
How to make DIY sea glass bottles.
It’s fairly straightforward on how to use spray paint (duh), but I can share some tips I learned from my first go round:

Clean the glass and make sure it’s dry before you spray. A lot of times old glass is dusty and grimy or had oil based food in it.
Set up an area outside away from everything. Because overspray and paint fumes. I find ripping apart a box headed to the recycle bin makes a good base for painting.

Spray a very light coat from at least 12 inches away. If you hold the can closer, you will get much more opaque, intense color. This paint dries almost immediately with a thin coat…at least it did for me in our heat! If you want more coverage or color, go back and spray a second very light coat. Better to go slow in thin layers and add.
I was going for a more “vintage” glass look than “sea glass” so I just wanted a hint of blue tint. So these don’t have as much of the frosted opaque sea glass “texture“. You can still see the glass shine with this very light coat.

I turned my jars upside down and sprayed first from that direction to achieve the old glass look that was still somewhat clear. After I turned the jars over I sprayed just a little more over the top.
#diy#sea glass#wedding decor#beach wedding decor#nautical wedding decor#mason jar decor#paint projects#easy diy decor
4 notes
·
View notes
Text
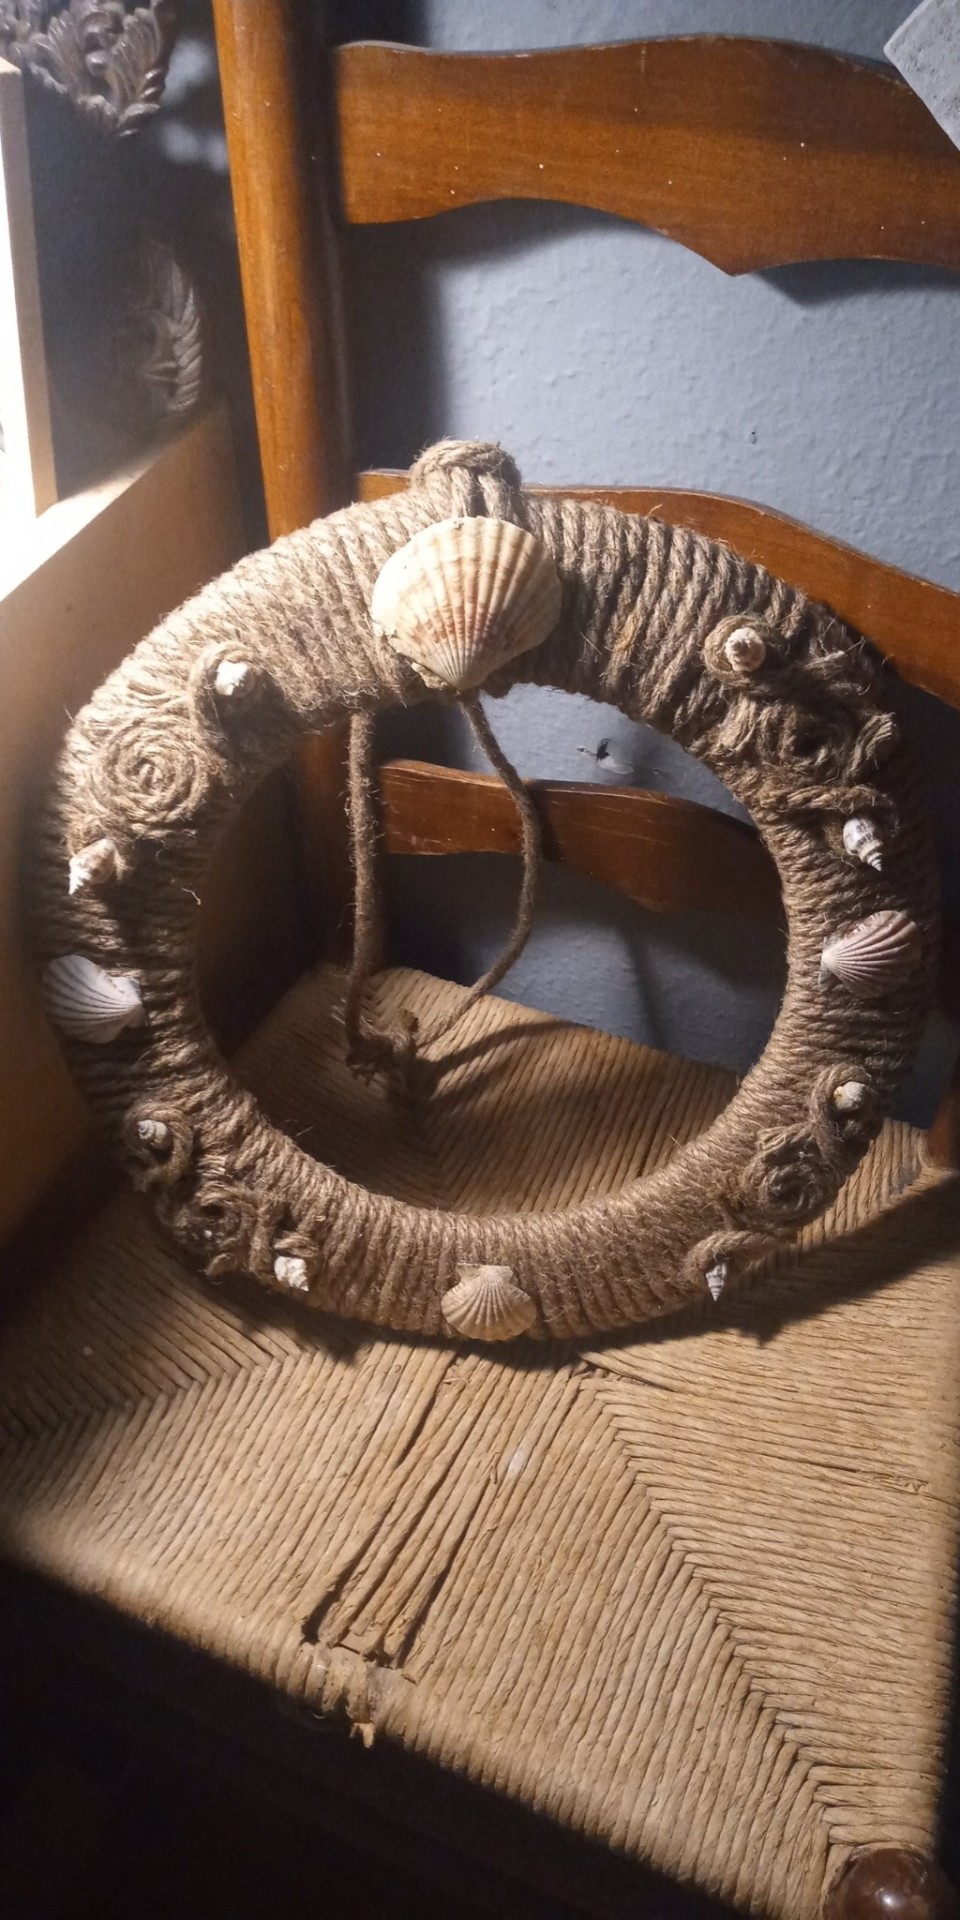
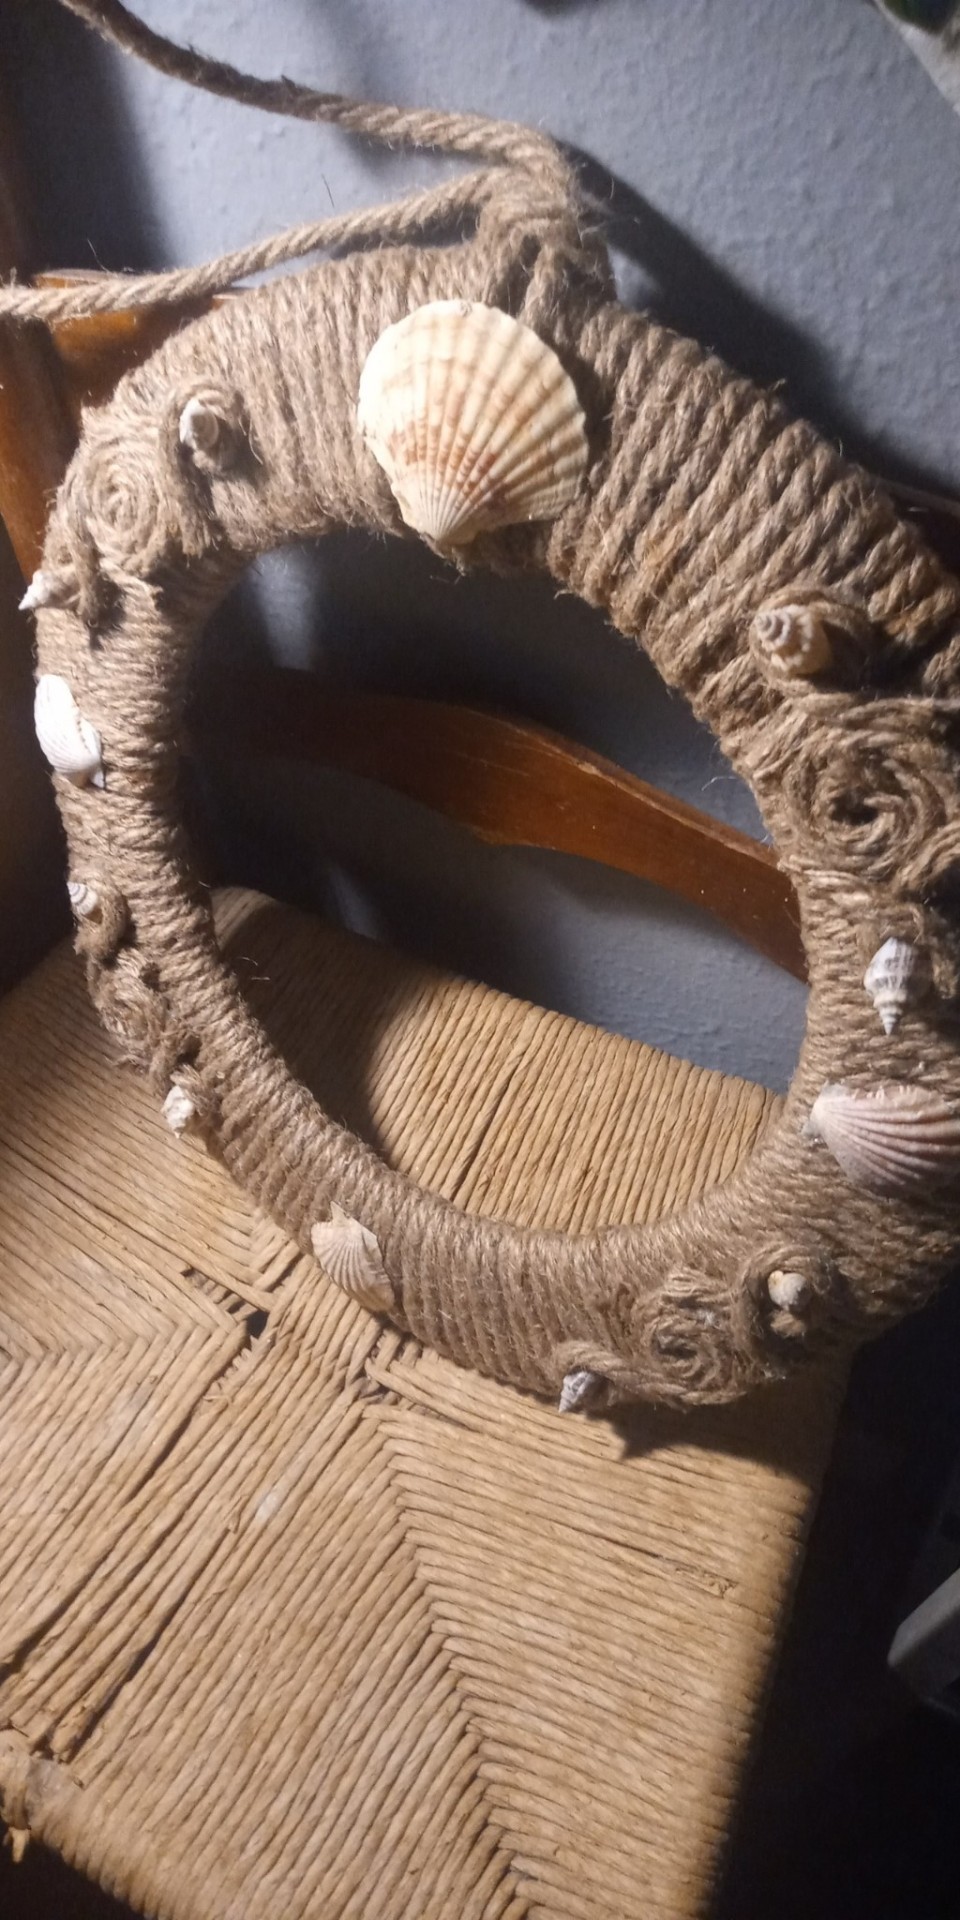
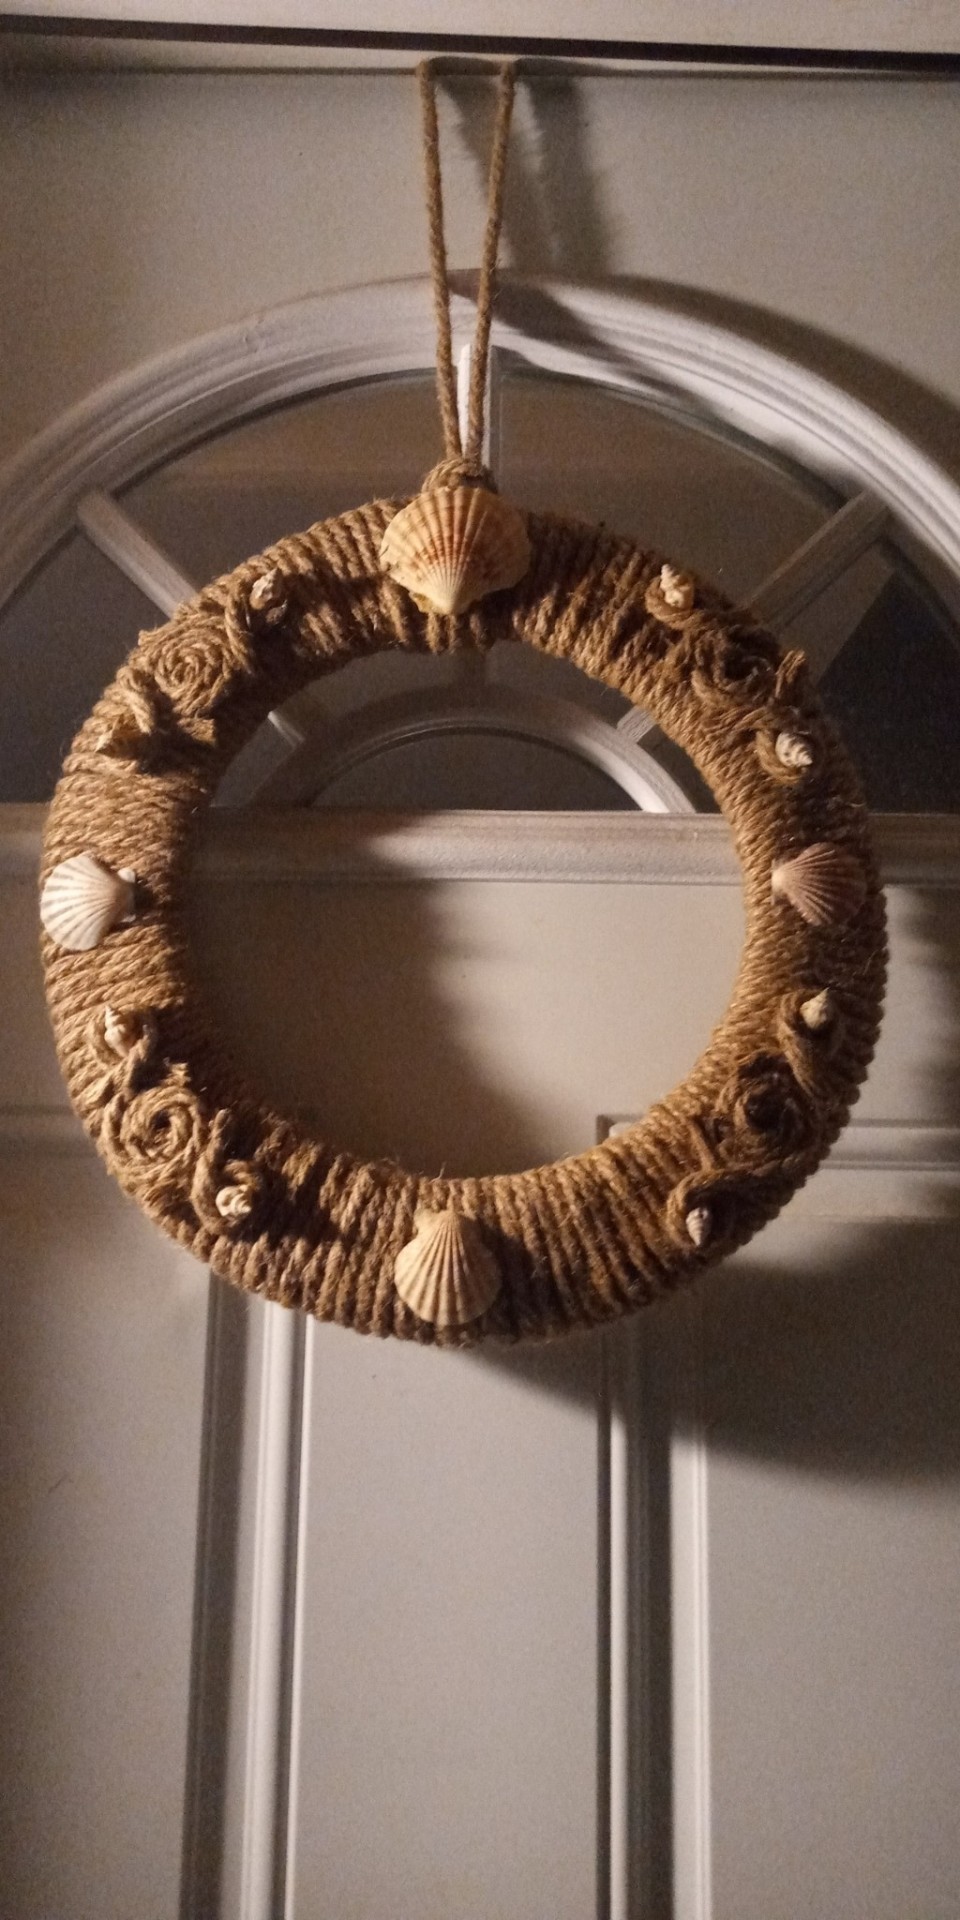
#diy#home decor#diy craft#diy ideas#diy projects#home design#diy rope mirror frame#mirror frame#diy rope#nautical touch
0 notes
Text
Restore and Resell: A Guide to Profiting from Salvage Boats

Looking for a unique investment opportunity?
Restoring a salvage boat in Florida can be a lucrative venture. With the right approach, you can transform a damaged vessel into a valuable asset.
Here's a step-by-step guide to profiting from salvage boats:
Find the Right Boat: Research and identify salvage boats with potential for restoration.
Assess the Damage: Conduct a thorough inspection to determine the extent of repairs needed.
Create a Restoration Plan: Develop a detailed plan outlining the necessary repairs and upgrades.
Secure Financing: If needed, arrange financing for the purchase and restoration.
Gather Materials and Equipment: Source the necessary materials and tools for the restoration process.
Start the Restoration: Begin the restoration process, following your plan and addressing any challenges.
Market and Sell: Once the restoration is complete, market the boat to potential buyers.
Tips for Maximizing Profit:
Choose a Popular Boat Type: Select a boat that is in demand in your market.
Focus on Quality: Invest in high-quality materials and workmanship to ensure a top-notch restoration.
Document the Process: Keep detailed records of the restoration process to attract potential buyers.
Set a Realistic Price: Research similar boats to determine a fair market value.
With careful planning and execution, restoring a salvage boat can be a profitable and rewarding experience.
#salvage boats#Florida#boat restoration#investment#nautical adventure#DIY boat project#boat sale#boat investment
0 notes
Photo

Wedding diy beach nautical theme 35+ ideas for 2019
0 notes
Text


I painted my light switch
#art#drawing#doodle#aesthetic#women#mermaid#nautical#diy#painting#paint#posca#redecorating#decorating
0 notes
Text
Building Your Own Pirate Ship: A Guide to Wooden Model Ship Kits

Have you ever dreamed of sailing the high seas on your own pirate ship, like the legendary Black Pearl or the fearsome Queen Anne's Revenge? While you may not be able to commandeer a real pirate vessel, you can still experience the thrill and adventure of building your own miniature replica with a wooden model ship kit.
Wooden model ship kits are a fun and rewarding hobby that allow you to create realistic and detailed models of historical and fictional ships, using various tools and materials. In this guide, we'll show you how to build your own pirate ship with a wooden model ship kit, and give you some tips and tricks to make the process easier and more enjoyable.
What You'll Need
To build your own pirate ship with a wooden model ship kit, you'll need the following items:
• A wooden model ship kit of your choice.
There are many different types and brands of wooden model ship kits available on the market, but for this guide, we'll focus on the ones offered by Premier Ship Models, a leading online retailer of quality model ships and boats. Premier Ship Models has a wide range of wooden model ship kits to suit your preferences and skill level, from beginner to expert. Some of their popular pirate ship kits include the Black Pearl, the Jolly Roger, the HMS Bounty, and the HMS Surprise. You can browse their collection of pirate ship kits https://premiershipmodels.us/.
• A set of basic tools and materials.
Depending on the complexity and size of your chosen kit, you may need different tools and materials to assemble your model. However, some of the common tools and materials you'll need are: a hobby knife, a cutting mat, a ruler, a pencil, a pair of scissors, a pair of tweezers, a drill, a hammer, a file, a sandpaper, a glue, a paint, a brush, and a varnish. You can find most of these tools and materials at your local hobby store or online.
• A spacious and well-lit work area.
Building a wooden model ship kit can take several hours or even days, depending on your pace and skill level. Therefore, you'll need a comfortable and convenient work area where you can spread out your tools and materials, and work without interruptions. Make sure your work area is spacious enough to accommodate your model and its parts, and well-lit enough to see the details clearly. You may also want to cover your work surface with a cloth or a paper to protect it from scratches, spills, or stains.
How to Build Your Own Pirate Ship
Once you have your wooden model ship kit, your tools and materials, and your work area ready, you can start building your own pirate ship by following these steps:
• Step 1: Read the instructions.
Before you start assembling your model, it's important to read the instructions carefully and familiarize yourself with the parts and the process. The instructions will guide you through the steps of building your model, from cutting and shaping the parts, to gluing and painting them, to rigging and mounting them. The instructions will also provide you with diagrams, photos, and tips to help you along the way. Make sure you follow the instructions closely and in the correct order, as any mistakes or deviations can affect the final outcome of your model.
• Step 2: Cut and shape the parts.
The first step of building your model is to cut and shape the parts according to the instructions. Most wooden model ship kits come with pre-cut parts that are ready to use, but some may require you to cut them out from a sheet of wood or a strip of metal. You'll need to use your hobby knife, your cutting mat, and your ruler to cut the parts accurately and safely. You may also need to use your file, your sandpaper, and your drill to shape and smooth the parts, and to create holes or slots for fitting them together. Be careful not to damage or lose any parts, as they may be difficult or impossible to replace.
• Step 3: Glue and paint the parts.
The next step of building your model is to glue and paint the parts according to the instructions. You'll need to use your glue, your brush, and your tweezers to attach the parts together, and to create details such as planks, windows, doors, cannons, and ornaments. You'll also need to use your paint, your brush, and your varnish to color and finish the parts, and to create effects such as weathering, aging, or damage. Make sure you apply the glue and the paint sparingly and evenly, and let them dry completely before moving on to the next step. You may also want to test the glue and the paint on a scrap piece of wood or metal before applying them to your model, to avoid any unwanted reactions or results.
• Step 4: Rig and mount the parts.
The final step of building your model is to rig and mount the parts according to the instructions. You'll need to use your scissors, your tweezers, and your drill to cut and attach the ropes, the wires, and the chains that make up the rigging of your model. You'll also need to use your hammer, your file, and your glue to fix and secure the parts that make up the hull, the deck, the masts, the sails, and the flags of your model. Make sure you align and tighten the parts properly, and check for any loose or missing parts. You may also want to use your varnish to seal and protect your model from dust, moisture, or damage.
Tips and Tricks
Building your own pirate ship with a wooden model ship kit can be a fun and rewarding hobby, but it can also be challenging and frustrating at times. Here are some tips and tricks to help you make the most of your experience and avoid some common pitfalls:
• Choose a kit that matches your skill level and interest.
Wooden model ship kits come in different levels of difficulty and detail, from beginner to expert. Choose a kit that suits your abilities and preferences, and that you find appealing and enjoyable. Don't choose a kit that is too easy or too hard for you, as you may lose interest or get discouraged. You can always start with a simple kit and work your way up to a more complex one as you gain more confidence and experience.
• Plan ahead and organize your work.
Building a wooden model ship kit can be a complex and lengthy process, so it's important to plan ahead and organize your work. Before you start, make sure you have all the tools and materials you need, and that you understand the instructions and the steps. During the process, keep your work area clean and tidy, and sort your parts and tools by type and size. This will help you save time and avoid confusion or mistakes.
• Be patient and careful.
Building a wooden model ship kit requires patience and care, as you'll need to work with small and delicate parts, and follow precise and intricate instructions. Don't rush or force anything, as you may damage or ruin your model. Take your time and enjoy the process, and if you encounter any difficulties or errors, don't panic or give up. You can always consult the instructions, the diagrams, or the photos for guidance, or seek help from other modelers online or offline.
• Have fun and be creative.
Building a wooden model ship kit is not only a hobby, but also a form of art and expression. While you should follow the instructions and the steps, you can also have fun and be creative with your model. You can customize your model with your own touches, such as adding accessories, decorations, or characters, or modifying the colors, the shapes, or the effects. You can also create your own backstory or scenario for your model, and imagine the adventures and stories it could tell. The possibilities are endless, and the only limit is your imagination.
Conclusion
Building your own pirate ship with a wooden model ship kit is a great way to indulge your passion for maritime history and culture, and to unleash your creativity and craftsmanship. By following this guide, you can create your own miniature replica of a legendary pirate vessel, and enjoy the satisfaction and pride of completing your own masterpiece. Whether you display your model in your home or office, or sail it on a pond or a pool, your pirate ship will surely attract attention and admiration from others, and inspire you to explore more of the fascinating world of wooden model ship kits.
#model ship building#wooden model ships#pirate ship model#nautical crafts#model making#hobby#DIY project#pirate ship kit#beginner model ship building#wooden model ship kit
1 note
·
View note
Note
I just found this blog and i love it!!! I have a few different questions so to make organizing easier im gonna ask one here and send the others separately so I apologize for the abundance of asks im about to send :D what are some of your favorite past jams or bundles?
THEME: Game Jams and Game Bundles.
Thank you so much! I will probably space out these answers so that other folks have a chance to get their questions answered first. But this one is a pretty fun one to start with.


I’m a sucker for charity bundles, to be sure. My first bundle was the Itch Bundle for Racial Justice and Equality, which was back in 2020. I filtered through all 50 pages and sorted all of the ttrpgs into folders - this was the start of my Itch organization. It also introduced me to quite a few games that showed me the amazing breadth of tabletop games, including Subway Runners, Visigoths vs Mall Goths, Troika, and i’m sorry did you say street magic. An additional recommendation I have from this bundle is Transmission Burst v.1 and Transmission Burst v.2, collections of evocative mini games by UFO Press.
One really impressive bundle was The Bundle for Ukraine, which had a staggering amount of tabletop games in it, including Thirsty Sword Lesbians, Apocalypse Frame, Lutong Banwa, and The Great Soul Train Robbery. I want to give a specific shout out to Bright & Terrible (Atlantean Exiles from a kingdom that fell), as well as Recipe on Kmiydish Paper, a solo gaming experience that fleshes out a world through a single recipe.
If you have bought a lot of charity bundles, I also recommend checking out Bundle Browser, which is a website that helps you sift through games by bundle and tag. I find it super helpful when I'm not sure I have a copy of a game, and clicking on the game brings you to its game page!


Now, let's talk about game jams. The Emotional Mecha Jam was a game jam in the beginning of 2019 that explore the depth of emotions that exist in the mecha genre. This jam inspired works such as A Long Night in the Mech Bay, All My Exes are in Mechsuits, and Breakup on Re-Entry. You should absolutely check this jam out.
In 2021, there was a jam called Applied Hope: The Solarpunk and Utopias Jam. I’ve talked about this jam recently, and it’s very very good. I love the theory and conversations sparked in this jam - the goal was to dream of possible worlds - not perfect ones, but ones that were brighter, worlds that could are meant to increase our capacity for joy. I’ve talked about a number of games here before, including subconscious_Routine, Waxworm, and After the World Drowned. I’m also intrigued by Scraps, which won the award for Best Solarpunk DIY game.
The BIPOC Vamp Jam was also a lot of fun! It was a jam that ran in 2021 and asked Black, Indigenous and Creators of Colour to submit their vampire games, in an effort to look at vampires through a different lens. I’ve talked about Vamp Camp and Bloodbeam Badlands before, but I’m also stoked about The Vamp is Dust, (a hack of The Witch is Dead), as well as Project: Day Breaker (Vampires in space!).


Some of my favourite jams are jams that are focused on a specific system. The What’s So Cool About Jam is one of those. It is a super simple system, and the jam is what introduced me to the WSCA ruleset, which is pretty light-weight system that can be translated to a lot of settings. I’ve personally been interested in What is So Cool About Sky Pirates, as well as What’s So Scary About Dinosaurs?.
Titanomachy also has a solid history of good game jams, as evidence by their first and second Caltrop Core jams. Caltrop Core has gotten some pretty big attention, because it’s so easy to hack! This can be seen in in HexFall, which is also by Lex, as well as SW//NG by @farmergadda (emotional superheroes), and Last Hope (dark magical girls). I’m also interested in The Dreaded & The Deep (nautical horror) and The Dying of the Light (a city struggling in the darkness).
29 notes
·
View notes
Text

Some kind of magic happens on Lighthouse Island. No matter how many fish the Lighthouse Keeper catches, they just disappear from the bucket! 🪄 And something tells me these two magicians might have something to do with it! 🙈
Crochet pattern for amigurumi Lighthouse Island 🦭 is available in English, German, French, Spanish, Italian and Dutch here -> https://etsy.me/4ctnkOP 🤗
#aradiyatoys#olka novytska#adorable#cute#handmade#crochet#diy#crochet pattern#amigurumi#kawaii#pelican#seal#baby seal#amigurumi pattern#lighthouse island#mini kingdom#aww#nautical#nautical aesthetic#nautical decor
46 notes
·
View notes
Text


MERROCK TASK #18
HOME SWEET HOME
No matter what, Livvy knew that someday, she would grow up to live along the coast of Maine. And when she moved back to Merrock after years on the other coast, studying medicine in various forms, she was delighted to find the perfect little bungalow, with two bedrooms and beautiful views of the Atlantic ocean, all of the space a person could ask for to relax, unwind, and build a life for themselves. It didn't take much persuasion for her to decide to buy the place.
Livvy's done quite a bit of work in the house over time, renovating the kitchen with a lot of little DIY projects, and slowly changing out all of the furniture to match her style. She's also spent a lot of time on the outdoor space, making sure her patio is always ready for company, often a hot spot on the summer nights with girlfriends for family members. And wine, of course.
Unsurprising to anyone, Livvy loves light, pastel tones, and most of her home is decked out in white linen, with soft pink or taupe touches and a lot of natural wood. She has a lot of plants (mostly fake, though -- real stuff goes outside, where Mallow can't eat it), and trinkets that take up the shelves. Plus seashells, her house does lend itself towards a sort of nautical theme, even if she didn't think that would be her vibe. Oh, and there are almost always cat toys laying around, waiting to be batted around the house.
2 notes
·
View notes
Text
DIY Rustic, Nautical Rope Charger Tutorial


Materials for Rope Table Charger Tutorial:
1/4 inch natural sisal rope (approximately 35 feet per charger)
felt
hot glue gun
scissors
Directions
Start by cutting a circle of felt the size you want your charger to be. I did this quickly and easily by tracing around a charger I happened to have on hand, but you could make your circle any size. Heck, there's no reason it even needs to be a circle.

Glue down the rope, starting at the edge of the felt circle. If you try to start at the center, I can pretty much guarantee you won't get it exactly right, and you'll end up with a lopsided charger, or having to trim the felt and ending up with a smaller charger. Starting at the outside is just way easier.

Continue coiling and gluing, until you reach the very center of the circle. Cut the excess rope off, and glue the little tail of rope in the center. That's it.
#diy charger#diy#summer wedding#nautical wedding#table decor#nautical table charger#diy table charger#rustic wedding#nautical table decor#country tablescape
4 notes
·
View notes
Photo

diy farmhouse decor is a great way to add a rustic touch to your home.
#home#apartment#house#room#interior#interiordesign#decor#decoration#homedecor#interiordesigner#homedecoration#interiordecor#interiorstyling#decorating#livingroom#homedesign#interiordecorating#roomdecor#homeideas#homeinterior#homestyle
2 notes
·
View notes
Link
Check out this listing I just added to my Poshmark closet: Kombuch Anchor Follow Your Gut Amber Brown Glass 7” Bottle Bundle Of 7.
0 notes
Text
Coastal Buckets & Bins
Coastal Buckets & Bins: Crafting Your Own Beach-Inspired Storage Solutions
Introduction
Coastal decor evokes a sense of tranquility and connection to the sea. It’s characterized by its use of natural materials, soft colors, and a relaxed aesthetic that brings the soothing ambiance of the beach into your home. Coastal buckets and bins are perfect for adding both style and functionality to your space, whether you're organizing beach gear, storing household items, or simply adding a nautical touch to your decor. In this handmade article, we’ll explore how to craft your own coastal-themed buckets and bins using easy-to-find materials and creative techniques.
1. Why Coastal Buckets & Bins?
Coastal buckets and bins combine practicality with a charming seaside vibe. Here’s why they’re a great addition to your home:
- Functionality: Ideal for organizing various items such as toys, towels, or pantry goods.
- Aesthetic Appeal: They bring a relaxed, beachy feel to any room or outdoor space.
- Customization: Handmade options allow you to personalize designs and colors to fit your decor.
2. Materials Needed
To create coastal-inspired buckets and bins, gather the following materials:
- Buckets or bins (plastic, metal, or fabric)
- Coastal-themed fabrics (such as stripes, anchors, or nautical prints)
- Jute or rope
- Hot glue gun or fabric glue
- Scissors
- Paint (optional for metal or plastic buckets)
- Decorative elements (shells, driftwood, sea glass, etc.)
3. DIY Coastal Bucket & Bin Instructions
A. Coastal Fabric Bucket
Materials:
- Fabric bucket or plain bucket
- Coastal-themed fabric
- Fabric glue
- Scissors
- Decorative elements (optional)
Instructions:
1. Prepare the Bucket: Clean the bucket to remove any dust or residue. If using a plain bucket, consider painting it with a base coat that complements your coastal fabric.
2. Cut the Fabric: Measure the fabric to cover the outside of the bucket. Cut the fabric so it wraps around the bucket with a bit of overlap.
3. Attach the Fabric: Apply fabric glue to the bucket, starting from the bottom and working your way up. Press the fabric onto the bucket, smoothing out any wrinkles. Allow the glue to dry completely.
4. Add Decorative Touches: Glue on additional decorative elements like seashells, driftwood, or nautical-themed patches to enhance the coastal look.
5. Finish Up: Trim any excess fabric and ensure all edges are securely glued.
B. Jute-Wrapped Bin
Materials:
- Plastic or metal bin
- Jute rope
- Hot glue gun
- Scissors
Instructions:
1. Prepare the Bin: Clean the bin and, if desired, paint it with a color that complements the jute rope.
2. Wrap the Bin: Starting at the bottom of the bin, apply a small amount of hot glue and begin wrapping the jute rope around the bin. Continue wrapping, securing with glue every few inches to keep the rope in place.
3. Secure the Ends: Once you reach the top of the bin, trim the rope and glue down the end securely.
4. Add Finishing Touches: For an extra coastal touch, you can glue on small decorative items like starfish or driftwood to the jute-wrapped bin.
C. Painted Metal Bucket with Coastal Stencils
Materials:
- Metal bucket
- Coastal-themed stencil (e.g., anchors, seashells)
- Acrylic paint
- Paintbrush
- Masking tape
Instructions:
1. Prepare the Bucket: Clean the metal bucket thoroughly. Apply a base coat of acrylic paint if desired, and let it dry.
2. Apply Stencil: Position the coastal stencil on the bucket. Secure it with masking tape to avoid shifting.
3. Paint the Design: Use a small paintbrush to apply paint over the stencil. Be careful not to overload the brush to avoid bleeding.
4. Remove Stencil: Carefully remove the stencil while the paint is still wet to reveal the design.
5. Seal the Paint: Once the paint is dry, apply a clear sealer to protect your design and ensure durability.
D. Driftwood Basket
Materials:
- Basket base (wicker or fabric)
- Driftwood pieces
- Hot glue gun
- Scissors
Instructions:
1. Prepare the Basket: Clean the basket base and, if needed, paint it with a color that complements the driftwood.
2. Attach Driftwood: Begin gluing driftwood pieces around the basket. Arrange the pieces in a pattern or randomly for a natural look. Secure with hot glue.
3. Fill and Use: Once the glue is dry, fill the basket with your desired items. The driftwood adds an authentic coastal touch to your storage solution.
4. Tips for Crafting Coastal Buckets & Bins
- Choose Durable Materials: Ensure that the materials used are suitable for the intended use, especially if the bins will be exposed to moisture.
- Mix and Match: Combine different coastal themes (e.g., stripes with anchors) for a more dynamic look.
- Protect Your Work: For items exposed to the elements, use waterproof sealers or liners to extend their lifespan.
- Personalize: Add personal touches that reflect your coastal experiences, like pieces of sea glass collected during vacations.
5. Troubleshooting Common Issues
- Fabric Wrinkles: Smooth out fabric wrinkles by using an iron on a low setting or by applying additional glue to secure the fabric.
- Jute Unraveling: Prevent unraveling by securing the ends of the jute rope with extra glue and trimming any loose strands.
- Paint Bleeding: Use painter’s tape to mask off areas around the stencil to prevent paint from bleeding onto unwanted areas.
Conclusion
Crafting your own coastal buckets and bins is a delightful way to bring a touch of the seaside into your home. With these DIY projects, you can create beautiful and functional storage solutions that reflect your personal style and love for coastal living. Whether you opt for a fabric-covered bucket, a jute-wrapped bin, a painted metal bucket, or a driftwood basket, each project offers a unique way to enhance your space with a relaxed, beach-inspired aesthetic. Embrace your creativity and enjoy the process of making coastal decor that’s both practical and charming.
This article provides a comprehensive guide to creating coastal-themed buckets and bins, offering practical steps and creative ideas to enhance your home decor with a beachy flair.
0 notes
Last Seen Blogs

blogrep816
blogrep

sleepymaplepines
“You can do this”

viadescioism
The Temple Of Viadescioism


vaporloox
Cass' Art Corner