#diagonal bracing design
Explore tagged Tumblr posts
Visit Tumblr Blog
Explore Tumblr blogs with no restrictions, modern design and the best experience.
Last Seen Tumblr Blogs


Fun Fact
The “We are the 99%” Tumblr blog became the slogan for the Occupy Wall Street movement.
Text


Rivercane Planter Basket - Edmund Youngbird
Walnut hulls were used to dye the rivercane and to achieve the dark brown color.
Traditionally Cherokee basket makers are women; Youngbird being one of the few male weavers. Born in 1922, Youngbird learned to weave rivercane baskets from his grandmother.
Both the design and form of this basket are adaptations of Cherokee traditions. The dominant motif is the Snake or Serpent design, with the "serpents" running diagonally across the base of the basket. This design might be an adaptation of Louisiana Chitamacha basketry.
The upper third of the basket is marked with a Chain design. The design is a 20th century adaptation, but is a popular motif among Eastern Band Cherokee today. The interior of this basket has a cross brace to give strength to the bottom. Baskets were made as planters as part of the tourist trade, rather than for in-home use. What remains from tradition is the material, the single weave technique, and the coloration of the basket.
82 notes
·
View notes
Text


A (late) piece for dmcweek2024 day 4! I was buzzing to put forward something for the week. Prompt was alt universe.
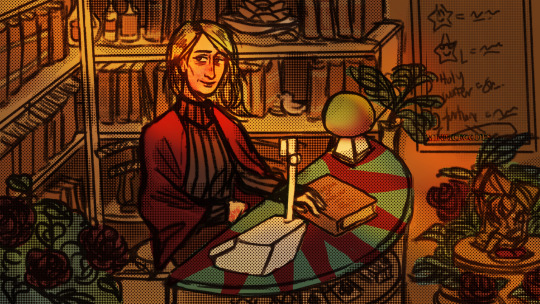
AU where Eva survived the fire and had to figure out a way forward, believing the twins dead. She becomes an RPG shopkeeper selling wares ranging from antique books to magical goods (Devil May Scry). She's also out for Mundus' blood.
Image descriptions are the same as in alt.
[ID: 7 Digital illustrations and sketches. 1: Coloured illustration of a bookshop at sunset. Eva, a pale blonde middle aged woman mans the bright patterned counter. She wears a turtleneck and red shawl, has shoulder length hair, and diagonal facial burn scar and scarring on her left hand. Light rays illuminate her gently smiling face. Besides packed books, on the shelves are potion bottles, statuettes, succulents, and a displayed katana. Roses and plants decorate the shop. On the counter are a thick hardback, bookscanner, and crystal ball. Cards are displayed inside the counter. On the wall hangs a price sign, featuring doodled vital stars (large star drawn with sunglasses), holy water and fortunes. Beneath it is a rose wreathed divinity statue display, with 2 red orb offerings in a dish. 2: Eva from behind, sitting hunched alone at a table where a birthday cake sits untouched. It's a two flavour cake. By her clenched hand are crumpled tissues. Caption: 'Vergil...Dante...happy birthday...' 3: Eva bracing the Devil Sword Sparda across her shoulders, aimed at the ground. She wears a bell sleeved, ruffled funeral/wedding dress with a slit for leg movement. A veil trails behind her like a ribbon. Close ups of her show the headpiece design; a pacifier made of a long bird skill, feather, rose, and four skeletal 'legs'. 4 & 5: Trish taking on teen Dante's image: a tan teen in black, with chin length white hair, a halter neck tank top, leather pants, kneelength boots and black polish. Her leather jacket collar resembles lightning bolts. She leans against an invisible wall, one leg bent to brace her foot against it. She looks askance with arched brows, lifting shades from her face. The 2nd image is a 3/4 profile with shades perched on her forehead and popped collar. 6: Helmetless portraits of Dante and Vergil in armour, expressionless. Dante's hair is shoulder length and falls across his face. 7: Full body of 2 somewhat lanky demonic knights. One (Nelo Angelo) in black and blue with droopy horns rests his palms atop his blue broadsword's pommel, the sword upright against the ground. He stands straight, staring ahead. The other in white and red and curled horns has a palm clapped on Nelo Angelo's shoulder, other hand at his hips. Somehow the eyes on his helmet express playfulness. At his back is the hilt to a flail, the spiked ball resting on the ground by his armoured heels. They're labelled '~16' . End ID.]
Read more for some wordy backstory and sketches. TW for mentions of torture, abuse and solitary confinement surrounding the twins.
I had...so many more ideas that I'm leaving out to keep this short. It's fun to think how she'd mesh with the cast.
Like! her and Lady. Mother that lost her kid and kid that lost her mother. It writes itself how much unwitting projection can go wrong. And pretty much everything about her, the twins, and Trish :)
In terms of backstory:
After the fire she's alone. Her birth family disowned her long ago. She thinks about revamping the mansion but the idea of staying in that empty space with only memories for company is too much. So she eventually opens a small store.
Starts off paranoid and distant. Still is distant but gets entangled with the local community overtime. Greets people by name and they'll chat about how life has been going. This includes demon hunters and demons and supernatural beings living peacefully; her shop becomes a small safe haven to exchange information to stay safe.
Gets very good at forging protective charms. Haunted by the memory of the enchanted closet, smashed in and empty.
A regular is a schoolgirl who originally came to pick up reserved books for her father but stuck around because hey, this place is quiet and interesting, and the owner serves stellar teacakes. Great place to study. To Mary, Eva's kind, though odd, secretive and a little lonely.
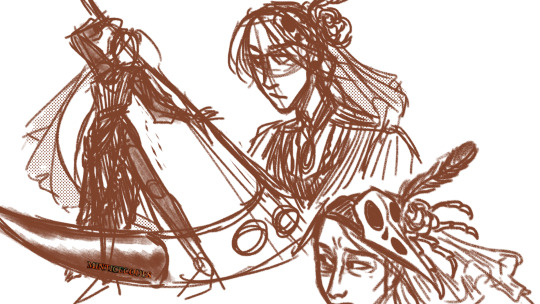
I got inspired by Eva's association with the bangle/bracelet of time and the amulets for her fighting style. It's based around item crafting, like an RPG character slapping on every stat boosting item.
She stitches together different outfits for different needs Cardcaptor style. They're all exceedingly dramatic. It's not clear here but I wanted a bird motif to eventually come through. Phoenix motif, really.
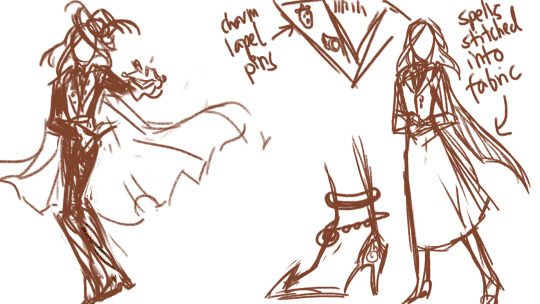
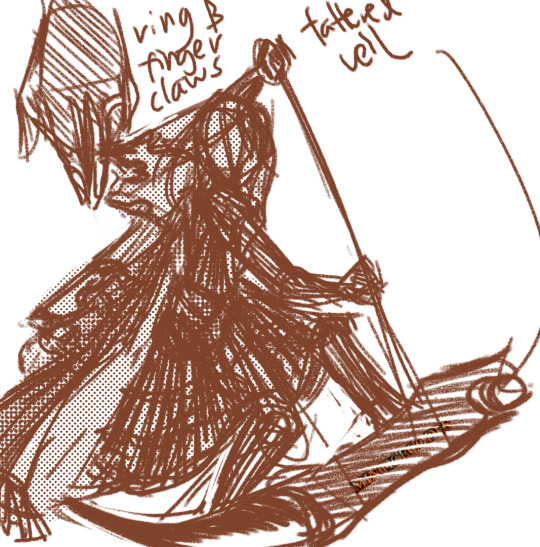
[ID: Rough sketches: A magician esque outfit with vest, feathered tophat and cape. A longcoat with long skirt and long scarf at her back like a cape. The cape is tagged with 'spells stitched into fabric'. Close ups on the coat lapel show two pins (strawberry and wing), labelled 'charm lapel pins.' Close up of the shoes show sharp heals and ankle bracelets. Eva leaping in a black bodysuit and leotard, with feathery collar, quill behind her ear, and ballet shoes with a claw at the heel. Eva making a triangular 2 hand sign in a hooded cloak and longskirt. Around her shoulders are claws. At her hips is an hourglass. Above her heeded head is a clocklike halo. Beside her is a sketch of a woman with a lionhead mask. A funeral and wedding dress inspired outfit. Eva crouches, wielding the Devil Sword Sparda in scythe form. Her face is covered by a tattered veil. She wears a knee length ruffled dress, black gloves, and a long, ruffled cape. Close up of her left hand shows a ring and finger claws Rough comic. Chibi lady talks to chibi Eva. Lady holds up a black body suit with billowing sleeves and a cleavage window. Lady: "Eva what is this" Eva (smiling cheerfully): "Oh - that old thing!" Eva: "My old hunting outfit. Gosh I'd almost forgotten about it. Not the most comfortable thing - so skin tight..." However Lady fixates on 'my old hunting outfit'. The words go in one ear and come out as a younger Eva in a catsuit, pointing a gun with a serious expression, wind blowing through her hair. Lady stares into the distance, bewildered, and slightly blushing. End ID]
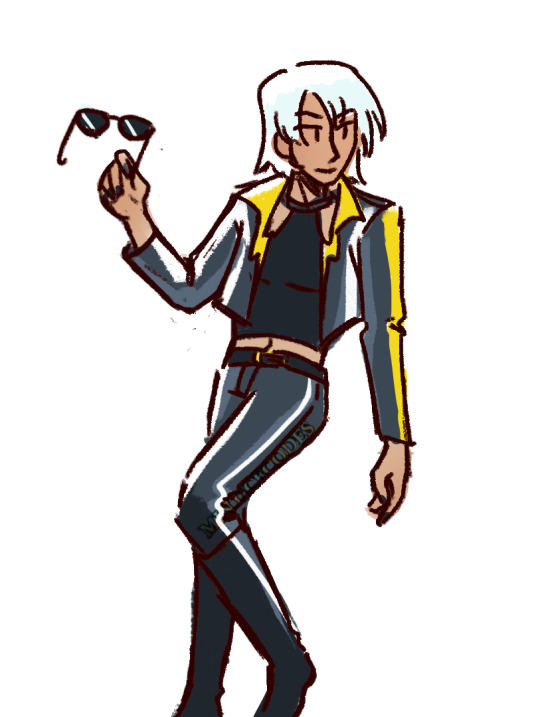
Meanwhile the twins are having a terrible time but they have each other, even if they don't remember they're brothers. I think it'd be sweet if they have a bond anyway. Everyone else thinks they're rivals at best.
(Nelo is Mundus' favourite to toy with as the proud, eldest son. But when he gets rough, Bianco butts in and acts up for Mundus' attention. This gets him sent to solitary confinement; Mundus figured out Bianco hates small spaces and designed an iron maiden for him. Others think Bianco is a brute who acts out for a fight. But that's ok. It means Bianco can keep buying Nelo time.) (When lucid, Nelo despises his own weakness when this happens.)
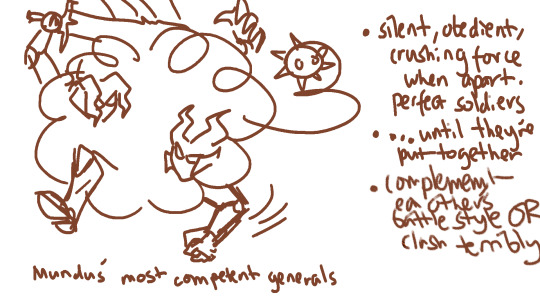
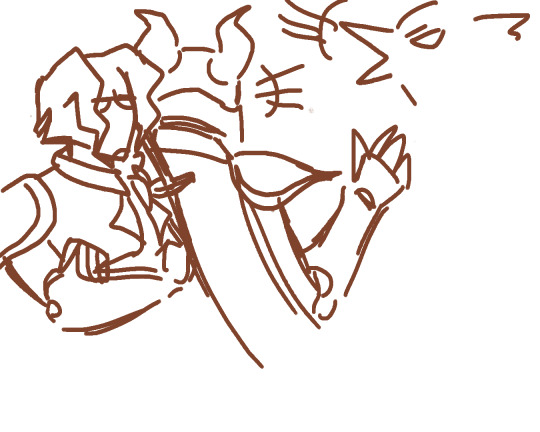
[ID: 2 Images. Nelo and Bianco Angelo in fisticuffs in a cartoony dustcloud, glaring at each other as they fight. They're captioned 'Mundus' most competent generals'. Additional text: 'silent, obedient, crushing force when apart. Perfect soldiers. ... until they're put together. Complement each other's battle style OR clash terribly. Nelo Angelo staring off, arms crossed and furrowed eyes somehow expressing being completely fed up. Behind him, Bianco and Griffin talk at each other. Griffin's glaring. Bianco has a hand up to gesture. End ID]
#dmc#dmcweek2024#devil may cry#dmc eva#eva sparda#dante sparda#dmc dante#vergil#nelo angelo#dmc vergil
205 notes
·
View notes
Text
I may just be a biased Slate fan but ouegh. their design is so visually interesting
The asymmetry and diagonals with their tool belts going from their left to right. The balance of how the patches are placed to highlight the empty spots that line leaves, without being too visually distracting. The fabric physics with their scarf, rolled sleeves, tied pants. That big glove (arm brace?) visibly shored up with just loops of tape because who tf has the time to do more than that, they've got work to do, it's almost launch day, c'mon. All this so in one glance we can read 1. Utility and skill, and 2. A lack of patience or caution, both communicated extremely efficiently. Amazing model. 10/10. this is what peak Hearthian performance looks like.
#original posts#outer wilds slate#man I love Slate#also just from a game/visual perspective big props#it makes sense that there'd be a lot of work put into them since they're the Hearthian we see most often#but still extremely tasty amount of detail
37 notes
·
View notes
Text
Creep
Pairing: Peter Parker x Black Fem Reader
WARNINGS: Description of underage drinking (don't do!!)

When you were here before, couldn't look you in the eye
You're just like an angel, your skin makes me cry
Peter was late to his morning class, AP Lit. The class that he actually somewhat enjoyed from the series of classes he had this semester. Technically this would be his last semester of high school since he applied to graduate early. Receiving the Tony Stark Foundation Scholarship, he would be having an internship in replacement to the spring semester of highschool.
He didn't have alot of people who would miss him. His best buddy Ned, was still here. But he was recently voted SGA President and Peter could see how busy that was going to keep him. He was spared a humiliating belittlement from his English teacher Mrs. Sparrow, and quietly took his seat in the back. Eyes down to the ground, he almost didn't notice the person sitting in his designated unassigned seat.
You were pretty. Micro twists styled in a half-up half-down style. A soft purple scrunchie holding your hair up. You held the same colored purple pencil in your hand. Notebook open, annotating the assignment for the class period. Peter coming to his senses, that he was staring took the nearest seat. The one beside you to your left. The desk itself was at a diagonal angle, so he was facing the front, but he could look at your side profile without it coming across as weird.
Feeling his lingering gaze, despite his attempt not to stare. You looked at him. Really looked at him. Could you see that he existed? Smiling at him, he could see your lips move but couldn't understand a word you said. The elastic bands of your braces, peeking out of your mouth.
"Huh?"
"I'm Yn, nice to meet you."
Frozen like a deer in headlights. Peter's inner thoughts short circuited. He was seconds away from entering a panic state.
"We're in the same literary group." You continued, not wanting to make him more nervous. A pink flush scattered across his face.
"I'm Peter." He spoke like he finished running a mile.

I wish I was special, you're so fuckin special
Like the whole school could smell the new blood in the water. Everyone attempted to make small talk with you at lunch. Which happened to be the same lunch block Peter had. Not knowing anyone, you asked if you could sit with Peter. Not even able to form the words to verbally agree, he nodded his head.
However that invite seemed to apply to multiple people. Flash Thompson, MJ, and Liz made their way over to the table. Peter sitting on the end farthest away from you. He appeared like an outcast at his own lunch table.
Watching everyone ask you questions, hearing your laugh, hearing your stories. The reason you had moved from your hometown up state to Queens. You had a northerner accent that captivated the group. All of them wanting to hear you pronounce certain words.
But that was just the beginning of all the cool things about you. You were a student athlete, which practically had Flash drooling in the palm of your hands. You were a gynamist by technique, but loved cheer. You shared your plans to try out for the varsity team as a sophomore this weekend.
"Damn girl your resume is already three pages, and you still have two years left." Michelle commented, pointing at you with a celery stick.
"Most of it I wouldn't even be doing if my parents weren't making me. They think I have a real chance at going to an Ivy if I am apart of eight extracurriculars and keep my GPA high." You stated so casually.
"I mean yeah, what more do you have to do. You already have the looks." Flash blurted out. Uncharacteristically of him, causing everyone to blurt out a laugh. Peter himself even let out a laugh.
"Shut up penis parker."
"Somebody sounds jealous." Liz pointed out.
"Perhaps someone didn't get that Tony Stark Scholarship."
Michelle added salt to the injury.
Clenching his fist, Flash was a ticking time bomb. Like someone had just added mentos to his sprite. Cutting him off, you peaked down the lunch table at Peter.
"You got the Tony Stark scholarship?"
Clearing his throat quickly. Peter played off his accomplishment. Like it wasn't winning the academic lottery.
"Congrats! You worked hard for it, you deserve it Peter."
Yours words went straight to his heart. He couldn't ignore the increasing speed of the butterflies in his chest. For the short amount of time that you knew of his existence, you spoke to him with kind authenticity. Something that he hadn't received in years, something he didn't know that he wanted so badly.
"Thanks."

But I'm a creep. I'm a weirdo. What the hell am I doin' here.
The New York skyline was becoming one of Peter's favorite sights. It was oddly peaceful at 2:00 am. The city traffic was background noise to the internally dialogue Peter was having with himself. He paced back in forth.
I'm a loser, Yn wouldn't want anything to do with me
But I'm also Spider-Man, I could be her knight in shining armor
Telling her I'm Spider-Man could jeopardize her safety and May's safety.
His senses perked up from a string of dark grey clouds, coming from the building he was on top of. The smoke wafting through his nostrils, he slipped his mask on before webbing to the side of the building. Crawling down he searched for the fire.
With full force a window Peter was getting ready to crawl over thrusted open. Hiding a few inches above, more smoke funneled out of the apartment.
"I told you not to have the oven that high Yn." A man's voice spoke. But Peter froze at the sound of your name.
"The box said 400 degrees."
You weren't upset at all. Laughing and fanning the beeping smoke detector. A failed attempt at making your grandfather's cinnamon apple cobbler.
"I fear for your future roommates."
Peter on the other side of the wall had a stupid smile on his face. It was nice to hear normalcy for once. Not world-ending threats that he was traveling to space to defeat aliens that could wipe out the world with one snap. Or worrying about balancing the mutually complex lives of Peter Parker and Spider-Man. Part of him wished he could join in on the laughter. Pretend he was normal, that everything would be okay for longer than five minutes.
A few seconds later a firetruck could be heard approaching the apartment building. Peter could see the big truck turning on the block.
"Go on the ledge and tell them everything is fine. It's probably Antonio working this time." Your dad was so calm about the situation. Poor cooking skills, is a trait you seemed to inherit from your mother. So the local firefighter station and it's volunteers were familiar with the failed attempts at your cooking.
Following his instructions. You waved your hands seeing Antonio in his gear getting ready to set up the ladder. Peter like a fly on the wall watched you in your pajamas. A vintage band t shirt from the 2000s and fuzzy pants. Nike slides with white socks and a jumbo bonnet.
"Everything alright up there." Antonio yelled spotting you.
"Yeah! Just a bad attempt at apple cobbler. I'm sorry!" You giggled halfway.
"Turn down the oven next time Yn."
"Told you."
He watched like was a background character. Unimportant. Irrelevant. Obsolete. He needed to get out of here.

I wanna have control. I want a perfect body, I want a perfect soul.
Anger. Pain. Numb. Those were the three words that Peter could only feel. His encounter with the multiverse villains. The death, murder of his Aunt. The publicized murder of his Aunt. It was pushing him to his breaking point, and he was losing every piece of his humanity.
He stopped holding pack his punches. Letting his grief come out in the broken bones of the criminals he fought. He was having emotional outburst in schools. It took the smallest thing to set him off.
He walked through the hallways, quiet. More quiet that unusual, only a few people knowing about the recent passing his Aunt. Those people being Ned, Liz, and Michelle. And soon enough you were told.
"Have yall noticed a change in Peter? Is everything okay?"
Ned and Michelle looked between each other. They debated on whether they should tell you about what is wrong with Peter. Michelle watched as Ned opened his mouth but cut him off.
"He's just on his period. You know, testerone. Uh hormone imbalance."
"Yeahhhh. He just needs space right now." Ned topped off. Unsure what the two were hiding you didn't push the topic any further. Yet when you two were alone in AP Lit, you were seeing a different Peter.
His eyes were blood shot red, eyes puffy. You could hear the music from his headphones blasting in his ears. Low enough that Mrs. Sparrow wouldn't notice, but sitting right beside him you noticed. His posture was haunched over, his head was almost touching the desk.
Your heart ached seeing Peter like this. Sure he was quiet, but he was rude towards you. Ripping out a piece of paper from your notebook you wrote down two questions.
Are you okay?
Do you want to talk about it?
Discreetly slipping it to Peter. You faced forward to appear that you were listening to the lecture. Peter lifted his head, looking at his elbow to see the piece of paper.
Once you knew he read the note, you looked at Peter. Lending him your favorite pencil. His eyes held a different level of sadness to them. Almost like the light had left his eyes a long time ago.
He scribbled on the paper.
'No'
'No'.
Peter returned the note before standing up and walking out of the classroom. Ignoring Mrs.Sparrow's calls for him to return to class. A seed of guilt planted in your gut, feeling like you set off Peter.
Peter stepped into the apartment for the first time since Aunt May died. He could do 24 hour patrol shifts for so long before his body gave up on him. He was on the hunt for the Norman Osborne, Green Goblin. His quest for vengeance would be filled until he watched the life leave his eyes, like he had to watch Aunt May's.
Taking off the suit Peter showered. His body littered in new and old bruises. His torso resembling one of a dalmation, it was a surprise he could still walk upright. His brown hair sticking to his forehead as the water ran down. Days of sweat and dirt clumped into his hair. The hot water felt good and soothed his muscles.
Drying off, he winced touching a sore area. Right below his ribs there was a evident gash. Now starting to heal, Peter wondered how long the wound had been there. His emotional numbness evolving, further than he imagined. Looking the wound over, it was quite deep and he would require stitches.
He wondered how you would react seeing his bruises. If you were the squeamish type and hated looking at blood. Would be be disgusted seeing the toll Spider-Man had on his body.
Would you view him differently if you knew he was on a man-hunt for Green Goblin. That he was going to be his one way ticket to hell. Serving justice to his Aunt, or would you want him to turn the other cheek. Keep his moral compass straight and not let the name friendly neighborhood Spider-Man be tarnished by grief.

I want you to notice when I'm not around
Five days had gone by since you saw Peter in AP Lit. The general school body carried on like normal, but internally you were panicking. Perhaps it was naive of you to think that a school that saw over 800 students would notice one students unusual absence. Coming from a smaller school, it was hard not to notice when the same classmate was absent multiple days in a row.
At the lunch table, you waited for Michelle and Ned to join you. From the facial expression you were making, they could already tell you were going to talk about Peter. Truth to be told, Peter hadn't spoke to Ned or Michelle. They were just in the dark as you were. Except they knew about his other identity, and knew about the death of Aunt May.
"Okay, let's cut to the chase. What's wrong with Peter?"
Your voice was firm and somewhat demanding. Giving each other the same look as last time.
"And I want the truth. The full truth." You nipped any planned lie in the bud.
"His Aunt died." Ned said softly. Slapping his arm, Michelle fussed at him through tight lips.
Covering your mouth, you felt your stomach drop 100 feet. He was grieving. It would explain the puffy eyes he had over the past few days.
"His uncle died when he was in elementary school, and his aunt. He doesn't have any family left."
Hurting more for Peter. Your mind went into action mode. Determined, you slapped the back of your hand into your palm.
"That's not true. We are his family. We have to do something for him."
And something you all did. After school you walked to the nearest store. Buying him flowers, a card, and a basket filled with his favorite snacks. It wasn't too much, but you wanted do something. The plan was for you to deliver the basket to Peter. Ned had a mandatory SGA meeting to plan Homecoming and MJ had a debate match. Now all you had to do was gather your courage to face him.

She's runnin out the door. She's runnin' out. She run, run, run run.
Slightly delirious Peter sat up in a daze. Confused as to who could be at the door. Hoping it wasn't the landlord to ask where the rent for this month was it. He could only handle one obstacle at a time.
Concentrating to walk to the door without falling over. The effects of the alcohol hitting him in full effect. He swung open the door, eye lids heavy.
"Peter."
"Yn." He slurred. Not fully processing you standing in front of him.
"What are you doing here?"
"I just wanted to check on you. You haven't been at school."
"Didn't think you would notice." Peter stood to the side letting you enter the apartment. You could sense the touch of Aunt May from the apartment. There were several pictures on the dinner table of her and Peter. The one in the center of Peter accepting the Tony Stark Scholarship. His smile was bright, radiant almost.
You took a seat on the couch. Your fingers in your lap, wondering how to bring up the care basket.
"Want some?" Peter offered holding onto the bottle of Chardonnay. He poured himself a glass, almost filling it up to the top.
"Peter we are sixteen."
"Right. I apologize." He put the bottle back into the cabinet. Taking a big gulp, he joined you on the couch. You were speechless watching how low Peter had become.
You struggled to find the words to express your support for Peter in this difficult time. With a gentle touch, you laid your hand on top of his. The other reaching behind you to give the signed card.
"Here." Peter looked at the envelope with a neutral facial expression. He too was at a loss for words. Opening the card silently, Peter read the heartfelt words from his friends. In his drunken state his emotions twisted and turned inside his chest. His emotional resolve starting to crack, tears flooding yet again.
"You all didn't have to do this." Dry and emotionless, you explained to Peter that the three of you noticed the hurt he was going through.
"Am I some charity case to you all. You think a card is just going to make it disappear." He stood up, looking down at you like you offended him.
"Is that all I am to you? Huh!?" He voice raised.
"Peter, no."
"Do you think I'm weak. You think I'm some fragile piece of glass." His anger rising, hands pulling at his scalp. You stood up as well, trying to reason with him.
"Peter listen-"
"No!"
"No you listen to me! You aren't going to shut out your friends, people who care about you because you are grieving. You don't have to carry this eight alone."
Cutting him off again before he could speak.
"Maybe Ned and Michelle will let you toss them to the side. But I won't let you. You don't know how good you have it right now."
Swallowing thickly, Peter reflected on the past week. The missed calls he ignored claiming he wanted to space. Walking to school to avoid seeing Ned on the bus. Skipping debate club so Michelle could question him about his absence.
Stunned into silence, you took it as Peter being stubborn.
"I thought that maybe hearing it from me, you would change your mind. But obviously I was wrong. I'll give you your space Peter." The way you said his name was with complete dejection. Like it was form of rejection in itself. Peter saw you turn your back to walk out of the front door. Leaving him alone in the empty apartment, drunk and upset.
"Please, help me." He said weakly, voice cracking. "Don't go."

Whatever makes you happy, whatever you want.
You're so fuckin special, I wish I was special
But I'm a creep
The first promise you made Peter do was to pour out all of the bottles of alcohol in the apartment. He agreed, partially embarrassed you had to see him in that state.
The second promise was to call of Ned and Michelle and apologize. He invited them over to his apartment for Legos and pizza, which they readily accepted. For the first few minutes it was a little tense. Peter apologized for his behavior and by the end of the night everything was back to normal. Ned and Peter geeking out over Star Wars, and Michelle making fun of them equally.
You were able to insert yourself into the flow of the conversation naturally. Being able to laugh at the quirky humor the group had, not having to try to hard to socially camouflaged into someone else. You were being yourself.
You were having so much fun that you nearly forgot you had a curfew, and your apartment was a twenty-minute bus ride in the opposite direction. Hugging everyone individually, you promised to see them on Monday for school. Holding Peter by his shoulders to watch his promise to attend school regularly again.
"Do you want us to walk with you Yn. It's not good for a girl to walk around by herself at night." Peter offered.
"No, you all live in this area. It's fine, I promise."
"Call us if someone follows you."
"Or just call for Spider-Man." Michelle chimed in sarcastically. Ned looked at her knowingly.
"Right, like Spider-Man is going to show up out of thin air." You joked back.
"You never know." She shrugged, and Peter cleared his throat awkwardly. You didn't linger any further, hurrying down the steps. The cool New York air hitting your face. Grateful you had on a heavy coat, so the walk wasn't too painful.
Holding onto the pepper spray in your pocket. You weren't naive of the New York streets, and took every necessary precaution. No headphones, staying in public areas, no short cut through alleys. Hair pulled up so it couldn't get tugged on. Your father a Harlem native, taught you the basics of walking home alone.
"Psst. Pssst." You ignored the voice cat calling you. Increasing your pace faster, you didn't even turn around to look at them. But the voice got closer and more desperate. Almost sprinting at this point, you could hear the feet picking up equal speed. Adrenaline on 10, you run avoiding street lights and lingering shopping carts. Before you realized it your feet were in the air, your body in the air.
"Oh my God!" You looked at the ground which you were significantly higher.
"It's okay! You're okay." He soothed, trying not to sound scared himself.
Balancing you both on the buidling, you had a chance to look at the man in front of you.
"Spider-Man!?"
Wiggling his fingers, you couldn't contain your excitement. Nearly jumping back into his arms. You cheesed harder than ever before.
Regaining your composure you, thanked him.
"No need to thank me."
"How did you even know where I was?"
Lying smoothly on the spot. "I was just in the neighborhood."
Sincerely, thanking him again.
"Do you think you could bring me back to the ground?"
"Right." He grabbed your waist so naturally. Webbing to the building sliding you both to the ground.
"Get home safely Yn." He spoke to himself, watching you walk down the street longer than he should have.
Gosh, he was creep.
#madameaug#x black reader#black readers#peter parker#peter parker x reader#peter parker x black!reader#marvel x black reader#spiderman x reader#spiderman x black reader#x black fem reader#black reader
26 notes
·
View notes
Text
Like It Was Built For You
Pairing: James Potter x Disabled!Reader Summary: James takes you to the lake for a day of sunshine, stories, and sweet surprises. Tags: disabled!reader, depictions of chronic pain, reader using mobility aids, thoughtful!james, no use of y/n, fluffy accessible date ideas, james being a golden retriever in love, floating lounger designed with care, subtle environmental magic, storytime and snacks, soft boy charm, lakeside serenity, water accessibility with magic, gentle support not pity, reader feeling safe in their body, feeling seen and loved, the lake whispers back, sunshine and dragonflies and dumb songs, this is what a full-time job of love looks like Word count: 2.3k words

The sun begins to tip above the tree line as James helps you out of the car, his hand warm and steady on your arm. You adjust your forearm crutches, eyeing the rough forest path ahead. Even with magic, this kind of terrain is usually a hassle—roots protrude like gnarled fingers, loose stones lie in wait to trip you up, and the mud masquerades as solid ground. Your body braces for the challenge, muscles tensing in anticipation, a dance as familiar as it is exhausting.
But if James is daunted, he doesn't show it. His smile is easy, as though navigating the wilderness were no different than a stroll down Diagon Alley. His gaze never strays far from you, as if there's nowhere else he'd rather be.
"Don't worry," he reassures you, pressing a quick kiss to your temple. "I've got it all figured out. Just wait and see."
"Right. That's what you said before you tried to charm the toaster and nearly set our kitchen curtains on fire."
"Ah, well, that was a calculated risk," he retorts, feigning seriousness. "This, however, is a well-planned masterpiece. No fire involved. Unless you count your sharp wit."
"Flattery won't make me forget it."
A laugh rumbles from his chest, and he pulls out his wand with a flourish that speaks of long practice. He murmurs an incantation, too low for you to catch, and the path ahead alters subtly. The ground firms underfoot, roots retracting beneath the soil like shy creatures embarrassed to have been caught underfoot. Stones shift, creating a smooth walkway, and where sharp edges once threatened, moss cushions the path. The air around you seems to brighten, as if the very forest is leaning back to allow you passage.
Your eyes widen, taking in the transformation. "You really have thought of everything."
"Told you," he replies, grinning now. His arm extends toward you, not just for support but as a gentleman might offer to a lady in a grand ballroom. "Shall we?"
"Still trying to impress me, Potter?"
"Always." His grin broadens. "It's practically a full-time job."
Together, you navigate the gentler terrain, your pace slow and deliberate, each step an act of trust. James never rushes you, matching his stride to yours, his presence a constant at your side. He fills the silence with stories—of the last time they were here, how Sirius nearly fell into the lake chasing after a frog; how Remus sat under a tree, nose buried in a book, until he was so sunburned his freckles seemed to rebel against his skin. He tells you how Peter swore the lake was haunted, and how James spent half the afternoon making ghostly noises just to spook him.
"Haunted? Really?" You raise an eyebrow, but you can't suppress the smile tugging at your lips.
"And then Sirius convinced him it was the ghost of a mermaid who died of boredom," James says, laughing softly.
"Did he cry?" you ask, trying to picture the scene.
"Only a bit, when he tripped over his own shoelaces running away." James grins, clearly pleased with the memory.
The stories fill the silence between you two like a comforting melody, allowing you to lose yourself in the rhythm of shared memories and laughter. It's almost as if you're walking through the pages of a storybook, each tale more enchanting than the last.
The trees part, and dappled sunlight spills onto a placid lake that stretches out before you. The water is so clear you can see the pebbles near the shore, their colours muted by the gentle waves lapping against them. A family of dragonflies skim across the surface, disturbing it with fleeting kisses. The hum of bees fills the air, punctuated by the occasional trill of distant birdsong. Every now and then, the wind whispers through the leaves, carrying with it the scent of damp earth, sun-warmed water, and the promise of adventure. The atmosphere hovers on the edge of tranquillity and suspense, as if the day itself holds its breath, waiting for the story to unfold.
You pause at the water's edge, eyes wide as you take in the scene. It feels like stepping into one of those paintings that hang in fancy galleries, the ones where the world seems both impossibly beautiful and achingly real.
James watches your expression, his own face lit up not by the spectacle of nature, but by the wonder reflected in your eyes. For a moment, he remains silent, allowing you to soak in the view without interruption. Then, with a clap of his hands, he breaks the stillness.
"Alright," he announces, his voice carrying across the open space. "Operation Lake Day begins now."
"The name could use some work," you say, turning to him with a smirk. "It's a bit...on the nose."
"Do you want branding?" James retorts, feigning hurt. "I'll get us a flag next time. And maybe a theme song."
"With choreography?"
"Obviously. I've already got half the lyrics written in my head. Want to hear the chorus?"
"Only if I must," you retort with a roll of your eyes.
He clears his throat dramatically. "At the lake, with my best girl—her smile shines like a pearl—"
"Enough!" You laugh, shaking your head. "That's atrocious."
"But you love it."
A few flicks of his wand later, and a large lounger floats just above the water's surface, drifting closer towards the shallows. It's not just a simple sunbed, but a floating oasis built for relaxation, complete with cushions and adjustable backrests that seem to respond to the slightest shift in weight. There are no steps to climb or balance to maintain—just a gentle slope leading from the shore to the lounger itself.
"No stairs, no balancing acts," James declares, watching your expression closely. "Just you, me, and the lake." He winks, and though you try to hide it, your curiosity is piqued.
"You're going to feed me out there, too?" you ask, raising a sceptical eyebrow. "Or was that the extent of the romance?"
"Darling, you wound me." James places a hand over his heart, feigning hurt. "I've come prepared with snacks, magical music, and my sparkling wit. Honestly, you should be thanking me for the pampering you're about to receive."
He sets up a large sun umbrella next, casting a welcoming shade over your spot. The deck chair adjusts to your body automatically, even tilting slightly to support your legs. A cooler materialises at your side, filled with refreshing fruit, crisps, fizzy drinks and chocolate frogs. There are even small napkins with ducks printed on them.
James pulls out a portable speaker from his bag, and your favourite playlist begins to play. It's soft acoustic guitar and mellow singing, the kind of music that doesn't demand attention but rather hangs in the air, adding to the tranquillity.
"Thought I'd forget the music, didn't you?" he teases, smiling as he reclines on his own chair.
"I wouldn't put it past you," you reply, letting the rhythm wash over you. "You once gave me a Valentine's card with a Bludger on it."
"It said 'You knock me out.' That was clever!"
"Romance, thy name is Quidditch injury."
Laughter bubbles up between you, light and unforced. It's been far too long since you've felt this... normal. Slowly, your shoulders relax as you stretch out your legs and let yourself sink into the moment.
When the time comes for you to take the plunge, James helps you into the water with a charm that gently lifts and lowers you, as if the lake itself cradles you in its embrace. A flotation ring appears, supporting your back while another adjusts snugly around your legs. You float there together, buoyed by magic and care, his hand never straying far from yours. The lapping water against your skin isn't a reminder of what you can't do but a testament to what you can—feel, sense, be alive. The sun warms your face, being near James soothes your heart, and the world's noise fades into dragonflies' hum.
"Are you certain this won't topple over?" you ask, testing the stability.
"Only if you start reciting poetry," comes his dry response. "That seems to unbalance everything."
"I'll have you know I'm quite poetic."
"Darling, last week you rhymed 'cauldron' with 'shouldn't.'"
"It was abstract."
"It was an abomination."
James flicks water at you, and you return the gesture, laughter bubbling from your lips as droplets catch the sunlight and glisten like tiny diamonds. Curious fish dart close to investigate, their scales flashing silver and blue, but they scatter when your hand breaks the surface.
The sun begins to set, casting long shadows across the deck of the yacht. You're lounging on a plush chair, James at your side, his arm draped casually over your hips. A soft breeze rustles through your hair, carrying with it the scent of the ocean mingled with the faint aroma of the dinner you shared earlier.
You're both relaxed, the tension of the day gone, replaced by a comfortable silence. James reaches for one of the books he brought along—a campy detective novel featuring a talking cat named Inspector Whiskers. He opens the book and begins reading aloud, using different voices for each character, switching from a high-pitched squeak for the mouse informant to a gruff growl for the bulldog police chief.
"Inspector Whiskers doesn't appreciate your scepticism," James says, looking at you from under furrowed brows, mimicking the cat's supposed haughtiness.
"Perhaps Inspector Whiskers should solve the case faster," you retort playfully, propping yourself up on one elbow to look at him.
"Ah, but where's the fun in that? It's all about the chase, not the catch."
His deep laugh is contagious, and soon you're both laughing so hard that your sides ache, and James has to pause reading to catch his breath.
He feeds you another grape, the sweet juice bursting in your mouth as you bite into it. With his other hand, he holds a small fan, waving it back and forth to create a gentle breeze that cools your skin. His voice is soothing as he talks about the constellations that will soon appear in the night sky, pointing out where they'll be located.
"Do you want to stay out here until the stars come out?" he asks, tracing a path with his fingers down your arm, causing goosebumps to form despite the warmth.
"Only if you promise to name a constellation after me," you tease, closing your eyes as his touch becomes more deliberate, more intimate.
"I already did," he whispers against your ear, sending shivers down your spine. "You know the cluster near Orion's belt? That's yours. I call it 'The Brilliant Flame of My Heart'."
You can't help but laugh, the sound light and free. "That sounds like a candle scent from a gift shop."
"Shh, let me be romantic," he chides gently.
Resting your head against his shoulder, you listen to the distant hum of insects and the occasional birdcall. Your lips curve into a wide smile as the sun starts its descent, casting long shadows over the rippling water. The golden hour bathes everything in a soft glow that seems to suspend time itself. You breathe in the serenity of the moment, letting it fill you until there's no room for anything else.
James moves closer, until the space between you is nothing but a whisper. His lips find yours, not in a hurry, not with urgency, but with an unhurried warmth that spreads from your mouth to your chest, radiating through your body like the summer sun. His hands, strong and reassuring, settle on your waist, their touch grounding you in the moment, in this reality.
Your fingers brush away the damp curls clinging to his forehead, tracing the lines of his face as if committing them to memory. He pulls back slightly, eyes still closed, a smile tugging at the corners of his mouth. He leans in again, this kiss softer, a seal upon an unspoken promise.
"Thank you," you murmur against his skin, "for making today the best."
He shakes his head, pulling away just enough to look into your eyes. "It was perfect because you were here."
A dragonfly zips past, its wings glinting iridescent under the umbrella's shade. It hovers for a second before darting off, leaving you two alone once more, suspended in time by the lake's still waters. You lean in, savouring another kiss, and close your eyes to the world around you, focusing only on the here and now—the sun's warmth, the embrace of a friend, the solace of being truly seen.
For once, everything feels right—like the universe has conspired to give you this moment of peace, like someone somewhere looked at your heart and decided it deserved happiness.
The sky deepens from lavender to indigo, the first stars piercing the velvet expanse. You remain, cocooned in warmth and tranquility, lying next to James under a blanket that seems to hold the world at bay. His fingers are entwined with yours, a silent promise that lingers even as sleep beckons.
Soft strains of music drift through the air, mingling with the subtle scent of pine and the rhythmic whisper of the lake. Every so often, you and James play a quiet game, tracing constellations and inventing stories about the figures they form. Your words weave tapestries in the dark, stitching together the fabric of this shared moment.
Eventually, your eyelids grow heavy, surrendering to the lullaby of nature's breath and the distant melody. As sleep claims you, there's a sense of rightness, of pieces falling into place. It's a simple contentment, profound in its rarity—a bubble of joy that swells within your chest until it's all you can feel.
#james potter x reader#james potter x you#chantelle writes fic#harry potter fanfic#marauders era#marauders fanfic#marauders au
13 notes
·
View notes
Text
deployment
"Circuit, brace for combat."
"Received and deploying, handler."
The circuit, the pilot of their mech, was nestled in the wires of its heartmount; cables hooked into their neural ports, wrapping around their brainstem and invading their nervous system. They hadn't synched yet, but they were prepared.
Fifty meters of white-gold eschatalium, sharp and pseudo-organic in design, artfully painted black to intersperse with the gold, colors of the Empyrean. Two legs on heel-mount feet, stiletto-like greaves for agility; two arms, long and spiked with clawed hands and packed full of the best weaponry humanity could produce. An armored torso with a head atop, sleek and like a knight's helm, massive sharp-toothed jaws that could snap steel girders in half; four camera eyes, diagonally-spaced, with a wreath of decorative red feathers signifying its position: solo work, sovereign from any squadron.
A Mechanical Eden, one of the finest and greatest weapons of the Empyrean. And within, its circuit, a pilot called Killy, short for Killer. They looked over the hardlight screens before them, ensured all systems were green, and hit the button to synch: all at once, a flood of chemicals surged through the wires and into their body. The lovechild of opium, methamphetamine, cannabis, and psilocybin, derived from human spinal fluid and currently smashing a hole in Killy's consciousness.
Their spirit expanded out through their body and into the soul matrix of their Eden; they meshed together, an amalgamate machine consciousness and its pilot, a beautiful union of identity put to one purpose--war.
Hey, pretty. Hello, circuit. Good to be back. Good to have you back.
Through the Eden's eyes--their own eyes, now--they surveyed the beach. They had been dropped down from orbit onto this small island to await orders in case a battle some kilometers away went badly. Through their body's eyes, now just another part in the war machine, they received signals on-screen from the Athame, the Arbiter-class doll overseeing battle on this, the moon of Illulia.
"Witch summoning imminent. Eliminate or contain threat."
Killy didn't hesitate, and their body--as well as their Eden--broke out into a manic grin. It was time for battle.
Massive golden wings unfurled from the Eden's back, spell circles humming to life as ether coursed through them, and Killy was off: maneuvering thrusters ignited and glassed sand underneath as the wings lofted them over the ocean at mach speeds, coming in low over the waves.
Soon the objective was in sight: an island with smoke curling off it, palm trees and underbrush devastated by the fires of war, with a towering metal building up on a mountain at its center.
"Killy," their handler's voice came into their mind through neural connection, "Your target is the Witch of Scripts. It's a master strategist that uses spells to manipulate the mind and body. Any second, it's going to breach and come into reality. Full force permitted. Destroy it."
Killy licked their lips, drooling in anticipation, already wetting their crotch tubes with cum due to the chems. "Received. Affirmative, handler."
It took no seconds for the island in front of Killy to explode.
The corporate tower on the mountain shattered apart in a spray of molten steel and rubble; the Empyrean forces that had been surrounding it were crushed and scattered. Killy could feel Athame sending orders to gather and retreat to the beachhead, and could see combat dolls and infantry fleeing and trying their best to follow the command.
As they kept closing the distance, cresting the ocean, and now flying over the island's beach, they could also see… A swathe of death. Doll parts, drone parts, human corpses still clad in advanced armor, blood and oil everywhere… Killy came to a stop over the ashy, ruined ground and the mountain of bodies.
And there was a girl there. In the middle of it all, far below, there was a girl.
The Eden looked down on her, and she looked far, far up to the Eden. She was wearing some kind of battle-dress, shimmering brilliantly and beautifully in the eternal night.
"Oh, an Eden? Really? My Witch is that big of a deal?" The Innocence smiled up at the mech and pointed her halberd at it. "Well! Not like it matters, it's already here!"
That was true; the Eden looked up and around at the scene. Steel raining from the sky, and a towering cloud of nightmarish, stained glass darkness was erupting from where the corporate building once stood.
Killy looked back down at the Innocence, and opened the Eden's jaw to let a grinding, destructive voice boom from it, "I am going to kill it. Don't get in the way."
"Oh…?" The Innocence pursed her lips. "No you aren't. I'll stop you right here and now!" Suddenly--she jumped up, far up, flying into the air on glittering magical wings, twirling her halberd and drawing seals in the air with witchfire--
The Eden rose an arm to swat her, but she danced aside--the battle began.
Rays of witchfire shot from the Innocence's seals, splashing off the Eden's heavy armor, as Killy swung levers in their cockpit and danced their legs in their sheathes; their eyes dilated, and they grinned fiercely.
The Innocence flew around, arcing through the air while raining beams down on the Eden; the Eden leaped back, gaining distance, and released the support assault guns from its arms. Hardlight bullets rained out of them, pelting the Innocence as she ducked around, whirled through the air, bounced shells off magical barriers and parried them with her weapon.
"I bet you weren't expecting this!" She flew straight at the Eden and drew a seal with her halberd in shining witchfire--the spell resolved, and suddenly, it staggered and stumbled.
In its heartmount, Killy screamed as the connection between themself and their Eden was scrambled, the mesh forcefully torn-at and damaged.
The Innocence plunged in, spear wreathed in flames, and dove at the mech's leg--and exploded through it, a dart of molten force, laughing triumphantly.
Killy screamed again, in further pain, and the Eden shot towards the Innocence to pursue, wheeling a kick at her.
It was fast, unexpected--her eyes got wide as the incoming leg, a tower of hard metal, careened into her and flung her to the ground, scraping across its ashes and rocks and bloodying her form.
At last she came to a stop and looked up, frantic--but Killy wasn't paying attention to her. The Eden was looking towards the column of emanation coming from the mountaintop, where the Witch of Scripts was entering the world.
Killy felt their entire world focus to a single point, and a euphoria surged through them, not only at beating the Innocence but in anticipation of the next step.
They unfurled their wings and took to the sky, up to where the Witch awaited…
19 notes
·
View notes
Text
A different kind of post from me!
Asking for ✨help✨
So *long story short I created a cosplay design for Oboro/Kurogiri? And I kind of settled on a design I like, but something still feels.... not right. So on the off chance one of my followers has design know how and is willing to chime in.... uuh please feel free to weigh in.
*a con I'm going to announced Elements as their gala theme and my friend suggested an Oboro/Kurogiri mash up and I dove head first into the idea. whoopsies. I did solidify fabric choices but looking at the cost of all dress materials in addition to Ms. Joke's stuff I decided to leave this as a cosplan for the future (maybe a masquerade entry???? I think it'd be lit... literally lmao - I want the lightening to be lights under organza. but since it won't have to fit into an elements theme I might nix that part or change it?)
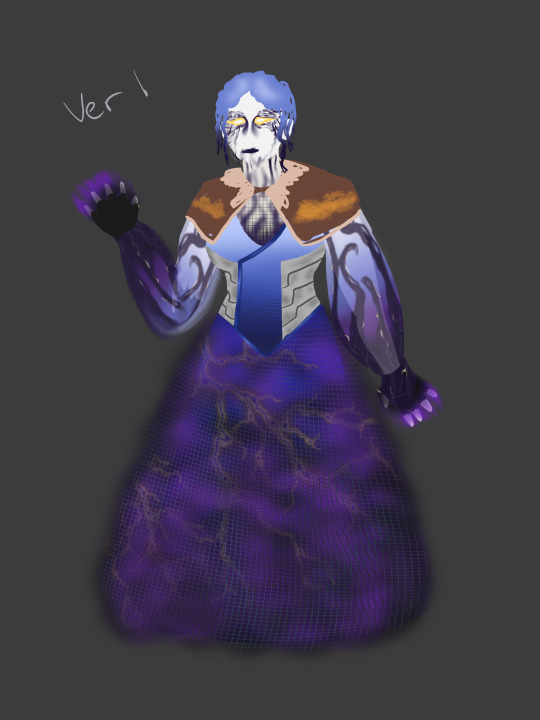
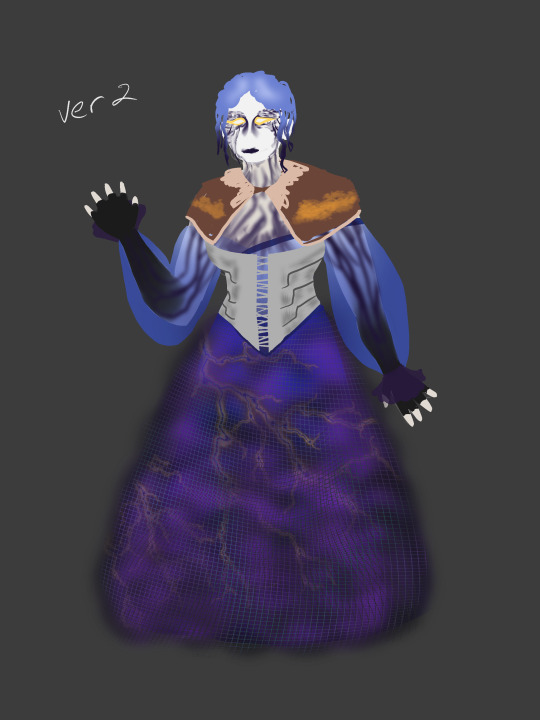
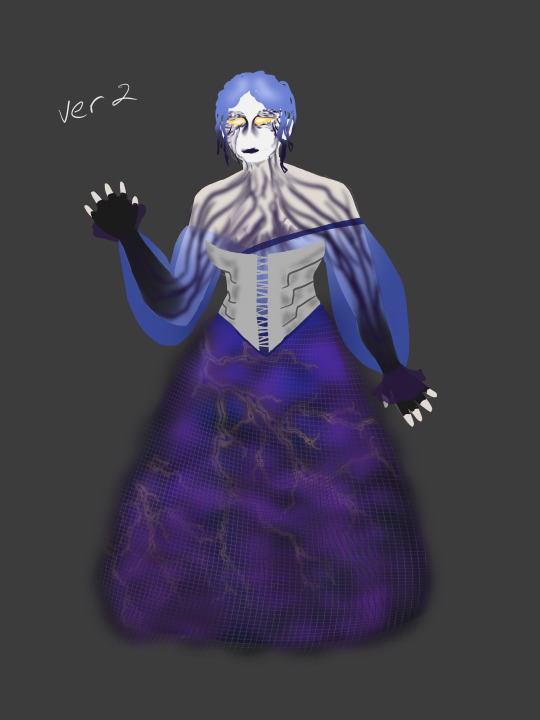
Version 1 relies on tulle to create a kind of shadow-y gradient up the torso. I didn't actually figure out what under the capelet would look like - it's the most unfinished design of all. Version 2 played around with the corset idea, but I still wasn't pleased with it - it cut off too much visually, but at least I thought through the shirt portion?
(you might be asking yourself what's up with the white. well... yea. I like body paint more than straight foundation and I think the starkness lends itself more to the established nomu-ification more than trying to make the top portion more like Oboro's canon design. Honestly liable to change. Idk how to incorporate Oboro's nose plaster/bandaid on the white face as it is visually one of the markers of the character. But also I love contrast. oooooh contrast my love)
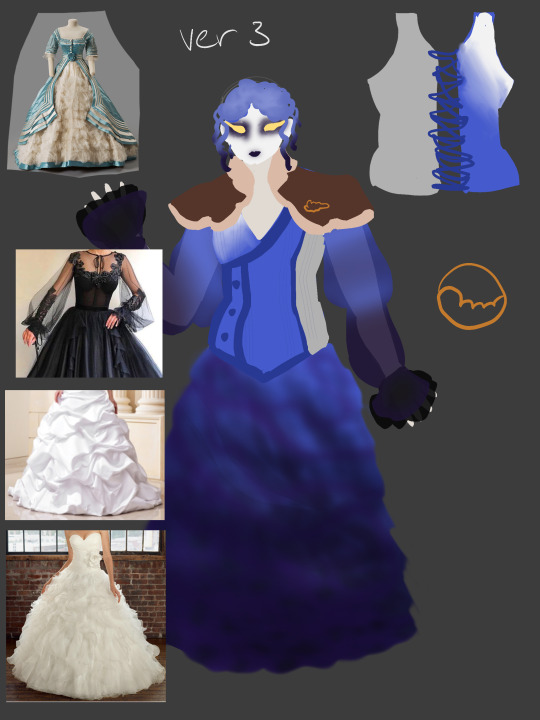
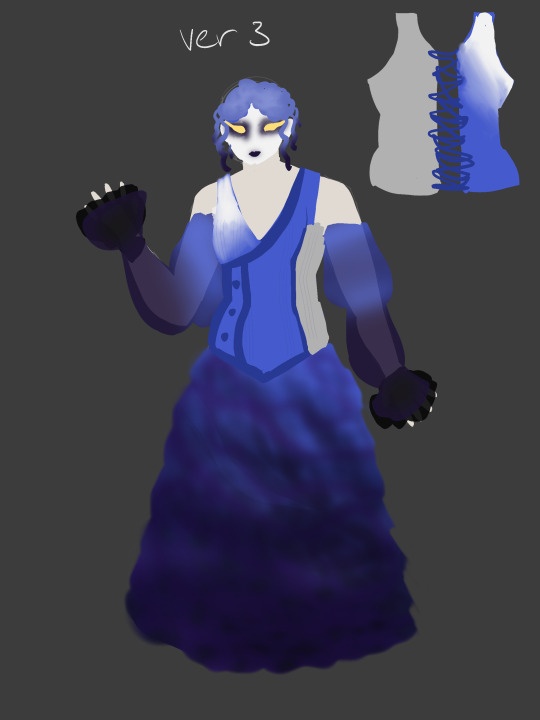
Version 3 tried to make the top section/corset more like Oboro's hero costume, and then adding in elements of Kurogiri's vest with the "buttons" but it was clunky trying to fit in Kurogiri's uuuh.. neck... brace... thing.... and I didn't like the silhouette enough to figure it out. lmao. BUT I figured out how to do the skirt portion! (The black dress is just there as a visual reminder of what the arm section is trying to go for. I just got lucky finding a picture that fit well enough to what I'd already come up with.) SO the bottommost base will be a circle skirt of sorts to lay down a base over the hoop skirt. Then the next layer of fabric on top will be like the 3rd reference picture down - I liked the poofy/cloud like texture, but I still wanted the smokiness of Kurogiri to be present in the skirt so I was thinking adding layers like you see in the 4th picture on top of the poofy cloud structure. Which is.... a lot considering I've never attempted a formal dress before. And all of that will be textured diagonally down the skirt to give a sense of swirling movement hopefully reminiscent of Kurogiri's portals. Inbetween the cloud texture and smoky texture is where I was planning on applying the lights. (The smoky gradient texturing would be layered organza which should be shear enough even with layering to allow the light to shine through.)


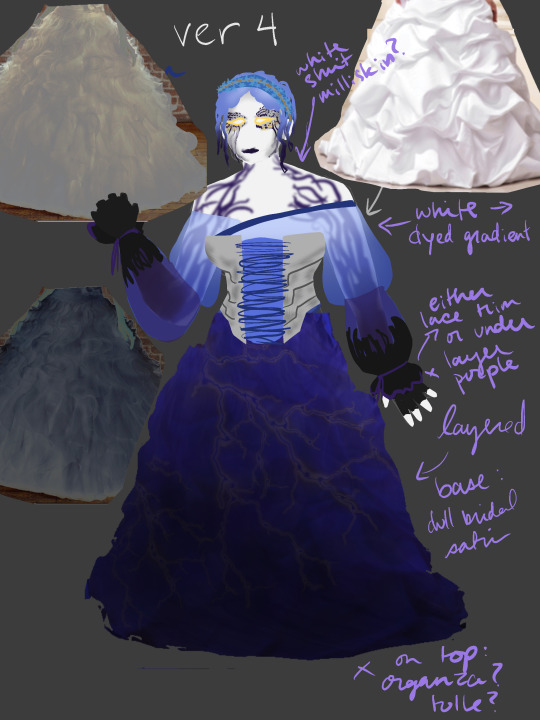
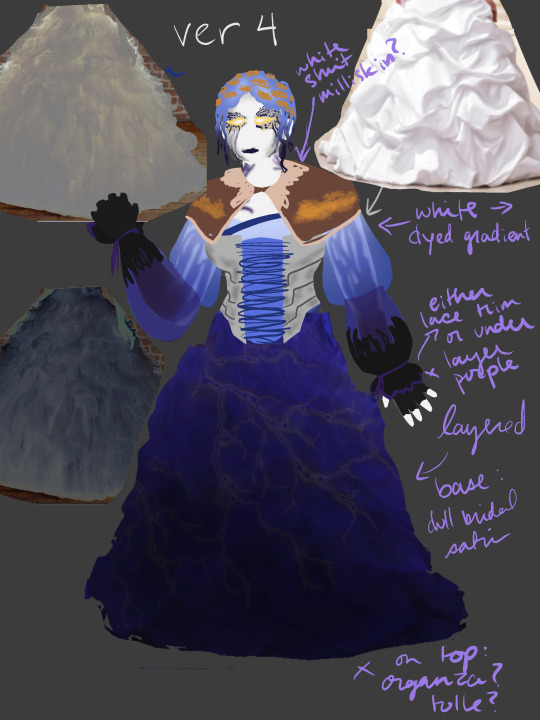
Version 4!!! So many variants of version 4! I solidified what I wanted the torso to look like! Which is a cross of a stay and a corset. I've yet to find any examples of real garments that match my design but I want a front lacing corset that has that blue stomacher. The shirt borrows from version 2 except this version is like a wrap shirt so instead of applying the blue ribbon (satin? I'll figure it out later exactly what I want from it) over a completed shirt I make things more difficult for myself by making a wrap shirt whose edge is lined with the darker blue. How will I make this stay in place and be comfortable under a corset? idk.
(Also - the shirt is going to be so much gradient dying.... because I have to add in things I don't have a lot of experience in.... I love throwing myself into the deep end haha... The black will probably be an applique? Or if the fabric won't hold up to the weight I might just "paint" on black dye for the corruption effect.)
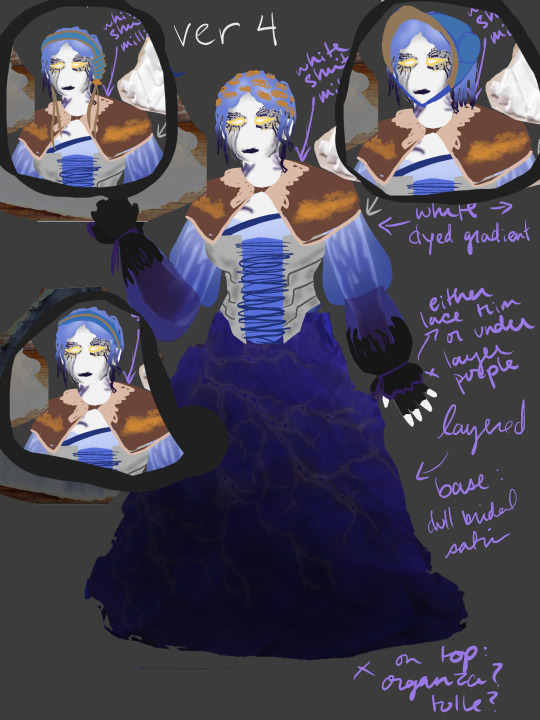
I played around with different hair covering to bring in the orange cloud logo Oboro has on his jacket. I'm not sold on the jacket design, so I wanted to figure out how to incorporate the cloud motif and jacket colors another way. (Also on purpose to primarily focus that on the most Oboro part of this design.) At the time of compiling this post I might try out an actual (short) cape? So as to keep the frontal view as is but still add some interest to the back view? Also I'm imagining twirling with a cape on stage.... It'd look so cool.

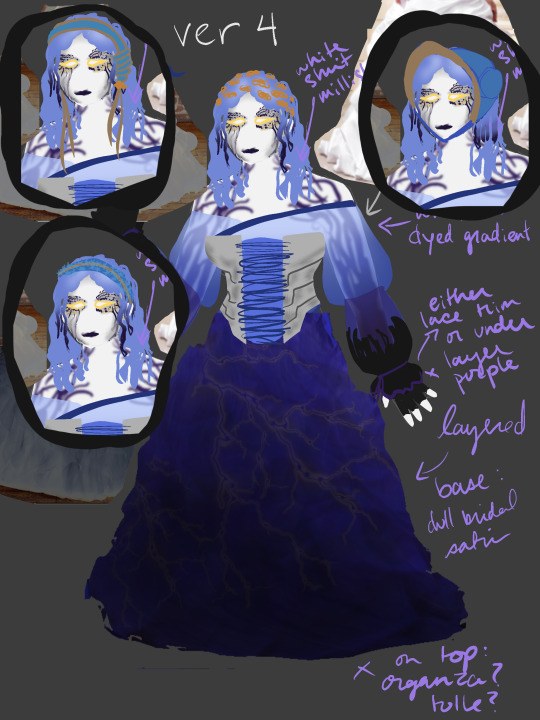
I also tried out a hair down style instead of the bun with a few curls/waves released. I was leaning towards hair down would have the different hats/bonnets/hair accessories. And then hair up would be balanced with the capelet.
Also I might just be overthinking the hair lmao. A cute cloud clip in the hair would also work perfectly fine. (Also as mentioned I love contrast and that includes blue/orange my complementary color love)
Idk why I have pictures here with capelet and hair coverings but I do.
Anywho! This last picture is the one I've settled on.
Additional notes about the design: The white body base with shadows creeping up is actually a shirt. Because body painting myself and creating a mess on my body and clothes sounds like an actual nightmare. So it'd be more like white long sleeved shirt, basically the equivalent of a blue shift for the hero shirt with ... idk what those sleeves would be called where they're like gathered with a sewn in string or elastic? The sleeves would end in.... organza? tulle? for the kind of shadowy effect over the hands. (It's hard to see but the bulk of it over the hand would blend with the black fingerless gloves and then the bottomost layer would be purple to give that halo-y effect that Kurogiri's hands have. (Where his body smokes out you see the purple color on the edges - ya know that whole thing?) It'd have removable fingerless gloves taken directly from Oboro's hero design, but also so that I can visually continue the sleeves and still remove them as needed. The orange floating clouds are actually like a veil? The clouds would be embroidered on blue tulle (?) so it's hard to see but still be able to be embroidered on and pinned into the wig. I didn't draw in my eyes because... I was lazy lmao but I don't wear contacts... I suppose for this I'd have to either take off my glasses or finally get some. But I do think coloring in my entire eyelid with yellow so that with my eyes closed it all looks uniform across is the way to go.... Or maybe have one eye be normal and the other smoky? Oh, and then I could have a corner of my face that isn't white. I'm not sold on the corset/stay design. I think in order to have it properly supporting things I have to increase the length of it down so it settles over my hips to displace the weight instead of ending right above them... From what I gather that should increase comfortability, but it also makes it tricker to visually get the angles on the sides to translate right. Honestly I don't even know how well a more form fitting corset and a stomach will interact for support? I might just have to make it more like a proper stay with a flatter profile for it to physically work. I've got no idea on shoes though. (Men's) Dress shoes would be a fun nod to Kurogiri's formal outfit but also sneakers are so much nicer to move in... Oh! The bit around the eyes is supposed to be like smoky/cloudy makeup. Tumblr will probably trash the quality so it'll be hard to tell.
I have considered making this in a style that properly pulls from one time period but I've yet to find a historical period of fashion that encapsulates what I'm trying to achieve. Until then it remains a mish mash of fashion ideas.
#*in a mocking voice* you can only upload 10 photos from the app#fine then I guess I'll type up a whole bunch on my laptop#the bee talks#long post#yea... i guess at the moment my biggest hurdle on this design is the hair vs accesories vs capelet thing. otherwise i quite like it?#but also. i know better than to trust myself on clothing designs lmao#maybe this doesn't work for what I'm trying to do. idk. also thought about adding a fan!#oh!! i could paint oboro's face and then the kurogiri/oboro face on the other side! that would be a good prop#kind of want to tag this so it can be found by people but also... this is... kind of a mess of a post lmao#i would put this on my cosplay account story and get input but .... i kind of want this to be a surprise for my mha mutuals there#i might break down anyways and post there for thoughts but i really got to work on ms joke! i got fabric just waiting for it to ship now
2 notes
·
View notes
Text
Offshore Wind Power Jacket Market Growth Analysis, Market Dynamics, Key Players and Innovations, Outlook and Forecast 2025-2032
According to a new report from Intel Market Research, the global Offshore Wind Power Jacket market was valued at USD 1,820 million in 2024 and is projected to reach USD 3,092 million by 2032, growing at a CAGR of 6.6% during the forecast period (2025-2032). This remarkable growth trajectory reflects the accelerating global transition toward renewable energy infrastructure, particularly in offshore wind farm developments across Europe, Asia-Pacific, and North America.
Offshore Wind Power Jacket Market - View in Detailed Research Report
What are Offshore Wind Power Jackets?
Offshore wind jacket foundations are steel lattice structures that serve as critical support systems for wind turbines in aquatic environments. These engineered frameworks consist of welded steel pipes with diagonal bracing and specialized nodes, designed to withstand extreme marine conditions including hurricane-force winds, 15-meter waves, and corrosive saltwater exposure. The jackets distribute structural loads through their pile legs which are driven 30-50 meters into the seabed, while providing a stable platform for turbines that can reach heights exceeding 250 meters.
📥 Download Sample Report: Offshore Wind Power Jacket Market - View in Detailed Research Report
Key Market Drivers
1. Global Renewable Energy Acceleration
The urgent need to meet climate commitments under the Paris Agreement is driving unprecedented investments in offshore wind. With the European Union targeting 300 GW of offshore wind capacity by 2050 and China committing to 52 GW by 2030, jacket foundations have become the solution of choice for medium-depth (30-60m) installations. The Dogger Bank Wind Farm in the UK - currently the world's largest offshore development - demonstrates this shift, utilizing 277 jacket foundations to support its 3.6 GW capacity.
2. Technological Innovations in Fabrication
Modern jacket manufacturing has undergone a revolution through:
High-strength steel alloys reducing weight by 15-20%
Automated welding systems cutting production time by 30%
Modular designs enabling easier transport and installation
The latest suction bucket jacket variants have demonstrated 40% faster installation than traditional piled foundations, significantly reducing costly offshore construction windows.
Market Challenges
While the sector shows strong potential, several constraints require attention:
Supply chain bottlenecks: Only ~50 heavy lift vessels worldwide can install jackets, creating installation logjams
Specialized labor shortages: The industry faces a deficit of 15,000-20,000 certified welders and marine engineers
Raw material volatility: Steel plate prices have fluctuated over 35% annually
Emerging Opportunities
1. Floating Wind Expansion
Next-generation floating jacket concepts could capture 30-40% of the floating wind market by 2035 as projects move into 100+ meter water depths. Pilot projects in California and Scotland are testing innovative designs that reduce steel requirements by 25% compared to conventional solutions.
2. Digital Transformation
Advanced technologies are reshaping the sector:
Digital twins monitoring 200+ sensor points on installed jackets
AI-powered quality control detecting welding defects with 95% accuracy
Generative design algorithms optimizing geometries for material efficiency
3. Emerging Market Localization
Countries like Vietnam and Brazil are implementing 50-80% local content rules, creating opportunities for international manufacturers to establish joint ventures with regional fabricators. Taiwan's successful localization program demonstrates how such partnerships can reduce transportation costs by 40-60% while meeting regulatory requirements.
Competitive Landscape
The market features a mix of established European marine engineering firms and agile Asian manufacturers:
Lamprell (UAE) and Sif (Netherlands) lead in North Sea projects
Shanghai Taisheng (China) dominates Asian supply with government-backed initiatives
Smulders (Belgium) recently acquired robotics specialist Octinion to automate production
The sector has seen strategic consolidation, with the top five suppliers controlling over 60% of global jacket fabrication capacity - a trend expected to continue as smaller players struggle with the $200-300 million capital requirements for new production facilities.
Regional Market Insights
Europe: Remains the mature hub with 60% of installed capacity, driven by North Sea developments
Asia-Pacific: Fastest growing region (25% CAGR) led by China's ambitious offshore targets
North America: Emerging market constrained by Jones Act vessel requirements
Latin America: Early-stage opportunities focusing on Brazil's northeast coastal waters
Market Segmentation
By Foundation Type
Three-legged jackets (for shallow waters <30m)
Four-legged jackets (standard for 30-60m depths)
Specialty designs (suction buckets, floating variants)
By Material
Carbon steel (declining market share)
High-strength steel (75% of current projects)
Hybrid composites (emerging segment)
By Turbine Capacity
<8 MW (legacy installations)
8-12 MW (current standard)
>12 MW (next-gen platforms)
📘 Get Full Report Here: Offshore Wind Power Jacket Market - View in Detailed Research Report
Recent Developments
April 2025: Vietnam's PV Shipyard delivered a 2,500-ton jacket for Taiwan's offshore substation
December 2024: Seaway7 secured contract to install 18 jackets for Scotland's 1.1 GW Inch Cape project
2022-2023: Multiple Taiwanese projects awarded to local manufacturers under content rules
Future Outlook
The offshore wind jacket sector sits at an inflection point where technological innovation must keep pace with escalating project scales. With the global project pipeline exceeding 200 GW and LCOE reductions of 30% targeted by 2030, manufacturers that invest in digitalization, advanced materials, and localized production will lead the next phase of industry growth.
📥 Download Sample Report: Offshore Wind Power Jacket Market - View in Detailed Research Report
Visit more reports :
https://www.tumblr.com/intelmarketresearch/787844496856580096/chlorinated-paraffins-for-paints-and-coatingshttps://kapshikarsiddhesh.livepositively.com/chlorinated-paraffins-for-paints-and-coatings-market-growth-analysis-market-dynamics-key-players-and-innovations-outlook-and-forecast-2025-2032/new=1https://hallbook.com.br/blogs/628783/Chlorinated-Paraffins-for-Paints-and-Coatings-Market-Growth-Analysis-Markethttps://logcla.com/blogs/707496/Chlorinated-Paraffins-for-Paints-and-Coatings-Market-Growth-Analysis-Markethttps://controlc.com/48a9b411https://justpaste.it/b6m1vhttps://www.flexartsocial.com/blogs/10727/Chlorinated-Paraffins-for-Paints-and-Coatings-Market-Growth-Analysis-Markethttps://pastelink.net/wymkdsoxhttps://penposh.com/blogs/447409/Chlorinated-Paraffins-for-Paints-and-Coatings-Market-Growth-Analysis-Markethttps://imimmigrant.ca//read-blog/16224https://iamstreaming.org/siddheshkapshikar/blog/10884/chlorinated-paraffins-for-paints-and-coatings-market-growth-analysis-market-dynamics-key-players-and-innovations-outlook-andhttps://intel24.hashnode.dev/chlorinated-paraffins-for-paints-and-coatings-market-growth-analysis-market-dynamics-key-players-and-innovations-outlook-and-forecast-2025-2032https://siddheshkapshikar7.wixsite.com/my-site/post/chlorinated-paraffins-for-paints-and-coatings-market-growth-analysis-market-dynamics-key-players-ahttps://chatterchat.com/create-blog/https://sites.google.com/view/intel-market-research/home/chlorinated-paraffins-for-paints-and-coatings-market-2025
About Intel Market Research
Intel Market Research is a leading provider of strategic intelligence, offering actionable insights in energy infrastructure, renewable technologies, and industrial manufacturing. Our research capabilities include:
Real-time competitive benchmarking
Global project pipeline monitoring
Country-specific regulatory and pricing analysis
Over 500+ industry reports annually
Trusted by Fortune 500 companies, our insights empower decision-makers to drive innovation with confidence.
🌐 Website: https://www.intelmarketresearch.com 📞 International: +1 (332) 2424 294 📞 Asia-Pacific: +91 9169164321 🔗 LinkedIn: Follow Us
0 notes
Text
Elevating Entrances with Stunning Drive Gates
When considering gate options, field gates offer a rustic allure that resonates with rural and suburban settings alike. Traditionally used to secure pastures or farmland, these gates have evolved into stylish additions for residential driveways, particularly for properties with expansive grounds or a countryside aesthetic. Typically crafted from wood, field gates feature simple yet sturdy designs, often with horizontal rails or diagonal braces that evoke a sense of timeless tradition. Their versatility allows them to complement a variety of landscapes, from rolling hills to manicured lawns.
https://penzu.com/public/1fb658e366564068
0 notes
Text
The Importance of Foundation Repair: What Every Homeowner Should Know

Your home’s foundation is one of its most critical structural components. It supports the entire building, keeps walls aligned, and maintains the integrity of everything above it. Unfortunately, foundation issues are often overlooked—until they become serious. Cracks, uneven flooring, or moisture in the basement may seem minor at first, but they can be signs of more severe structural problems. Addressing foundation issues early can save homeowners thousands of dollars in future repairs and preserve the long-term value of their property.
In this blog post, we’ll explore why foundation repair is essential, the common signs of damage, causes, repair methods, and tips for maintaining a healthy foundation.
Why Foundation Repair Matters
When your foundation becomes compromised, your entire home is at risk. Walls may begin to bow or crack, doors and windows might not close properly, and floors can become uneven or sag. Over time, these issues can lead to significant damage to your home’s structure, plumbing, electrical systems, and even its aesthetic appeal.
Foundation problems don’t resolve themselves. In fact, they typically worsen with time, especially if left untreated. Foundation repair ensures your home remains safe, stable, and valuable. It prevents minor issues from escalating into major structural failures that can affect both safety and livability.
Common Signs of Foundation Problems
Identifying foundation issues early is key to minimizing damage. Here are some of the most common signs that you may need professional foundation repair:
Cracks in walls or ceilings – Especially diagonal cracks near doors and windows.
Uneven or sloping floors – Indicates that the foundation may be settling or shifting.
Sticking doors and windows – Often caused by structural misalignment.
Gaps between walls and ceilings or floors – May indicate the home is shifting away from its original structure.
Water in the basement or crawl space – Suggests drainage problems that can lead to erosion or foundation weakening.
Cracks in the foundation itself – These are red flags that should be inspected immediately.
These signs don't always mean severe damage, but they should never be ignored.
What Causes Foundation Issues?
Understanding what causes foundation problems can help homeowners prevent them before they occur. Here are some of the most common culprits:
1. Soil Movement
Soils expand when wet and shrink when dry. Over time, this constant movement can lead to shifting and settling of your foundation. Clay-rich soils are especially prone to this.
2. Poor Drainage
Water pooling around your foundation can weaken the soil underneath. Poor grading, clogged gutters, or broken pipes can all contribute to excess moisture and erosion.
3. Tree Roots
Large trees growing too close to the home can draw moisture away from the soil or physically disrupt the foundation with their roots.
4. Construction Deficiencies
Improperly compacted soil, poorly mixed concrete, or inadequate structural design can all lead to premature foundation failure.
5. Natural Disasters
Earthquakes, floods, and extreme weather events can significantly impact the stability of a home’s foundation.
Types of Foundation Repairs
The right solution depends on the type of foundation and the extent of the damage. Here are some common foundation repair methods:
1. Slab Jacking (Mudjacking)
This method lifts sunken concrete slabs by injecting a slurry mixture underneath. It’s often used for driveways, patios, and minor foundation adjustments.
2. Piering (Underpinning)
Steel or concrete piers are driven into the ground beneath the foundation to lift and stabilize it. This method is ideal for more serious settlement issues and is commonly used for homes built on expansive soils.
3. Wall Anchors and Bracing
These systems stabilize and straighten bowed or leaning basement walls by anchoring them to stable soil or using interior braces.
4. Sealing Cracks
Epoxy or polyurethane injections are used to seal foundation cracks and prevent water intrusion. While this doesn’t address structural issues, it can be part of a broader repair plan.
5. Drainage Solutions
Installing French drains, gutters, or grading the landscape can help redirect water away from the foundation, preventing future damage.
What to Expect During a Foundation Repair
A typical foundation repair project begins with a detailed inspection. Professionals will assess the severity of the damage, identify the underlying cause, and recommend the most effective solution. Depending on the repair method, work can take anywhere from one day to several weeks.
Temporary disruption is expected—especially if large equipment or interior access is needed. However, most contractors take care to minimize impact on your property and daily life.
It’s also wise to ask for a written repair plan, estimated timeline, and warranty. A reputable service will provide all of this clearly and transparently.
How to Prevent Future Foundation Problems
Foundation maintenance is just as important as the repair itself. Here are some simple yet effective tips to protect your home:
Maintain consistent moisture levels around your home—avoid overwatering or letting soil dry out completely.
Ensure proper drainage by cleaning gutters regularly and directing water away from the foundation.
Inspect for plumbing leaks and fix them quickly to avoid water accumulation under your home.
Avoid planting large trees close to your foundation to prevent root damage.
Schedule regular inspections, especially if you live in areas with expansive clay soils or frequent rainfall.
When to Call a Professional
If you notice any signs of foundation damage—or simply suspect something isn’t right—it’s best to consult a professional. A licensed foundation repair specialist can assess your situation and provide a clear path forward. Even if you don’t end up needing immediate repairs, the peace of mind from a professional evaluation is well worth it.
Conclusion
Foundation repair may not be the most glamorous part of homeownership, but it’s one of the most essential. Ignoring foundation problems can lead to extensive damage, costly repairs, and even safety risks. On the other hand, addressing issues early with the help of experienced professionals ensures your home remains strong, stable, and valuable for years to come.
Whether you’re dealing with small cracks or major settlement, understanding the causes, solutions, and preventive steps is the first step toward protecting your investment. Don’t wait for small problems to become large ones—take action today for a safer and more secure tomorrow.
1 note
·
View note
Text
Is Selective Pallet Racking Right For My Warehouse?
Selective pallet racking is the most popular and economical warehouse storage system. The plug-in combined structure is mainly composed of uprights, box beams, horizontal bracings, diagonal bracings and self-locking bolts. It is easy to install and disassemble. The racking height is adjustable every 75mm. It offers the best solutions for warehouses with palletized products and a wide variety of goods. The 75mm pitch selective pallet racking is very popular in the markets of Asia, Europe, Middle east and Africa.
Advantages
1. All pallets are accessed independently to meet demand of goods turnover;
2. Beam height is easy to adjust to meet demand of different pallet heights;
3. The bottom pallet can be placed on the ground to save costs;
4. Fully assembled structure can be combined, installed, disassembled, reused according to demand, convenient and flexible;
5. Simple structure, strong load capacity, low cost, simple replacement.
Although selective pallet racking systems are the most commonly used type of pallet racking in warehouses, they may not be the best for yours. The only way to determine if this type of system fits your needs is by considering the following factors:
Product specifications
Always start with your products. Ask yourself, “How many different SKUs will I be storing?”. The racking system that you use will be dictated by the variability in the types of products you are storing, the weight of your products, and the type of pallets you are using. Selective rack works best when storing a wide variety of SKUs, while a drive-in pallet racking system would work best when you have a large quantity of a few SKUs.
Equipment
If you have a standard forklift, a selective pallet racking system would work well for you. If you have specialized equipment, then you should factor that into your warehouse design as you may need to account for additional aisle space which could reduce your storage density.
Space
The amount of space in your warehouse is another important factor to consider. You need to know your ceiling heights, where columns are located, and if other components could get in the way of planning where to place your selective racking system. It’s recommended that you get a professional warehouse designer or create your own rack layout drawing to avoid over-or under-purchasing components for your racking system. You might also ask your local dealer if they’d let you return any product you purchase and don’t need.
Cost
Because selective pallet racking is the most commonly used system, it’s much easier to acquire the components needed to build one out. Our online shop, www.aslmhc.com , makes it easy to buy uprights, beams, starter bays, adder bays, and pallet rack components - 100% online. As mentioned earlier, compared to other types of pallet racking, selective systems are the most cost-effective.
Buy Your Selective Pallet Racking Components Online Today
Nanjing Sunnyrack Manufacturing Co.,Ltd is the leading pallet rack supplier in China. If you need assistance with the design of your pallet rack system or with ordering, please contact us to speak with a warehouse design specialist.
Are you Searching Pallet Rack Manufacturer in China, Warehouse Rack Manufacturer in China, Cantilever Rack Manufacturer in China, Mezzanine Rack Manufacturer in China, Steel Rack Manufacturer in China? Here we are! Leveraging on advanced storage rack systems and equipment more than 16 years. Sunnyrack is a professional manufacturer specializing in Warehouse rack, Cantilever rack, Mezzanine rack, Racking, Steel & Pallet Rack System in China. You can easily browse our catalog and specify the products you need.
0 notes
Text
Hyderabad Workspaces Re‑imagined: From Executive Chairs to Slotted‑Angle Racks
Hyderabad’s economy—propelled by HITEC City’s IT corridors, Genome Valley’s biopharma labs, and a thriving e‑commerce backend around Shamshabad—demands work environments that balance comfort, productivity, and space efficiency. Two seemingly unrelated furniture heroes rise to that challenge: executive chairs that pamper decision‑makers through ten‑hour marathons, and Slotted Angle Racks In Hyderabad that tame inventory chaos in warehouses, retail storerooms, and office archives. Let’s explore how each product solves real Hyderabad problems while fitting local budgets, climates, and design tastes.
1. Executive Chairs: Comfort That Commands
a. Ergonomics First
The average tech leader or BPO manager in Gachibowli spends nearly 180 minutes in continuous sitting. Chairs engineered with synchronous‑tilt mechanisms, four‑way adjustable lumbar support, and breathable mesh backrests reduce spinal compression and muscle fatigue. Hyderabad’s 40 °C summers make mesh preferable to leatherette; it wicks away heat during load‑shedding moments when the AC pauses.
b. Material & Build
Quality brands source glass‑fiber‑reinforced nylon frames and class‑4 gas lifts, tested to BIFMA X5.1 standards for 100,000 cycles—important insurance when heavy monsoon humidity can swell cheaper plywood seat pans. For corner suites in Jubilee Hills, top‑grain leather on a polished aluminium base signals authority, while sustainably tanned vegan leather is gaining traction among ESG‑focused startups in T‑Hub.
c. Smart Features
Post‑pandemic hybrid work nudges chair makers to embed IoT seat‑presence sensors that log utilization data. Facilities teams use that data to right‑size real estate in Raheja Mindspace towers. Meanwhile, magnetic headrest speakers enable private Teams calls without clunky headsets—a boon for executives juggling meetings from home‑office annexes in Manikonda.
d. Buying and Servicing in Hyderabad
Clusters of importers in Begumpet supply global brands like Herman Miller and Steelcase, but local OEMs in Balanagar offer custom upholstery and faster spare‑part availability at 30 % lower cost. Expect on‑site demo units, five‑year structural warranties, and AMC packages that include caster cleaning—a must with Hyderabad’s red‑soil dust.
2. Slotted‑Angle Racks: Storage That Scales
a. Modular Muscle
Whether you’re kitting out a pharma warehouse in Bachupally or adding a records room to a Secretariat department, slotted‑angle racks deliver unmatched flexibility. Uprights punched at 50 mm centres let you raise or lower shelves without welding. Start with a single bay today; bolt‑on more tomorrow as SKUs multiply.
b. Load Capacity & Durability
Local fabricators use ISI‑certified cold‑rolled steel—40 × 40 mm angles for light loads (80–120 kg per shelf) and 60 × 40 mm for heavy tools (up to 500 kg). Powder coatings cured at 180 °C form a corrosion shield essential in Hyderabad’s 60‑plus‑percent monsoon humidity. Ask vendors in Jeedimetla for salt‑spray test reports and a three‑year anti‑rust warranty.
c. Space Economics
Real‑estate near the Outer Ring Road commands premium rents; maximizing vertical cubic capacity can shave 20 % off warehouse expansions. Racks up to 3 metres high pair well with rolling ladders, while mezzanine‑supported racks create two‑level storage without new construction permits—perfect for fast‑growing e‑commerce sellers in Uppal.
d. Safety & Compliance
Ensure racks come with load signage, diagonal bracings, and anchor bolts drilled into RCC floors. Reputed vendors provide IS 800 structural calculations and even seismic bracing kits—prudent given Telangana’s mild earthquake zone classification.
3. Synergy: A Holistic Approach to Workspace ROI
An Executive Chairs in Hyderabad that prevents back pain directly boosts cognitive performance, cutting costly sick days. Slotted‑angle racks, by organizing parts and documents, slash pick‑and‑pack times, increasing throughput. Together, they illustrate a larger principle: invest in the human and spatial ergonomics simultaneously to amplify overall return on workspace spend.
For instance, a biotech lab in Genome Valley recently combined height‑adjustable executive chairs for research leads with chemical‑resistant slotted racks for reagent storage. The result? A 17 % uptick in lab task efficiency and a happier, healthier staff—all without expanding square footage.
0 notes
Text
Explore the 10 Types of Roof Trusses for Your Next Project 🏠✨
Welcome to Whitewater Trusses! If you’re embarking on a construction or renovation project, choosing the right roof truss is one of the most important decisions you’ll make. Whether you’re designing a cozy home, a grand commercial building, or anything in between, roof trusses are the backbone of your structure. Here at Whitewater Trusses LLC, we specialize in crafting premium, custom roof trusses tailored to meet your specific needs. In this article, we will walk you through 10 different types of roof trusses, their applications, and why Whitewater Trusses is your best choice for top-quality roofing solutions.
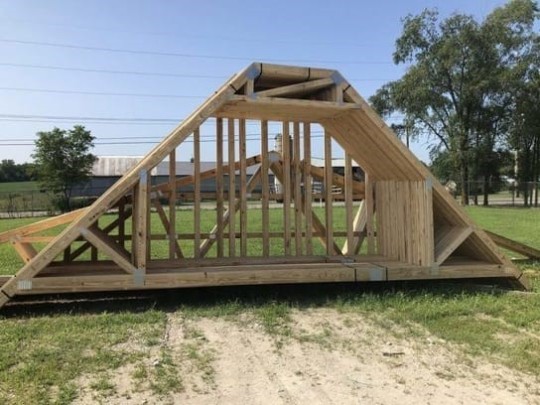
What Are Roof Trusses? 🏗️🔧
Roof trusses are triangular structures made from wood or metal, designed to support the roof of a building. These trusses distribute the weight of the roof evenly, providing stability and durability. They are an essential part of any construction, whether for residential, commercial, or industrial purposes. Trusses come in many shapes and sizes, and each type serves a unique purpose.
At Whitewater Trusses LLC, we specialize in creating custom trusses tailored to your needs. Our expert craftsmanship ensures each truss is built to last, providing the strength and support needed for your project.
Types of Roof Trusses 🌟
1. Polynesian Truss 🌺
The Polynesian truss is a unique design that brings a touch of island-inspired beauty to any structure. It combines strength with an aesthetic flair, perfect for residential homes with high ceilings or those seeking a tropical vibe. The Polynesian truss provides exceptional support while creating an open, airy space inside.
2. Barrel Trusses 🎪
Barrel trusses are curved, creating a smooth, continuous arc that looks stunning and offers great structural support. These trusses are ideal for large open spaces, such as auditoriums, churches, or large commercial buildings. The curve adds a distinct aesthetic appeal while distributing the load efficiently.
3. Barrel Roof Trusses 🌄
Barrel roof trusses are like barrel trusses but are specifically designed for roofing applications. Their gentle curve offers a modern, sleek appearance and is excellent for buildings with large spans. These are commonly used in industrial and commercial applications where both form and function are essential.
4. 30 Ft Attic Truss 📏🏠
The 30 ft attic truss is perfect for homeowners looking to maximize space in their attic. These trusses provide additional room for storage or even an extra living area. By spanning 30 feet, they offer ample space without compromising on the strength needed to support the roof structure.
5. 36 Ft Attic Truss 📐
If you require more expansive attic space, the 36 ft attic truss is an ideal choice. With a greater span, it offers plenty of space for larger storage areas or for creating an extra room in your home. This truss is ideal for projects requiring both space and strength.
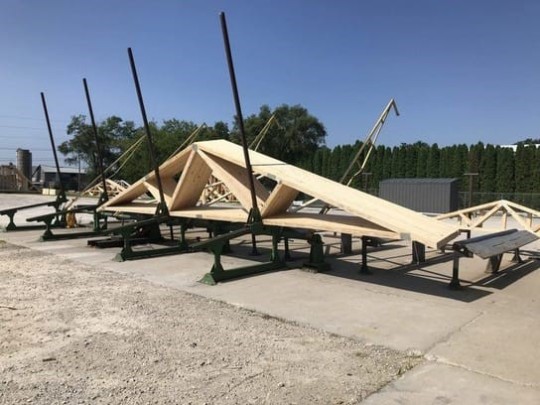
6. King Post Truss 👑
A king post truss features a central vertical post and is commonly used in traditional roof designs. It’s ideal for shorter spans and provides excellent structural integrity. The simple yet effective design allows for cost-effective construction while ensuring the roof remains secure and durable.
7. Fink Truss 🔲
The Fink truss is a popular choice for residential homes due to its cost-effectiveness and ease of construction. It consists of a series of triangular units that create a “W” shape, allowing it to support large roofs with a simple design.
8. Howe Truss 🔨
The Howe truss is similar to the Fink truss but features a different arrangement of diagonal braces. It is often used in larger buildings like warehouses or factories because of its strength and ability to handle heavy loads.
9. Scissor Truss ✂️
Scissor trusses are a great option if you need vaulted ceilings. The design of scissor trusses creates a beautiful, open interior space with an aesthetic that’s perfect for modern homes and commercial buildings alike.
10. Attic Trusses 🏡
Attic trusses are designed to provide usable space in the attic while supporting the roof structure. These trusses maximize floor area by incorporating a flat ceiling with a spacious storage area beneath. The 30 ft and 36 ft attic trusses are two examples of the various lengths available.
Why Choose Whitewater Trusses LLC? 🌍💼
At Whitewater Trusses LLC, we’re committed to providing top-quality roof trusses that are both durable and beautiful. Our trusses are designed to meet the highest standards of craftsmanship, ensuring that your roof will remain strong and secure for years to come. We offer:
Custom Design: Tailored solutions to fit your specific project requirements.
High-Quality Materials: Only the best materials to ensure long-lasting durability.
Expert Craftsmanship: Skilled professionals with years of experience in the roofing industry.
Affordable Pricing: Competitive rates for top-quality trusses.
Our Mission 🏅
At Whitewater Trusses LLC, our mission is simple: to provide superior roof trusses that blend strength with design, meeting the needs of every project. We focus on delivering customer satisfaction by offering top-notch services and ensuring that each product is made to the highest standards.
Conclusion: Build with Confidence, Build with Whitewater Trusses 🛠️🌟
When it comes to roofing solutions, choosing the right truss is critical for both the structural integrity and visual appeal of your building. Whitewater Trusses LLC offers a diverse range of roof trusses to suit any project, from barrel trusses to 30 ft attic trusses. With our commitment to quality craftsmanship and customer satisfaction, we are the best choice for all your roofing needs. Contact us today to get started on your next project!
1 note
·
View note
Text
Buy Premium Diagonal Braces Scaffolding in Houston
Scaffold Store is one of the leading providers of Diagonal braces scaffolding in Houston. Our scaffold diagonal bracing offers dependable support for scaffold towers. Its sturdy design, slide clamps, and squaring bracing make it a perfect choice for construction workers who value safety and efficiency in the workplace. Buy premium quality diagonal braces scaffolding from the Scaffold Store.
0 notes
Text
Top 7 Construction Techniques for Earthquake-Resistant Buildings
With advancements in construction technology and structural engineering, creating an earthquake-resistant building has become more achievable than ever. Earthquake-resistant buildings are designed to withstand seismic forces, reducing the risk of structural damage and saving lives in the event of an earthquake. By using innovative techniques, builders can make structures resilient and safe for their occupants. Below, we’ll explore the top seven construction techniques for creating earthquake-resistant buildings and how Teamhome applies these practices in building construction in Bangalore.
1. Base Isolation Technique
The base isolation technique is one of the most effective methods for constructing an earthquake-resistant building. This approach involves separating the building’s base from its foundation using shock-absorbing pads. These pads absorb and dissipate seismic forces, reducing the impact of ground shaking on the building structure.
Teamhome incorporates base isolation technology in their projects to ensure the safety and longevity of structures in building construction in Bangalore. By prioritizing safety in design, Teamhome’s buildings not only meet structural standards but also stand resilient in the face of potential seismic activities.
2. Flexible Foundation
Flexible foundations allow buildings to sway with seismic waves rather than rigidly resisting them. This design prevents cracks and structural failure, enabling the building to "ride out" the tremors. A flexible foundation typically includes materials like rubber and lead-core bearings, which absorb and reduce earthquake forces.
In regions like Bangalore, where occasional seismic activities can occur, Teamhome uses flexible foundation techniques in building construction in Bangalore to ensure structures are built for longevity and resilience. With a focus on durability, this approach provides peace of mind to property owners concerned about earthquake safety.
3. Shear Wall Structure
Shear walls are vertical walls that provide stiffness and strength, helping buildings resist lateral forces caused by earthquakes. They are typically made from reinforced concrete and are strategically placed within the structure to bear significant loads and absorb seismic energy. Shear walls prevent excessive swaying, keeping the building stable during tremors.
Teamhome uses shear wall structures in their earthquake-resistant building designs to enhance stability and safety. By incorporating shear walls, Teamhome ensures that the buildings they construct have the strength to withstand horizontal movements, a crucial factor in areas prone to seismic activity.
4. Cross-Bracing
Cross-bracing involves placing diagonal steel braces across the building’s walls, which adds to the structure’s strength and rigidity. These braces form triangular shapes that distribute forces evenly, allowing the building to flex without collapsing. Cross-bracing is a cost-effective solution for enhancing the stability of an earthquake-resistant building.
Incorporating cross-bracing into building construction in Bangalore is a technique that Teamhome frequently employs. This technique is not only effective but also adds aesthetic appeal, making it a popular choice for modern architectural designs. Cross-bracing is essential in areas susceptible to earthquakes, as it strengthens the building’s structure without compromising design.
5. Damping Systems
Damping systems are used to reduce the energy transferred from the ground to the building during an earthquake. These systems work like shock absorbers, dissipating seismic energy and minimizing the impact on the building structure. Types of damping systems include tuned mass dampers, viscous dampers, and friction dampers.
Teamhome integrates damping systems into their earthquake-resistant building projects to ensure each structure can endure seismic shocks. By using advanced damping systems in building construction in Bangalore, Teamhome provides buildings that are not only functional but also safe, protecting both property and lives during potential seismic events.
6. Reinforced Steel and Concrete Framework
Reinforced steel and concrete frameworks are essential in creating a robust and resilient earthquake-resistant building. Steel provides flexibility and tensile strength, while concrete adds compressive strength. The combination of both materials ensures that the building can withstand the stresses induced by an earthquake without cracking or collapsing.
Teamhome uses reinforced steel and concrete frameworks in building construction in Bangalore to enhance the stability and safety of its projects. This tried-and-tested method ensures that each structure meets industry standards and provides a solid foundation for buildings that must endure seismic forces. By focusing on quality materials and construction, Teamhome upholds its commitment to creating safe, durable buildings.
7. Lightweight Materials for Non-Structural Elements
Using lightweight materials for non-structural elements, such as partitions, cladding, and ceilings, helps reduce the overall weight of the building. This reduction in weight decreases the seismic load, making it easier for the structure to withstand an earthquake. Lightweight materials also reduce the risk of injury from falling debris.
For building construction in Bangalore, Teamhome often opts for lightweight, high-quality materials for non-structural elements, enhancing the building's earthquake resilience. With safety in mind, Teamhome’s approach to using these materials ensures that even during strong seismic events, the structure maintains its integrity and minimizes risks to its occupants.
Additional Tips for Earthquake-Resistant Construction
Building an earthquake-resistant building goes beyond just techniques—it also involves using the right materials, planning, and designing spaces that enhance stability. Here are some additional tips to consider:
Soil Analysis: Conducting a thorough soil analysis before construction ensures the land can support an earthquake-resistant foundation. Teamhome always performs soil assessments for building construction in Bangalore to guarantee the foundation is strong and stable.
Structural Design Expertise: Collaborating with structural engineers ensures that buildings are designed to meet seismic standards. Teamhome works closely with experts to deliver high-quality earthquake-resistant buildings tailored to the unique requirements of Bangalore’s landscape.
Regular Maintenance and Retrofitting: For existing buildings, regular maintenance and retrofitting are crucial for earthquake preparedness. Teamhome provides retrofitting services to enhance the safety and durability of older buildings, helping them meet modern standards.
Final Thoughts
Incorporating these top techniques for earthquake-resistant building is essential for creating safe, durable, and resilient structures. Teamhome, a leader in building construction in Bangalore, understands the importance of utilizing advanced construction methods to ensure that each project can withstand potential seismic forces. By combining innovative design, high-quality materials, and safety-focused construction practices, Teamhome builds structures that offer not only aesthetic appeal but also uncompromised resilience in the face of nature’s challenges.
Investing in an earthquake-resistant building is an investment in safety, stability, and peace of mind. With experts like Teamhome leading building construction in Bangalore, property owners can trust that their structures will remain safe, secure, and ready to face the future.
0 notes