#denim stretch
Explore tagged Tumblr posts
Visit Tumblr Blog
Explore Tumblr blogs with no restrictions, modern design and the best experience.
Last Seen Tumblr Blogs


Fun Fact
69% of Tumblr users are millennials.
Text
L'Evoluzione dello Stile: Dalla Moda Casual alle Tendenze Contemporanee
Un viaggio attraverso le trasformazioni della moda e il suo impatto sulla società
Un viaggio attraverso le trasformazioni della moda e il suo impatto sulla società L’evoluzione dello stile, in particolare nel contesto della moda, ha subito notevoli trasformazioni nel corso degli anni. Dalle origini del casual agli stili più sofisticati e innovativi, ogni epoca ha portato con sé nuove tendenze che riflettono i cambiamenti sociali e culturali. Storia e Trasformazione dello…
#abbigliamento quotidiano#autoespressione#cambiamenti sociali#colori e stampe#comfort ed eleganza#cultura della moda#denim stretch#design contemporaneo#Espressione Personale#evoluzione dello stile#fashion history#grunge anni &039;90#innovazioni tessili#jersey di cotone#lifestyle fashion#minimalismo chic#Moda#moda casual#palette vivaci#sneaker iconiche#stili di abbigliamento#storia della moda#tendenze contemporanee#trend analysis.
0 notes
Text
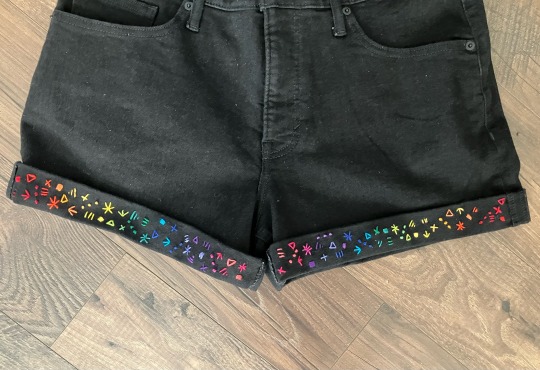
Finished the rainbow shorts!!!
#handmade#embroidery#rainbow embroidery shorts#for some reason like every pair of shorts I’ve bought in a lotta years#has unfinished hems? they are just kinda folded and not sewn#probably because denim is stretchy now and it’s harder to make the stitching on the hems without limiting the stretch#idk? but it makes it so easy to embroider!#also idk how to take a photo of these while wearing them#I feel like I should? they look better worn than they do flat#but idk how to do that in a way that’s not like ‘look at my legs’#which is a thing I tend to avoid especially online because I usually dislike comments on my legs#except the time my sister said my thighs look like she doesn’t want me to kick her#which was a weird but delightful compliment#got sidetracked. embroidery is done!!!
156 notes
·
View notes
Text

Inferno Denim Corset Top & Inferno Non Stretch Utility Jean in Rust in Fashion Nova (sold out)
#Bianca Belair#Bianca Crawford#Inferno Denim Corset Top#corset top#top#tops#rust#Non Stretch Utility Jean#jean#jeans#Fashion Nova#women of wrestling fashion#wwe
11 notes
·
View notes
Text


#cravity hyeongjun#song hyeongjun#cravity#kpop idols#kpop gifs#cute guys#flexible#shorts#denim shorts#barefoot guys#malefeet#in bed#gifs#gif#stretching#hyeongjun#kpop boys
11 notes
·
View notes
Text

non levis but jeans passion!
27 notes
·
View notes
Text


adventures in mending
#the red one was my first try and the black is a stretch denim with a pocket in the way so they're not particularly pretty#but the blue one came out great and they all seem sturdy!#jabbermikey#mending
25 notes
·
View notes
Text
Actually didn't mean for like 2 excerpts and a chapter to all go up on the same night BUT HERE WE ARE
Also I'm going through my wardrobe and I've kept like every pair of jeans I've owned in the last 20 years so I'm having to try on like 15 pairs of jeans (it's all I wear aside from Snag leggings) to see which ones I can keep and which ones I can turf and which ones I can repurpose into shorts
And y'all, why is trying on jeans so hard T.T
#i don't throw any clothes out#like seriously i have clothes here from the 90s that are back in fashion again dsalkfjasd#i know none of you actually need to know this#but i don't use facebook for stuff like this#look idk what it is but repeatedly pulling on and taking off denim and checking to see#if the waist is too tight to stretch out or tight enough to be uncomfortable for 3 days before it's a perfect pair of jeans#is like... actually really tiring#i'm sitting here taking a denim break#i have like 6 things left to try on x.x#pray for me#pray for my giant ass amazonian hips and my lil waist
20 notes
·
View notes
Text
laszlo roleplaying as a crew member alone in the costume trailer in the PI undercover episode 😂
#ooc.#also the way he specifically wants nandor's sweatshirt when he found a different one#also he looked hot in that denim jacket#i cannot stop thinking about the bit where he's trying to take nandor's sweatshirt and nandor goes “you're stretching it!”#and laszlo's like “wouldn't be the first time😏”
2 notes
·
View notes
Text
I’m very happy I discovered Madewell jeans and find them in my local consignment shops often, I find them on sale for $10-17 and they fit and feel so nice!! If I’m looking and see one that fits me and is on sale it’s generally an instant purchase, and they last ages too. I will never spend more than $35 on a pair of pants or buy new so I’m in a very happy spot for pants rn
#personal#also permanently living in my skinny jeans era#but also I have h&m and mossimo pants from like 2017 that are still in great condition. mossimo pants are noticeably thicker denim though#so they are my winter denims. stretch fabrics do not insulate from the cold at all naturally
2 notes
·
View notes
Text
.
#I've got a pair of jeans that's like.. maybe twelve years old? and I've been patching all the holes over the last six months#and my most recent patch job I got some rainbow faux fur and I love it it's so awful#I need courderoy for the last patch job tbh. the mismatch texture would be so fun. they're my favorite pants#tag talk#honestly it's a tragedy I can't wear them to work because they have so much personality#thanks tumblr for teaching me about mending clothing. I have unlocked my most chaotic aesthetic attribute#and you can even use any cloth you want. Just use a larger denim patch as a backing and any fabric you want as a front that shows through#I need to rip out the earliest patching I did on an earlier pair of pants and redo much better now that I've had a lot more practice#the first pair of jeans I did I didn't back with denim I just used t-shirt fabric which stretches something awful so I need to rework it#I also need to go thrifting again and find some new fabric patterns to use for patching.#anyway. mending pants is so fun and I only need to worry about keeping good pants for work. otherwise I can just wear my old pants#Highkey once I get a sewing machine I'm gonna start making my own shit#I already have several shirts I'm gonna take in the waist on since clothing proportions are a nightmare
2 notes
·
View notes
Text
Pattern: go ahead and flat fell this seam we only gave you 3/8" (1cm) allowance for
Me: or. Or. You could suck my dick
#stretch denim is gross and this is so fiddly#complaining is an important part of the creative process
4 notes
·
View notes
Text
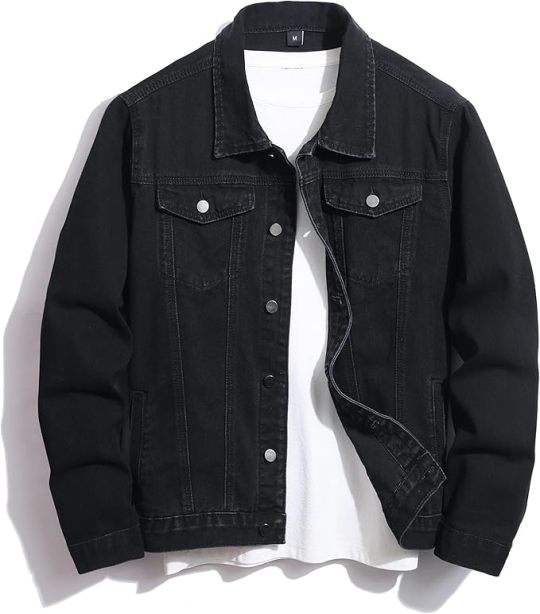
Men's Denim Jacket Distressed Ripped Slim Fit Stretch Trucker Jackets Classic Casual Denim Coat
BUY NOW
Elevate your style with this Men's Denim Jacket, a perfect combination of classic and modern fashion. Featuring a distressed and ripped design, this jacket exudes a rugged yet stylish vibe, making it an essential for casual outings and trendy ensembles. The slim fit and stretch fabric offer a tailored look without sacrificing comfort, allowing ease of movement throughout your day.
This classic trucker jacket is crafted with durable denim material, designed to stand the test of time. Whether you're layering it over a t-shirt or pairing it with chinos or jeans, this jacket is a versatile staple for all seasons.
BUY NOW
#denim#Men's Denim Jacket#Distressed Denim Jacket#Ripped Denim Jacket#Slim Fit Denim Jacket#Stretch Denim Jacket#Trucker Denim Jacket#Casual Denim Coat#Classic Denim Jacket#Men's Casual Outerwear#Men's Fashion Jackets#Stylish Denim Jackets for Men#Vintage Style Denim Jacket#Durable Denim Coat#Men's Streetwear Jackets#Rugged Men's Jacket
1 note
·
View note
Text
Urbano Juniors Boy's Slim Fit Washed Denim Jeans Stretch
Price: (as of – Details) Customers say Customers like the quality of the pants. They mention they come with stitched adjustment elastic and the material is good. However, some customers differ on the fit and color. AI-generated from the text of customer reviews

View On WordPress
0 notes
Photo

No Nonsense Women's Stretch Denim Leggings with Pockets
0 notes
Text
#liz claiborne#stretch jeans#straight legs#denim#karrenscellar#karrenscellar.com#ebaystore#ebayseller#fashion#karrenscellar fashion#womenswear
0 notes
Text
If, like me, you are a perfectionist, you can also sketch out your design on like printer paper or notebook paper or w/e beforehand, and then loosely baste it or pin it in place after you cut the pattern down to size. If you do, I recommend doing the outline first, or depending on how dense your fabric is, hold them together against a bright light and trace it out.
Also, I've found that using a layer or two of fabric paint on the back or around the edges helps with the fraying, without being too thick to sew through. It'll also help keep the stitches on the back secure, if that's something that you worry about.
You can get fabric medium for...decently cheap...at most craft stores, and mix it in shitty dollar store acrylic for basically whatever colors you want. Have I done this with glitter paint? Fuck yeah I did, it's awesome. You can also use paint to ~spice up~ your design, if you like, absolutely zero art skills required lol. Zero art skillz recommended, tbh ^_^
Had a few folks interested in how I made the patches I posted for Solarpunk Aesthetic Week, so I thought I'd give y'all my step-by-step process for making hand-embroidered patches!

First, choose your fabric and draw on your design. You can use basically any fabric for this - for this project I'm using some felt I've had lying around in my stash for ages.

Next, choose your embroidery floss. For my patches I split my embroidery floss into two threads with 3 strands each, as pictured. You can use as many strands in your thread as you prefer, but for the main body of my patches I prefer 3 strands.
Next you're going to start filling your design using a back stitch.

First, put in a single stitch where you want your row to start.

Poke your needle up through the fabric 1 stitch-length away from your first stitch.

Poke your needle back down the same hole your last stitch went into so they line up end-to-end.
Repeat until you have a row of your desired length (usually the length of that colour section from one end to the other). Once you have your first row, you're going to do your next row slightly offset from your first row so that your stitches lay together in a brick pattern like this:

Make sure your rows of stitches are tight together, or you'll get gaps where the fabric shows through.
Rinse and repeat with rows of back stitch to fill in your patch design.

When you're almost to the end of your thread, poke your needle through to the back of the fabric and pull the thread under the back part of the stitching to tuck in the end. Don't worry if it looks messy - no one's gonna see the back anyway.
This next step is fully optional, but I think it makes the patch design really pop. Once your patch is filled in, you can use black embroidery floss to outline your design (or whatever colour you want to outline with - it's your patch, do what you want). I use the full thread (6 strands, not split) of embroidery floss to make a thicker outline.

I use the same back stitch I used to fill the piece to make an outline that adds some separation and detail. You could use most any 'outlining' stitch for this, but I just use back stitch because it's just easier for me to do.
Once you're finished embroidering your patch, it's time to cut it out!

Make sure to leave a little border around the edge to use for sewing your patch on your jacket/bag/blanket/whatever, and be careful not to accidentally cut through the stitches on the back of the patch.
If you have a sturdy enough fabric that isn't going to fray, you can just leave it like this. If not, I recommend using a whip stitch/satin stitch to seal in the exposed edges (I find that splitting your embroidery floss into 3-strand threads works best for this).

And then you're done! At this point you can put on iron-on backing if you want, or just sew it on whatever you wanna put it on. Making patches this way does take a long time, but I feel that the results are worth it.
Thanks for reading this tutorial! I hope it was helpful. If anyone makes patches using this method, I'd love to see them! 😁
#yes!#it's very fun#ive been doing this with band patches and stuff#ive also been doing it on stretch denim (it's leftovers from when i cut jeans into shorts)#which is admittedly a pain in the dick and tbh i do not recommend that lmao#am i encouraging you to maybe mysteriously aquire fabric medium from your local chain craft store? nooooooo ;)#ill def be trying this stitch method tho#it looks like a lot of fun
18K notes
·
View notes