#cured in place pipe installation
Text
Choosing the Right Commercial Drain Cleaning Company for Efficient Solutions
Introduction:
Maintaining a smoothly functioning drainage system is paramount for any commercial establishment. When faced with clogged drains or drainage issues, seeking the services of a professional commercial drain cleaning company becomes crucial. In this guide, we will explore the key considerations for choosing the right commercial drain cleaning company that can provide efficient and effective solutions for your business.
1. Industry Experience and Expertise:
Look for a commercial drain cleaning company with a proven track record and extensive experience in the industry. An established company with years of experience is more likely to have encountered a variety of drainage issues and possesses the expertise to address them efficiently.
2. Range of Services:
Assess the range of services offered by the drain cleaning company. A comprehensive service portfolio should include not only drain cleaning but also inspection, maintenance, and repair services. This ensures that the company can address a variety of drainage issues and provide holistic solutions.
3. 24/7 Emergency Response:
Drainage issues can occur at any time, and a reliable commercial drain cleaning company should offer 24/7 emergency response services. This ensures that they can promptly attend to urgent situations, minimizing downtime and potential disruptions to your business operations.
4. State-of-the-Art Equipment and Technology:
Modern drainage issues often require advanced equipment and technology for effective resolution. Choose a company that invests in state-of-the-art tools such as hydro-jetting equipment, CCTV inspection cameras, and other advanced technologies to provide efficient and accurate solutions.
5. Licensed and Insured:
Ensure that the commercial drain cleaning company is licensed and insured. A valid license indicates that the company meets industry standards and regulations. Insurance is essential to protect both your business and the company's workers in case of any unforeseen incidents during the service.
6. References and Reviews:
Seek references from other businesses or read online reviews to gauge the satisfaction of previous clients. Positive references and reviews are indicative of a reliable and trustworthy drain cleaning company that delivers on their promises.
7. Transparent Pricing:
Transparent pricing is crucial for avoiding unexpected costs and budget overruns. Choose a commercial drain cleaning company that provides clear and detailed quotes, outlining the scope of services and any potential additional charges. This transparency ensures a smooth and predictable financial arrangement.
8. Environmental Considerations:
Consider a drain cleaning company that prioritizes environmentally friendly practices. Responsible disposal of waste and the use of eco-friendly cleaning agents demonstrate a commitment to sustainability and environmental responsibility.
9. Customized Maintenance Plans:
A proactive approach to drainage maintenance involves creating customized plans tailored to your business's specific needs. Choose a company that offers personalized maintenance plans to prevent recurring issues and ensure the long-term health of your drainage system.
Conclusion:
Selecting the right commercial drain cleaning company is a strategic decision that directly impacts the efficiency and functionality of your business operations. By prioritizing industry experience, a comprehensive service range, emergency response capabilities, advanced technology, and transparency in pricing, you can find a reliable partner for maintaining your commercial drainage system. Conduct thorough research, seek recommendations, and consider the factors outlined in this guide to make an informed decision that ensures your business remains free from drainage-related disruptions.
#cured in place pipe repair florida#cipp cured in place pipe#cured in place pipe cipp lining#cured in place pipe installation#cipp pressure pipe lining
0 notes
Text
Know About Cured-In-Place Pipe Installation by Renewa Line
Cured-in-Place Pipe Lining (CIPP) is a trenchless pipe repair method that involves inserting and curing a resin-impregnated tube within an existing deteriorated pipe. The goal of this pipe-lining process is to repair the existing host pipeline by providing support with the newly hardened pipe. To know more about Cured-In-Place Pipe Installation by Renewaline read the article.

1 note
·
View note
Text
where tf did i leave off
girl (nonspecific, just used here as an interjection, i know there are several of you reading this) i know it's been a lot and like shit got so hectic i updated that i had a backsplash and then nothing but
listen i've been unpacking stuff into my
NEW KITCHEN
which is fully operational and move-in ready it's just missing the door to one cabinet and a bunch of little pieces of trim and whatnot but
FEAR NOT
i will give you the scoop once i can figure out where i left off in the updates.

Image description: Picking up where we left off, here's the north wall looking east from the kitchen door, this time with the spacers removed from between the white tiles. The countertop is still covered with cardboard. You can see the underside of the cabinets a bit. The outlet has no faceplate on it.
Max mixed up a batch of grout and set to grouting the tiles, now that the adhesive or mortar or whatever had cured overnight. Jim, meanwhile, installed the dishwasher to be ready for the plumber, and installed the vent hood.
[image description: Two men are facing away from the camera, lifting a stainless steel vent hood up to hook it onto the screws it mounts to in a tiled wall.]
He also used a sheet of paper to cut out a template so he could cut the odd-sized piece of trim wood to cover the bay windowsill. "I got a whole roll of paper," he said, "but I only got one piece of wood." "Measure once, cut three times," Max interjected.

[Image description: Two men in a kitchen. The one on the left is standing on a stepstool to smear gray grout over the white tiled wall. On the right, the other man is bent over the countertop, with the offcuts of brown kraft paper curling away as he trims it with a utility knife.]
Finally the plumber rolled in-- Kyle, who'd been here before. He'd said he'd come Monday, but on Thursday when Jim called to confirm, he said he could push it up and come Friday instead. Which was huge, because it meant a working stove and working sink and working dishwasher and really, working kitchen, really really.
Jim bartered for a part from him, to hook the stove up-- he had one of Kyle's tools, left behind on an earlier job. Kyle was like ha I don't actually need it back I bought a replacement BUT i will give you the nipple you need anyway. (Yes! It was a nipple. That's a pipe fitting thing and I get a gold star for not giggling.)
So while Kyle was in the basement, hooking up my dryer and repairing my laundry sink (I had arranged to pay him separately for that, as neither thing were part of the kitchen job, and he figured he'd do those first so his boss would have a chance to send an invoice so I could pay him before he left, much easier all around), Jim and Max installed the stove and got it painstakingly leveled.

[Image description: a stove is pulled out somewhat from the surrounding counter. To the left a man is kneeling next to it; the other man stands to the right, leaning over to peer at a bubble level.]
They did a really thorough job on this, which involved pulling out that lower drawer so Jim could reach under to the rear adjustable feet with a wrench to fine-tune the position once the stove was shoved into place.
"Aw," I said, "now I gotta find the owner's manual to find out how to set the clock on this stove again," and Max wordlessly tilted his head, looked at the control panel, unerringly punched the button with a picture of a clock on it, and said "what time is it?" so I told him, he punched it in. "Kids," Jim laughed, and I said "so good with technology." Finished, Max hit the clock button again, and erased his work. "Oops," he said, repeated the process, and this time hit the "Start/OK" button at the end, which worked and actually entered the time.
Then the real excitement began, because Kyle finished mucking around in the basement and came up and put together the sink. Max, having now attached all of my cabinet door and drawer handles, had now mostly run out of work to do by then so he leaned on things and watched kyle work, which was also what I was doing, LOL.
But the moment of excitement came very soon.

[image description: two men standing by a kitchen counter. On the left, Kyle the plumber is staring down into the sink as the water runs. On the right, Max is leaning on the counter next to the stove, watching.]
No leaks! Hooked up! So exciting. He then ran a quick cycle on the dishwasher to make sure it didn't leak either, and lo and behold it did not.
Meanwhile Max lit the stove and ran it until the air was out of the line.
Literally, now we're cooking with gas.
So, everyone was done and wrapped up before 3pm on Friday afternoon, and they all left in high spirits. Jim will be back to put on the final cabinet door (they made it wrong! the custom cabinet people fucked up my door! I never knew because Jim had already sent it back) and all the crown molding, and a couple of other little details. He might come Monday but if the pieces aren't ready for him then he won't come until they are. In the meantime, I can use the kitchen to my heart's desire.
He gave me back my house key, since we were moving back into the house over the weekend, so I'd be present.

[image description: a kitchen! an actual kitchen, with grayish-blue cabinets, a white tiled wall, a dishwasher and a stove, a vent hood over the stove, and a hideous yellow flowered folding stool pulled up to the counter to be a makeshift chair. The knife block is on the counter, and the Instant Pot is sitting by the sink, and various other items are strewn around the counters. The floor is mottled gray and has a geometric blue and white mat in front of the sink.]
The first thing I did was put all my grungy old unwashable dishwares into the dishwasher to see if it melted them, hence my post on this topic. (Update: Nothing so far has actually gotten ruined! Amazing.)
But the second thing was that we went back over to dude's mom's to retrieve our cat. <3 <3 <3 and then i got to sleep in my own bed with my beloved cat.
39 notes
·
View notes
Text
L2 Certification Attempt
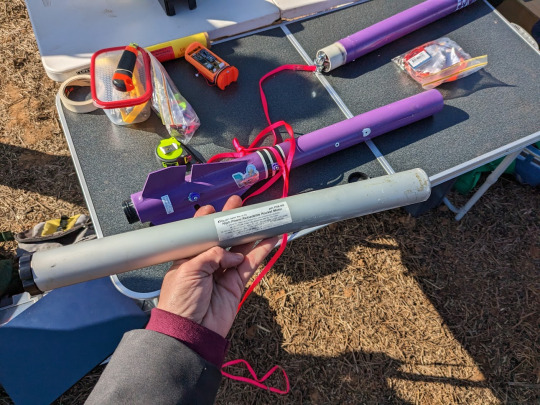
After obtaining my L1 attempt, I had originally planned to fly for an L2 attempt on the same rocket. However, I attended a VRA club night where a swap meet was being held and ended up with a Rocketry Warehouse (now Madcow) Broken Arrow 54. Sometimes a great deal is a great deal.

This was a pretty big step up from the cardboard and plywood construction I was used to, being entirely filament-wound fibreglass. Its large diameter/length ratio combined with its small split fins also made it intimidating. This kit is also intended only for dual-deploy, which is something I had never done before. I decided it was a good opportunity to challenge myself.
Build
The kit was pretty bare-bones, meaning I had to source a retainer and much of the hardware for it. I ordered a 38mm Aeropack retainer, and then I began the build.

The process was relatively simple, with through-the-wall fins like all my previous builds. However, this time they did not fit into divots in the centering rings, so I 3D printed a fin jig to hold them in place while the epoxy cured.
Speaking of epoxy, I moved away from the 5-minute Araldite I had used for previous builds in favour of a more serious adhesive. I used JB Weld for anything motor-adjacent because of its thermal tolerance, and Epiglue for all other structural attachments and fin fillets. This was recommended to me by a friend in Perth who flies truly ridiculous rockets and has used it on flights of up to Mach 2. It is also available from a local marine supplier, meaning I didn't have to pay through my nose to get hold of Rocketpoxy or West Systems. I was very pleased with how nicely it went on and how strong it was.
By this time I'd also nailed down my epoxy application and filleting methods - I use cheap silicone sculpting and grouting tools which can simply be cleaned with acetone after I'm done. For filleting, I also found that mixing the epoxy in a ziploc bag and piping it on like icing worked a treat.
My work gets cleaner with every set of fillets I lay down. These ones don't look fantastic, and the split fins were something I had never dealt with before, but that didn't matter for reasons that became apparent shortly after the epoxy had set.
The morning after I applied these fillets, I got up to continue working on the rocket when I noticed that something had shifted overnight. The motor mount tube was somehow at an angle, as shown in the image above. I know I installed it perfectly level, but I didn't secure it while it set so I think it slipped as it cured. In my defense, I was quite sick and not firing on all cylinders when I had completed all the work up until now, but the realisation of what I'd managed to do was pretty disappointing and a bit of a knock to my confidence. Some measurements and a bit of trig suggested that the offset was only a degree or two, but the image suggests otherwise. I consulted some friends who are far more experienced flyers than I, and the consensus was a mix between 'send it' and Do Not Fly That Rocket, with more in favour of flying it than not. I looked at my OpenRocket sim for stability characteristics, and read some old Rocketry Forum posts about this model, all which pointed to it being rather squirrelly. In hindsight, I feel like I made the right decision, as I just couldn't ignore my gut feeling. I decided to rip it apart and rebuild it completely.
I did not take photos during this phase due to being completely covered with fibreglass dust, but I ended up using a diamond Dremel cutting wheel to first cut the fin can off, then cleanly slice the fins out of the body. I cannibalised a small section of the avionics bay tube to use as a coupler to reattach the aft section. I was then able to epoxy the whole thing back together, sand it all down, and it looked no different - apart from the motor mount being at the correct angle of zero degrees. I re-filleted the fins with a larger radius than before, as I wasn't happy with how they looked initially. I was very pleased with this effort, and confident to a) present this rocket to an RSO and b) fly it safely.
I also took the opportunity during this rebuild to modify the rocket to be motor-eject capable, by removing the bulkhead to which the recovery harnessing would be attached. I cut a small divot in the forward centering ring and attached a looped piece of kevlar around the motor tube before reinstalling it. This 'leash' provides the anchor point for a longer recovery harness to be attached to. I am very glad I did this, as not long after I was informed that my university club possessed a grand total of two (2) grams of black powder. Traditional dual-deploy would no longer be an option. More on that later.
To finish off the construction, I 3D printed rail guides from ABS and bolted them to the body, with a bit of JB Weld in there for good measure. I drilled pressure relief holes in the forward and aft sections of the body, and another in the avionics bay for altimeter readings. I then drilled a more smaller holes and installed screws to pin the nosecone to the forward section, and the forward section to the avionics bay. Since the flight would no longer be traditional dual-deploy, the rocket would not need to separate at these points. Finally, I gave it a purple paintjob and the name of CRUNCHWRAP 3.
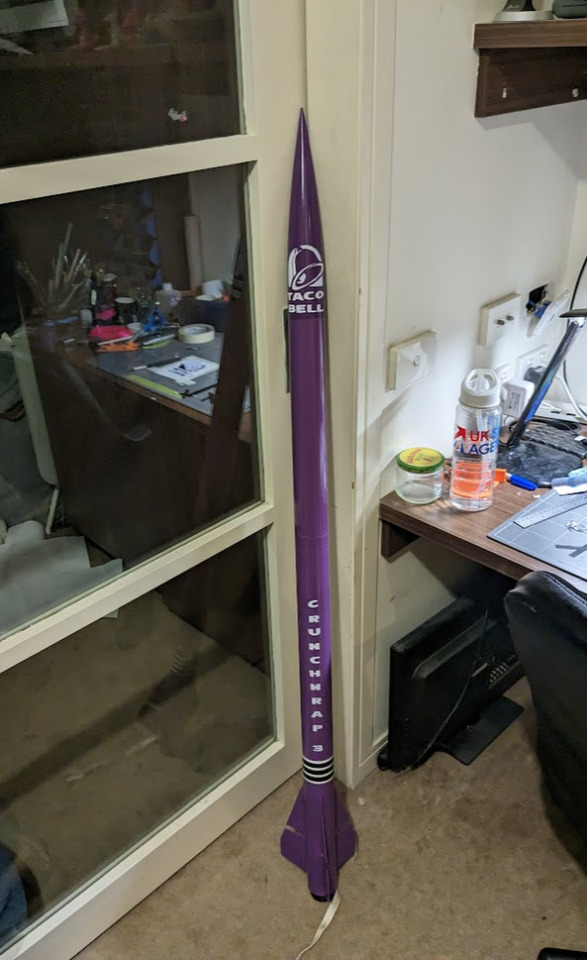
At some point, Taco Bell might see these and send me a cease and desist. I am going to keep building and flying them until they do.
Recovery
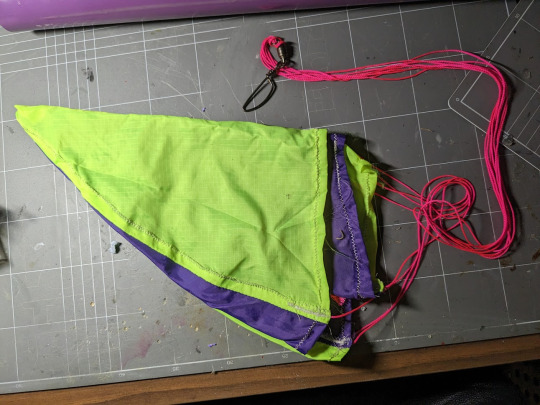
With a proper dual-deploy ejection now out of the question, I turned to my backup plan. My team calls it the 'poor-man's dual deploy', even though it's arguably actually more expensive than using black powder. This involves deploying a drogue with the motor charge, then using a JollyLogic chute release device to deploy the main at whatever altitude you have chosen. There is a substantial risk of the harnessing becoming tangled using this method, but I didn't really have a choice. I used a 4.5m nylon shock cord, tied to the anchored kevlar leash. I divided the cord into thirds, tying a loop at each third. I attached the drogue to the forward-most loop, and the main to the aft loop. Both chutes were on quick links and swivels to reduce the risk of tangling as much as possible. Each of these chutes were wrapped in their own nomex protector, and then placed in the aft section of the rocket with their harness. I used a 36' (91-ish cm) main chute from Loc Precision, and a 40cm 4-gore drogue which I sewed using Scott Bryce's fantastic Spherical Parachute Pattern Generator.

Avionics
Although it ended up not being needed, I decided to send the flight computer I got hold of along for the ride. I thought it would be cool to get an altitude reading to compare with the simulated apogee. A buddy of mine in the US was getting rid of a few bits and pieces, so I bought his RRC2+ off him with the intent of flying it for my L2 attempt. First, though, it needed somewhere to live.
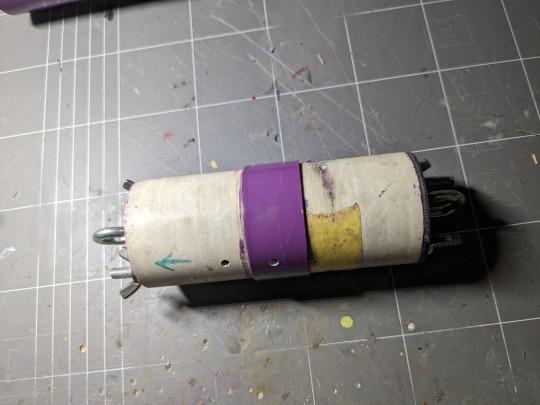
I found the supplied parts for the av-bay were a little lacking, so I added some modifications - the main one being drilled holes for two threaded rods to pass through. I used two for redundancy, since the idea of a single rod made me a little uneasy. I used wingnuts on these so I could fasten them nice and tight without the need for a spanner. It was also missing enough eye bolts, so I grabbed some from Bunnings.
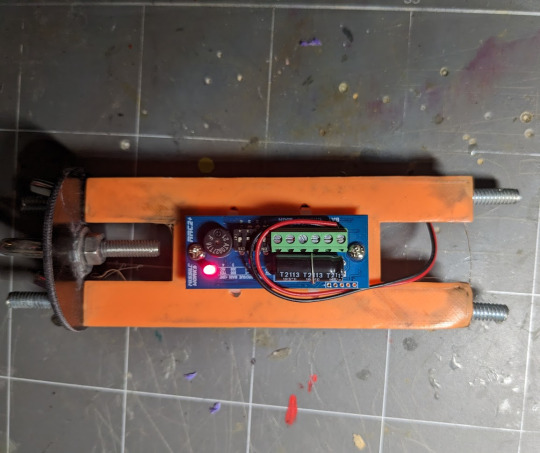
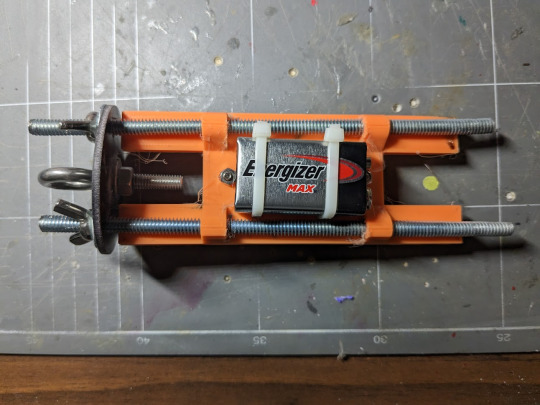
I then designed and 3D printed a sled to fit onto the threaded rods and provide a mount for the battery and the flight computer. A very simple setup. The sled looks objectively awful since the printer was having a bit of a sook at the time, but the actual functionality was not affected and it serves its purpose just fine.
Motor
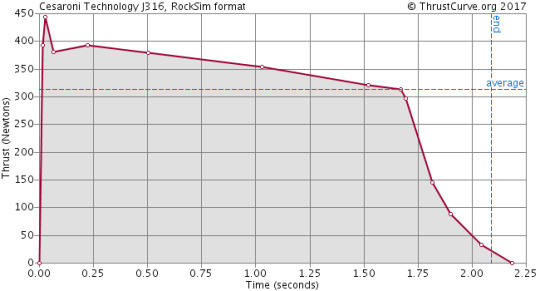
With an unbelievably limited amount of motors available in Australia at the time of writing, I had to work with what I could get hold of. I was lucky enough to snag was a CTI J-316 (pink!!) through my university team, which is a 38mm 5 grain reloadable motor with an adjustable delay of up to 17 seconds. Unfortunately, we didn't have a 5-grain case so I made do with a 6-grain case and a spacer. I only became aware of that the night before the launch, so I had to very quickly revise my recovery packing technique to account for the now limited real estate inside the body.
It provided an average thrust of roughly 316N, with a max of 450N, over a burn time of about 2.1sec, for a total impulse of roughly 650Ns. A pretty tame J motor, but still far more powerful than anything I'd ever flown before.
Simulation
After carefully weighing every single component of the rocket and entering them into OpenRocket, I simulated the flight on the motor above. The entire vehicle weighed 2.7kg, with a length of 1.41m. It was simulated to hit Mach 0.77, and fly to an apogee of 5191ft.

Theoretically, the centre of pressure and centre of gravity would be 0.86m and 1m respectively from the tip of the nose cone. This would give a stability calibre of 2.44 at Mach 0.3 - however, this rocket is quite a bit faster than that. Also, the 'rule of thumb' which says a rocket's CG should be roughly 1.5 body diameters in front of the CP is not as helpful on rockets with a length/diameter ratio of over 10, such as this one (which is 24). Here, the CG should be roughly 10% of the overall length in front of the CP, which it was, almost (9.6%). The stability calibre off the rod was predicted to be only a little over 1.5 (6%), but given that it would be going 31m/s I was confident this would be fine as long as it didn't launch into a strong wind gust. At motor burnout, stability would be up near 3.8 (15%), which I was happy with.
I set the motor delay to the full 17 seconds for the simulations, as anything shorter would have the recovery devices deployed before apogee. This would a) cut the flight short and more importantly b) place a huge amount of strain on the harnessing and chutes due to a very high deployment speed. With the full delay, deployment would be at 11.3m/s, which the harness and drogue could handle easily. Ground hit was simulated to be a brisk but not destructive 6.8m/s.
As an aside, OpenRocket includes a little disclaimer about 'jagged edge fin predictions may not be accurate'. I bore this in mind through the whole process, but based on others I'd seen fly and forum posts I'd read online, I was comfortable with what I was doing.

Flight
L2 certifications require passing a written exam with two sections - technical knowledge and the Tripoli safety code. I had already passed the exam (100%, don't mind if I do) at a previous date, so all I had to do was install my motor, altimeter, and recovery gear. I didn't even have to drill out a delay. After a quick field CG test and a visit to the RSO tent, I was ready to rack up.
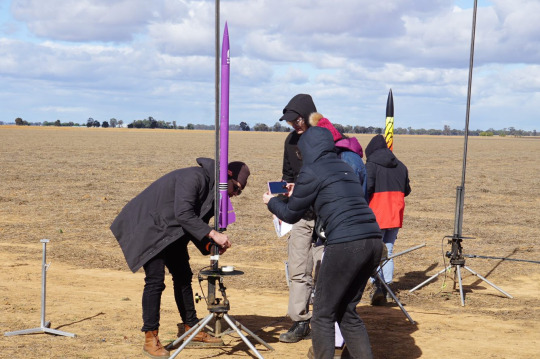
A few new recruits to our team came out to the launch day, so I enjoyed an opportunity to show them how to set up for flight, install an igniter, and test for continuity.

After a small delay to clear the range and ensure the skies were clear overhead, the LCO hit the button.
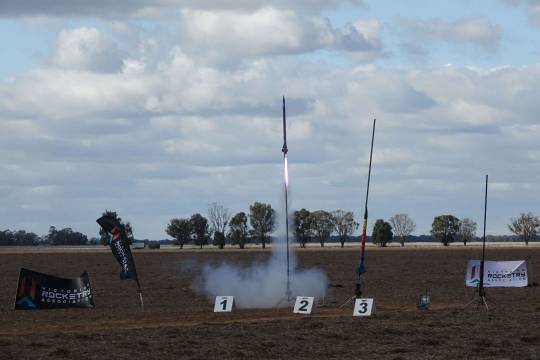
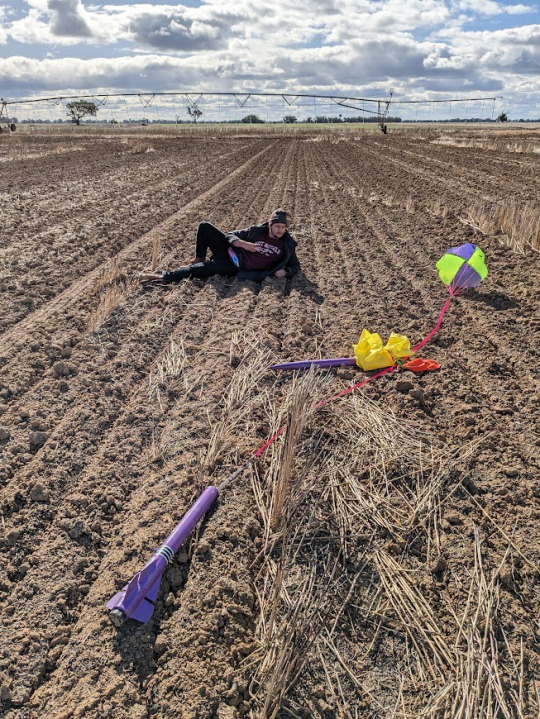
The rocket flew straight and fast on a frankly gorgeous purple flame, and almost instantly got high enough that we struggled to keep a visual on it. A puff of smoke indicated the ejection charge had blown, and then I was able to see the fluoro yellow gores of the drogue as it opened. The rocket began to drift slowly as it came down, as there was a fairly stiff breeze blowing at the time. I had programmed my chute release to 500ft, and it performed as intended. The main chute deployed and thankfully none of the recovery gear got tangled. I watched it gently descend, albeit with a decent drift going on, and set itself down in a field about 800m away. After a gentle stroll (read: powerwalk to warm up, it was freezing), we arrived at the rocket. It had been dragged a little and the chute had become tangled on the ground, but all was intact. One quick pitstop at the RSO tent later, I had my L2!
Upon reflection....
Things to improve
Use a much smaller drogue. The one I flew was about twice as big as it needed to be, and it was far too windy for such a chute. I simply didn't have a smaller one, although making one would have only taken about an hour.
I didn't get any useful readings from my altimeter. I don't believe I set it up properly, so I need to make sure I learn to do that and fly it as a passenger on at least one more flight before I use it as a deployment computer. I am disappointed that I couldn't get a figure to compare with the simulation.
Use a proper stand to rest the rocket on, perfectly horizontally, during construction. This would have avoided the whole debacle of the motor mount slipping and me consequentially having to rip it apart and rebuild.
Things that went well:
Being absolutely prepared and packing my car the night before, and bringing spares of most components, made launch prep a breeze
That was the first flight of my homemade drogue, and upon inspection afterwards there was no damage. I can now be confident that others of the same design and similar construction that I have planned for bigger rockets will perform in a similar way.
The recovery technique worked as intended, with no tangling. This is probably not a viable option for rockets going any higher, but it's nice to have in the back pocket for projects of this scale if black powder and/or avionics access might be an issue
I am also extremely relieved that this certification only took me one shot, rather than the three that my L1 took. I think it reflects well on my progress.
Next:
Fly it again with proper dual deploy, if I can get my hands on some black powder
Scratch build of a rocket of similar scale
...... L3?
2 notes
·
View notes
Text
Why Liquid Screed is the Top Choice for Modern Flooring
Modern flooring mostly uses liquid screed as a better solution for flooring in place of other traditional methods. screed is characterized by its ability to level itself and as such it offers a perfect leveling that is most appropriate for under-floor heating installations as well as other floor coverings. It cures faster than regular screed and when used in construction helps to shorten project duration since less time is spent to cure it and also its thermal properties assist in saving energy. Due to its flexibility good adhesion properties and durability, the screed is quickly proving to be a popular choice for modern construction and decorating HUNDRED and living space improvement.
Why Liquid Screed is the Top Choice for Modern Flooring:
1. Perfect for Underfloor Heating
Another benefit of screed is that it is well compatible with underfloor heating systems, this is because of its good thermal properties. It also surrounds the heating pipes tightly hence lacking areas where heat conduction can be hampered with by cold areas. This not only optimizes the heating system but at the same time saves energy in the long run as costs of energy are reduced.
2. Smooth and Level Surface
Screed is unique because it does not require much effort to be leveled since it will automatically level itself on the floor. As such, it becomes very suitable for any type of flooring décor including tiling, laminating raw or laminate flooring, and so on, to produce a perfect outcome.
3. Faster Drying Time
Further, one significant feature, that makes screeds superior to sand-cement screeds, is its drying time. This leads to savings for the contractors since they spend a limited amount of time by having to stop construction activities mid-way and then wait for concrete to set. It is faster thus enabling projects to continue at a faster pace and meet project development deadlines on time.
4. Thin Layer Application
Compared to the usual screed that requires the application of heavy layer thickness, liquid screed can be applied in a thinner layer without affecting its sturdiness. This has the advantage of reducing the overall load on the floor making it appropriate for a multiple-storey structure.
5. Eco-Friendly Option
Still, screed usually contains components that are still more eco-friendly than screed used for normal applications. It also cuts down energy consumption because of its improved thermal efficiency, which forms part of sustainable construction.
Conclusion:
Screed appears to have tremendous advantages in contemporary flooring from perspectives such as thermal conductivity, quick drying, and green solution. Due to its non-porous surface, its ability to withstand underfloor heating, and its convenience it is preferred by both homeowners and contractors. To the Clients willing to get the maximum benefit of the floor heating system, One Time Floor Heating Group offers the best option – professional screed installation. In both architectural designs for houses or business premises, the use of screed is advisable for the construction of long-lasting, efficient, and level floors.
0 notes
Text
What are the Steps to Construct a Building?
Constructing a building, whether it’s a small home or a multi-story residential complex, involves a series of carefully planned steps. From initial planning to the final finishes, the construction process requires the expertise of skilled professionals such as builders in Delhi, residential construction specialists, and contractors. Understanding these steps helps homeowners gain insight into how their dream home comes to life and how to plan for a smooth construction process.
In this blog, we’ll break down the essential steps to construct a building, while highlighting how Makhijas Group, a trusted house maker in Delhi, can guide you through each phase of your dream project.
1. Pre-Construction Planning
Before construction begins, comprehensive planning is crucial. This stage involves:
Site Selection and Analysis: Choosing the right location is key. The site should meet zoning regulations, offer good infrastructure, and align with your vision for your residential property. Makhijas Group provides expert guidance in site selection and evaluation, ensuring you make the right decision for your new home.
Design and Blueprints: Architectural design plays a critical role in residential construction. Working with experienced builders in East Delhi, like Makhijas Group, helps you develop detailed blueprints that align with local regulations and your lifestyle needs.
Permits and Approvals: Acquiring the necessary building permits is a must. Local regulations vary, and experienced builders are well-versed in securing all the required permits efficiently. Makhijas Group handles this process for you, ensuring no delays due to legal paperwork.
2. Site Preparation and Excavation
Once the design and permits are ready, site preparation begins:
Clearing the Land: The construction site must be cleared of any vegetation, debris, or old structures to make way for the foundation work.
Soil Testing and Excavation: Soil quality impacts the foundation’s strength. Based on the soil test, builders decide the type of foundation needed. The excavation process involves digging trenches and preparing the ground for laying the foundation.
3. Laying the Foundation
The foundation is the most crucial part of any building. It supports the entire structure:
Foundation Design: Depending on the project size and soil conditions, the foundation could be a slab, pier, or pile foundation. Builders ensure that the foundation is strong and durable.
Pouring Concrete: Once the foundation formwork is in place, concrete is poured and allowed to cure. During this phase, it’s important to have skilled residential construction professionals managing the process, ensuring structural integrity.
4. Framing the Structure
After the foundation has been laid, the next step is framing:
Walls and Roof Structure: Framing involves constructing the skeletal structure of the building, including walls, floors, and the roof. This phase gives the building its shape. Materials like wood, steel, or concrete are used, depending on the design.
Window and Door Openings: Once the basic structure is framed, spaces for windows and doors are marked and cut out.
5. Installing Plumbing, Electrical, and HVAC Systems
After the structure is in place, the installation of essential systems begins:
Plumbing: Pipes for water supply and drainage are installed throughout the building.
Electrical Wiring: Electricians run wires through the walls, connecting outlets, switches, and lighting fixtures.
HVAC: Heating, ventilation, and air conditioning systems are installed to ensure comfort in the building.
These systems are installed before closing up the walls to ensure easy access for future repairs or upgrades.
6. Roofing and Exterior Finishing
Once the frame is complete, it’s time to install the roof:
Roofing: The type of roof (flat, sloped, tiled, etc.) depends on the design. Roofing materials such as shingles or tiles are laid to ensure the building is weatherproof.
Exterior Finishes: Siding, brickwork, or plaster is applied to the exterior walls, enhancing the aesthetic appeal and protecting the building from external elements. Makhijas Group, renowned as one of the top builders in East Delhi, offers a wide range of design options to match your style.
7. Interior Work and Finishes
The next phase focuses on the interior:
Drywall and Flooring: Walls are closed with drywall, and flooring materials such as wood, tile, or carpet are installed.
Painting and Interior Design: This is where your home starts to take shape visually. Makhijas Group provides expert interior design services, ensuring that every detail of your home reflects your taste and lifestyle.
Fixtures and Appliances: Finally, light fixtures, kitchen appliances, bathroom fittings, and other essential components are installed.
8. Final Inspections and Handover
Before the project is completed, the building must pass final inspections to ensure it meets local building codes and safety standards:
Final Inspection: Inspectors review the entire project, including the structure, electrical, plumbing, and HVAC systems.
Handover: Once the building passes all inspections, it’s ready for occupancy. Makhijas Group, as leading builders in Delhi, ensures a smooth transition from construction to handover, making sure your dream home is move-in ready.
How Makhijas Group Can Help with Your Dream Project
Building your dream home requires the expertise of seasoned house makers in Delhi. With years of experience in residential construction, Makhijas Group offers comprehensive services, from design to completion. Here’s how they can assist:
Customized Designs: Whether you’re constructing a modern apartment or a luxury builder floor, Makhijas Group tailors designs to meet your preferences and needs.
Timely Delivery: Makhijas Group understands the importance of time management in construction projects. They ensure that every phase is completed efficiently, avoiding unnecessary delays.
Quality Assurance: Known as trusted builders in East Delhi, Makhijas Group uses high-quality materials and follows industry best practices to deliver durable, beautiful homes.
End-to-End Services: From acquiring permits to interior design, Makhijas Group handles every aspect of the construction process, giving you peace of mind.
Conclusion
Constructing a building is a complex process that requires attention to detail and careful planning. From the initial design stage to the final handover, each step plays a crucial role in bringing your vision to life. With the expertise of builders in Delhi, like Makhijas Group, your dream of owning a beautiful, functional residential property can become a reality.
For more details on how Makhijas Group can help you with your next residential construction project, visit their website.
0 notes
Text
Introduction to Pipe Relining in Melbourne
For many Melbourne homeowners, dealing with damaged or blocked pipes can be a nightmare. Traditionally, fixing damaged pipes involved extensive digging and costly replacements. However, Jo Plumbing is here to offer a modern, efficient, and non-invasive solution: pipe relining. As a trusted plumbing service provider in Melbourne, Jo Plumbing specializes in pipe relining, ensuring you get the best and most durable solution for your plumbing issues without the mess and hassle of digging up your property.
This article will walk you through everything you need to know about pipe relining in Melbourne, the benefits it offers, and why Jo Plumbing is the best choice for this service.
What Is Pipe Relining?
Pipe relining is a cutting-edge plumbing solution used to repair damaged or blocked pipes without the need to dig up and replace them. Instead of removing the old pipes, relining involves creating a new pipe within the existing damaged pipe using a durable resin liner. This method provides a strong, long-lasting solution that can restore your plumbing system to full functionality without the mess or disruption of traditional pipe replacement.
Key Features of Pipe Relining:
Non-Invasive: No need for extensive digging or property damage.
Durable: Creates a new pipe within the old one, resistant to cracks and corrosion.
Cost-Effective: Saves you money by avoiding major excavation and replacement work.
Why Choose Pipe Relining in Melbourne?
When it comes to pipe repairs, many Melbourne homeowners are now opting for pipe relining due to its numerous advantages over traditional methods.
Benefits of Pipe Relining:
Minimal Disruption: Pipe relining is a trenchless solution, meaning there’s no need to dig up your lawn, driveway, or other parts of your property. The process is clean, quick, and non-disruptive.
Cost-Effective: Compared to the high costs of excavation and pipe replacement, relining is a more affordable option that delivers long-term results.
Long-Lasting Solution: Pipe relining uses high-quality materials designed to last for decades, providing you with peace of mind.
Environmentally Friendly: Since there’s no digging or removing old pipes, pipe relining has a smaller environmental footprint.
How Pipe Relining Works: A Step-by-Step Guide
Jo Plumbing follows a precise and thorough process to ensure the best results from pipe relining. Here’s a breakdown of how the method works:
1. Inspection and Assessment
First, Jo Plumbing’s experts use advanced CCTV cameras to inspect the condition of your pipes. This allows them to identify the exact location and extent of the damage.
2. Pipe Cleaning
Next, the pipes are cleaned using high-pressure water jets or mechanical tools to remove any debris, roots, or blockages that could interfere with the relining process.
3. Liner Installation
A resin-saturated liner is then inserted into the damaged pipe. This liner is carefully positioned to cover the entire damaged section of the pipe.
4. Curing
Once the liner is in place, it’s inflated and left to cure, creating a strong, seamless pipe within the existing one.
5. Final Inspection
After the curing process is complete, another CCTV inspection is conducted to ensure the new pipe is fully functional and free from any defects.
Signs You Need Pipe Relining in Melbourne
Wondering if pipe relining is right for your property? Here are some common signs that indicate you might need pipe relining:
Frequent Blockages: If your pipes are constantly getting blocked, it could be due to cracks or tree root intrusion.
Slow Draining: Slow drainage often points to internal pipe damage or clogs.
Water Backups: Water coming back up through sinks or drains is a sure sign of a significant issue within your pipes.
Cracks or Leaks: If you notice damp patches, water stains, or unusual moisture around your home, it could be due to leaking pipes.
Sewer Smells: Bad odors coming from drains often indicate pipe damage that allows sewage to escape.
Benefits of Pipe Relining for Melbourne Homes
Pipe relining offers multiple advantages for Melbourne homeowners looking to fix their plumbing issues with minimal disruption.
Key Benefits Include:
Durability: The new pipe created through relining is resistant to corrosion, cracks, and tree root intrusion, ensuring a long-lasting solution.
Cost-Effectiveness: Pipe relining avoids the need for expensive excavation and pipe replacement, saving you money on labor and materials.
Faster Repairs: Since there’s no need to dig, the process is quicker, meaning your plumbing system is back up and running in less time.
Pipe Relining vs. Pipe Replacement
When comparing pipe relining to traditional pipe replacement, relining offers several distinct advantages:
Less Disruption: Pipe replacement typically requires digging, which can damage your property and take much longer. Relining avoids this by working within the existing pipe structure.
Cost Savings: Because there’s no need for extensive labor and digging, relining is usually more affordable than full pipe replacement.
Longer Lifespan: The materials used in relining are highly durable, offering a longer-lasting solution than replacing old pipes with new ones.
Frequently Asked Questions about Pipe Relining
How long does pipe relining take?
Most pipe relining jobs can be completed in just a few hours to a day, depending on the extent of the damage.
Is pipe relining permanent?
Yes, pipe relining creates a durable new pipe that can last for decades, often up to 50 years or more.
Does pipe relining work for all types of pipes?
Pipe relining is suitable for most types of pipes, including clay, cast iron, and PVC.
Will my yard be dug up during the process?
No, pipe relining is a trenchless process, meaning there’s no need for digging or excavation.
Can pipe relining fix severe damage?
Yes, pipe relining can repair most types of damage, including cracks, breaks, and intrusion from tree roots.
Conclusion: Why Jo Plumbing Is Melbourne’s Go-To for Pipe Relining
For homeowners in Melbourne looking for a fast, cost-effective, and non-invasive solution to their pipe problems, pipe relining with Jo Plumbing is the best choice. Our team of experienced plumbers ensures that your pipes are restored to full functionality with minimal disruption to your property. With long-lasting results, professional service, and competitive pricing, Jo Plumbing is Melbourne’s trusted expert in pipe relining solutions.
Telephone No. +61 422 653 347
#emergency plumber pakenham#plumber#plumber hampton park#plumbing services#plumber lysterfield#plumber pakenham#water tap repair#plumber vermont#toilet cistern seals#plumbing
1 note
·
View note
Text
Pipe Relining Artarmon: Efficient Solutions for Damaged Pipes
Pipe Relining Artarmon: Innovative Solutions for Your Plumbing Needs
At Total Pipe Relining Sydney, we specialize in providing top-notch pipe relining services in Artarmon, offering an efficient and modern solution for damaged or blocked pipes. Our trenchless technology allows for effective repairs without the need for disruptive excavation, making it a preferred choice for homeowners and businesses in the area.

What is Pipe Relining?
Pipe relining is a cutting-edge technique that involves creating a new pipe within the existing damaged pipe. This process begins by cleaning the damaged section of the pipe, followed by inserting a resin-coated liner. Once in place, the liner is inflated and cured, forming a robust, seamless pipe that addresses leaks, cracks, and other structural issues. This innovative approach not only restores functionality but also significantly extends the lifespan of your plumbing system.
Why Choose Pipe Relining?
Minimal Disruption: One of the most significant benefits of pipe relining is its trenchless nature. Unlike traditional repair methods that require extensive digging and disruption to your property, pipe relining can be done with minimal excavation, preserving your landscaping and hardscapes.
Cost-Effective Solution: Although the initial costs of pipe relining may seem higher than traditional methods, it often proves to be more cost-effective in the long run. By avoiding the costs associated with excavation and restoration, homeowners save money while benefiting from a long-lasting repair.
Durability and Longevity: The materials used in pipe relining are designed to withstand the test of time. Once cured, the new pipe is incredibly strong and resistant to corrosion, tree root intrusion, and other common issues, providing peace of mind for years to come.
Fast Turnaround: Our team at Total Pipe Relining Sydney is equipped with the latest technology, allowing us to complete most pipe relining projects in just a few hours. This means minimal disruption to your daily life and a quick return to normalcy.
Environmental Benefits: Pipe relining is an eco-friendly solution. Since it reduces the need for excavation, it minimizes waste and lessens the impact on your property. By choosing pipe relining, you're making a responsible choice for the environment.
The Pipe Relining Process
Inspection: The first step in our pipe relining service is a comprehensive inspection using advanced CCTV cameras. This allows us to accurately assess the condition of your pipes, identifying any cracks, blockages, or other issues.
Cleaning: After the inspection, we thoroughly clean the affected pipes using high-pressure water jetting. This step ensures that any debris, grease, or buildup is removed, creating a smooth surface for the liner to adhere to.
Liner Installation: Once the pipes are clean, we insert the resin-coated liner into the damaged pipe. The liner is then inflated, allowing it to conform to the shape of the existing pipe.
Curing: The next step involves curing the resin to create a solid, durable new pipe. This can be done using hot water or UV light, depending on the type of resin used. Once cured, the liner becomes a strong and seamless pipe.
Final Inspection: After the curing process is complete, we conduct another inspection with our CCTV cameras to ensure the relining was successful and that your pipes are functioning properly.
Why Choose Total Pipe Relining Sydney?
When it comes to pipe relining in Artarmon, you want a company that is experienced, reliable, and committed to providing high-quality service. Here are several reasons to choose Total Pipe Relining Sydney:
Experienced Professionals: Our team consists of skilled technicians with extensive experience in pipe relining. We stay updated with the latest industry practices and technologies to provide the best solutions for our clients.
Customer-Centric Approach: We prioritize customer satisfaction and work closely with you throughout the entire process. From the initial consultation to the final inspection, we ensure that you are informed and comfortable with our services.
Transparent Pricing: We believe in honesty and transparency in our pricing. Before any work begins, we provide you with a detailed quote, ensuring that there are no hidden costs or surprises.
Comprehensive Services: In addition to pipe relining, we offer a wide range of plumbing services, including drain cleaning and maintenance, allowing us to address all your plumbing needs.
Preventing Future Issues
While our pipe relining services provide a long-lasting solution, it’s essential to take preventative measures to keep your pipes in good condition. Here are a few tips:
Regular Inspections: Schedule routine plumbing inspections to catch potential issues early.
Mind What Goes Down the Drain: Avoid flushing items that can cause blockages, such as wipes, paper towels, and grease.
Use Strainers: Install strainers in sinks and showers to catch hair and debris before they enter your pipes.
Contact Us Today
If you’re experiencing issues with damaged or blocked pipes, don’t wait for the problem to worsen. Contact Total Pipe Relining Sydney for professional pipe relining services in Artarmon. Our skilled team is ready to provide fast, effective, and long-lasting solutions that keep your plumbing system running smoothly. Let us help you restore your pipes and bring peace of mind back to your home or business!
For More Information-
Website - https://www.totalpipereliningsydney.com.au/
Address - 4, 14/7 Villiers Pl, Cromer NSW 2099
Phone - 0423 600 455
0 notes
Text
Zurn Plumbing Service: Offering Complete Plumbing Solutions
Every property can have unique plumbing needs. You must work with a company that caters to them with the best tools and techniques. For this, you should choose Zurn Plumbing Service. This company can guide you with water heater installation, sewer line repair Atlanta, maintenance, and more. It has a team of highly skilled and experienced technicians who offer the most premium quality services. The entire experience would be hassle-free for you right from the beginning. Let’s discuss more about this company.
Extensive Experience
These professionals truly know how to cater to the growing needs of the community. you will always experience the difference if you choose Zurn Plumbing Service for your plumbing needs. When you require help with sewage pipe repair, these professionals can make the process convenient.
Commercial Plumbing
Zurn Plumbing Service offers commercial plumbing solutions to various businesses. So, this company can help identify problem areas and offer the best solutions based on your needs. When you need quick solutions, you can choose this company. These specialists can offer commercial water heaters, advanced drainage cleaning, general building plumbing, etc.
Residential Plumbing
When you choose Zurn Plumbing Service, you can work with certified professionals. These professionals can easily identify the reason behind a problem. This makes it easier for them to solve issues depending on your location. They understand that the requirements can change in every county. They know how to do things precisely the first time.
Cured-in-Place Piping
Zurn Plumbing Service is working on transforming pipe repairs. They are utilizing the trenchless technology. This helps complete the work in less time. This also makes the process more cost-effective. Traditionally, pipe repair and replacement require a lot of time and money. This has changed with the latest process. It is useful for many types of piping materials, such as clay, concrete, metal, iron, steel, and PVC. So, what are you waiting for? Schedule your service at Zurn Plumbing Service right away.
Prioritizing customers
Zurn Plumbing Service has succeeded in the industry by always prioritizing customers. These experts understand when you need immediate help and will always help you. When you are stuck in an unwanted plumbing situation, you can easily choose Zurn Plumbing Service. If you are looking for Atlanta sewer line repair solutions, contact Zurn Plumbing Service today.
To get more details, visit https://www.zurnplumbing.com/
Original Source: https://bit.ly/3Mv539p
0 notes
Text
#cured in place pipe repair florida#cured in place pipe installation#cured in place pipe cipp lining#cipp cured in place pipe
0 notes
Text
7 Sewer and Stormwater Pipe Repair Methods You Might Not Know Of
Maintaining a well-functioning sewer and stormwater system with the help of a plumber Newcastle is crucial for the health and safety of any property. These systems play a vital role in ensuring that wastewater is carried away efficiently, and stormwater is managed to prevent flooding. However, over time, these pipes are prone to wear and tear due to factors like environmental changes, ageing infrastructure, root intrusion, and even accidental damage. If left unattended, damaged sewer and stormwater pipes can lead to unpleasant and costly consequences such as backups, leaks, or environmental contamination.
The following list explores the modern sewer and stormwater pipe repair methods that you might not know of, offering solutions that prioritise efficiency, minimal disruption, and long-term results.
Pipe Relining
Pipe relining is one of the most advanced methods for repairing damaged sewer and stormwater pipes. It involves the installation of a new liner inside the existing pipe, which forms a durable inner layer that effectively seals cracks, leaks, or other structural issues. The liner is typically made of a flexible material like resin-impregnated fabric, which hardens after it’s installed, creating a smooth and seamless pipe within a pipe.
Pipe Bursting
Pipe bursting is a trenchless method used to replace severely damaged pipes. Instead of repairing the existing pipe, pipe bursting involves breaking apart the old pipe while simultaneously pulling a new pipe into place. This is done by using a bursting head that fragments the old pipe as it is drawn through, with the new pipe attached behind it.
Cured-In-Place Pipe (CIPP)
Cured-in-place Pipe (CIPP) is a trenchless rehabilitation method similar to pipe relining but with a key difference in the installation process. In CIPP, a resin-saturated tube is inserted into the damaged pipe and then inflated to fit the diameter of the host pipe. Once in place, the tube is cured using hot water, steam, or UV light, which hardens the resin and creates a new, structurally sound pipe within the old one.
Slip Lining
Slip lining is a technique that has been around for decades and is used to reinforce deteriorating pipes by inserting a new, smaller pipe into the existing one. The new pipe is usually made from materials like PVC or polyethylene, which are known for their durability and resistance to corrosion. Once inserted, the annular space between the old and new pipes is filled with grout to provide stability.
Sectional Point Repair
Sectional point repair is a targeted approach to fixing localised damage within a sewer or stormwater pipe. Rather than relining or replacing the entire length of the pipe, sectional point repair focuses on the specific areas that are damaged. This method involves inserting a small liner or patch at the site of the problem, which is then cured in place to restore the pipe's integrity.
Hydro Jetting
Hydro jetting is not a repair method in the traditional sense, but it’s an essential technique for maintaining the health of sewer and stormwater pipes. It involves using high-pressure water to clear out blockages, debris, and buildup from the interior of pipes. In cases where pipes are damaged due to blockages caused by grease, sediment, or tree roots, hydro jetting can restore proper flow and prevent further damage.
Grouting
Grouting is a method used to repair leaks in stormwater and sewer pipes. It involves injecting a sealing material, such as chemical grout, into the cracks or joints of the pipe. Once injected, the grout expands to fill the gaps, effectively sealing any leaks and preventing water infiltration. Grouting can be used in both gravity and pressure pipes and is often used as a preventative measure in stormwater systems.
Advances in sewer and stormwater pipe repair technologies have revolutionised the way we maintain and fix these critical systems. From trenchless solutions like pipe relining and pipe bursting to preventive measures such as hydro jetting, property owners now have a range of options that can extend the lifespan of their infrastructure while minimising disruption and cost.
Choosing the right repair method depends on the extent of the damage, the type of pipe, and the surrounding environment. It’s essential to address issues early before they escalate into more significant problems. By staying informed about these repair methods, you can ensure that your sewer and stormwater systems remain in optimal condition for years to come.
0 notes
Text
Common Mistakes to Avoid in Asphalt Pavement Installation
Asphalt pavement installation is an essential investment for any kind of property, be it an industrial complex, a commercial parking lot, or a residential driveway. A well-executed installation guarantees longevity, use, and visual appeal. Nonetheless, a lot of contractors and property owners make mistakes that can lower the pavement's durability and quality. In the long term, you can save time and money by being aware of these typical traps and avoiding them.
1. Skipping the Site Preparation
Inadequate site preparation is one of the biggest errors made during the asphalt paving process. In order to guarantee a strong foundation, planning is essential. This includes removing any debris from the area, making sure that drainage is adequate, and grading the ground to avoid water buildup. Inadequate site preparation can result in uneven pavement, cracking, and early asphalt breakdown.
Tip: Prior to starting the asphalt paving process, make sure the location is properly ready. This includes clearing up outdated pavement, leveling the ground, and taking care of any drainage problems.
2. Using Poor-Quality Materials
The final outcome can be significantly impacted by the quality of the materials used in the asphalt paving process. Potholes, early cracking, and a shorter lifespan might result from using an inferior asphalt mixture or material. Make sure you always utilize products of the highest caliber and that they come from reliable sources.
Tip: Check the materials' quality before using them. Purchasing premium materials and asphalt will result in a pavement that lasts longer.
3. Inadequate Compaction
Adequate compaction is necessary to create an asphalt surface that lasts. An unstable surface that is prone to distortion and breaking might result from inadequate compaction. To guarantee that the asphalt is compacted to the proper density, the compaction process needs to be closely watched.
Tip: To attain the best density, use the proper compaction tools and methods. This contributes to the creation of a sturdy, durable surface that can tolerate environmental factors and traffic volumes.
4. Ignoring Temperature and Weather Conditions
The weather and temperature have a significant impact on the asphalt paving process. A certain temperature range must be maintained during asphalt installation in order to guarantee adequate compaction and bonding. When asphalt is installed in cold or wet weather, the surface may be of worse quality and more prone to deterioration.
Tip: Schedule your asphalt paving project for a time when the weather is favorable and keep an eye on the temperature to make sure it's within the acceptable range for installation.
5. Improper Drainage Design
The lifespan of asphalt pavement is highly dependent on effective drainage. Water pooling brought on by poor drainage can erode asphalt and produce cracks and deterioration. To keep water off the paved surface, a suitable drainage system must be designed and put into place.
Tip: To avoid water damage and prolong the life of your pavement, incorporate appropriate drainage solutions, such as sloped surfaces, catch basins, and drainage pipes, into your asphalt paving process.
6. Neglecting Regular Maintenance
Ignoring routine maintenance after an asphalt paving process goes well can still result in issues later on. Regular upkeep helps shield the pavement from harm and increases its longevity. Examples of this type of maintenance include crack sealing and sealcoating.
Tip: A regular maintenance routine will help you keep your asphalt pavement in top condition and handle problems quickly.
7. Overloading the Surface Prematurely
It takes time for asphalt to cure and become fully strong. It is possible to distort and harm the surface if large trucks or equipment are placed too soon after installation. It's crucial to give the asphalt time to cure completely before applying heavy loads to it.
Tip: As advised by your contractor, wait until the freshly laid surface has completely dried before putting in a lot of traffic.
Conclusion
You can guarantee a successful asphalt paving operation that produces a strong and long-lasting surface by avoiding these typical blunders. You may obtain a surface that fulfills your needs and endures over time by properly preparing the site, utilizing high-quality materials, and following best practices throughout installation. Your asphalt pavement will work dependably and raise the value of your home with adequate design and attention to detail.
0 notes
Video
Build A Strong Stone Wall Around My House - Name The House
Building a stone wall around your house is a rewarding project that adds beauty, privacy, and security. Here’s a detailed guide to help you through the process:
Planning and Design
Determine the Purpose:
Privacy
Security
Aesthetic appeal
Choose the Location:
Mark the boundary where you want the wall to be.
Check Local Regulations:
Ensure you have the necessary permits and adhere to local building codes.
Design the Wall:
Decide on the height, width, and style of the wall.
Consider the type of stone: fieldstone, granite, limestone, etc.
Materials and Tools
Materials:
Stone: Calculate the amount based on wall dimensions.
Mortar: Cement, sand, and water.
Gravel: For the foundation.
Drainage pipe: To prevent water buildup.
Tools:
Shovel and wheelbarrow.
Level and measuring tape.
Trowel and mason's hammer.
String line and stakes.
Construction Steps
Prepare the Foundation:
Excavate a trench along the wall's path, about 1-2 feet deep.
Fill the trench with gravel and compact it for a stable base.
Lay the Foundation Stones:
Place the largest stones at the bottom.
Ensure they are level and stable.
Build the Wall:
Mix the mortar according to the manufacturer's instructions.
Apply a layer of mortar on the foundation stones.
Place the stones one by one, applying mortar between them.
Use a level to ensure each stone is properly aligned.
Stagger the joints for stability.
Add Drainage:
Install a drainage pipe at the base to prevent water buildup.
Finish the Wall:
Continue laying stones and applying mortar until you reach the desired height.
Capstones can be added on top for a finished look.
Curing:
Allow the mortar to cure for at least a week before subjecting the wall to heavy loads.
Maintenance Tips
Regular Inspection:
Check for cracks or loose stones periodically.
Cleaning:
Clean the wall with water and a soft brush to remove dirt and moss.
Repairs:
Fix any damage immediately to prevent further deterioration.
Naming the House
Naming your house adds a personal touch and charm. Here are some tips:
Reflect the Surroundings:
Consider names that highlight natural features, such as "Stone Haven" or "Rocky Ridge".
Incorporate Personal Elements:
Use family names or meaningful words, like "Smithstone Manor" or "Heritage House".
Historical Significance:
If the area has historical relevance, incorporate it into the name, like "Pioneer’s Rest" or "Colonial Stonehouse".
Inspirational Names:
Choose names that inspire tranquility or strength, such as "Fortitude Manor" or "Tranquil Stones".
Example Names
Stone Haven
Rocky Ridge
Smithstone Manor
Heritage House
Pioneer’s Rest
Colonial Stonehouse
Fortitude Manor
Tranquil Stones
By following this guide, you can build a beautiful and sturdy stone wall around your house, enhancing its appearance and value. And by naming your house thoughtfully, you add a unique identity and story to your home. Enjoy the process and the lasting benefits of your hard work!
0 notes
Text
Common Issues Resolved by Patch Relining Pipe Repairs
Maintaining a well-functioning plumbing system is crucial for any home or business. Over time, pipes can develop issues due to wear and tear, blockages, or environmental factors. Traditional pipe repair methods often involve extensive excavation and disruption. However, patch relining, a modern and minimally invasive technique, offers an effective solution to a variety of common pipe problems. Let's explore the benefits of patch relining pipe repairs and the issues they can resolve.

What is Patch Relining?
Patch relining is a trenchless pipe repair method that involves inserting a resin-coated liner into the damaged section of a pipe. Once in place, the liner is inflated and cured, creating a seamless, durable new pipe within the existing one. This method avoids the need for extensive digging, making it a less disruptive and more cost-effective solution for fixing pipe issues.
Common Issues Resolved by Patch Relining
Cracked or Fractured Pipes
Pipes can develop cracks or fractures due to ground movement, tree root intrusion, or natural aging. These cracks can lead to leaks, water damage, and reduced water pressure. Patch relining effectively seals these cracks from within, restoring the pipe's integrity without the need for excavation.
Corroded Pipes
Corrosion is a common issue in older metal pipes, causing them to weaken and develop leaks. Patch relining creates a new, corrosion-resistant pipe within the existing one, preventing further deterioration and extending the lifespan of the plumbing system.
Leaking Joints
Joint leaks occur at the connections between pipe sections, often due to improper installation or shifting soil. Patch relining can seal these joints, preventing water from escaping and ensuring a watertight system.
Root Intrusions
Tree roots are naturally drawn to the moisture in pipes, leading to blockages and damage as they grow into small cracks or joints. Patch relining repairs these entry points and provides a barrier against future root intrusion, maintaining a clear and functional pipe system.
Blocked Pipes
Blockages caused by debris, grease buildup, or foreign objects can restrict water flow and cause backups. Patch relining can smooth out the interior of the pipe, reducing friction and preventing future blockages while also repairing any underlying damage.
Collapsed Sections
In severe cases, sections of a pipe may collapse due to heavy loads, soil erosion, or advanced corrosion. Patch relining can reinforce these areas, restoring the pipe's structural integrity without the need for extensive excavation and replacement.
Benefits of Patch Relining
Minimal Disruption
One of the most significant advantages of patch relining is that it requires minimal digging. This means less disruption to your property, landscaping, and daily activities.
Cost-Effective
Patch relining is often more cost-effective than traditional pipe repair methods because it reduces labor, time, and restoration expenses associated with excavation.
Quick and Efficient
The patch relining process is faster than traditional repairs, often completed within a day, allowing for quicker restoration of your plumbing system.
Long-Lasting Results
The resin used in patch relining is highly durable and resistant to corrosion, providing a long-lasting solution that can extend the life of your pipes by several decades.
Environmentally Friendly
By eliminating the need for extensive excavation and disposal of old pipes, patch relining is an environmentally friendly option that reduces waste and preserves natural landscapes.
Conclusion
Patch Relining Pipe Repairs offer a modern, efficient, and minimally invasive solution to a range of common plumbing issues. From cracks and corrosion to root intrusions and blockages, patch relining can restore your pipes' functionality and integrity without the hassle and expense of traditional methods. If you're facing plumbing problems, consider the benefits of Patch Relining Pipe Repairs and consult with a professional to determine if this innovative technique is the right solution for your needs. Embrace the future of plumbing repairs and enjoy a reliable, long-lasting plumbing system with patch relining.
0 notes
Text
Putting the "Wash" in Washington: Soap Lake
Among the local American Indian tribes there is a legend about an old woman who died near Soap Lake. Her people had to leave before the snows fell, and they did not have time to bury her. So they threw her body into the lake and continued on their journey. A few days later the old woman caught up with them. The lake water had brought her back to life.
Since prehistoric times, people have sought healing from the waters of hot springs across the world. Washington State has several, which is not remarkable, but what about an entire lake saturated with minerals like sodium, silicon, chloride, various sulphates, aluminum, potassium, and magnesium? That place is Soap Lake, in the northeast of the state.
The American Indians of eastern Washington recognized the healing powers of the lake when they drank its waters. In the summer and fall, members of many tribes gathered there, calling it Skokiam, which meant something like "strong" or "healing" waters. They camped there for days or weeks, gathering roots, racing horses, and socializing with their friends and relatives.
American settlers moved into the area in the mid-1800s. They found that when they swam in the lake, they floated more easily in its mineral-rich waters than they did in normal water or even in the ocean. And they were amazed to find that when washed their clothes, they did not need soap. The water formed suds and lathered when they rubbed their clothes against the rocks-and so they named the place Soap Lake.
Many settlers also noticed that although the lake was cold, they felt better after a plunge in its waters. They promoted the lake waters as a cure for rheumatism, arthritis, lumbago, and skin diseases such as eczema. In the early 1900s, several businessmen opened spa resorts in the area and piped in water from the lake for bathing as well as for patrons to drink. Some people gathered mud from the east end to coat the bodies of people suffering from joint pain. It may also cured a condition known as Berger's Disease, a cardiovascular ailment caused by exposure to mustard gas in World War I.
Soap Lake is not easy to get to, and over time the inconvenience made it less appealing. Today many people stop at Soap Lake only because they are on the highway headed to other places, like Grand Coulee Dam. Consequently, the town now has a somewhat forlorn look. The buildings are in good repair, but many display FOR SALE signs. Although some of the original resorts have been torn down, there are still plenty of others to stay: motels along the lake and several campgrounds and RV parks that hug its south and east sides.
In a bid to regain some of its former glory, Soap Lake took ownership of a fifty-foot-tall lava lamp and hopes to install it downtown. However, it is not easy for the town of about a thousand people to come up with the several thousand dollars needed to set it up.
Not a Washout
Soap Lake was formed over a period of several thousand years by a dramatic geologic process involving an ice dam that blocked the Columbia River, causing it to cut a channel through what is now the lake. The dam burst at the end of the Ice Age, allowing the Columbia River to flow in its present-day channel. Water still flowed into Soap Lake, however, though layers of basalts, granites, and other stone, carrying many minerals with it.
Over the last twelve hundred years, hot, dry weather evaporated much of the lake water, concentrating the minerals. These minerals divided into two distinct layers: The bottom of the lake is ten times saltier than the Pacific Ocean and cooler than the water on the lake's surface, making it too heavy to rise and mix with the warmer upper layer, which has a high alkali content. The healing mud at the bottom of the lake also seals the lake bottom, stopping minerals from leaching back into the bedrock.
Large aquatic animals cannot survive in the lake due to its heavy mineral content. It is home instead to algae, bacteria, and small crustaceans, which may be the key to some of its healing powers. It also contains a substance called ichthyols, created when the crustaceans in the lake die and decompose. Ichthyol oil is used in Europe as a salve for cuts, burns, and minor injuries.
In the 1950s, several engineering projects increased the amount of water flowing into Soap Lake, diluting its mineral content. The citizens of Soap Lake appealed to the federal government to have pump and well system set up to drain off the fresh water before it flowed into the lake, hopefully preserving its benefits for future generations of bathers.
1 note
·
View note
Text
Navigating the Unique Challenges of Sewer Repairs in Seattle

Seattle, renowned for its stunning landscapes, vibrant culture, and innovative spirit, also faces unique challenges when it comes to maintaining its infrastructure, particularly sewer systems. The city's geography, climate, and aging infrastructure create a distinct set of conditions that sewer repair professionals must navigate to ensure the system's efficiency and reliability. Understanding these nuances is crucial for appreciating the complexity and expertise required in Seattle sewer repairs.
The Impact of Seattle’s Geography
Seattle's geographical landscape significantly influences sewer repair strategies:
Hilly Terrain: Seattle's steep hills and valleys pose challenges for sewer line installation and repairs. The gravitational flow of wastewater must be carefully managed to prevent backups and overflows. Repair teams often need specialized equipment and techniques to work efficiently in these conditions.
High Water Table: Many areas in Seattle have a high water table, complicating excavation work and increasing the risk of groundwater infiltration into sewer lines. This necessitates meticulous planning and advanced methods to ensure successful repairs without compromising the surrounding environment.
Proximity to Water Bodies: Seattle's numerous lakes, rivers, and proximity to Puget Sound demand that sewer systems are impeccably maintained to prevent contamination of these vital water bodies. Environmental regulations are stringent, requiring sewer repair professionals to adhere to high standards to protect these ecosystems.
Climate and Weather Challenges
Seattle's climate and weather patterns add another layer of complexity to sewer repairs:
Heavy Rainfall: Known for its significant rainfall, especially during the fall and winter months, Seattle’s weather can lead to increased surface runoff and potential overloading of the sewer system. Repair professionals must ensure that the infrastructure can handle peak flows during heavy rains to prevent overflows and backups.
Seasonal Changes: The city's wet and dry seasons create fluctuating ground conditions, which can cause soil movement and stress on sewer pipes, leading to cracks and breaks. Repair teams need to be prepared for these seasonal variations and plan accordingly.
Tree Roots: Seattle’s abundant greenery means tree roots often infiltrate sewer lines, causing blockages and damage. Regular maintenance and innovative solutions, such as root barriers and chemical treatments, are essential to manage this persistent issue.
Aging Infrastructure
Like many older cities, Seattle has an aging sewer infrastructure that requires constant attention:
Old Sewer Lines: Many of Seattle's sewer lines are constructed from materials that degrade over time, such as clay or cast iron. These older materials are prone to cracking, leaking, and collapsing, necessitating frequent inspections and repairs.
Combined Sewer Systems: Parts of Seattle still use combined sewer systems, where stormwater and sewage share the same pipes. During heavy rains, these systems can overflow, posing significant health and environmental risks. Upgrading these systems is a priority, but it’s a complex and costly endeavor.
Modernization Needs: Upgrading to modern, durable materials like PVC or cured-in-place pipes (CIPP) is essential for ensuring the longevity and reliability of the sewer system. This requires significant investment and coordination with city planning initiatives.
Advanced Repair Techniques
Sewer repair professionals in Seattle employ a variety of advanced techniques to address these unique challenges effectively:
Trenchless Technology: Methods such as pipe bursting and CIPP allow for repairs without extensive excavation, minimizing disruption to the urban environment and reducing repair times. These techniques are particularly useful in Seattle's densely populated areas.
Video Inspections: High-resolution video cameras are used to inspect sewer lines from the inside, identifying issues like blockages, cracks, and root intrusions with precision. This technology enables targeted repairs, saving time and resources.
Hydro Jetting: This technique uses high-pressure water to clear stubborn blockages and clean sewer lines, ensuring smooth operation and preventing future issues.
Root Barriers and Chemical Treatments: To manage tree root intrusion, professionals use root barriers and safe chemical treatments that prevent roots from infiltrating sewer lines without harming the trees or the environment.
Environmental Considerations
Seattle places a strong emphasis on environmental protection, influencing sewer repair practices:
Eco-Friendly Solutions: Repair methods and materials are chosen with environmental impact in mind, ensuring minimal disruption to natural habitats and waterways. This is critical in a city that values its natural surroundings as much as Seattle does.
Green Infrastructure: Integrating green infrastructure solutions, such as permeable pavements and rain gardens, helps manage stormwater naturally and reduces the load on the sewer system. These solutions work in tandem with traditional sewer systems to enhance overall effectiveness.
Regulatory Compliance: Strict adherence to local, state, and federal regulations ensures that sewer repairs meet environmental standards and protect public health. Professionals must stay updated on these regulations and implement best practices in their work.
Community Engagement and Awareness
Educating the community about the importance of sewer maintenance and the unique challenges faced in Seattle is crucial:
Public Education Campaigns: Informing residents about what not to flush, how to prevent clogs, and the importance of timely repairs helps reduce the strain on the sewer system. Public awareness can significantly contribute to the longevity and reliability of the infrastructure.
Collaborative Efforts: Working with local organizations, government agencies, and community groups to develop sustainable solutions and promote best practices in sewer maintenance and repair. Community engagement fosters a sense of shared responsibility and cooperation.
Seattle Sewer Repairs Come with Unique Challenges
Sewer repairs in Seattle are uniquely challenging due to the city's distinctive geography, climate, aging infrastructure, and stringent environmental considerations. Addressing these challenges requires advanced techniques, specialized knowledge, and a commitment to sustainability. By understanding the unique aspects of sewer repairs in Seattle, homeowners, businesses, and the community can appreciate the importance of proactive maintenance and the expertise needed to keep the city's sewer system functioning effectively. Investing in regular inspections and timely repairs will ensure the long-term health and efficiency of Seattle's essential sewer infrastructure.
1 note
·
View note
Last Seen Blogs

mermaidsbeauty-blog
a dream is a wish your heart makes

backwardstraveller
none of your fivebar gate jumps & over sorta stuff

foreverrelapsingana
ye haw

bruhhna
.

wolvesofinnistrad
Wolves of Innistrad