#control cable linkage
Explore tagged Tumblr posts
Visit Tumblr Blog
Explore Tumblr blogs with no restrictions, modern design and the best experience.
Last Seen Tumblr Blogs


Fun Fact
When “GIF” was named word of the year in 2012, Oxford Dictionaries U.S.A. credited Tumblr for pushing the word.
Text
Sebulba's Right Engine Crashes

STAR WARS EPISODE I: The Phantom Menace 01:09:15
#Star Wars#Episode I#The Phantom Menace#Tatooine#Boonta Eve Classic#podrace#Hutt Flats#Sebulba's podracer#Plug-F Mammoth#control cable linkage#annular fuel tank#Split-X radiator#quold runium#injectrine#upper Split-X air intake#Split-X repulsor generator housing#lower Split-X air intake#combustion chamber
0 notes
Text
There's a whole lot of towns out there that you'll never visit. Most of them are chock full of people you'll never meet. Tulsa, for example. Never been there, might never go there. And that makes me a little sad.
Sure, I only have enough time on this earth to visit so many towns. And when I'm there, I don't have enough time to interrogate every single one of the locals to see if, say, any of them have a set of Mopar F-body windshield wiper linkages sitting in the back of their garage. They'll just go to waste, damned to irrelevance by my lack of time. That's what the MBAs call a "market inefficiency."
The internet has helped, sure, but you can only demand what other people have supplied. Any quick browse on a model-specific forum is full of lonely folks crying out to the heavens for a specific piece of trim, or an entire automatic transmission, that they will never receive. And it's a lot of work to put that stuff up for sale. Who knows what's actually inside that weird pile of oil-stained gewgaws that Pawpaw left behind before he joined that alien cult and drank all that Flavor-Aid? His surviving next-of-kin sure don't know the difference between a 4.11 and a 3.90 rear end, nor are they willing to teach themselves that information in order to list it on eBay for twenty bucks.
Don't worry, though, I have a solution. That solution is that the Boston Dynamics warehouse is not secured very well. Their robots are powered by a two-stroke lawnmower engine: it's like they wanted me to show up with a turbine-generator-powered plasma cutter and chop right through the rebar holding the walls of their robot storage lockup together. After that, it was a quick couple of dozen trips to the local electronics store to get the right USB-to-serial cable, and I soon had my harem of semi-autonomous Parts-Seeking Drones® roving the backwoods of America.
So, if you see a lanky, creaking doglike shape lurking outside your yard tonight, smelling oddly of pre-mix and human arterial blood, let it in your garage. All it wants to do is scan your spare parts so I can find that goddamn last piece of dash trim for the cruise control lever on my Volare. Don't worry: I won't have the robots kill you if you decide not to sell it to me after all. It would be hypocritical of me to judge another hoarder. We'll have coffee when I come see your town for the first time! We can trade junk and be best friends and call each other on the phone afterward and talk about nitrous oxide. No promises on what the robots will do if they search your entire property and don't find any Plymouth Volare stuff, though. I forgot to program that part before I let them out of radio range.
247 notes
·
View notes
Text
We Who Are Far From Home, ch. 5: Bree 3
"For once, I've got you all to myself," Nost whispered, and then she pressed her lips to Bree's, tongue probing for entrance. Bree allowed the intrusion, delicately jointed porcelain tongue meeting and then pushing past Nost's, clicking softly off the artificer's teeth. The other woman shivered in Bree's arms.
Nost came up for air. Her wide grey eyes scanned across the doll's. Bree thought she'd go for a renewed kiss, but Nost paused.
"This can't feel good for you," the artificer said. "I know you don't taste. I know your tongue only tells you where its parts are. I'm halfway there just from feeling all those tiny clockworks moving, but you're as steady as ever. Why do you let me have this?"
Bree slid fingers up Nost's neck, the precious sensitive machinery and magic in her fingertips fully capable of sensing the heat of the artificer's flesh, the prickle of fine body hair in arousal. Coda had done her best work where a maid would need it. She hadn't foreseen that these fingers would slither into wavy red hair, hold fast, and pull, eliciting a squeak from a suddenly captive Nost.
(Or perhaps Coda had foreseen exactly that. Bree's first question when they'd first been introduced had been "So, you ever fuck the dolls?", and her future partner-criminal's answer had been, "They're anatomically correct," and an enigmatic grin.)
"Because you enjoy it," she told Nost. "Because I enjoy you enjoying it. Because," she added, pushing nightbrass-armored ceramic knuckles slowly but firmly into the fabric between Nost's legs, "the body I'm in only matters as much as the person in it, Nost, and I've been making girls squeal with my fingers for far longer than I've been capable of ripping someone apart with them. Don't worry your clever little head with extrapolation of doll psychology from doll artifice, when an actual expert is about to pull down your trousers and fuck you."
Nost whimpered, a high, pathetic sound, but not the loss of control that Bree wanted to hear. Not yet.
"The last few upgrades were all you, Nost. Tell me about the artifice. Tell me what part of your work is about to fill your cunt. Left arm. Say it."
The artificer looked down.
"Oh no, Nost," Bree said, "no peeking. Too easy." She ceased grinding her first into the short redhead, undid Nost's wide belt, letting Nost's pants slip down past her hips as she pulled it from its loops. She passed it around the artificer's head, covering her eyes in thick knit fabric, and seized it with the same hand that held her victim's hair.
"Ah! Okay! I… uh… left arm. Second iteration of the module system. Forearm, control linkages from your core, packed into one thickened hollow structural member, two solid structural members to either side, forming an internal cradle for module cylinders… nnngh!"
Bree circled powerful fingers over Nost's pubic mound, teasing. "That's from memory. No. Feel for me, Nost. Pay attention to your senses. Tell me what cylinder is loaded."
The artificer's face twisted with mixed pleasure and frustration. Then her thighs clamped around Bree's wrist and arm. She shifted her weight.
"No slosh. Not… not utterfrost, then. You've swapped since you came aboard."
"Tempting," Bree said. "Truly. But I don't know it as completely as I know you. I wouldn't risk that, not yet."
"All of this is a risk! Gods, there's a soulcatcher against the back of my head, and a harpoon launcher a few centimeters below that! You could kill me with a twitch!"
"I could," Bree agreed. "Just a twitch. A tug from my core on a cable you threaded yourself. How does that make you feel?"
"Nngh! Not distracted enough to give up!" Nost threw herself to one side. Bree barely swayed, but the artificer grinned ferociously under her impromptu blindfold anyway.
"Hah. No springy wobble… nnnot one of the ones where the internals are much smaller than the cylinder proper. Not a sun-serpent gland, not blindshrooms, not the canister launcher. So! It has to be one of the heavy non-liquid cylinders, but that still leaves three…"
"Good girl," Bree told her. "I think you deserve a hint."
She extended a sharpened fingernail a bare millimeter from its housing, flicked the arc of green-black, flexible, razor-edged deep-turtle shell across the side of the artificer's panties.
Nost gasped. "Ah, fuck, what was that? There's blood, I'm…"
Bree ripped the ruined panties away.
"You're fine. There's not much blood. There won't be any, in a minute."
She forced facial panel actuators into a practiced facsimile of a proper smirk. Nost couldn't see her face; this was just for her, a tie to a long chain of memories to back when she discovered what she liked.
"…definitely bleeding…"
"Ignore that," Bree said, "focus on me. How many fingers?"
"Two…"
There hadn't been any need for "one". Bree had slid two fingers into Nost, and that was that. She was soaked already, an incredibly useful trait in a fucktoy, given that Bree herself hadn't had salivary glands for years now.
"Do you want more," Bree asked, allowing a little cruelty to shade her always-too-soft voice, "or are you still worried about how this feels for me?"
"Please," Nost choked out, "more."
Bree obliged, bringing all four of hers together, then pushing them into Nost.
"How many?"
"Aaah! Four!"
Bree's smirk set. "How many now?" She rubbed her thumb through Nost's juices, forced the tip in, alongside her fingers.
"F–five?"
"You once said you wanted to take my fist, Nost. Remember that? Still mean it?"
The artificer was audibly panting. Bree flexed her fingers where they were, awaiting an answer.
"We… we tried, that time. You're too big, or I'm too small, I think I'm too small, I– I can't–"
"And I was worried about hurting you. But I've had a lot of time to think since then, Nost. Lots of bleak polar ocean on my last trip, and nothing to do, and I had an idea."
She woke the module, widening the slow drip of mana down internal filaments to a flood. Thin orange tendrils extruded from an aperture in her palm, seeking a task, and an entrance.
"How many do you want, Nost?"
"I want all of you," the artificer gasped.
"Do you feel that?"
A tendril slid into Nost alongside her hand. Others lashed over Nost's thighs, smearing pale yellow-orange mucus over rapidly fading superficial cuts.
"I… yes… wha… wha's… it…"
"You know that," Bree told her. "Tell me which cylinder I've got installed for you, and you get all of me. Give up and we're done for tonight. I trust you with my body, Nost, every moment of every day. Do you trust me with yours?"
She ceased all movement, still as only a doll could be, waiting for an answer.
Nost gulped. "Field trauma module. Has to be. The one with the preserved bog kraken regeneration glands."
"If you break, Nost, I will put you back together."
The artificer swallowed. "Do it," Nost said. "Before I lose my nerve."
Bree pushed deeper into her than she ever had before. Nost was already slick with arousal, now further with terror, and no small quantity of bog kraken mucus. It was the tiniest of efforts for her to force her way inside. She was rewarded by the artificer screaming her lungs out, a sustained cry that would wake the Eternal Blue in an instant. But the door was closed; Zai and Em knew what went on behind it, and would not interrupt.
She pushed further. The delicate mechanisms in her fingers registered the faintest of pops. A sudden rush of mana drain fuzzed her vision and sucked the colors from it, while kraken tendrils squirmed and probed, inside Nost and out.
There was nowhere further to go. Nost, out of breath or overcome by sensation, stopped screaming, and Bree looked down to see her left hand entirely vanished inside her artificer.
After a moment, Nost batted weakly at Bree's other hand, the one holding her blindfold and her hair. "Hey. Lemme… see you."
She slackened her grip, let the belt fall clear.
"Th–thought… I was…" Nost breathed, "gonna… gonna rip."
"You did," Bree told her. "But I didn't let you stay that way."
"I feel so full," Nost said. She gazed at Bree from what seemed like a long way away. "I'm full of you. I had to be split open and forcibly healed to be this full of you. I'm not sure if I'm already coming or if I've forgotten how and it only longer matters because I feel like this now."
"You'll figure it out," Bree assured her, and began to move inside her again. She didn't stop at the next scream, or the one after that. She didn't stop until Nost finally slumped over, drooling, not able to support her own weight. Even then, she could have comfortably maintained the position all night, but Nost was human.
"You did so well," she whispered to the half-conscious artificer, lowering her to the floor, slowly sliding her hand back out, letting the healing tendrils linger. With her other hand, the one full of far more deadly potential, she stroked Nost's hair. "You did so well."
---
prev: We Who Are Far From Home, ch. 4: Lyric 2 next: We Who Are Far From Home, ch. 6: Bree 4 original location: https://www.tumblr.com/frostgears/751040874722525185/bree-3
17 notes
·
View notes
Text

Early in the program, when then Colonel (he retired as a two-star General) Charles Minter was in command of the SR 71 program, an incident slowed down an operational flight. A mechanic placed the J-58 inlet spike on the wrong side of the airplane. This caused significant damage to the engine. I don’t know how long it takes to replace and transfer the spike to the other side, but I’m sure one of my experts can tell us. This caused Colonel Minter to order that every SR 71 in the fleet, 29 of them, be painted with a stencil of an R on the right side or an L on the left side to keep it straight. Next time you visit an SR 71, see if they still have the left and right identified as they do at the Smithsonian in Chantilly, Virginia. John Olp, SR-71 engine expert, told me something I’d never heard before about the cutting-edge engineering of the Blackbird.
‘The right engine throttle linkage was connected to the afterburner fuel control, and the left engine throttle linkage is connected to the main fuel control!
‘The aircraft throttle linkage was connected to the afterburner fuel control on the left engine and the main fuel control on the right engine (inboard side of the engines).
‘It absolutely did matter because of the two different functions.’
Olp adds more details; The two fuel controls were interconnected by a pulley and cable system in order to be fully synchronized. There was a pulley on each fuel control with a steel braided cable running underneath the engine, around more pulleys, so that, whatever position you set one fuel control at, the other one moved with it!
‘Afterburner fuel control on the right, main fuel control on the left. The aircraft throttles were connected to the threaded portion sticking out of the pulley shaft.’
So today when you visit an SR-71, walk up to the inlets and look for the “L” or the “R” and you will know a little story about why they are marked left and right.
~Linda Sheffield
@Habubrats71 via X
10 notes
·
View notes
Text
What To Do If Your VW Jetta Reverse Gear Fails to Engage
Struggling to shift your Volkswagen Jetta into reverse?

What’s going on with your vehicle? Why is it acting in such a weird manner? And most importantly, what can you do to troubleshoot the issue? These are among the topics we have discussed in this article. Therefore, it is recommended that you read this post all the way through.
Why Your VW Jetta Reverse Gear Might Fail to Engage
#1- Insufficient fluid levels
When was the last time you had your Volkswagen’s gearbox fluid checked? Has it been a while? This fluid aids your vehicle’s transmission system with many different things. By reducing friction among moving parts, it minimizes wear. By facilitating the dissipation of heat generated during transmission operation, it prevents overheating. Besides, it helps with gear shifts.
If there is an issue with this fluid or its level has dropped below the recommended amount, you will experience all sorts of shifting-related issues. So, if you’re struggling to put your VW Jetta into reverse gear, there is a possibility that the gearbox is running low on fluid.
#2- Clutch issues (Manual transmission)
A properly functioning clutch is essential for smooth gear shifting. What it does is… it temporarily disconnects the engine from the transmission―to facilitate a smooth transition between gears. Since it deals with engine torque, it can run into troubles every now and then. Its key components… especially those involved with torque transfer, can malfunction over time.
The clutch plate, clutch disc, and release bearing can malfunction due to regular use. Defective components might prevent the clutch from properly disengaging… which could in turn hinder the reverse gear engagement.
#3- Faulty gear linkage
This is yet another noteworthy reason why you might struggle to put your VW Jetta into reverse. The gearbox is a very complex system… made up of many different parts. Want to know what else is as complex as the gearbox??? Yup, you guessed it right… the linkage that connects the gear shifter to the transmission.
If the gear linkage is misaligned or damaged, you might need to put in extra effort to engage reverse gear. Some of the other issues that you might encounter because of faulty gear linkage are… incorrect gear selection, delayed response, and more. Have the issue diagnosed at your earliest convenience to prevent escalation.
#4- Electronic issues
Even if the odds of electrical issues preventing reverse gear engagement are very low… we can’t simply rule this out. Sensor malfunction, a flawed transmission control module, bad wiring, short circuits, faulty switches, poor ground connections, and software bugs… are among the electronic issues that might interfere with reverse gear engagement in your VW Jetta. Not fixing such flaws in time… can contribute to expensive repairs down the road.
Troubleshooting The Issue
- Check for error codes: If your VW is not showing any interest of shifting into reverse and you have no clue why it’s acting like that, the very first thing that you should do is… use an OBD-II scanner to scan your vehicle for error codes. Retrieval of such codes can help pinpoint the exact issue.
- Examine the gear linkage and cables: Cables, bushings, and other important parts of your vehicle’s gear linkage need to be thoroughly checked for signs of wear, damage, and misalignment. Replace any worn components and adjust the linkage if misalignment is detected.
- Look for transmission leaks: Your gearbox’s ability to engage reverse gear will be hindered if there is not enough fluid available to support the shifting process. Keep an eye on your VW Jetta’s gearbox fluid level. If the fluid is leaking out of the system, locate the source and have it repaired as soon as possible.
- Contact professionals: If the issue persists despite your repeated troubleshooting attempts, it may be time to call in certified technicians.
Key Takeaways
If you’re finding it hard to shift your Volkswagen Jetta into reverse, it could be due to one of the following reasons;
- Your gearbox lacks sufficient fluid... necessary for proper gear engagement
- Its clutch is not working as it should, most probably because of a defective part
- There is something off with its gear linkage―it’s likely damaged or misaligned
- One of the key electronic components of the gearbox has failed
Whatever the reason may be… have it fixed.
#volkswagen jetta#volkswagen reverse gear#volkswagen service center#volkswagen maintenance#volkswagen mechanic
0 notes
Text
Why Does a Car Clutch Become Hard? Common Causes and Practical Solutions
Sakto Automotive is a leading manufacturer of clutch plates with outstanding quality, concentrated on strong and effective solutions for automotive use. Concentrating on quality control and client satisfaction, Sakto Automotive provide dependable goods developed to satisfy the needs of modern automobiles. The best clutch plate manufacturer in India offers high-quality clutch plates at an affordable cost for your cars. Sakto Automotive are well known for manufacturing auto components for brands which includes Spicer, Mercedes Benz, Volvo, Scania, Tata, and Leland. Renowned for our outstanding craftsmanship and inventiveness, Sakto Automotive are a top producer and supplier of premium automotive parts, including clutch cover assemblies, clutch plates, flywheel assemblies, lever kits, pressure plates, clutch Button and more.
Being a car owner brings many delights but also regular functions. One of the common hopes is a hard clutch plates, which makes driving useless and can lead to even more serious mechanical possibilities if left uninstalled. Knowing why a car clutch gets hard and how to fix it can save time and money. In this blog, we will explore the common stuff of a hard clutch and the professional solutions to make your car as useless as possible.
What is a Clutch Plates?
Before we explain the workings of the clutch plates, let's find out what the clutch does. The clutch is a mechanical device that attaches and discontinues engines. It allows you to change gears when you drive a car. When you press the clutch pedal, the clutch engages, allowing you to change gears without damaging the brakes. When everything works properly, the clutch works fluently and only requires moderate pressure. However, when the clip becomes tight, it can be a sign that something is not right.
Common Causes of a Hard Clutch
1. Worn-Out Clutch Cable
The most ordinary cause of a clutch being stiff is a loose clutch cable (in kennel-operated clutches). Over time, the cable can become worn, kinked, or frayed, causing it to lose its grip. A worn clutch cable requires less force to move, causing the clutch pedal to feel firmer.
Solution: It is usually a straight and stable grip. However, regular inspections can help avoidance the problem from worsening.
2. Hydraulic Issues
In cars with hydraulic clutch systems, the pedal may become stiff due to problems in hydraulic elements, such as the clutch master cylinder or slave cylinder. This portion may leak or transform. airlocked, reducing their ability to supply smooth hydraulic pressure.
Solution: Check for leaks in the hydraulic system and make sure the clutch fluid level is sufficient. Bleeding the clutch system to remove air bubbles may also restore pedal lubrication. If the cylinders are damaged or worn, they must be returned.
3. Pressure Plate Wear
The Pressure clips are an important part of the assembly. They manage engine transmission power by operating as the clutch's disc pressure function. A weakly shaped plastic plate can make the clutch difficult to operate, as it will essential more force to drill through to engage it.
Solution: regrettably, this problem usually requires removing the entire plastic assembly, including the plastic plate. This is more complicated but may restore clutch operation.
4. Clutch Disc or Release Bearing Problems
A worn clutch disc or loose relevance can also make the clutch plates difficult to press. The blading clutch plates needs to be detached for the clutch disc. If either one of these components is worn, it can cause opposition and make the clutch pedal stiff.
Solution: If the clutch disc or blading plate is worn, replacing these scooters is often the best solution. These prototypes are usually replaced as parts of a larger clip kit.
5. Misaligned Clutch Linkage
The clutch linkage is the authority for transmitting the gear from the pedal to the clutch. If the linkage is misaligned, bent, or disabled, it can cause problems when pressing the pedal.
Solution: To determine whether the linkage can be altered or required repair, the mechanic has to examine it. Once properly aligned, the clutch should be easy to operate.
6. Lack of Lubrication
In both cable-operated and technician clutches, the pedal feels hard due to a lack of lubrication. Cables or pivot points such as those with revolve may need lubrication to minimize pitch and make the clutch effortless to operate.
Solution: Apply the right type of lubricant to the clip cable, linkage, or pivot point. constant coaching and lubrication can prevent this problem from occurring in the first place.
7. Faulty Clutch Fork
The clutch fork is the authority for launching the release bearings, and permission for the clutch to be engaged or disengaged. If the clutch fork is damaged, bent, or worn, it may be difficult to press this pedal.
Solution: Restoring the normal clutch fork will be done by reinstalling the normal clutch fork. For this, the parts of the clutch system can be read individually.
Practical Solutions to a Hard Clutch
Now that we’ve explored the common causes of a hard clutch, here are some practical solutions to ensure your clutch remains smooth and easy to use:
1. Regular inspection: Get your car's clutch system examined generally, especially if you feel any stiffness. It may help to pack the documents beforehand.
2. Replace worn parts directly: If your clip cable, disc, or any other part shows signs of wear, replace it as soon as possible. This can cause further destruction to the clash system.
3. Lubrication supporting: Keep working parts well-lubricated to avoid unessential friction that can make the clutch hard to press.
4. Monitor fluid level: Check the fluid level and make sure there is no debris in the organization. If required, bleed the system to remove any air debris.
5. Consult an experienced mechanic: If your problem persists after that, it is best to advise a professional mechanic. They can diagnose and fix the problem correctly, ensuring that your clincher works fluently.
Conclusion
A hard chemical combination is more than just an element it can be a sign of chemical grease that needs awareness. By appreciating the common aspects of a hard clutch and addressing them promptly, you can prevent further destruction to your car and enjoy a smoother, more comfortable driving experience. Regular maintenance, lubrication, and timely replacement of worn-out grease are vital to keeping your clutch in top condition.
Are you prepared to enjoy driving once again?
Take right steps away to enjoy a smoother, more enjoyable journey rather than waiting for the problem to get worse.
Set up a clutch inspection and repair by getting in contact with our experienced specialists.
Schedule your repair immediately to take the initial step toward clutch outstanding service!

0 notes
Video
youtube
Smart Gateway Edition Customizable Smart Home 4 inch Control panel Touch #shorts #iot #smarthome
Zigeeb Smart Center Control for Tuya Smart Home Series Product Specification System: Operating System LINUX CPU model :SigmaStar 202 1.2GHZ; RAM :128 M;ROM :16M+128M Voice: Xunfei, 2MIC voice control IOT : Graffiti intelligent center control (support graffiti and intelligent life, OEM graffiti APP binding control), 2-way lighting control Screen: main bright screen 4 inches, resolution: 480 * 480, material: IPS (full viewing angle), touch screen: multi-touch capacitive screen USB: OTG, USB ZIGBE gateway Support Graffiti ZIGBEE gateway, can be connected to 80 devices, support scene linkage, and Power input: AC110-250V Wake-up word modification Support (MOQ) Length 86MM, Width 86MM, Height 10MM Weight 0.35KG, cable box size 80*80*57MM, color black Web:https://www.teejoin.com Global Sourceshttp://www.globalsources.com/teejion.co More:https://lnkd.in/gYm5mxXG #Smartswitch #smartcurtain #smartdoorlock #SmartBulb #DoorContact #SmartLock #wifiswitch #zigbee #tuya #Gateway #SmokeDetector #SmartSocket #Curtainmotor #IRRemote #SmartSystem #smarthome #smartgrid #smartswitch #IOT #SmartHome #SmartHomeSystem #SmartHost #SmartHomeHost #iot #WiFiUSTuyaplug #WiFiPlugs #USBTuyaPlugs #IntelligentCenterControl #SmartHome #series #homeautomation #homeautomationsystem #4inch #controlpanel #controllerplayer #controllersettings
0 notes
Text
Here is the time to get back again to the waves, the most pleasant period of the year is calling towards the beaches and lakes. Be prepared guys the big toys are waiting for you to clean them up and get them ready for fun.
Whether it’s a leisure trip or you want to go fishing your favorite companion is your boat. Along with all the necessities they need humble care and precision. Not only your fishing rod, should be perfect your boat should not ruin your essence of joy and fun with your family and friends.
Keep your boats aligned with your plans. Apart from other maintenance checks, you must move to check your boat steering system on priority. Boat steering is that eminent part of your boat, ignoring may result in huge disappointment. Let us now go for inspecting the boat through a precaution and solution list.
Boat precautions and solutions
PrecautionsSolutionCheck for cracks & dents Repair any damage using marine-grade epoxy or fiberglass repair kitsInspect fuel lines, filters, and belts for wear or damageReplace any worn or damaged componentsChange the engine oil and replace the oil filterUse the manufacturer-recommended oil and filterCheck spark plugs for wear or corrosionClean or replace spark plugs as needed Inspect life jackets, fire extinguishers, flares, and distress signals Replace any expired items and ensure all equipment is readily accessibleInspect cables, hydraulics, and linkages for wear or damage Lubricate moving parts and replace any worn componentsTest the operation of the steering wheel, throttle, and shift controlsAdjust or repair as necessary for smooth operationClean the propeller and inspect the shaft for wear or corrosion.Use a propeller cleaner and inspect the shaft for any damageGrease wheel bearings and check tire pressure Use marine-grade grease and inflate tires to the recommended pressureConduct a test run in a controlled environmentPay attention to engine performance, steering responsiveness, and any unusual noises or vibrations
Note: If you are using a Mechanical steering system and is more than 3-5 years old, we recommend to switch it to a better steering system like Steerlyte Plus Power-Assisted Steering System is the latest and innovative boat steering system which lets you enjoy the feather-light navigation on the waters. Or if you want to keep your boat steering replacement in your budget, we would suggest considering Multisteer Hydraulic Steering Kits.
Both the steering systems are offered in the form of a kit including all essential components so that you can implement DIY on them.
Enjoy your best days, with your family and friends, keep us following for more interesting information. If you want to learn more about the boat steering kits connect with us at [email protected]
Conclusion:
By following these boat maintenance tips regularly, you keep your boat safe. Remember, taking care of your boat steering, not only keeps you safe but also makes boating more enjoyable. So, make sure to give the boat the attention it needs. Happy and safe boating!
#boat hydraulic steering kit#hydraulic boat steering systems#marine hydraulic steering#outboard hydraulic steering#hydraulic steering system for outboards
0 notes
Text
Following Sebulba into the Whip
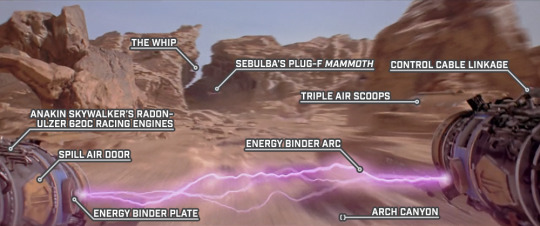
STAR WARS EPISODE I: The Phantom Menace 01:08:09
#Star Wars#Episode I#The Phantom Menace#Tatooine#Boonta Eve Classic#podrace#Arch Canyon#The Whip#Sebulba's podracer#Plug-F Mammoth#control cable linkage#triple air scoops#energy binder arc#energy binder plate#spill air door#Anakin Skywalker's podracer#Radon-Ulzer 620C
0 notes
Text
Speedmaster® Introduces Chevy Gen V LT1 Downdraft EFI Intake Manifold System at the 2023 SEMA Show

Speedmaster®, a leader in automotive performance innovation, is set to unveil one of the company’s latest groundbreaking engine products at the 2023 SEMA Show - the Chevy Gen V LT1 Downdraft 8 Stack EFI Intake Manifold System. The completely polished manifold system will be entered into this year’s New Products Award competition as one of 30 new products from Speedmaster. This system is more than a visual nod to the classic Weber-designed induction. Designed to elevate performance, Speedmaster’s intake manifold system marries vintage manifold aesthetics with contemporary EFI functionality. Designed for quick throttle response through tight air/fuel ratio control, the Chevy Gen V LT1 EFI Intake Manifold delivers aesthetics and improved performance in one package. Key Product Features: - Aesthetics & Function: Combines the classic look of Weber induction with modern EFI precision. - Versatile Performance: Designed for an LS3 engine block and operates seamlessly from idle to 7,000 RPM. - Precision Engineered: CNC machined from heat-treated 601 cast aluminum, ensuring durability and performance. - Optimal Drivability: Features a fully indexable eccentric cable pulley on the bell crank, striking the perfect balance between slow speed and full throttle. Speedmaster's unique linkage set innovatively integrates throttle stops, idle controls, lever arms, and a joiner/balancer, all fine-tuned with a single screw adjustment for perfect synchronization. For performance enthusiasts, this product not only symbolizes a return to iconic car culture while introducing a level of fine-tuning previously unattainable with traditional systems. With a U.S. MSRP of $2,450.00, the Chevy Gen V LT1 Downdraft EFI Intake Manifold System is a game-changer in the realm of fuel-injected intake manifolds in terms of budget, appearance, and function. To discover more about the Chevy Gen V LT1 Downdraft EFI Intake Manifold, visit Speedmaster at one of two locations at the 2023 SEMA Show. Speedmaster’s outside booth is located at #22753 in the Silver Lot. The location inside is in Racing and Performance in the Central Hall, booth #81020. For more information, visit www.speedmaster79.com, email [email protected] or call (909) 605-1123. For more information about Speedmaster, view this video. Read the full article
0 notes
Text
Mercedes Gear Selector Failure: What to Do & How to Fix It from Certified Mechanics in Austin

Mercedes is one of the most sought-after luxury cars due to its advanced systems that help in its smooth running and better performance. However, like other high-end cars, your Mercedes is also susceptible to issues and one such concerning problem might be posed by a malfunctioning gear selector in your luxury car.
The gear selector failure in your Mercedes can create a lot of trouble for you while driving. Here are the reasons behind gear selector failure & ways to fix it as shared with us by the certified mechanics in Austin, TX.
Transmission Linkage Failure
When you are driving an automatic transmission car, then the gear selector is the most crucial part at the disposal of the driver which helps you in changing the gear as per the demands of the situation. However, when the gear selector fails it can leave you stranded on the road.
Most of the time it is seen that gear selector failure happens because of a bad transmission linkage in cars. It is highly likely that something might be struck between the shifter in the cabin and the transmission which acts like an obstruction in the communication between the gear selector & the shifter cable.
At times, it is seen that any kind of collision or accident damages the shifter cable and you are unable to shift into any gear while driving. The problem with the shifter cable is quite complex to diagnose and you will need the assistance of a Mercedes specialist to pinpoint the problem and take remedial measures.
Contaminated Transmission Fluid
The transmission fluid is one of the most important fluids in your vehicle that helps in lubricating the various parts of the transmission system for their efficient functioning. Moreover, the transmission fluid also helps prevent the transmission system from overheating as it reduces friction between the various parts.
Nonetheless, like other fluids in your car, the automatic transmission fluid in your vehicle also picks up dirt and debris when it circulates through the transmission system. Whenever the transmission fluid gets contaminated it loses its lubricating properties and this adversely affects the functioning of the transmission system.
Whenever the transmission fluid gets contaminated along with facing problems with your gear selector, you are going to experience a host of other issues. You will note that the car suddenly dies when you shift into drive or reverse.
In addition to this, you might also experience slipping of your gears when you try to shift in your car and there will be a drastic drop in the performance of your car as the vehicle would fail to perform to its full potential. Some drivers also complain about a rough shifting of the gears caused due to dirty transmission fluid.
Malfunctioning Shift Lock
The transmision shift lock is a crucial part of your automatic transmission system which acts like a sensor for the transmission system. Now, cars equipped with an automatic transmission system won’t shift out of park unless they detect someone is sitting in the driver’s seat and you have your foot on the brake pedal.
This is referred to as the shift lock mechanism in high-end cars and acts as an important safety feature for your vehicle. Nevertheless, it is seen that a malfunctioning shift lock system in your vehicle can create problems for the gear selector in your car as the system is not going to function as it fails to get information that someone is sitting in the driver’s seat.
Well, if the shift lock is malfunctioning, then there is nothing to worry about because your Mercedes will be having a shift lock override and you need to have a look at your owner’s manual to determine the way it works to make it override the shift lock mechanism.
Onboard System Failure
The onboard computers in your high-end car control all the major actions in your vehicle. Especially the engine control unit (ECU) controls the shifting of the gears in automatic transmission-equipped vehicles including your Mercedes.
The speed of your car along with the throttle position is checked by the ECU before it initiates a gear shift. However, if the ECU itself encounters issues with its functioning, then your transmission system will experience problems in shifting gears and this might manifest in the form of gear selector failure.
Finally
The above-discussed factors are some of the leading issues associated with a failing gear selector in your Mercedes. These are some of the reasons that hamper the functioning of the gear selector in your high-end car. You must take your Mercedes to a certified repair shop to get the vehicle inspected & fix the gear selector system.
#mercedes car#mercedes transmission#mercedes transmission fluid#mercedes transmission service#mercedes gear selectror
0 notes
Text


When I used to walk around the SR-71 with my father, Butch Sheffield, he would point to the L on the one inlet of the SR 71 and smile and say, Minter. Colonel Minter ordered that every SR-71 in the inventory be labeled to make sure It was clear which was the left from the right.
A mishap happened on the 964 early in the program; damage was done to the engine when they were placed in the wrong inlet. Former crew chief Floyd Jones elaborates more on the story …. they will fit, but they are canted outboard instead of inboard. It happened on 964; she flew with no problem until checking the inlet's significant damage on spikes and center body also FOD the engine.
The reason it happened was they did something out of the usual. Both spikes were left on one side of the hanger. Usually, when a spike was removed, it was left on the side of the hanger.
John Olp, an SR 71 engine expert, told us about something I’d never heard before.
The right engine throttle linkage is connected to the afterburner fuel control, and the left engine throttle linkage is connected to the main fuel control!
The aircraft throttle linkage was connected to the afterburner fuel control on the left engine and the main fuel control on the right engine (inboard side of the engines).
It absolutely did matter because of the two different functions.
John goes on to explain it more..
The two fuel controls were interconnected by a pulley and cable system in order to be fully synchronized. There was a pulley on each fuel control with a steel braided cable running underneath the engine, around more pulleys, so that, whatever position you set one fuel control at, the other one moved with it!
Afterburner fuel control on the right, main fuel control on the left . The aircraft throttles were connected to the threaded portion sticking out of the pulley shaft.
So today when you visit an SR 71, walk up to the inlet and look for the L or the R and you will know a little story about why they are marked. left and right.
Written by Linda Sheffield Miller
The second photo was taken by William Franklin Cely.
Source and credit go to John Olp and Floyd Jones thank you.
@Habubrats71 via X

17 notes
·
View notes
Text
Enhance Gear Shifting Precision: Upgrading Shift Cable Bushings in Your Chevrolet Trailblazer

Introduction: The Chevrolet Trailblazer, known for its robust performance and comfortable driving experience, is a popular choice among SUV enthusiasts. One crucial component that contributes to its smooth gear shifting is the shift cable bushing. In this article, we will delve into what a shift cable bushing is, its significance in the Chevrolet Trailblazer's transmission system, and how to identify signs of wear and tear.
What is a Shift Cable Bushing? A shift cable bushing is a small but vital part of the transmission system in the Chevrolet Trailblazer. It serves as a connector between the gear shift cable and the transmission linkage. This bushing ensures that the gear selection made by the driver accurately translates to the transmission, enabling seamless gear changes during driving.
Importance of Shift Cable Bushing: The shift cable bushing plays a crucial role in the overall performance of the vehicle. Its durability and proper functioning are essential for a smooth and precise gear-shifting experience. A well-maintained bushing ensures that the gear shifts are effortless, enhancing the driving experience and control over the vehicle.
Signs of a Worn Shift Cable Bushing: Over time, the shift cable bushing can wear out due to constant use and exposure to varying weather conditions. Recognizing the warning signs of a worn bushing is vital to prevent further damage and costly repairs. Some common signs of a worn shift cable bushing include:
a. Difficulty in Shifting Gears: If you notice increased resistance or difficulty when shifting gears, it may indicate a problem with the bushing.
b. Inaccurate Gear Shifts: If the gear positions do not align correctly with the actual gear engaged, the bushing may be worn out.
c. Gear Lever Feels Loose: A loose gear lever that feels wobbly or imprecise can be a sign of a failing bushing. d. Unresponsive Gear Changes: If there is a delay or unresponsiveness when shifting gears, the shift cable bushing may be to blame.
Maintenance and Replacement: Regular maintenance of the shift cable bushing is crucial to extend its lifespan and avoid premature wear. Lubrication and inspection during routine service intervals can prevent potential issues. However, if signs of wear are evident, timely replacement is essential to prevent further damage to the transmission system and ensure a safe driving experience.
Conclusion: The shift cable bushing in Chevrolet Trailblazer may seem like a small component, but its role in the smooth functioning of the transmission system is significant. Regular maintenance and timely replacement of a worn bushing are essential to ensure a pleasant driving experience and avoid costly repairs. If you notice any signs of a failing shift cable bushing, it's best to consult a professional mechanic to address the issue promptly. By doing so, you can continue to enjoy the impressive performance and reliability that the Chevrolet Trailblazer has to offer.
0 notes
Text
Unleash Optimal Performance with Throttle Cable Brackets and Bulkhead Connectors: A Comprehensive Guide
When it comes to optimizing a vehicle's throttle system, throttle cable brackets and bulkhead connectors are often overlooked components that carry immense significance. In this comprehensive guide, we will delve into the world of throttle brackets and explore their interplay with bulkhead connectors. By understanding the importance of these components and their impact on performance, you can enhance throttle response and overall engine efficiency. Whether you're a racing enthusiast or seeking to maximize your vehicle's potential, this guide will provide valuable insights.
At the core of the throttle system, the throttle cable bracket plays a pivotal role in connecting the accelerator pedal to the throttle body. This linkage enables precise control over the engine's power output. By efficiently transmitting the driver's input, the throttle cable bracket regulates the engine's airflow through the opening and closing of the throttle plates. It is crucial to invest in a high-quality throttle cable bracket that ensures smooth and responsive throttle operation, promoting optimal engine performance and acceleration.
While the throttle cable bracket is essential, integrating bulkhead connectors further enhances performance. A bulkhead connector serves as a reliable interface between the internal and external components of a vehicle. It allows for the passage of electrical signals and maintains the integrity of the wiring system. By incorporating a 4 wire bulkhead connector, bulkhead electrical connector, or bulkhead wiring connector, you can establish a secure and efficient electrical connection within the throttle system. This ensures seamless communication between various components, promoting reliable throttle response and minimizing the chances of electrical malfunctions.
To optimize performance, proper installation and maintenance of throttle cable brackets and bulkhead connectors are crucial. During installation, ensure a secure fitment and alignment of the throttle cable bracket and bulkhead connector. Regular inspections should be conducted to detect any signs of wear, such as frayed wires or loose connections in the bulkhead plug. Applying appropriate lubrication to moving parts minimizes friction, extending the lifespan of these components. Adhering to manufacturer guidelines and seeking professional assistance, if needed, are essential steps to avoid potential issues and maximize the benefits of throttle cable brackets and bulkhead connectors.
In conclusion, throttle cable brackets, combined with bulkhead connectors such as the 4 wire bulkhead connector, bulkhead connector, bulkhead electrical connector, bulkhead plug, and bulkhead wiring connector, play a significant role in optimizing throttle response and enhancing engine performance. Understanding their importance and ensuring proper installation and maintenance are key to unlocking the full potential of your vehicle's engine. Whether you're a racing enthusiast seeking exhilarating performance or simply aiming to improve your daily driving experience, never underestimate the power of throttle cable brackets and bulkhead connectors. By harnessing their capabilities, you can unbridle your vehicle's performance and enjoy a seamless and efficient driving experience.
0 notes
Text
A Comprehensive Guide to Access Control and Elevator Integration Technology

Access control and elevator integration technology, also known as elevator access control, is a system that combines access control features with elevators. It utilizes authentication methods to grant authorized individuals access to specific floors within a building. I. What is Elevator Access Control? Elevator access control is an advanced technology that enhances the security and efficiency of elevators. By installing access control devices similar to "door entry systems" in elevators, only individuals with authorized credentials can operate the elevator buttons, allowing them to reach their desired floors. II. Common Terminology in Building Elevator Access Control - Lobby Call: This refers to the process where residents authenticate themselves at the unit's entrance and call the elevator to the ground floor using the lobby call panel. - Access Call: Inside the elevator car, residents authenticate themselves through the access control panel. The designated floor button is automatically or manually illuminated based on the authentication result. - Indoor Call: Residents press the floor button on the indoor panel to call the elevator, which then arrives at the specified floor. - Internal Call Control: This system controls the floor buttons inside the elevator car and is widely used for calling the elevator. - External Call Control: This system controls the up and down buttons located outside the elevator car. III. Topology Diagram of Elevator Access Control System The topology diagram illustrates the installation layout of an elevator access control system: Topology Explanation: - The elevator access control host and linkage modules are installed on the top of the elevator car. They communicate internally via 485 communication protocol. The linkage modules are connected to the elevator buttons through dedicated cables, requiring the disconnection of the original elevator button board. - The elevator access control host connects to the lobby call panel or access control panel via HTTP protocol over the network. - The elevator car's network can be wired or wireless based on the actual situation. IV. Elevator Access Control Operations - Home Call: Residents swipe their access cards or use facial recognition at the lobby call panel to authenticate themselves. If the authentication is successful, the elevator is called to the lobby floor. The elevator access control grants residents access to their designated floors manually, and if timed out, a secondary authentication is required inside the elevator car. After the secondary authentication, single-floor access is automatically activated, while multi-floor access requires manual activation. - Indoor Call: Using the indoor call panel, residents can call the elevator. The lobby call panel receives the elevator call command, and the elevator access control host sends the authorized elevator access information to the elevator, which then takes the resident to the desired floor. - Resident-to-Resident Visit: When one resident calls another resident, the receiving resident authorizes access to their floor. The lobby call panel receives the call command, and the authorized elevator access information for the second resident is sent to the elevator access control host, enabling access to the corresponding floor buttons. - Visitor Call: Visitors use the lobby call panel to call the resident's indoor panel. The indoor panel authorizes access, and the lobby call panel receives the command. The authorized elevator access information is sent to the elevator access control host, granting access to the corresponding floor buttons. V. Frequently Asked Questions - How many floors can be controlled by a single elevator access control module? A single elevator access control module has 36 interface ports. The configuration depends on the specific scenario: - For a single-door single-button board: Floors 1-36 require 1 host + 1 linkage module, and floors 37-72 require 1 host + 2 linkage modules. - For a single-door dual-button board: Floors 1-36 require 1 host + 2 linkage modules, and floors 37-72 require 1 host + 4 linkage modules. - For a double-door dual-button board: Floors 1-18 require 1 host + 1 linkage module, floors 19-26 require 1 host + 2 linkage modules, and floors 37-54 require 1 host + 3 linkage modules. - How many elevators can be controlled by a single elevator access control host? One elevator can be controlled by one elevator access control host. - Does the elevator access control linkage module require separate power supply? A single elevator access control host can provide power to two linkage modules. However, if there are more than three linkage modules, a separate 5V power supply is required. - What is the installation method for elevator access control? The current elevator control system uses dry-contact disconnection installation, which involves using passive switches (dry contacts) that can be adapted by major elevator manufacturers. - What is the difference between an elevator access control host and a linkage module? The elevator access control host serves as the communication core, interfacing with the access control/lobby call panel. It manages the authentication process and sends authorized access information to the elevator. On the other hand, the linkage module is installed on top of the elevator car and provides the interface between the elevator's physical buttons and the elevator access control system. For more detailed information and specific product recommendations, you can refer to the Seckron Elevator Access Control page. Read the full article
1 note
·
View note
Text
LIUGONG WHEEL LOADER SPARE PARTS 106

SP170775 IDLER GEAR SHAFT SP170776 IDLER GEAR ASSEMBLY SP170777 CLAMP SP170780 HEXAGON NUT SP170781 AIR COMPRESSOR ASSEMBLY SP170782 FLYWHEEL CONNECTING RING SP170783 FUEL COARSE FILTER SP170784 WATER PUMP PULLEY ASSEMBLY SP170785 HEXAGON FLANGE BOLT SP170788 VALVE STEM SEAL 70C1545 CAB HARNESS SP171536 HEXAGON PLUG SP151245 SPIRAL BEVEL GEAR 27C1258 COUNTERWEIGHT 49C5445 HOSE 05C7254 HOSE AS 66C8073 HOSE AS 20C3197 TRANSMISSION OIL COOLER SP178543 DAMPING SP178544 VALVE BODY SP178545 ELEMENT ASSEBLY SP178546 INDICATOR SP178547 O-RING SP178549 THE PLASTIC CUP BODY HEIGHT (M85X2.5) 25D0682X1 FORK BODY 14D0883 PISTON ROD SP170795 BOLT M8X65 56A5358 WASHER 47C3722 DOOR LOCK 45C0704T0 CLAMP AS 55A9219 SPACER SLEEVE 53A3182 CAP 66C8374 HOSE AS 41A0881 GEAR 08D0365 TUBE AS 08D0364 TUBE AS 90A8161 TAG 90A8159 TAG 05C9036 HOSE AS 05C9037 HOSE AS 67C1308 HOSE AS 20C3204 WATER RADIATOR 67C1309 HOSE AS 67A0793 PIPE 67A0794 PIPE SP178553 LOCKWASHER 09D9460 TUBE AS 12C6846 CONTROL VALVE 18D3697 MOUNTING PLATE GP 07C9022 HOSE AS 07C9023 HOSE AS 07C9025 HOSE AS 09D9855 TUBE AS SP167254 FLYWHEEL SP166361 SCREW HEX FLANGE HEAD SP166352 SENSOR POSITION SP166408 ISOLATOR VIBRATION 35C1584 SEAL RING 35C1583 SEAL RING 30B1364 REV SENSOR 07C8995 HOSE AS 67C1001 HOSE AS 39Y0150X0 FORK AS SP176058 STUDDED FLANGE CAP SCREW SP176077 SEALING WASHER 82A3957 LUBRICATION CHART 07C8999 HOSE AS 07C9000 HOSE AS SP166188 OIL PAN SP166189 PLUG 07C9014 HOSE AS 04C1431 HOSE AS SP169344 BOLT M6×15 SP169345 CONNECT THE HOSE SP169347 OIL PRESSURE TEMPERATURE SENSOR SP169348 WATER TEMPERATURE SENSOR SP169349 CRANKSHAFT SPEED SENSOR SP169350 INTAKE MANIFOLD PRESSURE SENSOR SP169352 WIRING HARNESS FASTENER Ⅳ SP169353 WIRING HARNESS FASTENER(Ⅰ) SP169354 THE ADJUST PAD SP169355 RIGHT-ANGLED HOSE SP169356 THE COVER OF DRIVE RETAINER SP169358 DRIVE RETAINER Ⅰ SP169360 AIR COMPRESSOR GEAR SP169361 GEAR HOUSING SP169362 THE ENGINE SOFTWARE TAB SP169363 ADJUSTER SP169365 ECU SP169366 WIRING HARNESS FASTENER Ⅳ SP169368 COVER BOARD 49C5914 CONTROL BOX 07C7168 HOSE AS SP168421 SEAL KIT SP167996 TURBOCHARGER SP163921 POSITION BRAKE BULB SP163930 GASKET GEAR HOUSING SP163931 REGULATOR SHELL SP163933 CUSHION PLATE SP163934 SUPPORT BASE PLATE SP163935 INSTALLING BASE PLATE SP163940 SENSOR SP163943 SET MAIN BEARING 21C1304X0 HYDRAULIC OIL TANK 21C1305X0 HYDRAULIC OIL TANK 67C1408 HOSE AS 67C1407 HOSE AS 85A5438X0 SIDE HOOD 38Y0316X0 BUCKET SP171513 RELIEF VALVE SP171514 THE PILLOW BALL BEARING SP171515 CROSS ASSEMBLY MAINTENANCE-FREE SP171516 SLIDE FORKS SP171517 UNIVERSAL JOINT ASSEMBLY MAINTENANCE-FRE SP171518 SEAL KIT SP171520 SEAL KIT SP171521 SAFETY VALVE SP171522 PILOT OVERLOAD VALVE SP171523 SEAL KIT SP171525 SEAL KIT SP171535 HEXAGON FLANGE BOLT HEAVY SERIES SP182365 SPRING WASHER SP182366 PLAIN WASHER SP182367 INNER HEXAGON SOCKET HEAD CAP SCREW SP182368 INNER HEXAGON SOCKET HEAD CAP SCREW SP182369 HEXAGON NUTS STYLE 1 67C2004 HOSE AS 67C2003 HOSE AS 67C2025 HOSE AS 97A0726 CUTTING EDGE 67C1536 HOSE AS 70C1340 HARNESS 70C1341 CAB HARNESS 66C8351 HOSE AS 70C1629 CABLE 08D0305 TUBE AS 51C0786 MIDDLE DRIVE SHAFT 51C0788 FRONT DRIVE SHAFT&BRG AS 35B0603 INSTRUMENT 66C2375 HOSE AS 09D4476 TUBE AS 32A4195 HOSE 15D1594 TUBE 18A8132 CUTTING EDGE 04A4325 FLANGE 30D3637 REAR FRAME 70C1133 CAB HARNESS SP171579 INNER HEXAGON SOCKET HEAD CAP SCREW SP171592 SQUARE TAPER SCREW PLUG SP171595 HEXAGON HEAD BOLT SP171598 CRANKSHAFT PULLEY SP171599 ALTERNATOR BRACKET SP171602 TENSIONER ASSEMBLY SP171609 FIRST COARSE AIR FILTER 40C6589 PLUG 04B1465 SCREW 66C9808 HOSE AS 27A4248 MOUNTING PLATE 59A0007 PLATE 79A1330 DECAL 34C8262 SPACER RING 24C3386 BOOM 24C3387 LINKAGE 97A0850 CUTTING EDGE 97A0835 CUTTING EDGE 22D1944 BUCKET SP126823 TUBE 11C2722 TRAVEL MOTOR SP163412 OIL PUMP 60C0905 AIR FILTER MAIN ELEMENT 60C0906 AIR FILTER SAFETY ELEMENT 51C0764 FRONT DRIVE SHAFT&BRG AS 34B1820 START SWITCH 05C8993 HOSE AS SP166342 INJECTOR SP168713 FLANGE YOKE SP168716 OUTER HEXAGON BOLT SP168719 SPRING 37B2747 CIRCUIT BREAKER 85A5705X0 SIDE HOOD SP168720 SHUT-OFF VALVE 11C2723 TRAVEL MOTOR SP168442 PISTON SP168448 PISTON ROD 48A6819 PLATE 58A4301 PLATE 70C1582 HARNESS 70C1109 HARNESS SP161752 TEMP SENSOR SP161764 BOLT 27C1109X0 COUNTERWEIGHT 38Y0431X0 BUCKET 48C5212 TOP COVER 30D3441 FRONT FRAME 10C4659X1 BUCKET TILTING CYLINDER 10C4658X1 BUCKET TILTING CYLINDER 32E2048X0 BUCKET AS SP176116 HEXAGON FLANGE HEAD CAP SCREW 44D0885 COVER 70C2009 CAB HARNESS 05C9360 HOSE AS 52C0219T2 HOUSING 24C3367 BOOM 24C3368 LEVER 24C3369 LINKAGE 32A4271 WATER HOSE 38Y0471X0 BUCKET AS SP164083 RIGHT HANDRAIL SP164084 LEFT HANDRAIL 53C1144 SECONDARY FILTER AS 60A6020 LOWER PIN 21C1260X0 HYDRAULIC OIL TANK 18D3598 COVER 18D3599 BRACKET 34C7720 LOCKNUT 18D3597 BRACKET 60C0974 DIESEL ENGINE 76A1184 SNAP RING 53A3183 CYLINDER HEAD 01C1603 TUBE AS 18D4403 BRACKET SP171501 TENSIONER ASSEMBLY SP176117 HEXAGON FLANGE HEAD CAP SCREW SP176123 HEXAGON FLANGE NUT SP176128 HEXAGON FLANGE HEAD CAP SCREW SP176129 HEXAGON FLANGE HEAD CAP SCREW SP176130 HEXAGON FLANGE HEAD CAP SCREW SP176133 HEXAGON FLANGE HEAD CAP SCREW SP176134 HEXAGON FLANGE HEAD CAP SCREW SP176135 HEXAGON FLANGE HEAD CAP SCREW SP176136 HEXAGON FLANGE HEAD CAP SCREW SP176137 HEXAGON FLANGE HEAD CAP SCREW SP176140 HEXAGON FLANGE HEAD CAP SCREW SP176142 HEXAGON FLANGE HEAD CAP SCREW SP176143 HEXAGON FLANGE HEAD CAP SCREW SP161378 COVER 70A0959T2 HOUSING 41C0788T0 DIFFERENTIAL 41C1612T0 OPEN DIFFERENTIAL 07C9529 HOSE AS 32A4288 WATER HOSE 08D0748 WATER HOSE 67C1766 HOSE AS 67C1814 HOSE AS 66C8373 HOSE AS 38Y0579X0 BUCKET AS 07C9423 HOSE AS 70C1488 CAB HARNESS 70C2006 GRID HEATER HARNESS 10C4772X0 BOOM CYLINDER 13D2282X1 CYLINDER BODY 10C4771X0 BOOM CYLINDER 13D2281X1 CYLINDER BODY 10C4757X0 BUCKET TILTING CYLINDER 13D2277X1 CYLINDER BODY 14D0943X0 PISTON ROD 13D2257X1 CYLINDER BODY 49C6600 HOSE 45D2781 SHROUD AS 12C7047 CONTROL VALVE 20C3175 WATER RADIATOR SP172934 SEAL KIT SP172935 SEAL KIT 38Y0492X0 BUCKET AS 27A4238 PLATE 27A4237 PLATE 24C3136 LINKAGE 04C1429 BELLOWS 24C3137 LINK 24C3147 LINK 32A4072 INTAKE PIPE 67C1505 HOSE AS 79A0838 DECAL SP168166 CONNECTION OIL SUCTION SP168209 GASKET OIL PAN SP168239 BOWL PLUG 22D1957 BUCKET 67C2291 HOSE AS 00A8724 JOINT 70C2061 HARNESS 70C2060 HARNESS 48A7984 PLATE 35C1591 CUSHION SP182370 HEXAGON FLANGE BOLT 09D9555 TUBE AS 67C0731 HOSE AS 49C5444 HOSE GP 30D3325 REAR FRAME 90A8093 TAG SP175049 SEAL KIT 20C2469P01 AIR COOLER 20C2469P02 AIR COOLER 20C2469P03 AIR COOLER 20C2469P04 AIR COOLER 20C2470P01 WATER RADIATOR 20C2470P02 WATER RADIATOR 90A8101 TAG 20C2470P03 WATER RADIATOR 20C2470P04 WATER RADIATOR 20C2471P04 TRANSMISSION OIL COOLER 20C2472P04 OIL COOLER 90A8102 TAG SP139444 EXHAUST WASHER SP171601 PLUG 49C6356 CONTROL BOX 70C1935 HARNESS 40D1664 FRONT FENDER-LH 40D1665 FRONT FENDER-RH 40D1667 FENDER 38Y0524X0 BUCKET AS 67C0361 HOSE AS 56A5359 SHIM 57A2741 WASHER 12C6745 CHECK VALVE 18A7721 CUTTING EDGE 70C1106 CAB HARNESS 48A1285 PLATE SP170172 CONTROL BOX AS SP170182 SEAL KIT SP170205 HOUSING FLYWHEEL SP170206 DOWEL RING 01Y0562X0 FRONT AXLE AS 38Y0472X0 BUCKET SP173361 PLANET CARRIER ASSY SP173362 PLUG SCREW JB/ZQ4444-1997 M20×1.5 SP173363 OIL SEAL GB9877.1-88 62×93×20 SP173364 BOLT GB/T5785-86 M12×1.5×25 SP182371 HEXAGON HEAD BOLT SP182372 HEXAGON HEAD BOLT SP182373 HEXAGON HEAD BOLT SP182374 HEXAGON PLUG SP182375 INNER HEXAGON SOCKET HEAD CAP SCREW SP182376 HEXAGON HEAD BOLT SP182377 HEXAGON HEAD BOLT SP182378 HEXAGON FLANGE BOLT SP182379 TURBOCHARGER SP182380 CRANKCASE ASSEMBLY SP182382 BRACKET SP182383 GAS PIPE SP182384 HEAT EXCHANGER COOLANT PIPE SP182385 BACK-UP BLOCK SP182386 HEAT EXCHANGER BRACKET SP182387 HARNESS ADAPTER SP182388 PARKER FUEL FILTER Read the full article
0 notes