#contour guide for beginners
Explore tagged Tumblr posts
Visit Tumblr Blog
Explore Tumblr blogs with no restrictions, modern design and the best experience.
Last Seen Tumblr Blogs


Fun Fact
In 2020, 44% of users from Denmark used Tumblr daily.
Text
.•౨*🎀*ৎ•. a guide to igari makeup!.•౨*🎀*ৎ•.

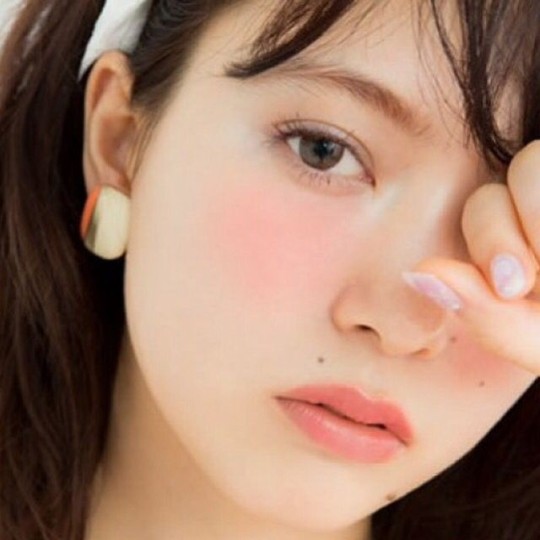


this japanese makeup trend has been viral for a couple of years now. igari makeup, also known as 'drunk/hangover makeup' uses a ton of blush, particularly, peachy, coral lotus pink blushes that goes under your eyes, through your nose and lids. this makeup is very natural and can elevate your natural features, this makeup style is also school friendly and beginner friendly!!!

.•౨*🎀*ৎ•. ...............................•౨*🎀*ৎ•.
1. prep first! (moisturizer, sunscreen or primer.)
after prepping, go grab your concealer and cover any blemishes or spots.
2. nose contouring, after contour add a lil bit of highlight in the tip of your nose. (you can do your brows if u want to.)
3. the fun part, BLUSH! now, I'd personally recommend really, really pastel pink blushes like the one in the pictures above, but if u have diff shades, try experimenting and mix the shades that's what i do lol. I'd also recommend a liquid blush for this. add blush in the apple of your cheeks, under ur eyes, ur lids.
4. mascara!!!!! and a brown eyeliner is a must! add a bit of aegyo sal if u want.
5. lips. lips is pretty simple, just a pink lipstick and u're done!!!
.•౨*🎀*ৎ•.thank uuu, pls give this blog a follow!! all pics are from Pinterest, credits to the owner.!.•౨*🎀*ৎ•.
#drunk#hangover#igari#makeup#guide#i love pink#pintetest#pinkcore#pink moodboard#japanese#cute#pink blog#pink pilates princess#vintage#blushes#i love makeup
209 notes
·
View notes
Text
A Night on the Ice
Day 6/12 of Smutmas
Summary: Jongho and Yeosang go on a date to an ice rink after hours.
CW: Car sex, unprotected sex

“Are we even allowed to be here?” Yeosang asks in a hushed voice.
“It’s fine, Sangie… I know the owner..” Jongho replies, “Now, what size skate?”

Yeosang clutches his stomach and doubles over while his laughter echoes in the empty skating rink. “That’s what… ten falls?”
Yeosang takes his hand, his fingers intertwining with Jongho's as he helps the other stand.
Jongho pouts, his cheeks pink from a mix of embarrassment and the cold air. “Shut up..”

They spend the next hour lost in a world of their own, their laughter mingling with the soft hum of the cooling system. They held hands, their fingers brushing against each other, a silent understanding passing between them.
Finally, exhausted but exhilarated, they collapsed onto a nearby bench, their breaths misting in the cold air. Jongho leaned against Yeosang, his head resting on his shoulder. "That was fun," he murmured, his voice a soft sigh.
Yeosang smiled, his gaze lingering on Jongho's face. "It was," he replied, his voice barely above a whisper. "Thank you for bringing me here."
Jongho chuckled, his eyes twinkling. "I still don’t believe that you’ve never skated before," he teased, his hand reaching up to gently stroke Yeosang's cheek. "You were as graceful as a swan."
Yeosang blushed, feeling a surge of warmth spread through him. He turned his head, his lips brushing against Jongho's hand. "Beginners luck?”
Jongho's eyes linger on Yeosang’s face, his gaze intense. He leans in, his lips hovering inches from Yeosang's. "I love you," he whispers, his voice husky with desire.
Yeosang's breath hitches. He closes his eyes, his lips parting slightly as he waits for Jongho's kiss. But instead of kissing him, Jongho pulls back, his eyes filled with a mixture of longing and something Yeosang can’t quite make out.
"I want you" he says, his voice rough. "But…not here."
Yeosang's heart skips a beat. “Then.. where?”

As Yeosang climbs into the backseat of Jongho’s car, a wave of warmth washes over him. The air inside was warm and inviting, the scent of leather and something faintly musky filling his senses. Jongho follows after him and shuts the door.
Jongho leans closer, his breath fanning against Yeosang's face. He whispers, his voice a low growl, "I've been wanting to taste you all night."
Yeosang gasps, his eyes fluttering shut. He reaches out, his fingers tangling in Jongho's hair, pulling him closer. Jongho wastes no time, his lips crashing down on Yeosang's in a searing kiss that leaves Yeosang breathless.
The car rocks gently as they explore each other, their bodies pressing together. Yeosang moans softly, his hands trailing across Jongho's chest, his fingers tracing the contours of his muscles.
Jongho groans, his hands sliding under Yeosang's shirt, his touch sending shivers down Yeosang's spine. He deepens the kiss, his tongue exploring the depths of Yeosang's mouth, tasting the sweetness of him.
Yeosang arches against him, his body trembling with desire. He reaches down, his hands finding the waistband of Jongho's pants, his fingers tracing the outline of his erection.
Jongho gasps, his grip on Yeosang tightening. "Yeosang," he groans, his voice rough with desire. "You're driving me crazy."
Yeosang smiles, his eyes dark with passion. "I know," he teases, his voice a barely audible whisper.
With a groan, Jongho shifts, his hands guiding Yeosang's towards his zipper. Yeosang fumbles with the zipper, his fingers clumsy with anticipation. Finally, he manages to pull it down, revealing Jongho's hard, throbbing dick.
Yeosang's eyes widen, his breath catching in his throat. He reaches out, his fingers gently stroking the length of Jongho's shaft. Jongho shudders, his head thrown back, his eyes closed.
Yeosang shifts his body, now partially laying across the seat his lips brush against Jongho's sensitive head. He moans softly at the taste of Jongho on his tongue. He slowly begins to move his head, his tongue swirling around Jongho's cock, eliciting a series of low groans from Jongho.
Jongho's hands tighten in Yeosang's hair, his back arching.
"Yeosang," he groaned, his voice rough with desire. He guides Yeosang’s mouth off of his dick and pulls him up to sit in his lap, capturing his mouth in another kiss. Jongho’s hands fumble with Yeosang’s pants and eventually, with Yeosang’s help, he manages to get them off, followed shortly by Yeosang’s underwear.
Yeosang reaches back and aligns Jongho’s cock with his entrance and slowly sinks down. They groan in unison as Yeosang fully seats himself on Jongho's lap and stills as he gets used to the size and feeling of Jongho.
Slowly, Yeosang starts to roll his hips. Jongho’s hands find his ass and softly grip at the flesh and massaging it.
“Fuck… Yeosang,’ Jongho moans. “You’re so tight.”
“A-and you’re so…mmh.. So big.” Yeosang keens. His hand braces against Jongho’s shoulders as he starts to roll his hips quicker. He buries his head against Jongho’s neck, rutting against him feverishly.
Jongho plants his feet against the floor of the car and cups his hands on the underside of Yeosang’s thighs, lifting him slightly. He begins to fuck up into Yeosang quickly, jackhammering into him. Yeosang tightly clutches Jongho’s shoulders, loud moans forced out of him with every thrust. He works a hand between their bodies and starts to jerk himself off in time with Jongho’s thrusts.
“I’m close… I’m gonna cum.” Jongho pants, his thrust growing sloppy.
“Me too.” Yeosang moans. His hand speeds up over his dick and a few strokes later he’s spilling into his hand and tightening around Jongho.
Jongho groans at the feeling of Yeosang clamping down around him. His hips sutter as he cums, releasing inside of him. Yeosang slumps against Jongho, breathing heavily. Jongho’s arms come up and wrap Yeosang in a loose hug as they sit in comfortable silence, the only sound being their breathing.
Series masterlist
#ateez#ateez fanfic#ateez smut#kang yeosang smut#kang yeosang#kang yeosang imagine#choi jongho imagine#choi jongho smut#choi jongho
13 notes
·
View notes
Note
Maybe you have some drawing tips for beginners?
Your style is incredibly beautiful and it just inspires this thing inside me to grab my iPad and start drawing but unfortunately I have no idea where to even begin
Or maybe you have some recs where to look to learn how to draw stuff?
But I understand completely that it’s your thing and artists should never feel pressured to share all their techniques and secrets, you worked hard on it!
I just really really love your art to the point where I just look at it for 30 minutes straight with this big feeling in my chest
<3
ah it was never about being secretive, i'm pretty open about my drawing process since gatekeeping knowledge is a big pet peeve of mine. It was more like,, laziness because writing a cohesive and helpful drawing tutorial is pretty difficult and i wouldn't even know where to start; i'm afraid i'll get maybe too technical and what have you.
As for tips for beginners, i've shared plenty on my couriouscat so you can scroll through the answers there, i also have some drawing timelapses on my twitter account as well (albeit you'll have to scroll a little)
I'm very flattered you feel that way about my art, it really means a lot to me and i'm glad to have inspired you to draw as well that's awesome and i wish you best of luck!
I actually don't know how different drawing on an iPad is compared to a graphic tablet+desktop, so I am actually pretty clueless in that regard. I think Procreate is the most used digital art app for iPad so you can start by getting it and familiarizing yourself with the UI. I think this step is often overlooked. The brushes and the chosen program can make or break the drawing experience. If you simply find yourself not enjoying Procreate, experiment with other apps or maybe try switching to a graphic tablet, maybe that feels better and is more suited to your tastes.
To be completely honest, one "bad" piece of advice that i should probably keep to myself is to draw something you actually enjoy: fanart, Pretty Girl Portrait(tm), your cat, landscapes etc even if it's above your skill level (becoming obsessed/ fixated on some character from a piece of media also works wonders i'm just gonna throw that out there). The main point is to actually care about your chosen subject in order to get inspired and to have that inner desire of "doing them justice" aka drawing them well. The traditional art learning route probably involves studying the fundamentals, shading spheres and cones and simple 3D forms blablbablah which. Yeah ! sure that's probably better advice but i'm telling you what will make you want to keep going and not get discouraged after a few failed attempts.
As for the drawing subject, I highly recommend having photo references to guide you.. you always need refs it's a recurring thing. My fastest artworks are the ones where I have the right references. the less references the more difficult it is to draw something
As a beginner it is also a good practice to draw OVER your photo reference to get the proportions right ( i'm not talking about literally tracing the contour of a face or limb ( just an example ), but moreso identifying the Main shape which makes up that body part and observe how long is it in respect to the other components, how does it connect to the other parts etc - big difference. Tracing won't help you in the long run).
Another thing you can do is to study your favourite artists and see how They tackle whatever it is that you like in their work. how do they simplify facial features? what about anatomy? color/ light etc and kinda reverse engineer your way through their process. ( but i highly recommend to just keep these practice sketches to yourself, and to not share them on social media- unless you get the artist's permission)
This is how i got into drawing and what i did back then, again, for more technical hands-on information i did answer similar CCs before so with a little bit of stalking you'll find them in no time
I wanna finish this with some resources that helped me:
>youtube guys - sinix, ahmed aldoori, marco bucci, and also just speedpaints in general i highly recommend watching those
>for simplified anatomy i found @/ taco1704 's ref sheets to be very helpful but ........... I'm pretty dry here i just look up refs on Pinterest tbvh
speaking of, here's my pinterest i have a bunch of art related boards board cool stuff overall maybe they can help guide you towards some direction or inspire you in some way idk
ok i kinda suck in the resource department listeN. im starving too just.................. watch youtube speedpaints ok
SORRY IT'S SO LONGGGBGGG i hope it was at least a bit helpful? this was all over the place... I'll try to come up with a tutorial as well but i really gotta be careful with how i go about it. I'll leave you with this for the time being. Again, thank you a lot for the kind words, I really am very grateful and touched esp by that last part about staring with the big feeling stuff eeeeeeeeeeeeee really wow T T that's so lovely and a big compliment thanks ty ly
#long post#this is so messy...... sorry anon#i don't have a very. linear thought process as the kids would call it#you should see my lit essays back in the day lmfao#anyways#if there are typos i'll fix them later#ASK IZTEA#they call me the tutor the way rial my way through the .....#ok nevermind
35 notes
·
View notes
Text
What Are Wall Reliefs? A Beginner’s Guide to This Classic Art Form
Introduction
Wall reliefs are a captivating art form that combines creativity with depth and dimension. Unlike flat artwork, wall reliefs are sculptural designs carved or shaped to project slightly from a flat background, creating a stunning play of light, shadow, and texture. This unique charm makes wall reliefs a timeless choice for enhancing residential and commercial spaces.
Historically, wall reliefs date back thousands of years, with roots in ancient civilizations like Egypt and Greece. They adorned temples, palaces, and monuments, often telling stories or reflecting cultural and religious themes. Today, wall reliefs have evolved into versatile decor elements, blending traditional elegance with modern aesthetics.
At Kanchan Mehra Centre for Art, we specialize in crafting wall reliefs that combine artistry and functionality. From design consultation to final installation, we ensure every piece reflects your vision and elevates your space. Whether it’s a bold centerpiece or a subtle accent, our wall reliefs bring sophistication and originality to any environment.
What Are Wall Reliefs? Wall reliefs are a fascinating and versatile form of art that has stood the test of time. These pieces are not simply flat images, but three-dimensional works of art that are affixed to a wall or surface, adding texture and depth to the space. Whether displayed in homes or commercial settings, wall reliefs can transform any environment, bringing life, personality, and a touch of elegance to the walls. At Kanchan Mehra Centre for Art, we specialize in crafting stunning wall reliefs that are tailored to your unique style and space.
Brief Definition and Characteristics A wall relief is a sculptural artwork that is attached to a surface, where part of the design protrudes from the wall while other elements remain flat. This form of art uses the wall as a canvas but takes it beyond the traditional two-dimensional plane, creating a visual and tactile experience for the viewer. Wall reliefs can vary in size, shape, and style, from subtle, abstract designs to detailed, narrative scenes.
The defining characteristic of wall relief is its ability to combine visual impact with tactile texture. These artworks invite viewers to engage with the space in a deeper way—both visually and physically. Whether you’re running your fingers over the contours or simply admiring the way light and shadow play across the surface, wall reliefs offer a dynamic and immersive experience that flat artwork can’t replicate.
Types of Wall Reliefs Wall reliefs come in three primary types, each with its own distinctive features and artistic effects. These are:
Bas-relief Bas-relief is the most common form of wall relief. In this technique, the design is slightly raised from the background, with shallow depth. The figures or elements appear to be carved or molded in low relief, meaning they don’t protrude far from the surface. Bas-relief is often used to create subtle, elegant designs or to depict historical scenes and portraits. The shallow depth allows it to maintain a refined, less obtrusive look, making it a popular choice for both residential and commercial spaces where a more understated touch is desired. High Relief High relief, as the name suggests, features elements that are raised more dramatically from the surface. This type of relief offers a more intense three-dimensional effect, where figures or objects may protrude significantly from the background. High relief works are often used for dramatic, bold designs that require more visual impact and depth. This form is more intricate and detailed, making it ideal for creating focal points in larger spaces or to capture the viewer’s attention with striking, high-impact designs. Sunken Relief In sunken relief, the design is carved into the surface of the wall, creating a recessed effect. Unlike bas-relief or high relief, the elements of the artwork appear to sink into the wall rather than protruding out. This creates a very different visual dynamic, with light and shadow emphasizing the depth of the carving. Sunken relief is often used in architectural settings or in works where a more subdued, subtle appearance is desired. Materials Used in Wall Reliefs Wall reliefs are an exceptional art form that has been celebrated for centuries. Whether adorning the walls of ancient temples or modern commercial spaces, the materials used to craft these masterpieces play a key role in their beauty, durability, and character. Over time, traditional materials have evolved, and new innovations have made it possible to create reliefs with greater versatility and creativity. At Kanchan Mehra Centre for Art, we blend the timeless charm of traditional materials with the flexibility of modern mediums to suit any residential or commercial space. Here’s a detailed look at the materials used to bring wall reliefs to life:
Traditional Materials Stone Stone has been one of the oldest and most prominent materials used in wall reliefs, dating back to ancient civilizations. Temples, palaces, and monuments often featured stone carvings as they offered unmatched longevity and a timeless aesthetic. Materials like marble, sandstone, and granite are still used today for their natural texture and durability. Advantages: Stone is incredibly durable and resistant to weathering, making it ideal for both indoor and outdoor settings. Best For: Classic and traditional designs, heritage-inspired spaces, or structures requiring permanence and grandeur. Our Approach: At Kanchan Mehra Centre for Art, we use high-quality stone to create intricate reliefs, ensuring precision and attention to detail while capturing the essence of classic art forms. Metal Metal reliefs bring strength, elegance, and a unique modern twist to wall art. Traditionally, metals like bronze and copper were hand-forged or cast to create elaborate and intricate designs. Metal offers a polished, reflective surface that enhances the depth and character of wall reliefs. Advantages: Metal is strong, durable, and adds a distinct visual appeal to wall art. It works well in both rustic and modern spaces. Best For: Industrial-style interiors, commercial spaces, or statement pieces for homes. Our Approach: We utilize various metal techniques to craft stunning relief designs that blend traditional craftsmanship with contemporary aesthetics. Modern Materials As technology and art processes have advanced, new materials have opened doors for more flexible, lightweight, and cost-effective wall reliefs. These materials allow artists to explore new textures, designs, and styles that cater to modern spaces.
Plaster of Paris (POP) POP is one of the most widely used materials in creating wall reliefs, especially in modern homes and commercial spaces. It is a quick-setting material that is lightweight and easy to mold into intricate patterns and designs. Advantages: POP is highly customizable, affordable, and works perfectly for both large and small-scale projects. Best For: Interiors with ornate details, ceiling designs, and temporary structures. Our Approach: We expertly mold POP to create beautiful, smooth, and detailed relief work that enhances the elegance of any space. Clay Clay is a versatile and natural material used to create textured wall reliefs. Its pliability allows artists to shape intricate details, making it a favorite for handmade, organic designs. Clay reliefs can also be glazed, painted, or finished to achieve the desired look. Advantages: Clay is eco-friendly, easy to mold, and ideal for creating custom, artistic wall designs. Best For: Personalized spaces, residential interiors, or earthy and natural-themed designs. Our Approach: Our team uses high-quality clay to shape intricate designs, ensuring every detail reflects creativity and craftsmanship. Resin Resin is a modern material that has gained immense popularity for its versatility and durability. It can mimic the appearance of stone, wood, or even glass while being significantly lighter and more affordable. Resin allows for detailed designs with smooth or textured finishes. Advantages: Resin is lightweight, durable, waterproof, and ideal for intricate detailing. Best For: Modern homes, commercial spaces, and artistic statement pieces. Our Approach: We use premium-grade resin to craft wall reliefs that are durable, visually stunning, and perfect for contemporary designs. FRP (Fiber-Reinforced Plastic) FRP is a revolutionary material in the world of wall reliefs. It combines the strength of fiber with the flexibility of plastic, creating a material that is lightweight yet incredibly durable. FRP reliefs can be molded into any design, shape, or texture, making them ideal for large-scale installations. Advantages: FRP is lightweight, weather-resistant, and highly customizable, making it ideal for both indoor and outdoor applications. Best For: Commercial spaces, outdoor installations, and large-scale decorative wall art. Our Approach: At Kanchan Mehra Centre for Art, we leverage FRP’s versatility to create bold and unique relief designs that can transform any wall into a focal point. Mixed Media Mixed media involves the use of various materials like metal, wood, POP, clay, and resin together to create a one-of-a-kind wall relief. By combining different textures, finishes, and mediums, mixed media reliefs can achieve depth, creativity, and visual interest that stand out. Advantages: Mixed media allows for endless creativity, offering unique combinations and layered designs. Best For: Artistic, eclectic, or modern interiors where individuality and character are key. Our Approach: Our team creatively blends multiple materials to design visually striking and highly personalized wall reliefs that resonate with your style and vision. Creation Process of Wall Reliefs Creating a wall relief is a fascinating journey that transforms a flat surface into an intricate piece of art. The process involves careful planning, skillful craftsmanship, and attention to detail. At Kanchan Mehra Centre for Art, we follow a methodical approach to ensure that every wall relief we create not only enhances your space but also tells a story. Here’s a detailed breakdown of the Creation Process for wall reliefs, from concept to finishing touches:
Step 1: Concept The creation of any wall relief begins with a thorough understanding of the space and the client’s vision. This is the foundational stage where we gather all the essential information, like the type of space (residential or commercial), the existing decor, and the intended mood or theme.
Our design team at Kanchan Mehra Centre for Art works closely with you during this phase. We take the time to understand your preferences, aesthetic choices, and the atmosphere you want to create. Whether you’re looking for a serene, abstract design or something more bold and statement-making, this stage sets the tone for the entire artwork.
Once the idea takes shape, we move forward with sketching the design. But before we dive into that, we make sure to consider the structural aspects of your wall, like its size, texture, and position within the room. This ensures that the relief will seamlessly blend with the environment, making it not just an art piece but a part of the space’s character.
Step 2: Sketching With a clear concept in mind, the next step is to bring the idea to paper. At this stage, our artists create detailed sketches that define the form, textures, and dimensions of the wall relief. These sketches act as the blueprint for the final sculpture and help visualize the overall design.
During the sketching phase, we focus on proportions, balance, and harmony. Whether the design is figurative, abstract, or nature-inspired, the sketch lays the groundwork for how the relief will be brought to life. We collaborate closely with you at this stage to refine the design, ensuring that all your expectations are met.
Step 3: Sculpting Once the sketch is approved, the next phase is sculpting the relief. This is where the design starts to take physical shape. Sculpting involves layering materials onto a wall surface to create a three-dimensional effect. Traditionally, artisans use plaster, clay, or cement as the primary material, but modern techniques allow for a wider range of materials, including resin, wood, and even metal.
At Kanchan Mehra Centre for Art, we take a meticulous approach to sculpting. Depending on the complexity of the design, our team may work in layers, gradually building up texture and depth. This is a time-consuming process that requires both patience and precision.
For more intricate designs, we sometimes use molding techniques to form certain elements of the relief. These molds are made from the sculpted design, allowing for repeated use, especially in large-scale commercial projects where consistency across multiple pieces is essential.
Step 4: Finishing The final step in creating a wall relief is the finishing process. This stage involves several aspects, including texturing, painting, and sealing. Depending on the desired effect, our artists may choose to leave the relief in its natural state, highlighting the raw texture of the material, or apply a coating of paint or patina to give the relief a more polished, artistic look.
The finishing process also includes adding protective layers to ensure that the relief stands the test of time. At Kanchan Mehra Centre for Art, we use high-quality sealants that prevent wear and tear, ensuring that the artwork remains vibrant and intact for years to come.
Some designs may also involve the application of special finishes like gold leaf, metallic paints, or even stone coatings, to create a more luxurious or dynamic look. These final touches can elevate the relief, making it a true masterpiece that catches the eye from every angle.
Traditional Techniques vs. Modern Tools While the creation process for wall reliefs has remained relatively consistent over the years, advancements in technology and tools have introduced new methods that complement traditional techniques. Let’s take a closer look at both:
Traditional Techniques Historically, wall reliefs were created using handcrafting techniques passed down through generations. Artists would typically work with clay, plaster, or cement, applying these materials by hand, shaping them directly on the wall. Tools like chisels, spatulas, and carving knives were essential in bringing the design to life.
This traditional method allows for a great deal of texture and detail, with each piece being uniquely hand-crafted. It also provides a strong tactile quality, as the imperfections and subtle variations in texture are part of the charm of the artwork.
Modern Tools and Techniques Today, the creation of wall reliefs is not limited to traditional methods. Modern tools and technologies have made the process more efficient and versatile. For example, 3D modeling software can be used to create precise designs that are then transformed into physical forms using CNC (computer numerical control) machines or even 3D printers.
In addition to these tools, new materials such as fiberglass, synthetic resins, and eco-friendly compounds have made the sculpting process easier and faster, without compromising on the aesthetic quality of the final product.
At Kanchan Mehra Centre for Art, we combine the best of both worlds. We still embrace traditional techniques, like hand-sculpting and molding, but also incorporate modern tools to streamline production and create more detailed, larger, and more intricate designs when needed. This blend of tradition and innovation ensures that every wall relief we produce is of the highest quality and meets the unique needs of our clients.
Why Choose Wall Reliefs?
Wall reliefs are an exquisite form of art that can elevate any space, be it a home, office, or commercial establishment. At Kanchan Mehra Centre for Art, we specialize in creating wall reliefs that add a touch of elegance, depth, and uniqueness to your walls. Here’s why choosing wall reliefs can be the perfect addition to your interior design project:
Aesthetic Appeal and Timeless Charm Wall reliefs have an inherent ability to transform a space into something truly captivating. Unlike flat wall art or paintings, reliefs add texture and depth, giving your walls a 3D visual appeal. The intricate details and craftsmanship behind each wall relief not only make them a focal point but also bring a sense of sophistication and elegance to any room.
The timeless charm of wall reliefs is part of their appeal. These pieces can seamlessly blend into both modern and traditional interiors, ensuring that they remain relevant and beautiful for years to come. Whether it’s a delicate floral design, a bold abstract pattern, or a serene landscape, a wall relief has the unique ability to enhance the aesthetic value of any space, making it feel richer, warmer, and more inviting.
Customization Options for Homes and Businesses One of the biggest advantages of choosing wall reliefs from Kanchan Mehra Centre for Art is the level of customization we offer. We understand that every space is unique, and so are the tastes and preferences of those who inhabit it. That’s why we offer tailor-made wall reliefs that perfectly align with your vision, whether you’re decorating your home or outfitting a commercial space.
For residential projects, wall reliefs can be personalized to reflect your personal style, creating a statement piece that resonates with your lifestyle. Whether you prefer minimalist designs, intricate patterns, or thematic representations, we work closely with you to craft a piece that complements your home’s decor and enhances its overall atmosphere. From modern, geometric designs to classical, nature-inspired motifs, the possibilities are endless.
For commercial spaces, wall reliefs can be customized to suit the brand’s identity and create a memorable experience for clients and visitors. Imagine a business lobby featuring a beautifully crafted wall relief that represents your company’s values or an office space adorned with sculptures that inspire creativity and productivity. Custom wall reliefs can be designed to tell your brand’s story in a way that is both artistic and impactful.
Versatility for Different Spaces Wall reliefs are incredibly versatile, making them a perfect fit for virtually any type of space. Whether it’s a cozy living room, a bustling office, a high-end restaurant, or a grand hotel lobby, wall reliefs can be adapted to fit the mood and function of the environment. Their versatility extends beyond size and design to materials as well, allowing them to suit various interior styles—from industrial chic to classic elegance.
For residential spaces, a well-placed wall relief can turn a plain wall into an attention-grabbing feature. Imagine a relief above your fireplace, in the hallway, or as a headboard in the bedroom. In larger areas, like open-plan living rooms or dining areas, a large, bold wall relief can serve as the perfect centerpiece, creating a dramatic effect.
In commercial settings, wall reliefs add a distinctive edge, helping to create an unforgettable impression. They work beautifully in restaurants, cafes, hotels, office lobbies, and retail spaces, offering a balance of functionality and art. Wall reliefs can be used to divide spaces visually, enhance branding, or set the tone for a particular ambiance.
Whether you are looking for a large statement piece or subtle reliefs that provide texture without overpowering the space, the adaptability of wall reliefs ensures they always look right, no matter where they are placed.
Incorporating Wall Reliefs
Wall reliefs are a beautiful and unique way to transform any space, whether residential, commercial, or even in public settings. With their distinctive 3D texture and artistic appeal, wall reliefs can not only serve as works of art but also enhance the overall atmosphere of a room or area. At Kanchan Mehra Centre for Art, we specialize in designing and installing custom wall reliefs that fit seamlessly into any environment. Here, we’ll explore some exciting ideas for incorporating wall reliefs into your space, whether it’s a cozy home, a dynamic commercial space, or a bold public art installation.
Ideas for Residential Spaces In residential settings, wall reliefs offer a fantastic way to bring personality and flair to your home. Whether you want to create a statement piece or simply add a touch of elegance to a room, wall reliefs can fit into various styles and themes. Here are some ways to incorporate them into your home:
Living Rooms: A large, eye-catching wall relief above the sofa or fireplace can serve as the focal point of the room. Whether you choose a modern geometric design or a nature-inspired relief, it can transform the atmosphere of the space, creating a sophisticated, artful vibe. You can go for a minimalistic design if you prefer something more subtle or opt for intricate patterns for a bolder statement. Hallways and Entryways: Hallways are often underutilized spaces, but they present an excellent opportunity to showcase wall reliefs. Adding a long, narrow relief or a series of smaller ones can make a significant impact without overwhelming the space. This can set the tone for the rest of the home as guests walk in. Bedrooms: For bedrooms, wall reliefs can be a beautiful addition above the bed or on an accent wall. A soft, calming design—such as floral motifs, abstract patterns, or serene landscapes—can create a peaceful and welcoming atmosphere. The textured nature of wall reliefs adds warmth and depth, making the room feel cozy and inviting. Bathrooms: Wall reliefs aren’t just for large spaces. In bathrooms, they can be used to add a touch of luxury and uniqueness. A small, detailed relief can work wonders in a powder room or above a bathtub, turning an ordinary bathroom into a spa-like retreat.
Ideas for Commercial Spaces For businesses, wall reliefs offer a way to blend art with branding, creating an environment that resonates with clients and visitors. Whether you’re designing a chic cafe, an inspiring office, or a trendy boutique, wall reliefs can help set the right tone and reinforce your brand’s identity. Here are some creative ideas for incorporating wall reliefs in commercial spaces:
Office Lobbies: The entryway of your office is the first impression visitors will have of your brand. A grand wall relief in the lobby can serve as a striking visual element that communicates professionalism, creativity, and innovation. The design can reflect your company’s values, mission, or industry, offering a memorable, brand-centric experience. Corporate Offices: Wall reliefs in meeting rooms or executive offices can help create a stimulating environment that fosters creativity and collaboration. Choose reliefs that complement your office décor and encourage productivity. Modern, abstract designs or artistic interpretations of the company’s goals can help set a forward-thinking tone for meetings. Restaurants and Cafes: Wall reliefs can also enhance the dining experience. Whether you’re going for a rustic, industrial vibe or a modern, minimalist look, reliefs can add texture and interest to the walls. In restaurants, larger reliefs can be used as focal points or as part of the overall ambiance, creating an immersive dining experience that encourages customers to linger. Retail Stores: In retail, wall reliefs can be used to create an immersive shopping environment. You can incorporate branded designs that tell the story of your products or use reliefs to highlight the uniqueness of your offerings. In boutiques or high-end stores, intricate and artistic wall reliefs can give the space a luxurious, artistic edge that draws customers in. Conclusion
Wall reliefs are a unique and versatile art form that can instantly enhance any space with depth and character. Whether you want a bold statement piece or a subtle texture, wall reliefs bring a timeless elegance to both residential and commercial environments.
At Kanchan Mehra Centre for Art, we specialize in creating custom wall reliefs that reflect your vision. Our team is committed to delivering high-quality, personalized designs that exceed your expectations.
#art#kmcac#kmca#wall sculpture#kanchan mehra centre for art#sculpture#frp wall relief#pop wall relief#wall relief guide#wall relief#wall relief art
2 notes
·
View notes
Note
would you mind giving some pointers for people who want to learn how to make gifs (and are completely clueless)? ❤️
hello, thank you for the ask ❤️
tl;dr - used these two (guide for beginners & how to make hq gifs) great tutorials to learn but more under the cut.
i'm not quite sure why after seeing my gifs you thought "yeah, that's the one", but thank you and sorry if i misled you into somehow thinking i know what i'm doing. instead of me blindly leading you down the wrong path, here is a list of tutorials and sources that helped me:
Getting Started - 1) if you don't have ps, photopea is a great website equivalent. if you want a cracked version of ps for mac or pc, dm me and ill give a link. 2) I used screen recorder pro to capture video or if I'm super lazy, I just use the screen record function on my android phone. Either one doesn't give you the highest quality, which might bother you in the long run. There are other ways though. @kylos created this tutorial on how to download HQ videos and i think vapoursynth is quite popular amongst kpop gifmakers. 3) @usergif compiles a lot of tutorials.
Tutorials -
@saw-x - guide for beginners.
@f1-stuff - how to make hq gifs.
@quokki - full process
@jasonkelce - how to gif (very informative post and includes other tutorials)
@woozis - pretty comprehensive process + sharpening + contouring
@anya-chalotra - sizing and sharpening
@haleths - sharpening
@userdramas - sharpening
@jeonghan-yoons colouring
quokki's - colouring
@rotatemp3 - colouring
usergif's - what format to save
CC community has been super helpful and nice. I'm sure if you ask any gif-maker they can help you out with more tips and pointers. My only tip really is to have fun. hope that helps ❤️🍉
#i feel like i only started giffing im still learning so idk if im the right person to ask this but thanks for the ask all the same#hope you start giffing soon#e.a
9 notes
·
View notes
Text
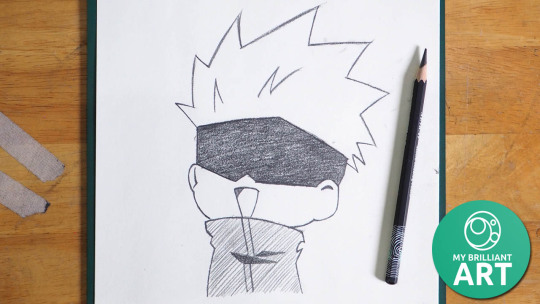
Cute Gojo Satoru - Easy Drawing Tutorial
Gojo Satoru, the charismatic and powerful sorcerer from the hit manga and anime series "Jujutsu Kaisen," is a fan favorite known for his striking appearance and playful personality. Drawing a cute version of Gojo Satoru can be a fun and rewarding experience, even for beginners. This step-by-step guide will help you capture his charm in an easy and approachable way.
Materials Needed:
Pencil
Eraser
Drawing paper
Fine-tip black pen (optional for inking)
Colored pencils or markers (optional for coloring)
Step 1: Basic Head Shape
Start by drawing a simple circle for Gojo's head. This will be the foundation of his cute, chibi-style appearance. Lightly sketch a vertical and horizontal line across the circle to help place the facial features symmetrically.
Step 2: Facial Features
Begin by drawing large, expressive eyes slightly below the horizontal guideline. Chibi characters often have oversized eyes to enhance their cuteness. Draw a small curved line for the nose just below the eyes, and a simple curved line for the mouth to give Gojo a cheerful expression.
Step 3: Hair Outline
Sketch the outline of Gojo's iconic spiky hair. Start by drawing the hairline, which follows the curve of the top of the head. Then, add large, pointed spikes that extend outward. Keep the spikes slightly exaggerated to maintain the chibi style.
Step 4: Body Shape
Draw a small, simple body below the head. Chibi characters have proportionally larger heads and smaller bodies. Use basic shapes like rectangles and ovals to outline the torso, arms, and legs. Position the arms and legs in a relaxed or playful pose to enhance the cute appearance.
Step 5: Clothing Details
Add details to Gojo's outfit. Draw the collar of his high-necked jacket, and add simple lines to indicate the folds and seams. Keep the details minimal to maintain the chibi style. You can add his blindfold or his sunglasses on top of his head for extra character.
Step 6: Hands and Feet
Sketch small, simple hands and feet. Chibi hands can be drawn with just a few curved lines to suggest fingers, and the feet can be simple ovals or rectangles. Keep the proportions small and cute.
Step 7: Finalize the Outline
Go over your sketch, refining the lines and adding any additional details. Make sure the proportions are accurate and the lines are clean. Erase any unnecessary guidelines and adjust any elements to perfect the overall appearance.
Step 8: Inking (Optional)
For a polished look, use a fine-tip black pen to outline your drawing. Carefully trace over the pencil lines, making sure to follow the contours of Gojo's features and clothing. Allow the ink to dry before erasing any remaining pencil marks.
Step 9: Coloring (Optional)
Add color to your drawing using colored pencils or markers. Choose appropriate colors for Gojo's hair, eyes, and outfit. Use light, pastel shades to enhance the cute, chibi appearance. Add shading and highlights to create depth and dimension.
Step 10: Final Touches
Add any final touches, such as additional shading, highlights, or small details, to enhance the overall look of your drawing. Step back and admire your cute version of Gojo Satoru, appreciating the effort you've put into capturing his charm.
Conclusion:
Drawing a cute version of Gojo Satoru from "Jujutsu Kaisen" can be an enjoyable and accessible project for artists of all levels. By following these simple steps and embracing the chibi style, you can capture the playful and endearing side of this beloved character. Remember to practice regularly and have fun expressing your creativity through your artwork!
► Video Drawing Tutorial
► All Video Cute Drawing
► All Video How to Draw Chibi Characters
2 notes
·
View notes
Text
Tips for portrait photography
Essential Tips for Capturing Stunning Portrait Photography
Portrait photography is an art that requires a balance of technical skills and a keen eye for capturing the essence of your subject. Whether you’re a seasoned photographer or a beginner, understanding the nuances of light, composition, and interaction with your subject can elevate your portraits to new heights. Here are some essential tips to help you capture stunning portraits.
1. Master the Lighting
Lighting is the cornerstone of great portrait photography. The way you light your subject can dramatically influence the mood and impact of the photo.
Front Lighting: Lighting your subject from the front is a technique that inspires clarity and confidence. It evenly illuminates the face, reducing shadows and blemishes, which results in a clean and bright portrait. This type of lighting is perfect for headshots and professional portraits where you want to convey a sense of approachability and sincerity.
Side Lighting: For a more dramatic and character-filled portrait, light your subject from the side. Side lighting creates depth and texture, highlighting the contours of the face and adding a sense of mystery or intensity to the image. This technique is excellent for artistic portraits where you want to capture the emotional depth of your subject.
2. Choose the Right Background
The background of your portrait can either complement your subject or distract from them. Always aim for a background that enhances the overall composition without drawing attention away from the subject. Simple, uncluttered backgrounds work best. You can also use shallow depth of field (achieved by using a wide aperture) to blur the background and keep the focus on your subject.
3. Focus on the Eyes
The eyes are the windows to the soul, and in portrait photography, they are crucial. Ensure the eyes are in sharp focus, as they are typically the first thing viewers notice. Catchlights (reflections of light in the eyes) can add a sparkle and bring your portrait to life. Positioning your light source to create catchlights will make your subject’s eyes more engaging.
4. Experiment with Angles and Composition
Don’t be afraid to experiment with different angles and compositions. Shooting from a slightly higher angle can make your subject’s eyes appear larger and more expressive, while a lower angle can add a sense of power and dominance. Use the rule of thirds to place your subject off-center for a more dynamic and interesting composition.
5. Communicate and Build Rapport
Great portraits capture the personality and essence of your subject, which requires a level of comfort and trust between the photographer and the subject. Spend time getting to know your subject, make them feel at ease, and guide them through different poses and expressions. Genuine emotions and relaxed poses will result in more natural and compelling portraits.
6. Use Reflectors and Diffusers
Reflectors and diffusers are essential tools for controlling light in portrait photography. Reflectors can bounce light back onto your subject to fill in shadows, while diffusers can soften harsh light. These tools are especially useful for outdoor shoots where the lighting conditions can be unpredictable.
7. Post-Processing
Post-processing is the final step to enhance your portraits. Use editing software to adjust exposure, contrast, and color balance. Retouching can help remove blemishes and imperfections, but remember to keep it subtle to maintain a natural look. Enhancing the eyes, sharpening details, and adjusting the overall tone can make your portraits stand out.
By mastering these tips, you can create portraits that not only capture the physical appearance of your subjects but also convey their inner character and emotions. Whether you’re shooting in a studio or on location, the key is to experiment, communicate, and always be mindful of how light and composition can transform your portraits.
2 notes
·
View notes
Text
Unlocking Beauty Secrets.click here
As an avid makeup enthusiast, I'm always on the lookout for ways to enhance my skills and elevate my beauty routine. That's why stumbling upon "100 Makeup Tips" was like discovering a treasure trove of beauty wisdom neatly packaged into a convenient digital format.
Firstly, the comprehensiveness of the guide is astounding. From fundamental techniques to advanced tricks, this collection leaves no stone unturned. Whether you're a beginner eager to master the basics or a seasoned pro looking to refine your craft, there's something valuable for everyone.
What sets this guide apart is its practicality. Each tip is concise yet impactful, making it easy to implement them into your daily routine. Whether it's achieving the perfect winged eyeliner or mastering the art of contouring, the step-by-step instructions accompanied by clear illustrations ensure success is within reach.
Moreover, I appreciate the versatility of the guide. It caters to a diverse range of preferences, skin types, and makeup styles. Whether you prefer a natural, everyday look or daring avant-garde creations, you'll find inspiration aplenty within these pages.
Another aspect worth highlighting is the convenience of the digital format. Accessible across various devices, from smartphones to tablets, it's like having a beauty guru on-the-go whenever you need it. Plus, the PDF format allows for easy printing of specific tips or sections for quick reference.
Overall, "100 Makeup Tips" is a must-have addition to any beauty enthusiast's collection. It's not just a guide; it's a roadmap to unlocking your full beauty potential. Whether you're a makeup aficionado or a novice eager to explore the world of cosmetics, this digital gem is sure to become your go-to resource for all things beauty.CLICK HERE
#Makeup Tips#Beauty Tips#Cosmetics Advice#Makeup Techniques#Beauty Hacks#Makeup Secrets#Makeup Tricks#Beauty Guides#Makeup Tutorial#Makeup eBook#Beauty PDF#Cosmetics Handbook#Makeup Mastery#Makeup Essentials#Glamour Guide
2 notes
·
View notes
Text
Kardi
My final choice is Kardi Black. She's another UK based YouTuber who does a lot of tutorials, makeup reviews and beginner's guides. They're very down to earth and really good at explaining things...even if I sometimes fail to match their example (entirely down to my lack of practice!).
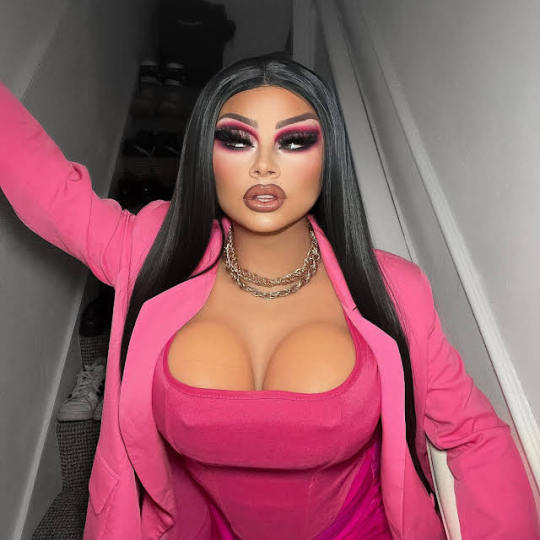
The outfit is pink again but it's a harder pink than Luna's look. I like how it's "smart" but still shows cleavage, how they've used a neutral lip to make the overall look a little less overwhelming and the highlighting/contouring is very effective too.
It's a much more classic "draggy" look, with the heavy makeup and strong eyes and the hair really adds to it's sleekness.
It would be something of a mid-point between the other two looks, available but not slutty, if he plays his cards right the night could very definitely end with something more than a peck on the cheek but it's not a guarantee he has to make the effort!
3 notes
·
View notes
Text
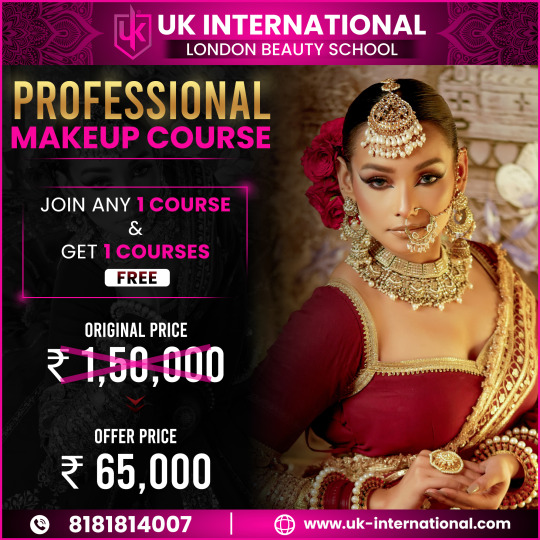
Comprehensive Botox and Filler Course for Beginners
The aesthetics industry is one of the fastest-growing fields in healthcare and beauty, driven by the increasing demand for non-surgical cosmetic treatments. Botox and dermal fillers are at the forefront of this trend, offering effective solutions for enhancing natural beauty, reducing signs of aging, and boosting confidence.
If you’re new to the field, starting your journey with a comprehensive Botox and filler course designed specifically for beginners is the best way to set yourself up for success. This article explores the importance of foundational training and what you can expect from a beginner-level course.
Why Start Your Career in Aesthetics?
Starting a career in aesthetics is not only rewarding but also full of opportunities. Here’s why more professionals are joining this thriving industry:
1. High Demand for Non-Surgical Treatments
Millions of people worldwide are opting for Botox and filler treatments to enhance their appearance without surgery. This growing demand means plenty of opportunities for skilled practitioners.
2. A Lucrative and Flexible Career
A career in aesthetics allows you to earn a competitive income while offering the flexibility to choose your working hours and environment, whether in a clinic, salon, or your own practice.
3. Make a Difference
Helping clients feel confident and look their best is deeply rewarding. A career in aesthetics combines creativity, science, and compassion to transform lives.
4. Suitable for Various Backgrounds
Whether you’re a nurse, doctor, dentist, or even a beauty professional, the aesthetics field welcomes individuals from diverse professional backgrounds.
Why Choose a Comprehensive Botox and Filler Course?
For beginners, a comprehensive course is essential to build a strong foundation. Here’s why investing in the right training matters:
1. Learn from Experts
A well-structured course provides you with direct access to experienced trainers who guide you through every step of the learning process.
2. Gain Confidence in Your Skills
Beginner courses combine theory and hands-on practice, ensuring you feel confident and capable when performing treatments.
3. Prioritize Safety
The aesthetics industry prioritizes patient safety. Comprehensive training teaches you to minimize risks, avoid complications, and adhere to safety standards.
4. Earn Certification
Certification from an accredited course enhances your credibility and helps you meet legal requirements to practice.
What to Expect in a Beginner Botox and Filler Course
A beginner-level course offers a mix of theoretical knowledge and practical training. Here’s what a typical curriculum includes:
1. Fundamentals of Botox and Fillers
Understanding Botox: Learn about Botox, how it works, and its applications, such as smoothing forehead lines, reducing crow’s feet, and softening frown lines.
Introduction to Fillers: Discover how fillers restore volume, enhance lips, and contour facial features.
2. Facial Anatomy and Physiology
Understanding facial anatomy is crucial for safe and effective injections. You’ll learn about:
Muscles and nerves of the face.
Blood vessels and their importance in avoiding complications.
Areas where Botox and fillers can be safely injected.
3. Injection Techniques
Hands-on training focuses on:
Proper handling of syringes and needles.
Injection depth and angle for different areas.
Techniques for achieving natural-looking results.
4. Patient Assessment and Consultation
Learn how to assess your clients’ needs, set realistic expectations, and create personalized treatment plans to achieve their aesthetic goals.
5. Managing Complications
Safety is a top priority. You’ll learn how to handle potential complications, such as swelling, bruising, or rare side effects like vascular occlusion.
6. Hands-On Practice
Practical experience is key. You’ll perform treatments on live models under expert supervision, allowing you to refine your skills in real-life scenarios.
Benefits of a Beginner Course
1. Step-by-Step Guidance
As a beginner, you’ll receive step-by-step guidance, starting with basic concepts and progressing to practical applications.
2. Build a Strong Foundation
A comprehensive course ensures you master the fundamentals, providing a solid base for advanced training in the future.
3. Immediate Career Opportunities
With certification, you can start offering Botox and filler treatments right away, whether you’re adding these services to your existing practice or starting a new career.
4. Support and Mentorship
Beginner courses often include post-training support, such as access to mentors, refresher sessions, and resources to help you grow in your career.
Who Can Take This Course?
This course is ideal for:
Healthcare Professionals: Doctors, nurses, and dentists looking to expand their practice.
Beauty Professionals: Estheticians and cosmetologists seeking to enhance their skill set.
Career Changers: Anyone interested in entering the aesthetics field with little or no prior experience.
Career Opportunities After Completion
Completing a beginner Botox and filler course opens the door to a variety of career opportunities:
Work in aesthetic clinics or medispas.
Start your own aesthetics practice.
Offer mobile Botox and filler services.
Collaborate with dermatologists or plastic surgeons.
Why Choose Our Course?
Our Comprehensive Botox and Filler Course for Beginners is designed to provide you with the skills, knowledge, and confidence needed to launch your aesthetic career. Here’s what makes our program unique:
Expert Trainers: Learn from experienced professionals who are passionate about teaching.
Hands-On Training: Practice on live models in a supervised environment.
Comprehensive Curriculum: Covering everything from the basics to advanced safety protocols.
Small Class Sizes: Receive personalized attention and tailored guidance.
Post-Course Support: Access mentorship, networking opportunities, and resources to continue growing.
Take the First Step Today
Embarking on a career in aesthetics is a decision that can change your life and the lives of your clients. With the right training, you’ll gain the skills and confidence to provide transformative results while building a fulfilling and lucrative career.
Don’t let inexperience hold you back—our Comprehensive Botox and Filler Course for Beginners is designed to help you succeed, even if you’re starting from scratch. Take the first step today and begin your journey toward becoming a skilled and trusted aesthetic practitioner.
#Advanced Aesthetics Course#Injectable Training#Aesthetic Skills#Professional Botox Filler#Medical Aesthetics Education
0 notes
Text
Enhance Your Look with Typsy Beauty: Eye Makeup Essentials
Your eyes are the window to your soul, and with the right makeup, they can also be the focal point of your entire look. Typsy Beauty’s curated collection of eye makeup products is perfect for creating everything from subtle, natural looks to bold, dramatic statements. Here’s an in-depth guide to their must-have products and how to use them to elevate your eye makeup game.
The Power of Eyes
Eyes are often the first feature people notice. With the right tools and techniques, you can emphasize their beauty and express your unique style. Typsy Beauty offers a range of products designed to suit every mood and occasion, ensuring you’re always ready to turn heads.
Must-Have Eye Makeup Products by Typsy Beauty
1. Eyeshadow Palettes
Typsy Beauty’s eyeshadow palettes are a treasure trove of vibrant hues and versatile shades. From earthy neutrals to bold pops of color, these palettes cater to every makeup enthusiast. The finely milled, blendable formula ensures a smooth application, making it easy to create both subtle day looks and smoky evening eyes.
Pro Tip: Use lighter shades to highlight the brow bone and inner corner of the eye, medium shades for the crease, and darker shades to define the outer corner for a well-balanced look.
2. Eyeliner
For precision and drama, Typsy Beauty’s eyeliners are a game-changer. Whether you prefer a sleek liquid liner for sharp cat eyes or a creamy pencil for a smudged, sultry effect, their collection has something for everyone. Long-lasting and highly pigmented, these eyeliners ensure your look stays intact all day.
Pro Tip: Pair a winged liner with nude eyeshadow for a classic, timeless look or experiment with graphic liner shapes for a modern edge.
3. Mascara
No eye makeup routine is complete without mascara, and Typsy Beauty’s formulas deliver volume, length, and definition. With options that range from waterproof to curl-enhancing, their mascaras lift and define lashes, making your eyes appear bigger and brighter.
Pro Tip: Apply mascara in a zigzag motion to coat each lash evenly, and don’t forget the lower lashes for a wide-eyed effect.
4. Brow Products
Well-groomed brows frame your face and complete your eye makeup. Typsy Beauty’s brow pencils and gels come in a variety of shades to match different hair colors and provide a natural finish. The smooth, blendable formula helps fill in sparse areas effortlessly.
Pro Tip: Use short, hair-like strokes for a natural look, and set your brows in place with a clear or tinted gel.
5. Eye Primer
An often-overlooked essential, eye primer ensures your eyeshadow stays vibrant and crease-free throughout the day. Typsy Beauty’s primer creates a smooth canvas, enhancing the longevity of your eye makeup.
Pro Tip: Apply a thin layer of primer across your lids and let it dry before adding eyeshadow.
Tips for Perfect Eye Makeup
Blend, Blend, Blend: Seamless blending is key to professional-looking eye makeup. Invest in quality brushes and take your time to soften harsh edges.
Experiment with Color: Don’t shy away from bold shades. Bright colors can make a statement and complement your outfit or mood.
Define with Liner: Eyeliner shapes can transform your eyes. Experiment with different styles, like tightlining for a subtle look or graphic wings for something bold.
Highlight and Contour: Use light, shimmery shades to highlight and deeper tones to add depth and dimension.
Why Choose Typsy Beauty?
Typsy Beauty stands out for its commitment to quality, inclusivity, and innovation. Their eye makeup products are crafted with care, ensuring they are suitable for all skin types and tones. Plus, their sleek packaging and cruelty-free ethos make them a guilt-free addition to your makeup collection.
Final Thoughts
Your eyes deserve the best, and Typsy Beauty delivers just that. Whether you’re a makeup beginner or a seasoned pro, their products offer endless possibilities to create stunning looks. So, explore their collection, unleash your creativity, and let your eyes do the talking.
0 notes
Text
i've spent hours drawing stuff from memory, looking at something and drawing it from another angle without reference, and relearning how to draw basic shapes in perspective and MAN i feel like I've just learnt to draw all over again. I've spent so long just copying the contours of references without understanding how to do it on my own (so many figure drawings) and of course it's using the proportion guides and drawing objects/the body as a bunch of cubes/spheres like every beginner guide tells is what actually makes the biggest difference.
#i can draw poses!!#and because i spent so long thinking it was my anatomy was wrong im able to add the proper contour lines and bump after the shapes#artist problems#mine being not using common sense and getting frustrated
0 notes
Text
Step-by-Step Guide to Achieving a Flawless Contour Look
Contouring has become a makeup staple, offering a way to enhance and sculpt facial features with precision. A well-executed contour look can add depth, balance proportions, and emphasize your natural beauty. Whether you’re a beginner or looking to refine your technique, this step-by-step guide will help you achieve a flawless contour. Incorporating professional insights from Colour Contour Makeovers and ensuring healthy skin with treatments like those at the best full body massage spa in Udaipur can elevate your results.
1. Prepare Your Skin for Contouring
Cleanse and Moisturize
Start with a clean and moisturized face to ensure smooth application. Hydrated skin prevents makeup from settling into fine lines or appearing patchy.
Prime Your Skin
A primer creates a smooth base for makeup. Choose one that suits your skin type—hydrating for dry skin, mattifying for oily skin, or pore-blurring for combination skin.
Pro Tip
Regular skincare treatments, such as those offered at the Best Full Body Massage Spa in Udaipur, can improve skin texture, making makeup application more seamless.
2. Choose the Right Products
Select Your Contour Formula
Contour products come in powder, cream, and stick forms. Here’s how to choose:
Powder: Ideal for a matte finish and easy blending.
Cream: Provides a natural, dewy effect.
Stick: Perfect for precise application.
Pick the Right Shades
Contour Shade: Should be 1-2 shades darker than your skin tone. Avoid overly warm tones to prevent a muddy appearance.
Highlight Shade: Should be 1-2 shades lighter than your skin tone to brighten and accentuate features.
3. Map Your Face
Understand Your Face Shape
Your face shape determines where to apply contour and highlight for the most flattering effect. Common face shapes include oval, round, square, heart, and diamond.
Contour Placement
Forehead: Apply contour along the hairline to reduce width.
Cheekbones: Place contour below the cheekbones to define them.
Jawline: Apply along the jawline to sculpt and sharpen.
Nose: Contour the sides of the nose for a slimmer appearance.
Highlight Placement
Forehead: Brighten the center for balance.
Cheekbones: Apply above the contour for a lifted look.
Nose: Highlight the bridge for definition.
Chin: Add a touch of highlight for dimension.
4. Blend Like a Pro
Tools for Blending
Brushes: Use dense brushes for creams and fluffy ones for powders.
Sponges: Damp sponges work well for blending creams and liquids seamlessly.
Blending Techniques
Blend contour upwards to avoid dragging the face down.
Use circular motions for creams and sweeping motions for powders.
Ensure no harsh lines remain for a natural look.
5. Set Your Contour
Use Setting Powder
Apply a translucent or skin-toned setting powder to lock the contour in place and reduce shine. Focus on areas prone to oiliness, such as the T-zone.
Setting Spray
A setting spray ensures your contour lasts all day and gives a seamless finish.
6. Add Blush and Highlighter
Blush Placement
Apply blush to the apples of your cheeks, blending upwards towards your temples for a natural flush.
Highlight for Glow
Use a shimmery highlighter for a luminous effect.
Apply to the tops of the cheekbones, brow bones, and the tip of the nose.
7. Refine Your Look
Check for Symmetry
Ensure both sides of your face are evenly contoured and highlighted. Use a mirror and natural lighting for accuracy.
Clean Up Mistakes
If you’ve over-applied contour, blend it out with a clean brush or sponge. For harsh edges, use a bit of foundation to soften the lines.
8. Practice Makes Perfect
Contouring is an art that improves with practice. Experiment with different techniques and products to find what works best for your face shape and skin type.
Professional Insights
For tailored advice, seek out experts in Colour Contour Makeovers who can provide personalized tips and tricks.
Common Contouring Mistakes to Avoid
1. Using the Wrong Shades
Choosing a contour shade that’s too dark or too warm can result in an unnatural look.
2. Over-Contouring
A heavy hand can make contouring look harsh. Start with a light application and build up gradually.
3. Ignoring Blending
Unblended lines can ruin the overall effect. Take your time to blend properly.
4. Forgetting to Set
Skipping setting powder or spray can cause your contour to fade quickly, especially in humid climates like Udaipur’s.
Conclusion
Achieving a flawless contour look involves proper preparation, the right products, and precise techniques. By understanding your face shape and using the right tools, you can create a sculpted and polished appearance that enhances your natural beauty. Regular skincare maintenance, such as visiting the Best Full Body Massage Spa in Udaipur, can also ensure a healthy canvas for your makeup routine. With practice and guidance from professionals specializing in colour contour makeovers, you’ll master the art of contouring in no time.
0 notes
Text
Unlock Your Beauty Skills with the Best Makeup Course in Noida
Introduction:
Are you passionate about makeup and looking for a way to enhance your skills? Whether you’re a beginner or looking to take your makeup artistry to the next level, enrolling in a makeup course in Noida can open doors to a successful career in the beauty industry. In this blog, we will guide you through everything you need to know about choosing the best makeup course, the benefits of professional training, and why Noida is the perfect place to start your journey.
Why Choose a Makeup Course in Noida?
1. Central Hub for Beauty Professionals:
Noida has emerged as a growing hub for beauty professionals, with many top-tier makeup academies offering specialized courses. Whether you want to learn bridal makeup, special effects makeup, or fashion makeup, Noida offers a variety of options with industry-experienced instructors.
2. Learn from Industry Experts:
Many makeup schools in Noida are run by experts with years of experience in the beauty industry. You get to learn from professionals who have worked with top brands, celebrities, and in-demand clients. Their expertise helps in providing hands-on training with the latest makeup trends and techniques.
3. Access to High-End Tools and Products:
Noida’s makeup schools use high-quality tools and products to ensure that students are trained with the best. You will have access to products from global brands, giving you an edge in mastering professional techniques.
What Will You Learn in a Makeup Course?
A comprehensive makeup course in Noida offers various modules to make you a complete makeup artist. Here are some key areas you will master:
1. Skin Care & Pre-Makeup Essentials:
Before learning how to apply makeup, you’ll first be taught how to take care of your skin. Skin preparation is the key to a flawless finish, and this module will help you learn techniques for cleansing, moisturizing, and prepping skin for makeup application.
2. Foundation & Concealer Application:
One of the first essential skills you’ll learn is how to create a smooth base using foundations and concealers. Techniques like contouring, highlighting, and blending will be covered, enabling you to create a picture-perfect canvas.
3. Eye Makeup & Techniques:
Eyes are one of the most important features in makeup. This module covers everything from applying eye shadow to creating bold, smoky eyes and mastering eyeliner. Learn the tricks to make any eye shape look flawless.
4. Bridal and Party Makeup:
Bridal makeup is one of the most lucrative niches in the makeup industry. A makeup course in Noida will teach you all about creating long-lasting, glamorous bridal looks and trendy party makeup to suit every occasion.
5. Hair Styling:
Some makeup schools in Noida also include hair styling as part of their makeup course. You’ll learn how to do basic to advanced haircuts, curls, braids, and updos to complement your makeup work.
Top Benefits of Joining a Makeup Course in Noida
1. Career Opportunities:
With the booming beauty and fashion industry, becoming a certified makeup artist in Noida opens many career doors. From working as a freelance makeup artist to joining a reputed salon or becoming a bridal makeup artist, the possibilities are endless.
2. Personalized Attention:
Most makeup courses in Noida offer personalized attention to students, ensuring that you understand every technique thoroughly. This level of mentorship helps you hone your skills quickly.
3. Networking and Exposure:
Noida has a vibrant community of beauty professionals, and a makeup course gives you the opportunity to network with professionals and other students. This exposure can open up opportunities for collaborations and freelancing projects.
How to Choose the Best Makeup Course in Noida?
When choosing the best makeup course, consider the following factors:
1. Accreditation & Certification:
Ensure the course you choose is accredited and offers a certification that is recognized in the industry. This adds credibility to your career as a makeup artist.
2. Experienced Instructors:
Check the credentials of the instructors to ensure they have hands-on experience in makeup artistry. Look for reviews or testimonials from previous students to gauge the quality of training.
3. Course Content:
Look for a course that covers all aspects of makeup application, including practical training, theory, and industry insights.
4. Facilities and Tools:
A well-equipped academy is essential. Ensure that the academy uses professional-grade tools, makeup products, and offers access to modern learning facilities.
5. Fees and Duration:
Compare the fees and course duration to ensure that it aligns with your budget and goals. Some courses might offer flexible schedules, which could be beneficial if you are working or studying.
Why Noida Is Ideal for Makeup Courses
Noida is not only home to several beauty academies but also offers a supportive environment for the growth of beauty professionals. The city has:
Top-tier salons and beauty businesses.
Access to beauty industry events, exhibitions, and conferences.
An urban culture with a growing demand for beauty and wellness services.
Choosing Noida for your makeup course means you're entering a vibrant market with numerous career opportunities and a solid professional network.
Conclusion:
A makeup course in Noida is the first step towards transforming your passion for makeup into a rewarding career. Whether you’re looking to become a professional makeup artist or start your own beauty business, the skills you acquire from a top-notch makeup academy will set you apart in the competitive beauty industry.
Start your journey today and explore the endless possibilities that a professional makeup course in Noida can offer.
0 notes
Text
If you’re considering dermal fillers, you might have a lot of questions about what they are and how they can benefit you. Dermal fillers are non-surgical treatments that help to restore volume, smooth out wrinkles, and enhance facial contours. For anyone new to the world of cosmetic treatments, starting with the basics is essential. Fillers typically contain hyaluronic acid or other substances that are naturally found in your skin, making them a popular choice for individuals looking to rejuvenate their appearance without the need for invasive procedures.
0 notes
Text
Beauty Tips & Makeup Tutorials by Hypeladies
Ultimate Beauty Tips & Makeup Tutorials: Skincare & Makeup Advice for Radiant Skin Introduction Every woman dreams of flawless skin and stunning makeup. Whether you're a beginner or an expert, mastering the right beauty routine is crucial. This article covers essential beauty tips, makeup tutorials, and skincare advice to help you achieve a glowing look effortlessly. Skincare Tips: The Foundation of Beauty Healthy skin is the base for perfect makeup. Here are some expert skin care advice and scientifically backed skincare tips: - Hydration is Key - Drinking 2-3 liters of water daily keeps your skin hydrated and prevents dryness. - Use hyaluronic acid-based serums to lock in moisture. - Cleanse, Tone, and Moisturize (CTM Routine) - Cleansing: Removes dirt, oil, and makeup residues. - Toning: Balances pH levels and tightens pores. - Moisturizing: Nourishes and prevents premature aging. - Sun Protection is a Must - Always wear SPF 30+ sunscreen to prevent UV damage. - Reapply every 2-3 hours for maximum protection. - Exfoliation for Clear Skin - Use chemical exfoliants like AHAs and BHAs for deep cleansing. - Exfoliate twice a week to remove dead skin cells. - Night Skincare Routine - Apply retinol or vitamin C serum to boost collagen production. - Use a night cream with peptides to repair skin overnight.

Beauty Tips & Makeup Tutorials by Hypeladies Makeup Tips for Beginners: A Step-by-Step Guide If you're new to makeup, follow these essential makeup tips for beginners to create a flawless look. - Prepping Your Skin - Cleanse and moisturize your skin. - Apply a primer to create a smooth base. - Foundation & Concealer - Choose a foundation that matches your skin tone. - Use concealer to hide dark circles and blemishes. - Eye Makeup Tricks - Apply neutral eyeshadow as a base. - Use eyeliner tricks to make eyes appear bigger. - Finish with mascara for voluminous lashes. - Contouring & Highlighting - Use a contour stick to define cheekbones. - Apply highlighter on high points for a radiant glow. - Lip Makeup Advice - Exfoliate lips before applying lipstick. - Use lip liner for a defined look. - Opt for matte or glossy lipsticks based on the occasion. Advanced Makeup Tricks for a Professional Look For those wanting to level up, here are expert makeup tricks used by professionals: - Baking technique: Set concealer with loose powder for a crease-free finish. - Eyebrow shaping: Use a brow pencil and gel to define brows. - Blending magic: Always blend foundation and eyeshadow seamlessly. - Setting spray: Lock your makeup for long-lasting wear. Beauty Tips for Women: Secrets to Timeless Elegance

Beauty Tips & Makeup Tutorials by Hypeladies - Invest in Quality Skincare Products - Choose paraben-free and sulfate-free products. - Prefer natural ingredients like aloe vera and green tea. - Proper Diet for Healthy Skin - Eat antioxidant-rich foods like berries and nuts. - Include omega-3 fatty acids for skin hydration. - Get Enough Sleep - Aim for 7-9 hours of sleep to prevent wrinkles. Best Beauty Hacks for Everyday Glow Here are some quick and easy beauty hacks to enhance your routine: - Use an ice cube on your face before applying makeup to reduce puffiness. - Mix foundation with moisturizer for a natural, dewy finish. - Apply white eyeliner on the waterline to make eyes look bigger. - Use lip balm as a highlighter for a soft, glowing effect. - Store skincare products in the fridge for a refreshing application. Seasonal Beauty Tips: Adapting to Weather Changes Different seasons require different skincare and makeup techniques: Summer Beauty Tips - Use oil-free sunscreen to avoid greasy skin. - Apply lightweight makeup to prevent clogged pores. - Keep blotting papers handy for oil control. Winter Skincare Advice - Use a heavier moisturizer to prevent dryness. - Opt for hydrating foundations and creamy lipsticks. - Avoid hot showers, as they strip natural oils from the skin. Final Thoughts: Your Beauty Journey Starts Today Mastering beauty is a mix of the right makeup advice, skincare tips, and expert beauty hacks. By following these beauty tips for women, you can achieve a radiant and confident look. Whether you're a beginner in makeup or an expert looking for advanced makeup tricks, these techniques will help you shine. Start your journey today with these skincare tips and makeup tutorials, and enjoy flawless beauty every day! Frequently Asked Questions (FAQs) - What are the must-have makeup products for beginners? Beginners should start with a BB cream, mascara, lip tint, and an eyebrow pencil for a simple yet polished look. - How often should I exfoliate my skin? For oily skin, exfoliate twice a week, while dry or sensitive skin should limit it to once a week. - What’s the best way to make lipstick last longer? Apply a lip liner first, then layer your lipstick, blot with tissue, and finish with a light dusting of translucent powder. - Is it necessary to use a primer before makeup? Yes, a primer helps smooth the skin, minimizes pores, and makes makeup last longer, especially for oily skin types. - How can I reduce under-eye dark circles naturally? Use cold tea bags, cucumber slices, or an eye cream with caffeine to brighten the under-eye area. - What’s the best foundation for acne-prone skin? Opt for a non-comedogenic, oil-free, and lightweight foundation to prevent clogged pores and breakouts. - How can I achieve a natural makeup look? Use a lightweight foundation, neutral eyeshadows, and nude lipstick, and blend everything seamlessly for a fresh, no-makeup look. - Can I wear sunscreen under makeup? Yes, apply a broad-spectrum SPF 30+ sunscreen before makeup and let it absorb for 5-10 minutes before layering on foundation. - What’s the best way to remove makeup without damaging the skin? Use a gentle oil-based or micellar water cleanser, followed by a water-based cleanser for deep cleaning. - How do I choose the right blush for my skin tone? - Fair skin: Soft pinks and peaches - Medium skin: Corals and warm pinks - Dark skin: Deep berry and rich plum shades Read the full article
0 notes