#concrete waterproofing additive
Explore tagged Tumblr posts
Visit Tumblr Blog
Explore Tumblr blogs with no restrictions, modern design and the best experience.
Last Seen Tumblr Blogs


Fun Fact
The KCSC sent more than 20K requests to delete posts related to prostitution and porn to Tumblr from January to June 2017.
Text
Enhance Durability with Concrete Waterproofing Admixture
Discover premium concrete waterproofing additives for durable, leak-free structures. Improve strength and water resistance with advanced solutions.

0 notes
Text

Explore RCMPL’s advanced liquid construction chemical plants designed for optimal efficiency and superior quality. Our cutting-edge facilities produce a wide range of construction chemicals, including waterproofing solutions, concrete additives, and industrial coatings.
#Liquid construction chemicals#Advanced construction chemical plants#Concrete additives production#Waterproofing solutions plant#Industrial coatings manufacturing#State-of-the-art construction chemical facilities#High-performance construction chemicals#Chemical plants for construction industry#RCMPL construction chemical production#Durable construction solutions.
0 notes
Text
Ensuring Quality in Cement Construction: Inspection and Testing

In the construction industry, cement serves as the backbone of structural integrity, providing the foundation upon which buildings and infrastructure stand. However, the efficacy and durability of these structures heavily depend on the quality of the cement used. With numerous options available in the market, it's imperative to understand the importance of inspection and testing to ensure that only the best cement is employed for construction projects.
When it comes to selecting the best cement in India, the discerning builder or contractor seeks not only reliability but also consistency in quality. Among the myriad choices available, one brand consistently stands out for its excellence – JSW Cement. Renowned for its superior quality and performance, JSW Cement has established itself as the no. 1 cement in India, trusted by professionals across the construction industry.
Quality Assurance Through Inspection and Testing
Before delving into the specifics of JSW Cement, it's essential to underscore the significance of inspection and testing in cement procurement. The process of ensuring quality begins right from the procurement stage, where cement undergoes rigorous inspection to assess its conformity to relevant standards and specifications.
Key aspects evaluated during inspection include chemical composition, particle size distribution, fineness, compressive strength, and setting time. Additionally, visual inspection of the cement's colour and consistency aids in identifying any anomalies that may affect its performance.
Following inspection, thorough testing is conducted to validate the cement's quality and suitability for the intended application. Testing procedures encompass both physical and chemical analyses, with tests such as compressive strength testing, consistency testing, and soundness testing being integral to the assessment process.
Selecting the Best Cement: Why JSW Cement Stands Out
In the quest for the best cement in India, JSW Cement emerges as a frontrunner, distinguished by its unwavering commitment to quality and innovation. With a comprehensive range of cement products catering to diverse construction needs, JSW Cement epitomizes excellence in the industry.
Buy white cement from JSW Cement, and you'll experience firsthand the unparalleled quality that sets it apart from the competition. Renowned for its purity and brightness, white cement from JSW Cement is coveted for architectural and decorative applications, delivering pristine aesthetics coupled with exceptional performance.
As the leading producer of ordinary Portland cement, JSW Cement ensures uncompromising quality across its product portfolio. Engineered to deliver superior strength, durability, and consistency, ordinary Portland cement from JSW Cement is the preferred choice for a wide array of construction projects, ranging from residential buildings to infrastructural developments.
JSW Cement: A Testament to Quality and Excellence
JSW Cement exemplifies the epitome of quality and excellence in the cement industry. With a steadfast commitment to innovation and customer satisfaction, JSW Cement continues to set benchmarks for quality assurance and performance, earning the trust and accolades of industry professionals nationwide.
In your pursuit of the best cement in India, look no further than JSW Cement for unparalleled quality, reliability, and performance. Whether you're embarking on a residential construction project or undertaking large-scale infrastructure development, JSW Cement stands ready to surpass your expectations and elevate the standards of cement construction.
Incorporating JSW Cement into your construction endeavors isn't just a choice; it's a testament to your commitment to quality and enduring excellence. Trust JSW Cement for all your cement needs, and experience the difference that superior quality makes in cement construction.
Ensure quality in your construction projects with JSW Cement – the benchmark of excellence in the cement industry.
JSW Cement reigns supreme as a beacon of quality and excellence. With its unwavering dedication to innovation, reliability, and customer satisfaction, JSW Cement has rightfully earned its status as the preferred choice for discerning professionals across the construction industry. Whether it's ordinary Portland cement or white cement, JSW Cement stands as a symbol of unparalleled quality, ensuring durability and performance that exceed expectations. Trust JSW Cement for your construction needs, and witness firsthand the transformative power of superior quality cement in shaping a robust and enduring built environment.
#eco friendly cement#cement dealer near me#concrete admixtures#concrete additives#ggbs concrete#waterproofing compound#buy cement online#ordinary portland cement#green cement company#slag cement#power pro cement#cement supplier
0 notes
Text

🌊 Embrace Excellence with CERA CRYSTALLINE CRETE Waterproofing System! 🏆
💎 The Perfect Blend: Our unique mix of penetrative swellable salt, cementitious binders, and chemical additives ensures unrivaled performance.
🛡 Crystal Clear Protection: Watch as our active chemicals react with free lime to form insoluble crystals, safeguarding against moisture.
🏗 Built to Last: CERA CRYSTALLINE CRETE becomes an integral part of your concrete, ensuring long-lasting results and substantial savings in time and resources.
🌟 Endless Versatility: Ideal for both internal and external applications, offering resilience against chemical attacks, including sewage and industrial waste.
🚰 Seal Every Pore: Experience unmatched penetration and capillary tract sealing, creating a barrier against water intrusion.
💧 Potable Water Safe: Rest easy knowing our system is VOC-free and compatible with potable water.
📞 Transform Your Projects: Contact us now to protect your concrete structures with CERA CRYSTALLINE CRETE. Unlock the potential for exceptional waterproofing! 💦
#🌊 Embrace Excellence with CERA CRYSTALLINE CRETE Waterproofing System! 🏆#💎 The Perfect Blend: Our unique mix of penetrative swellable salt#cementitious binders#and chemical additives ensures unrivaled performance.#🛡 Crystal Clear Protection: Watch as our active chemicals react with free lime to form insoluble crystals#safeguarding against moisture.#🏗 Built to Last: CERA CRYSTALLINE CRETE becomes an integral part of your concrete#ensuring long-lasting results and substantial savings in time and resources.#🌟 Endless Versatility: Ideal for both internal and external applications#offering resilience against chemical attacks#including sewage and industrial waste.#🚰 Seal Every Pore: Experience unmatched penetration and capillary tract sealing#creating a barrier against water intrusion.#💧 Potable Water Safe: Rest easy knowing our system is VOC-free and compatible with potable water.#📞 Transform Your Projects: Contact us now to protect your concrete structures with CERA CRYSTALLINE CRETE. Unlock the potential for excepti#CERA#CrystallineCrete#WaterproofingSystem#ConcreteProtection#ChemicalReaction#SafeguardYourStructure#HighPerformance#VersatileSolutions#ChlorideFree#LongLastingResults#ConstructionSolutions#SealEveryPore#TransformYourSpace#InstaHome#QualityMatters
0 notes
Text
The Gates of Jackson | Joel Miller x F!Reader | Chapter 6 - The Lodge
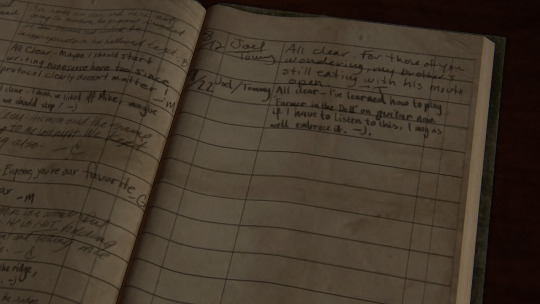
masterlist | ao3 | follow @youwouldntdownloadapizza and turn on notifications for updates
You showed up at the gates of Jackson with hands covered in blood and no memory of how you got there. That was two years ago. Since then, you've become Maria's right-hand woman and the person in charge of Jackson's logistical backend. Patrol schedules, inventory—all your purview. When a patrol gone wrong forces you to get to know Joel, memories of your past begin resurfacing—along with their consequences.
previous | next
pairing: joel miller x f!reader
rating: 18+, minors DNI
word count: 1.1k
tags: no use of y/n, eventual smut, no beta we die like sarah, jackson era, other additional tags to be added, slow burn, ellie needs a hug, joel lives, good parent joel, reader-insert, reader insert, forced proximity, only one bed trope, nightmares, childbirth, hurt/comfort, emotional hurt/comfort, angst with a happy ending, soft joel, cuddling & snuggling, fluff, masturbation, pining, joel falls first, possibly demisexual reader (tbd), ptsd, ptsd flashbacks, panic attacks, amnesia, sexual braiding
Chapter 6 - The Lodge
A light rain had begun to fall by the time you reached the lodge. The dirt trail quickly turned to mud, and the horses’ hooves squelched with every step. You braced yourself, sliding off Bailey’s back and landing in the stuff with a resolute plop .
Though you’d had the foresight to waterproof your boots, water and mud were two very different beasts. You’d probably be scrubbing dirt out of your laces for a good long while once you got home. Which at this rate felt like it may not happen until well after you died of old age.
Sodden and starving, you tethered Bailey to a post and approached the front porch.
“More breaking and entering?” Joel asked as you crouched to a squat before the door.
“Nope.” You flipped up the corner of the doormat to reveal a hidden key. “Consider us lodge-sitters.”
“Aren’t you worried about break-ins?” Joel asked.
“I don’t know if you’ve noticed, Joel, but this region isn’t exactly overflowing with people. And if any do find this place…” You trailed off as you slid the key in the lock, glancing up to meet his eyes. “Well, has a locked door ever stopped you?”
Before he could answer, you pushed through the door and stepped into the mercifully well-insulated structure.
The place was pretty bare-bones, with empty storage shelves built into one wall and a threadbare couch pushed up against another. The worn-down dregs of what had once been carpet covered the concrete subfloor here and there.
Despite it all, the sofa beckoned. You sank into it, backpack sandwiched between you and the rear cushions, and sighed.
Then Joel had the audacity to block your light.
“Can I help you?” you asked, opening one eye to glare up at him.
“What’s the plan?”
“Logbook. Linner. Leave.” You counted out the steps of your incredibly thorough plan on frozen fingertips.
“Linner?”
“We’re well past lunchtime. Not quite to dinner. It’s linner, the brunch of the afternoon.”
“That is so goddamn stupid.”
Even with your eyes closed, you could hear the smile in his voice. That is so goddamn adorable .
Joel trailed off towards the only other thing in the room, an old podium atop which rested the dusty, leather-bound logbook. A clicky pen sat nestled between the pages, bearing words he’d never expected to read again, let alone here:
Dr. Neil Henry, DDS - Austin Community Dentistry
He laughed, holding up the pen to show you.
“You know this used to be my dentist, back in Austin?”
“Did it now?” You smirked.
“Dr. Henry. Always used to nag me about flossin’,” he reminisced.
“Did it work?”
“No,” he chuckled. “Not ‘till after the outbreak, anyhow. No one’s around to give you a root canal nowadays. I’d rather not need one.”
“Fair point,” you said, well aware of the hypocrisy as you gnawed on an extraordinarily tough chunk of jerky.
Your eyes swept the stunning vista visible through the lodge’s massive windows. They reminded you of the ones in your office, and in the lookout tower. There was something about them that put you at ease, which made no sense whatsoever. They were glass, and not even particularly thick glass at that. Much like life before the outbreak, they were an illusion of security at best.
But still, you liked them.
Joel followed your gaze, and his breath caught in his throat at the view. It was beautiful. Not quite as magnificent as this morning’s sunrise had been, but still breathtaking.
“Wow,” he whispered.
“Pretty, huh?” you answered without looking back.
“It’s like a screensaver. Or a wallpaper or somethin’.” Joel mused, eyes wide in awe.
“Hmm,” you mused. “Mine used to be a picture of the Great Wall of China.”
“Why’s that?”
“It was the default,” you sighed, picking out the raisins from your trail mix. “But also I’ve always thought ruins were cool as shit.”
“Plenty of those to be had nowadays,” he said.
“Too many, if you ask me.”
You both chewed in silence for a minute, watching the birds coming home from their winter vacations.
“You know Eugene leaves jokes in here?” Joel broke the silence.
“I did.”
“You hear his latest?”
“Hit me with it.”
“Alright,” Joel turned to face you, smile wide. “What do we want? Low-flying planes! When do we want ‘em? Nyeowwww.” He mimed a plane diving with his finger, eliciting a chuckle from you.
“That’s one of his better jokes.”
“Yeah, the man’s no Will Livingston.”
You smiled. You were intimately familiar with Livingston’s work, ever since Ellie decided to thank you for her new light-up sneakers with a selection of the punster’s greatest hits.
There was no need for a security sweep after you’d finished eating. The whole place was only a couple of rooms, and you’d already checked the perimeter before entering.
“Go get the horses ready,” you instructed. “I’ll finish up here.”
You scribbled your report in the logbook and tucked away the remnants of linner, swinging your pack over your shoulders before taking one last look at the view.
It was golden hour, and the sun hit the clouds in a way that transcended any screensaver comparison. It was as if you’d been granted a glimpse of heaven itself.
* * *
You watched from the porch as Joel took a drink from his canteen. The way his Adam’s apple bobbed as he swallowed, the chiseled scruff of his jawline–from an objective standpoint, the man certainly had a rugged charm to him. But he was far from the only cowboy type in Jackson. And this was far from your first rodeo.
As Joel tucked the canteen away, he remembered the outside pocket of his pack. It held loose bullets and some of Ellie’s hair ties, but most importantly, it held a ballpoint pen.
As he heard you turn the key in the lock, he called out.
“Hang on! I forgot something.”
Unlocking the door once more, you ushered Joel inside.
He jogged over to the logbook with his offering, swiftly swapping it out for the one with a touch of home. He was halfway to the door when his brain caught up with his eyes and he turned on the spot to inspect your logbook entry.
All clear, no signs of raiders or infected.
It wasn’t the description that jarred him. It was the names. His, of course, was transcribed in loopy cursive, the standard, un-misspell-able ‘Joel Miller’. Beside it was a nickname–no, a last name –preceded by a first name that brought everything into focus:
Jane Doe.
previous | next
chapter notes:
New chapter! Yay!!!!!!!!!!!!!
Sorry for the long gap between updates, life has been cray.
Big Jane Doe reveal oooh!!! I would never blatantly rip off Yearling like that don't worry!!!!!!!!!! @justagalwhowrites BIG FAN THO
Curious to hear everyone's thoughts on this chapter and what's coming next, I legit have been planning out this whole fic with a very elaborate color-coded notecards-on-corkboard setup (I am, in fact, a virgo). So more fun stuff coming hopefully sooner rather than later.
Comments make me type faster!
Love you all so much, and thank you for reading! I got really creatively blocked during the writers' strike and getting back into fanfic writing has been incredibly healing. Grateful for you all.
taglist: @aspecialgreenie
#joel miller x reader#joel miller x you#joel miller smut#joel miller fluff#joel miller angst#joel miller series#joel miller fic#the last of us#tlou#joel x reader#joel x you#no use of y/n#joel miller x f!reader#jackson era#joel lives#ao3#fanfic#fanfiction#pedro pascal
54 notes
·
View notes
Text
How to Build a Container Home Step by Step in 2025
Container homes have become a groundbreaking trend in sustainable architecture, offering affordability, eco-friendliness, and versatility. In 2025, the process of building a container home has become even more streamlined, thanks to advanced materials and innovative designs. This comprehensive guide outlines every step to create your dream container home while ensuring compliance with modern standards.

Step 1: Planning and Design
Define Your Goals and Budget
Before starting, determine your purpose for the container home. Is it a permanent residence, a vacation property, or an investment rental? Establish a realistic budget, considering land acquisition, permits, materials, labor, and unforeseen costs.
Research Local Building Codes
Container homes must comply with local regulations, including zoning laws and building permits. Research thoroughly or consult a professional to avoid legal issues later.
Select the Right Design
Modern container homes range from minimalist single-container structures to luxurious multi-container designs. Collaborate with an architect experienced in container home construction to optimize space utilization and aesthetics.
Step 2: Choosing and Preparing Containers
Select High-Quality Containers
Opt for ISO-certified shipping containers to ensure structural integrity. Containers come in two standard sizes: 20 feet and 40 feet. Choose new or lightly used containers to avoid dealing with rust and damage.
Inspect and Clean the Containers
Thoroughly inspect the containers for dents, corrosion, or chemical residues. Once inspected, clean them using pressure washers and non-toxic cleaning solutions to eliminate contaminants.
Modify Containers for Your Design
Cut openings for windows, doors, and ventilation according to your design. Reinforce edges with steel beams to maintain structural strength during modifications.
Step 3: Securing the Foundation
Choose the Right Foundation
The type of foundation depends on your site conditions and budget. Common options include:
Concrete slab foundation for flat surfaces.
Pier foundation for uneven or sloped land.
Crawl space foundation for additional storage or ventilation.
Prepare the Site
Level the ground, remove debris, and compact the soil. Install drainage systems to prevent water pooling, which could compromise the foundation over time.
Step 4: Assembling the Structure
Position the Containers
Using cranes or heavy equipment, place the containers on the foundation as per your design. Align them carefully to ensure structural stability.
Weld and Secure Containers
Weld the containers together for a unified structure. Seal any gaps to improve insulation and prevent water leaks.
Install Structural Reinforcements
For multi-story container homes, add steel columns or beams to support the weight of the upper containers. Reinforce the roof if necessary for load-bearing purposes, such as solar panels or rooftop gardens.
Step 5: Insulation and Weatherproofing
Insulate for Comfort
Steel containers are excellent conductors of heat and cold, making insulation crucial. Popular options include:
Spray foam insulation for superior thermal performance.
Rigid foam panels for cost-effective solutions.
Natural materials like wool for eco-friendly insulation.
Weatherproof the Exterior
Apply anti-corrosion coatings to the steel surface. Seal joints with waterproof caulking to protect against moisture. Add cladding or siding for aesthetics and additional protection.
Step 6: Installing Utilities
Electrical Systems
Hire a licensed electrician to install wiring, outlets, and circuit breakers. Plan for energy-efficient systems, such as LED lighting and solar panels, to reduce your carbon footprint.
Plumbing Systems
Install water supply lines, drainage systems, and sewage connections. Consider using a tankless water heater or rainwater harvesting system for efficiency.
HVAC Systems
Choose compact and efficient heating, ventilation, and air conditioning systems to maintain comfort throughout the year.
Step 7: Interior Finishing
Walls, Floors, and Ceilings
Walls: Cover the interior with drywall, plywood, or reclaimed wood for a polished look.
Floors: Install durable flooring materials such as vinyl, laminate, or bamboo.
Ceilings: Use suspended ceilings to conceal wiring and ductwork while adding insulation.
Furniture and Fixtures
Optimize space with built-in furniture and multi-functional designs. Use modular kitchen units and compact bathroom fixtures for maximum efficiency.
Step 8: Exterior Enhancements
Landscaping
Enhance your container home’s surroundings with landscaping features such as pathways, gardens, and outdoor seating areas.
Decks and Patios
Extend your living space with a deck or patio. Use reclaimed wood or composite materials for sustainability.
Solar and Energy Systems
Install solar panels, wind turbines, or battery storage systems to power your home sustainably.
Step 9: Final Inspections and Permits
Conduct Professional Inspections
Before moving in, have professionals inspect the structure, electrical systems, plumbing, and overall safety. Address any deficiencies to ensure compliance with building codes.
Obtain Occupancy Permits
Submit all necessary documentation to local authorities and secure an occupancy permit to finalize the project.
Step 10: Maintenance and Upgrades
Regular Maintenance
Inspect your container home periodically for rust, leaks, or structural issues. Repaint and reseal the exterior as needed to maintain its durability.
Future Upgrades
Consider adding features like rainwater harvesting systems, additional solar panels, or a green roof to enhance sustainability.
Building a container home is an exciting and rewarding endeavor that combines functionality, sustainability, and modern design. By following these detailed steps, you can create a comfortable and eco-friendly living space tailored to your needs.
Tags:
2 notes
·
View notes
Text
How Concrete & Brick Sealers Improve Property’s Durability, Appearance, and Long-Term Value?
In Melbourne, well-known producers and sellers provide essential building protection products like premium brick sealer, concrete grouting and driveway sealer, moisture sealing materials, and more. These manufacturers and suppliers provide a large selection of locally designed and produced building solutions to maintain building structures and enhance their longevity.
They offer a wide range of products, such as concrete, render, and paint additives, concrete sealer and hardeners, water-repellent and stain-proof sealers, waterproof concrete solutions and additives, anti-graffiti products, and rising damp treatments.
For prompt delivery right to their location, skilled and experienced concrete waterproofing contractors and building owners typically order sealers and waterproofing supplies online from these industry-leading merchants.

Why Include Local Manufacturers of Products for Concrete Preservation?
Reliable concrete protectors are essential for both interior and outdoor surface concrete because they operate as a barrier against moisture, heat, and other environmental elements that could compromise the integrity or quality of the construction.
Some respectable local sealing and waterproofing manufacturers deliver a variety of products for building materials coating, sealing off moisture grinding, raising damp protection, a concrete additive, polymer renders, timber protection, and other services necessary during building development to preserve the integrity of the concrete.
Some of these businesses are renowned for being the first in Australia to do research and manufacture water-repellent, stain-proofing sealers and building protection additives.
They provide a variety of based on water and solvent-based versatile water-repellent sealers, including silicone sealers, conventional full-proof silane treatment for building materials infrastructure, innovative silane cream water distasteful treatment for building materials infrastructure, and deep-entry water-repellent concrete sealers.
Natural stones, concrete blocks, pavers or driveways, clay bricks, terracotta, tiles, and grouts are just a few of the masonry and flooring materials for which they have created polishing solutions. These are water-based compounds that don't penetrate thick substrates very well.
Therefore, contact these sellers to get premium-quality sealing, waterproofing, and polishing products for porous brick substrates online.
Source
3 notes
·
View notes
Text
A Guide To Choose The Right Concrete Sealers For Home

Maintaining the efficiency of the commercial property is extremely important especially the concrete that makes the floor pitch perfect. In fact, not just maintaining but preventing the damage to concrete is equally essential. Concrete is one of the crucial construction elements owing to its strength and longevity. However, because concrete is porous, it can absorb soluble salts and water, which can be harmful. Furthermore, the absorption of salts by the concrete, especially chlorides, can eventually lead to corrosion problems when steel reinforcement is inserted in the concrete to strengthen it.
As a result, opting for the right type of concrete sealers is of utmost necessity. It ensures protection by shielding surfaces from a wide range of water-related issues caused by the cycles of thawing and freezing, stains from dirt, oil, and other impurities. In addition, it also prevents an individual from investing unnecessarily.
Understanding The Role Of Concrete Sealers
The sealers for concrete are intended to provide protection for the concrete's surface against degradation, rust, and discolouration over time. Most concrete surface degradation is usually caused by surface moisture penetration. It's essential to safeguard and preserve the concrete surfaces while doing regular maintenance to increase their lifespan. Concrete sealers function by covering your concrete's surface or by penetrating into its pores and attaching to its inherent attributes. There are several types of sealers and choosing the right one can be the game changer.
How To Choose The Right Concrete Sealers?
In order to choose the right kind of sealers for a concrete surface, one must be aware of the different types of concrete sealers in the market and their benefits.
Waterproof Concrete Sealers
A sealer should be a product that has the ability to penetrate deep into the surface as well as the substrate in order to seal and act as a protective covering. A waterproof sealer protects the concrete surface from penetrating water deep into the seal on which it turns into a solid form enclosing all alkali and lime in its impenetrable layer.
As a result, the concrete surface coated with waterproof sealers becomes water resistant along with other dirt, grease and acid which extends the overall life of the surface.
Epoxy Concrete Sealers
Epoxy concrete sealers are a great option for heavily utilized interior floors. This specific sealer not only offers a durable finish but also deters excessive abrasion. The most popular applications for epoxy coatings are concrete flooring and countertops. As a matter of fact, this type of sealer offers a glossy finish with a thick composition.
Depending on the requirement of an individual, pigments can be added to the sealers for better colours and one can choose either some mid-level sheen or highly glossy one.
Acrylic Concrete Sealers
If an individual is looking for a cost-effective option, acrylic sealers are the best. Not only is it easy to apply but is also best suited for the interiors and exteriors for sealing the concrete. In addition, this type of sealer is well resistant to UV and therefore doesn’t fade away with time.
If one is looking for sealers for the garage or wants to seal the pool decks and walkways, individuals can opt for acrylic sealers as they offer protection against chlorine water. The paint dries really fast and enhances colours while protecting against damage.
Final Thoughts
Choosing the right concrete sealers perth and applying them correctly is extremely crucial. To find the ideal balance of protection, durability, and affordability, consider the specific needs, surface, and location.
Spraypave Pro is a concrete sealer expert in Perth and can help with the process of concrete sealing.
2 notes
·
View notes
Text
Residential Roofing - What You Need to Know

alt="Residential asphalt shingle roofing system installation"
Prevent having your residential roofing system improperly installed or assembled with poor-quality material. Knowing how components of a residential roofing system are made and installed will help you acquire the best quality residential roof and its installation in the Atlanta metro area.
newimageroofingatlanta.com gathered the following residential roof anatomy, manufacturing, and installation information to help you when selecting a roofing system, its components, and the roof installer for your Atlanta, Georgia, home.
Residential Sloped Roofing System
A residential sloped roof is a protective shield for your home, safeguarding you from the elements while increasing your home’s structural integrity. An essential component of the roofing system is the shingle (a key component that enhances your home’s aesthetic appeal and contributes to the durability and longevity of its roof). Consider the following anatomy of a residential sloped roof:
1. Roof Deck – A sloped roof’s foundation is its deck, typically made of plywood or oriented strand board (OSB). It provides a sturdy base for the installation of roofing materials and ensures structural stability.
2. Underlayment – Beneath the roofing shingles lies the underlayment, a water-resistant barrier shielding the roof deck from moisture and helps prevent leaks. Common underlayment types include asphalt-saturated felt and synthetic materials like synthetic underlayment or rubberized asphalt.
3. Roofing Shingles – Roofing shingles are the visible layer of a residential sloped roof, providing protection and enhancing the overall aesthetics. There are various shingle types available, like asphalt shingles, wood shingles, metal shingles, and clay or concrete tiles. Among these, asphalt shingles are the most commonly used due to their affordability, durability, and ease of installation (specially cut or formed shingles are produced for the ridge and hips).
Asphalt Shingle Manufacturing Process
While asphalt shingle manufacturing and technology have evolved over the years, their basic composition has remained the same. Consider the following asphalt shingle manufacturing process:
Raw Materials – Asphalt shingle production begins with high-quality material selection. Fiberglass or organic mats serve as a shingle’s core, while asphalt acts as a waterproofing agent. Mineral granules are then applied for surface protection and UV resistance, and additives are incorporated to enhance the shingle’s fire resistance and flexibility.
Mat Preparation – The selected mat material (fiberglass or organic), undergoes a manufacturing process to reinforce its strength and durability. Fiberglass mats are made by weaving glass fibers together, while organic mats are typically composed of recycled felt paper.
Coating and Drying – The prepared mat is then coated with asphalt (front and back), using a saturation process to ensure consistent coverage. The coated mat passes through a drying oven, which allows the asphalt to rapidly cure and stabilize.
Granule Application – Once dried, the coated mat proceeds to the granule application process. A layer of ceramic-coated mineral granules is evenly distributed on the top surface of the shingle, providing color, texture, and protection against weathering elements. The granules are embedded into the asphalt surface to enhance adhesion and durability.
Cutting and Shaping – After granule application, the asphalt-coated mat is cut into individual shingles. This process can be done manually or using automated machinery, depending on the production scale.
Packaging and Distribution – Finished roofing shingles are carefully inspected for quality and packed into bundles or cartons. They are then shipped to distributors, contractors, and suppliers for installation on residential roofs.
Note: Read more about roofing shingle production and options by visiting this roof shingle manufacturer.
Residential Sloped Roof Installation
Installing a residential shingle roofing system requires careful planning, proper preparation, and skilled execution. Here is a step-by-step overview of the typical installation process:
Preparation and Safety – Before beginning any work, safety must be prioritized. This includes wearing appropriate personal protective equipment (PPE) like:
Hard hat
Gloves
Goggles
Non-slip footwear
Harness
The area around the home should be cleared of any obstacles, and precautions should be taken to protect landscaping and outdoor features or furniture.
Removal of Existing Roofing Materials (Tear-off) – If there is an existing roof, the first step is to remove the old roofing materials. This may involve stripping off old shingles, underlayment, and flashing. Care should be taken to dispose of the old materials properly.
Inspection and Repair – Once the roof is cleared, a thorough inspection should be conducted to identify any damaged roof decking, sheathing, or structural issues. Any necessary repairs or replacements should be completed before installing a new roofing system.
Underlayment Installation – Install the underlayment, which acts as a moisture barrier and provides an additional protective layer. Asphalt-saturated felt or synthetic underlayment is commonly used. The underlayment should be rolled out horizontally, starting from the bottom edge of the roof and overlapping each subsequent row by a few inches (to ensure proper watershed).
Flashing Installation – Flashing is used to prevent water penetration at vulnerable areas like:
Valleys
Chimneys
Skylights
Roof intersections
Flashing is typically made of metal or a flexible waterproof material. Flashing should be installed before the shingles, ensuring proper coverage, sealing, and drainage.
Starter Shingle Placement – These shingles have a specialized adhesive strip and are installed along the roof’s eaves. These specialized shingles provide a secure foundation for the rest of the shingles and help prevent wind uplift.
Shingle Installation – The chosen shingles are installed from the bottom up, working in rows. Each shingle is nailed or stapled into place using appropriate roofing fasteners. It is crucial to follow the manufacturer’s guidelines regarding nail placement, spacing, and shingle overlap (for best product performance).

Ventilation and Ridge Cap Installation – Roof vents or ridge vents are installed to ensure proper attic ventilation preventing moisture buildup, allow air circulation, and help regulate temperature and humidity. The ridge cap, a specialized shingle designed for the roof’s peak, is then installed, overlapping the adjacent shingles and providing a solid, finished look.
Cleanup and Final Inspection – Once the roof’s shingles are installed, the work area should be thoroughly cleaned, removing all debris or loose material. A final inspection should be conducted to ensure the roof is properly installed, all shingles are secure, and there are no visible issues or gaps.
Note: The specific installation process may vary depending on factors like the shingle type, roof design, and local building codes. It is recommended to consult with a professional roofing contractor for a precise installation or replacement tailored to your specific roof and location requirements. A well-installed residential shingle roofing system provides long-lasting protection, durability, and aesthetic appeal to your home.
Residential Asphalt Shingle Roofing
In this article, you discovered the composition of a residential roofing system, asphalt shingle manufacturing, and how residential sloped roofs are installed.
Understanding how residential roofing systems are built, manufactured, and installed will help you choose the best materials for your home’s roof.
Not knowing how to recognize quality roofing material or identify the steps in a roof replacement or installation will leave you vulnerable to unscrupulous and unprofessional roofers trying to take advantage of your need.
Sources: energy.gov/eere/buildings/articles/cool-asphalt-shingles gccds.msstate.edu/research/altconstruction/roof/roof.pdf owenscorning.com
To see the original version of this article, visit https://www.newimageroofingatlanta.com/residential-roofing-what-you-need-to-know/
#Residential Roofing Atlanta#Roofing Contractors Atlanta GA#Roofer Atlanta GA#Residential Roofing Systems Atlanta#Shingle Roof#Asphalt Shingles
2 notes
·
View notes
Text
The Role of Civil Contractors in The Construction in The Business
In this article, we look at the importance of a civil contractor, the role that civil contractors play in the construction business and how they contribute to its success.
The construction business is vigorous and responsible for developing as well as maintaining our infrastructure. Without civil contractors, the construction business would grind to a halt.
What is a Civil Contractor?
A civil contractor is a qualified who delivers construction services for both public as well as private sector clients.Civil contractors characteristically work on infrastructure projects for example roads, dams, bridges, and canals. Moreover, to construction services, contractors may as well provide engineering and project management services.
Construction projects can be large and complex, so it is essential to have contractors who are experienced and knowledgeable about the construction process. Civil contractors typically have experience in a variety of construction disciplines, including project management, engineering, and architectural design.
Construction is a notoriously risky business, so it's essential to have a contractor who is willing to take that risk.Contractors are characteristically responsible for the entire construction procedure, from start to end. This means that that are responsible for managing the construction site, coordination with subcontractors and ensuring that the project is completed on the time and within budget.
What Are the Responsibilities of a Civil Contractor?
Civil contractors are responsible for planning, coordinating and executing construction projects.They work thoroughly with clients to grow project plans, recognize construction materials and methods, as well as oversee the construction process from start to end. Civil contractors also make sure that projects are finished on time and within reasonable price.
The civil contractor will also be responsible for ensuring that all safety regulations are followed and that the quality of the finished product meets all specifications.The different types of civil contractors
There are many different types of civilian contractors, each with their own area of expertise. Here are a few of the utmost common:
#1: Excavation Contractors
These contractors are answerable for excavating the site where the construction happens. This includes clearing the land eliminating any trees or other obstacles, as well asmaking the ground for construction.
#2: Concrete Contractors
These contractors are responsible for pouring and finishing the concrete on site. This includes creating foundations, floors, walls and other structures made of concrete.
#3: Masonry Contractors
These contractors are answerable for laying bricks, stones &also other masonry materials on the construction site. This includes the creation of walls, chimneys, fireplaces and other structures from masonry materials.
#4: Roofing Contractors
These contractors are responsible for installing the roofs on the construction site.This includes putting in shingles, titles, metal roofing, or other materials to create a waterproof barrier over the structure.
The Benefits of Working with a Civil Contractor in Noida
Cooperation with a civil contractor in the construction industry has many advantages. Civil contractors are usually very experienced and knowledgeable in the construction industry, from foundation work to utilities and everything in between.
This means that they can frequently provide important cost savings and productivities to construction projects. In addition, contractors typically have a strong network of subcontractors and suppliers, which can be extremely helpful in ensuring that construction projects are completed on time and on budget.
Conclusion
Civil contractor plays an essential role in the construction business. They are accountable for a wide range of responsibilities, from site work to project management, and their proficiency is essential to certify the successful accomplishment of any construction project.If you are planning a construction project, consult with a qualified construction contractor to ensure your project is completed on time and on budget.
Moschell is engaged in providing Civil Contractor in Noida, India. The entire project is done by our Civil Contractors who are in this field from a long time.
3 notes
·
View notes
Text
Mastering Epoxy Floor Waterproofing: Essential Tips and Tricks
Epoxy flooring is a popular flooring option for both residential and industrial areas. It is durable, easy to clean, and offers a sleek, modern look. However, one of the biggest concerns is its susceptibility to water damage. This is where floor waterproofing singapore comes into play. In this article, we'll discuss essential tips and tricks for mastering floor waterproofing.
Understand the Importance
Before we dive into tips and tricks, it's important to understand why floor waterproofing is so essential. floors are not naturally waterproof and can suffer from damage due to water exposure. Water damage can lead to bubbling, peeling, and even cracking of the flooring. This can result in costly repairs and replacements. You can protect them from water damage, extend their lifespan, and save money in the long run.
Choose the Right Waterproofing Product
Choosing the right waterproofing product is crucial for effective floor waterproofing. There are many options available in the market, but not all products are created equal. It's important to choose a high-quality product that is specifically designed for floors. Look for a product that is easy to apply, dries quickly, and offers long-lasting protection against water damage.
Prepare the Surface
Proper surface preparation is key to successful floor waterproofing. Before applying any waterproofing product, make sure the surface is clean and free of any dirt, oil, or debris. Use a degreaser to remove any oil or grease stains, and then thoroughly clean the surface with a pressure washer or a scrub brush. Once the surface is clean, allow it to dry completely before applying any waterproofing product.
Apply the Waterproofing Product
When applying the waterproofing specialist product, make sure to follow the manufacturer's instructions carefully. Use a roller or a brush to apply the product evenly over the entire surface. Be sure to apply a sufficient amount of the product to ensure complete coverage. Once the product has been applied, allow it to dry completely before walking on the surface or applying any additional coats.
Maintain Your Epoxy Floors
Proper maintenance is key to preserving the waterproofing of your floors. Regularly clean your floors using a mild detergent and a soft-bristled brush or mop. Avoid using abrasive cleaners or tools that could damage the waterproofing layer. If you notice any damage or wear on your floors, address it immediately to prevent further water damage.
Consider Adding a Sealant
In addition to using a waterproofing product, you may also want to consider adding a sealant to your floors. A sealant can provide an extra layer of protection against water damage and can help to enhance the durability and lifespan of your floors.
Use a Moisture Meter
Before applying any waterproofing product, it's important to check the moisture levels of your concrete or substrate. Use a moisture meter to ensure that the surface is dry and free of any moisture. Applying a waterproofing product to a surface that is not completely dry can result in ineffective waterproofing and may even cause more damage.
Conclusion
epoxy floor waterproofing services is a crucial step in protecting your floors from water damage and extending their lifespan. By choosing the right waterproofing product, properly preparing the surface, and maintaining your floors, you can master floor waterproofing and enjoy the benefits of a long-lasting, waterproof flooring option.
#concrete crack repair epoxy injection#injection grouting chemical#water leakage repair#water pipe leakage repair#ceiling water damage repair
2 notes
·
View notes
Text
What Is Industrial Grout? A Complete Guide for Beginners

In the construction and industrial sectors, materials play a crucial role in ensuring the strength, durability, and stability of structures. One such essential material is industrial grout. Whether you’re working on heavy machinery installations, bridge construction, or structural repairs, grout is a key component that enhances the longevity and performance of projects.
If you’re new to the world of construction materials, this guide will provide you with a complete understanding of industrial grout—what it is, its types, applications, benefits, and how to choose the right one.
What Is Industrial Grout?
it is a high-strength, cementitious, or epoxy-based material used to fill voids, provide structural support, and secure heavy equipment in place. Unlike regular grout, which is commonly used for tiling, industrial grout is designed for high-load and high-performance applications. It ensures stability, prevents shifting, and enhances the lifespan of structures and machinery.
Evergreen Enterprises, a trusted manufacturer and dealer of grout, provides premium-quality solutions that cater to the demanding needs of industries like construction, infrastructure, and manufacturing.
Types of Industrial Grout
They comes in different formulations, each suited for specific applications. The main types include:
1. Cementitious Grout
Made from a mixture of cement, sand, and additives
High compressive strength and durability
Used for structural applications like bridge supports, precast concrete, and column bases
Commonly used where high strength and minimal shrinkage are required
2. Epoxy Grout
Composed of epoxy resin, hardener, and aggregate
High resistance to chemicals, water, and extreme temperatures
Ideal for machinery bases, chemical plants, and food processing units
Provides superior bonding and low permeability, making it ideal for environments exposed to harsh conditions
3. Polyurethane Grout
Expands when injected, filling cracks and voids effectively
Commonly used for waterproofing and soil stabilization
Excellent for sealing leaks and repairing foundations
4. Furan Grout
Made from furan resin and filler, known for its extreme chemical resistance
Used in chemical processing plants, pharmaceutical industries, and refineries
Withstands high temperatures and aggressive chemical environments
Applications of Industrial Grout
It is widely used across multiple industries, including construction, manufacturing, and infrastructure development. Some key applications include:
1. Machinery and Equipment Foundations
Used to anchor heavy machinery and prevent movement due to vibrations
Ensures stability and alignment, reducing the risk of operational failure
2. Bridges and Infrastructure
Provides strong support for bridge bearings, beams, and piers
Enhances load-bearing capacity and longevity of infrastructure projects
3. Precast Concrete and Structural Repairs
Fills gaps in precast concrete structures, ensuring a seamless fit
Used in restoration and reinforcement of aging structures
4. Industrial and Chemical Plants
Epoxy and furan grouts are essential for chemical-resistant flooring
Used in areas exposed to corrosive substances and high temperatures
5. Waterproofing and Leak Sealing
Polyurethane grout is used for sealing cracks in tunnels, basements, and underground structures
Prevents water infiltration, protecting structures from damage
Benefits of Using Industrial Grout
Using high-quality industrial grout from Evergreen Enterprises offers several advantages:
Increases the lifespan of machinery, structures, and foundations
Resists cracking, shrinking, and chemical exposure
Provides strong support for heavy loads, ensuring safety and stability
Reduces stress on concrete and metal structures
Ideal for industrial machines and rotating equipment
Reduces wear and tear, extending equipment life
Epoxy and furan grouts are resistant to chemicals, water, and extreme temperatures
Suitable for industrial and marine applications
Requires minimal upkeep, making it cost-effective
Comes in ready-to-use formulations for quick installation
Conclusion
Industrial grout plays a vital role in construction and industrial applications, ensuring strength, stability, and durability. Whether you’re securing machinery, reinforcing infrastructure, or sealing cracks, choosing the right industrial grout is essential for long-term performance.
Evergreen Enterprises provides high-quality industrial grout solutions tailored to your project’s needs. With a focus on durability, performance, and innovation, our products are trusted by industries across construction, manufacturing, and infrastructure.
For expert guidance and premium-quality industrial grout, contact Evergreen Enterprises today and ensure your projects stand strong for years to come!
0 notes
Text
Can a Sunroom Be Used as a Kitchen?
A sunroom as a kitchen—sounds a little unconventional, right? But if you think about it, a sunroom’s bright, airy space could make for a pretty incredible cooking and dining area. Imagine whipping up breakfast while natural light floods in, or enjoying a cup of coffee as you take in a panoramic backyard view. But is it really practical? Can you turn a sunroom into a fully functional kitchen without running into a bunch of issues? Let’s get into it.
Why Would Anyone Want a Kitchen in a Sunroom?
Sunrooms aren’t just for lounging with a good book. Homeowners are getting creative with their spaces, and converting a sunroom into a kitchen comes with a few tempting perks:
More Natural Light: No need to flip on the lights every time you chop an onion. Sunrooms provide an abundance of natural light, making cooking more enjoyable.
Better Ventilation: Cooking smells? Smoke? Just open up those big windows.
Scenic Views: Whether it’s a backyard garden or a snowy winter wonderland, a sunroom-turned-kitchen keeps you connected to nature.
Extra Space: Need a bigger kitchen without a full-on home addition? A sunroom might be your answer.
And let’s be real—having a kitchen with floor-to-ceiling windows sounds pretty amazing. But it’s not all sunshine and rainbows. There are some serious considerations to think about.
Challenges of Using a Sunroom as a Kitchen
As dreamy as it sounds, converting a sunroom into a functional kitchen isn’t as simple as rolling in a stove and fridge. There are a few hurdles to clear:
Temperature Control
Sunrooms can get blazing hot in the summer and freezing cold in the winter—hardly the ideal environment for cooking or food storage. You’ll likely need:
Insulated windows (double or triple-pane glass)
A good HVAC system (mini-split AC or radiant floor heating)
Proper ventilation to prevent overheating
If you live in South Bend, you know how extreme the seasons can get, so climate control is a big deal.
Plumbing & Electrical Work
A fully functional kitchen needs water, power, and gas—none of which are typically built into a sunroom. That means you’ll need to:
Extend plumbing lines for a sink and dishwasher
Add electrical outlets (a fridge, oven, and small appliances all need power)
Consider gas lines if you want a gas stove
Depending on your sunroom’s current setup, these upgrades could be straightforward or expensive.
Flooring Choices Matter
Sunrooms often have tile or concrete flooring, which works well in a kitchen. But if yours has carpet or hardwood, you’ll need something water-resistant and durable—think:
Porcelain or ceramic tiles (easy to clean, but cold in winter)
Vinyl or luxury vinyl plank (waterproof and softer underfoot)
Sealed concrete (modern but can feel industrial)
The key is finding something that can handle spills, heat, and high foot traffic.
What About Permits & Building Codes?
Before you start ripping out walls or installing appliances, check with local building codes in South Bend. Some important things to consider:
Permits may be required for electrical, plumbing, and structural changes.
Zoning regulations might affect what you can do with a sunroom.
Inspections may be needed if you're adding gas lines or making significant modifications.
It’s worth consulting a contractor or the Screenmobile of South Bend to make sure your renovation meets local requirements.
How to Design a Functional Sunroom Kitchen
If you’re set on making this work, a little planning goes a long way. Here’s how to design a sunroom kitchen that’s both practical and stylish.
Focus on a Functional Layout
You want a layout that flows well while making the most of the natural light. A few smart ideas:
L-Shaped Layout: Keeps everything along two walls, leaving space for a small dining area.
Galley Kitchen: Ideal for narrow sunrooms, placing cabinets and appliances along opposite walls.
Island or Peninsula: Great for extra prep space and casual dining.
If your sunroom isn’t huge, a compact or modular kitchen setup might be your best bet.
Choose Heat-Resistant Materials
Because a sunroom is more exposed to sunlight, materials need to hold up against heat and humidity. Some good choices:
Quartz countertops (won’t fade in direct sunlight)
Stainless steel appliances (durable and easy to clean)
UV-resistant cabinetry (to prevent warping and discoloration)
Install Proper Ventilation
A sunroom with a stove or oven needs good airflow to keep things from getting unbearably hot. Solutions include:
Ceiling fans to circulate air
Range hoods to vent out cooking fumes
Retractable windows for a natural breeze
Proper ventilation will keep your kitchen comfortable and fresh, even in summer.
Should You Do It?
So, can a sunroom be used as a kitchen? Absolutely—but with the right planning. If you're up for the challenge, the end result could be a stunning, light-filled space perfect for cooking, dining, and entertaining.
But if you’re hesitant about the costs, temperature control, or plumbing work, you might be better off using the sunroom as a dining area or second prep space rather than a full-fledged kitchen.
Either way, if you're considering the switch, Screenmobile of South Bend can help with custom enclosures, window treatments, and ventilation solutions to make sure your sunroom is kitchen-ready.
Ready to Get Started?
Whether you’re dreaming of a full sunroom kitchen or just looking to upgrade your space, Screenmobile of South Bend has the expertise to help. Contact us today for a consultation and bring your vision to life.
1 note
·
View note
Text
Foam insulation: The ideal solution for insulating roofs and walls
Foam insulation: The ideal solution for insulating roofs and walls Foam insulation is considered one of the best modern technologies used in thermal and water insulation, due to its superior ability to prevent heat and moisture leakage, which helps improve energy efficiency inside buildings and reduce maintenance costs. Foam is characterized by being a lightweight, easy-to-apply, and long-lasting material, making it an ideal choice for homeowners, businesses, and industrial facilities. In this article, we will review in detail the types of foam used in insulation, its advantages, disadvantages, and various uses.
🔹 What is foam insulation? Foam insulation is a modern technology that relies on the use of expandable foam materials to fill gaps and completely cover surfaces, creating an insulating layer that prevents heat transfer or water leakage. Insulating foam consists of chemicals that react when sprayed, causing them to expand and harden quickly, forming a tight insulating barrier.
🔹 Types of foam used in insulation There are two main types of foam used in insulation, which are:
1️⃣ Open-Cell Foam It is characterized by its light weight and contains small air bubbles. It allows air to pass partially, making it suitable for internal insulation. It is effective in reducing sound transmission between rooms. It is usually used in ceilings and interior walls. 2️⃣ Closed-Cell Foam Its density is higher than open foam, giving it additional strength and durability. It is completely resistant to water and moisture. It enhances the overall durability of the building structure when used. It is used in external surfaces and walls exposed to moisture. 🔹 Advantages of foam insulation ✅ Strong thermal insulation: Reduces heat loss in winter and heat gain in summer, which helps reduce electricity bills. ✅ Effective waterproofing: Prevents water leakage and protects buildings from damage caused by moisture. ✅ Long life: It is characterized by its durability and ability to withstand for many years without the need for continuous maintenance. ✅ Easy to apply: The foam can be quickly sprayed on any surface, as it expands to completely cover the gaps. ✅ Prevents air and dust leakage: Helps improve the air quality inside the building. ✅ Resists insects and mold: Does not provide a suitable environment for the growth of fungi or insects. ✅ Does not add extra weight to the building: It is lightweight compared to traditional insulation materials such as foam concrete.
🔹 Disadvantages of foam insulation ❌ Its initial cost is high: Compared to some traditional insulation methods, it saves money in the long run due to its efficiency. ❌ It requires professional specialists to apply: To ensure complete coverage and not leave any gaps. ❌ It must be applied in suitable weather conditions: As high humidity or low temperatures may affect its quality during installation. ❌ It needs good ventilation during application: Because the chemicals used in spraying may be harmful if the necessary precautions are not taken.
🔹 Uses of foam insulation 📌 Insulating roofs and residential buildings: Used to protect homes from heat and water leakage. 📌 Insulating warehouses and factories: Prevents damage to goods due to temperature or humidity changes. 📌 Insulating tanks: Used to insulate water tanks to prevent heat leakage and pollution. 📌 Insulating water and air conditioning pipes: Helps reduce heat loss and increase the efficiency of systems. 📌 Insulating boats and vehicles: Gives them additional protection against water leakage and weather factors.
🔹 How to apply foam insulation? 1️⃣ Surface preparation Clean the surface well from dust and oils. Ensure that the surface is dry before starting. Repair any large cracks or holes before spraying. 2️⃣ Spraying foam A special device is used to spray foam on the desired surface. It is applied in several layers to obtain the required thickness. The foam expands immediately to cover all gaps and cracks. 3️⃣ Final Finish After the foam has hardened, it can be covered with an additional layer of protection such as paint or insulating membranes. Make sure that no areas are left uncovered. 🔹 Comparison between foam insulation and other insulation methods Type of insulation Cost Thermal insulation efficiency Water resistance Ease of application Foam High Very high Very high Easy Rock wool Medium High Medium Time required Insulating panels Medium Medium High Needs complex installation Cement insulation Low Medium High Time required 🔹 Tips when choosing a foam insulation company 🔹 Ensure the company's experience: It is preferable to deal with companies with a good reputation and experience in the field. 🔹 Request a warranty on the service: Some companies offer a warranty of up to 10 years on the insulation. 🔹 Ensure the use of high-quality materials: Because some companies may use poor materials to reduce costs. 🔹 Inquire about safety procedures: To ensure that the insulation is applied in a safe manner without harming the health of individuals.
🎯 Conclusion Foam insulation is considered one of the best modern solutions for insulating buildings and roofs, as it combines high efficiency in thermal and water insulation, ease of application, and long service life. Despite its high initial cost, it is a good investment in the long term, due to its energy saving and reduction in future maintenance costs. When choosing a company to install foam insulation, you must ensure its quality and experience to get the best results.
see also
شركة عزل فوم بالرياض شركة عزل الايبوكسي بالرياض
0 notes
Video
youtube
Since you’ve been asking about Nill Embeds from Nill Building Solutions and now want a comparison to competitors, I’ll evaluate the Nill Concrete Embed Anchor Mounts against other waterproof concrete embed solutions in the market. The focus will be on their waterproofing benefits, installation methods, and overall performance, as these seem to align with your earlier questions. Here’s how they stack up:Nill Concrete Embed Anchor Mounts vs. Competitors1. Nill Concrete Embed Anchor Mounts (Nill Building Solutions)
Overview: Cast-in-place embeds with proprietary waterproof internal threaded ports, made from stainless steel, designed for bolting attachments without welding.
Waterproofing:
Installation:
Strength: Superior pull-out and lateral load strength (exact values not public but implied by design and stainless steel construction).
Unique Selling Point: The waterproof threaded port is patented (e.g., U.S. Patent No. 10,501,939), offering a unique, weld-free attachment method.
Cost/Time: Reduces labor and material costs by skipping welding and secondary waterproofing steps.
100% waterproof due to sealed internal threading, preventing water ingress at the attachment point.
No need for additional sealants or welds, which eliminates common failure points like seams or caulk degradation.
Embedded during the concrete pour, secured to formwork, and bolted post-cure.
No welding or post-installation sealing required—faster and simpler than traditional methods.
2. Traditional Cast-in-Place Anchors (e.g., J-Bolts, L-Bolts from Williams Form Engineering)
Overview: Simple bolts or shaped anchors embedded during the pour, often requiring welded attachments.
Waterproofing:
Installation:
Strength: High tensile strength (e.g., ASTM A615 rebar options), but welds can weaken over time due to corrosion.
Drawback: Relies on skilled welding and consistent sealing, which increases variability in waterproofing success.
Cost/Time: Higher long-term costs from maintenance and repairs due to water damage.
Poor inherent waterproofing—welds and exposed bolt heads are prone to rust and water infiltration.
Requires additional sealants (e.g., caulk, flashing) that degrade over time, leading to leaks and structural rot.
Secured to formwork and embedded in wet concrete, but attachments typically need welding post-cure.
More labor-intensive due to welding and sealing steps.
3. Concrete Embedded Anchor Channels (e.g., Unistrut Concrete Inserts)
Overview: Slotted channels cast into concrete, allowing adjustable attachment points with bolts or clips.
Waterproofing:
Installation:
Strength: Solid holding power, though dependent on bolt size and concrete quality; not as inherently strong as a fixed embed for heavy loads.
Unique Selling Point: Flexibility in attachment placement, popular for curtain walls.
Cost/Time: Moderate upfront cost, but sealing and maintenance can add up.
Better than traditional bolts since no welding is needed, but the open channel design can still allow water entry unless meticulously sealed.
Often requires additional caulking or covers, which can fail over time.
Cast into concrete during the pour, with attachments bolted into the channel afterward.
Adjustable positioning is a plus, but sealing the channel adds complexity.
4. Mechanical Post-Installed Anchors (e.g., Wedge Anchors, Sleeve Anchors from Concrete Fastening Systems)
Overview: Drilled into cured concrete and secured via friction or expansion.
Waterproofing:
Installation:
Strength: Good shear and tension strength (e.g., wedge anchors excel in static loads), but holding power depends on concrete quality and embedment depth.
Drawback: Not cast-in-place, so less integrated with the structure; waterproofing relies heavily on installer skill.
Cost/Time: Lower initial cost but higher effort for waterproofing and potential repairs.
Minimal inherent waterproofing—drilled holes and exposed bolts can let water in unless sealed with caulk or epoxy.
Less reliable in wet environments compared to cast-in-place solutions.
Post-cure drilling and insertion, no need for pre-planning during the pour.
Faster for retrofits but requires precise drilling and additional sealing steps.
5. Adhesive Post-Installed Anchors (e.g., Epoxy Anchors)
Overview: Bolts or rods bonded into drilled holes with adhesive like epoxy.
Waterproofing:
Installation:
Strength: Excellent tensile strength, often exceeding mechanical anchors, but reliant on adhesive bond quality.
Drawback: Not as seamless as cast-in-place embeds; waterproofing isn’t guaranteed without extra effort.
Cost/Time: Higher material cost (epoxy) and longer install time due to curing.
Can be waterproof if the adhesive seals the hole completely, but this depends on the product and application quality.
Exposed bolt heads still need sealing to prevent water entry.
Drilled post-cure, filled with adhesive, and bolted—requires curing time for the epoxy.
More steps than Nill’s cast-in-place method and less suited for immediate use.
Head-to-Head Comparison
Waterproofing: Nill Embeds lead with their built-in, weld-free threaded ports—competitors rely on secondary sealing that’s less reliable long-term. Traditional embeds and post-installed options lag furthest behind.
Installation Ease: Nill’s method is among the simplest for cast-in-place (pour, cure, bolt), beating out welded traditional embeds and complex post-installed setups. Anchor channels offer flexibility but add sealing steps.
Durability: Nill’s stainless steel and waterproof design give it an edge in harsh environments over carbon steel competitors (e.g., J-Bolts) or post-installed anchors prone to corrosion.
Cost Efficiency: Nill saves on labor and maintenance, though upfront cost might be higher than basic J-Bolts. Long-term, it outperforms competitors needing repairs from water damage.
Versatility: Nill excels for fixed attachments (e.g., railings, supports), while anchor channels win for adjustable needs (e.g., curtain walls). Post-installed options are best for retrofits.
VerdictNill Concrete Embed Anchor Mounts stand out where waterproofing and simplicity are priorities—like exterior railings or moisture-prone structural connections. Their patented design eliminates the Achilles’ heel of traditional embeds (weld-related water entry) and outshines post-installed anchors in integration and reliability. However, if you need adjustable positioning (Unistrut) or retrofit solutions (wedge/epoxy anchors), competitors might fit better. For a new build prioritizing longevity and zero leaks, Nill’s got the edge.If you want a deeper dive into specific competitor models or real-world performance data, let me know—I can hunt down more details! What’s your project context? That could narrow this down further.specific competitor analysisalternative building materialsDeepSearchThinkAttach
0 notes
Text

Waterproof concrete is an excellent solution for protecting basements and foundations from water damage. The best waterproof concrete in India, like Conkregard, prevents water seepage by forming a strong, impermeable barrier. Its self-healing technology fills small cracks over time, providing enhanced durability and protection.
Designed for long-term strength, waterproof concrete eliminates the need for additional sealants or coatings, making it a cost-effective and eco-friendly choice. By using high-quality waterproof concrete, you can prevent moisture damage, mold growth, and structural weakening, ensuring your home or building remains safe and stable for years to come.
0 notes