#com no just tee hee hee look :) lemon demon shirt :) and i was standing there (this was in the vast error discord) like :moai: do i say smth
Explore tagged Tumblr posts
Text
alr since this blog is 100% Inactive inactive now im gonna post (attempts at) tutorials of how i did my edits. pass down the torch to all of you people who i guess don’t have the xkit timestamp extension. you can use pretty much any program that supports layers and brushes w/o antialiasing; i use medibang paint. if you’re real dedicated you could probably manage to use a program without layers, but the aliasing is an absolute must. it just looks cheap and shitty with antialiasing instead of the authentic pixellated crunch of homestuck’s style.
part 1 of ?: PANEL EDITS TUTORIAL
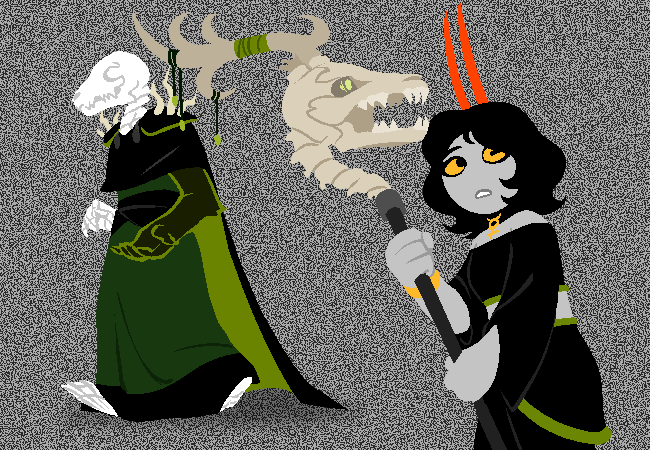
so the first thing you wanna do is grab the panel you want to use. i generally use vast error panels because finding workable homestuck panels takes longer. in my example ill be using this panel from right before i just outright stopped trying to stay caught up w vast error

to make an edit of my fantroll marina halcyn! now. look at all that god damn static. that would be really really inconvenient to erase out OR you could take the easy route and just open up another layer and use the fill tool to completely duplicate the parts you want from the original image and then delete the first layer. that might be a lil obvious to some of you but it took me a while to catch on to so in the tutorial it goes. medibang paint has a transparent fill tool that’s very useful if the character’s design is more complicated than the background, though- e.g if it’s solid black or if the character’s immediate surroundings are all pretty solid colored so you can just regular erase the rest of it, or if you just don’t want to fucking fill 100 little pixels individually.
if all you want to do is make transparents, then stop here! if not, proceed onwards. with your beautiful new transparent image, the next thing i do is remove all identifying details. just blandify the SHIT out of them. erase loose clothing, get rid of any details i don’t want to keep, smooth down the hair, etc. this is why i work with transparents, also. makes it a lot easier.
next step is to open up a second layer to draw over what you’ve got. you need the second layer because you want to be able to check your edits over the original to make sure it looks okay. i cannot give you the ability to draw clothes or hair. just reference the style you’re trying to replicate and it should be fine; stick to a relatively limited palette; the fill tool is your best friend.
so, by this point, the edit looks like this:

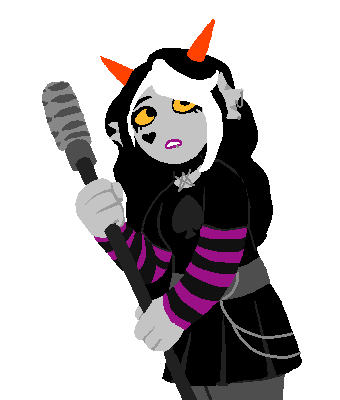
very much half-baked, but definitely coming together, yeah? open up another layer if you’re using something with layers. you can finish an edit in three main steps- the third is for details and anything that goes over the initial redraw layer (bangs, jewelry, horns, just for some examples), in a separate layer to make it easier to erase if it looks wonky. think of this as the refining stage, too, because i usually make small adjustments to the previous two layers here as well. there is literally not that much to it but it’s pretty important because with those extra touchups that screenshot becomes this

and that’s it. you’re done. three steps and you have a beaaautiful edit of your fantroll / kin timeline / self ship / idea you thought would be cool. like anything it does take practice for them to turn out good but panel edits dont exactly demand a fathomless amount of time and slash or effort.
#brackets#[i guess i kinda missed doing edits lol this was fun]#[i mean its not like ive been totally editless. i made a sprite edit of a video game character that got over 1000 notes]#[back when i was maintaining this blog i was like sure doing it cause i liked doing it but i valued clout too much]#[made it easy to get discouraged when edits i spent time and love on topped like 10 notes]#[now im older and wiser and i do shit just because i like looking at it. marina my beloved]#[but yeah its easy as shit to do edits.]#[OH i almost forgot that part of the reason i got super fucking discouraged was finding out that someone stole my edits and used them as a#base for their own thing man that was kind of a dick move. like didnt even say oh i found the original edit on ellsee--raines dot tumblr dot#com no just tee hee hee look :) lemon demon shirt :) and i was standing there (this was in the vast error discord) like :moai: do i say smth#i didnt. i prolly shouldve? man whatever it's in the past it just kind of stung]#[another another reason is that ive kind of given up on vast error cause i guess i just didnt see the point in continuing#when i knew i was gonna have to see a character that triggers the hell out of me if i did??? like seeing the wiccans was NOT worth it]#[i miss albion tho :/ pretty girl.... transgender swag..... :(........]#long post#[forgot . to put that]
18 notes
·
View notes