#cinnacorn
Explore tagged Tumblr posts
Note
WAIT where can I see this concept art of fret needing contacts/glasses? :o (love your headcanons so much btw!)
First of all, thank you so much!!! It makes me so happy to hear that you like my head canons!

As for the concept art, here!:

#lindseybot answers#twewy#the world ends with you#neo twewy spoilers#twewy spoilers#neo the world ends with you#neo the world ends with you spoilers#neo twewy#tosai furesawa#twewy fret#ntwewy spoilers#the world ends with you spoilers#cinnacorn
49 notes
·
View notes
Photo


These are my rattie boys, Ash (white) and Leaf (brown). They are fat and stink like stale corn chips. Ash is a perfect himbo--very soft, no thoughts, full of love. Leaf is known for enjoying lap cuddles and for pooping outside of the litter box while making it very clear that he knows he is pooping outside of the litter box. He is also a bully and does not share the blueberries. He is a little shit, but little does he know the neuter fairy is going to visit him this December for a very special affair...
4 notes
·
View notes
Text
cinnacorn replied to your post: y’all i fucking love Scorpia and Mermista really i...
cosplay a character with me when I cosplay she-ra!!!!!
yo i should!!!! i just gotta decide who to be because everyone is cute
but yes!! we’ve never done a cosplay from the same thing together so yeah i totally should!!!
#i still need to finish watching She ra but so far i'm thinking either Scorpia Mermista or Glimmer!!#though Scorpia might be.. hard to do... lmao#cinnacorn
1 note
·
View note
Text
Angie build update for the Donna cosplay Part 2
Part 1 Part 3

Ok so I probably should have updated this some time last week considering how much got done on this last week but I just did not have time til now.
This is probably gonna get long because of that so here’s a readmore
So last week I was visiting my family and it ended up being me and my dad working on this in his workshop for the most part (there’s other parts than just the above picture that didn’t take the whole week).
The picture above is the frame that I built, Dad has a ton of coat hangers that I stole both for this and for the arms and legs.
The ones he has are this yellowy brassy colour from the drycleaners and I was like, perfect I can just use those they’d work really well colour wise for her joints. But dad pointed out that the colour was just a coating and he was worried that it wouldn’t do well in the oven, one heat test involving a meat thermometer and a very large heat gun he has for lighting his barbeque we found that while it looks fine in the heat, it get soft so it rubs right off afterwards. Cue me sanding a whole lot of coat hangers down.
The main thing that we were working on while I was there was the mechanisms for puppetting the head.
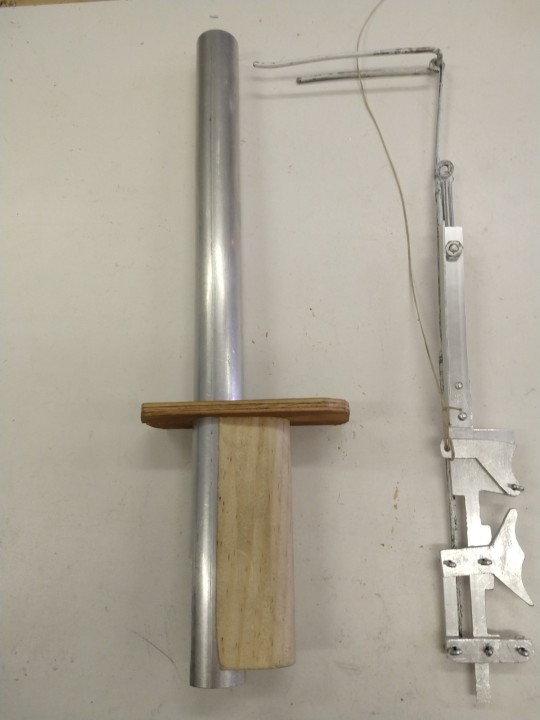
(See when Dad takes a photo he bothers to clear the space before hand lol)
The handle sits inside the bottom of the frame with the aluminum pipe we’ve been calling her spine goes up to just under the head, the fiddly bits beside it slot into the front of the pipe and go up the tube (they’re flipped over so it’s easier to see the moving parts).
The sideways Y shaped thing controls the up down movements of the head with my middle and ring fingers, it’s attached to the thick wire behind it with some springs you can’t see from this angle so the head’s resting position is more neutral.
The piece above it opens and closes the mouth using the piece of fishing line it’s tied to.
I can turn her head back and froth by just rotating the entire spine.
We also got started on the bits that live inside the head.

Sadly we did not get a chance to finish either the controls or the head pieces before I had to leave, partially because the mechanisms were having more hiccups than we expected, and partially cause we just ran out of time. Dad thinks that the wire he was using is bending inside of the tube which might be what’s causing our issues. He’s going to finish it on his own and mail me the parts when he is done.
This means I can’t work on the head until I get those parts but I can start sculpting the rest of the body.
Before I left I also made hair for her. @cinnacorn taught me how to do this (she learned it from a number of doll repainters but hextian in particular, she says that his custom ursula doll video details it best)
But you take Yarn, unravel it, put in around something in a larks head knot, brush it with a wire brush to really break it apart (if you’ve got a really heavy duty wire brush you can get away without unraveling it first, but if you’re blending colours it’s easier to space things out better if you unravel it), hit it with a straightening iron, trim off the knot, lay it flat on a silicone mat, put some hot glue at the top, while still hot use the edge of the mat to wipe away the excess glue, when it's dry trim away the excess,
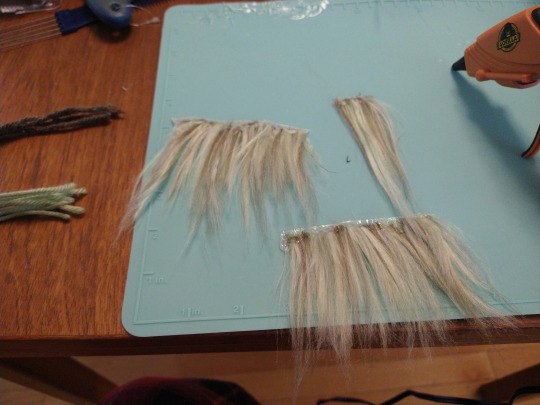
Then do it 80+ times over the course of 6 and a half hours with two people working on it (thank you again Ele) to get enough for your giant doll head.
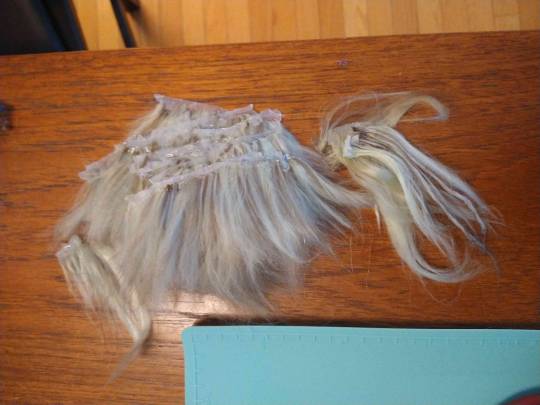
I’m using a light sage green and a grey brown to get that ‘this maybe was blonde once’ look, where it’s more streaky is going to be layered over so it blends better.
It looks super great and if you used colours that were closer together and actually styled it, it totally would look like a person’s hair. However this is a technique that clearly was meant for smaller doll’s heads, not ones as large as I’m making. As it is I ended up needing a bandaid halfway through cause the wire brush was eating the skin on my thumb from pushing the yarn through.
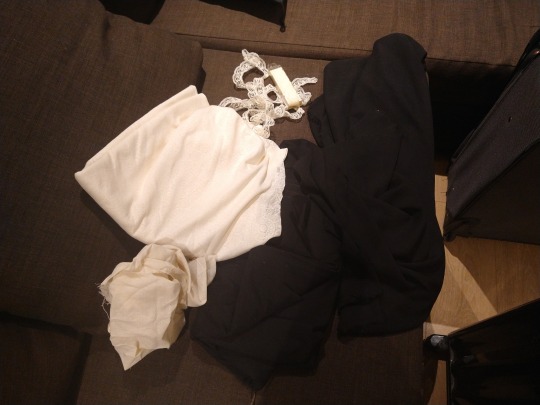
I also got fabric for both Donna and Angie, some from a shopping trip and some from my mother’s stash. (Some of that lace trim is in a Zellers container, which for those of you who aren’t Canadian, Zellers was a chain that closed in 2013 so that was a fun find)
Mom also has a stash of nail polish she uses as a craft supply. Me: Hey mom do you have any dark purple nail polish I can steal Mom: yeah it’s on the bookshelf in the guest room Me: Oh.
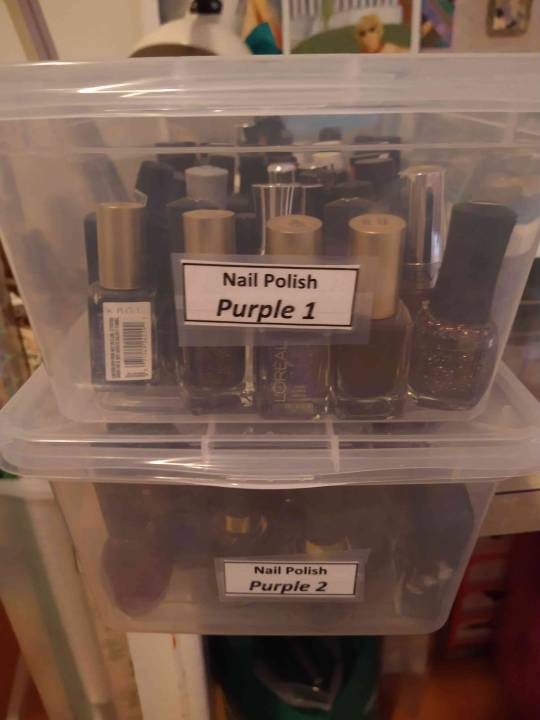
(90% of it is drug store stuff so not as expensive as you would think but still, that’s just the purple)
Mom also gave me a crackle paint that I need to experiment with so that’s going to be exciting.
I got home Sunday night and I spent most of the yesterday wrapping the frame in chicken wire.
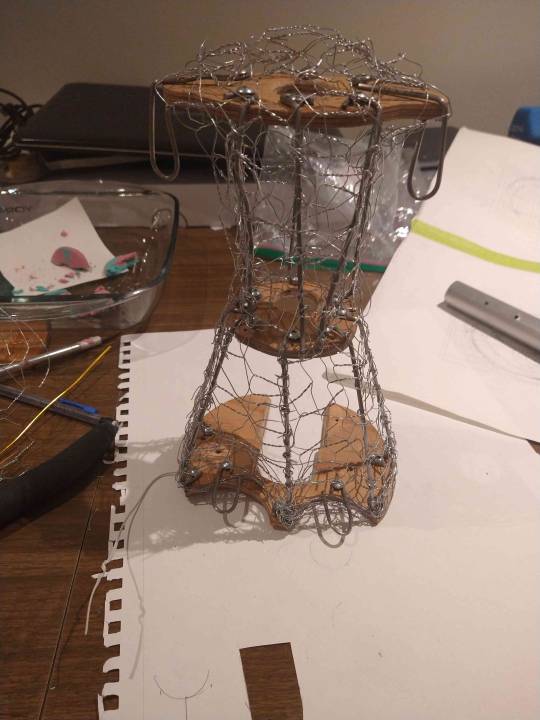
I now hate chicken wire.
Today I managed to get two coats of the clay on the front and one on the back (need to do them half at a time cause it doesn’t fit standing up in my oven)
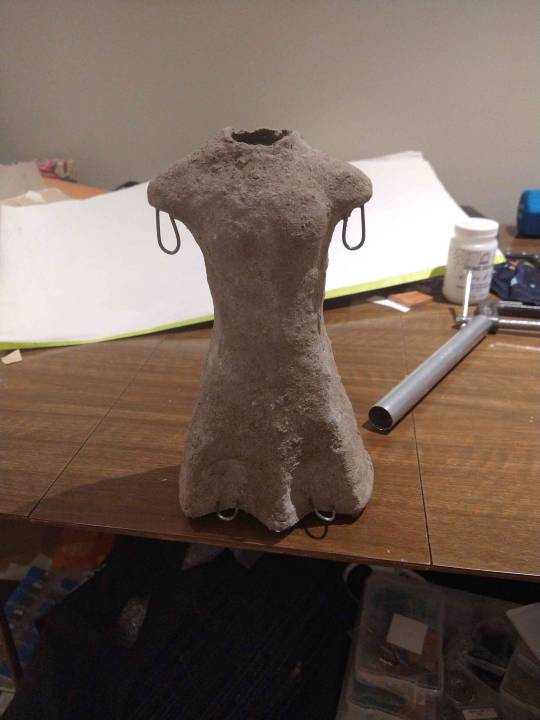
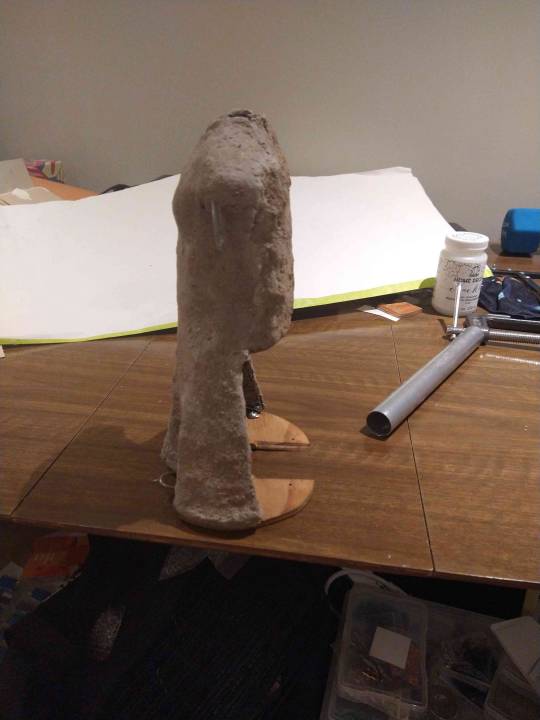
Still a few more layers to go, I need to bulid up her upper torso a bit and her shoulders need a lot more on top of them, I should have put more chicken wire there but I was worried about interfering with the spine. I have a piece of the tube to use as a mock up to make sure I don’t do that, but it’s a lot easier to break away the clay when it doesn’t have the wire in it.
I know her hips go really wide here but most of that’s going to be under her dress and I need that space to put my hand, and also so she can have a wide enough base to sit when I put her down.
I might close up her back a little bit more but the farther I go the less I can turn her head. It’s a trade off cause the fabric’s going to be tight on the body and then have just empty space there so it might be more noticeable if I leave it open. Still thinking on that one.
I’ve also cut to length and bent the coat hangers that will go inside her limbs but haven’t got any clay on them yet. A few of them I can get one loop on right now but the rest are going to have to wait until I’m putting it all together.
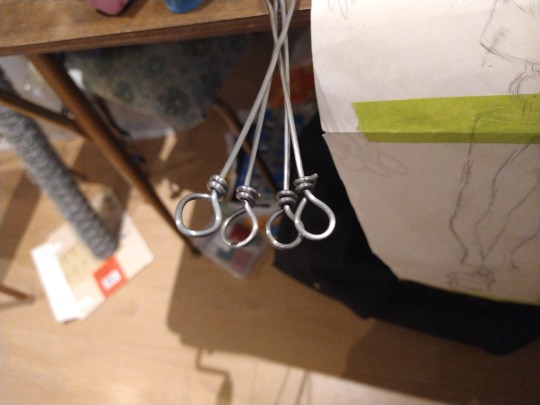
I did this by wrapping it around a giant nail that my dad and I found in his workshop that we cut down so I could put it in my suitcase, and then put it into a block of wood so I could clamp it to my table.
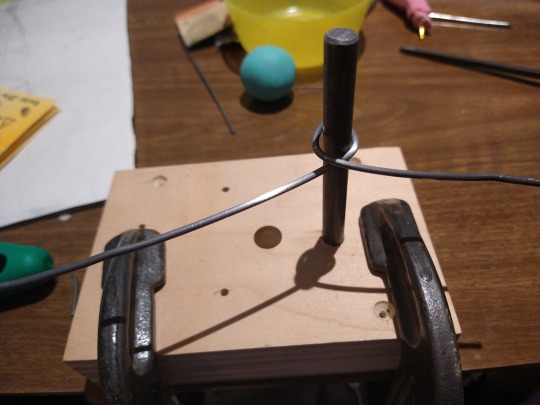
Then you use some pliers to bend the longer end of the wire so the circle is more aligned with it then wrap the shorter end around it a few times and trim it. I also filed down the sharp point where I cut it cause I’m worried about them catching on her clothing.
This is all fairly easy to do now, we will see how it is when I’m trying to do it with the rest of the limbs already on the wires.
Anyways that’s where I am for tonight, I have the rest of the week off so hopefully I’ll get most of the sculpting done and maybe (maybe) start sanding and varnishing it as well.
17 notes
·
View notes
Photo

Heck yeah, @cinnacorn!
3 notes
·
View notes
Text
cinnacorn replied to your photo: Of all the things I expected to happen at the BBQ...
that’s neat! what’s your plans for it?
guess i’ll clean it up a little more then put it on a shelf to make my pig skulls nervous
1 note
·
View note
Text
cinnacorn replied to your post: me at myself, remembering my disappointment when...
yo but do you have a starter preference yet? I think they’re all adorable so it’s gonna take seeing the evolutions for me to make a final decision but since I like water type sobble’s growing on me lol
The new starters really are super cute!! I always wait until I see the final evolutions before I decide for sure which one I want to choose, but so far I think sobble’s my favourite too
0 notes
Text
Sooooooo guess who’s decided to cosplay for the first time in a very long time.
I’m gonna cosplay Donna Beneviento from Resident Evil Village, which means I get to make her doll, Angie. I decided I want to document how I’m going about it as I go.
If you want to hear about all the experimentation I’ve been doing to prep for this follow me behind the readmore.
Part 2 Part 3
So right now I’m still very much in prep mode for this but talking about it keeps me motivated cause now I’ve said I’m doing it. Though I probably won’t have any updates for a couple of weeks cause life is happening but I wanted to yell about the thing I’m working on so here we are.
I have a pattern for Donna’s shirt, I’m probably just going to go with a fairly shear material for her veil rather than something closer too the game, the sewing part is less of my focus right now than the making Angie part.
The big thing I’ve done to prep is draw Angie out full scale

The drawing is 97 cm long (almost 38″) I might have gotten her legs a bit too big cause I was jumping between references so we’ll see if I scale them down a bit.
Shout out to Bigdaddyjende’s video on youtube of her without her dress cause that’s been my main reference for this.
the bottom of the profile view isn’t quite accurate because Donna’s hand was in the way of my reference
I’m not too mad about that because I’m going to be changing her hip area anyways so she can sit on a flat surface
I’m might do a few more drawings of other parts of her but I wanted to get her head and torso drawn out because I’m biting off more than I can chew in that I want to make it so I can puppet her head like a ventriloquist dummy so I need those measurements.
Also I wanna see if I can program a small speaker with some of her lines. Cause if I’m going to do a project I’m going to try and do something that’s way beyond my abilities.
Other things I’ve done in prep is I made a prototype mini Angie

I kind of gave up on her face cause at this scale it just wasn’t happening.
The main thing that I learned from mini Angie is that I need to figure out how much space her ‘joints’ will take up and plan accordingly, her limbs are a little too long cause I didn’t
Also remember when you are attaching things to triple check that you have the limbs on the right way, one of her legs is on backwards.
I still kind of love her though
And the final thing that I’ve been doing that I can take pictures of and show (as opposed to just the research that lives in my brain) is material tests
Lots and lots of material tests

So the grey material is what I’m going to go with. Why? because it’s sturdy and I already have the ingredients.
What it is newspaper kitty litter that’s been soaked, blended, drained, mixed with flour and baked.
Here’s where this gets long and rambly so like, feel free to skip, just know that it makes a damn sturdy, fairly lightweight material that I already have the ingredients for.
Let me explain how I came to this.
So @cinnacorn suggested I give paper clay a try cause I was worried about how fragile polymer clay can get. She meant the premade stuff that she had played around with before.
However the first thing I came across when googling paper clay is a video from Red Ted Art about How to Make a Bowl from Shredded Paper
Which details the soaking, blending, draining and mixing with flour (and a bit of salt so you can keep the ‘clay’ in the fridge for a week or two) with shredded paper for like upcycle purposes as an activity to do with kids.
Whether or not you can call this paper clay when it has no clay slip in it idk, so I’ve been calling it paper mache/paper clay stuff.
However, I have a good amount of unscented newspaper kitty litter that I’m not using because my pet rats both passed away a couple months ago (they were pretty old by rat standards) so I decided to test that out instead of shredded paper.
I don’t know how the original recipe is, maybe something in the kitty litter is firming it up a bit but I chucked a piece of this stuff at a concrete wall and it was fine.
Because the litter is so compressed it also makes a decent amount too.
The original recipe was 3 parts paper to 1 part flour, and that’s what most of my test pieces are, but in testing it I’ve found that a mixture that’s closer to 1 to 1 is stronger and easier to shape so I’m going to be going with that going forward.
That’s all I’ve got to show for now. I’m super excited to have a cosplay I’m actually interested in doing again!
8 notes
·
View notes
Text
@cinnacorn


💕 red, colorful, and green dragons by apricot lamb xx✨
3K notes
·
View notes
Text
Tagged by @rainbowsasafras
Rule - Always post the rules Answer the 11 random questions posted for you. Create 11 new ones and tag 11 people. Let the person who tagged you know that you answered. You don’t have though
1. Do you play any instruments? Several actually... Saxophone and Guitar mostly, but I dabble in Piano sometimes 2. Favorite videogame? UGHHH SO MANY... one I come back to over and over is Beyond Good and Evil 3. What’s your Chinese zodiac sign? Rooster 4. Do you like musicals? If so what’s your favorite? Chicago is pretty rad but it’s so hard to pick just onneeee 5. What exotic pet would you own if you could? Would a Platapus count...? 6. Celebrity crush? Currently Raquel Cassidy I’m sure no one’s noticed THAT 7. Favorite curse word? Fuck 8. Favorite flower? Forget-me-nots 9. Dream job? Arting? Making money as an artist in whatever form that may present itself 10. Favorite dinosaur? Apatosaurus (deciding on that took me way longer than it should have done) 11. Do you play any sports? Nope, but I used to Kajak and play Badminton in highschool
New Questions 1. Tea or Coffee? 2. Do you have any tattoos/do you want any? 3. Favourite kind of Bird? 4. Favourite meme? 5. A language you want to be able to speak? 6. Favourite ancient civilization? 7.Favourite subject at school? 8. Favourite number? 9. Do you have a secret talent? 10. Favourite ice cream flavour? 11. Favourite poem/song lyric?
Tagging
@matildaswan @duskirises @cinnacorn @astralnature @pipedreamdragon @ramenpopcorndrpepper @janetfraiser @hard-broom @ninjakittycomics @sasseffect @carol1st
8 notes
·
View notes
Text
@cinnacorn said: ugh I just block the bots the moment I see they follow me, it’s extremely frustrating
I do that too, but these aren't following me
3 notes
·
View notes
Note
hey happy birthday!!! congrats on making it around the sun again and hope your day was rad!
Thank you ele! It was gonna be bad but my family made a last minute save so I am content
1 note
·
View note
Text
cinnacorn replied to your post: damn it i knew this was going to happen but its...
do you still have access to the old URL or did it get snapped up? I kept my old URL as a side blog and it just has a post saying “this is my old blog, I’m now at this URL!”
I do! I just used one of my abandoned rp blogs to snatch up the old username so no one would claim it and like.. idk pretend to be me or something. And I adjusted the description on that blog to be like “yo go find me @new username!”, but on people’s reblogs of my art it’s still saying the account is deactivated(though my icon is showing like normal instead of the usual deactivated user icon that tumblr gives to people who deactivate, so i guess that at least is a good sign lol). I’m sure people will figure it out?
0 notes
