#chrome //flags menu
Explore tagged Tumblr posts
Text
Don't do this:
OK so do not go to Github and search for yt-dlp and don't either isntall it using brew, or download the binary.
Do not, I repeat do not then launch a command line...
MacOS: Command+Space type Terminal Windows, Right-click the Start Menu and open a command line
... then type something like
yt-dlp "https://www.youtube.com/playlist?list=WL" -S "ext" --embed-chapters --embed-subs --mark-watched --cookies-from-browser firefox
Because that will download the best quality audio and video format (mp4) at the best size, using your YouTube Watch Later playlist, mark all the videos as read, and give you MP4 files with subtitles and chapters, but no adverts. You can switch firefox for your browser if it's supported. Shit, I mean, don't do that.
Currently supported browsers are: brave, chrome, chromium, edge, firefox, opera, safari, vivaldi, whale.
Especially do not replace the URL with a BBC iPlayer page in case it accidentally downloads an entire series, or individual video. Or try non-DRM'd web pages, or you may find it's also downloaded those individual videos for later use too.
And whatever you do, don't spend a few hours on the GitHub page learning to use it. For example to rip just the audio files from YouTube videos for use as a personal musical playlist, or Twitch streams to play back when it's quiet.
And also beware if you slip and use the right flag it may even mark the YouTube video's sponsored ad reads so they can be auto-deleted or skipped.
This has been a public announcement to prevent you from accidentally downloading video or audio for your own personal use.
#shitposting#youtube#adverts#somehow this became a thing#honestly I've been really enjoying nerding#Anyway. PSA.#You wouldn't download a succulent chinese meal.#...#Actually you would. We all would.
27 notes
·
View notes
Text
An AO3 app? -- The next installment in my AO3 posting.
I'm going to preface this by telling you that I don't entirely understand the urge or need to have an app for everything, but then again, I am closer to 30 than 20, so maybe that's the difference. Moving on.
So I've seen a lot of people saying that they wish there was an AO3 app. Presumably these people read AO3 on their phones or tablets. The thing is, there is NO AO3 app. If you see an app in the App Store or the Play Store claiming to be an AO3 app, it is fake, and you should not download it.
Say it with me kids:
"ao3 does not have an app and will not have an app."
The thing is, there's a really good reason why it will never happen. If you've been on this site (tumblr) long enough you'll either remember or have heard about the great tumblr porn ban (aka the ban on "female presenting nipples"). Believe it or not there was time where the tumblr (official) policy on adult content was "go nuts, show nuts. whatever." <-- actual quote btw.
A big reason why the tumblr porn ban ever happened was because of the tumblr app, specifically, the tumblr app for iOS. Apple decided one day that they thought that the tumblr app contained too much "sensitive content" and they banned tumblr's app from the Apple App Store, until such time as tumblr took what they believed sufficient corrective action for this "issue." Apple also believed that tumblr's app was hosting CP, which they considered a violation of their TOS.
So, in response to Apple banning them from the app store (which did not effect current users of the tumblr app, only potential new tumblr users), tumblr rolled out the adult content ban, so that they could get re-instated on the App Store. Like many other new "features" and "updates" to this site, the roll out was clunky, badly done and deeply unpopular. It was easily one of the worst changes for this site, in no small part because of how clunky it was; lots of innocuous posts were incorrectly flagged, and many bloggers found their entire blogs flagged, with little recourse in the initial wake of the ban. Critically, this event saw a great many users on tumblr leave this platform for twitter. How this affected site culture is up to debate.
Why am I telling you this? Well, as I am sure you, as an AO3 user are well aware, AO3 hosts a great deal of "adult content," of many persuasions and forms. They are explicitly against censorship of any kind. The app store is NOT against all censorship. These are two conflicting values. Since AO3 (and by extension OTW) has no interest in purging content from their site on behest of a megacorp (which btw is also why they rely on donations only and don't serve advertisements), they have no interest in developing an app, given the potential for restrictions.
Besides, AO3's website is simple, clean, and mobile responsive. Why fix something that ain't broke??
But, wait, if you're the target audience I'm hoping to reach with this post, you still want an app for AO3 on your home screen!
Never fear, my app loving youngsters! There is a way for you to create an "app" icon on your iPad or iPhone's home screen for AO3 (or any other site you like really) Apologies Android users; I don't have an Android, so I can't show you something analogous to this on Android, and don't know if they have it. Ditto on Kindle Fire.
This tutorial will use both safari and Firefox*. I won't show you Chrome (derogatory) because I don't have it and don't use it.
*Side note, switching to Firefox today is a great thing that you can do for yourself. You can easily import all of your Chrome bookmarks if that's what worries you.
In Firefox:
Step 1. Visit AO3 in the Firefox browser.

Step 2. Tap the hamburger menu in the right hand side of the top ribbon to reveal the browser and page settings and options menu, and locate the "Share" option (highlighted in blue below):

Step 3. In the "share" menu popup, locate and tap the "Add to Home Screen" option (highlighted in blue below):

Step 4. Give your new "app" (secretly just a bookmark) a title. You can leave it as the default, but I suggest shortening it so that the entirety of it shows on your home screen. You can name it whatever you want.

In Safari:
Step 1. Visit AO3 in the Safari browser.

Step 2. Tap the share icon in the right hand side of the top ribbon and scroll down until you find the "Add to Home Screen" option (highlighted in green below). Tap this option.

Step 3. In the "add to home screen" pop up, type whatever name you want in the name field (highlighted in green below). You can leave it as the default, but I suggest that you change it to something shorter so it displays in full with the icon on the home screen.

Either way, you should end up with an icon on your home screen that looks like this:

This is not an "app" BUT it is an icon on your home screen. When you tap the icon, it takes you to the home page of AO3, in whatever browser you created the bookmark in. You can move it around however you'd like, just like a real app, and put it any folder you'd like.
So that's all I have for this chat.
See you again next time I get inspired to write an ao3 chat/tutorial post for newbies!
Final note, If any of my followers have Android devices or Kindle Fire devices and want to add a photo tutorial for this on those platforms to this post, please feel free to, since I don't have any devices with either of those OSes, and thus could not do that myself.
#archive of our own#fanfiction#ao3#ao3 how to#iPad#ios#long post for ts#ao3 chats#ao3 for newbies#margaret babbles#mine
20 notes
·
View notes
Text
Hello my dears, New day, new horrendous Chrome UI update. 🎉🎉🎉
Fear not, even while they removed the flags from the settings which permitted to disable it in previous waves, and really want you to use their new UI, and really do act like a bully who just doesn't accept the word 'no'— there's still a way to disable it :)
thanks reddit user diegounion 🤍
Basically you right click the icon of the chrome wherever you usually use it, this guide will be for taskbar, under the cut other locations if you need :)
1.CLOSE ALL CHROME WINDOWS!! 2.Right click the chrome icon on the taskbar:
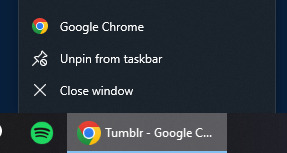
2.right click the chrome line again and click "properties"

3.inside the tab "shortcut" on the target/destination line, you must add the disabling of the new update in the following manner:

You will see this written: "C:\Program Files\Google\Chrome\Application\chrome.exe" you will need to add, with a space, this: --disable-features=CustomizeChromeSidePanel It'll end up like this: "C:\Program Files\Google\Chrome\Application\chrome.exe" --disable-features=CustomizeChromeSidePanel 4.Apply and it's fixed, cheers :)
copy pasted from reddit for the other chrome shortcut locations:
If you have Chrome pinned to the start menu, open Windows Explorer and navigate here: C:\ProgramData\Microsoft\Windows\Start Menu\Programs When you find the Chrome icon, repeat the six steps. If you have Chrome on your desktop, you do the same, repeat the six steps.
#I will not have my day ruined by this. Honestly what the hell. The community been actively and aggressively giving bad feedback#And finding ways to disable it from day one. SO THEY JUST REMOVED THE FLAGS TO DISABLE IT???#But good for us they're not very good at coding-- are they? if they leave a karkin backdoor in the code.... 🤦🏻♀️#Chrome#Chrome UI#chrome refresh 2023#ChromeRefresh2023#Chrome Update#Kark them :)#I hope it helped save someone's day because that UI is a crime against all that is holy. They all deserve to be fired.#When you get such bad feedback--- you change it or cancel it-- you don't force feed it down the throats of people. wow.#I hate this mentality so much. So damn aggressive.#Why change something that people are used to and have no issues with???? Instead of adding new helpful features they just want to make#it look like they're working and justify their ridiculous salaries for essentially doing nothing...#this is something I personally dislike. The whole 'i'll visually alter and move thing so my boss sees work being done' without actually#doing anything at all????
15 notes
·
View notes
Text
Heads up for anyone who struggles with websites not having dark mode
If you use chrome, you can visit chrome://flags to access the experimental features.
Search for 'dark mode' and an option will appear to enable it from the dropdown menu.
This turns pretty much any website to dark mode, regardless of whether they have one enabled!

It's still in development, but it's working pretty well from what I can see!
#technology#chrome#experimental features#chrome features#chrome flags#dark mode#accessibility#browser accessibility
5 notes
·
View notes
Text
You can add the "Sensors Off" tile to your drop-down menu to be one of the 6 main tiles too.
How To Add the "Sensors Off" Tile for Usage
1. Pull the menu all the way down, then tap the pencil icon in the top right corner.
2. You can choose to edit the top menu piece with the 6 icons or the full menu, choose the top menu option.
3. The "Sensors Off" tile is the last one on the list (on my phone at least), so scroll to page 3 & add it to your set of 6. You'll have to get rid of one of the 6 you currently have to add the "Sensors Off" tile.
This will help to keep your phone from sending everything to Google to use in their AI & tracking systems. Also, turn off all tracking permissions from your apps like the microphone & camera if possible & that includes your GPS location services. Yeah, they track your location & send your data to Facebook & other social sites so business ads for whatever you're around pop up in your social feeds. Mobile ordering apps may be nice, but you can usually use their main website to order from & you can deny the permission to use your location if the box pops up. Those food apps send your location to Google too, so why even have them? Use your phone's mobile browser in Desktop Mode & deny permission for your location to be used. Where you're at is NONE of their business! (Firefox browser has a ton of privacy add-ons & if you don't have it, download it & get rid of Chrome, Safari & the Samsung browsers if you can. If you can't delete them, then forcibly stop them. You can do that from the Settings menu.)
I really wouldn't be shocked if Google is having Gemini use your camera & microphone to train its AI system at all, so you might as well turn the sensors off while the phone is in use & turn the phone off when you're home, especially if you've got kids in the house. They really spy on your kids & throw ads at you to get not just your attention, but your child(ren)'s too. That's a big red flag for parents & they need to know that.
☆ Pictures? I won't be surprised if they scrape every picture in the phone & computer to train their AI on art either, which is likely.
☆ Using a digital wallet? They're tracking you by every purchase you make & where it's made at to throw ads at you. Turn them off & use your physical cards or cash instead.
Stay safe & be mindful of what your tech is doing. Shut down what you can to keep your privacy, especially at home.
Hey everyone, I know it's going to be a busy day for a lot of people, but Google enrolled everyone over 18 into their AI program automatically.
If you have a google account, first go to gemini.google.com/extensions and turn everything off.
Then you need to go to myactivity.google.com/product/gemini and turn off all Gemini activity tracking. You do have to do them in that order to make sure it works.
Honestly, I'm not sure how long this will last, but this should keep Gemini off your projects for a bit.
I saw this over on bluesky and figured it would be good to spread on here. It only takes a few minutes to do.
123K notes
·
View notes
Text
Google Chrome 128 update Fixes 38 Security Issues
Chrome 128 (version 128.0.6613.85) is available with security updates and the Latest bug fixes. Today's release also includes new features including Isolated Web Apps, standardized CSS zoom support, new Attribution Reporting API features, CSS ruby-align property functionality, line-breakable Ruby support, and more. The latest release also addresses 38 security vulnerabilities.
To get the latest Chrome update download on your device select Menu > Help > About Google Chrome or load chrome://settings/help directly to run a manual update check. Chrome downloads and installs the new version then automatically. A restart of the browser is required.
If you are looking for Chrome offline installer get it here.
What’s new Chrome 128 update?
The latest Chrome release brings, several new features and bug fixes to enhance the browsing experience.
The Chrome 128 release brings several key features and improvements aimed at enhancing both security and usability. A notable addition is Isolated Web Apps, which strengthen protection against tampering and web server compromises, though this feature is currently limited to enterprise-managed ChromeOS devices. This builds on previous work with Progressive Web Apps (PWAs) and Web Packaging, offering a more secure browsing experience.
Another significant update is the standardization of the CSS zoom property. Previously, this property was non-standard, leading to inconsistent behaviour across different browsers. Chrome 128 now fully supports it, making it easier for developers to control the scaling of elements on a webpage. This update is part of Chrome’s broader effort to align with modern web standards.
The release also introduces enhancements to the Attribution Reporting API, which aids in measuring online ad effectiveness while respecting user privacy. Additionally, support for the ruby-align property and line-breakable Ruby annotations improve the presentation of East Asian typography on the web, making it easier to create accessible and visually appealing content.
For developers, Chrome 128 adds features like Promise.try, which simplifies asynchronous operations in JavaScript, and WebAuthn hints, which enhance the user experience during authentication. Additionally, support for WebGPU HDR has been introduced under a developer trial flag, enabling richer graphics for web applications.
Security remains a priority, with Chrome 128 addressing several vulnerabilities by fixing seven high-priority Common Vulnerabilities and Exposures (CVEs). These updates highlight Chrome’s commitment to maintaining a secure browsing environment.
source: https://windows101tricks.com/google-chrome/
0 notes
Text
Disable or Enable Extensions on Specific Websites
We already know how to enable or disable Chrome extensions. Disabling an extension removes it from all websites. What if you want to keep the extension and enable or disable it only one a specific website or two? Let me show you how. Enable or Disable on Websites This feature is currently available behind a Chrome flag. Let’s first enable the flag. Extensions Menu Access Control – Enables a…
0 notes
Text
Turns out I am LAZY AS FUCK, so here’s the tutorial in a Tumblr post, rather than the crazy shit I was planning beforehand
Step 1:
Go into a dissociative fugue state, while listening to Squidward’s AI cover of Boulevard of Broken Dreams, and actively going insane
Step 2:
Find the “Custom Progress Bar for YouTube” extension on the chrome web store, and smash that Add button
Step 3:
Open it up through your extensions menu, and go to their website with the gear icon (hehe, gear). Click “MORE” in the top right, and find the Constructor tab on the left.
Now you can plop Brisket’s gif into the Scrubber Image, and align the size and correction sliders, so that she’s walking on top, and her yo-yo covers the end of the progress bar.
If you want to change the bar to the gradient I made, just click “color slider”, “gradient”, and fuck around with it until it looks good.
This is the gif I used, but I’m too incompetent to figure out how transparent backgrounds work. Just Google “Bridget walking gif”, and you’ll find the proper image.

The transgender flag’s official colors EXACTLY, are
#5BCEFA - Blue
#F5A9B8 - Pink
#FFFFFF - White
In the gradient editor, just input these codes in the HEX thingy, and it’ll work fine (white may need two stops so it isn’t overpowered by other colours)
USE THIS POWER RESPONSIBLY
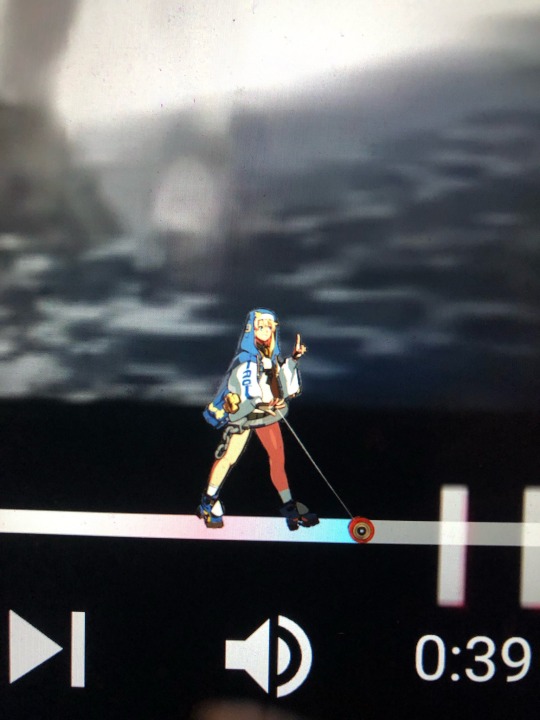
She has invaded my life, my home, and my YouTube progress bar
May god have mercy on my soul
#transgender#lgbtq#trans#guilty gear#bridget#bridget guilty gear#lgbt#ggst#guilty gear strive#guilty gear bridget
514 notes
·
View notes
Text
Chrome right click menu (context menu) just had a garbage update Here's how to get the older COMPACT menu back
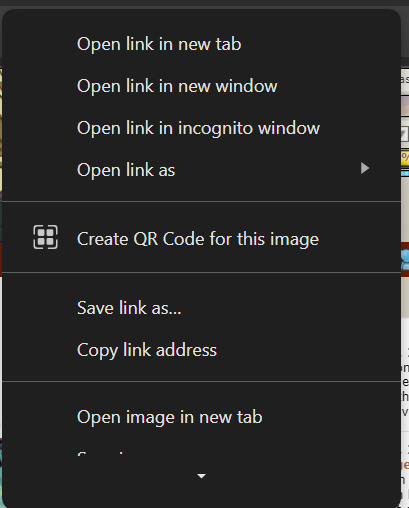

Head to this adress, disable the setting, and relaunch the browser chrome://flags/#chrome-webui-refresh-2023

#google right click menu#context menu#google update#right click#info post#I hate having to scroll to copy a heccin image#companies stop making bad UI updates challenge
1 note
·
View note
Text
Google Chrome officially removing the download bar for a new tray UI
For years, things you downloaded from Chrome would appear in a bar at the bottom. However, Google Chrome is currently updating the desktop browser’s user interface so that you now see a download tray.
Google Chrome claims to have discovered three problems with the old download bar after speaking with users:
“Occupied valuable pixels at the bottom of the screen, compressing the space for web content, and was constrained by screen width in the number of files it could show at once.”
No longer contemporary, interactive, and compatible
“Didn’t go away automatically and only offered fixed overflow menu actions like pause/resume and open in folder” It was no longer contemporary, interactive, and compatible with the overall browser environment or other UIs.
The first problem was unpleasant, especially on a laptop, so I would always swiftly close out the bar. As a result, Google Chrome is rolling out the download tray for desktop Chrome.
Google Chrome thinks the new position, which appears to the right of the address bar (Omnibox), “helps create a clearer separation of trusted browser UI from web content.” A small pop-up notification and an animated progress ring will be displayed, but you can turn these features off by going to Settings > Downloads and unchecking the box next to “Show downloads when they’re done.”
Tapping displays a list of “all your downloads from the past 24 hours in any browser window, not just the one in which you originally downloaded a file.” A download folder can be accessed using buttons, along with options to pause/resume, cancel, and try again.
What’s new in web UI
youtube
Another folder, program, or website
Downloaded files can still be moved by dragging them to “another folder, program, or website.” Chrome downloads and “Downloads” in the overflow menu are still present, along with “Show all downloads” at the bottom of the tray.
With the help of this new download tray, Chrome can offer more accurate malware and virus warnings as well as context. Google Chrome will, for instance, flag harmful downloads when they have been stopped.
For Mac, Windows, Linux, and ChromeOS, the new download tray for Chrome is currently being rolled out. Ensure that your browser is completely updated; it should become fully functional during the next few weeks.
On some websites, the Chrome Omnibox on iOS and Android will display “Related to this page” search options. Opening the address bar while on the New Tab Page will display trending searches, and Chrome now provides 10 (instead of six) suggestions as you type a search. Last but not least, when you highlight something, the Touch to Search box that displays at the bottom of your screen will now provide a “carousel of related searches.”
Curious to learn more? Explore our articles on Enterprise Wired
0 notes
Text
Come forzare Google Chrome a mostrare qualsiasi sito Web in modalità oscura

Chrome può essere facilmente attivato in modalità oscura, offrendoti un'esperienza molto più piacevole per gli occhi per le ricerche su Google a tarda notte. Inoltre, Chrome può persino forzare i siti Web con un tema chiaro a visualizzare i colori invertiti, offrendoti uno sfondo scuro e un testo di colore chiaro.
Se stai cercando di preservare la durata della batteria sul tuo cellulare o semplicemente ridurre il bagliore dal monitor del tuo desktop, ecco come abilitarlo.
Come abilitare la modalità oscura per Chrome su Windows Accedi al menu Impostazioni di Windows, fai clic su Personalizzazione, quindi su Colori e scorri verso il basso fino all'interruttore contrassegnato Scegli il tuo colore o, su Windows 11, Scegli la tua modalità La modifica in Scuro abilita la modalità oscura su tutte le app con supporto nativo, incluso Chrome Tuttavia, ciò influirà solo sull'interfaccia e sui menu del browser. Se desideri modificare l'aspetto dei contenuti Web, forzando in effetti le pagine Web chiare a mostrare uno sfondo scuro e testo bianco, procedi nel seguente modo
Come forzare la modalità oscura per i contenuti web di Chrome Inserisci il seguente indirizzo nella barra degli URL: chrome://flags/#enable-force-dark Verrà visualizzato un menu delle impostazioni di Chrome nascosto e l'opzione Force Dark Mode Vai al menu a discesa accanto a Force Dark Mode e seleziona Enabled In basso, premi il pulsante Riavvia per riavviare il browser Nota: nel passaggio 3 sopra, vedrai diverse opzioni nel menu a discesa; funzionano tutti in modo simile, semplicemente cambiando le combinazioni di colori. Puoi provarli tutti se vuoi. Si riduce alle tue preferenze personali.
Come forzare Chrome a mostrare tutti i siti Web in modalità oscura immagine 2 Pelucchi tascabili Come abilitare la modalità oscura per Chrome su macOS Apri le Preferenze di Sistema scegli Generale e poi Aspetto Fare clic sull'opzione Scuro. Analogamente a Windows, tutte le app con una modalità oscura nativa passeranno Come abilitare la modalità oscura per Chrome su Android La modalità oscura su Android è abilitata più o meno allo stesso modo dei contenuti Web sul desktop. È ancora una funzionalità sperimentale, quindi alcuni elementi di design potrebbero sembrare leggermente fuori posto.
Forza la modalità oscura Chrome Android Passa a chrome://flags nella barra degli indirizzi di Chrome Premi la casella Cerca flag e inserisci la parola "scuro". Qui ti verranno presentate due opzioni: Auto Dark Mode per i contenuti Web e la casella di controllo Darken website nelle impostazioni dei temi Se scegli l'opzione uno, puoi scegliere tra più opzioni di inversione, proprio come puoi fare con l'app desktop L'opzione due aggiungerà un'impostazione che puoi attivare e disattivare nel menu delle impostazioni Scegli quale metodo preferisci e quindi riavvia Chrome per vedere gli effetti
0 notes
Text
Ok here's what you do in this case.
Most networks will have the wifi password on the back of the router.
While on your main network, the one she turns off, you're going to go to your preferred web browser, and open an incognito tab.
The way you do this:
For Chrome in the very top right corner, there are 3 dots next to where your account is.

You're going to click the dots, and it will open a long menu. The 3rd or 4th option down says "New Incognito window". Press that button.
For Firefox it's in a similar place, only it's 3 lines stacked together.

Click those lines, and the 3rd or 4th option will say, "Open private window". Click that.
You are now going to make a Proton email. The site lets you create an email without 2FA (2 factor authentication) meaning you do not need to verify your identity with a backup email, phone number, etc. so that if this following method is discovered, there are fewer traces to find how you did it. Make sure you have a secure place to record your Proton email and password because if the password is lost then you lose the email!!
THE SITE HAS FREE OPTIONS!! KEEP SELECTING THE PROMPTS FOR THE FREE EMAIL!!! DO NOT PAY!!!
Proton email will ask you if you'd like to add a backup/recovery method. SELECT "MAYBE LATER"!!

It will ask you to confirm your choice to not have a backup. Select "confirm"!!
It will ask again if you would like to attach a Gmail account or otherwise. Select "skip".
Now you have your private and secure email, no strings attached. You're ready for part 2!
From here, still in the incognito tab, you're going to visit Proton VPN and install the VPN for your type of computer (Windows, Mac, Linux). DO NOT RUN IT YET!!
CREATE THE FREE PROTON VPN ACCOUNT!! AGAIN, DO NOT PAY FOR IT!! THEY HAVE THE OPTIONS TO DENY PAYMENT AND USE THEIR PROGRAM FOR FREE!!
Once the FREE account is made, it's onto the next step.
Now for the hardest part. Disregard if you know the wifi router name and password, and skip the next 2 paragraphs. If not, deep breaths. It's going to be intimidating, but you've got this.
WAIT UNTIL YOUR MOTHER IS ASLEEP OR GONE FOR A REASONABLE AMOUNT OF TIME!!! Essentially, learn her sleep and exit patterns to know if she will wake after an hour, two hours, three, etc. And if she does, then does she leave her bedroom? If she leaves the house, does she return within any amount of time?
You're going to pattern your timing here, and make sure you know where the router she uses and you do not, is located. Bring something to record the wifi network name and password. Whether this is a phone camera, a scrap of paper and a pen/pencil, make sure you can collect that name and password quickly.
Get the info ASAP and go back to your computer. Now, you're going to disconnect from the network your mother turns off.
The way you do this on Windows 10 is you go to your wifi settings.
When you select this, at the top, it will list the network you're currently connected to. You're going to know your computer is connected when it says, "You're connected to the Internet."

On the leftmost side, in the options, select, "Wi-Fi".

Now you'll see at the top of this page, there is the small blue toggle that says, "On."
Select this toggle so it turns gray.
Run Proton VPN now.
Tell it to connect to a network from any available in the list by clicking "Quick Connect".
It will not be able to connect yet because you're disconnected from any network, but let it keep trying to connect regardless.
From here, you're going to go back to your computer's internet settings, and look for the network your mother uses.
To do this, go to your Windows wifi settings again, and under the Wi-Fi tab, just beneath the toggle you selected before to make it gray, you're going to select the toggle again so it turns blue. This turns the wifi back on, and the VPN will connect. YOU WILL KNOW THE VPN IS CONNECTED WHEN IT SHOWS A FLAG FOR ANOTHER COUNTRY AND THE OPTION "DISCONNECT"!!
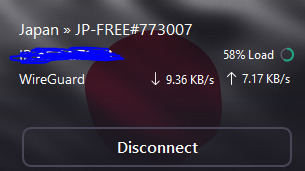
Now, back to the Windows wifi settings yet again. You'll notice just beneath this toggle, there's the option "Show available networks".

This will open in the bottom right of your screen, the list of available wifi networks. Search for the one your mother uses, the one with the same router name that you wrote down. Click on it, enter the password you collected.
Now you're connected to her network, and it's nearly impossible to kick you off unless she shuts the router down as a whole!
Should the router go down, Proton VPN will say so. If your IP gets blocked, or it changes, Proton VPN will say so.
Now! Go ahead and do everything in the above original post I made SPECIFICALLY FOR THIS ROUTER, THE ONE YOUR MOTHER USES AND WHICH YOU JUST CONNECTED TO, and you'll be able to protect your IP even more!
Make sure to hide your Proton email and VPN account information in a secure place, and be safe on the internet!!
And, if you want to hide Proton VPN as a whole on your computer, let me know. I can show you how to change the icon so it's less suspicious!
An important life tip for parents who block your wifi on PC/laptop (Windows 10)
I found a workaround that's suiting me so far. How it works is, wifi is blocked through the router by detecting your computer's IP address, and blocking said address. Now, it seems complicated because there are tons of methods to use for changing your IP. But so you don't have to go through the same steps every time, do this:
Make sure you're connected to a wifi network that you're blocked on. You can check by going to the Windows search bar, type "settings", hit enter, and select "Network & Internet".

It will show you the network you're currently connected to. If it says "connected, no internet" or something along those lines, you're good for the next step.
Next, go to the tab on the left labeled "WiFi". There, you will see a setting labeled "Random hardware address", and a slider beneath it that is most likely greyed out. Select it, making sure it turns blue.

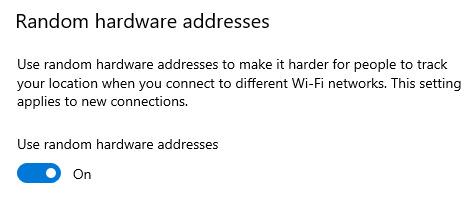
Then, you're going to hit the tab on the left labeled "Status". From there, just beneath where it says you're connected to a router without internet, click the grey button labeled "properties".
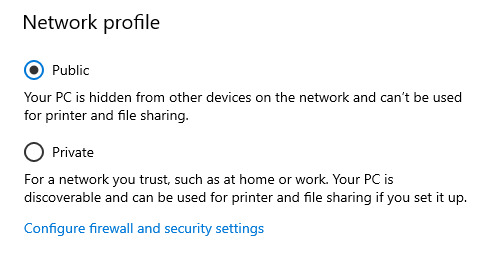
Where it says "Network profile", click the "Public" setting, so that other devices in the house cannot discover your computer or connect to it, and therefore reach its files and settings.
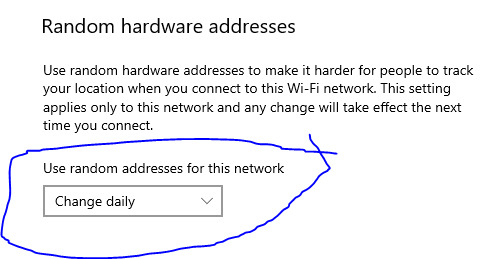
And lastly, scroll down to the section labeled "Random hardware address". There is a drop down menu. Open the menu, and select "Change daily". This will change your IP address on a daily basis, meaning your computer will be unblocked until the IP is discovered, but once the next day arrives, it will change again and unblock it.
Hope this helps y'all as it helped me. Do not let fucking shit block you from the most essential resource in the modern world. Internet connects you to every necessary thing in existence. It's a basic necessity at this point, by ethical standards. Regain access to it however you can, wherever you can, whenever you can.
461 notes
·
View notes
Text
Google not too long ago made a change to Chrome for Android that now exhibits steadily visited websites in addition to your previous searches on the browser's New Tab web page.Whereas the function has apparently been in testing for the previous few months, it is now being rolled out to all prime Android telephones, a lot to the chagrin of many Android customers — myself included.While you open the New Tab web page in Chrome for Android, you will often see a Google search bar beneath it with a listing of your most steadily visited websites. This may be actually helpful as a result of whenever you open a brand new tab all of the websites you utilize usually are there which implies you do not have to go to your bookmarks.Nonetheless, with the rollout of this new function, along with the location favicon, the magnifying glass icons with the textual content of earlier searches you have looked for will now additionally seem on this record. Whereas this can be helpful for some, I've observed that my previous search queries from days and even weeks in the past seem on Chrome's new tab web page on my Android smartphone. Though I considered ditching Chrome altogether and utilizing one other greatest Android browser as a substitute, there's a workaround which you could apply proper now. For those who're as bored by this modification as I'm, it is positively price doing and solely takes a couple of minutes.Tips on how to flip off search leads to a brand new Chrome tab(Picture credit score: Future)When Google makes a change to Chrome that you do not like or has a brand new function within the works that you simply wish to attempt, Chrome flag can assist you disable or allow them.As found by 9To5Google (opens in new tab), this annoying function is referred to on the Chrome Flags web page as "Natural Repeatable Queries on Most Seen Tiles". After we disable this function in Chrome for Android, you'll be able to see the varied 'exams' at present out there from Google's Chrome staff by going to chrome://flags in your browser on cell or desktop.(Picture credit score: Google/Toms Information)To go on to this function in Chrome Flags, sort "chrome:flags/#organic-repeatable-queries" into your browser's handle bar. By default, it is going to be enabled. Nonetheless, simply Faucet Activate and a drop down menu will seem. Go all the best way down and Faucet on Disabled to shut itSadly for the time being, there isn't any method to customise the brand new tab web page in Chrome from inside the browser however this workaround will take away previous search queries whenever you open a brand new tab or faucet on the handle bar in Chrome for Android. It is also price noting which you could long-tap steadily visited websites that seem on the brand new tab web page to take away them fully.Extra from Tom's InformationRight this moment's greatest Google Pixel 7 offers (opens in new tab)There isn't any contractLimitless minutesLimitlessthe textual content4 GBDataname: Contains calls to MX and CATextual content: MX and CA embrace messagingData: (gradual to 128kbps) (opens in new tab)There isn't any contractLimitless minutesLimitlessthe textual content4 GBDataname: Contains calls to MX and CATextual content: MX and CA embrace messagingData: (gradual to 128kbps)free of charge (opens in new tab) in entrance (opens in new tab)There isn't any contractLimitless minutesLimitlessthe textual content10GBDataname: US, CA, MEX and extra + limitless world textsData: Limitless 2G after utilizing up your 4G LTE/5G information steadiness (opens in new tab)There isn't any contractLimitless minutesLimitlessthe textual content10GBDataname: US, CA, MEX and extra + limitless world textsData: Limitless 2G after utilizing up your 4G LTE/5G information steadiness$598 (opens in new tab) in entrance (opens in new tab)There isn't any contractLimitless minutesLimitlessthe textual content10GBDataname: Contains calls to MX and CATextual content:
MX and CA embrace messagingData: (gradual to 128kbps) (opens in new tab)There isn't any contractLimitless minutesLimitlessthe textual content10GBDataname: Contains calls to MX and CATextual content: MX and CA embrace messagingData: (gradual to 128kbps)free of charge (opens in new tab) in entrance (opens in new tab)There isn't any contractLimitless minutesLimitlessthe textual content15GBDataname: Contains calls to MX and CATextual content: MX and CA embrace messagingData: (gradual to 128kbps) (opens in new tab)There isn't any contractLimitless minutesLimitlessthe textual content15GBDataname: Contains calls to MX and CATextual content: MX and CA embrace messagingData: (gradual to 128kbps)free of charge (opens in new tab) in entrance (opens in new tab)There isn't any contractLimitless minutesLimitlessthe textual contentLimitlessDataname: Contains calls to MX and CATextual content: MX and CA embrace messagingData: (gradual to 128 kbps) (opens in new tab)There isn't any contractLimitless minutesLimitlessthe textual contentLimitlessDataname: Contains calls to MX and CATextual content: MX and CA embrace messagingData: (gradual to 128 kbps)free of charge (opens in new tab) in entrance
0 notes
Text
I feel like I have made an opera GX post before but I’m going to make ANOTHER Opera GX post because I really. I really need to turn you all
Some of you may not even know what opera IS in this context so anyway
So there’s a web browser called opera which used to be more popular than it is but STILL used to have a way bigger market share than it does now. It’s basically a forgotten thing and if you mention opera to someone they’re likely to say wait, that still exists?
But Opera launched a spinoff. A “gaming” browser. Which sounds silly, I admit, but this thing. This thing is a gift from the heavens. A blessing from god above. I did not think I could be evangelical about a browser. So let me tell you of opera GX. Opera GX has:
- Native dark mode with the ability to force dark pages
- Bookmark sync, password saving, and all the other stuff you love and need from Chrome
- The ability to install all of your chrome extensions
- fancy power limiters that allows you to control how much processing power and ram it’s allowed (no more of those jokes about chrome consuming all the ram on your device)
- deeply satisfying (but disable-able, if you desire) types typey noises it plays when you type anywhere in the browser and honestly a ton of just. Lovely little sounds
- workspaces that allow you to have essentially two different windows open at once but within the same instance and you can go back and forth between them
- a dev option (accessible under opera://flags/ in your address bar) to enable entire new PROFILES for the whole browser that act like entirely separate installations of the browser with their own sync, settings etc, so you can like…make a profile with no distractions. Or maximum distractions.
more importantly, Opera GX seems to be on a mission to simply incorporate EVERY WEBSITE and EVERY TOOL you’ve ever needed into the BROWSER ITSELF (I’m gonna use some of their promo pics because I shut down my desktop and I’m too lazy to take my own). OPERA GX HAS, BUILT IN:
- Pinboards! That you can share with others! Fuck Pinterest this is my baby now
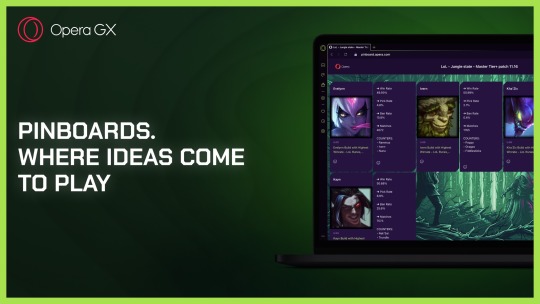
- “Flow” which allows you to link a phone with a QR code and send links to yourself
- a FULL SCREENSHOT TOOL that will capture either full window or region screenshots and immediately gives you options to copy or save and mark up, as well as censor/blur any info beforehand
- and most importantly, this nifty thing called the “sidebar” that holds a shit ton of useful widgets and allows you to pop them over your main window briefly and close them again when you click off of them. And my beloveds. Everything you have ever wanted. Is accessible from the sidebar.
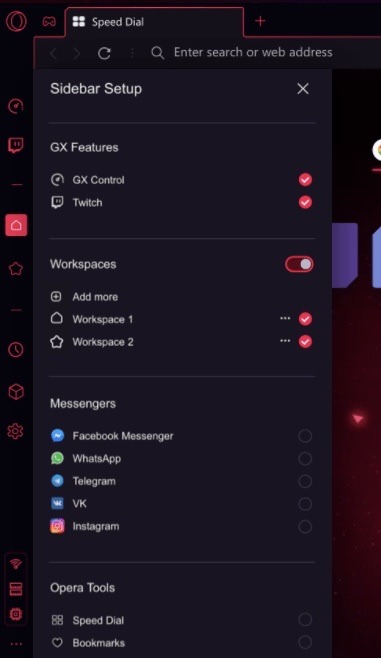
(This screenshot is out of date, there’s way more stuff now)
- you want discord? It’s in the sidebar. You want messenger? It’s in the sidebar? Whatsapp? VK? Telegram? In the sidebar
- they just added MUSIC PLAYERS to the sidebar. YouTube music, deezer, apple music, Spotify, and SoundCloud can all be accessed from their own special tab in the sidebar
- If you go down into the super secret hidden dev menu (which you can get to by typing opera://flags/ into your address bar) you can enable CUSTOM SITES in the sidebar. You want tumblr in the sidebar? Full YouTube? Mega? Crunchy roll? You want it you can have it
basically that suite of default tabs you run in the background all of the time while you function during the day? Spotify, YouTube, tumblr, google docs, whatever? It’s all just PART OF YOUR BROWSER here. Wanna get work done and dip in and out of a discord chat? You can do that.
anyway I know it’s funny to be evangelical about a browser but this thing changed my life and I. I want to spread the good word. Come to the opera GX side we have fun noises and integrated native discord.
57 notes
·
View notes
Text
mafia rewrite - The Nightwing
Richard Grayson walks out of the thick, steel, mirrored elevator doors straight past the shining, gleaming, modern, glass and chrome waiting area and straight into the heart of the cool, elegant Iceberg Lounge.
The Iceberg Lounge has been host to ambassadors, vandals, thieves, presidents, models, princes, billionaires, genius savants, call girls, bus boys, and every single person in between. The Iceberg Lounge has seen catastrophe, it’s seen ruin, it’s seen blood and murder, it’s seen parties that, from street level made the glass walled lounge look like a shining beacon of pure white. The Iceberg Lounge has had many names, many renovations, many changes of management, and withstood them all with a timeless grace.
The Iceberg Lounge, currently, plays host to a — compared to its normal volume — small and subdued crowd. Murmurs of death, blood, change, and escape carry over martini glasses, underneath swirling kinetic aluminum and steel light fixtures, slithering and insidious into the ears of every single moving body present. All of them, in their gossip, complicit.
Richard Grayson cuts the crowd and cuts a terrific — in the oldest sense of the word — figure. His suit is the black of Gotham, the black of its royal Wayne blood. The black of omens and death and the distant winter sky come to bear down on the trailing ends of summer as it runs in the opposite direction.
He’s always been known as the least violent Wayne. But least violent does not mean non-violent. Not when the comparisons are the rest of the Waynes.
A nurse shark is still a shark, even if you compare it to a megaladon. A butterfly knife is still a blade even, when compared to a zweihandler. Carbon monoxide is still a poison, even when compared to cyanide.
A bullet is a bullet no matter what kind of name you give it.
This one’s name is the Nightwing.
Even as a boy, he flittered and floated and glided through crowds like this. A strange figure in the gowns and tuxedos of Gotham’s socialites, and university night club crawlers, and the booming and bustling pub crawlers down narrow sidewalks with sports bars and dives.
A man made to fly through the night.
Richard Grayson glides into the Iceberg Lounge. Orca, seal, predator. And through schools of silver and gold glimmering fish that part as though they had suddenly turned hydrophobic he is untouched. Unmoved.
He keeps walking.
He walks up the spiral staircase to the VIP lounges. He walks towards the edge of the platform that overlooks the rest of the lounge. He walks up to a table set for one and he sits across the other occupant.
As he sits a chair materializes for him before he could fall. As though the universe and gravity had joined hands and conspired. As if the world could not conceive of a place where Richard Grayson does not get a seat at the table. As if this dimension could not fathom the golden son of Gotham being disappointed.
Or, more realistically, as though a panicked attendant realized that blood could be spilled tonight if even one thing fell out of place and quickly kicked a chair into motion, into another attendant’s body and that other attendant, carrying the same fear as the first, hustled to have the chair in position and ready to slide it in as Richard Grayson’s body entered its sure and unbothered controlled fall.
Richard Grayson unbuttons his suit jacket as he sits in this seat provided by fear, long legs crossing as he looks around the lounge. And then he does a slow, quiet, dangerous scan of the person in front of him.
He gestures around them with a lazy twist of his wrist.
“Ten million.” His beatific smile spreads like a plume of blood in water. He waits. The best predators know how to do this.
Eric Shin closes his eyes and breathes what could possibly be one of his last breaths and opens them again. Richard Grayson is waiting for his response.
“What?” He croaks out instead.
“That’s how much it cost to buy you,” Richard Grayson says. “Ten million. For someone from your circuit of the market? Entry to the VIP are of the Iceberg is at least five million per quarter. Minimum. Trust me. I know how much it costs to get into these kind of places. And you haven’t earned VIP seating. The Lucky Hand is lucky to barely be alive right now. Remind me, by who’s grace?”
“Yours,” Eric whispers against his will. The word slides out like bubbles from a drowning man.
“Exactly right. And when was that?”
Eric closes his eyes, and prays for a swifter death than this one of small cuts. “Seven years ago.” He swallows, throat dry, eyes stinging. “When the Dubelz ran across the Whispers on their hunt for the man who killed their leader and the violence spilled over onto into a war along the entire Port Adams and started getting the Lucky Hand’s shipments sunk in harbor as collateral.”
“Right, right. Excellent memory, Eric. Excellent memory. So. Where was I? Ah. Five million per quarter, which the Hand hasn’t been pulling in for you of all people to be getting into the VIP Iceberg Lounge. So it’s not coming from that business. The car is new. Imported, based on the interior and the relatively new plates. That’s about seven hundred just to bring over. And I know that thing isn’t going to be meeting US standards of emissions so that’s — let’s lowball it, say two grand? Three grand? To get enough people to rubber stamp those forms. Now, I’m not too hot on the numbers. So let’s make this easy. I’m going to place your car, fees and bribes and all, somewhere in the range of three hundred grand.”
Grayson taps his middle and index finger on the white cloth covered table as he watches Eric with bright, terrible eyes.
“And if I’m right that’s about — well. Still a lot more than you’d be worth normally. But you’re being paid for silence. And you’re being paid for dying.” Richard Grayson’s mouth twitches up at the corners. “You sold your life for ten, Eric. So far you’ve got VIP entrance to the lounge — which, mind you, isn’t going to last and isn’t refundable. The Penguin’s got a nose for business and he knows that you having entry to his lounge is just going to be earning him a whole lot of grief —, you’ve got a nice imported car that ignores US regulations, and let’s see. Let’s have a look at you. That’s tailored. You’re not buying that off the rack and that takes out everything under five hundred. At a glance I’d say that’s eight thousand. And the watch? A Submariner? Can’t get that in store unless you’ve got a name like mine. You’re looking black market and if you’re smart you’re paying extra for paperwork and someone to scrub it. Base price alone for the green dial is twenty grand. You’ve been burning through that blood money.”
“What do you want?” Eric asks.
Grayson leans forward, leopard seal and killer whale, and descending fury.
“You’re a smart man. The Waynes interfered to spare the Hand because you made a very good case for why we should. And for the past seven years we’ve been good neighbors. We’ve never had a problem with you. Until today. One hell of a problem to choose to be, Eric. I want you to tell me who paid you ten million dollars to give up your life and keep your silence. Because we traced the guns used at the shootout. And those guns and those cars came through Port Adams. And we traced records of those cars and plates and found them cruising up the Old Highway. And if they’re going up Old Highway and if they’re being supplied through Port Adams there’s no way in hell that the Lucky Hand didn’t see that coming.”
Grayson’s blue eyes burn with awful fire.
The Nightwing circles. The Nightwing descends.
“And you didn’t say anything. Someone paid you off. And how damn cheap of a pay off it was. Ten million? If I were in your position and being asked to keep my silence about any kind of whisper of a hallucination about Tim Drake being hunted like a dog through the streets of Gotham in broad daylight I would be asking for the keys to the diamond vaults. I’d be asking for the moon and the stars. Ten million.” The man leans back in his seat, face incredulous as he takes Eric in. “That’s all you were worth. I mean. Sure. I wouldn’t have paid you ten million to tell me this information before hand if I knew about it. But you’d still be alive, you know?”
Grayson flags a waiter over.
“You must have realized,” Grayson says as he peruses the liquor menu, “That regardless of whether Tim lived or died, someone would have found you.”
Eric doesn’t cry. He signed his death certificate weeks ago when he watched those first ships start to unload their guns into the storage facilities next to his own; when he took the money; when he failed to call any of the Waynes to say something, anything, over the past days when the plot came to its finalization.
“He’s alive, by the way. In case you were wondering.” Grayson raises his voice a little so it projects over the dead silence of the lounge. “My brother’s faced worse before. He’s alive. And you know that egghead remembers every single face that was present. License plates, too. Kid’s messed up, his priorities are all wrong. If it were me I’d be focused on wondering something more simple, you know? Like who I last talked to and if I said anything cool. Well. That’s why he’s head of W.E. and not me. I don’t have a head for business.”
He taps something on the liquor menu, handing it back to the waiter.
“Out of consideration for the past years of you being a good neighbor, I’ll let you have one last drink,” Grayson says. “My treat, seeing as how the Penguin is revoking all your access. Don’t worry. You’re not dead yet. I’ll be needing you later. You haven’t given me any names yet. And I promised Cobblepot I wouldn’t make a mess of his lounge. He just got this floor redone, you know? I missed the grand re-opening.”
Grayson looks around, smiling and nodding his divine approval.
“Personally, I think it’s a little too minimalist modern, but compared to before I like it. It’s quiet. Easy on the eye. Excellent balance and color coordination, though. Spot on. I’d ask Cobblepot who his designer was except I don’t have anything I want to tear down and rebuild. I’m more in the mood for the tearing down, frankly. Now, if you’ll excuse me. I’ve got a list of people to get to before someone else does.”
Grayson pauses. “And by someone else I mean another Wayne. The rest of the people in this family have no respect. Between Jason and Cassandra there isn’t enough to around, you know? They ruin everything they get their hands on. Usually so no one else can use it. Mostly so that I don’t get to use it, really. So I’m in something of a race against the clock to get everything I want done tonight. Lucky you, you were near the top of the list. Alright. I’ll leave you to that final drink. And when you’re done with that drink you’re going to get into the car I’ll have the Penguin pull around for you. Before I leave is there anything you want to say?”
Eric swallows roughly, slowly moving his eyes to met Grayson’s. A dead man has nothing to fear of asking a last second boon from his executioner.
“In punishing me will you spare the Hand?”
Grayson looks momentarily surprised.
Eric gestures around them. “They bought me. Not the Hand. My silence. My trespass. My wrong. Not a single cent of the money has gone to the Lucky Hand. You can check the accounts. It’s all with me, still. Tell me now. Give me this one certainty. Will you spare the Hand, or have I doomed us all?”
Grayson considers him. And then he leans forward, all blue eyes and terrific face.
“Tell me,” He says softly, “Tell me why you accepted the pay off.”
“Because no matter who won to rule Gotham — the Waynes or the plotting syndicates — it wouldn’t matter for us,” Eric confesses. “The syndicates have a backer. And under this backer the Hand would never have made it. Stay silent and earn the Wayne’s wrath is to perish. To speak to you of this plot and be turned on by the plotters who surround the Hand’s territory on all sides is immediate suicide. If the plotters won this battle but lost the war we would perish. If I was silent and you lost the plotters would still remove the Hand from the playing field for whatever excuse they could find. In every situation the Lucky Hand would have to fold.”
Grayson closes his eyes, bringing up a hand to press at his temples. It obscures his face for one moment of relief on Eric’s part.
“I will not act on the Lucky Hand for this,” he finally says, drawing up, buttoning his suit jacket once more. “That’s my personal statement on the matter. But as you can guess, the Wayne family’s many arms are rarely in agreement. Pull a repeat of seven years ago. Convince us. For what it’s worth — I think you have a shot at it.”
13 notes
·
View notes
Text
Chrome Can Soon Organize Your Tabs (Automatically)
Google Chrome is adding a way to automatically group your tabs. This new feature will be available in the recently added tab search menu. Organize Tabs Google added a bunch of tab orgnization-related flags this morning to the Chromium Gerrit. Tab Organization – Enables the Auto Tab Groups feature, which can be found within the Tab Search bubble. Tab Organization Settings Visibility – Enables…
0 notes