#charactermovement
Explore tagged Tumblr posts
Visit Tumblr Blog
Explore Tumblr blogs with no restrictions, modern design and the best experience.
Last Seen Tumblr Blogs


Fun Fact
In Q3 of 2020, 31% of US users access the Tumblr app daily.
Text
Unreal Engine: sliding
This feature turned out to be a lot more complicated than I thought. For reference, my player is using the default Character blueprint, so there's things that are hard for me to change. For example- I can't change the rotation of the default CapsuleComponent, which would have been my first approach.
Because of this, I had an idea of giving my player 2 collision capsules, like this:
I would then toggle the collision of these capsules based on what state the player was in. This was great in theory, but when I disabled the collision of the default CapsuleCollision, the player stopped:
youtube
I looked on the internet for anything related to this issue, but I couldn't find anything except people saying how the default CapsuleComponent really didn't like to be edited.
After a lot of brainstorming I landed on my working approach, setting the half height of the capsule. This made it look like this:
Obviously this doesn't look right at all, but gravity in the CharacterMovement will pull the player down and make them "slide" along the floor. I would love to increase the radius of this capusle so it actually covered the player properly, but:
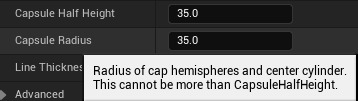
So no luck there. Suddenly increasing the width of the player's hitbox might make for some seeming unfair deaths where you don't gauge the distance correctly, so this isn't something crucial to fix.
Now that I could get into a sliding hitbox, I wrote the code to allow the player to slide:
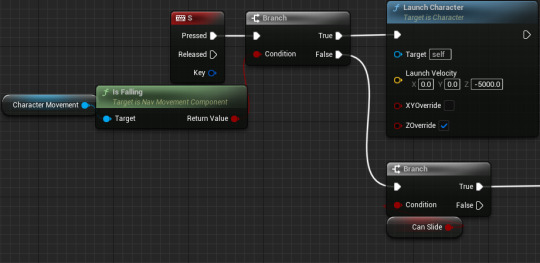
I like having it on the same key as the downward dash like in Subway Surfers, as it reduces the total amount of keys the player needs to learn and because both of these moves "go down" in a way, so it makes sense. The CanSlide variable is also there for when I lock it behind my rougelike mechanics.

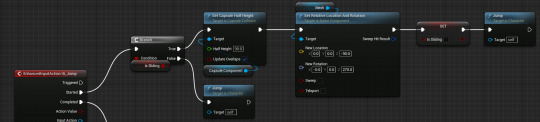
This is what puts my testing into actual runtime changes. It's a lot of nodes but not too bad- it just sets the capsule height and player rotation to what I tested in the viewport.
Then there's obviously the question of "what happens if the player slides then jumps?" The only realistic answer to this I could think of was to cancel the slide state and then start a normal jump. This was the blueprint change I had to make:
And this is the result of it all:
youtube
Obviously, there's no specific animation for this, but that isn't something I want to focus on for this project. I'm happy with the visuals as they are now- it's clear enough that your collision has changed and you are sliding.
There's also a bug where the player is stuck in the floor. My biggest problem with fixing this is that it seems to be random so replicating it to work on a fix is really difficult.
Aside from that issue, I'm really happy with my process of overcoming the problem I faced while implementing this feature and the final result.
0 notes
Text
Unreal Engine: making my player character
The criteria I had for my player character was:
Be a ship
Have fluid 8-directional X/Z movement
Have an accurate hitbox
After some experimentation with the default BP_ThirdPersonCharacter Unreal engine gives you, I decided that using it wouldn't be effective as it had very limited flying controls in it's CharacterMovement component:
The movement also wasn't very fluid- it felt like the player was on ice and I could only change the player's deceleration to try and fix it.
If that wasn't bad enough, when I tried to add the Player's ship to the character, it went completely invisible and I couldn't revert it- this also meant I couldn't get any videos of me using the default character.
Because of these reasons, I decided to make a new pawn actor that would be the player. This allowed me to use the FloatingPawnMovement component which has much more customizability:
Something I did keep from the original character was the movement code:
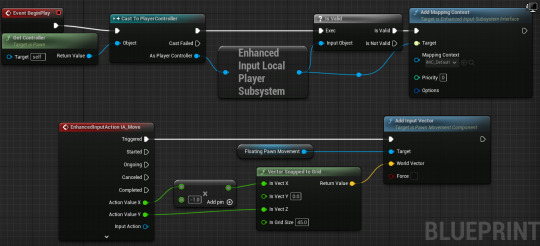
This was much simpler than making a whole new movement system. It also allowed me to keep the 8-directional movement I had made before.
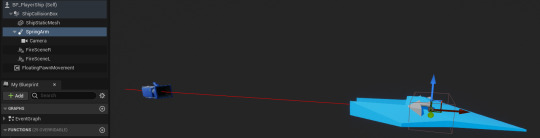
The only thing left to do was adding the static mesh and camera into the viewport. When adding a camera it's also good practice to add a SpringArm to it for more adjustability:
The only problem I have with this new character is the hitbox. Due to the shape of the ship, it's hard to find perfect collision. It's also important to have the hitbox be in favor of the player to reduce the amount of unfair hits they take.
This was the final hitbox I decided on:
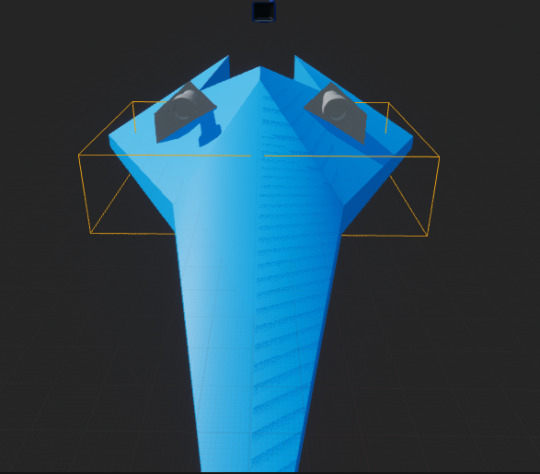
It's not perfect, but it's the best I could do with the box collision.
This is the final result:
youtube
I am personally very happy with this result, but I will have other people playtest the movement to make sure it feels right/intuitive for the player.
1 note
·
View note
Photo

Trying new things with my illustrations during our implementation week at @storyteller_academy …working in gray scale and shape style. I’m having fun with it and seeing what I come up with. The 2nd pic is an assignment to draw people standing in line. I also started #sentencedtodeath by @lorna.barrett last night. I was in need of a #cozymystery so back to #booktown I go. #bookstagram #characterdesign #bookgeek #drawing #bookworm #draw #booknerd #artistsloftmarkers #bookish #tryingnewthings #bibliophile #childrenbooksillustrator #charactermovement #shapestyle #grayscalecoloring https://www.instagram.com/p/CUbsSJzr8q4/?utm_medium=tumblr
#sentencedtodeath#cozymystery#booktown#bookstagram#characterdesign#bookgeek#drawing#bookworm#draw#booknerd#artistsloftmarkers#bookish#tryingnewthings#bibliophile#childrenbooksillustrator#charactermovement#shapestyle#grayscalecoloring
0 notes
Text
Cambiar velocidad de personaje
Este es el blueprint

Pasos:
Abrimos blueprint de personaje

Viewport -> characterMovement

En la barra de al lado podemos ver el Max Walk Speed, es el que nos da la velocidad del personaje

TPC -> Event Graph

Seleccionamos el de Q

Hacemos dos variables, velocidad y aceleracion, para poder hacer ambas parametrizables
Son del tipo Float, se les activa el ojo

Arrastramos el Charcater Movement (inherited) para poder acceder al Max Walk Speed

Buscamos SET Max Walk Speed, lo unimos con la variable que ya teniamos para que la variable sea la que le de el valor
Lo unimos tambièn con la Q para que se active ese SET al presionar la tecla

Para que cambie la velocidad despuès de un tiempo
Colocamos un Delay y lo conetamos al primer set

Conectamos el segundo SET, que sacaremos tambien de character movement, para regresarlo a la velocidad inicial o cambiarla
0 notes
Text
Trying a different way to have a topdown 2d game in unreal
Video Used: https://youtu.be/nmHtwWbpuk4?list=PLLRtRBZUfrogFSzSq6gyjL8cmsqxN3hfv
From using the top down character preset for my first attempt at getting a top down 2d game to work i found that it had some issues when the 2d character was moving around leaving it to spin around to change direction instead of having a realistic movement. So now im trying to make a 2d piece of movement with code from a blank piece with no prier code in the game to see if it made a difference.
To start doing this you need to open unreal and create a blank project From there you will want to create a new level so that the level is completely empty and with that you will want to drop in a tile map and drag it onto the level to use it as the floor.


From here you are now going to create a spawner where you the character is going to spawn into when played. So to do that in content browser create a blueprint name it spawner and then open it up.


Once you have opened up the blueprint you want to head to the event graph and create a variable called target character and change its variable type to paper character (As a class) And make sure the character is visible so we can change which character is spawned later.


with this you now want to use it in this bit of code so that when the game starts it will spawn a target character (After this you will quickly need to check the game mode settings in the world setting and change the game mode override to none. this is so a default pawn wont spawn in the place of our character). And with all that done just drag the spawner on top of the tile map world we have already.


Now with are spawner done we need something to actually spawn out of it so next we will be creating our character and its code.
To start you need to right click on content browser create a blueprint class and then in all classes search for a paper character and select it. Right after that go to the spawners detail panel and make it so that it spawns the character you just created.


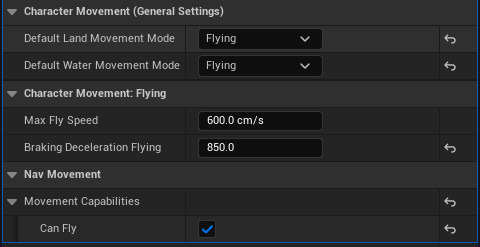
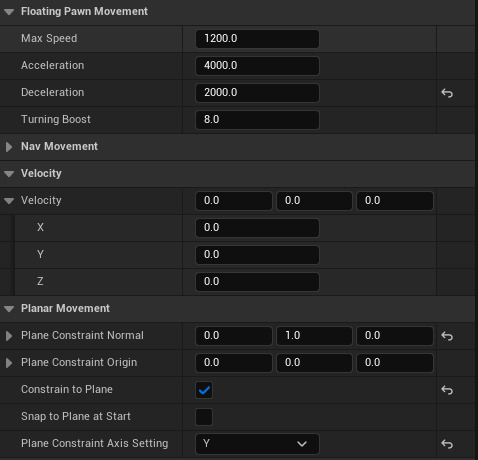
Now with that done that we need to open the character and go to the charactermovement’s detail panel and change some stuff. First we will need to go to the character general movement and change the gravity scale to 0 while also switching the default land movement to flying so that the character can go every direction on the map without having to abid by the laws of gravity. we also do this as flying movment has much easier movement controls compared to normal

Next we will go to character movement: Flying and change the setting to what the screenshot is so that the character can move at a steady speed while also stopping and slowing down faster than it starts.

Finally we go planar movement and enable constrain to plane and then change the panel constraint axis setting to Y this is so when the character spawn he will not fall down the map but stick to it as it moves round.

Now that we have the settings sorted we now need to go out of our character and go to the project settings. in there we will go to input and add these nex axis mapping so that our character can move left, right, up and down.


With our axis set up we move back into our papercharacter and go to its event graph. Inside of the event graph we set up this code so that our character will now have movement in all directions.

we now want to create a new function called setmyflipbook but before we do anything with this function we need to create some flipbooks to use. below are the flipbooks I used (they were of the main character of undertale frisk)


Once you have all your flipbooks set you can return to you papercharacter blueprint and click on sprite in the components panel in the details panel of this you can find source flipbook where you can set the sprite to a idle flipbook so when the game starts that will be the default flipbook playing.


You next want to put a camera in so that we can actually see and follow the character as it moves around the level (turn camera to orthographic for 2d feel.

Now before we can get to the code we need to set up an enum to put into the code. To do this we go into the content browser right click go to blueprints and click on enumeration. and name it movement.

Inside of the enum we want to create 4 different direction and call the up, down, left and right and then close it down.

Finally we will have to set up this long code which will basically always check for which direction our character is faceing and will change the flipbook to fit the direction.

To finish this off we go back into the event graph and add a final piece of code that connects the flipbooks to the character.

0 notes
Text
Polish Something
I decided after looking at what I had made, the AI movement worked, but wasn't very smooth and they kept stuttering etc.
Overall, I decided that would be the best thing to polish, as it was the most noticeably unperfect thing there. I found out after looking online for help, that apparently disabling orient rotation to movement on the CharacterMovement component of the enemy base, and then enabling Use controller desired rotation, really helps to smooth out the AI movement, which it did.
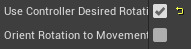
It also said to disable Use controller rotation yaw in the (self) section of the blueprint.

After doing that, the AI movement was so much smoother, and I’m very pleased I got to learn how to polish that aspect of the game, as it was annoying me in the back of my mind how jittery they were moving.
Here is a video of the before and then the after:
youtube
0 notes
Text
Casting in unreal and other stuff
Casting in unreal can be explained using a fishing metaphor. You cast out into the sea and fishing for the actor that you want to talk to and then you just talk with the actor you casted to for thing such as asking them for variable such as hp. The reason we’d need to do something like this is so that we can use the hp variable from the character on the damage object so that it can reduce it when the character touches the object. Because the HP variable is local to the character, it means that only the character can use it making the damage box not work at all. By casting, we give the damage box access to the HP variable, allowing it to affect it.

This wouldn’t work if it didn’t cast tom side scroller character at the very beginning. By doing pretty much the same thing on my coin object, i made it so that the player score increases upon touching it. Unlike the damage box, the coin will actually disappear once collected.

By going into the character blueprint and choosing the “CharacterMovement (Inherited)” component, you can find an option that changes the amount of times the character can jump before they hit the ground with them being able to jump 3 times if you set the number to 3. I set my number to 2 so that my character could double jump if the player pressed jump again in the air.

0 notes
Text
Having a animated character
In the “sidescrollercharacter” blue prints go the view port and drag and drop the flipbook of your animated character into the port so it with the character. Transform it so it goes with the size of the hit box of the character you control so then it fits well as a hit box. On the left tab in view port select “mesh” then on the details panel on the right scroll down to find rendering and untick visible so then the mesh cant be seen and its only your flipbook you added.


Now go to the event graph and drag from the left tab in contents “charactermovement” and drop it in the event graph. then drag out the blue line from the dot off character movement and let it go on the event graph it will come up with a search bar. Search for “is falling” and select it. This checks if the character is in the air and is falling we want to have this so if are character is falling then it plays a falling animation. Drag out the red dot from “is falling” and let go anywhere on the event graph. Then look up in the search tab “branch” then select it. This takes the information from earlier then splits it into two paths of true or false. Also right click anywhere on the graph and look up “event tick” and drag the line out of it and connect it to the branch. (If you already have an event tick then just look up a sequence instead it splits the white line feed constantly through multiple ports. connect the “event tick” to the “sequence” and the sequence to what ever the “event tick” was connected too before and to the branch). Then drag a white line from true and In the search tab again look up “set flipbook”. This changes a flip book its assigned to. On the left side tab in contents there's your Flipbook which you put in with the character. Drag that out of the tab into the graph. It should have a similar shape to the “character movement” one then connect the blue line from the animation to the set flip book to the target bit. This lets it knows what its changing. Then in the set flipbook tab at the bottom there's a section to select what flipbook would play. select the one of your character when its jumping and falling. This is how you set up a animation for falling.


Now to make sure it doesn't get stuck on just the falling animation in the branch from when we checked if the character was falling drag out from false and search up another branch. Then from both true or false in the second branch drag out and search up “set flipbook” so you have two of them then drag out again from the left in contents your flipbook animation from before. and drag out the blue line from it and connect them to both set flipbook sections. Now to finish this we need to set up the branch. At the top of the graph there should be a piece of code already written out with it being in a section called Movement input, This is where its coded to determine how you move. Now from the “inputAxis MoveRight” drag out the green line and search for “==“ or “Equal (float)”. Then with that new “==“ bubble drag that down to where you put the branches earlier and connect it the the second branch in condition which is connected to two “set flipnote” bubbles. In the “set flipbook” bubbles set the true one to the character idle flipbook/animation and the false one to the walking flipbook/animation.


0 notes
Text
Cutting spread sheet And texture collision
First thing to cutting up a spread sheet you need to drag and drop the spread sheet from your Photoshop file into your unreal engine from there you want to right click on it and apply paper2d texture settings and then right click again and then go to extract sprite and it will open the grid menu.

from here you would want to change the sprite extraction from auto to grid this will let you know decide the amount of grids you want to cut out for us we used 64 x 64 as all our sprites where in a 64 x 64 square. From there we click export and we get all our sprites separate all at once.

next we wanted to add our game grid so that it matches with our sprites grid that being 64 x 64 to change this we went to edit then editors preference to open up the editors menu from there we type up grid on the details scroll down to decimal grid sizes and from there create our own grid size being 64 x 64.


Next we had to edit sprite collision on the map of our game. to do this we needed to double click the sprite we wanted to change and that opens up the sprite editor. from there we go to edit collision and then click on the sides to then be able to change the collision.

To get our character to go up a 45 degree angle we need to change his character angle. to do this we have to open his character blueprints then click on the charactermovement (inherited).

From there look in the details section and search for walkable floor angle after you have found it change it to 46 so that it can get over 45 degree hills and not walk over the whole level.

0 notes
Text
I dragged my sprite into the view-port of the 2DSideScrollerCharacter and made the side scroller character invisible by toggle the visible port to false and then i went to charactermovement in the components searched “Rotation” and changed the turn speed to an ungodly number so the turns happen immediately. I edited the collision after double clicking the sprite and dragging the corners in to make proper collision


0 notes
Text
Unreal Engine - Starting an FPS
It’s extremely simple to create an FPS on Unreal, when opening the editor, you can choose to make a Starter FPS Blueprint.

When inside, there is a small area for testing, cubes with physics and walls on either side of the room.

The main part of this is the First Person Character blueprint. It was difficult to understand at first, but thankfully the comments made sense of things.


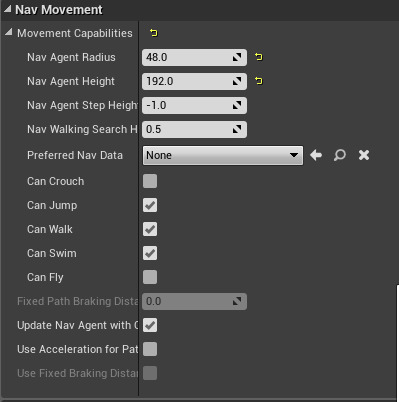
A part of the character that was vital to me was in the CharacterMovement component. this is where I could control walk speed and air control. I changed the air control to a higher value so there was a small amount of it. This meant the player could change direction slightly when mid-air.
There was also an option to add crouching, which I included because I had planned to have areas in which the player had to duck beneath hazards.
0 notes
Text
How to Create a Simple FPS in Unreal Engine 4
A first-person shooter (FPS) is a genre where the player uses guns and experiences the game through the eyes of the character. FPS games are immensely popular, as shown by franchises such as Call of Duty and Battlefield.
Unreal Engine was originally built to create FPS games so it only makes sense to create one using it. In this tutorial, you will learn how to:
Create a first-person Pawn that can move and look around
Create a gun and attach it to the player Pawn
Shoot bullets using a line trace (also known as a ray cast)
Apply damage to actors
Note: This tutorial is part of a 10-part tutorial series on Unreal Engine:
Part 1: Getting Started
Part 2: Blueprints
Part 3: Materials
Part 4: UI
Part 5: How to Create a Simple Game
Part 6: Animation
Part 7: Audio
Part 8: Particle Systems
Part 9: Artificial Intelligence
Part 10: How to Create a Simple FPS (you are here!)
Getting Started
Download the starter project and unzip it. Navigate to the project folder and open BlockBreaker.uproject. You will see the following scene:

The green wall consists of multiple targets. When they take damage, they will turn red. Once their health reaches zero, they will disappear. The red button will reset all the targets.
First, you will create the player’s Pawn.
Creating the Player Pawn
Navigate to the Blueprints folder and create a new Blueprint Class. Select Character as the parent class and name it BP_Player.

Character is a type of Pawn but with additional functionality such as the CharacterMovement component.

This component automatically handles movement such as walking and jumping. You simply call the appropriate function and it will move the Pawn. You can also set variables such as walk speed and jump velocity within this component.
Before you can make the Pawn move, it needs to know when the player presses a movement key. To do this, you will map movement to the W, A, S and D keys.
Note: If you are not familiar with mappings, you can learn about them in our Blueprints tutorial. Key mapping is how you define which keys will perform an action.
Creating Movement Mappings
Select Edit\Project Settings and open the Input settings.
Create two Axis Mappings called MoveForward and MoveRight. MoveForward will handle moving forwards and backwards. MoveRight will handle moving left and right.

For MoveForward, change the key to W. Afterwards, create another key and set it to S. Change the Scale for S to -1.0.

Note: If you’d like to learn about the Scale field, read our Blueprints tutorial. The Axis Value and Input Scale section describes what it is and how to use it.
Later on, you will multiply the scale value with the Pawn’s forward vector. This will give you a vector that points forward if the scale is positive. If the scale is negative, the vector will point backwards. By using the resulting vector, you can make your Pawn move forwards and backwards.

Next, you need to do the same for moving left and right. Change the key for MoveRight to D. Afterwards, create a new key and set it to A. Change the Scale for A to -1.0.

Now that you have the mappings set up, you need to use them to move.
Implementing Movement
Open BP_Player and open the Event Graph. Add a MoveForward (the one listed under Axis Events) event. This event will execute every frame, even if you don’t press anything.

It will also output an Axis Value which will be the Scale values you set earlier. It will output 1 if you press W and -1 if you press S. If you don’t press either key, it will output 0.
Next, you need to tell the Pawn to move. Add an Add Movement Input and connect it like so:

Add Movement Input will take a vector and multiply it by Scale Value. This will convert it to the appropriate direction. Since you are using Character, the CharacterMovement component will move the Pawn in that direction.
Now, you need to specify which direction to move in. Since you want to move forward, you can use Get Actor Forward Vector. This will return a vector pointing forwards. Create one and connect it like so:

Summary:
MoveForward will run every frame and output an Axis Value. This value will be 1 if you press W and -1 if you press S. If you don’t press either key, it will be 0.
Add Movement Input will multiply the Pawn’s forward vector with Scale Value. This will cause the vector to point forwards or backwards depending on which key you press. If you don’t press any key, the vector will not have a direction, meaning the Pawn will not move.
CharacterMovement component will get the result from Add Movement Input. It will then move the Pawn in that direction.
Repeat the process for MoveRight but replace Get Actor Forward Vector with Get Actor Right Vector.

Before you can test the movement, you need to set the default pawn in the game mode.
Setting the Default Pawn
Click Compile and then go back to the main editor. Open the World Settings panel and locate the Game Mode section. Change Default Pawn Class to BP_Player.

Note: If you don’t have the World Settings panel, go to the Toolbar and select Settings\World Settings.
Now you will automatically use BP_Player when the game starts. Press Play and use the W, A, S and D keys to move around.

Next, you will create mappings for looking around.
Creating Look Mappings
Open the Project Settings. Create two more Axis Mappings called LookHorizontal and LookVertical.

Change the key for LookHorizontal to Mouse X.

This mapping will output a positive value when you move the mouse right and vice versa.
Next, change the key for LookVertical to Mouse Y.

This mapping will output a positive value when you move the mouse up and vice versa.
Now, you need to create the logic for looking around.
Implementing Looking
If a Pawn does not have a Camera component, Unreal will automatically create a camera for you. By default, this camera will use the rotation of the controller.
Note: If you’d like to learn more about controllers, take a look at our Getting Started with AI tutorial.
Even though controllers are non-physical, they still have their own rotation. This means you can make the Pawn and camera face different directions. For example, in a third-person game, the character and camera do not always face the same direction.

To rotate the camera in a first-person game, all you need to do is change the rotation of the controller.
Open BP_Player and then create a LookHorizontal event.

To make the camera look left or right, you need to adjust the controller’s yaw. Create an Add Controller Yaw Input and connect it like so:

Now, when you move the mouse horizontally, the controller will yaw left or right. Since the camera is using the controller’s rotation, it will also yaw.
Repeat the process for LookVertical but replace Add Controller Yaw Input with Add Controller Pitch Input.

If you use test the game right now, you’ll notice that vertical looking is inverted. This means when you move the mouse up, the camera will look down.
If you prefer non-inverted controls, multiply Axis Value by -1. This will invert Axis Value which will invert the controller pitching.

Click Compile and then press Play. Use your mouse to start looking around.

Now that all the movement and looking is done, it’s time to create the gun!
Creating the Gun
You know how when you create a Blueprint Class, you can select a parent class? Well, you can also select your own Blueprints as the parent too. This is useful when you have different types of objects that share common functionality or attributes.
Let’s say you want to have multiple types of cars. You can create a base car class that contains variables such as speed and color. You can then create classes (the children) that use the base car class as the parent. Each child will also contain the same variables. Now you have an easy way to create cars with different speed and color values.

You can use the same method to creating guns. To do this, you need to create a base class first.
Creating the Base Gun Class
Go back to the main editor and create a Blueprint Class of type Actor. Name it BP_BaseGun and then open it.
Next, you will create a few variables that will define some properties of the gun. Create the following float variables:
MaxBulletDistance: How far each bullet can travel
Damage: How much damage to apply when a bullet hits an actor
FireRate: How long (in seconds) before the gun can shoot another bullet

Note: The default values for each variable is zero which is fine for this tutorial. However, if you wanted new gun classes to have a default value, you would set it in BP_BaseGun.
Now, you need a physical representation of the gun. Add a Static Mesh component and name it GunMesh.

Don’t worry about selecting a static mesh for now. You will do this in the next section when you create a child gun class.
Creating a Child Gun Class
Click Compile and then go back to the main editor. To create a child class, right-click on BP_BaseGun and select Create Child Blueprint Class.

Name it BP_Rifle and then open it. Open the Class Defaults and set each variable to the following values:
MaxBulletDistance: 5000
Damage: 2
FireRate: 0.1

This means each bullet can travel a maximum distance of 5000. If it hits an actor, it will deal 2 damage. When firing consecutive shots, the duration between each shot will be at least 0.1 seconds.
Next, you need to specify which mesh the gun should use. Select the GunMesh component and set its Static Mesh to SM_Rifle.

The gun is now complete. Click Compile and then close BP_Rifle.
Next, you will create your own camera component. This will give you better control of camera placement. It will also allow you to attach the gun to the camera which will keep the gun in front of the camera.
Creating the Camera
Open BP_Player and then create a Camera component. Name it FpsCamera.

The default position is a bit too low which might make the player feel small. Set the location of FpsCamera to (0, 0, 90).

By default, Camera components don’t use the controller’s rotation. To fix this, go to the Details panel and enable Camera Settings\Use Pawn Control Rotation.

Next, you need to define where the gun should be located.
Defining the Gun Location
To create the gun location, you can use a Scene component. These components are perfect for defining locations because they only contain a Transform. Make sure you have FpsCamera selected and then create a Scene component. This will attach it to the camera. Name it GunLocation.

By attaching GunLocation to FpsCamera, the gun will maintain the same position relative to the camera. This is how you always keep the gun in front of the camera.
Next, set the location of GunLocation to (30, 14, -12). This will place it to the front and slighly to the side of the camera.

Afterwards, set the rotation to (0, 0, -95). When you attach the gun, this will make it appear as though it is aiming towards the center of the screen.

Now, you need to spawn the gun and attach it to GunLocation.
Spawning and Attaching the Gun
Locate Event BeginPlay and create a Spawn Actor From Class. Set Class to BP_Rifle.

Since you will need to use the gun later, you should store it in a variable. Create a variable of type BP_BaseGun and name it EquippedGun.
It is important that the variable is not of type BP_Rifle. This is because the player can use different types of guns, not just the rifle. If you spawned a different type of gun, you would not be able to store it in a variable of type BP_Rifle. It would be like trying to fit a circle into a rectangular hole.
By making the variable of type BP_BaseGun, you are creating a big hole that can accept many shapes.
Next, set EquippedGun to the Return Value of Spawn Actor From Class.

To attach the gun, you can use an AttachToComponent. Create one and set Location Rule and Rotation Rule to Snap to Target. This will make the gun have the same location and rotation as its parent.

Next, create a reference to GunLocation and connect everything like so:

Summary:
When BP_Player spawns, it will spawn an instance of BP_Rifle
EquippedGun will keep a reference to the spawned BP_Rifle for later use
AttachToComponent will attach the gun to GunLocation
Click Compile and then press Play. Now you will have a gun when you spawn! When you look around, the gun will always be in front of the camera.

Now comes the fun part: shooting bullets! To check if a bullet hits something, you can use a line trace.
Shooting Bullets
A line trace is a function that takes in a start and end point (which form a line). It will then check each point along the line (from start to end) until it hits something. In games, this is the most common method to check if a bullet hits something.
Since shooting is a function of guns, it should go in the gun class rather than the player. Open BP_BaseGun and create a function called Shoot.
Afterwards, create two Vector inputs and name them StartLocation and EndLocation. These will be the start and end points of the line trace (which you will pass in from BP_Player).

You can perform a line trace using a LineTraceByChannel. This node will check for hits using the Visibility or Camera collision channel. Create one and connect it like so:

Next, you need to check if the line trace hit anything. Create a Branch and connect it like so:

Return Value will output true if there was a hit and vice versa.
To give the player some visual feedback on where the bullet hit, you can use a particle effect.
Spawning Bullet Impact Particles
First, you need to get the location of the trace hit. Drag-click on Out Hit and release left-click in the graph. From the menu, select Break Hit Result.

This will give you a node with various pins relating to the result of the line trace.
Create a Spawn Emitter at Location and set Emitter Template to PS_BulletImpact. Afterwards, connect its Location to Location of Break Hit Result.

Here is the function so far:

Summary:
When Shoot executes, it will perform a line trace using the provided start and end points
If there was a hit, Spawn Emitter at Location will spawn PS_BulletImpact at the hit location
Now that the shooting logic is complete, you need to use it.
Calling the Shoot Function
First, you need to create a key mapping for shooting. Click Compile and then open the Project Settings. Create a new Axis Mapping called Shoot. Set its key to Left Mouse Button and then close the Project Settings.

Afterwards, open BP_Player and create a Shoot event.

To check if the player is pressing the Shoot key, you just need to check if Axis Value equals 1. Create the highlighted nodes:

Next, create a reference to EquippedGun and then call its Shoot function.

Now you need to calculate the start and end points for the line trace.
Calculating the Line Trace Locations
In many FPS games, the bullet starts from the camera rather than the gun. This is because the camera is already perfectly aligned with the crosshair. So if you shoot from the camera, the bullet is guaranteed to go where the crosshair is.
Note: Some games do shoot from the gun. However, it requires extra calculations to shoot towards the crosshair.
Create a reference to FpsCamera and then connect it to a GetWorldLocation.

Now you need the end location. Remember that the guns have a MaxBulletDistance variable. This means the end location needs to be MaxBulletDistance amount of units in front of the camera. To do this, create the highlighted nodes:

Afterwards, connect everything like so:

Summary:
When the player presses or holds left-click, the gun will shoot a bullet starting from the camera
The bullet will travel forward by the distance specified by MaxBulletDistance
Click Compile and then press Play. Hold left-click to start shooting.

Currently, the gun is shooting every frame. That’s a bit too fast so the next step is to decrease the gun’s fire rate.
Decreasing the Fire Rate
First, you need a variable to decide if the player can shoot. Open BP_Player and create a boolean variable named CanShoot. Set its default value to true. If CanShoot equals true, the player can shoot and vice versa.
Change the Branch section to the following:

Now, the player can only shoot if the Shoot key is being pressed and CanShoot equals true.
Next, add the highlighted nodes:
Changes:
The player can only shoot if holding left-click and CanShoot equals true
Once the player shoots a bullet, CanShoot will be set to false. This will prevent the player from shooting again.
CanShoot will be set back to true after the duration provided by FireRate
Click Compile and then close BP_Player. Press Play and test out the new fire rate.

Next, you will make the targets and button respond to bullets. You can do this by applying damage to them.
Applying Damage
In Unreal, every actor has the ability to receive damage. However, it is up to you to decide how the actor responds to it.
For example, when receiving damage, a fighting game character would lose health. However, something like a balloon would not have health. Instead, you would program the balloon to pop when it receives damage.
Before you handle how the actor receives damage, you first need to apply damage. Open BP_BaseGun and add an Apply Damage at the end of the Shoot function.

Next, you need to specify which actor you want to damage. In this case, it is the actor hit by the line trace. Connect Damaged Actor to Hit Actor of the Break Hit Result.

Finally, you need to specify how much damage to apply. Get a reference to Damage and connect it to Base Damage.

Now, when you call Shoot, it will damage any actors hit by the line trace. Click Compile and then close BP_BaseGun.
Now you need to handle how each actor receives damage.
Handling Damage
First, you will handle how the targets take damage. Open BP_Target and then create an Event AnyDamage. This event will execute whenever the actor receives damage that is not zero.

Afterwards, call the TakeDamage function and connect the Damage pins. This will subtract health from the target’s Health variable and update the target’s color

Now, when the target takes damage, it will lose health. Click Compile and then close BP_Target.
Next, you need to handle how the button takes damage. Open BP_ResetButton and create an Event AnyDamage. Afterwards, call the ResetTargets function.

This will reset all of the targets when the button receives damage. Click Compile and then close BP_ResetButton.
Press Play and start shooting the targets. If you want to reset the targets, shoot the button.

Where to Go From Here?
You can download the completed project here.
Even though the FPS you created in this tutorial is simple, you can use easily extend it. Try creating more guns with different types of fire rate and damage. Maybe try adding reload functionality too!
That’s it for our Unreal Engine for Beginners tutorial series. But don’t worry – we’re hoping to make many more tutorials in the months ahead.
And that’s where you come in! Tomorrow, we’re going to start recruiting for our new Unreal Engine tutorial team, to help create more great Unreal Engine tutorials like this series for the community. I hope to see some of you apply! :]
The post How to Create a Simple FPS in Unreal Engine 4 appeared first on Ray Wenderlich.
How to Create a Simple FPS in Unreal Engine 4 published first on https://medium.com/@koresol
0 notes
Text
Peer Review
Blog Review
Very well detailed blog. However, you could expand more about the animations and what programs we used (fuse, mixamo.) And you could also talk about how we got everything into unreal and made the blueprint work and how you created the blueprint and what it does. Also, maybe show each of the cameras perspective when you enter the trigger box. (camera experimentation.)
-Alex
Your camera set-up is great. I like that you can watch the character going up the stairs – the character moving to the higher platform gives it something a bit more interesting to look at. Maybe talk about what cameras and controls you plan to use in Arkade. You could use it for an enemy.
-Silke
UE4 Game Review
1: What Cameras worked well?
The matinee cameras worked and showed exactly what and where you need to go. Also the toggle between 3rd and 1st person perspective worked really well and was smooth.
2: What Cameras could be improved?
I would say to add some sort of fixed camera either on the maze or on the collision course. Maybe add one on the big balls of death on the collision course. So you attempt to get past them with a side on camera. Maybe even add CCTV cameras in the maze.
3: Did you ever feel lost or needed more direction?
No I felt the maze was the perfect size to get through without being lost. However, on the collision course I would suggest adding a checkpoint when you get to the switch to save the player from physically dying.
4: What did you think of the controls?
I felt the controls where fine. However, I would lower the jump distance to make it a bit easier on the collision course.
-Alex
1: What Cameras worked well?
The camera worked mostly well, aside from the fixed camera section.
2: What Cameras could be improved?
The fixed camera section could be improved if movement was changed relative to the camera, rather than the character.
3: Did you ever feel lost or needed more direction?
No. the stage was clear and concise.
4: What did you think of the controls?
The jumping felt rather floaty and somewhat tricky to control.
-James
With my feedback from my peers I decided to go back and makes changes based off my feedback. I added a checkpoint to the collision course once the switch has been pressed so the player does not have to repeat the whole course each time they die.
I also added some additional cameras to the maze to make it more interesting and some visual queues which showed the player that they could switch camera perspective from 3rd to 1st. I also added some fixed cameras to the collision course to give a forced perspective.
With James’ feedback I went into the CharacterMovement (Inherited) as it was using the same movement of the default UE4 mannequin and changed the Jump Velocity and move speed.


By reducing both of these values the character is a lot easier to control and does not overshoot the platform section of the level.
I also changed the forced camera section of the obstacle course so the player is able to navigate past the moving balls section.
-Adam
0 notes
Photo

Circus Noir at the Universal Soul Circus #circusarts #charactermovement #circusshirt #popnoir #circusstage
0 notes
Text
Characters walk angle
To change what angles your character can walk on go to the characters blue prints then go to view port then in on the top right click “charactermovement”

Then on the details panel on the right near the top in the section of “walking” there will be “walkable floor angle” then you can change here what angle your character can walk up on

0 notes