#carolynscamper
Explore tagged Tumblr posts
Visit Tumblr Blog
Explore Tumblr blogs with no restrictions, modern design and the best experience.
Last Seen Tumblr Blogs


Fun Fact
The Tumblr app for Google Glass was released on May 16, 2013.
Text
Riding this wave til the end
I’ve been working on the camper for about 4 weeks now after a 4 month break. I realized early on that I can’t work on the camper if it’s under 50 degrees so I pushed to get the fiberglass and paint done before closing down for the winter.
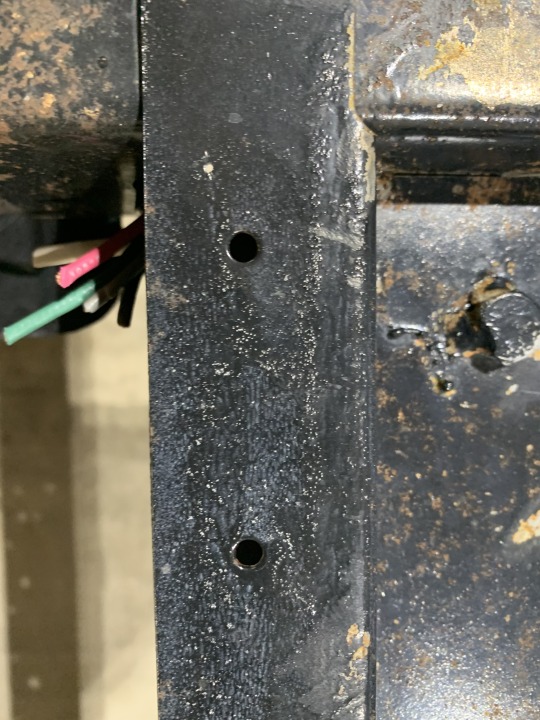
Now I’m back and I’ve spent the last 4 weeks worried about the tail and marker lights. I had to install and wire the brand new tail and marker lights and I’d never done any electrical work before. The first hurdle was finding the time to wire the camper. Youtube tutorials said it should take 30 minutes to an hour to wire a trailer. I expected it to take me even longer because I needed drill holes to feed the wires in and out of the camper. I also had to make a wiring map to reference throughout the process. In the end it took me 3-4 hours to finish and when I plugged the camper into our SUV nothing lit up. This was the second hurdle.

That was hard. Because I had no idea how to figure out why it didn’t light. I guessed that either my map was wrong (it wasn’t) or that my connections weren’t secure enough (they weren’t). So I called my mechanic. He came out and did a free look over and confirmed my suspicions. Everything was wired correctly, I just needs special adapters and connectors to complete the circuit. 2 weeks later, he came back and secured everything. Even though all the wires were in the right place and matched up perfectly, the connectors required a lot attention to detail and it took him another 3.5 hours to finish. When we plugged the camper into the SUV, it lit up!
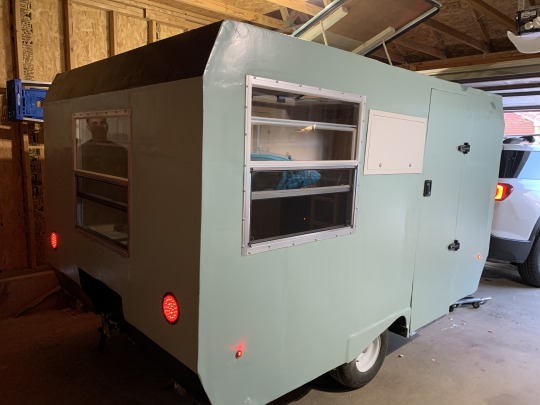
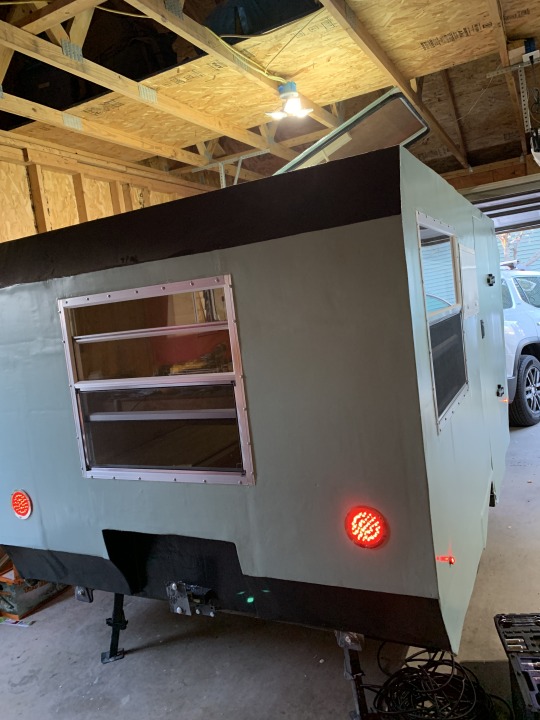
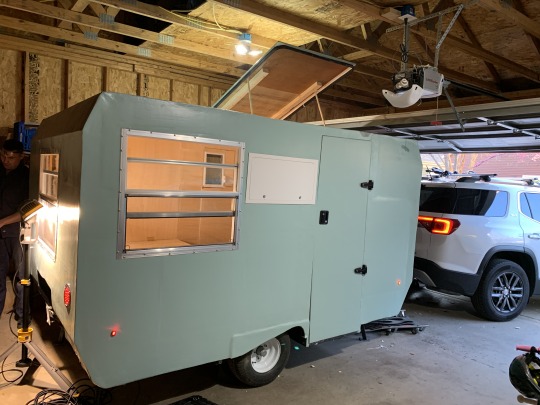
I don’t know the last time I squealed with so much joy. Until this point, I’d spent so much time second guessing this project. I thought I was in over my head. I thought the lights would never work. I again wondered if I should just sell it. But now I am ready to finish. I’m riding this excitement wave until the end. At this point I estimate 2-3 weeks until it is camping ready. Maybe a few more weeks to be “done” (decorating, etc). The end it in sight. I can’t believe it.
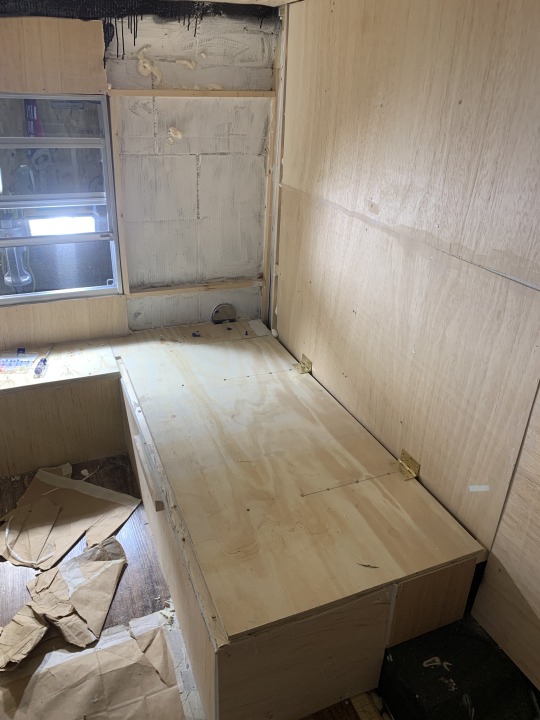
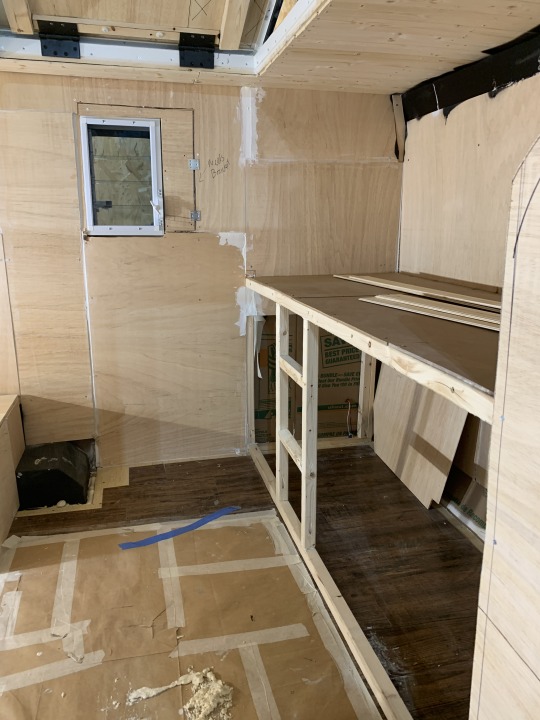
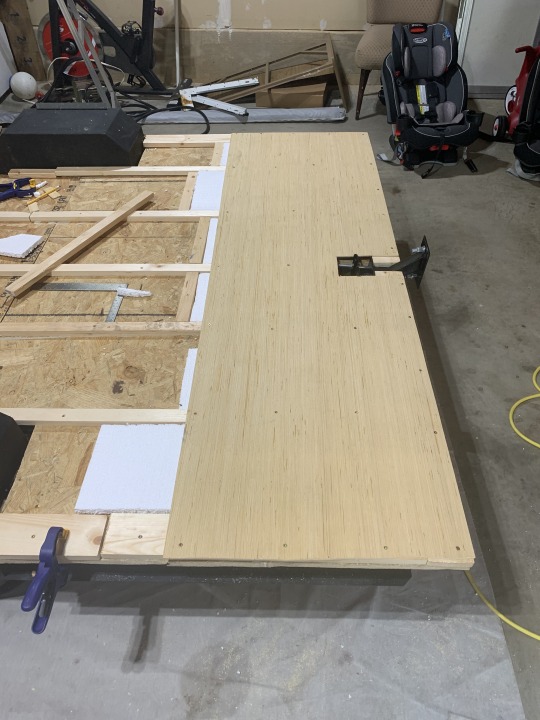
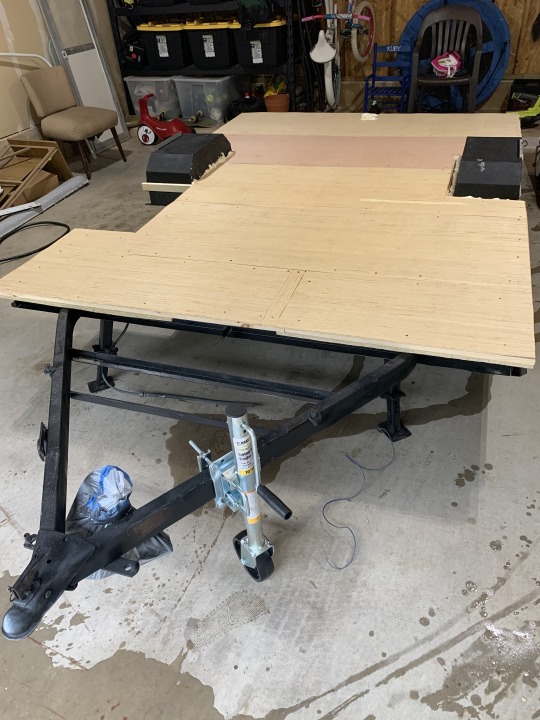
Here are some photos of the current interior. While waiting to get the lights working, I filled some wall patches, added some waterproofing to the interior cardboard, installed the ceiling panels, finished the bunk bed structure, made progress on the pop top, and cleaned up the door frame.


#carolynscamper#camperrenovation#camperbuild#diycamper#optoutdoors#camping#vanlife#blackvanlife#outdoorafro#vintagecamper#traveltrailer#camper
7 notes
·
View notes
Text
I have never spent so much time correcting mistakes
November 1, 2020
Early in the building process, I made a comment about respecting the craftsmanship of seasoned builders. That has never rang more true than right now.
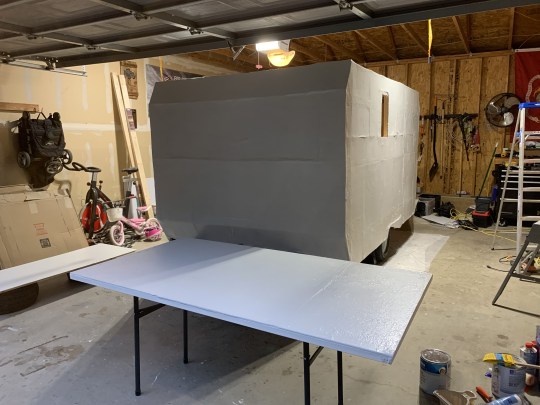
About 10 days ago the camper was completely primed and painted. But all of the cosmetic imperfections that I thought would be covered by the paint job looked worse. I was so upset. How could this happen when I spent SO much time filling and sanding before I painted? (1) Lack of experience working with fiberglass finishes (2) hard to see problem areas with between layers of fiberglass and filler (3) garage lighting (4) wanting to reach my October 31 goal.
I thought about selling it (again). I considered just painting the whole thing black. I tried to convince myself it didn’t look that bad (it did). None of these would work for me. My only option was to find all the patience I had to sand it down, fill the areas I missed, laminate it with another thin coat of fiberglass with silicone additive, and repaint it. I was and still am heartbroken but thankful the problem was fixable.
I’ve never sanded so much in my life. I’ve spent between 30-90 minutes sanding everyday for the past 10 days. My garage is a complete mess. I bought a freaking shop vac. I am about 4 weeks behind schedule now and I definitely don’t have a camp ready camper like I thought I would. But... The shell looks amazing. So much better than before. So much smoother and stronger. Definitely worth the time. Because if I continued pouring time and energy into this project with the disappointment I had, I would've probably just trashed it.
I have a few more areas to address but I am on track to have it painted in the next few days. I am so eager to get the windows and doors installed.
A photo of the door, pop top and camper completely primed with all the imperfections glaring at me. The front could use the most attention but will be the least seen so I started my cosmetic attention the the rear and sides.

After painting, I sanded it back down to even and fill.

Close up of the shell after sanding. You can see the texture of the cardboard, which was something I didn’t expect or like. Even though it’s not completely flat at this point, all of the texture went away after going back over it with epoxy resin.

The shell was significantly smoother after another layer of epoxy resin. You can still see some of the streak and brush marks but that will be sanded down before applying the primer and paint.
#carolynscamper#camperrenovation#camperbuild#diycamper#diycaravan#optoutdoors#camping#vanlife#blackvanlife#outdoorafro#vintagecamper#traveltrailer#camper#caravan
1 note
·
View note
Text
Framing
August 23, 2020
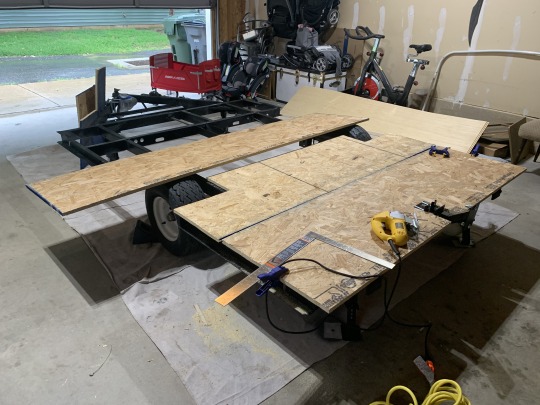
I went into this week hoping to tackle a short punch list and ended the week with a 95% complete frame. This type of progress gets me so excited.
I decided on vinyl peel and stick floor tiles for the floor. I want the tiles to be the flooring for our storage areas as well so I put it down before building the dinette and bunk beds.

Framing was fun. It take patience and precision but watching the puzzle come together was great. I have such an appreciation for good craftsmanship. I spent a lot of time making adjustments, re-measuring, and swapping tools to ensure everything fit as nicely as possible.

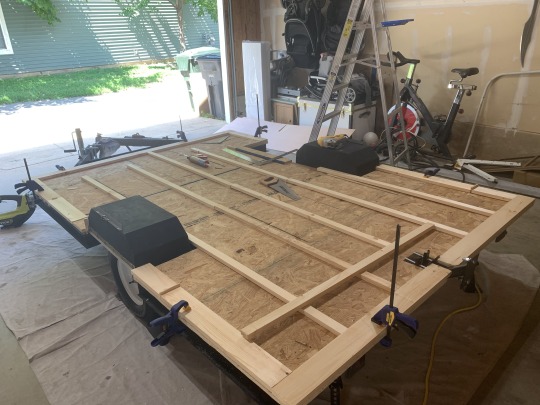
The frame is very light. It will be skinned by 1/8 plywood and then fiber glassed. The three combined will make a very sturdy and comfortable camper. The interior will have a layer of insulation. I haven’t decided on the interior wall panels yet. I will probably go back to Lowes to see and feel all the materials before making a decision.
Weight is on my mind this week. It’s really important that the camper stay under 2000 lbs. I have a 3500 lb axle rating but the Coleman camper manual suggests keeping the weight lower. Right now my weight sits around 300 lbs. I estimate that 1/8 ply, fiberglass, insulation, and walls will add 85-100 lbs based on the weights of those products and how much I think I’ll need.

Once the framing was mostly done I used painter’s tape to map out the floor plan. We’ll have:
Bunk beds for the kids in front
A small kitchenette
An outdoor shower
A dinette that turns into a queen bed
Some creative storage areas
You’ll also see a rectangle shape in the roof. That’s because I am engineering a pop-top roof similar to the European Eriba caravan.

I am having minor surgery so I won’t be able to work on it that much this week. But I will get lay in bed and watch electrical and plumbing tutorials over and over and over again.
2 notes
·
View notes
Text
Subfloor
August 16, 2020
One thing I’m learning through this process is that my estimates for completing tasks have been way off. For instance, it took me the whole weekend to finish the subfloor when I thought it would only take me a day. Or that I thought it would take me a whole day to fabricate a new entry step and it only took me 20 minutes.
Subfloor layers:
OSB Framing support and insulation (Liquid Nails applied throughout) 1/4 plywood underlayment Spray can foam insulation for the cracks and gaps
To be honest, I probably overdid the subfloor. Someone more experienced could probably get a decent foundation without this much work. Also, my body hurts. But, I have a strong foundation and that feels great.
Shoutout to my neighbor, Dave, who stopped by to check out the progress. He helped me take off the broken jack stand and gifted me a router!
I’m focusing the next week on pacing myself. It’s been a sprint couple of weeks and I know I won’t be close to done until Halloween.
Next I’ll install sheet vinyl flooring, install the entry step, and start the framing. I have dreams about framing. I am constantly engineering and re-engineering my approach in my head. Will I finally use the Pythagorean theorem in real life!?
#carolynscamper#ditcamper#camper#diycaravan#caravan#rv#rving#greatoutdoors#covidproject#blackvanlife#vanlife#diversifyoutdoors#optoutdoors#teardropcamper#camping#vintagecamper
2 notes
·
View notes
Text
Update: Managing My Own Expectations
It’s been a few weeks since I updated. I promise to be better at this. I just haven’t made as much progress as I expected. Whenever I go to the garage to work, I leave thinking “I only got [some small project/goal] done and that’s not worth sharing.” Fast forward 3 weeks and I’m in awe of all that I’ve accomplished so far. So, I’m pulling myself out of this funk and will post as much as I can, not matter how small.
2 Weeks of Mini Projects and Corrections
Resize and reinstall that piece. Measuring 2, 3, 4 times before cutting. Grind that nail off. Sand that edge. Sometimes I’ll spend 2 hours and only get 2 wall panels up. In the moment, it feels like a really slow pace. But in reality, I’m using that time to double check my work, resolve issues, and consider all the other components around it. When I started, I had a goal to have it “camping ready” by Halloween. That deadline is looking murky these days but I’m not even upset about it. I’m just proud of how good it looks at this stage.
Framing
I get more confident with this project the further I get into it. Framing started off light and wobbly. Now it’s light and solid and the shell isn’t even on yet. Ugh, I can’t believe I started from scratch.


Windows
The windows were backordered when I ordered them a few weeks ago but they are supposed arrive by Oct 5.
Door
I decided to build my own door. It fits. That’s all I can say about it for now. I expect to spend 8-12 more hours on it sanding, fiberglass, painting, positioning, and weatherstripping. I’ll probably dedicate a whole week to getting the door in and functional.
Pop top
Although I haven’t started the pop top I’m constantly engineering it in my head. One thing I did this week was widen the pop top area on the camper. Now, we’re less likely to bump our head coming in and out. Once the interior is framed enough to work on the outer shell, I’ll start working on the pop top mechanics.
Shell
The plan is to still fiberglass over cardboard. Fingers crossed, I’ll be ready to make my fiberglass order this week!
#carolynscamper#camperrenovation#camperbuild#diycamper#diycaravan#optoutdoors#camping#vanlife#blackvanlife#outdoorafro#vintagecamper#traveltrailer#camper
1 note
·
View note
Text
More Framing, Rework, and Problem Solving
Thank you to everyone that wished me well through my surgery. It was my first time being completely under and I didn’t know what to expect from recovery but everything went well and I was back on my feet within a few days.
Before surgery I thought I would be working on electrical by now. However, while recovering my focus went to weight consciousness and ensuring I don’t go over my 2,000 lbs limit. My original plan was to cover the camper in plywood and fiberglass. The 1/4″ plywood I selected is about 22 lbs per 4′ x 8′ panel. I estimated it would add 300 lbs to my weight. So, after searching all the self-built camper and teardrop groups/forums/websites for lightweight alternatives, I decided to use the corrugated cardboard composite core method used commonly on homemade surfboards and boats. For those interested in more details, I have referenced this Nomadic Research Labs article a lot this week.
Framing Progress Framing is coming along. The frame that I created before surgery was a great start but this week I needed to build the bunk beds and dinette/bed. There was a lot of measuring and a lot more mistakes. At this point I’m about 90% done with the bunk beds and 50% done with the dinette. I thought I would knock it all out over the long weekend but instead I’ll keep working on it a bit every day this week.


I’ve decided to hold off on electrical until the fiberglass shell is complete. So my next purchases will be fiberglass cloth, epoxy, and windows.
#carolynscamper#camperrenovation#camperbuild#diycamper#diycaravan#optoutdoors#camping#vanlife#outdoorafro#greatoutdoors#vintagecamper#traveltrailer
1 note
·
View note
Text
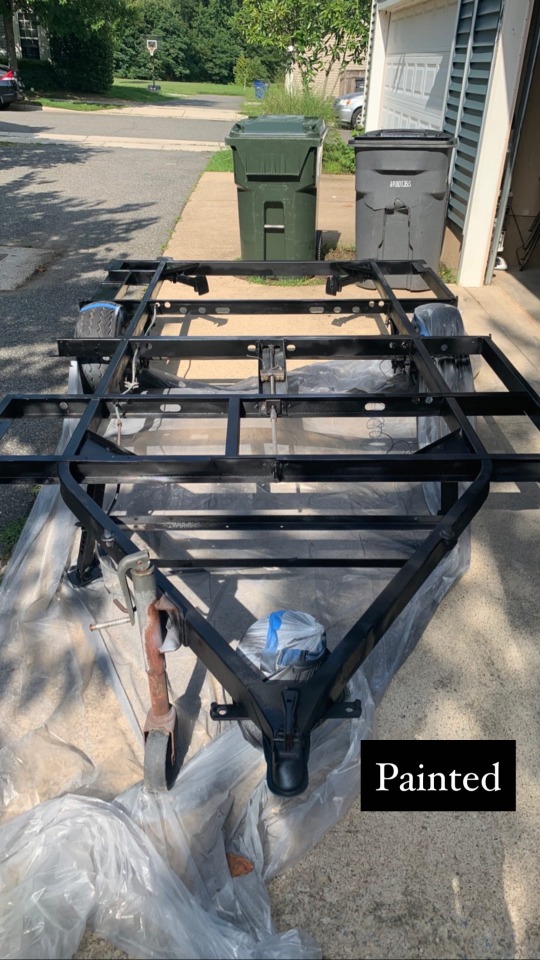
Finishing Some Trailer Maintenance
August 8, 2020
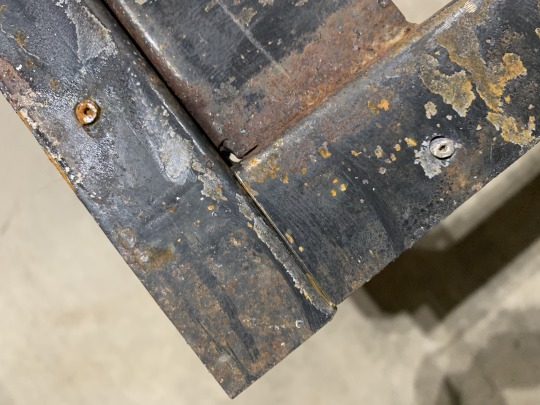
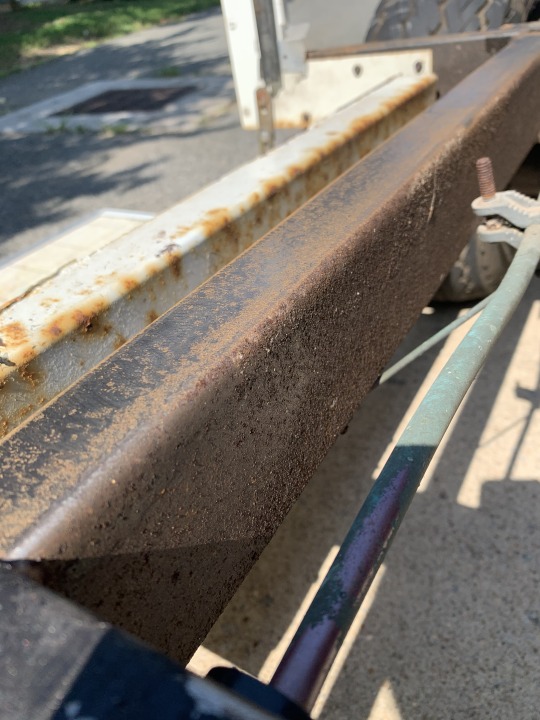
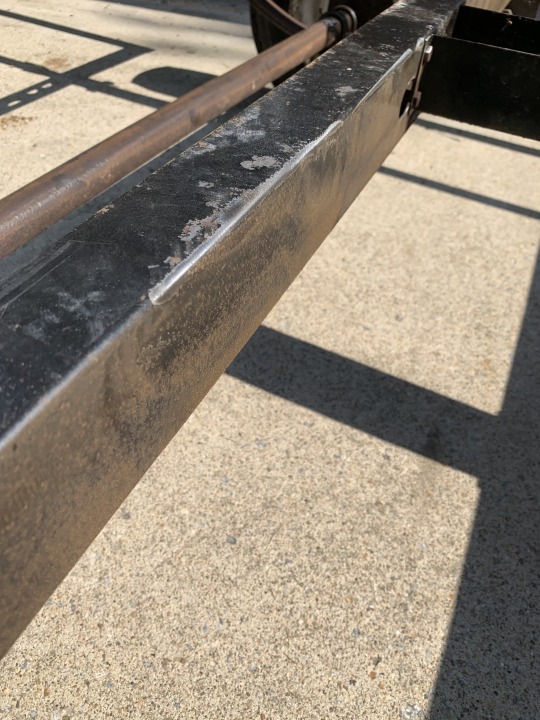
After demo, I had to decide what maintenance I wanted to do with the trailer. I have researched a lot of these builds and saw that some people jump right to building from here. Since this will be used by my family and I hope to sell it one day, I wanted to do my due diligence to make sure it was safe. Also, I’d be really upset if I build my camper on this frame and had to tear out a section to make a repair down the road.
Trailer Frame Prep:
Power wash all the dirt, dust, cobwebs, etc
Remove as much surface rust as I can with a grinder and wire brush attachment
Sand rust in hard to reach places by hand
Grind and hammer out leftover screws and bolts
Power wash sanding residue
Remove step
Clean trailer surface with CLR
Final clean with Acetone
Prime - Rustoleum Professional Primer (2 cans)
Paint - Rustoleum High Performance Enamel Paint (4 cans)
The paint won’t be visible. Once the floor is attached I will protect the bottom of the trailer and floor with a wood sealant and either a rubberized underbody spray or roofing asphalt/tar. But my goal was to do whatever I could to prevent rust to the frame.

Tracking System Prep (completed by a mechanic):
Remove and inspect tires (one is in bad shape so I ordered a new pair from etrailer.com)
Remove, inspect, and repack wheel bearings (both were in great shape)
Inspect axle (no concerns)
Inspect wheel bolts (no concerns)
Thank goodness the trailer was stored in a garage all this time.

New Orders
2 new tires
New swivel jack stand
New spare tire ring (haven’t found a spare tire I like yet)
The extra cleaning and safety measures added 2 weeks to my build but it feels so good to have a safe foundation to complete my build on.
Next Week: Subfloor
I am very excited to start the subfloor. Right now my plan is to layer: subfloor plywood, insulation, and flooring plywood. I haven’t decided which final materials I am going to use because I want to see everything in person. I plan to go to 2 building material merchants this week and get a better idea of my options. I have a few more tools to collect as well but Saturday morning I should be framing out the floor.
#carolynscamper#subfloor#trailermaintenance#diycamper#vintagecamper#camper#diycaravan#caravan#vintagecaravan#outdoors#aventure#diversifyoutdoors#simpleliving#quarantineproject
1 note
·
View note
Text
Yup, a Camper. Yup, like an RV.
After months of research to the point of obsession, I have decided to build a camper. Yup, a camper. Yup, like an RV.
I’ve got cabin fever. We don’t know how long COVID-19 will have a grip on our lives but waiting it out in the house is getting old. That, combined with my desire to have a hands on project and challenge myself a bit has lead me here.
I don’t even remember how I got this idea in my head. One day I joined a FB group for DIY Teardrop trailers. Then I fell into the rabbit hole. Teardrops, canned hams, eggs, fiberglass, travel trailers, motorhomes, caravans, conversions vans, transit vans, etc. The creativity. The freedom to hook up and go. I was immediately all in.
So, my plan here to to document every step of the way. This will act as both a journal and inspiration repository. I hope to demystify parts of this process and meet others who are doing the same.
#carolynscamper#traveling#camper#caravan#traveltrailer#vanlife#diycamper#diycaravan#rv#rving#nomad#nomadlife#simpleliving#militaryfamily#usmcfamily#workingmom#usmclife#momof2#explore#nature#adventure#outdoorafro
1 note
·
View note
Link
#carolynscamper#camperrenovation#camperbuild#diycamper#diycaravan#camping#optoutdoors#vanlife#blackvanlife#diversifyoutdoors#outdoorafro#vintagecamper#traveltrailer
0 notes
Text
Demolition
7/24/2020 It’s Demo Day

In reality, it took all weekend. HGTV has always made demo day seem so easy. Well I’m here to tell you it’s trash. It’s dirty and stinky. We had to use a sledgehammer a lot and I didn’t like it as much as I thought I would.

We quickly realized the entire roof was full of mold and rot. The base hid old hornets nests and lots of spiders. I’m not gonna lie, at one point during demo I thought I was in way over my head. Thankfully, my husband was all about the sledgehammer and literally crushed it.

So much mold oh my god. We were trying to figure out how to break the roof down and finally realized the roof was rotten enough to crumble right off the brackets.

This is how far we got on Saturday night. I rented a 9x12 Uhaul trailer for the next day. We had way more debris than I expected and we needed to take it to the landfill ourselves.

Sunday morning Derek bought an angle grinder and by Sunday afternoon the trailer was completely bare. We took a family trip to the landfill “to see the cool dumptrucks and vultures” (it was v. gross). And I finished by powerwashing the grit, loose rust, cobwebs, hornets nest, and remaining dust off the frame.
Here’s a list of items we kept from the original camper that I hope to reuse in the new camper:
The awning which is in really good shape.
The sink
The stove
The converter
1 cabinet
1 bench seat
One of the slideout posts
The water and electrical inlet sockets
The door
The entry step
#carolynscamper#camper#diycamp#caravan#diycaravan#camping#demolition#demoday#traveling#vanlife#simpleliving#rv#rving#usmcfamily#militaryfamily#momof2#adventure#outdoorafro#explore#workingmom
0 notes
Photo


I found this 1992 Coleman Pioneer Newport pop-up camper on Facebook Marketplace for $350. And just like that, we have our base.
#carolynscamper#camper#caravan#diycamper#diycaravan#found#traveltrailer#rv#rving#greatoutdoors#covidproject#quarantineproject#camping#campingwithkids#vintagecamper#outdoors#outdoorafro
0 notes