#buttonpin
Explore tagged Tumblr posts
Text




I made some killjoys pins for myself!!!
I love Danger Days so much :)
#gerard way#mikey way#frank iero#ray toro#mcr#mcr art#mcr fanart#my chemical romance#killjoys#danger days#buttonpin#pin#fanart#diy
46 notes
·
View notes
Photo


Tree Rings
1 note
·
View note
Text
My shop is live! Check it out!
Only Printful items are available at this time but I will post updates when new items are available! Follow me on Instagram @ opalgoblin for the soonest updates!
#ecommerce#entrepreneur#digital illustration#artwork#printful#art#design#tshirts#stickers#mugs#hats#buttonpins#opalgoblin
0 notes
Text
Collecting Custom Button Pins: Tips for Beginners and Enthusiasts
Custom button pins have a long history as popular collectibles and personal accessories. They offer a unique way to express interests, support causes, and celebrate special events. For both beginners and seasoned enthusiasts, collecting custom button pins can be a rewarding and enjoyable hobby. This guide provides valuable tips to help you start and grow your collection, offering insights into finding, preserving, and showcasing your pins.

Understanding the Appeal of Custom Button Pins
Custom button pins have a broad appeal for several reasons:
Personal Expression: Pins allow individuals to showcase their interests, affiliations, and personality.
Memorabilia: They often serve as souvenirs from events, concerts, or trips.
Artistic Value: Many pins feature unique and creative designs, making them miniature pieces of art.
Community: Collectors often find a sense of community and connection with others who share their interests.
Getting Started with Collecting
1. Define Your Focus
Before you begin collecting, it's helpful to define your focus. Consider the following questions:
Themes: Do you want to collect pins related to specific themes, such as music, sports, movies, or social causes?
Types: Are you interested in certain types of pins, such as vintage, limited edition, or artist-designed pins?
Sources: Will you focus on pins from specific sources, like events, organizations, or custom creators?
Having a clear focus will help guide your collection and make it more cohesive and meaningful.
2. Research and Learn
Spend some time researching the world of custom button pins. Learn about the history of pins, popular styles, and notable designers. Online forums, social media groups, and collector websites are valuable resources for gaining knowledge and connecting with other enthusiasts.
3. Start Small
It's easy to become overwhelmed when starting a new collection. Begin with a few pins that resonate with you, rather than trying to acquire a large number right away. This approach allows you to appreciate each piece and gradually build your collection.
Finding Custom Button Pins
1. Online Marketplaces
Online marketplaces like eBay, Etsy, and dedicated pin collector websites offer a vast selection of custom button pins. These platforms allow you to browse a wide range of designs, compare prices, and read reviews from other buyers.
2. Social Media and Forums
Join social media groups and online forums dedicated to pin collecting. These communities often share information about where to find rare and unique pins, as well as opportunities for trading and buying directly from other collectors.
3. Events and Conventions
Attending events and conventions related to your interests can be a great way to find custom button pins. Many events, such as comic cons, music festivals, and sports tournaments, offer exclusive pins as merchandise or giveaways.
4. Local Shops and Flea Markets
Don't overlook local shops, flea markets, and antique stores. These places can be treasure troves for finding vintage and unique pins that you might not come across online.
Preserving and Displaying Your Collection
1. Proper Storage
Proper storage is essential to preserve the condition of your pins. Consider the following storage options:
Pin Binders: These binders have plastic sleeves with compartments to hold individual pins, keeping them organized and protected.
Display Cases: Glass display cases allow you to showcase your pins while keeping them safe from dust and damage.
Pin Boards: Cork Boards or fabric-covered boards are great for displaying pins in a visually appealing way. Use push pins or fabric hooks to attach your pins securely.
2. Avoiding Damage
To prevent damage to your pins, follow these tips:
Keep Them Dry: Moisture can cause rust or tarnish, especially on metal parts. Store your pins in a dry, cool place.
Handle with Care: When handling your pins, avoid touching the front design to prevent smudges and fingerprints.
Avoid Sunlight: Prolonged exposure to sunlight can cause colors to fade. Store your pins away from direct sunlight.
3. Cleaning and Maintenance
Regularly clean your pins to maintain their appearance. Use a soft, dry cloth to gently wipe away dust and dirt. For stubborn grime, a slightly damp cloth can be used, but ensure the pin is thoroughly dried afterward. Avoid using harsh chemicals or abrasive materials that could damage the design.
Showcasing Your Collection
1. Creative Displays
Get creative with how you display your pins. Consider using shadow boxes, framed corkboards, or even custom-made displays that reflect your personal style. Organize your pins by theme, color, or type to create visually appealing arrangements.
2. Rotating Displays
If you have a large collection, consider rotating the pins on display periodically. This way, you can enjoy different parts of your collection at different times and keep your display fresh and interesting.
3. Digital Sharing
Share your collection online with other enthusiasts. Use social media platforms like Instagram, Pinterest, or dedicated collector forums to post photos of your pins. Engaging with the online pin-collecting community can provide inspiration and help you connect with fellow collectors.
Connecting with Other Collectors
1. Join Collector Groups
Joining collector groups, both online and offline, is a great way to connect with others who share your passion. These groups often organize events, trading sessions, and meetups where you can exchange pins and stories.
2. Participate in Swaps and Trades
Swapping and trading pins with other collectors is a fun way to acquire new pieces and build relationships within the community. Be open to trades and consider participating in online or in-person swap events.
3. Attend Collector Conventions
Collector conventions and expos provide opportunities to meet other enthusiasts, discover rare pins, and learn more about the hobby. Look for events in your area or consider traveling to larger conventions for a broader experience.
Expanding Your Collection
As you become more experienced in pin collecting, you may want to expand your collection in new directions:
1. Limited Edition and Rare Pins
Seek out limited edition and rare pins that can add value and uniqueness to your collection. These pins often have special features, such as unique designs, materials, or production methods.
2. Custom and Artist-Designed Pins
Support independent artists and designers by adding custom and artist-designed pins to your collection. These pins often feature original artwork and creative concepts, making them stand out.
3. Themed Collections
Create themed collections based on specific interests or topics. For example, you could focus on pins related to a particular band, movie franchise, or historical event. Themed collections can add depth and focus to your overall collection.
Conclusion
Collecting custom button pins is a rewarding and enjoyable hobby that allows you to express your interests, support causes, and connect with a community of like-minded enthusiasts. By defining your focus, researching, and starting small, you can build a meaningful collection over time. Proper storage, preservation, and creative display methods will help maintain the quality and appeal of your pins. Engaging with other collectors through swaps, trades, and conventions can enhance your experience and provide opportunities to expand your collection. Embrace the world of custom button pins and enjoy the journey from concept to creation.
0 notes
Photo


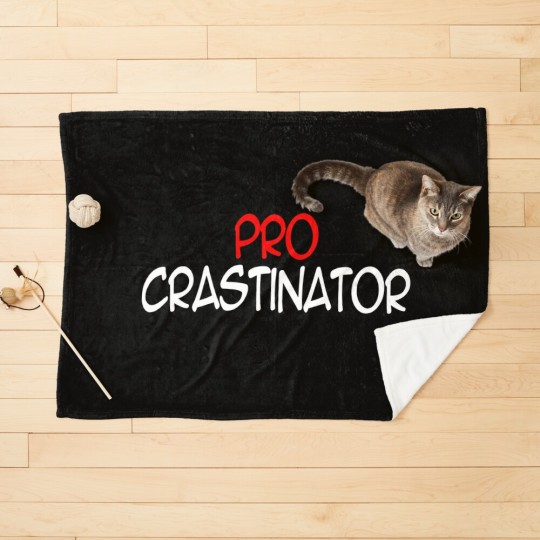
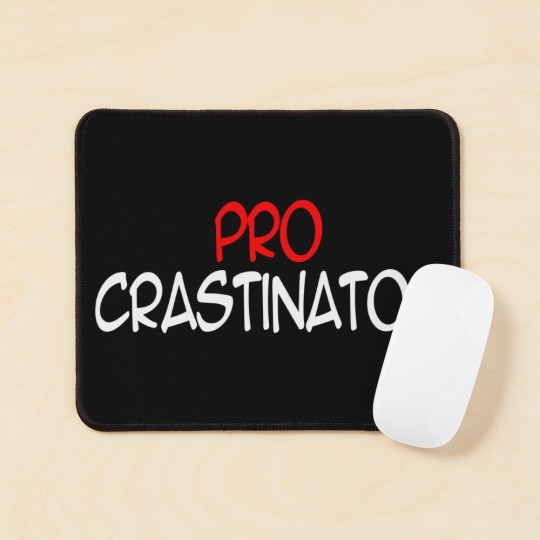
(via "Pro Crastinator" Pin for Sale by artdethwish)
You might like this Procrastinator Button Pins! Get in now on RedBubble!
0 notes
Note
I know you’re taking a little break when I’m sending you this, so don’t feel rushed to answer! I just wanted to show you the finished product 😌
So here I present the Drunkdice casino buttonpin in the flesh!


I had so much fun making it (but I swear painting little dice is torture) and I can’t wait to wear around 😆
AHHHHHHH??????? you did such a good job with it, it's so pretty❗️❗️ thank you for showing me the finished product🥺🩷 you executed the vision perfectly and i have been looking at this buttonpin for at least ten minutes, it's so incredibly well done😩💕
and i'm really glad you enjoyed the process!! that is the most important part👉👈 i can imagine the tiny dice would've been a bit fiddly to paint but they turned out so nicely in the end😌✨️ you should definitely be super proud of your work, i just know it's gonna look amazing when you wear it🥰
12 notes
·
View notes
Text
Today whilst getting groceries, I saw a pair of midteen girls who caught my eye because their backpacks where just utterly plastered with buttonpins. I did not recognize a single character, but some of them definately where about at least three different ships. And that made me smile a bit, cause it brings comfort that some things simply dont change and persist, no matter how horrible things may get. These two survived 2016 in 2nd grade. I will survive 2025 and turn 40. (And ship my OCs until 2068 if my retirement nurse lets me!)
1 note
·
View note
Text
Dice Generator Circuit 🎲
This week we were challenged to create a circuit that mimicked rolling a die and producing random numbers. There was guidance but the goal was to explore the circuit and code with more independence.
This was my first attempt...👎
youtube


After doing some research, watching some videos, and working on the code, I finally got it to work!!
youtube


The pictures above are the circuit that worked. I need to add a resistor to the button and move some of the wires around to match the code.
int pinLeds1 = 10;
int pinLeds2 = 9;
int pinLeds3 = 7;
int pinLed4 = 8;
int buttonPin = 6;
int buttonState;
long ran;
int time = 2000;
void setup ()
{
pinMode (pinLeds1, OUTPUT);
pinMode (pinLeds2, OUTPUT);
pinMode (pinLeds3, OUTPUT);
pinMode (pinLed4, OUTPUT);
pinMode (buttonPin, INPUT);
randomSeed(analogRead(0));
}
void loop()
{
buttonState = digitalRead(buttonPin);
if (buttonState == HIGH){
ran = random(1, 7);
if (ran == 1){
digitalWrite (pinLed4, HIGH);
delay (time);
}
if (ran == 2){
digitalWrite (pinLeds1, HIGH);
delay (time);
}
if (ran == 3){
digitalWrite (pinLeds3, HIGH);
digitalWrite (pinLed4, HIGH);
delay (time);
}
if (ran == 4){
digitalWrite (pinLeds1, HIGH);
digitalWrite (pinLeds3, HIGH);
delay (time);
}
if (ran == 5){
digitalWrite (pinLeds1, HIGH);
digitalWrite (pinLeds3, HIGH);
digitalWrite (pinLed4, HIGH);
delay (time);
}
if (ran == 6){
digitalWrite (pinLeds1, HIGH);
digitalWrite (pinLeds2, HIGH);
digitalWrite (pinLeds3, HIGH);
delay (time);
}
}
digitalWrite (pinLeds1, LOW);
digitalWrite (pinLeds2, LOW);
digitalWrite (pinLeds3, LOW);
digitalWrite (pinLed4, LOW);
}
I actually didn't see that I was supposed to create a graph with my results until AFTER I was completely done but this graph does show the probability of getting any number 1-6 on any given roll.

This week was definitely the most challenging so far! Creating and manipulating code is still very tricky for me. This particular circuit made me think of the Texas State Fair games. Probability, circuits used to generator numbers for chances to win, and the challenge of actually playing the game! It was fun to see when it finally worked!
0 notes
Text
RGB Beleuchtung einfach steuern: NeoPixel Ring mit Arduino

In diesem Beitrag möchte ich dir ein kleines Projekt mit einem 12bit NeoPixel Ring und einem Arduino Nano V3 präsentieren. Die Idee zu diesem Projekt kommt von einem Leser meines Blogs, bei welchem ich mich zunächst bedanken möchte. https://youtu.be/CX-Rkm5ZVK0 Hast du selber Ideen und benötigst Hilfe? Dann melde dich doch einfach per E-Mail an mich und wir können gemeinsam darauf schauen.
Ziel des Projektes
Das Ziel ist es, eine kleine Schaltung am Arduino Nano V3 mit einem 12bit NeoPixel Ring und einem Taster aufzubauen. Mit dem Taster sollen dann verschiedene Farben auf dem Ring angezeigt werden.
Benötigte Ressourcen für dieses Projekt
Für den Aufbau der Schaltung benötigst du: - einen Arduino Nano V3* - ein USB-Datenkabel* - ein 12bit NeoPixel Ring* - ein Printtaster*, 12 x 12 mm - ein paar Breadboardkabel*, 10 cm, männlich-männlich - ein 400 Pin Breadboard*
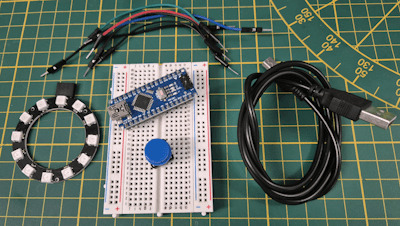
Hinweis von mir: Die mit einem Sternchen (*) markierten Links sind Affiliate-Links. Wenn du über diese Links einkaufst, erhalte ich eine kleine Provision, die dazu beiträgt, diesen Blog zu unterst��tzen. Der Preis für dich bleibt dabei unverändert. Vielen Dank für deine Unterstützung!
Vorbereiten des Mikrocontrollers
Wenn du wie ich die Mikrocontroller öfters und für verschiedene Projekte verwendest, dann empfehle ich dir vor dem Aufbau der Schaltung ein leeres Sketch / Programm auf diesen zu laden. Damit stellst du sicher, dass alle Pins den korrekten Status haben und du nicht versehentlich deinen Mikrocontroller oder ein angeschlossenes Bauteil zerstörst! void setup() { // put your setup code here, to run once: } void loop() { // put your main code here, to run repeatedly: }
Aufbau der Schaltung zum steuern eines NeoPixel Ring am Arduino
Bevor wir mit der Programmierung starten, bauen wir die Schaltung auf.

Schaltung - Arduino Nano V3 mit 12bit NeoPixel Ring und Taster
Einrichten der Arduino IDE
Für die Programmierung verwende ich die Arduino IDE, das gute ist, dass du hier lediglich die benötigten Bibliotheken einbinden musst. Zum einen ist es die Adafruit NeoPixel für den NeoPixel Ring und für den Taster verwende ich Bounce2.


Schritt-für-Schritt-Anleitung zum Programmieren des Projektes
Nachdem die Bibliotheken installiert wurden, kann jetzt mit der Programmierung begonnen werden. Dieses möchte ich dir Schritt-für-Schritt zeigen. Projekt - Arduino Nano V3 mit 12bit NeoPixel Ring & TasterHerunterladen Schritt 1: Anzeigen von Farben auf dem 12bit NeoPixel Ring Im ersten Schritt zeigen wir eine Farbe auf dem NeoPixel Ring an. //Adafruit Bibliothek zum ansteuern //der NeoPixel #include //NeoPixel Ring am digitalen Pin D4 angeschlossen #define neoPixelPin 4 //insgesamt 12 NeoPixel auf dem Ring #define numPixels 12 //Objektinstanz erzeugen Adafruit_NeoPixel pixels(numPixels, neoPixelPin, NEO_GRB + NEO_KHZ800); void setup() { //Beginn der Kommunikation mit dem Ring pixels.begin(); //eine Schleife von 0 bis 11 zum ansteuern der einzelnen NeoPixel for (int i = 0; i < 12; i++) { //setzen der Farbe Rot an jedem Pixel pixels.setPixelColor(i, pixels.Color(255, 0, 0)); //anzeigen der Farbe pixels.show(); } } void loop() {} Der Code bewirkt, dass alle NeoPixel in der Farbe Rot angezeigt werden.

Schritt 2: Auswerten eines Tasters am Arduino Nano V3 Für das Auswerten des Tasters verwende ich zusätzlich die Bibliothek Bounce2. Diese wird benötigt um den Taster zu entprellen. //Adafruit Bibliothek zum ansteuern //der NeoPixel #include //Bounce2 Bibliothek zum entprellen des Tasters #include //NeoPixel Ring am digitalen Pin D4 angeschlossen #define neoPixelPin 4 //insgesamt 12 NeoPixel auf dem Ring #define numPixels 12 //Taster am digitalen Pin D11 angeschlossen #define buttonPin 11 //Objektinstanzen erzeugen Adafruit_NeoPixel pixels(numPixels, neoPixelPin, NEO_GRB + NEO_KHZ800); Bounce2::Button button = Bounce2::Button(); //Index für das hochzählen der Tastenbetätigungen int index = 0; void setup() { //Beginn der seriellen Kommunikation mit 9600 baud Serial.begin(9600); //Beginn der Kommunikation mit dem Ring pixels.begin(); //Verbinden des Pins des Buttons mit dem //Objekt vom Typ Bounce2, //Der Taster wird über den //internen 10kOhm PullUp Widerstand verbunden! button.attach(buttonPin, INPUT_PULLUP); //Interval für das entprellen auf 5 Millisekunden button.interval(5); //Wenn der Taster betätigt wird, wird dieses als //LOW interpretiert. button.setPressedState(LOW); //eine Schleife von 0 bis 11 zum ansteuern der einzelnen NeoPixel for (int i = 0; i < 12; i++) { //setzen der Farbe Rot an jedem Pixel pixels.setPixelColor(i, pixels.Color(255, 0, 0)); //anzeigen der Farbe pixels.show(); } } void loop() { //aktualisieren des Status des Buttons button.update(); //Wenn der Taster betätigt wurde, dann... if (button.pressed()) { //Variable index um 1 erhöhen index = index + 1; //Ausgeben des Inhalts der Variable auf //der seriellen Schnittstelle Serial.println(index); } } } Wenn man jetzt auf den Taster drückt, dann wird über die serielle Schnittstelle der Inhalt der Variable index ausgegeben.

Schritt 3: Anzeigen von Farben bei Tastendruck Im letzten Schritt wollen wir jetzt die verschiedenen Farben auf dem NeoPixel Ring anzeigen lassen. Dazu benötigen wir die RGB Codes der Farben, diese können wir über die Seite https://www.rapidtables.com/web/color/RGB_Color.html sehr einfach ermitteln. Jedoch lassen sich nicht alle Farben so gut anzeigen, hier muss man etwas experimentieren. //Adafruit Bibliothek zum ansteuern //der NeoPixel #include //Bounce2 Bibliothek zum entprellen des Tasters #include //NeoPixel Ring am digitalen Pin D4 angeschlossen #define neoPixelPin 4 //insgesamt 12 NeoPixel auf dem Ring #define numPixels 12 //Taster am digitalen Pin D11 angeschlossen #define buttonPin 11 //Objektinstanzen erzeugen Adafruit_NeoPixel pixels(numPixels, neoPixelPin, NEO_GRB + NEO_KHZ800); Bounce2::Button button = Bounce2::Button(); //Index für das hochzählen der Tastenbetätigungen int index = 0; //maximale Anzahl der Farben const int MAX_COLORS = 12; //ein Array mit den Farbwerten für den Ring uint32_t colors = { pixels.Color(255, 255, 255), //weiss pixels.Color(255, 0, 0), //rot pixels.Color(0, 255, 0), //gruen pixels.Color(0, 0, 255), //blau pixels.Color(255, 255, 0), //gelb pixels.Color(255, 0, 255), //pink pixels.Color(255, 102, 102), //hellrot pixels.Color(255, 153, 51), //orange pixels.Color(0, 255, 255), //tuerkis pixels.Color(0, 0, 153), //dunkel Blau pixels.Color(102, 0, 204), //dunkel lila pixels.Color(153, 255, 51), //hell gruen }; void setup() { //Beginn der seriellen Kommunikation mit 9600 baud Serial.begin(9600); //Beginn der Kommunikation mit dem Ring pixels.begin(); //Verbinden des Pins des Buttons mit dem //Objekt vom Typ Bounce2, //Der Taster wird über den //internen 10kOhm PullUp Widerstand verbunden! button.attach(buttonPin, INPUT_PULLUP); //Interval für das entprellen auf 5 Millisekunden button.interval(5); //Wenn der Taster betätigt wird, wird dieses als //LOW interpretiert. button.setPressedState(LOW); updateNeoPixel(); } //Funktion zum anzeigen einer Farbe am NeoPixel Ring void updateNeoPixel() { //löschen aller gesetzen Farben pixels.clear(); //eine Schleife von 0 bis 11 zum ansteuern der einzelnen NeoPixel for (int i = 0; i < numPixels; i++) { //setzen der Farbe aus dem Array mit dem Index pixels.setPixelColor(i, colors); //anzeigen der Farbe pixels.show(); } } void loop() { //aktualisieren des Status des Buttons button.update(); //Wenn der Taster betätigt wurde, dann... if (button.pressed()) { //Wenn die maximale Anzahl der Farben erreicht wurde, dann... if (index == (MAX_COLORS-1)){ //Index auf 0 setzen index = 0; } else { //andernfalls... //Variable index um 1 erhöhen index = index + 1; //Ausgeben des Inhalts der Variable auf //der seriellen Schnittstelle Serial.println(index); } //Aufrufen der Funktion zum anzeigen der Farben auf dem Ring updateNeoPixel(); } }
Fazit zum Projekt - Arduino, NeoPixel Ring mit Taster steuern
Das kleine Projekt ist recht schnell umgesetzt und durch die sehr einfache Adafruit Bibliothek ebenso einfach zu programmieren. Im nächsten Schritt könnte man nun eine kleine Platine entwickeln, um diese Schaltung fest zu verbauen. Read the full article
0 notes
Text
Cozy Con Fundraiser
Thanks to you fantastic folks, we reached our 2nd goal during yesterdays stream which unlocked #ButtonPins (in shop soon) & some more artist comp. Next goal unlocks a special merch item~ Check out whats currently available at https://ko-fi.com/cozycononline

View On WordPress
0 notes
Text
int buttonPin = 3; // setup initializes serial and the button pin void setup() { Serial.begin(9600); pinMode(buttonPin, INPUT); } // loop checks the button pin each time, // and will send serial if it is pressed void loop() { if (digitalRead(buttonPin) == HIGH) { Serial.write('H'); } else { Serial.write('L'); } delay(1000); }
0 notes
Text
I really love Danger Days and I wanted to make more art about it so I decided to make a button pin :D


#mcr#my chemical romance#gerard way#party poison#danger days#killjoys#mcr art#mcr fanart#diy#pin#buttonpin
26 notes
·
View notes
Text
Electric ... Dice ... Machine (Makerspaces week 4)
This week our challenge was to use our Arduino boards to create a circuit that represented a randomized dice roll. By successfully creating a circuit that connects resistors, different size resistors, and a push button we hope to resemble a dice rolling at random, generating different values ranging from 1-6.
Lets "dice" into this

Phase 1: Initially the idea was to construct and effectively run the circuit for a push button. I began by setting up a build with the 7 LEDs but I did not leave enough room for the individual resistors. The push button needed a resistor as well along with additional wiring. There was no room so I scrapped it and started again. After rebuilding the circuit I assigned my push button to input 2. Realizing the connection of the LED's was more important than the location I felt as though this would be a successful build. This build was good, please see attachments below for this phase of this weeks challenges:
Code: const int buttonPin = 13; const int ledPin = 9; int currentState; int lastState = HIGH; int ledState = LOW; void setup() { Serial.begin(9600); pinMode(ledPin, OUTPUT); pinMode(buttonPin, INPUT); } void loop() { currentState = digitalRead(buttonPin); if (lastState == HIGH && currentState == LOW) { ledState = !ledState; digitalWrite(ledPin, ledState); } lastState = currentState; delay(50); }
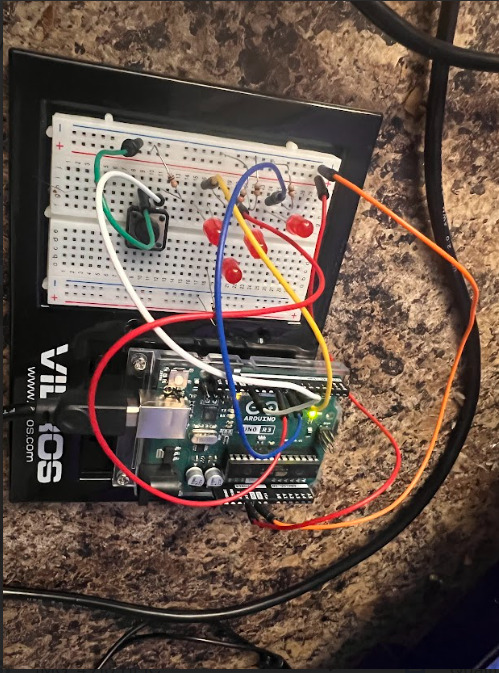
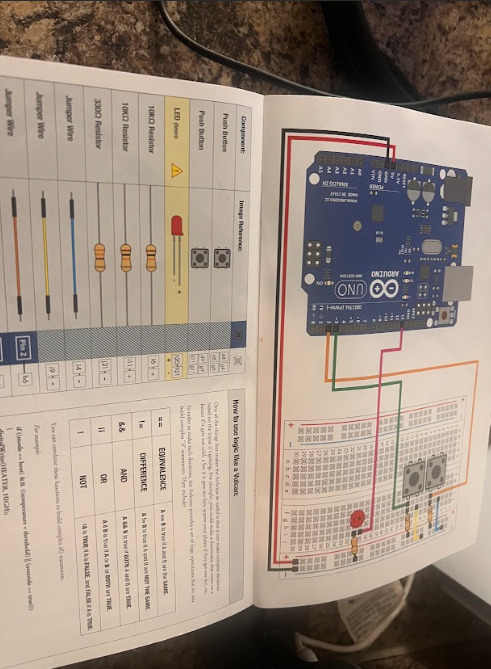
I felt good at the end of this phase of week 4's activities. After a positive phase 1 I was ready to begin phase 2.
Phase 2: In the next phase my goal was to connect all 6 LED bulbs and get the circuit read the randomized roll results. After placing all 6 LED's onto the board and verifying their connection I went and altered the code to include the dice and random order. After locating a code and getting it wrote to fit my circuit it was time for me to test my circuit.
See results in video below:
There was a resistor that had fallen out of place, after correcting this resistor and realizing that one LED was facing the opposite way this was the next test
See results in video below:
Code: #define BUTTON_PIN A0 const byte die1Pins[] = {3, 4, 5, 6, 7, 8,9}; void setup() { pinMode(A0, INPUT_PULLUP); for (byte i = 0; i < 7; i++) { pinMode(die1Pins[i], OUTPUT); } } void displayNumber(const byte pins[], byte number) { digitalWrite(pins[0], number > 1 ? HIGH : LOW); // top-left digitalWrite(pins[1], number > 3 ? HIGH : LOW); // top-right digitalWrite(pins[2], number == 6 ? HIGH : LOW); // middle-left digitalWrite(pins[3], number % 2 == 1 ? HIGH : LOW); // center digitalWrite(pins[4], number == 6 ? HIGH : LOW); // middle-right digitalWrite(pins[5], number > 3 ? HIGH : LOW); // bottom-left digitalWrite(pins[6], number > 1 ? HIGH : LOW); // bottom-right } bool randomReady = false; void loop() { bool buttonPressed = digitalRead(BUTTON_PIN) == LOW; if (!randomReady && buttonPressed) { /* Initialize the random number generator with the number of microseconds between program start and the first button press */ randomSeed(micros()); randomReady = true; } if (buttonPressed) { for (byte i = 0; i < 10; i++) { int num1 = random(1, 7); displayNumber(die1Pins, num1); delay(50 + i * 20); } } }
Reflection: This week was challenging much like each week up to this point. I enjoyed being able to create something as cool as an electric dice machine, completing a circuit of this level of difficulty only makes me wonder what is ahead.

0 notes
Text
Final project light game code
int ledPins[] = {2, 3, 4, 5, 6}; // array of LED pinsint numLeds = 5; // number of LEDsint direction = 1; // current direction of LED motionint currentLed = 0; // index of currently lit LEDbool stopped = false; // whether the LEDs are currently stoppedbool buttonPressed = false; // whether the button is currently pressedint buttonPin = 7; // pin for the stop buttonint speed = 100; // initial delay between LED changesint buttonCount = 0; // number of times button was pressed on current LEDunsigned long buttonPressStartTime = 0; // time when the button was pressed void setup() { // set LED pins as outputs for (int i = 0; i < numLeds; i++) { pinMode(ledPins[i], OUTPUT); } // set button pin as input with pull-up resistor pinMode(buttonPin, INPUT_PULLUP); // turn on first LED digitalWrite(ledPins[0], HIGH);} void loop() { // check whether button is pressed if (digitalRead(buttonPin) == LOW) { if (!buttonPressed) { // button just pressed buttonPressStartTime = millis(); // record the press start time buttonPressed = true; } else { // button still pressed unsigned long currentTime = millis(); unsigned long buttonHoldDuration = currentTime - buttonPressStartTime; if (buttonHoldDuration >= 2000) { // button held for 2 seconds resetSpeed(); } } } else { if (buttonPressed) { // button released buttonPressed = false; if (!stopped) { // LEDs still moving buttonCount++; // increment button count if (buttonCount == 3) { // button pressed 3 times stopAndBlink(); } } } if (!stopped) { // LEDs still moving moveLEDs(); } }} void moveLEDs() { digitalWrite(ledPins[currentLed], LOW); // turn off current LED currentLed += direction; // move to next LED if (currentLed == numLeds || currentLed == -1) { // if at end of LEDs, reverse direction direction *= -1; currentLed += direction; } digitalWrite(ledPins[currentLed], HIGH); // turn on next LED delay(speed); // delay between LED changes} void stopAndBlink() { stopped = true; // stop the LEDs for (int i = 0; i < 5; i++) { // blink all LEDs 5 times for (int j = 0; j < numLeds; j++) { digitalWrite(ledPins[j], HIGH); } delay(200); for (int j = 0; j < numLeds; j++) { digitalWrite(ledPins[j], LOW); } delay(200); } stopped = false; // resume LED motion buttonCount = 0; // reset button count} void resetSpeed() { speed = 100; // reset speed to its original value}
0 notes
Photo
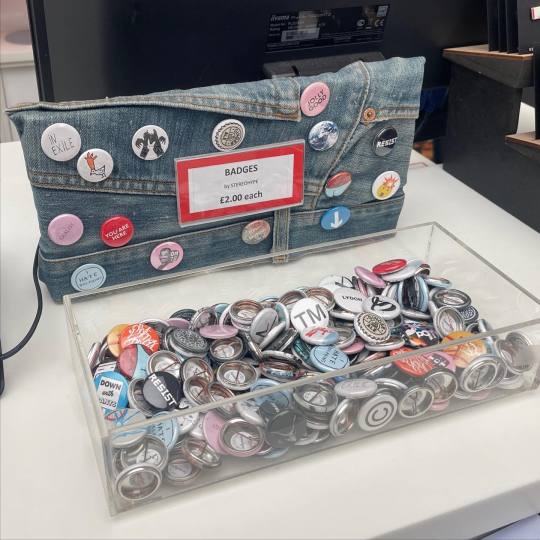
🔴🟣🔵🟢🟡🟠🟤⚪️⚫️ Our amazing @stereohype stockist @saatchi_gallery store kindly sent us new snapshots of their button badge till point displays. They focus on approximately 50 designs from our 1777-strong collection and temporarily added a few more street art themed designs for their recent #streetart exhibition. For wholesale info please visit https://www.stereohype.com/content/9-wholesale ❤️🐿️ — #planetstereohype #buttonbadges #pinbadges #buttonpins #badges #stereohype #saatchigallery #saatchigallerystore #saatchigallerylondon https://instagr.am/p/CsTcebJtHai/
0 notes
Photo

I’m so happy to say, I have a new product finally after so long! I GOT A BUTTON MAKER WHOOHOO! For now I only have these 23mm buttons, but bigger ones are soon to come.. HEHE. I love pins and buttons. I collect them on my tote and so I figured others would have the same obsession.. Do you like buttons and pins too? 😋 #buttonpin #buttonpins #stationery #stationeryaddict #stationeryholics #stationery #stationeryshop #stationerylove #loveforanalogue #ephemera https://www.instagram.com/p/CLZR81DpBZC/?igshid=1a0f5t8l1p1km
#buttonpin#buttonpins#stationery#stationeryaddict#stationeryholics#stationeryshop#stationerylove#loveforanalogue#ephemera
3 notes
·
View notes