#bowers pavers
Explore tagged Tumblr posts
Text
Pergola in Orange County

Inspiration for a mid-sized transitional backyard concrete paver patio remodel with a fire pit and a pergola
0 notes
Text
Sacred Spaces
“Nature is the original church. Worship there daily.” Alan Cohen
If we have learned anything from the pandemic of the past eighteen months, it is that our greatest blessing is to be able to go outdoors to breathe fresh air. Many people choose to hike the hills, walk the reservoir, or take a jaunt to the ocean to calm nerves and preserve sanity. For those of us fortunate enough to have a garden, balcony, porch, or patio, we can open a door to escape the confines of lockdown.
The majesty of Mother Nature rivals the most exquisite man-made cathedral. Throughout my landscape, I have designed special areas that stimulate my senses, inducing a sense of tranquility and connectivity with the natural world. I have dubbed these my “sacred spaces”, places where I can meditate, watch the wildlife, listen to birdsong, commune with the breeze, rest my weary legs, take a nap, or just sit and contemplate life. My “sacred spaces” provide a structure amidst the chaos, a respite against the turmoil of the times.
We can expand our living environment by crafting outdoor elements that nurture our spirits, emotions, and bodies. Here are a few of my favorite strategies to help gardeners recast their yards into a serene, yet lush oasis.
Water
The sound of water is immensely soothing. Listening to the gurgling of a fountain or the rippling of a stream heightens my creativity. Birds splashing in a birdbath bring a smile to my face. A pond with a recirculating pump provides a happy home for frogs, and if deep enough, fish.
Hammock
Hanging a hammock from two trees is the ultimate in shaded relaxation. I have double hammocks strung between a giant magnolia and Japanese maples. There is nothing quite like swaying in the hammock looking up at the light as it dances between the branches. The colors of the leaves are forever changing. For an afternoon nap on a hot day, a hammock provides a piece of paradise.
Swing
I’ve installed a metal garden swing behind my pond flanked by orange Birds of Paradise and midnight blue agapanthus. By adding comfy cushions, I can silently swing while listening to the aerating pond and watching the aerial antics of squirrels spiraling through the loquat tree.
Tables, Chairs, and Benches
Throughout my landscape, I have placed multiple tables, chairs, and benches in specific areas to encourage me to take a break from the hard labor. A wooden picnic table under an apple tree begs me to take a lunch period. A bench facing the hills beckons me to behold a doting doe with her twin fawns as they forage. A small rocking chair in a cozy nook allows me to remove my mud boots and watch the sunset.
Paths and Walls
Whether you use gravel, bricks, decomposed granite, pavers, or flagstone, creating paths throughout the garden allows for interesting patterns and yard exploration. Because I believe in recycling, upcycling, and repurposing, I always utilize whatever materials are available when I’m building stairs, paths, or walls. A former built-in redwood bench is turned on its side to be reused as a retaining planter box. Used bricks add a separation element to the revamped below-deck walkway bordering the tangled wisteria forest.
Pergolas, Gazebos, Decks
A deck is always a great gathering spot. A gazebo or pavilion is a stately structure to sit, embrace the view, and offer gratitude for outdoor rooms. On my deck, under my grape, wisteria, and bower vine-covered pergola, I unwind after a long day by soaking in the hot tub. This is my prayer place as I gaze at the twinkling stars above.
Plantings
The selection of specific plants is critical to the overall color and scale of any garden. My goal is always to witness botanical interest 365 days a year through express attention to the trees, flowers, shrubs, bulbs, vegetables, herbs, and bushes. Every season brings a change to the landscape. Roses bloom for nine or ten months when regularly dead-headed. Perennial sweet peas flourish with their pretty purple pea heads from spring until autumn. Pink naked ladies pop up to smarten the summer soils when most other plants find it too hot to shine. Deciduous trees such a Japanese maple, pistache, crape myrtle, and liquid amber offer spectacular autumn colors.
When you think about creating your sacred spaces, make sure you are bringing the indoors out and the outdoors in. Expand your home environment by mimicking and mingling colors, patterns, themes, and shapes through both areas. Great design amplifies your emotional well-being. Rediscover forgotten or overlooked spots. Feel the vibes as you develop your scheme keeping comfort and safety at the forefront. Use your imagination to unearth the endless possibilities.
Mother Nature is the original church. When we honor Her, we will attain a more balanced life with peace as a bonus gift, no matter what is happening around us. As this latest Delta variant spreads its dangerous virus tendrils, I urge everyone to talk with their physicians, listen to the science, and get vaccinated. Discover your sacred space, breathe, and spend as much time outdoors as possible.
A Be the Star You Are!® volunteer from Minnesota emailed me “I go for walks on our nearby trail as often as I can because it’s a way to escape to nature, and I know how you feel about that! So off I go.”
Off you go!
MARK YOUR CALENDARS!
Saturday, September 25th, Be the Star You Are!® will participate in the first live event at the Pear and Wine Festival with a booth sponsored by the Lamorinda Weekly(www.Lamorindaweekly.com) and MB Jessee painting (www.MBJessee.com). Wear your mask and visit us! Details at https://www.bethestaryouare.org/copy-of-events
Phots and more: https://www.lamorindaweekly.com/archive/issue1513/Digging-Deep-with-Goddess-Gardener-Cynthia-Brian-Sacred-spaces.html
Press Pass: https://blog.voiceamerica.com/2021/08/18/sacred-spaces/
Happy Gardening. Happy Growing.
Cynthia Brian, The Goddess Gardener, is available for hire to help you prepare for your spring garden. Raised in the vineyards of Napa County, Cynthia is a New York Times best-selling author, actor, radio personality, speaker, media and writing coach as well as the Founder and Executive Director of Be the Star You Are!® 501 c3. Tune into Cynthia’s StarStyle® Radio Broadcast at www.StarStyleRadio.com.
Buy copies of her books, including, Chicken Soup for the Gardener’s Soul, Growing with the Goddess Gardener, and Be the Star You Are! www.cynthiabrian.com/online-store. Receive a FREE inspirational music DVD and special savings.
Hire Cynthia for writing projects, garden consults, and inspirational lectures.
www.GoddessGardener.com
2 notes
·
View notes
Text
10 Questions to Ask Before Building a Swimming Pool
The most important part of building a pool is the preparation phase, when you’ll decide the overall look of your swimming pool and hire a pool contractor. A landscape architect or luxury pool builder can walk you through the design process, but it helps to have a general idea of what you ultimately want. Before building a pool, ask yourself these 10 questions and follow tips from the pool builders who weighed in to share their expertise.

1. Why do I want a swimming pool?
As with all good design, form follows function — so the answer to this question will establish the foundation for your pool design. For example, a pool meant for fitness swimming can look remarkably different from one intended for backyard entertaining. You may simply want to enjoy the aesthetics or audible appeal of water in your garden — which will greatly influence the design. To fulfill hydrotherapy aspirations, a combination pool/spa may be in order.
Brian Van Bower, owner of Aquatic Consultants, Miami, FL., recently designed a pool for one high-profile client in Pennsylvania who requested a pool situated on the side of his yard where his kids could play. After visiting the client’s estate, Van Bower was able to show the homeowner that what he really wanted was a centrally-located, three-sided vanishing-edge pool to accentuate the spectacular hillside view. “Sometimes, people don’t know what they want until they see it,” Van Bower says.
2. Who will use the pool?
Keep in mind that a pool designed for child’s play may look quite different from one designed for romantic interludes. To accommodate swimmers of all ages and allow for multiple activities, you might want to include shallow areas for toddlers, extra grab rails for the elderly, tanning ledges for sun worshippers or even underwater speakers for music aficionados.
3. Is my yard suitable for pool construction?
Many builders recommend that soil tests be conducted to confirm the site is suitable for pool construction. Sandy, expansive or rocky soil and other ground factors present unique building concerns. In addition, a high water table can significantly increase construction costs.
Bill Drakeley, owner of Drakeley Swimming Pool Company, Bethlehem, CT, recalls one project where he uncovered a garbage dump during excavation. The trash had to be removed and the loose soil compacted, costing the homeowner an additional $30,000.
Sometimes a proposed site will not work because it is inaccessible by the heavy machinery needed to dig the hole for the pool. Ideally, the pathway should be at least 8 feet wide.
4. Where will the pool be located?
Before you can answer this question, you’ll need to know the zoning and building laws for your property. To control water runoff, there may be restrictions on how much of your yard can be covered with decking and in which direction it must slope. Many municipalities also require that pools be fenced in, which might affect where your pool can be located. Gas, electrical, telephone, cable and water lines may also influence the pool’s location, as there is often an additional expense to relocate these utilities.
Remember to consider how people will enter and exit the pool, where people will congregate and how to maximize sun exposure while minimizing wind exposure, which contributes to heat loss and evaporation.
Because homeowners typically spend more time looking at their pool than swimming in it, consider how the pool will be viewed from the rest of the yard and from within the home, says Kevin Braidic, vice president of Watershape Consulting, Inc., San Diego, CA. He recommends including landscape lighting and water features so that the pool can be enjoyed year-round. “We do a lot of design based on visibility from within the house,” Braidic says. “We strive for a work of art that is dynamic, that clients can enjoy everyday, whether they’re eating dinner, washing dishes or whatever.”
5. What shape and style will the pool be?
Luxury pool builders suggest choosing a shape and style that complements the architecture of the home and existing landscape.
One of Drakeley’s New England clients lived in a traditional colonial home but wanted a freeform kidney-shaped pool like the one his mother had in Florida. “I had to tell him, ‘You may like that because it’s a great memory, but it doesn’t fit with the house,’” Drakeley recalls. “Once you bring up the point that the architecture doesn’t fit, most clients are open to discussing other options.”
If you are set on a pool design that doesn’t match the home’s architecture, try to incorporate a transition area from the home to the pool, says Brian Van Bower. Through the use of walkways and plantings, as well as by changing materials, you can gently guide people from one aesthetic to another without causing a clash in styles. “Landscaping makes a great transition, especially where there are elevation changes,” he says.
6. What special features do I want in my pool?
To maximize enjoyment of your pool, even when you’re not swimming, you can incorporate water features and lighting. Based on how you plan to use your pool, you may also want to consider underwater benches, shallow beach-style entries, a swim-up bar and areas to play water volleyball or basketball. An automatic pool safety cover will also provide a convenient form of protection whenever the pool is unsupervised. If aquatic exercise interests you, consider installing underwater handrails and a variable-speed current system, which creates a flow of water that enables you to swim in place.
7. What other backyard amenities do I want?
When planning your ideal poolscape, list everything you’d like to include, even if your budget does not permit building it now. Some things to consider include a pool house, outdoor kitchen, firepit, outdoor shower, swim-up bar, gazebo and even children’s play equipment.
As Braidic points out, it’s much cheaper to accommodate future plans in your original design than to modify your poolscape later on. For example, if you know you’ll be adding a firepit or outdoor kitchen at a later date, it’s best to run the gas lines to those areas of the poolscape in the beginning, which eliminates the need to tear up the deck and surrounding landscape at a later date.
8. What materials do you want to use?
Although plaster had been the dominant pool surface for decades, aggregate and tile surfaces have become de rigueur. Elaborate tile mosaics and, more recently, glass tile provide the artistic flexibility many luxury pool owners seek.
You’ll want to look at the surrounding architecture and landscape for clues about what materials to use. Natural stone pavers and rock waterfalls can help a pool blend into a natural landscape, whereas glass tile and arcing jets of water might look lovely around a home in a contemporary, urban setting.
“Our design is a seasonal design,” Drakeley says, pointing out that the colors and textures of both the hardscape and softscape play an important role. “They have to have a symbiotic relationship.”
youtube
9. How can you ensure that your pool will be easy to maintain?
No pool is maintenance-free, but you can greatly reduce maintenance by making sure your pool is engineered to be energy-efficient, with sound hydraulics and substantial filtration. According to Van Bower, this means using variable-speed pumps, larger pipes, adequate skimmers and above-standard turnover rates. Automatic sanitizers, such as saltwater chlorinators, ensure that the proper amount of sanitizing chemicals are in the water at all times, making it hard for algae to grab hold of your pool.
10. Who will build the pool?
The best way to locate pool builders who are committed to quality construction and good design is to ask for referrals from friends and colleagues who own pools you like. Building inspectors and landscape architects are other sources of referrals. Thanks to referrals, Van Bower, who works on award-winning projects around the world, is able to forgo traditional advertising. If a potential client calls, it’s because he or she was given Van Bower’s name by a previous client. The same goes for Drakeley, who once built a vanishing-edge pool for a client and then signed pool contracts for six other couples in the client’s social group.
“The important thing is for clients to enjoy the relationship with their contractor,” adds Van Bower. “I’m a big believer in breaking bread and getting to know people. That’s when you can tell whether it’s right or not.”
Find Original Post Here!
1 note
·
View note
Text
It Goes Smoothly: How Bowers Handles Local Commercial Paving
Support Your Local Businesses In More Ways Than One
Simply put Bowers Asphalt & Paving, Inc. takes care of their local commercial paving projects in the same manner as their huge, industrial projects. Local commercial retail is the heart of the community. It's important that the logistical support they receive is of the highest quality.
Bowers has always set out to build up the community. No pun intended, they lay the foundation and the structure for local businesses. That's because they are a local business. Back in 1946, the company started with simple paving of driveways. Along with that the Bowers family performed asphalt repairs and sealcoating. Being consistent has always been a mainstay of the company. Starting with a simple pull box in 1946, the company has grown and constantly built itself up so it can be a better asset to the community it serves.
The incorporation in 1965, just 19 years from the start of the company was an important milestone. It hasn't stopped there, and they continue to build the company as they build the communities that pave in and serve.
Encouraging big business to come into the community is a win-win for both the residents as well as the economy in general. With a facilitator around like Bowers, this can become a reality. That means you don't have to drive 40 minutes out of your way to visit a larger scale commercial business. Having a big box retailer right next to a mom-and-pop business helps everyone. The road leading to the local commercial business is important. The maintenance of the road will ensure that customers can make it there safely and soundly without incident. Bowers Asphalt and Paving, Inc. is dedicated to building communities.

Local commercial means the businesses that are in your local area. These businesses are close to where you live and provide an immeasurable resource to the residents of the community. They deserve the best logistics. Local commercial paving includes the parking lots as well as the foundational and entrance structures to the commercial enterprise. Having a high-quality paver means these businesses have the aesthetics they require to draw people into the business. High-quality also means that people are not incurring injury due to substandard paving. Bowers has been in business to ensure your business stays in business.
They know how important it is to have integrity in every yard of concrete that is poured. It is a family owned and operated business. The Bowers name stands for excellence.
Serving the Lucas and Northern Wood counties that lie within a 20-mile radius of Toledo, Ohio – Bowers performs
new asphalt pavement
asphalt mill and fill
asphalt reconstruction of parking lots
asphalt reconstruction of roads
In addition, Bowers asphalt and paving provides excavation and aggregate placement for building sites. Located in Walbridge Ohio. They are an accredited business according to the Better Business Bureau. They are a member of Flexible Pavement of Ohio, as well as Asphalt 100% Recyclable. The folks at Bowers Asphalt & Paving are conscious of their community. That's why they have taken the time and effort to gain and maintain membership in these responsible entities.
https://bowersasphalt.com/careers/
0 notes
Photo

SOLD! Under Contract in 10 days! Congrats to our Buyer and their Leis Realty REALTOR® Mike Bowers ✊ You don’t want to miss the opportunity to own this gorgeous tri-level.This home is move in ready with beautiful hardwood floors throughout the entire home. The kitchen and bathroom have been recently remodeled and the entire house has many updates. The home has double pane windows and levelour blinds. Step out the back door to two very nice entertaining areas. Get ready to sit out and enjoy your screened in back porch and paver patio. Agent is related to seller.👉 🏡1128 Gray Ave. Greenville, OH 💵$145,000. 🤳Call/Text for your personal tour with Leis Realty REALTOR® Mike Bowers at 937-564-1355. https://www.instagram.com/p/B_GL_zbp6RN/?igshid=1tu2jdxdzxcna
0 notes
Text
The 10 Most Marvellous Modernist Homes Of The Year
The 10 Most Marvellous Modernist Homes Of The Year
Architecture
by Amelia Barnes
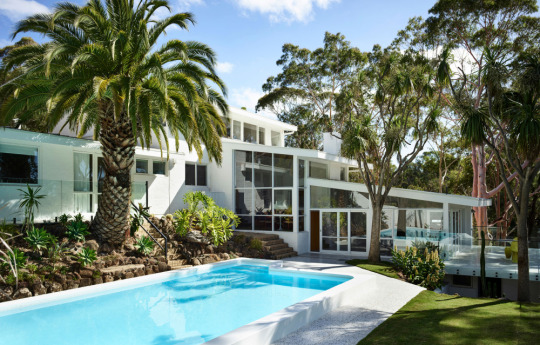
The Fender House in Mount Martha, with renovations from Whelan Project. Photo – Derek Swalwell.
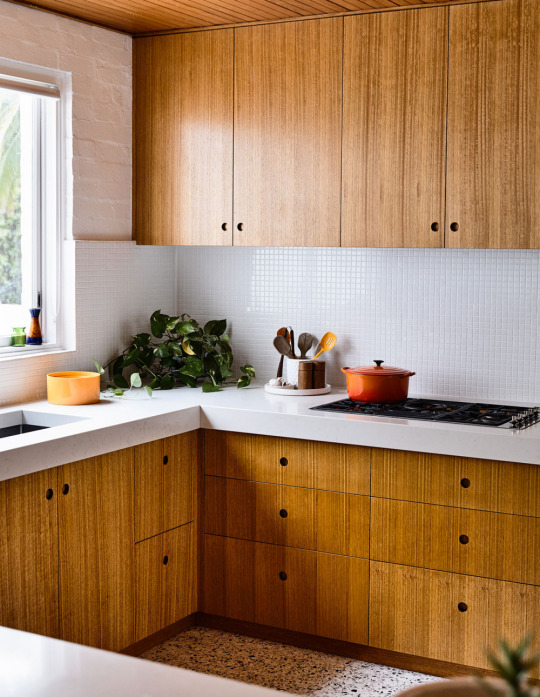
‘We love our kitchen, it’s so big and spacious and chunky. Cabinet maker Roman rebuilt all the cabinetry as it was rotting and about to fall through the floors. He skilfully managed to match the wood stain to the original wood panels.’ On the bench is the 1970s Le Creuset pot, and vintage orange bowl. Photo – Derek Swalwell.
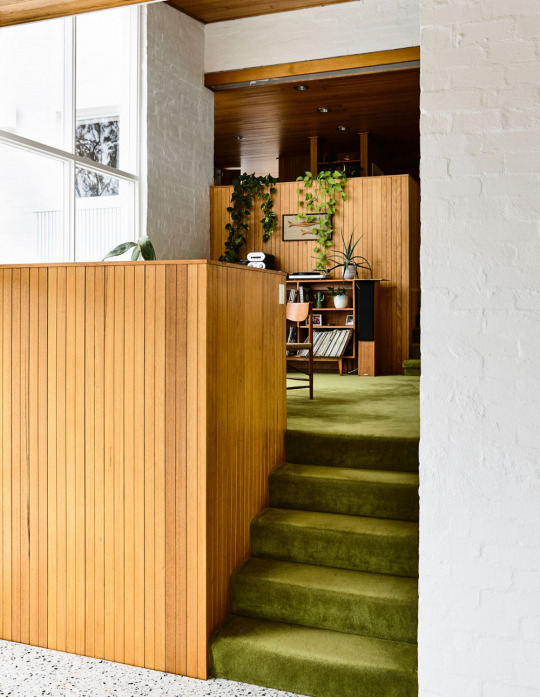
There are stairs and split levels everywhere in this house. These stairs lead from the sun-room to the music room then up another level to the kitchen. You can also see the original porthole lights in the ceilings and the very uniquely designed light boxes, which Katie and Ian re-furbished. Photo – Derek Swalwell.
A Lovingly Restored Mid-Century Marvel In Mount Martha
This circa 1973 home may look straight out of Palm Springs, but it’s actually located just outside Melbourne in Mount Martha.
Originally designed by Karl Fender (now one half of Fender Katsalidis), owner Katie Brannaghan and her husband Ian purchased the property in 2017 and have since returned the house to its former glory.
We shared this spectacular home back in October, and it’s already one of the popular mid-century homes we’ve published to date!
Revisit the original story here
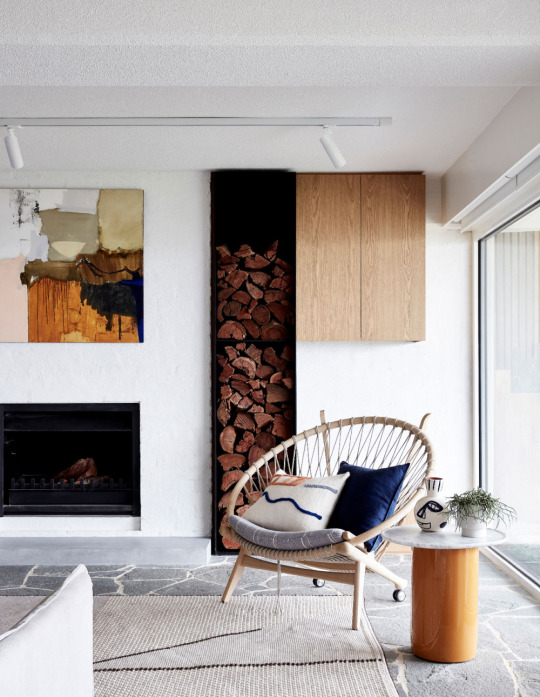
An elegant corner in the mid-century home. Photo – Sean Fennessy. Styling – Studio Esteta.
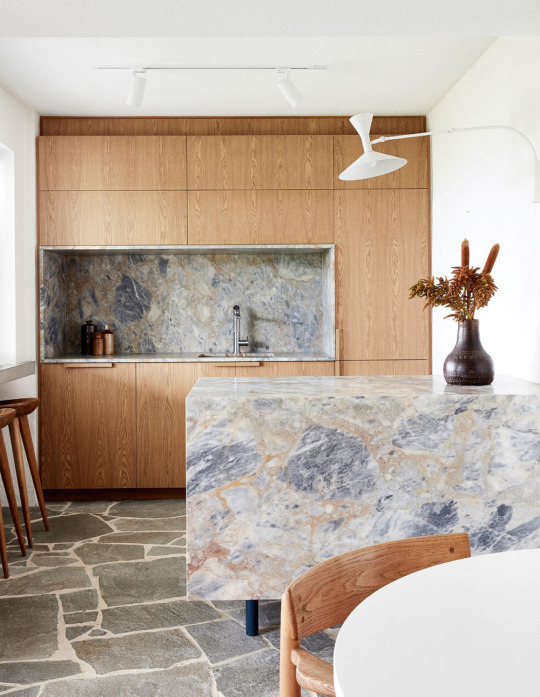
The wood and stone tones reflecting the colour palette of the surrounding environment. Photo – Sean Fennessy. Styling – Studio Esteta.
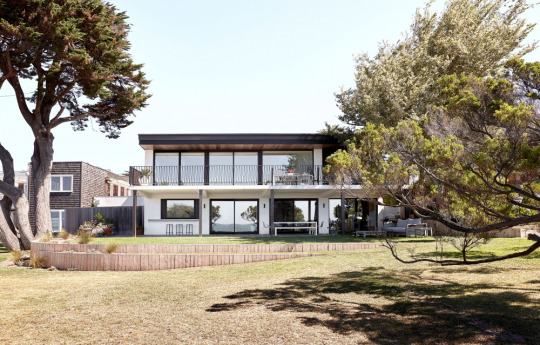
The Portsea Beach House by Studio Esteta. Photo – Sean Fennessey. Styling – Studio Esteta.
Avoiding The Coastal Cliché, With Mid Century Flair
This home on Victoria’s Mornington Peninsula is the ultimate combination of beach house, mid-century, and sophisticated modern design.
Studio Esteta recently updated the hilltop home to accommodate six bedrooms, without stripping it of modernist character. Among stunning features are the crazy interior paving and rich marbled surfaces, complemented by original mid-century furniture and decor.
Revisit the original story here
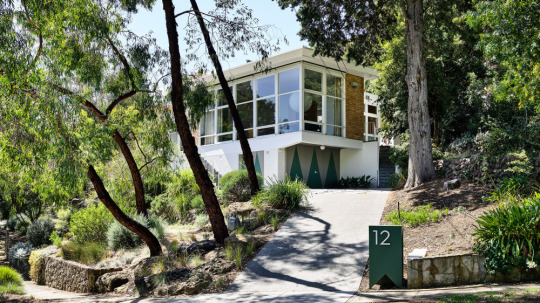
Looking stately, in Studley park. Photo – Derek Swalwell.
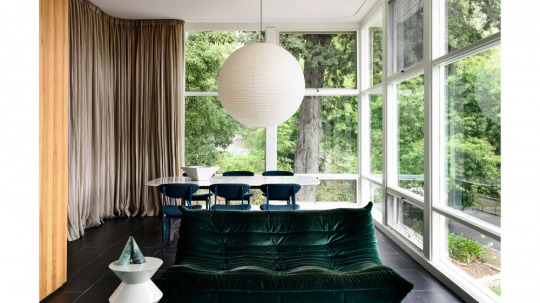
1950s windows, meet a contemporary couch. Photo – Derek Swalwell.
Enhancing The Past In Studley Park
Our Instagram went crazy upon posting the facade image of this home located on Studley Park, a tightly held pocket of Melbourne’s Kew!
The mid-century home was originally designed by influential Russian-born Australian architect Anatol Kagan, who was committed to designing buildings that had a positive impact on society.
Most recently, the 1950s home has been sympathetically renovated by Kennedy Nolan, who refreshed the architectural beauty of the property, and re-zoned the layout to reflect a more contemporary way of living.
Revisit the original story here
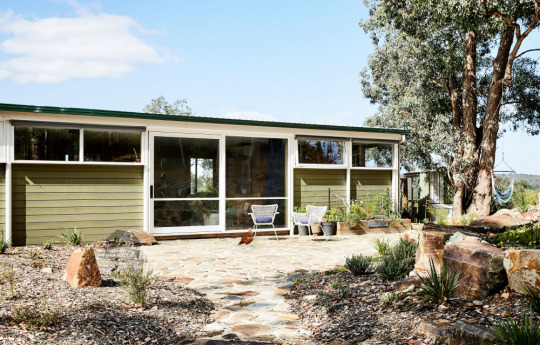
This original Robin Boyd-designed house in Warrandyte is now the family home of writer, strategist and podcast host Emma Clark Grattan, furniture maker Lee Grattan, and their children Archer and Jethro. The original house on the block burned down in 1962, and the owners commissioned Robin Boyd to design this new house in 1963. The house is clad with steel, which is quite unusual for the celebrated architect, but part of the brief was that the house was fire-resistant. Landscaping by Emma and Lee. Photo – Caitlin Mills. Styling – Annie Portelli.
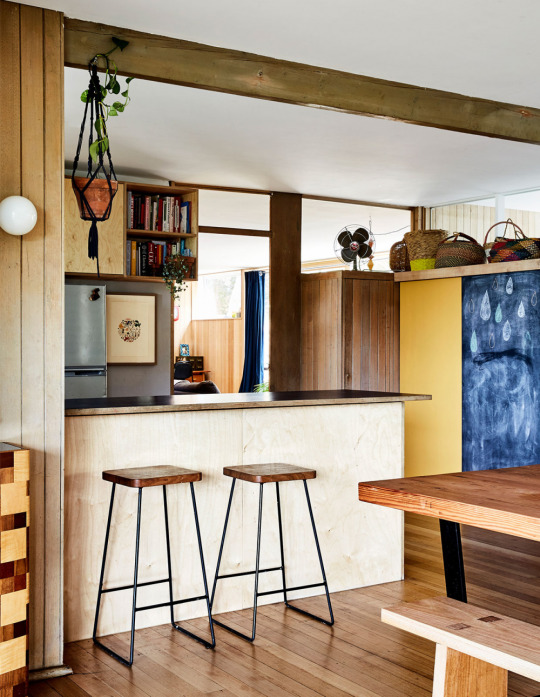
Original wall light and Tasmanian Oak flooring. The couple painted the pantry door to break up the timber in the house. Baskets collected over the years now hide the kids’ sports and winter clothing. Artwork next to the fridge was a gift from friends Ace Wagstaff and Sam George. Steel and timber stools made by Lee. Photo – Caitlin Mills. Styling – Annie Portelli.
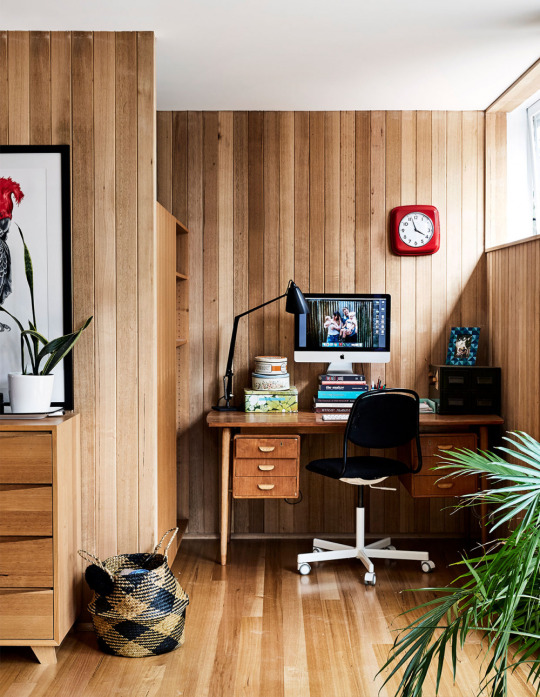
‘Lee got the desk from Great Dane, but it was broken and in pieces so they were going to throw it out. He managed to restore it and we’ve dragged it from house to house’. Lamp is an original Planet lamp bought for a dollar from a church sale in Warrandyte. Clock from IKEA. Geo dresser made by Lee. Photo – Caitlin Mills. Styling – Annie Portelli.
This Rare Robin Boyd Original Makes An Extraordinary Family Home
Among the many beautiful mid-century homes in Melbourne’s Warrandyte is this 1963 one designed by iconic Australian architect, Robin Boyd.
This home is owned by content strategist and writer Emma Clark Gratton, and her furniture making husband, Lee Gratton, who moved here in search of extra space for their young family.
The seasoned renovators couple have redone the kitchen, added new cabinetry and tiling, renovated the master bedroom, and installed solar panels among many other small tweaks.
We love the spectacular views appreciated via through floor-to-ceiling windows in every room, alongside the beautifully designed interiors full of Gratton furniture and retro finds.
Revisit the original story here
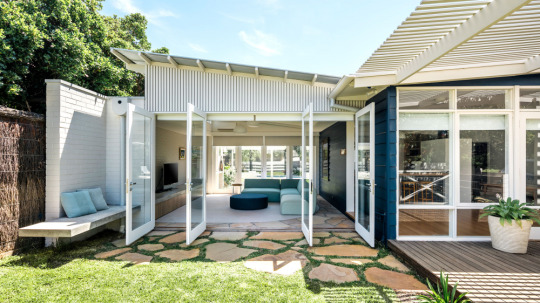
Perfect Portsea living. Photo – Michael Kai.
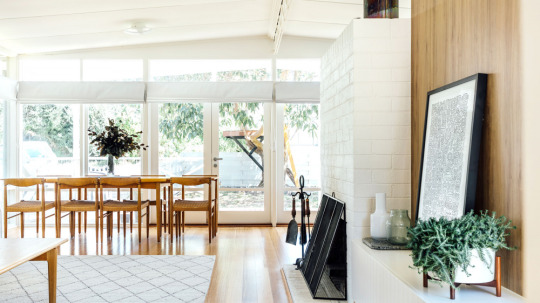
The new home is filled with light. Photo – Michael Kai.
A 1960s Portsea Shack Gets A Contemporary Revamp
Pleysier Perkins recently transformed this ‘tired beige’ ‘60s shack in Portsea, Victoria into a light and bright getaway that balances mid-century charm with modern family life.
The architects updated the kitchen, dining, and living area in the process to improve spatial flow, added a new playroom, and gave the interiors minor facelift.
Full-height doors at both ends of the new addition connect the space with the outdoors. The boundaries between these spaces are blurred with the use of crazy pavers that gently extend from the interiors to the grassy outdoor areas.
Revisit the original story here
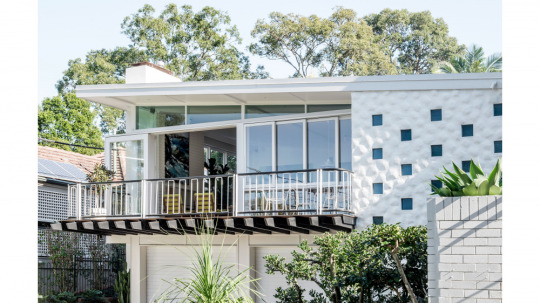
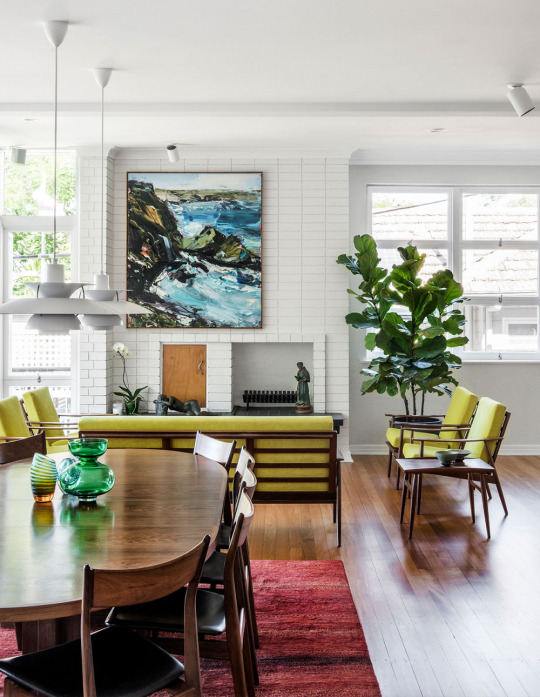

Modernising A Mid-Century Stunner
This mid-century home in St Lucia, Brisbane, features light and airy spaces to make the most of its subtropical climate.
The property was renovated by Lucy Jeffries as one of the first projects since establishing her own studio. Prior to this, she had been honing her skills with award winning residential architectural practices Vokes and Peters and Shaun Lockyer.
This home was all about paring back and returning the home to its essential form, with a few carefully considered contemporary updates.
Revisit the original story here
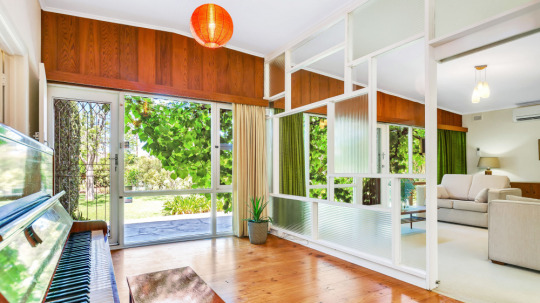
Photo – courtesy of Ouwens Casserly Real Estate.
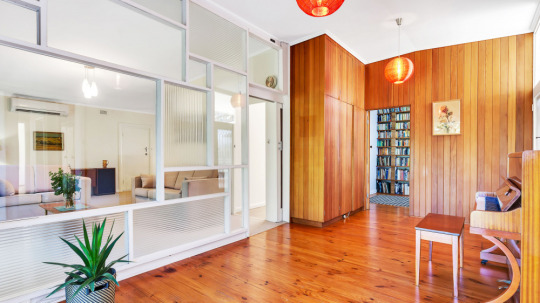
Photo – courtesy of Ouwens Casserly Real Estate.
A Corner-Block Mid-Century Classic
Our columnists over at Modernist Australia introduced this 1958 home in Klemzig, Adelaide, to us when it was on the market earlier in the year. It’s since been snapped up, and it’s not hard to see why!
The home has been sympathetically updated by its previous owners, who lived there since 1968. Many original features were retained over the decades, including a glassy window wall looking into the living room, and the wonderfully pink bathroom!
Revisit the original story here

The new century vibe! Artwork by Wilma Tabacco from Gallerysmith.hoto – Shannon McGrath. Styling – Swee Lim.
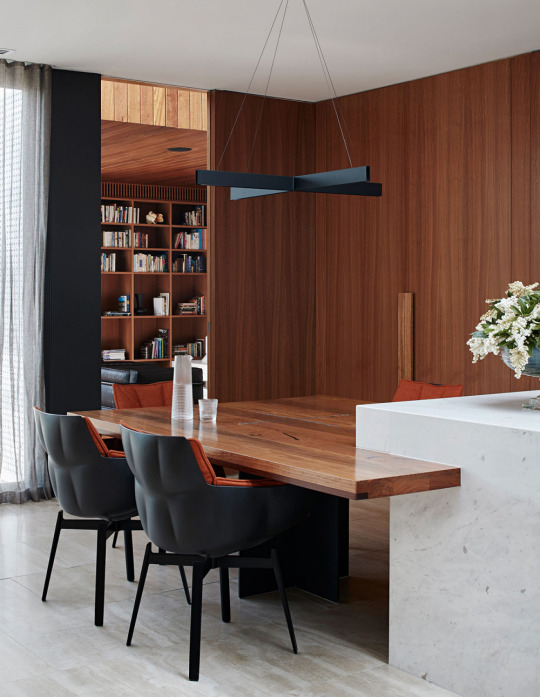
Clean mid-century lines, re-imagined for now. Photo – Shannon McGrath. Styling – Swee Lim.

The exterior maintains its strong 1960s facade. Photo – Shannon McGrath. Styling – Swee Lim.
Mid Century Meets Modern, In This Thoughtfully Renovated 1960s Home
This ‘60s home is pure mid-century from the street, but step inside and you’ll find some seriously glamorous interiors!
Bower Architecture and Interiors were responsible for recently updating this Caulfield property. The brief was to rediscover and celebrate the home’s original features, and create additional spaces with ‘hints of whimsy and glamour (but not glitz).’
Revisit the original story here
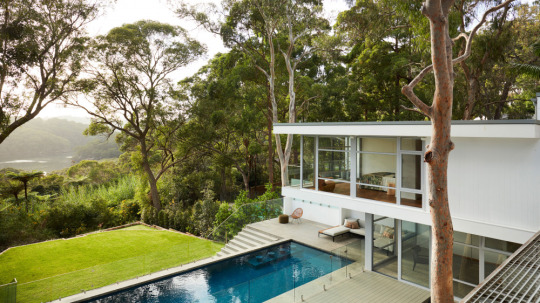
Photo – Prue Ruscoe.
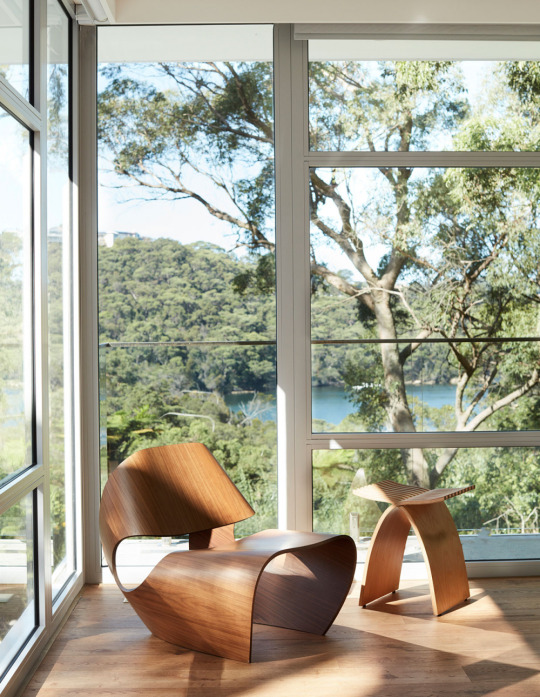
Photo – Prue Ruscoe.
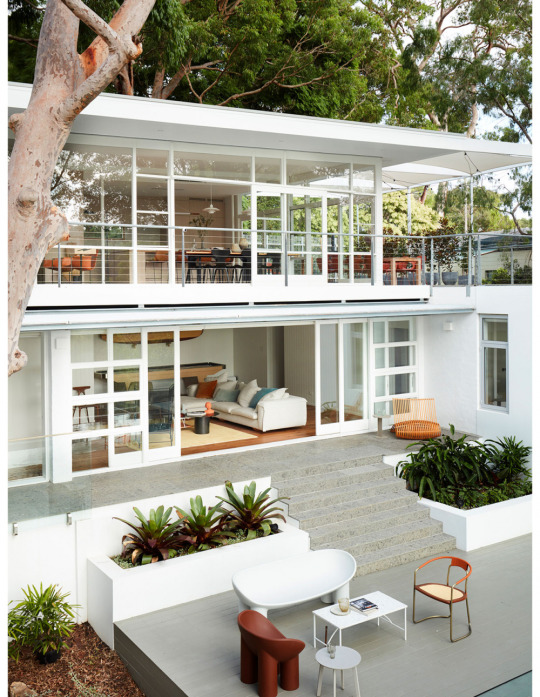
Photo – Prue Ruscoe.
An Amazing Mid-Century Home Gets A High-Tech Makeover!
A dreamy waterfront site meets classic mid-century in Sydney’s Middle Cove.
The house was originally designed by architect Glynn Nicholls (son of Eric Nicholls – Walter Burley Griffin’s Australian business partner) in 1959, but was recently extended by 8 Squared.
The interior design by Studio Gorman is just as impressive, combining ‘50s elements alongside the latest technology to take this home into the 21st century and beyond.
Revisit the original post here
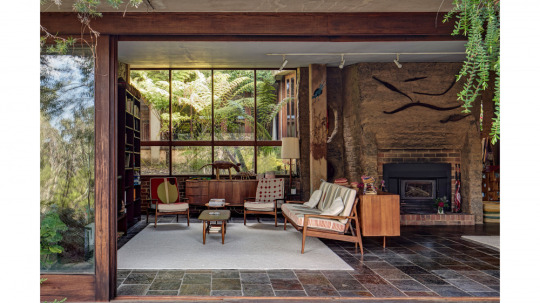
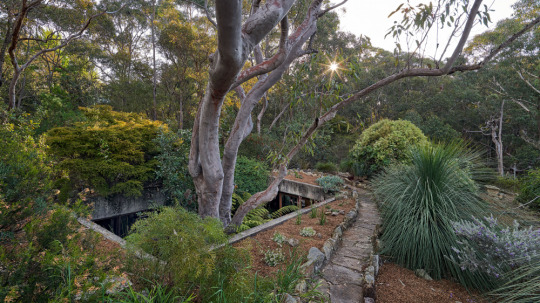
A Bohemian Blue Mountains Modernist Beauty
Trish from Modernist Australia recently shared with us this incredible find – a breathtaking Blue Mountains home, with Australian modern flavour, and a touch of bohemian flair.
Revisit the original post here
1 note
·
View note
Text
Comment on Success — You’ve Entered the Sweepstakes! - Today's Homeowner by Edward M Bowers
I have two areas . that I need to install pavers . to fix ,No pavers are in this area yet.
Comment on Success — You’ve Entered the Sweepstakes! - Today's Homeowner by Edward M Bowers published first on https://medium.com/@LandscapingMate
0 notes
Text
#107: Are We All Getting Sick Of Watching Big Renovations?
We can’t be the only ones noticing that all of the renovations on TV and online seem to be snowballing. Whatever happened to those budget decorating shows and use-what-you-have makeovers? And who remembers when a blog post might have just been “I ordered some new art” instead of “here’s the entire before & after of our kitchen gut job!” Our own projects certainly have ratcheted up over the years too, so this week we’re discussing how we all got here, if we might be approaching a tipping point, the understandable craving to scale back, and how bloggers & design TV are contributing to the escalation. We’re also breaking down some surprising features of something you’ve probably already got in your toolbox, and we reveal how we finally found some momentum in our beach house backyard projects. Hint: it rhymes with schmot mub.
You can download this episode from Apple Podcasts, Google Play, Stitcher, TuneIn Radio, and Spotify – or listen to it below! Then use this page to check out any links, notes, or photos we referenced. Note: If you’re reading in a feed reader, you may have to click through to the post to see the player.
WHAT’S NEW
Woo hoo! Our hot tub is in, despite the rest of the beach house’s backyard looking extremely unfinished. This is the Jacuzzi we got and you can hear more about why/where we got it in Episode #104.
Before it was delivered, we had to get some electrical installed, along with a 4″ concrete pad for it to sit on (which will eventually be surrounded by a paver patio). Below is the view from our back door. You can see the stack of pavers that our contractor Sean dropped off for us (we laid a temporary path to keep our feet from getting too muddy, but didn’t snap a photo of that yet).
For reference, this is the general layout we’re headed towards in the beach house backyard. It’s not totally to scale and we ended up putting the hot tub closer to the back corner so we’d have room between it and the shed for a seating area.
You can see our outdoor shower placement above. It’s right next to the back steps in the corner and this is what it looks like so far (we’re still on hold for a privacy surround to be built – but it’s coming eventually!). It’s just a simple outdoor shower kit that Sean put up for us.
You can see how the base turned out, which we described a bit more in the episode. They built a container with treated lumber, layered a base of bricks and sand for stability, poured pea gravel over the bricks for drainage, and topped it all with some Azek planks so it’s comfortable to stand on (Azek is a composite decking material that will never rot). We’ll stain the wood surround to match the back steps and we plan to use the same color Azek elsewhere in the backyard (like as steps to the hot tub and a few planter boxes) so everything should tie together.
I also mentioned getting bad poison ivy when demo-ing stuff in the backyard after we first bought it. If you want to hear that story, it’s in Episode #27.
And I thought I’d end this section with a “hot tub after dark” photo, where you can see the garden string lights that we hung (it’s the spare set we didn’t end up using in our own backyard). They’re just kinda randomly strung in the trees at this point, but we’re planning to drape them off the shed once it’s built. Thankfully even this temporary hanging job ups the charm-factor back there.
Take Five: 5 Things You Might Not Know About Your Tape Measure
The tape measure pictured above is a Stanley FatMax 25′ Tape Measure, which has served us well.
I wasn’t able to find the exact “self-centering” tape measure we used to have, but this one seems to be the current version of it. It clearly lists the half measurement under each number on the tape (for example, under the 2″ mark it says 1″) so you can quickly calculate the middle of your measurement. It’s really helpful for weirder measurements when your brain is too tired to figure that stuff out yourself.
Big Renovation Fatigue
Here are the articles we referenced about “big renovation fatigue,” as we’re dubbing it:
Curbed’s “We Need A New Kind Of HGTV”
Apartment Therapy’s “America, You’ve Lost Your Freaking Mind Over Renovations“
And what do you guys think?
Note: There is a poll embedded within this post, please visit the site to participate in this post's poll.
Here’s the link to that little guest bathroom makeover we mentioned from our last house: Our $51 Bathroom Makeover (it wasn’t $130 like Sherry guessed – it was actually just $51!)
Speaking of small renovations, here’s where you can read more about the “Phase 1” approach that Sherry mentioned us taking in a lot of our renovations.
We also shouted out some other bloggers who have taken on second properties as fixer uppers to renovate and use as vacation homes, rentals, and beyond:
Elsie’s Nashville Airbnb from A Beautiful Mess
Chris & Julia’s A-Frame Cabin
Emily Henderson’s Mountain House & Portland Fixer Upper
Katie Bower’s Monroe House
Forgot to mention Yellow Brick Home’s Tree House – but it’s a really cool project too!
We also mentioned designers on Instagram who are doing amazing whole house renovations and then decorating every inch of them like: Amber Interiors & Studio McGee
And, if you’re really interested in it, here’s the post about ordering a duvet cover and another post about it arriving. Oh 2010, you’re hilarious.
We’re Digging
First things first, here’s that link to our new Book Club page where we’ve rounded up all of the books we’ve recommended on the podcast over the last two years (not just creepy/murdery ones).
And this week, as you heard, I was digging Her Every Fear by Peter Swanson, the same guy behind another fave: The Kind Worth Killing. I was captivated by it, and it does weave in a little bit of real estate (there’s kind of a The Holiday situation that kicks off the mystery)
But if you need something lighter, check out Nailed It! on Netflix to crack up and feel better about your own baking shortcomings. Trailer below!
youtube
If you’re looking for something we’ve dug in a past episode but don’t remember which show notes to click into, here’s a master list of everything we’ve been digging from all of our past episodes.
And lastly, a big thank you to Agility Bed for sponsoring this episode. Remember to get $150 off your hybrid mattress order with the code YHL150 at AgilityBed.com. They’ll ship it to you for free and if you don’t like it, you can return it within the first 100 nights, no questions asked!
Thanks for listening, guys!
*This post contains affiliate links*
The post #107: Are We All Getting Sick Of Watching Big Renovations? appeared first on Young House Love.
#107: Are We All Getting Sick Of Watching Big Renovations? published first on https://bakerskitchenslimited.tumblr.com/
0 notes
Text
#107: Are We All Getting Sick Of Watching Big Renovations?
We can’t be the only ones noticing that all of the renovations on TV and online seem to be snowballing. Whatever happened to those budget decorating shows and use-what-you-have makeovers? And who remembers when a blog post might have just been “I ordered some new art” instead of “here’s the entire before & after of our kitchen gut job!” Our own projects certainly have ratcheted up over the years too, so this week we’re discussing how we all got here, if we might be approaching a tipping point, the understandable craving to scale back, and how bloggers & design TV are contributing to the escalation. We’re also breaking down some surprising features of something you’ve probably already got in your toolbox, and we reveal how we finally found some momentum in our beach house backyard projects. Hint: it rhymes with schmot mub.
You can download this episode from Apple Podcasts, Google Play, Stitcher, TuneIn Radio, and Spotify – or listen to it below! Then use this page to check out any links, notes, or photos we referenced. Note: If you’re reading in a feed reader, you may have to click through to the post to see the player.
WHAT’S NEW
Woo hoo! Our hot tub is in, despite the rest of the beach house’s backyard looking extremely unfinished. This is the Jacuzzi we got and you can hear more about why/where we got it in Episode #104.
Before it was delivered, we had to get some electrical installed, along with a 4″ concrete pad for it to sit on (which will eventually be surrounded by a paver patio). Below is the view from our back door. You can see the stack of pavers that our contractor Sean dropped off for us (we laid a temporary path to keep our feet from getting too muddy, but didn’t snap a photo of that yet).
For reference, this is the general layout we’re headed towards in the beach house backyard. It’s not totally to scale and we ended up putting the hot tub closer to the back corner so we’d have room between it and the shed for a seating area.
You can see our outdoor shower placement above. It’s right next to the back steps in the corner and this is what it looks like so far (we’re still on hold for a privacy surround to be built – but it’s coming eventually!). It’s just a simple outdoor shower kit that Sean put up for us.
You can see how the base turned out, which we described a bit more in the episode. They built a container with treated lumber, layered a base of bricks and sand for stability, poured pea gravel over the bricks for drainage, and topped it all with some Azek planks so it’s comfortable to stand on (Azek is a composite decking material that will never rot). We’ll stain the wood surround to match the back steps and we plan to use the same color Azek elsewhere in the backyard (like as steps to the hot tub and a few planter boxes) so everything should tie together.
I also mentioned getting bad poison ivy when demo-ing stuff in the backyard after we first bought it. If you want to hear that story, it’s in Episode #27.
And I thought I’d end this section with a “hot tub after dark” photo, where you can see the garden string lights that we hung (it’s the spare set we didn’t end up using in our own backyard). They’re just kinda randomly strung in the trees at this point, but we’re planning to drape them off the shed once it’s built. Thankfully even this temporary hanging job ups the charm-factor back there.
Take Five: 5 Things You Might Not Know About Your Tape Measure
The tape measure pictured above is a Stanley FatMax 25′ Tape Measure, which has served us well.
I wasn’t able to find the exact “self-centering” tape measure we used to have, but this one seems to be the current version of it. It clearly lists the half measurement under each number on the tape (for example, under the 2″ mark it says 1″) so you can quickly calculate the middle of your measurement. It’s really helpful for weirder measurements when your brain is too tired to figure that stuff out yourself.
Big Renovation Fatigue
Here are the articles we referenced about “big renovation fatigue,” as we’re dubbing it:
Curbed’s “We Need A New Kind Of HGTV”
Apartment Therapy’s “America, You’ve Lost Your Freaking Mind Over Renovations“
And what do you guys think?
Note: There is a poll embedded within this post, please visit the site to participate in this post's poll.
Here’s the link to that little guest bathroom makeover we mentioned from our last house: Our $51 Bathroom Makeover (it wasn’t $130 like Sherry guessed – it was actually just $51!)
Speaking of small renovations, here’s where you can read more about the “Phase 1” approach that Sherry mentioned us taking in a lot of our renovations.
We also shouted out some other bloggers who have taken on second properties as fixer uppers to renovate and use as vacation homes, rentals, and beyond:
Elsie’s Nashville Airbnb from A Beautiful Mess
Chris & Julia’s A-Frame Cabin
Emily Henderson’s Mountain House & Portland Fixer Upper
Katie Bower’s Monroe House
Forgot to mention Yellow Brick Home’s Tree House – but it’s a really cool project too!
We also mentioned designers on Instagram who are doing amazing whole house renovations and then decorating every inch of them like: Amber Interiors & Studio McGee
And, if you’re really interested in it, here’s the post about ordering a duvet cover and another post about it arriving. Oh 2010, you’re hilarious.
We’re Digging
First things first, here’s that link to our new Book Club page where we’ve rounded up all of the books we’ve recommended on the podcast over the last two years (not just creepy/murdery ones).
And this week, as you heard, I was digging Her Every Fear by Peter Swanson, the same guy behind another fave: The Kind Worth Killing. I was captivated by it, and it does weave in a little bit of real estate (there’s kind of a The Holiday situation that kicks off the mystery)
But if you need something lighter, check out Nailed It! on Netflix to crack up and feel better about your own baking shortcomings. Trailer below!
youtube
If you’re looking for something we’ve dug in a past episode but don’t remember which show notes to click into, here’s a master list of everything we’ve been digging from all of our past episodes.
And lastly, a big thank you to Agility Bed for sponsoring this episode. Remember to get $150 off your hybrid mattress order with the code YHL150 at AgilityBed.com. They’ll ship it to you for free and if you don’t like it, you can return it within the first 100 nights, no questions asked!
Thanks for listening, guys!
*This post contains affiliate links*
The post #107: Are We All Getting Sick Of Watching Big Renovations? appeared first on Young House Love.
#107: Are We All Getting Sick Of Watching Big Renovations? published first on https://ssmattress.tumblr.com/
0 notes
Text
#107: Are We All Getting Sick Of Watching Big Renovations?
We can’t be the only ones noticing that all of the renovations on TV and online seem to be snowballing. Whatever happened to those budget decorating shows and use-what-you-have makeovers? And who remembers when a blog post might have just been “I ordered some new art” instead of “here’s the entire before & after of our kitchen gut job!” Our own projects certainly have ratcheted up over the years too, so this week we’re discussing how we all got here, if we might be approaching a tipping point, the understandable craving to scale back, and how bloggers & design TV are contributing to the escalation. We’re also breaking down some surprising features of something you’ve probably already got in your toolbox, and we reveal how we finally found some momentum in our beach house backyard projects. Hint: it rhymes with schmot mub.
You can download this episode from Apple Podcasts, Google Play, Stitcher, TuneIn Radio, and Spotify – or listen to it below! Then use this page to check out any links, notes, or photos we referenced. Note: If you’re reading in a feed reader, you may have to click through to the post to see the player.
WHAT’S NEW
Woo hoo! Our hot tub is in, despite the rest of the beach house’s backyard looking extremely unfinished. This is the Jacuzzi we got and you can hear more about why/where we got it in Episode #104.
Before it was delivered, we had to get some electrical installed, along with a 4″ concrete pad for it to sit on (which will eventually be surrounded by a paver patio). Below is the view from our back door. You can see the stack of pavers that our contractor Sean dropped off for us (we laid a temporary path to keep our feet from getting too muddy, but didn’t snap a photo of that yet).
For reference, this is the general layout we’re headed towards in the beach house backyard. It’s not totally to scale and we ended up putting the hot tub closer to the back corner so we’d have room between it and the shed for a seating area.
You can see our outdoor shower placement above. It’s right next to the back steps in the corner and this is what it looks like so far (we’re still on hold for a privacy surround to be built – but it’s coming eventually!). It’s just a simple outdoor shower kit that Sean put up for us.
You can see how the base turned out, which we described a bit more in the episode. They built a container with treated lumber, layered a base of bricks and sand for stability, poured pea gravel over the bricks for drainage, and topped it all with some Azek planks so it’s comfortable to stand on (Azek is a composite decking material that will never rot). We’ll stain the wood surround to match the back steps and we plan to use the same color Azek elsewhere in the backyard (like as steps to the hot tub and a few planter boxes) so everything should tie together.
I also mentioned getting bad poison ivy when demo-ing stuff in the backyard after we first bought it. If you want to hear that story, it’s in Episode #27.
And I thought I’d end this section with a “hot tub after dark” photo, where you can see the garden string lights that we hung (it’s the spare set we didn’t end up using in our own backyard). They’re just kinda randomly strung in the trees at this point, but we’re planning to drape them off the shed once it’s built. Thankfully even this temporary hanging job ups the charm-factor back there.
Take Five: 5 Things You Might Not Know About Your Tape Measure
The tape measure pictured above is a Stanley FatMax 25′ Tape Measure, which has served us well.
I wasn’t able to find the exact “self-centering” tape measure we used to have, but this one seems to be the current version of it. It clearly lists the half measurement under each number on the tape (for example, under the 2″ mark it says 1″) so you can quickly calculate the middle of your measurement. It’s really helpful for weirder measurements when your brain is too tired to figure that stuff out yourself.
Big Renovation Fatigue
Here are the articles we referenced about “big renovation fatigue,” as we’re dubbing it:
Curbed’s “We Need A New Kind Of HGTV”
Apartment Therapy’s “America, You’ve Lost Your Freaking Mind Over Renovations“
And what do you guys think?
Note: There is a poll embedded within this post, please visit the site to participate in this post's poll.
Here’s the link to that little guest bathroom makeover we mentioned from our last house: Our $51 Bathroom Makeover (it wasn’t $130 like Sherry guessed – it was actually just $51!)
Speaking of small renovations, here’s where you can read more about the “Phase 1” approach that Sherry mentioned us taking in a lot of our renovations.
We also shouted out some other bloggers who have taken on second properties as fixer uppers to renovate and use as vacation homes, rentals, and beyond:
Elsie’s Nashville Airbnb from A Beautiful Mess
Chris & Julia’s A-Frame Cabin
Emily Henderson’s Mountain House & Portland Fixer Upper
Katie Bower’s Monroe House
Forgot to mention Yellow Brick Home’s Tree House – but it’s a really cool project too!
We also mentioned designers on Instagram who are doing amazing whole house renovations and then decorating every inch of them like: Amber Interiors & Studio McGee
And, if you’re really interested in it, here’s the post about ordering a duvet cover and another post about it arriving. Oh 2010, you’re hilarious.
We’re Digging
First things first, here’s that link to our new Book Club page where we’ve rounded up all of the books we’ve recommended on the podcast over the last two years (not just creepy/murdery ones).
And this week, as you heard, I was digging Her Every Fear by Peter Swanson, the same guy behind another fave: The Kind Worth Killing. I was captivated by it, and it does weave in a little bit of real estate (there’s kind of a The Holiday situation that kicks off the mystery)
But if you need something lighter, check out Nailed It! on Netflix to crack up and feel better about your own baking shortcomings. Trailer below!
youtube
If you’re looking for something we’ve dug in a past episode but don’t remember which show notes to click into, here’s a master list of everything we’ve been digging from all of our past episodes.
And lastly, a big thank you to Agility Bed for sponsoring this episode. Remember to get $150 off your hybrid mattress order with the code YHL150 at AgilityBed.com. They’ll ship it to you for free and if you don’t like it, you can return it within the first 100 nights, no questions asked!
Thanks for listening, guys!
*This post contains affiliate links*
The post #107: Are We All Getting Sick Of Watching Big Renovations? appeared first on Young House Love.
from RSSMix.com Mix ID 8265713 https://ift.tt/2B7roIm via IFTTT
0 notes
Text
Concrete vs. Pavers: Which Option is More Budget-Friendly?
The debate between concrete and pavers often boils down to cost-effectiveness, durability, and aesthetics. Homeowners and landscape enthusiasts weigh these factors carefully before committing to a choice. Both options offer unique advantages and cater to different functional and stylistic requirements. This detailed guide explores the nuances of concrete versus pavers, helping you make an informed decision while seamlessly integrating innovative solutions like round pavers NZ or firth driveway pavers into your outdoor spaces.
Upfront Costs and Installation
Cost is often the first consideration for any outdoor project. Concrete slabs typically come with lower initial expenses. They are poured in place, requiring minimal labor compared to pavers. However, the simplicity of installation can sometimes compromise the design versatility. In contrast, holland pavers NZ and other paver options, like flagstone pavers NZ, offer modular designs that are labor-intensive but visually striking.
Concrete installation requires precise timing and expertise to prevent cracking. While the upfront cost may be attractive, the rigidity of concrete often results in additional long-term expenses for maintenance. On the other hand, bowers permeable pavers and similar materials provide flexibility, reducing the risk of cracking.
Longevity and Durability
Durability is paramount for outdoor surfaces. Concrete slabs, while initially robust, are prone to cracking under temperature fluctuations and pressure. Repairs can be costly and visibly disrupt the surface. Pavers, like courtyard pavers, are individual units that offer replaceability. If one paver is damaged, it can be swapped out without disturbing the entire layout.
Modern innovations like firth permeable pavers provide enhanced durability by allowing water to drain effectively, preventing erosion and pooling. These features make them ideal for areas experiencing heavy rainfall or drainage issues.
Aesthetic Appeal and Design Versatility
Concrete provides a clean, uniform look but offers limited customization. While it can be stamped or stained for added appeal, these enhancements often come with additional costs. Pavers, however, deliver unparalleled design versatility. Whether you're opting for the sleek look of firth holland pavers or the textured charm of bowers driveway pavers, the possibilities are endless.
Materials like feinwerk pavers and bowers pavers allow for intricate patterns and color combinations. This customization elevates the aesthetic value of your property, making it a worthwhile investment for enhancing curb appeal.
Maintenance and Upkeep
Maintenance requirements often determine the long-term affordability of a surface. Concrete surfaces demand sealing every few years to prevent staining and cracking. In contrast, pavers like firth pavers are inherently low-maintenance.
Weeds may grow between pavers, but this is easily remedied with regular cleaning and polymeric sand. For areas prone to high traffic, like driveways, firth driveway pavers are particularly advantageous due to their robust construction and minimal upkeep.
Environmental Considerations
Sustainability is becoming an essential factor in construction materials. Concrete has a larger carbon footprint due to its production process. Pavers, particularly bowers permeable pavers, are eco-friendly options. They allow water to percolate through the surface, replenishing groundwater and reducing stormwater runoff.
For homeowners seeking environmentally conscious solutions, permeable pavers provide a balance between functionality and sustainability. Pairing them with Auckland landscape supplies can further enhance your project’s eco-friendly credentials.
Regional Preferences and Applications
In regions like New Zealand, pavers are increasingly popular due to their adaptability. Landscaping services in West Auckland frequently recommend pavers for residential and commercial projects alike. Whether you're looking to revamp your garden or construct a patio, the diverse range of paver styles, such as round pavers NZ, caters to various design preferences.
Final Verdict
When evaluating cost-effectiveness, concrete may initially seem cheaper. However, pavers offer superior durability, flexibility, and aesthetic appeal, making them a more economical choice in the long run. By incorporating fencing services in Auckland and innovative paver solutions, you can create a functional and beautiful outdoor space tailored to your needs.
#round pavers nz#holland pavers nz#courtyard pavers#firth permeable pavers#bowers permeable pavers#firth driveway pavers#bowers driveway pavers#bowers pavers#feinwerk pavers#flagstone pavers nz#firth holland pavers#firth pavers
0 notes
Photo
#107: Are We All Getting Sick Of Watching Big Renovations? https://ift.tt/2MnrP5I
We can’t be the only ones noticing that all of the renovations on TV and online seem to be snowballing. Whatever happened to those budget decorating shows and use-what-you-have makeovers? And who remembers when a blog post might have just been “I ordered some new art” instead of “here’s the entire before & after of our kitchen gut job!” Our own projects certainly have ratcheted up over the years too, so this week we’re discussing how we all got here, if we might be approaching a tipping point, the understandable craving to scale back, and how bloggers & design TV are contributing to the escalation. We’re also breaking down some surprising features of something you’ve probably already got in your toolbox, and we reveal how we finally found some momentum in our beach house backyard projects. Hint: it rhymes with schmot mub.
You can download this episode from Apple Podcasts, Google Play, Stitcher, TuneIn Radio, and Spotify – or listen to it below! Then use this page to check out any links, notes, or photos we referenced. Note: If you’re reading in a feed reader, you may have to click through to the post to see the player.
WHAT’S NEW
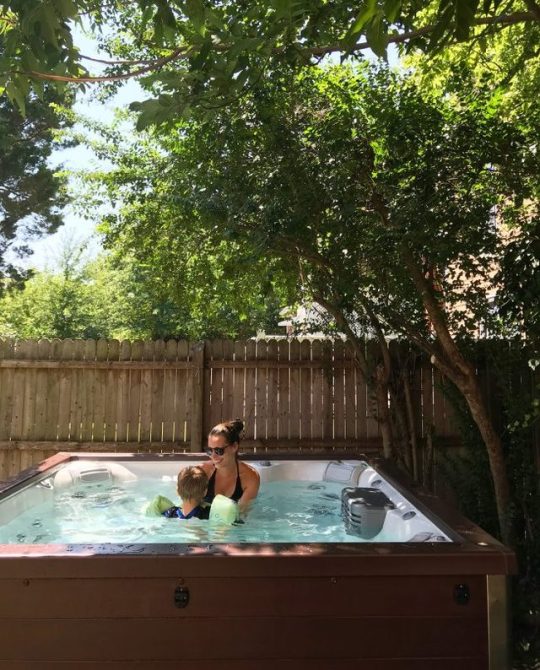
Woo hoo! Our hot tub is in, despite the rest of the beach house’s backyard looking extremely unfinished. This is the Jacuzzi we got and you can hear more about why/where we got it in Episode #104.
Before it was delivered, we had to get some electrical installed, along with a 4″ concrete pad for it to sit on (which will eventually be surrounded by a paver patio). Below is the view from our back door. You can see the stack of pavers that our contractor Sean dropped off for us (we laid a temporary path to keep our feet from getting too muddy, but didn’t snap a photo of that yet).
For reference, this is the general layout we’re headed towards in the beach house backyard. It’s not totally to scale and we ended up putting the hot tub closer to the back corner so we’d have room between it and the shed for a seating area.
You can see our outdoor shower placement above. It’s right next to the back steps in the corner and this is what it looks like so far (we’re still on hold for a privacy surround to be built – but it’s coming eventually!). It’s just a simple outdoor shower kit that Sean put up for us.
You can see how the base turned out, which we described a bit more in the episode. They built a container with treated lumber, layered a base of bricks and sand for stability, poured pea gravel over the bricks for drainage, and topped it all with some Azek planks so it’s comfortable to stand on (Azek is a composite decking material that will never rot). We’ll stain the wood surround to match the back steps and we plan to use the same color Azek elsewhere in the backyard (like as steps to the hot tub and a few planter boxes) so everything should tie together.
I also mentioned getting bad poison ivy when demo-ing stuff in the backyard after we first bought it. If you want to hear that story, it’s in Episode #27.
And I thought I’d end this section with a “hot tub after dark” photo, where you can see the garden string lights that we hung (it’s the spare set we didn’t end up using in our own backyard). They’re just kinda randomly strung in the trees at this point, but we’re planning to drape them off the shed once it’s built. Thankfully even this temporary hanging job ups the charm-factor back there.
Take Five: 5 Things You Might Not Know About Your Tape Measure
The tape measure pictured above is a Stanley FatMax 25′ Tape Measure, which has served us well.
I wasn’t able to find the exact “self-centering” tape measure we used to have, but this one seems to be the current version of it. It clearly lists the half measurement under each number on the tape (for example, under the 2″ mark it says 1″) so you can quickly calculate the middle of your measurement. It’s really helpful for weirder measurements when your brain is too tired to figure that stuff out yourself.
Big Renovation Fatigue
Here are the articles we referenced about “big renovation fatigue,” as we’re dubbing it:
Curbed’s “We Need A New Kind Of HGTV”
Apartment Therapy’s “America, You’ve Lost Your Freaking Mind Over Renovations“
And what do you guys think?
Note: There is a poll embedded within this post, please visit the site to participate in this post's poll.
Here’s the link to that little guest bathroom makeover we mentioned from our last house: Our $51 Bathroom Makeover (it wasn’t $130 like Sherry guessed – it was actually just $51!)
Speaking of small renovations, here’s where you can read more about the “Phase 1” approach that Sherry mentioned us taking in a lot of our renovations.
We also shouted out some other bloggers who have taken on second properties as fixer uppers to renovate and use as vacation homes, rentals, and beyond:
Elsie’s Nashville Airbnb from A Beautiful Mess
Chris & Julia’s A-Frame Cabin
Emily Henderson’s Mountain House & Portland Fixer Upper
Katie Bower’s Monroe House
Forgot to mention Yellow Brick Home’s Tree House – but it’s a really cool project too!
We also mentioned designers on Instagram who are doing amazing whole house renovations and then decorating every inch of them like: Amber Interiors & Studio McGee
And, if you’re really interested in it, here’s the post about ordering a duvet cover and another post about it arriving. Oh 2010, you’re hilarious.
We’re Digging
First things first, here’s that link to our new Book Club page where we’ve rounded up all of the books we’ve recommended on the podcast over the last two years (not just creepy/murdery ones).
And this week, as you heard, I was digging Her Every Fear by Peter Swanson, the same guy behind another fave: The Kind Worth Killing. I was captivated by it, and it does weave in a little bit of real estate (there’s kind of a The Holiday situation that kicks off the mystery)
But if you need something lighter, check out Nailed It! on Netflix to crack up and feel better about your own baking shortcomings. Trailer below!
If you’re looking for something we’ve dug in a past episode but don’t remember which show notes to click into, here’s a master list of everything we’ve been digging from all of our past episodes.
And lastly, a big thank you to Agility Bed for sponsoring this episode. Remember to get $150 off your hybrid mattress order with the code YHL150 at AgilityBed.com. They’ll ship it to you for free and if you don’t like it, you can return it within the first 100 nights, no questions asked!
Thanks for listening, guys!
*This post contains affiliate links*
The post #107: Are We All Getting Sick Of Watching Big Renovations? appeared first on Young House Love.
0 notes
Text
#107: Are We All Getting Sick Of Watching Big Renovations?
We can’t be the only ones noticing that all of the renovations on TV and online seem to be snowballing. Whatever happened to those budget decorating shows and use-what-you-have makeovers? And who remembers when a blog post might have just been “I ordered some new art” instead of “here’s the entire before & after of our kitchen gut job!” Our own projects certainly have ratcheted up over the years too, so this week we’re discussing how we all got here, if we might be approaching a tipping point, the understandable craving to scale back, and how bloggers & design TV are contributing to the escalation. We’re also breaking down some surprising features of something you’ve probably already got in your toolbox, and we reveal how we finally found some momentum in our beach house backyard projects. Hint: it rhymes with schmot mub.
You can download this episode from Apple Podcasts, Google Play, Stitcher, TuneIn Radio, and Spotify – or listen to it below! Then use this page to check out any links, notes, or photos we referenced. Note: If you’re reading in a feed reader, you may have to click through to the post to see the player.
WHAT’S NEW
Woo hoo! Our hot tub is in, despite the rest of the beach house’s backyard looking extremely unfinished. This is the Jacuzzi we got and you can hear more about why/where we got it in Episode #104.
Before it was delivered, we had to get some electrical installed, along with a 4″ concrete pad for it to sit on (which will eventually be surrounded by a paver patio). Below is the view from our back door. You can see the stack of pavers that our contractor Sean dropped off for us (we laid a temporary path to keep our feet from getting too muddy, but didn’t snap a photo of that yet).
For reference, this is the general layout we’re headed towards in the beach house backyard. It’s not totally to scale and we ended up putting the hot tub closer to the back corner so we’d have room between it and the shed for a seating area.
You can see our outdoor shower placement above. It’s right next to the back steps in the corner and this is what it looks like so far (we’re still on hold for a privacy surround to be built – but it’s coming eventually!). It’s just a simple outdoor shower kit that Sean put up for us.
You can see how the base turned out, which we described a bit more in the episode. They built a container with treated lumber, layered a base of bricks and sand for stability, poured pea gravel over the bricks for drainage, and topped it all with some Azek planks so it’s comfortable to stand on (Azek is a composite decking material that will never rot). We’ll stain the wood surround to match the back steps and we plan to use the same color Azek elsewhere in the backyard (like as steps to the hot tub and a few planter boxes) so everything should tie together.
I also mentioned getting bad poison ivy when demo-ing stuff in the backyard after we first bought it. If you want to hear that story, it’s in Episode #27.
And I thought I’d end this section with a “hot tub after dark” photo, where you can see the garden string lights that we hung (it’s the spare set we didn’t end up using in our own backyard). They’re just kinda randomly strung in the trees at this point, but we’re planning to drape them off the shed once it’s built. Thankfully even this temporary hanging job ups the charm-factor back there.
Take Five: 5 Things You Might Not Know About Your Tape Measure
The tape measure pictured above is a Stanley FatMax 25′ Tape Measure, which has served us well.
I wasn’t able to find the exact “self-centering” tape measure we used to have, but this one seems to be the current version of it. It clearly lists the half measurement under each number on the tape (for example, under the 2″ mark it says 1″) so you can quickly calculate the middle of your measurement. It’s really helpful for weirder measurements when your brain is too tired to figure that stuff out yourself.
Big Renovation Fatigue
Here are the articles we referenced about “big renovation fatigue,” as we’re dubbing it:
Curbed’s “We Need A New Kind Of HGTV”
Apartment Therapy’s “America, You’ve Lost Your Freaking Mind Over Renovations“
And what do you guys think?
Note: There is a poll embedded within this post, please visit the site to participate in this post's poll.
Here’s the link to that little guest bathroom makeover we mentioned from our last house: Our $51 Bathroom Makeover (it wasn’t $130 like Sherry guessed – it was actually just $51!)
Speaking of small renovations, here’s where you can read more about the “Phase 1” approach that Sherry mentioned us taking in a lot of our renovations.
We also shouted out some other bloggers who have taken on second properties as fixer uppers to renovate and use as vacation homes, rentals, and beyond:
Elsie’s Nashville Airbnb from A Beautiful Mess
Chris & Julia’s A-Frame Cabin
Emily Henderson’s Mountain House & Portland Fixer Upper
Katie Bower’s Monroe House
Forgot to mention Yellow Brick Home’s Tree House – but it’s a really cool project too!
We also mentioned designers on Instagram who are doing amazing whole house renovations and then decorating every inch of them like: Amber Interiors & Studio McGee
And, if you’re really interested in it, here’s the post about ordering a duvet cover and another post about it arriving. Oh 2010, you’re hilarious.
We’re Digging
First things first, here’s that link to our new Book Club page where we’ve rounded up all of the books we’ve recommended on the podcast over the last two years (not just creepy/murdery ones).
And this week, as you heard, I was digging Her Every Fear by Peter Swanson, the same guy behind another fave: The Kind Worth Killing. I was captivated by it, and it does weave in a little bit of real estate (there’s kind of a The Holiday situation that kicks off the mystery)
But if you need something lighter, check out Nailed It! on Netflix to crack up and feel better about your own baking shortcomings. Trailer below!
youtube
If you’re looking for something we’ve dug in a past episode but don’t remember which show notes to click into, here’s a master list of everything we’ve been digging from all of our past episodes.
And lastly, a big thank you to Agility Bed for sponsoring this episode. Remember to get $150 off your hybrid mattress order with the code YHL150 at AgilityBed.com. They’ll ship it to you for free and if you don’t like it, you can return it within the first 100 nights, no questions asked!
Thanks for listening, guys!
*This post contains affiliate links*
The post #107: Are We All Getting Sick Of Watching Big Renovations? appeared first on Young House Love.
#107: Are We All Getting Sick Of Watching Big Renovations? published first on https://novaformmattressreview.tumblr.com/
0 notes
Text
#107: Are We All Getting Sick Of Watching Big Renovations?
We can’t be the only ones noticing that all of the renovations on TV and online seem to be snowballing. Whatever happened to those budget decorating shows and use-what-you-have makeovers? And who remembers when a blog post might have just been “I ordered some new art” instead of “here’s the entire before & after of our kitchen gut job!” Our own projects certainly have ratcheted up over the years too, so this week we’re discussing how we all got here, if we might be approaching a tipping point, the understandable craving to scale back, and how bloggers & design TV are contributing to the escalation. We’re also breaking down some surprising features of something you’ve probably already got in your toolbox, and we reveal how we finally found some momentum in our beach house backyard projects. Hint: it rhymes with schmot mub.
You can download this episode from Apple Podcasts, Google Play, Stitcher, TuneIn Radio, and Spotify – or listen to it below! Then use this page to check out any links, notes, or photos we referenced. Note: If you’re reading in a feed reader, you may have to click through to the post to see the player.
WHAT’S NEW
Woo hoo! Our hot tub is in, despite the rest of the beach house’s backyard looking extremely unfinished. This is the Jacuzzi we got and you can hear more about why/where we got it in Episode #104.
Before it was delivered, we had to get some electrical installed, along with a 4″ concrete pad for it to sit on (which will eventually be surrounded by a paver patio). Below is the view from our back door. You can see the stack of pavers that our contractor Sean dropped off for us (we laid a temporary path to keep our feet from getting too muddy, but didn’t snap a photo of that yet).
For reference, this is the general layout we’re headed towards in the beach house backyard. It’s not totally to scale and we ended up putting the hot tub closer to the back corner so we’d have room between it and the shed for a seating area.
You can see our outdoor shower placement above. It’s right next to the back steps in the corner and this is what it looks like so far (we’re still on hold for a privacy surround to be built – but it’s coming eventually!). It’s just a simple outdoor shower kit that Sean put up for us.
You can see how the base turned out, which we described a bit more in the episode. They built a container with treated lumber, layered a base of bricks and sand for stability, poured pea gravel over the bricks for drainage, and topped it all with some Azek planks so it’s comfortable to stand on (Azek is a composite decking material that will never rot). We’ll stain the wood surround to match the back steps and we plan to use the same color Azek elsewhere in the backyard (like as steps to the hot tub and a few planter boxes) so everything should tie together.
I also mentioned getting bad poison ivy when demo-ing stuff in the backyard after we first bought it. If you want to hear that story, it’s in Episode #27.
And I thought I’d end this section with a “hot tub after dark” photo, where you can see the garden string lights that we hung (it’s the spare set we didn’t end up using in our own backyard). They’re just kinda randomly strung in the trees at this point, but we’re planning to drape them off the shed once it’s built. Thankfully even this temporary hanging job ups the charm-factor back there.
Take Five: 5 Things You Might Not Know About Your Tape Measure
The tape measure pictured above is a Stanley FatMax 25′ Tape Measure, which has served us well.
I wasn’t able to find the exact “self-centering” tape measure we used to have, but this one seems to be the current version of it. It clearly lists the half measurement under each number on the tape (for example, under the 2″ mark it says 1″) so you can quickly calculate the middle of your measurement. It’s really helpful for weirder measurements when your brain is too tired to figure that stuff out yourself.
Big Renovation Fatigue
Here are the articles we referenced about “big renovation fatigue,” as we’re dubbing it:
Curbed’s “We Need A New Kind Of HGTV”
Apartment Therapy’s “America, You’ve Lost Your Freaking Mind Over Renovations“
And what do you guys think?
Note: There is a poll embedded within this post, please visit the site to participate in this post's poll.
Here’s the link to that little guest bathroom makeover we mentioned from our last house: Our $51 Bathroom Makeover (it wasn’t $130 like Sherry guessed – it was actually just $51!)
Speaking of small renovations, here’s where you can read more about the “Phase 1” approach that Sherry mentioned us taking in a lot of our renovations.
We also shouted out some other bloggers who have taken on second properties as fixer uppers to renovate and use as vacation homes, rentals, and beyond:
Elsie’s Nashville Airbnb from A Beautiful Mess
Chris & Julia’s A-Frame Cabin
Emily Henderson’s Mountain House & Portland Fixer Upper
Katie Bower’s Monroe House
Forgot to mention Yellow Brick Home’s Tree House – but it’s a really cool project too!
We also mentioned designers on Instagram who are doing amazing whole house renovations and then decorating every inch of them like: Amber Interiors & Studio McGee
And, if you’re really interested in it, here’s the post about ordering a duvet cover and another post about it arriving. Oh 2010, you’re hilarious.
We’re Digging
First things first, here’s that link to our new Book Club page where we’ve rounded up all of the books we’ve recommended on the podcast over the last two years (not just creepy/murdery ones).
And this week, as you heard, I was digging Her Every Fear by Peter Swanson, the same guy behind another fave: The Kind Worth Killing. I was captivated by it, and it does weave in a little bit of real estate (there’s kind of a The Holiday situation that kicks off the mystery)
But if you need something lighter, check out Nailed It! on Netflix to crack up and feel better about your own baking shortcomings. Trailer below!
youtube
If you’re looking for something we’ve dug in a past episode but don’t remember which show notes to click into, here’s a master list of everything we’ve been digging from all of our past episodes.
And lastly, a big thank you to Agility Bed for sponsoring this episode. Remember to get $150 off your hybrid mattress order with the code YHL150 at AgilityBed.com. They’ll ship it to you for free and if you don’t like it, you can return it within the first 100 nights, no questions asked!
Thanks for listening, guys!
*This post contains affiliate links*
The post #107: Are We All Getting Sick Of Watching Big Renovations? appeared first on Young House Love.
#107: Are We All Getting Sick Of Watching Big Renovations? published first on https://landscapingmates.blogspot.com
0 notes
Photo

✊ You don’t want to miss the opportunity to own this gorgeous tri-level.This home is move in ready with beautiful hardwood floors throughout the entire home. The kitchen and bathroom have been recently remodeled and the entire house has many updates. The home has double pane windows and level or blinds. Step out the back door to two very nice entertaining areas. Get ready to sit out and enjoy your screened in back porch and paver patio. Agent is related to seller.👉 🏡1128 Gray Ave. Greenville, OH 💵$145,000. 🤳Call/Text for your personal tour with Leis Realty REALTOR® Mike Bowers at 937-564-1355. (at Leis Realty) https://www.instagram.com/p/B9CYJ4XpOQo/?igshid=1g1lzx3b4jqmo
0 notes