#bottom line!! keep drawing and animating!! youll get better with each piece you finish!!! :)
Explore tagged Tumblr posts
Note
How do you replicate the Rise style so well?? And animate so well??? Do you have any animation tips???
OOH POG POG, OKAY SO!! (also thank you ahh!!)
replicating a style
i feel the need to first point out that no one should do this to quote unquote steal someone's artstyle. being able to emulate a specific style is a good trick to learn for jobs in which you have to do just that (animation, comics etc.) i personally love being as canon compliant when it comes to fanart so i go crazy:
studying the source material! in general with drawing, you think you know what something looks like but when you draw it out, it may look weird and off!! this is when you're gonna want to hoard a lot of screenshots from the source material to study/draw over/redraw based on them. as you're drawing, you may realize that "WOW okay so i didn't know that part was so angled and sharp, i thought it was a near perfect circle!" (me when i first drew mikey's head fr).
repetition!! don't avoid drawing simply because you're thinking you're not good enough yet. art is something you get good at with trial and error so you'll only ever get better if you draw, draw and draw!!!! not only do you learn more with each drawing, you'll also get more comfortable with the overall process :)
(gonna throw in a mystery number three which is not really tied to replicating styles BUT!!! doing anatomy studies is a good way to improve your solid drawing skills fast!!! im linking my pinterest folder that i use for anatomy studies every now and then below the line to help anyone get started!)
animation tips
i'm like, 90% self-taught so i may not know the correct terminology for everything... but you're definitely going to want to study the 12 principles of animation!! there are a LOT of youtube videos available on this particular subject!! once you have gone through each principle, you may want to try and do little animation practices with these in mind!
i think ROTTMNT really kickstarted my personal learning curve as i'm just SO ridiculously eager to learn anything and everything i possibly can, i mean i have never in my life been so excited to just learn! i heavily recommend following the rottmnt animators' online profiles and go through their galleries/portfolios to study their work! it's all so amazing...
tldr, STUDY the source material and REPEATEDLY draw/animate and take active notes on what you could improve on, still. you got this!!! >:]
some links that other people have kindly compiled with lotsa references/tutorials and tips. i recommend eyeballing through them and checking out anything that interests you! :]
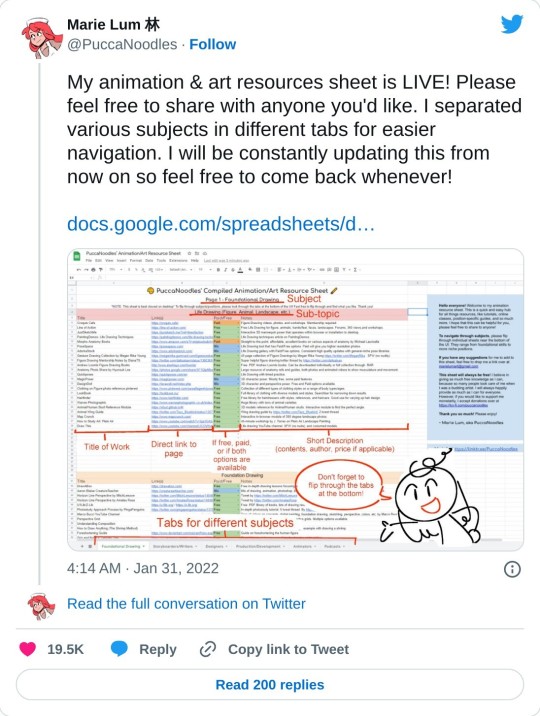
#im surprised i didnt end up writing more#i always felt like i was a can of worms ready to burst about this topic#though i dont wanna overwhelm you with too much stuff all at once!!!#bottom line!! keep drawing and animating!! youll get better with each piece you finish!!! :)#hope this helps!!#miiukkask
107 notes
·
View notes
Text
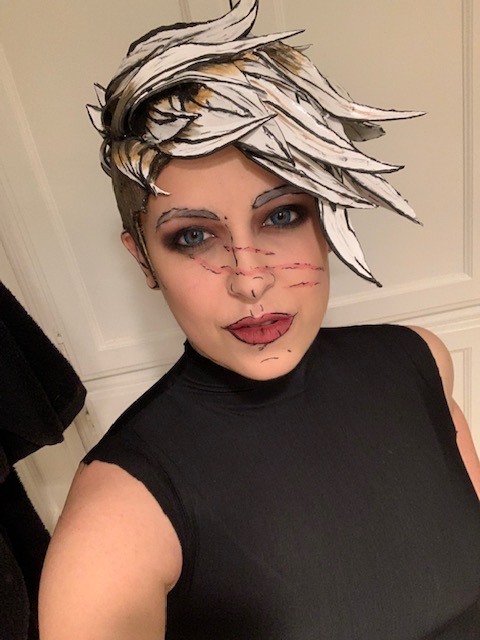
Borderlands Foam Wig Tutorial (Tyreen)
I was chatting with the lovely @void-noises-exe and it eventually circled around to offering to make a wig tutorial because you don’t see too terribly many, just thought I’d throw mine out ( especially because It was next to impossible to find good references of a foam version of Ty’s hair.) So this will be for foam wigs in general but Tyreen’s hair specifically (with a few pics of my Fiona wig from tales as well because they better accentuate my points) I didn’t plan on making this so I am missing a few pictures that might be helpful but here we go. This will not be short.
Supplies:
-Craft foam (ideally, in small and XL sheets, but you can make do with whatever size you have available)
- Spray paint as close to the BASE color of the wig you need (for Ty I used white, for Fiona a medium brown) ideally in a matte.
- a FUCKLOAD of paints (i use cheap acrylics from the craft store ) in Black, and then several shades of the colors in the hair. (For Fiona i used i think four browns? Tyreens shaved sides have three browns, and the top had an additional yellow-brown i mixed) try to vary them in darkness levels to add depth.
- multiple paint brushes. I like to use around four or five of varying sizes and hardness levels.
- plenty Hot glue, and a hot glue gun (note: you COULD use other typres of adhesive, I like hot glue because its got great hold on foam, it sets FAST and worst case scenario I can take a hair dryer to it and melt it again if I need something to be undone.)
- scissors
- duct tape
-plastic wrap
-sharpie
-wig head
-Plenty of reference images
(optional supplies include a rotary cutter and or exacto-knife [trust me, itll make your life so much easier] , and patience. )
SO to start
1) Put your hair in a wig cap or however you plan on wearing it under your wig. Wrap your whole hair bit of your head in plastic wrap. Make sure you get over your ears and the baby hairs on your neck if you want to keep them.
2) Wrap all the plastic covered bits in duct tape. This is easier for a friend to do on you, but not impossible to do alone, just make sure to get it all. It should be snug. Make sure you get as far down the back of your neck and down your sideburn area as you can. (Most characters have a bit of fringe hanging down in the back so its not the BIGGEST concern for them, but Ty’s got nada so you’re gonna want some good coverage for your hair line.)
3) Take your sharpie and draw an outline of where your ear is, and along the hairline you’d like your wig to have. For short haired characters you dont want to cut too far behind the ear or your hair will peek out, so I like to underestimate how big my ear is and adjust as needed later. Dont make your wig hairline too high either, particularly if you’re making a wig for a character who has no fringe in the front.
4) Take that bad boy off and cut along your outlines. Try it on again, adjust lines as needed. rinse and repeat.
5) once you reach a semi-accurate mold of your head, you’re gonna wanna take it off and cut AT LEAST 4 (front, back, and both sides (I like to do 8, it will lay flatter) sections,coming to a point at the crown of your head. It should come out looking something like this. NOTE : they’re all still connected in the middle. If you’re doing 8, cut each of these 4 in half. )
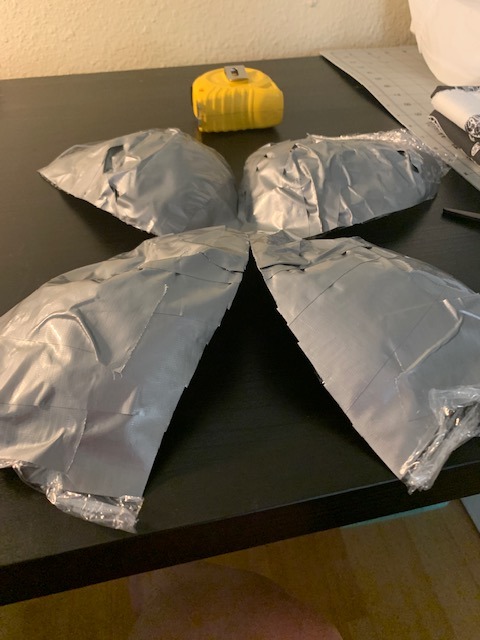
6) Lay out your foam beneath this. If you dont have a piece of foam big enough to trace this bad boy onto, what I do is literally just break out the hot glue gun a bit early, glue a couple pieces together along the edges, until i get a nice big connected surface. Trace this guy on there as accurately as you can, cut it out, and then glue all your sides together. Now you should have a foam version of your duct tape hat.
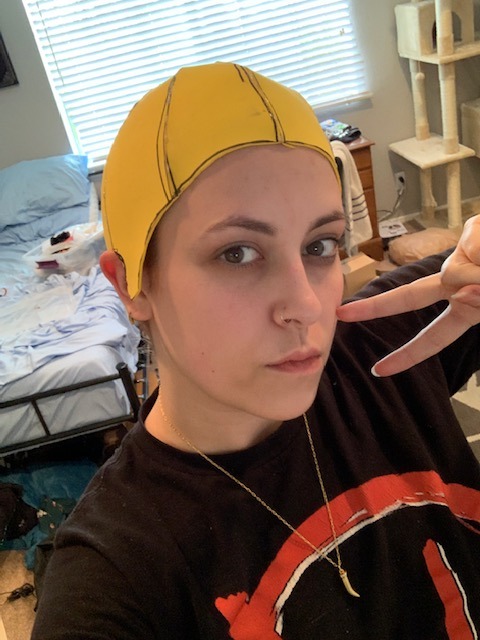
(Dont worry if the sides wont stay down, if you’re doing a character like Ty where thats an issue, we’ll get to that part later. )
7) (Optional but VERY helpful) Grab your wig head, and your duct tape head. Tape the duct tape back together and put something in it to make it hold shape, I use poly-fil. Tape the head-form to the wig head, and put your little foam cap on top of that.
8) Time to get creative. You’re gonna want to start from the bottom layers first. For Tyreen that’s the long fringe and her undercut. The strategy I decided on was to take a few large rectangular strips of foam, and lay them out everywhere I wanted the undercut to be and cut along the edges to match the hairline. I don’t have a picture of this exact point in the process but I have one from the beginning of the next step. Really the only thing to note at this point is obviously, your head is round and rectangles are not, for the curves where it sticks up along the edges, cut down where it sticks up in a little triangle and hot glue the ends together (you can sort of see this at the top left in the picture below). Dont worry about seams at this point, we’ll hide them later.
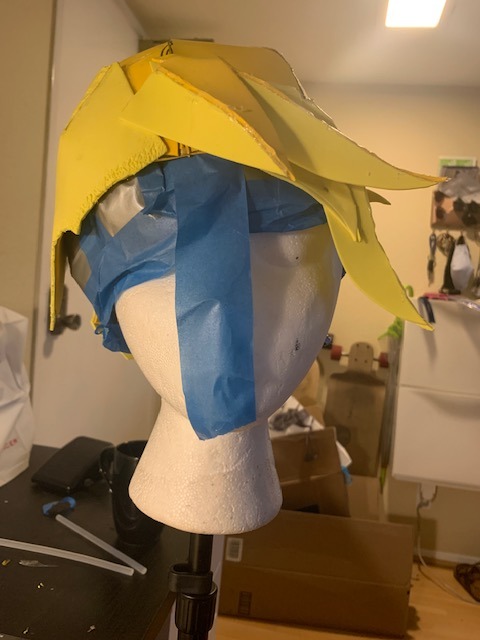
9) This was not the case for Fiona who has very flat hair ( especially because of her hat) but Tyreen has a lot of volume especially towards the front of her head. For hair pieces that need volume, such as the ones that are glued down here, cut two of the exact same foam piece (i like to do them in little waves like the side, but also just a little arch is good for volume without flips such as the front piece) and glue the matching edges together. Make sure the hair triangle is facing the way youd like it to! Then Flatten out the top as much as you can, the bottom will keep the volume and the top ill be able to be covered by “2D” hair pieces.
(NOTE: Honestly, it’s REALLY difficult to end up with an exact copy of cannon, and I ALLLLWAYS get carried away with the spikes. In the end, go by your reference images, but also follow your heart. Cosplay is half about having fun creating. )
10) Once youve started gluing, make sure to keep in mind where your part is (if you have one). For Fiona i didn’t trust myself so I glued in the hair at the part BEFORE anything, and left them ready to be glued down while I worked my way up to them.
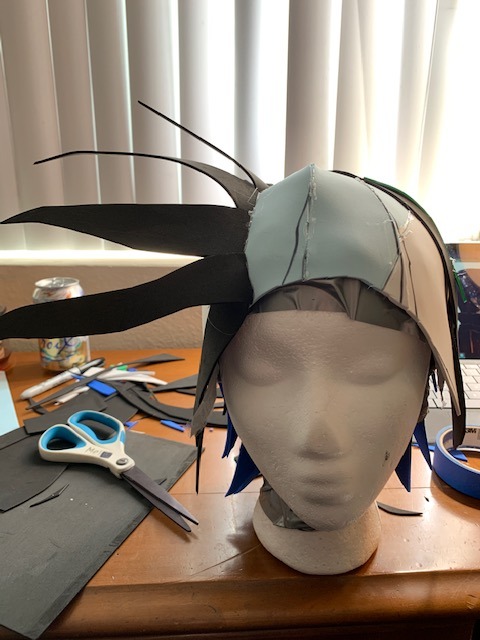
NOTE: All the hair at the parts of BOTH wigs is a single piece of foam.You want a nice wide base whenever possible to cover up the seams of all of the other edges of the hair. For your part, Carefully glue along the very end of your strip of foam and stick it down. It will be the last piece to be glueddown on top of everything else to make it look nice and clean.
11) Slowly start working your way around the head, gluing down first anything that will need to be covered (3D pieces and bottom pieces) before getting towards the top where youll need to be more strategic about what is going down and what can cover your edges. I’d definitely recommend mixing 2D and 3D pieces if that’s something you want to experiment with, otherwise, such as in the pic below, it is possible to get volume from a 2D piece, simply by gluing it in a way where it wont lie flat against the head.
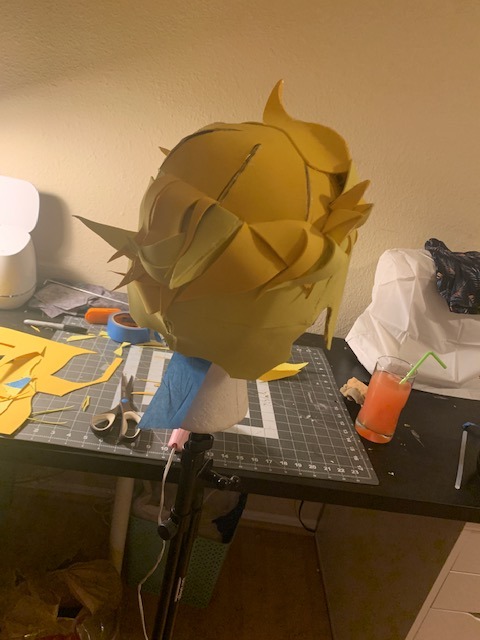
12) in the picture above you can also catch a glimpse of Ty’s cow lick. Those are done exactly the same as our 3D pieces from before, only you trace the edges of the open end, and should end up with a triangular third side to be glued in, then just glue along the edges just like the hair part.
13) Dont feel you have to overdo how many pieces the hair has, remember you may also paint in pieces and designs when it comes to the line-art!
14) Once you’ve added everything from the bottom that you’d like to, go ahead and glue down your hair-part.
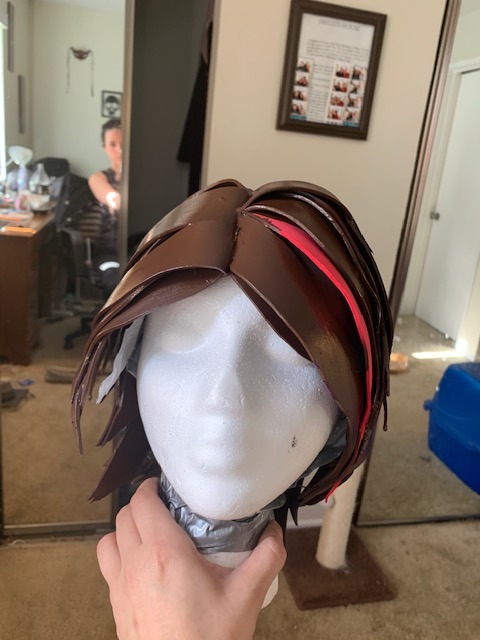
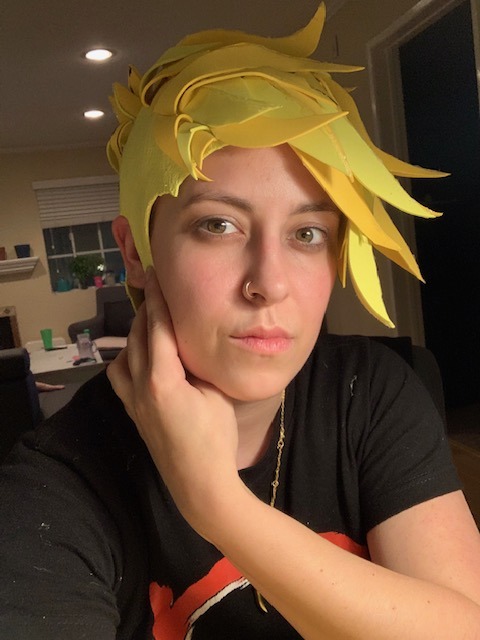
15) So, obviously, I wasn’t a big fan of Tyreen’s undercut just being flat foam across half my head. So I took an exacto to it for what felt like years. REALLY over-do it on the edges, it’ll get rid of that harsh foam line and give it a little more of a natural blend. Also pay special attention to all of your seams in the foam. The more distressing there is there, the less youll be able to spot lines later.
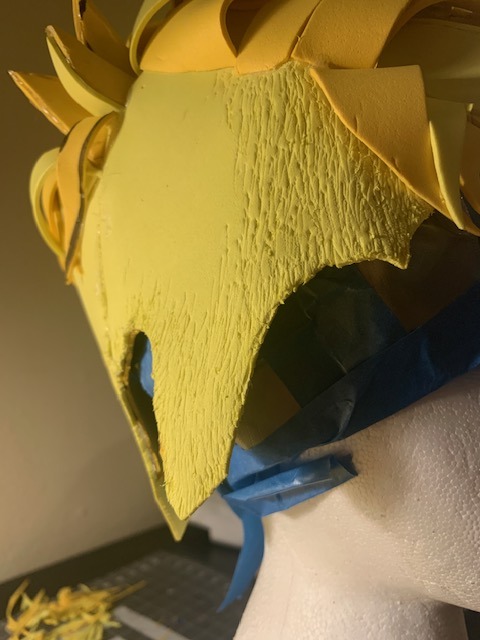
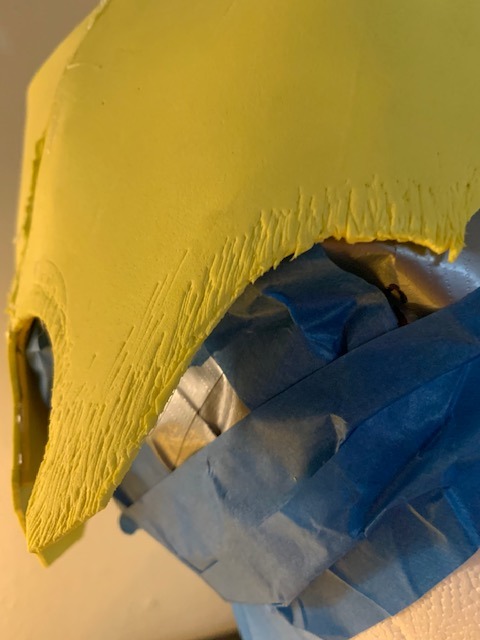
16) So once you have the overall structure of your wig and you’re thinking you might be happy with this, its spray paint time. (I’d recommend disposable gloves for this, you’re gonna need to maneuver it every which way to get the pain in every cranny and that paint does NOT like to come off easy.) Theres really not much advice I can offer on it, just be patient, and do a couple layers, spray it from every angle and let it dry completely before moving on to the next step unless youre as impatient as I am and dont mind ruining a few paintbrushes.
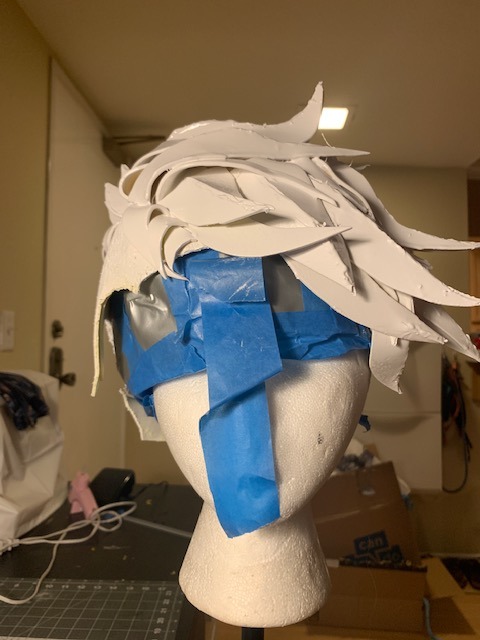
17) So, like the Fiona pic a few back or this one here, you should have a fairly flat evenly painted foam sculpture. Now is around the time you might start seeing all the inaccuracies in what you’ve made. You gotta push past that it’ll look great I promise. Time to get really creative.
18) for Ty I started by painting the buzzed bits in a base brown, and started in on the line art and her roots while i waited for it to dry before going in with two more colors of brown for depth.
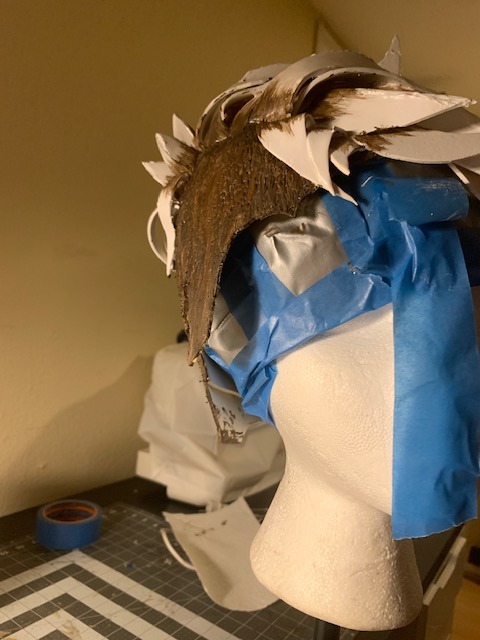
19) For her roots I ended up using three colors. Black at the very bottom (which blends into the line art) a dark brown that matches more or less the buzz, and then after the fact, a custom yellowed-brown to blend better into the white and give us a little more texture. For this and the rest of the cel-shading in the hair, dab your brush before painting and try to mostly stick to light strokes in one direction (OR: if you have one, a particularly hard bristled paint brush does wonders for this) you don’t want the ends of your strokes to be too defined.
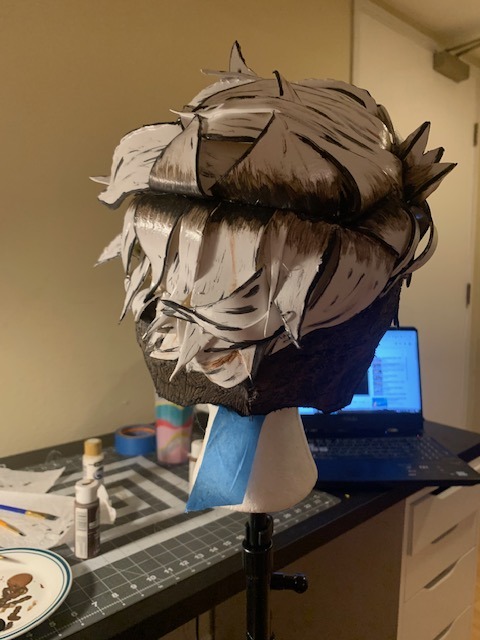
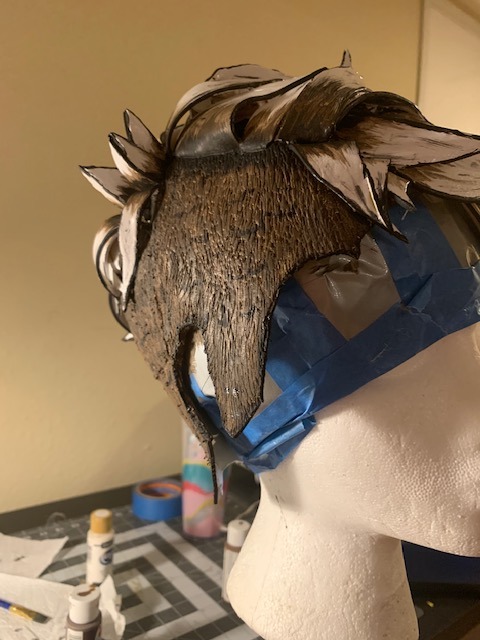
20) Outline the edges of the hair and all prominent pieces, particularly the hot-glue seams, itll make them less noticable. (dont forget the little animation squiggles for Ty’s sides) and beyond that-- honestly, black out to your hearts content. These pics are from when I thought I’d finished. I really felt I’d over detailed. The next day I looked at a picture and realized there is always WAY more texture and outlining than I feel like I see. Honestly, you cant really over-do it, especially with fine solid black lines.
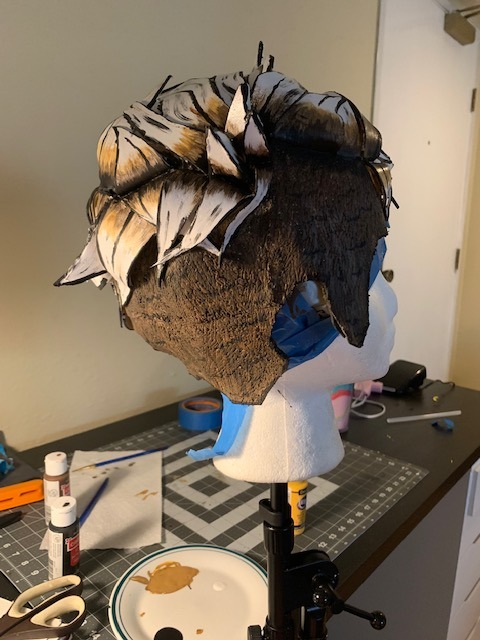
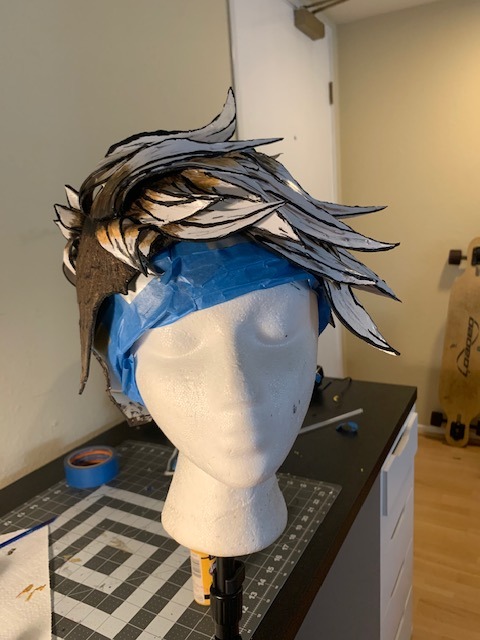
21) The next day I came back at it with the yellowed-brown and LOTS more solid black lines. (Currently in the process of taming down where I got too excessive with the spikes on the side)
22) Once it’s all dried, time to try on. Here’s where we address if you have a short haired character, and the edges of your wig just wont stay down -- invest in a little theatrical grade spirit gum. It’s not too terribly expensive, and unfortunately, I tried the cheaper halloween makeup kind, and it just wont hold how you need it too (and please for my sake, also make sure you get spirit gum remover) I took some hair gel (you could also use elmers glue) just to glue up as much of my hair as I could on the sides and the back of my neck to keep them from the spirit gum, and dabbed it along all of the prominent edges of the wig (namely, side and back) wait for it to get a little tacky and stick that MF-er down good.
Aaaaand Voila???
Let me know if I missed any steps? Its fairly simple, once you get going -- just time consuming.
59 notes
·
View notes