#between the c2 photography challenge
Explore tagged Tumblr posts
Visit Tumblr Blog
Explore Tumblr blogs with no restrictions, modern design and the best experience.
Last Seen Tumblr Blogs


Fun Fact
The Tumblr app for Google Glass was released on May 16, 2013.
Text
Thank you, Charles, for sharing your grandiose surfing skills with us. For allowing us to witness your wide variety of facial expressions. For not being embarrassed to show the whole world your ability to surf sideways and upside down. Grazie mille, Charles. What a joy to have you in my life.

#between the c2 photography challenge#and charles's new vlog#i laughed harder today than i have in a long time#also thank you antoine#for capturing precious moments#and editing them to the right music#charles leclerc#around the world vlog#antoine truchet#thank you note
22 notes
·
View notes
Text
Fanfic Friday
This week I probably read more fics than I wrote, but was still pretty productive. Thanks to pandemic-related issues, my day job has suddenly become 9-5 and on-call, so a lot of my writing happens (technically) during work hours. Usually between work crises.

Details below the cut.
This week I posted the last part of Lover Come Back (Clint/Darcy) and wrapped it. It was a fun little challenge, but now I’m looking forward to getting another series off the ground. I also posted Make Damn Sure (Bucky/Darcy), a cute little one-shot. And today’s Walk It Off (Clint/OFC) update is still on track.
Coming up:
Honestly, since I haven’t had a lot of time outside of work, I’ve just been working on whatever project catches my eye lately. It’s varied A LOT day-to-day.
A1: Brooklyn, You’re Killing Me (Steve/Darcy) is actually killing me. It’s gone through so many iterations (rewrites, deleting the intro, repositioning things) that I’m forcing myself to take days off in between edits. Ugh. It’s so close!
C2: Trick Photography (Clint/Darcy) tricked me into making it a mini series. Lots of banter, a nod to enemies to lovers with a little miscommunication, all against the backdrop of an Upper East Side wedding. So once I get a handle on chapter count and pacing, I’ll probably send it out into the world. Maybe get an extra bingo square or two out of it.
C3: The Best Deceptions (Bucky/Darcy) is this week’s dark horse and will probably be ready for release mid-next week. It’s an ode to how much I don’t miss writing my thesis and a cute little protective Bucky fluff piece.
And finally, I think I’m going to suck it up and start posting Me And The Moon (Bucky/Wanda) to see how it does. It might not get updated weekly, maybe every other week, but I think I need to just put it out there so it stops collecting dust in my WIP folder. It will either go up Sunday morning or mid-next week.
I updated my @darcylewisbingo Masterlist with some of the working titles from above. See something interesting or curious about pairings? Feel free to prod me via replies or DMs - always happy to chat!
Thanks for reading this week’s ramblings. Hope you all have a great weekend!
1 note
·
View note
Text
COLLABORATIVE TASK
Please read the article and consider how 'collective' ways of working might be useful to photographic artists.
Artists assemble! How collectives took over the art world
Oliver Basciano
Tue 10 Dec 2019 07.00 GMT
Upon reading this article, I came to the conclusion that spectators create a link between politics and society within the collaboration of artists. Though effective collaborative skills, we are able to create points and a stance against certain political and societal issues; collaborating within the creative umbrella is power.
Jane Hall of Assemble, a group of architects who came together in 2010 and won in 2015, says: ‘Coming together was about trying to refigure power relationships. Recognising that, at a certain moment, the traditional rules don’t apply any more, so there’s nothing to lose in trying something different.’ I agree with this statement in the sense that artists coming together and refiguring power is an achievement and should be hounded and appreciated.
Another factor that stood out upon reflection of the article was the use of identity and sharing identity within collaborations. I believe it is important to come together as artists and use our artistic identity and culture to encourage individuals to work together. It creates power behind a certain identity and our own varied cultures. Shared identity underpins much of the desire to work as a group, says curator Charles Esche : ‘I see what happened in the Turner prize as a gesture that recognises that not everything can be reduced to winners and losers. That’s no dogmatic leftism but something more appropriate to the times in which we find ourselves.’
The idea in which occurred within the article of art coming from a single mind to a single hand which I partly agreed with. However, I do believed that art is created to be shared and appreciated by not on the creator, but with individuals in which it interests and sparks something, an emotion, within them. I trust that the use of artists working collaboratively allows that message to be translated with larger power and meaning as it has been created with alternate and varied ideas and apron approaches. As part of the article states : ‘Within the money game, the idea of the artist is still such a traditional one, the lonely figure coughing up blood in the garret. When we started showing we were asked, ‘How can you make art collectively?’ People had this attitude that art comes from a single mind to a single hand.”
I was surprised to gain knowledge of that collectives make parts of the art work ‘jumpy’. Individuals find it hard to come to terms with the fact that artists are open to collaboration, however, it does that sit well with some. Niru Ratnam, a gallerist and former art fair director, says: ‘Collectives make parts of the commercial art world jumpy. They often form in response to social or political reasons or as a conceptual gesture, which means they are probably going to produce work that is more challenging to sell.’ I can understand how collaborative art may become more challenging to sell due to its diverse response to social or political statements. However, I hope it becomes more excepting and understood. Therefore it will become easier to sell and become a more popular approach to art.
However, there was hope within the article. Sagar goes into detail when describing the political approach and possible outcomes. Sagar believes that collective working should retain its utopian aims and that it can still pose a threat to the prevailing power structures, he states: ‘Collectivity is at the heart of what being leftwing is. Collectives contain the threat of the commons, and that scares the right people, that people can come together and produce complex methods of thinking that might work against capitalism.’
I trust that working collaboratively for photographic artists is definitely an approach that should be considered more. Our use of narrative and the power of the camera is underrated. The amount of power that can come forward within an image is meaningful and can ultimately change individuals views or opinions on topics that are currently relevant in the work for better: using photography as a tool for change. Narula concurs that the pull between optimism and frustration that spurred Raqs to form in 1992 still drives them today. “Working together was born out of a certain attitude in politics and life. At the heart of it, we believe collective action could make the world better.”
Further Examples
I believe that working collaboratively can occur in many forms. Whether its collaborating with an individual that works within the same creative practice as yourself, working with an individual within a different creative practice or working alongside an individual who is able to enhance your work, your practice, to bring forward a larger and more powerful message to a viewer. A collaboration does not necessarily have to occur between two individuals, it may even thrive more effectively within a larger group, a community, that all work in a cohesive manner and create something, a collective action that could make the world a better place.
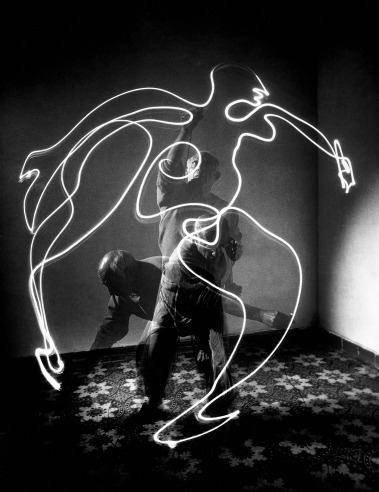
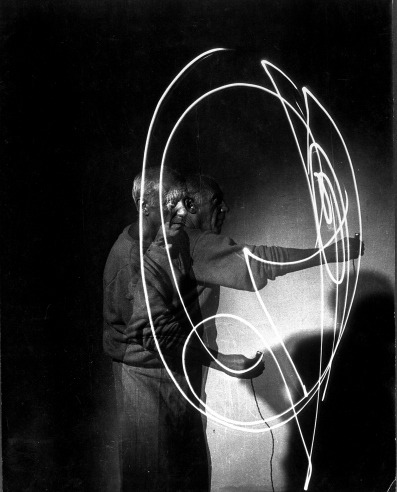
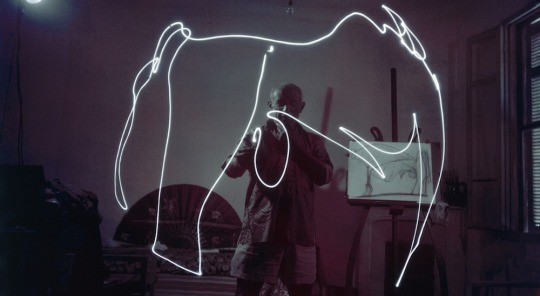
Pablo Picasso and Gjon Mili: Drawing with Pure Light
It was 1949, and a 68-year-old Pablo Picasso was spending time at his French home in Vallauris when Gjon Mili paid him a visit. At the time, Mili was a photographer for LIFE magazine and had come by to take some pictures of the great artist’s creative process. That’s where an incredible idea was born! Picasso and Gjon decided to collaborate on exploring the possibilities of painting with light. It was Mili who wanted to experiment with this technique, and he convinced Picasso to try making several paintings using the flash of a light as paint and air as the canvas.
Picasso took his assignment seriously. He was so inspired that his hands started moving around in flashing cuts, creating some of the most amazing light paintings, and Mili was there to seize the moment. Their collaboration extended for five sessions resulting in 30 images altogether.
Whether it was Picasso’s signature or a bull-shaped light trail that remained invisible until the photographs were developed, this art collaboration delivered one-of-a-kind artworks.
Gjon Mili ©Time & Life Pictures/Getty Images
Gjon Mili ©Time & Life Pictures/Getty Images
Gjon Mili ©Time & Life Pictures/Getty Images
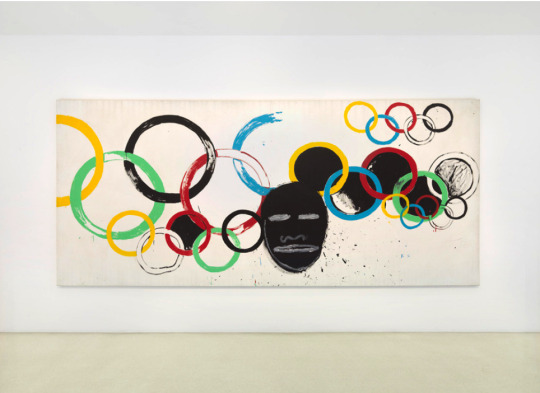
Andy Warhol and Jean-Michel Basquiat: A Crazy Art-World Marriage
From 1980 to 1986, renowned Pop artist Andy Warhol and a graffiti prodigy, Jean-Michel Basquiat, collaborated on a number of exciting pieces that actually led them to the position they now have in the art world. Their working process went on like this: Warhol usually painted first, and then Basquiat entered the scene with his colorful imagery. One of the most popular examples would be the piece titled Olympic Rings, completed in 1985. Warhol actually made several variations of the Olympic five-ring symbol, to which Basquiat responded with the oppositional graffiti style.
How did this “crazy art world marriage”, as Victor Bockris called it in his book, Warhol: The Biography, happen in the first place? It was due to the fame Andy Warhol had already achieved and the fact that Basquiat, a 20-year-old artist at the time, thought this fame was the missing piece which would help him with his big breakthrough in the art world. And he was right! Basquiat’s emotionally-charged paintings and graffiti art were about to become some of the best known Neo-Expressionist artworks in the U.S.
References:
https://www.theguardian.com/artanddesign/2019/dec/10/artists-assemble-how-collectives-took-over-the-art-world
http://resourcemagonline.com/2013/04/light-drawings-by-pablo-picasso-and-gjon-mili/24125/
https://www.agora-gallery.com/advice/blog/2017/04/27/famous-art-collaborations/
http://resourcemagonline.com/wp-content/uploads/2013/04/2_Gjon-Mili-%C2%A9Time-Life-PicturesGetty-Images.jpg
http://resourcemagonline.com/wp-content/uploads/2013/04/3_Gjon-Mili-%C2%A9Time-Life-PicturesGetty-Images.jpg
http://resourcemagonline.com/wp-content/uploads/2013/04/k9l3K.jpg
https://gagosian.com/exhibitions/2012/jean-michel-basquiat-and-andy-warhol-olympic-rings/
0 notes
Text
Alexa Towersey's resistance training workout
Resistance training targets the full body with particular emphasis on the posterior chain and core for both strength and physique shape and allows you to work towards YOUR own objective by having targeted options with both your rep range and load.

It also provides exercises designed to challenge your grip, in addition to providing some of the progressions needed to achieve a pull-up.
The HIIT component is representative of Jenna's ALL IN program. It is designed to challenge your strength, power, coordination and overall fitness, with the metabolic requirement of high reps, moderate load and minimal rest raising your heart rate as quickly as possible and keeping it elevated for up to 36 hours post workout.
The active rest and recovery component is highly recommended – not only as a stress management tool, but also to allow you enough time between workouts so that you can perform at your best. For both increased fat loss and muscle repair, in addition to supporting all the detoxification channels that may have been overworked over the holidays, I recommend power walking, foam rolling, infrared sauna and epsom salts baths. Supplementing with a pharmaceutical-grade magnesium is also suggested.
This workout consists of a standalone EMOM, followed by two supersets.
EMOM stands for 'every minute on the minute'. The beauty of this format is that you can structure the rep range and load of the EMOM to target your own specific goals.
If you're an advanced lifter, know your one rep max (1RM), and if you want to opt for pure strength and no advance in muscle size, aim for three reps with an exertion level of 8/10.
If you're a beginner to intermediate lifter and want to aim for more strength and minimal size, aim for five reps and an exertion level of 6–7/10.
If you're a beginner lifter and prefer to stick to lighter weights for form OR you want to aim for fat loss with a little lean muscle gain, then aim for 10 reps with an exertion level of 5/10. You should be able to complete all 10 reps for all 10 sets at the same weight – so don't be a hero by trying to go too heavy!
Perform each exercise for the reps/time that are prescribed. Where there is a superset [e.g. C1 & C2], perform the exercises one after the other with no rest in between. After you have completed the superset, rest 30 seconds. Complete three to five rounds before moving on to the next superset. To progress these workouts, you can increase the load (heavier weights), the time under tension (slow it down), and/or the volume (add a set each week).
NOTE: you should never sacrifice FORM for load, time or volume.
Model: Alexa Towersey (@actionalexa)
Photography: Jason Lee // @jasonminilee
Location: 98 Riley Street Gym // 98gym.com // @98rileystgym
Wearing: styling by StyleRunner // @stylerunner
Alexa wears: Top by Heroine Sport, tights by Lilybod
A1
Barbell Glute Bridge EMOM – goal-dependent rep range (3,5 or 10). Complete required amount of reps every minute on the minute for 10 minutes (so 10 sets in total).

Feet need to be set up in line with the sit bones: so align the hip bone, knee and 2/3rd toe. Place a towel or mat across the front of the hips underneath the barbell. Drive your hips up to the ceiling, squeezing the glutes. Keep a slight posterior pelvic tilt throughout to make sure you are using the glutes rather than the lower back. If you struggle to engage the glutes, pop a band around your knees, lift the toes and even turn your feet slightly out.
NOTE: 2 mins rest after EMOM to start first superset

B1
10 x barbell romanian deadlift into bent-over row

Feet hip-distance apart, hold the bar in front of your thighs. Pin the shoulders back and keep them set throughout. The RDL part of the movement is initiated by a hip hinge (imagine you're shutting a car door with your butt) – as your hips go back, the upper body naturally comes forward. Come to a position where your upper body is almost parallel with the floor, then perform the bent-over row, pulling to the bottom rib with elbows squeezing in. Drive through the heels to come up and squeeze the glutes at the top.

NOTE: If you struggle to keep your shoulders back throughout, you can perform this movement with an underhand grip.
B2
30-sec dead hang

With hands just wider than shoulder distance, hang from a pull-up bar using an overhand grip. Note: make sure you wrap your thumb around the bar and focus on gripping hard. Let your shoulders shrug up to your ears.
NOTE: Rest 2 mins before next superset
C1
10 x rack hold step-ups

Hold two kettlebells in front of the body with the inside of your wrists touching. Plant your top foot on a box and focus on engaging your glutes and hamstrings to pull you up through the heel, as opposed to pushing too much with the bottom leg. Keep the top leg elevated for all of the reps, then switch sides.
C2
10 x knee tucks

Set yourself up in a plank position with your shins and the top of your feet on a Swissball, hands directly underneath the shoulders. Initiate the movement from the lower abs by lifting your hips towards the ceiling as you draw your knees in towards your chest. Lower with control and repeat. To avoid dropping through the lower back, keep your glutes tight and your abdominals drawn in to the spine throughout.
{nomultithumb}
0 notes
Text
Loupedeck for Adobe Lightroom 6 & CC
Loupedeck is awesome, Loupedeck is great, Loupedeck makes me a better retoucher simply because its rekindled my love of RAW processing and as sad as it sounds I do actually love what I do which is mostly retouching photos.
Now that's a pretty open and shut statement to start an article with but it's important to not waste your time thinking you're about to read (or not) anything other than a positive look at what I think is a positive step forward in the photo manipulation world.
Why Lightroom? (warning: sob story coming up)
Here's something that's important to understand about why I use Lightroom. I use Lightroom for retouching at speed! I've been a dedicated user since it was in beta, what must have been 10 years ago, which is about the same time I started shooting property and weddings. Disciplines which both require retouching a high volume of images in a very short time.
Over the years after sitting up all night after a busy day shooting retouching hundreds of images into the early hours knowing I had to get them finished and send off before doing the same thing all over again in just a few hours I looked for ANY way to get through pictures quicker. I used actions, presets, tried other software, tried outsourcing, tried enlisting help from other photographers. My own wife (who's a doctor and nothing to do with photography) even at one point after seeing me constantly working and not sleeping more than a few hours every night asked if I could teach her how to retouch so she could help. So I come from a place of "Please for the love of all that is good someone design something to make my life easier!"
AND SO ALONG COMES LOUPEDECK......
Loupedeck was orginally a 'indiegogo' project (and how I wish I'd known about it back then just look at the backer perks! I would've loved that trip to try it out with the hotel)
I'd read about several other editing console products for Lightroom in the past and they all looked... ok. I think it was a facebook post featuring an article about Loupedeck's first finished units being shipped that caught my attention. I was getting very bored with Lightroom, sounds odd yes, but truly I was. Day in, day out, I would use the same trusty presets, do the same things, with the same sliders on my Wacom Tablet. I even took to using Apps like 'be focused pro' to try to challenge myself by improving my productivity. I had overlays for my keyboard from amazon, shortcuts assigned to the wacom tablet, but I still wondered if I could work faster - yet maintain the same quality.
Whilst on holiday I started watching youtube videos of people using Loupedeck. They were all very simple reviews that didn't really show me the actual unit properly. I wanted to see all the knobs and know if it was possible to use two or more at once. I started writing to loupedeck and Felix a very kind and helpful rep started writing back. A week into my holiday I thought 'Ah to hell with it! I spent the money and ordered 'my' Loupedeck.
5 - 7 days later....
It's here! It came in two boxes. The first is white with Loupedeck printed on it and inside that a black embossed box again with the words Loupedeck. I'm not going to go into anymore details here, whilst like it's design it's a box... many others on youtube will do far better justice to it in unboxing sessions.
Straight away I download the firmware for my mac and plug the unit into a usb port. A light came on, I opened Lightroom to be greeted with a message
'Loupedeck thinks you look great today' Well thank you Loupedeck that's very kind. A window pops up presenting me with options to customise Loupedeck.
I assign the top P buttons to presets, C1 dial to perspective correction, C2 button to gradient, and C3 to Radial gradient. That should do me for the moment. That's about it from there you can leap straight into things.
One pretty cool function I didn't know it did - If you press any of the dial it resets that value, for example if I spin a colour wheel and don't like what I've done rather than spin it back again I just press down on it it makes a satisfying 'click' and the value returns to 0.
All dials and wheels spin and turn 360 degrees which is good. Whilst I'm on this subject the turning mechanism and indeed dials are really well made. It doesn't feel loose or that they are going to come off anytime soon. Some of the buttons are a little stiff on rare occasions, my right arrow key for example tends to get slightly stuck but I think this is isolated to my unit and is the type of thing that would happen to any product you buy it's really not a big deal but it's the only negative I can find to the mechanical function of the unit.
The main unit is made of plastic, it's light and means when I'm working with the unit and my hands are resting on it it is not cold like aluminium might be. A few things at this point I would have liked. The first is a detachable USB cable like my wacom tablet, just incase the usb wire fails I would normally just replace it but when it's attached to the device I'd have to send it back to repairs. Better yet bluetooth. My only other criticism of the construction is the groove with holds the wire might be better if it let the wire sit a little deeper, mine tends to pop out ever so slightly.
So down to it , I started retouching some images. Within ten minutes I work out this isn't something you can just start twiddling the knobs and dials of and expect it to make you infinitely quicker than you were before. You have to learn where everything on the device is just like typing on a keyboard, at first you have to keep looking down looking at the letters you're typing then back up at the screen to check you've put them in the right order, but the more you practice the more you learn where those letters are and before you know it you're just staring at the screen typing and moving your fingers by instinct. It took me just over a month to get to that place with Loupedeck but when I did... 'wow'.. yes I was able to work much quicker than before.
I found I was working dials in groups of two, I'd be pulling the blacks down and the whites up simultaneously The same with the shadows and highlights, contrast and clarity, in fact at one point I realised I started using the edge of my palm pulling down the blacks whilst my little finger pulled up the shadows and my other hand the highlights!
Using the colour wheels is also incredibly quick! In my job at certain times of the year or after certain weather like rain the camera has a tendency to capture grass as a very bright yellow. When this happens I typically pull the luminance of the yellow down then the hue of the yellow up (to make it more green), then the saturation to the yellow down slightly to bring it back to the green colour that it should be, in the past that would involve a lot of clicking and sliding the panels with the graphics tablet, now i press the appropriate button to select 'lum', 'hue', or 'sat', and just to the right of them are all my colour wheels perfect! The led light to the side of lum, hue, and sat is incredibly useful. I do wish the colour wheels had some of these faint led's or something to illuminate them in the dark. I tend to dim all lights and cut out external light sources when retouching so that external light and colours don't influence the light and colours I'm seeing on the screen.
Now I know I said I can use the dials without looking, but that's also partly because they are well spread out. I love the set up of the colour wheels and I wouldn't want it changed but it is more difficult to know which wheel goes with which colour without looking. I have slight issues with the darker blue. I kept getting it mixed up with the colour to the right of it in dim lighting, I manipulate the colour blue a lot so in the end I put a tiny glow in the dark dot on my unit so a very quick glance down confirms where that colour is.
All the other buttons on the unit work really well. I particularly like the way you can swap between rating images by colour or numbers and by clicking between the two options you get an on screen message.
There are two Zoom buttons, I kind of wish one of these had been replaced with something else like 'select WB point' or even better another custom dial! The custom dial is a really strong point of the unit and by pressing the Fn key you can assign this custom dial another function which can be set up in the Loupedeck options menu.
Performance...
You can customise how fast Loupesdeck reacts based on how fast or slow you spin dials (I'm not sure what I've just typed makes sense??) basically... you can change the settings so that a small turn makes a BIG change on the slider or the other way around - dial sensitivity.. I can't think of another way to describe it. I've not played around with it too much as I'm used to how the dials work by default. One thing I do find is the more confident I get the more I start trying to spin dials and wheels really fast. It backfires on me in that the particular dial or wheel will adjust the slider up and then it'll 'rubber band' back down again. That's my bad 'bull in a china shop' mentality. Whats better practice is to work quickly but to not go too nutts on the unit.
Changes you make on Loupedeck adjust incredibly quickly on screen no real lag at all (unless its Lightroom lag which you'd get whether you were using the unit of not). One thing that does happen is as you make adjustments don't expect the visual sliders on the right to show up if they're not currently on your screen. So if my colour sliders menu is closed and I adjust the colour wheels on Loupedeck the panel doesn't open up on the screen, you'd have to actually click it open to see this (or press a key board short cut should one exist for that panel). If this happens and you're working quickly not wanting to click open panels you can't see then you can adjust be sight.
slightly off topic RANT WARNING!..
Any sort of performance issues I experienced are based more on Adobe's relationship with Apple which I think has plagued Lightroom for a good few years now. I remember back in 2014 when we bought new imacs with the new screens only to find Lightroom was';t compatible with the high resolution screens meaning we had to either reduce the resolution of the screen or make the windows substantially smaller to get a smooth Lightroom working environment. The same thing has happened again. I'm currently on a mid 2017 imac and as soon as Lightroom cc Classic dropped I noticed a huge increase in Lag I won't go into that now, only that the issue became so incredibly frustrating it actually made me revert back to Lightroom 6 as a stand alone copy and eventually move my RAW workflow mostly to Capture One Pro.
Rant over and back to Loupedeck.
There's a nifty little export button on the unit, all it does is open the export window, again I think it could've been used for something else, however as it's there I do use it, and I challenge anyone not to get the weirdest sense of joy pressing it when you're done, it's the strangest thing.
PRESETS
Loupedeck comes with some Lightroom presets, I've not used them. I tend to make my own presets rather than use other peoples, for no other reason than I just don't. So using them I've no idea if they're good or not since I've not any experience of using others in that regard it's wrong for me to judge them, but just to say they're there if you want to have a look once you buy the unit.
BUYING AND PRICE
Several places sell Loupedeck now a google search would show you UK stockists. I got mine directly from the website and it arrived in a week, I'm sure I remember paying close to 329 euros but currently on their site it's 249 euros, so in my opinion that's really very good value.
Loupedeck with other RAW editing software.
So when I was completely fed up with Lightroom Classic cola CC or whatever they're calling it at the moment. I wrote to the guys and gals at Loupedeck to ask if they had any plans to expand to other software. I'll be honest my love of this unit is the only thing still keeping me hanging on to Adobe's raw processing software at this point. They wrote back to say they are currently in talks with some other companies.
Then last month a very clever person posted on a facebook group I'm a member of they had got Loupedeck working with Capture One. Incredibly excited I got all the info and gave it a go myself.
Now basically what this clever person did was to program Loupedeck as a midi device with some purchaseable software called 'Bome'. You then just reassign the dials and buttons to Capture one functions. And 'by golly gosh' it actually works!... Ok so the colour wheels don't actually do what they're meant to do but are just assignable as buttons, and YES I accept you could just get any midi device for far cheaper and do the same but I have Loupedeck so thought I'd try it, it's just a fun thing.
Something pretty cool I was able to do was to assign brush size adjusting to a dial, it's incredible smooth and easy to use. This made me think, if Loupedeck 2 should ever appear how about a brush size dial?!
Using Bome in no way gets rid of Loupedecks proper software you just need to remember to close bome before opening Lightroom. It's a bit of fun but no substitute for the real thing of using Loupedeck with it's proper dedicated software with Lightroom.
Loupedeck alternatives
Loupedeck is awesome why on earth would you want to use anything else?! :) Incase you do or like me you're slowly watching Adobe doing weird and wonderful things with Lightroom, and change your RAW editing software here are some others you can look at (sources and prices are correct as of December 2017) Please note: I've not used any of these I'm just putting them out there for anyone to research further should they desire, it's actually this research that lead to me end up buying Loupedeck.
PALETTE
These look pretty nifty you kind of build you'r own kit, however quite pricey to me!
TANGENT
I found out about these whilst researching control devices for Capture One, lots of variety. Prices range from £300 - a lot of money :)
BEHRINGER MINI X-TOUCH (OR OTHER MIDI DEVICES)
The cheapest option but also the most manual set up needed, you basically plug these 'bad boys' in and assign controls from lightroom to the buttons and dials. I did order one in July from Amazon for £50 but after a month of waiting I gave up and bought Loupedeck instead. There are lots of guides about how to set these up on youtube, but obviously you run the risk of it stopping working after Lightroom updates. People seem to like the model to the left because like Loupedeck the dials are unobstructed.
So there you have it
There are other options out there but despite this I'd still buy Loupedeck in a heartbeat. I think it's incredibly well priced, it just works (unlike apple and adobes relationship these days it seems) it is constantly being worked on with positive updates and it is most definitely becoming more and more popular, appearing in more shops and online outlets all the time.
As I am quite passionate about this device I will keep my eyes peeled for any new developments in the Loupedeck camp with updates and new products so do check back here for any new news. Or lets be honest you could just check on their site.. Check here or there it makes no difference, they're worth your attention and keeping your photographic eyes on in the future.
NOTE: THIS IS A COMPLETELY INDEPENDENT REVIEW I HAVE NO CURRENT ASSOCIATION WITH LOUPEDECK (However if they would like to reach out and form one based on this review they can hit my contacts section... I'm just saying...)
I'll be doing some live sessions using Loupedeck soon so another thing if you are interseted to stop by for.
#Loupedeck#should-I-buy#Property-photographer-surrey#Mark-Hardy#Blog-farnham#Adobe-Lightroom#Lightroom-controller#review#indiegogo#project#Surrey-property#wacom#Bome#is-any-good
0 notes