#battery pole connector
Explore tagged Tumblr posts
Visit Tumblr Blog
Explore Tumblr blogs with no restrictions, modern design and the best experience.
Last Seen Tumblr Blogs


Fun Fact
12.7% of mobile users access Tumblr.
Text

6mm Battery Energy Storage Connector, from Guchen Electronics. The 6mm Battery Energy Storage Connector is a high performance energy storage connector. It provides the connection between positive pole and negative pole of an energy storage battery.
The 6mm Battery Energy Storage Connector has been designed for the Chemical energy storage industry that require high current output and long life cycle. It features low contact resistance, high current carrying capacity, low thermal resistance and high mechanical strength. With these advantages, it can ensure the safety and reliability of BESS high voltage interconnection system and reduce maintenance cost. The 6mm Battery Energy Storage Connector is made of silver-plated copper (contacts) and silicone rubber (seals), with high conductivity, high temperature resistance and corrosion resistance. The product has excellent anti-interference ability and mechanical strength. Its connection structure can effectively prevent short circuit caused by external impact or vibration during use.
https://www.guchen-connector.com/products/energy-storage-battery-connector/gcs1-6mm-hv-battery-connector.html
The product comes with a plastic housing, which provides protection to the internal components of the connector and makes it easier to install and maintain.
#energy storage connector#BESS connector#high voltage connector#battery pole connector#6mm energy storage connector#Shenzhen Guchen Electronics
0 notes
Text
BMS Safety Design: Best Practices for Preventing Battery Hazards

Voltage isolation and strong EMC anti-interference capabilities are prerequisites for BMS collection circuits. Special integrated circuits are generally not advised because they cannot achieve fault diagnosis, accuracy, passive equalization, or high-precision AD conversion. Examples of these circuits include optocoupler relay + external AD, data processing, passive equalization, drop monitoring, and high anti-interference ability. They are hard to guarantee, and they are not very resistant to interference.
It is advised that the voltage and temperature monitoring points be set to 1:1 and +2 (monitor module connector temperature), respectively, to guarantee that the temperature of each cell can be observed. Temperature monitoring points must also be installed on the battery pole to reduce the temperature monitoring delay and increase accuracy. Incorporate temperature monitoring at critical locations that are prone to overheating, like circuit breakers, relays, and power bus connection points.
Battery system safety will be directly impacted by SOS, and BMS ought to be able to assess the state of battery safety. It is impossible to determine the actual temperature inside the battery because temperature monitoring is either not done at this time or is limited to measuring the temperature of the confluence. As a result, there is a serious hidden risk to the battery’s safe operation when the heat inside the battery gets out of control and the rapidly rising temperature is not noticed in time.
Likewise, in the event that both the battery temperature and internal pressure rise too high, the safety valve will open. However, since safety valve monitoring is currently lacking, preventive actions such as shutting off the circuit, halting operation, initiating local cooling, and initiating firefighting cannot be taken in a timely manner. As a result, the two points mentioned above will eventually lead to breakthroughs in BMS security design.
Energy Storage BMS Development Trend
As monomer battery capacity increases, battery imbalance becomes more severe.
Passive equalization technology is no longer sufficient to balance battery systems and extend battery life.
Active equalization technology is an inevitable trend in the development of energy storage BMS.
Active equalization can extend battery life by 20%, which has high economic benefits.
Development Trend of Energy Storage BMS Battery Sensing Technology
The development of battery sensors and wireless BMS has become a priority due to the swift advancement of this technology. Future research and discussion on BMS are critically needed.

Problems with the technology of the current battery management system. There are obstacles in the way of technological advancement for the current battery management system:
1. There are two unsolvable issues because the voltage and temperature recorded by the current battery management system are the external parameters of the cell.
(a) Because the battery’s internal temperature cannot be measured, it is impossible to accurately determine how hot it gets inside. As a result, in the event of a small internal short circuit or thermal runaway cell, prompt safety warning and protection are not possible. This is a really big issue. The temperature inside the battery can be used to predict the thermal runaway of the battery in advance, preventing many combustion and explosion accidents that have happened in electric cars and energy storage power plants.
However, the system has experienced thermal runaway precisely as a result of the temperature gradient’s influence and the delay in temperature sampling. It’s too late to issue warnings and safeguards. This problem, which must be resolved immediately, is connected to the battery system’s safety.
(b) It is impossible to precisely determine the true state of the battery, including its capacity, health, attenuation, safety status, etc., since the real temperature and other state parameters inside the battery cannot be obtained.
2.The current battery management system must gather wire harness data to gather parameters like voltage, temperature, and other data. Numerous failure hazards, including poor contact, will arise because of the numerous geranium beams, sampling points, and connectors attached to the wire harness. In addition, it will result in production issues, insulation deterioration, and power leaks brought on by wire harness aging, damage, or extrusion. The system’s potential safety risk.
3. Since wire harness installation is typically done by hand, production and installation costs will inevitably rise.
4. Ineffective cell detection in the absence of installation and operation; damage to the battery; and thermal runaway safety.
Energy storage BMS development is moving in the direction of active equalization technology. This is because active equalization, particularly for large-capacity battery systems, can more successfully balance battery systems and increase battery life. Because active equalization technology can increase battery life by up to 20%, it offers significant economic benefits.
Since batteries account for a large portion of the cost of energy storage systems, this represents substantial savings for users of energy storage. Active equalization technology is where energy storage BMS development is trending. This trend is advantageous since it will result in energy storage systems that are more dependable and efficient.
#Battery Hazard Prevention#Battery Management System (BMS) Safety#Battery Safety Hazards#BMS Best Practices#BMS Safety Design
0 notes
Text
Price: [price_with_discount] (as of [price_update_date] - Details) [ad_1] Description: High quality Material‘:The car battery terminal connector is made of Pure copper tinned material, which provides better electrical conductivity and durability than other materials.Positive and Negative Terminal Clamps‘:The terminal connector comes with both positive and negative terminal clamps, making it easy to install on your car battery.Easy to Install‘: The positive and negative terminal clamps is easy to install, simply push the cable into the clamp and tighten the screw to secure it. The purpose of the product is to connect the battery and the power supply, stabilize the current, and protect the battery.Universal Fit‘:The cable end connector is designed to fit most car batteries, ensuring compatibility with your vehicle.Durable Design‘:The terminal connector is built to last and withstand extreme temperatures and harsh environments. Strong conductivity and long service life. Specification: Product attributes: positive pole 17.5MM, negative pole 15.9MMWire size: 5.2 to 7.4mm (AWG size 1 to 4) or 16 to 35mm^2 wire diameter Size Chart: 6.6cm/2.60inch Package Includes: Optional:Style A: Positive and Negative Pile Heads,Red and black casing, red and black sheathOrStyle B: Positive and Negative Pile Heads,Terminal block, insulating pad, cleaning brush, red and black casing, red and black sheathOrStyle C: Positive and Negative Pile Heads,Terminal block, red and black casing, red and black sheathOrStyle D: Positive and Negative Pile Heads,insulating pad, red and black casingOrStyle E: Positive and Negative Pile Heads,Terminal block, insulating pad, red and black casing, red and black sheathOrStyle F: Positive and Negative Pile Heads, insulating pad, cleaning brush, red and black casing Note: Please allow slightly errors due to manual measurement and different monitors. [ad_2]
0 notes
Text
Configuring AM32 ESC
You might have seen the AM32 Brushless ESC setup tutorial I posted previously over here. While it worked, we don't really know how that ESC was configured, or if it was properly configured in the factory. So, I got the AM32 ESC USB link module and hooked it up to my computer to check it out and see what I can do with the settings.
You connect the AM32 ESC's 3-pin connector that plugs into the receiver to the ESC USB link instead, taking note of the signal pin marked with "S". Connect the ESC to the battery, then plug in the USB-C cable to connect to your computer.
Next, use a browser that supports web serial like Microsoft Edge or Google Chrome, and point it to https://am32.ca. This USB link module uses the CH340 USB to Serial chip, so depending on your OS, you might need to install the driver for it. You can just click the "Port Select" button and see if a window pops up and shows you a "USB Serial ... " device. If nothing is listed, you probably need to install the driver. If a device is listed, you can just select it and click "Connect".

If everything worked, you should see a "Connected to device" status message on screen. Now, click on "Configurator". That's is, you can now see the current configuration of your AM32 ESC, and you can change it as you wish.


Before you mess with the settings, do check out the following video tutorial. It gives a decent explanation of the various settings and recommendations.
youtube
I followed most of his recommendations, except for the Motor KV and Motor Poles. I changed Motor KV to 4300 as that is the spec of the brushless motor I am using, and I change the Motor Poles to 12 (I counted the number of magnets to check).

Below is a video of my AM32 ESC with the above settings. I think it performs quite smoothly across the the throttle range, don't you?
Now, to be very frank, I don't really know if my settings now actually makes it perform better. It's really hard to tell based on the feel. I will still need to do more experimenting. I think it's running just a little more smoothly, but it could just be my imagination ... lol
I do have another AM32 ESC that seems to behave a bit odd and gets a bit out of sync at certain speeds, so I suspect there may be some misconfigured settings. However, it refuses to connect to my computer, so I am unable to change its settings. I guess it's a defective unit.
Anyway, if you guys find any settings that makes things run better, do let me know!
0 notes
Text
Cardinal Health Kangaroo Joey Parts & Accessories

Kangaroo Joey Parts & Accessories
Overinfusion safeguard (when used with 224, 324, PET or Control Pumps). Fits Kangaroo 224, 324, Pet and Control Pumps. Non-IV compatible connectors.
The Cardinal Health Kangaroo Joey Parts & Accessories are designed to enhance the performance and functionality of the Kangaroo Joey Enteral Feeding Pump. These accessories ensure smooth operation and provide necessary replacements for wear and tear, guaranteeing uninterrupted feeding support for patients. The Kangaroo Joey accessories are known for their reliability, ease of use, and compatibility with the Kangaroo Joey pump system.
Cardinal Health Kangaroo Joey Parts & Accessories Features:
WARNING: Cancer and Reproductive Harm - www.P65Warnings.ca.gov
Compatibility: Designed specifically for use with the Kangaroo Joey Enteral Feeding Pump.
Durability: Made with high-quality materials to ensure long-lasting performance.
Ease of Use: Easy to install and replace, minimizing downtime and ensuring continuous feeding.
Comprehensive Range: Includes a variety of parts and accessories such as feeding sets, power cords, and carrying cases.
Safety: Manufactured to meet strict medical standards, ensuring safe use for patients.
Kangaroo Joey Parts & Accessories Specification:
Feeding Sets: Available in various sizes and configurations to meet different patient needs.
Power Cord: Universal power adapter compatible with standard USA outlets.
Carrying Case: Durable and portable, designed to protect the pump during transport.
Tubing: Medical-grade, latex-free tubing for safe and efficient feeding.
Packaging: Each accessory is individually packaged to maintain sterility and hygiene.
Additional Information:
Looking for replacement parts or accessories for your Cardinal Health Kangaroo Joey enteral feeding pump? We've got you covered! Choose from our selection of printed main doors, batteries, pole clamps, and power cords.
Order today: Cardinal Health Kangaroo Joey Parts & Accessories
#kangaroo joey parts and accessories#cardianl health joey parts#cardinal health joey accessories#bttn#bttnusa
0 notes
Text
AUECOOR 1.4Kw Wind: Efficient Off-Grid Power Solution
The AUECOOR 1.4Kw Wind Solar Kit offers a comprehensive solution for off-grid power generation, combining wind and solar energy sources for efficient charging capabilities. With its durable construction and easy installation features, this kit is designed to provide reliable power for various applications. I recently installed the AUECOOR Solar Kit on my boat, and I have been impressed by its performance. The easy installation process, thanks to the included mounting systems and pre-installed diodes, made the setup hassle-free. The panels have proven to be durable, withstanding strong winds and snow loads without any issues. The pure sine wave inverter ensures a quick and responsive reaction, providing stable power output. AUECOOR 1.4Kw Wind: Versatile Power Generation Options Credit - Amazon.com Buy On Amazon The AUECOOR kit is built to withstand harsh weather conditions.4Kw Wind Solar Power kit offers a versatile solution for power generation. With 10pcs 100W mono Solar Panels, a 400W Wind Turbine Generator, and a 2000W 24V Off Grid Inverter, this kit allows users to harness the power of both wind and solar energy simultaneously. This makes it an ideal choice for off-grid applications, such as on a house boat or RV, where reliable power sources are essential. AUECOOR 1.4Kw Wind: Easy Installation and Compatibility Credit - Amazon.com Buy On Amazon One of the key features of the AUECOOR kit is its easy installation process. Compatible with various AUECOOR mounting systems like Z-Brackets, Pole Mounts, and Tilt Mounts, setting up this kit is straightforward. The panels come with pre-installed diodes in the junction box and 90cm cables with MC4 connectors, simplifying the connection process. This user-friendly design ensures that even those new to solar and wind power systems can set it up with ease. AUECOOR 1.4Kw Wind: Durable and Weather-Resistant Design Credit - Amazon.com Buy On Amazon A noteworthy aspect of the AUECOOR kit is its warranty and customer service. Designed to resist high wind and snow loads, the panels offer long-lasting outdoor durability and a prolonged lifespan. The corrosion-resistant aluminum frame further enhances its durability, ensuring that the panels can endure outdoor exposure for years to come. This robust design makes the AUECOOR kit a reliable and durable choice for power generation in various environments. AUECOOR 1.4Kw Wind: Efficient Power Conversion Credit - Amazon.com The AUECOOR kit features a pure sine wave inverter that ensures efficient power conversion. With faster and more sensitive reactions, this inverter provides optimal electrical protection and performance. The aluminum alloy housing adds to its durability, making it rust-resistant, heat-resistant, cold-resistant, and anti-corrosive. These features combine to deliver a reliable power conversion solution that is built to last. AUECOOR 1.4Kw Wind: Warranty and Customer Service Credit - Amazon.com The AUECOOR 1. The kit comes with a 6-year material and workmanship warranty, along with a 25-year power output transfer warranty, providing users with peace of mind regarding their investment. Additionally, the friendly 24/7 customer service ensures that users can seek assistance whenever needed. With reliable warranty coverage and excellent customer support, AUECOOR prioritizes customer satisfaction and product reliability. Pros: - This solar kit allows for both wind and solar energy to be utilized simultaneously, providing flexibility in charging a battery bank. - Easy installation with pre-installed diodes in the junction box and cables with MC4 connectors on the panels for quick and efficient connection. - Designed to withstand high wind and snow loads, offering weather-resistant durability and a longer lifespan with a corrosion-resistant aluminum frame. Cons: - The initial investment for this solar kit may be high, with a price tag of £1,437.31. - Limited information provided regarding the number of reviews and the overall rating of the product. - The warranty coverage may not be as extensive as some other solar kits on the market, with a 6-year material and workmanship warranty and a 25-year power output transfer warranty. Read also: - Portable Mini Machine - Efficient and Quiet Power Solution Generator - Portable and Efficient Power Solution: Spark Petrol Inverter Generator W2000i - Reliable and Efficient Portable Power: Wolf 2000w Petrol Inverter Generator - Wolf 5500w Diesel Generator: Reliable Power Solution with Convenient Features Conclusion Overall, the AUECOOR Solar Kit has exceeded my expectations in terms of performance and durability. With its reliable power generation capabilities and user-friendly features, this kit is a great investment for off-grid power needs. I highly recommend it to anyone looking for a sustainable and efficient energy solution for their home, boat, or RV. Questions & Answers: Question: What makes this solar kit stand out from others on the market? Answer: This solar kit stands out for its ability to harness both wind and solar energy simultaneously, its easy installation features, and its durability in harsh weather conditions. Question: Are there any additional accessories needed for the installation of this solar kit? Answer: This solar kit comes with everything needed for installation, including mounting systems, diodes, cables, and connectors, making it a comprehensive package. Question: How does the warranty coverage compare to other solar kits available? Answer: The warranty coverage for this solar kit includes a 6-year material and workmanship warranty and a 25-year power output transfer warranty, along with 24/7 customer service support. Buy On Amazon Read the full article
0 notes
Text
XT02 Selfie Stick with Tripod Stand

XT02 Selfie Stick with Tripod Stand, Mobile Desktop Live Telescopic Bracket Handheld Bluetooth Selfie Artifact Mini Portable Selfie Monopods
About this item
- Model : XT-02, Material: Stainless Steel, Wireless Version : Bluetooth 4.2, Bluetooth Range : 10 mtr., Battery : CR1632 (Replaceable) - Gently Slide The WIRELESS REMOTE From Stick .It Takes 3 Seconds To Make The TRIPOD Appear Just Simply Unfold The Bottom Part Of The Selfie Stick. Ingenious Design Which Makes The Tripod Open Or Close In One Step. Fantastic Way To Start Your Selfie Happiness. - The Selfie Stick Is Suitable For Most Smart Phone In Market, iPhone X/ 8/ 6/ 7 Plus Android Samsung Galaxy S7 S8 Blackberry Huawei Etc. No Need To Worry About Incompatibility Issues. Fits 3.5-6.2'' Screen Devices Like iOS & Android And Samsung.(No Need To Download Extra APP.) - Compact Design To Take This Selfie Stick Everywhere You Go. Does Not Weight Much Even When Carrying In Pocket. - 2 In 1 Selfie Stick Tripod With Built-In Wireless Remote, Perfect For Solo Or Group Selfies.
Product Description

Live Broadcast XT-02 Selfie Stick Tripod for Smartphone Screwing a mono-pod selfie stick with a heavy tripod, is a pain. Our lightweight foldable selfie stick was designed to eliminate this to make a ordinary Selfie Stick lighter but more functional. Gently slide the WIRELESS REMOTE from stick . It takes 3 seconds to make the TRIPOD appear just simply unfold the bottom part of the selfie stick. Ingenious design which makes the tripod open or close in one step. Fantastic way to start your selfie happiness. The tripod can stand on the ground smoothly without shaking or falling to the ground, which makes display for online class ,the photos and videos taken by the phone much clearer. The tripod is opened/closed easily or transforms into a handle.

Portable Wireless Selfie Stick & Phone Tripod Selfie stick tripod with built-in wireless remote controller (up to 10 meters wireless connection) and you can use it as a tripod, watch a movie or make a video. Use this Selfie Stand to watch your favourite videos or conduct Online Meetings. This Selfie Sticks for all phone is compatible with all smartphones of 4 Inches to 6.5 Inches dimensions.

2 in 1 Selfie Stick Tripod 2 in 1 Selfie Stick tripod with built-in Wireless remote, perfect for solo or group selfies. 360 Degree rotating Clamp can adjust then angle of selfie stick.
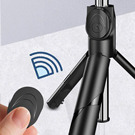
Connect via Bluetooth & Easy to connect Take out and install remote controls in the direction of arrows. Press and hold for about 3 seconds to turn on the remote control. Turn on ‘Bluetooth’ on phone setting. Select the device from the list and pairing will be finished automatically in few seconds. If you want to close, Just long press the button to turn it off.

Compact and Light In Weight Compact design to take this selfie stick everywhere you go. Does not weight much even when carrying in a pocket.

Extendable, Foldable and portable Selfie Stick XT-02 selfie stick pole is quite light and extremely strong to hold the phone when you take pictures or videos. With the weight of 130g and 18.8 cm folded size, very mini and convenient to carry in your pocket or bag.

Wide Compatibility The remote does not require any extra APP. iPhone 8/8Plus/X/7/7 Plus, iPhone 6/6 Plus; Samsung Note 8/Galaxy S8 / S7 / S7 Edge, S6 / S6 Edge / S6 Edge plus, S5 / S4 / S3, Galaxy Note 5/4/3/2; Google,Sony Xperia, LG, HTC, ONEPLUS, Huawei P10 Plus/P9 / P9 plus / P9 lite. Model XT-02 2 in 1 Selfie Stick Material ABS + Stainless Steel Wireless Version Bluetooth 4.2 Bluetooth Range 10 Meter Folded Size 5.1 x 3.0 x 18.8 cm Battery CR1632
Product information
Brand Generic Manufacturer Others Model XT-02 Selfie Stick A5 Package Dimensions 10 x 5 x 5 cm; 100 Grams Item model number XT-02 Selfie Stick A5 Compatible Devices Smartphones Special Features Bluetooth Number Of Items 1 Connector Type USB Material Plastic Form Factor Cardboard Manufacturer Others Country of Origin China Item Weight 100 g Read the full article
0 notes
Text
MINISFORUM V3 AMD Tablet Review

The V3 AMD Tablet is the newest creation from MINISFORUM in the field of cutting-edge technology. This 3-in-1 convertible is a multipurpose tool that aims to improve your computer experience, not simply a tablet. Now let’s explore the amazing features that set the MINISFORUM V3 apart.
Dynamic Display and Stylish Design The MINISFORUM V3 AMD Tablet is small and light, measuring 318 x 213.8 x 9.8 mm (WxDxH) and weighs only 946 grams. With a maximum brightness of 500 nits, 100% DCI-P3 coverage, a quick refresh rate of 165 Hz, and an amazing resolution of 2560 x 1600 pixels, its 14-inch, 16:10 aspect ratio display is a visual treat. The MPP 2.6 SLA-compatible, sensitive touchscreen guarantees a responsive and natural handwriting experience.
Redefining Connectivity Maintain seamless connectivity with Bluetooth 5.3 and Wi-Fi 6E. With two 40 Gbps USB4 ports, a 4-pole headset port, a fingerprint reader, and a USB-C V-Link (DP in), the MINISFORUM V3 goes above and beyond the standard. These connectivity choices provide a plethora of opportunities, satisfying demands for both work and play.
Energized Performance The MINISFORUM V3 has a powerful array of internal parts. Enormous 2 TB M.2 Gen 4 NVMe SSD and 32 GB LPDDR5-6400 RAM guarantee blazingly fast storage. With a 28 W TDP, the AMD Ryzen 7 8040U series “Hawk Point” processor ensures a smooth and effective performance. MINISFORUM has included a dual-fan, four flat copper heatpipe cooling solution to keep things cool.
Mastery of Multimedia Enter a world with exceptional sound and vision. With its four speakers and multidirectional microphone, the tablet offers an unmatched acoustic experience. With the 5 MP rear camera and the 2 MP front camera which is completely compatible with Windows Hello you can capture memories and have crystal-clear virtual meetings.
All-Day Energy and Intelligent Software With a powerful 50.82 Wh battery, the MINISFORUM V3 keeps you productive all day long. Through a type-C connector, the 65 W USB-PD power source effectively charges the gadget. This tablet comes pre-installed with the Ryzen AI-enabled Windows 11 Pro 23H2, which is more than just hardware rather, it’s a whole smart solution.
Cost and Final Thoughts The MINISFORUM V3’s amazing features have been revealed, but the business hasn’t disclosed the price yet. IT aficionados are excited to get their hands on this Windows 11 x64 marvel as the expectation for this cutting-edge technology grows.
To sum up, the MINISFORUM V3 AMD Tablet is a unique example of technological prowess and inventiveness. With its included dock or as a stand-alone 14-inch tablet, this 3-in-1 convertible is going to completely change how we use Windows 11 x64. Keep an eye out for how MINISFORUM is changing the market for high-end computers.
Read more on Govindhtech.com
0 notes
Text
Stihl extends battery-powered pruner line with new models
If you live in Pensacola, it's just a matter of time that you have to do the inevitable and remove a tree. Tree Removal in Pensacola Florida is a tree removal company that specializes in stump grinding, tree removal, and arborist services. They have been in business for over 10 years and have the experience and expertise to get the job done right. Fully licensed and insured, so you can rest assured that your property is in good hands. Pensacola tree service is a company that specializes in removing trees. They have been doing this for over 10 years and they are really good at it. They also do stump grinding, which means they get rid of the stump left behind after the tree is removed. They are fully licensed and insured, so you can be sure that your property is in good hands. The new HTA 150 and HTA 160 battery-powered pruners from Stihl are lightweight and easy for pros to maneuver. (Photo: Stihl) Stihl said its HTA 150 and HTA 160 battery-powered pruners offer pros both power and performance. Both offer a lightweight design at 14.3 pounds and 19.2 pounds, respectively, when paired with the company’s AP 300 S 36-volt battery. The fixed-shaft HTA 150 pole pruner features a fixed shaft that allows for control and stability when pruning. The pole pruner features a 10-inch bar and 3/8-inch PMM3 chain for a smooth cut with low vibration. The HTA 160 is equipped with a telescoping shaft featuring a distinctive square-shaft design that is strong and rigid and can reach from 9-feet, 4-inches up to 13-feet, 3-inches. In addition, the HTA 150 and HTA 160 come equipped with a variable-speed throttle trigger, allowing for precise control and enhanced cutting speed for top performance and run time. “Providing our professionals with the most powerful tools in the market is something we continue to strive for,” said John Allen, product manager. “The HTA 150 and HTA 160 pack plenty of power for the pro to effortlessly make a precision cut time and time again.” Additional features of the HTA 150: Lightweight and robust magnesium gearbox featuring a translucent bar and chain oil tank. Robust branch hook to remove loose clippings from trees. Commercial-grade, high torque brushless motor. Foot mount/support kit included. Predetermined molding for Stihl Smart Connector 2A. Cutting performance up to 6 inches in diameter. Additional features of the HTA 160: Durable square shaft. Lightweight and robust magnesium gearbox featuring a translucent bar and chain oil tank. Robust branch hook to remove loose clippings from trees. Commercial-grade, high-torque brushless motor. Foot mount/support kit included. Predetermined molding for Stihl Smart Connector 2A. Cutting performance up to 6 inches in diameter. The post Stihl extends battery-powered pruner line with new models first appeared on Landscape Management.
1 note
·
View note
Text
GODIAG GT108 Super OBDI-OBDII Conversion Adapter Use Tutorial
Godiag GT108 Super OBDI-OBDII Universal Conversion Adapter is specially designed for cars, SUVs, trucks, tractors, mining vehicles, generators, boats, motorcycles, and individual ECU control units, etc. It can convert the OBDI diagnostic interface into standard OBDII diagnostic interface through DIY wiring interface, and connect to OBDII diagnostic programming equipment to read data streams, diagnose fault codes, program, activate and code... for the car maintenance personnel conveniently.

Godiag GT108 Converter features:
1.DIY wiring, it can be converted to OBDII according to the car diagnostic interface.
Because the definitions of diagnostic interfaces in different regions are inconsistent, the popular conversion cables and adapters in the market cannot use different definitions of diagnostic interfaces. GODIAG GT108 Super OBDI-OBDII Adapter can be used by maintenance engineers to connect according to their own needs.
2.The device has reverse connection protection.
If the power supply is connected wrong, the device will not burn out, and it will not cause harm to the OBDII diagnostic programming device.
3.Independent GND4, GND5
It is more suitable for judging the problem of poor grounding of some control units.
4.Analog IGN switch.
Press the IGN switch, the corresponding port outputs ING VCC
5.Power indicator, GND4, GND5 switching indicator, IGN switching indicator.
6.DIY the way to lock the wire.
Equipped with different diagnostic interface cables, ECU cables, and locking screwdrivers.
7.Truck & Car Diagnostic Interface Connection Jumper Kit
Different configurations of wiring kits are different, please purchase according to maintenance needs.
Godiag GT108 VS other brands:

Godiag GT108 Connection Diagram:
Some vehicles’ definition:
Audi VW Skoda Seat/ BMW/ Ford/ Mazda PIN

Mercedes- Benz 38 PIN

Godiag GT108+ diagnostic tool (i.e. Autel MK808)+ Car Connection:

Gogidag GT108+ Delphi DS150+ Truck Connection:

Gogidag GT108+ Godiag GT106 + Truck Connection:

Gogidag GT108+ OBDSTAR MS70+ Motorcycle Connection:

Gogidag GT108+ Delphi DS150+ Mine Vehicles, Tractors, Boats and Generators Connection:


Gogidag GT108+ ECU Connection:

How to use Godiag GT108 Conversion Adapter?
1.Find the definition of the diagnostic interface
Find the maintenance manual of your own vehicle, or search online.), or see the definition diagram of the corresponding diagnostic interface of the GT108 manual.
2.According to the interface definition, find out the connection line needed by your car, and connect to the GT108 adapter according to the definition. (Use a screwdriver to lock the terminal.)
3.Connect the connected diagnostic cable to the vehicle OBD1 diagnostic interface according to the definition.
Connect GND 4 or GND5 first, and then connect BAT+.
If the power cable is connected correctly, the POW light of the GT108 host will light up.
If the vehicle diagnostic interface does not have power, please connect the car battery to the DC power connector of GT108 with the battery cable.
If the vehicle needs the ignition signal, connect the O-IGN line, and press the IGN switch, the corresponding IGN light will light up, and the O-IGN line will output the ignition power signal.
4.Connect the communication line CAN or K-line to the diagnostic interface.
Note: If it is the truck diagnostic software added by the car diagnostic equipment, you need to buy a GT106 24V to 12V adapter.
5.Connect the diagnostic device to start diagnosing the vehicle.
NOTE:
If you cannot find the definition for your own vehicle diagnostic interface, you can first find out the power supply of the diagnostic interface. First use the black battery clip on the battery connection cable to connect the negative pole of the battery, and then use the BAT+ line to connect to the diagnostic interface to find the power supply. You can also use a multimeter to find the diagnostic interface power supply. The definition of the diagnostic interface can also be judged by the GT101 PIRT Electric Circuit Tester device.

Godiag GT108 OBDI-OBDII Conversion Adapter has A, B, C three configurations. A & B configurations are at the same price, and the C configuration is more expensive as it supports the vehicles covering A & B.
A Configuration is for Cars, SUVs, Pickup Trucks, and Motorcycles
(Item No. SO669-C, Price: €48)
B Configuration is for Trucks, Tractors, Mining Vehicles, Generators, and Boats
(Item No. SO669-B, Price: €48)
C Configuration includes both A and B configuration.
(Item No. SO669, Price: €57)
0 notes
Text
Which Solar Products Are Needed to Generate Electricity?

To generate electricity using solar energy, you’ll need a combination of solar products and components. Here’s a list of essential items you’ll need for a basic solar electricity generation system:
youtube
Solar Panels: These are the core components that convert sunlight into electricity. Solar panels contain multiple solar cells that generate direct current (DC) electricity when exposed to sunlight.
Inverter: Solar panels generate DC electricity, but most household appliances and the grid use alternating current (AC). An inverter converts the DC electricity into AC electricity, making it usable for your home or for feeding back into the grid.
Batteries (Optional): If you want to store excess energy generated during sunny periods for use when the sun isn’t shining, you’ll need a battery bank. Batteries store the excess energy and release it when needed.
Charge Controller (for Battery Systems): If you’re using batteries, a charge controller is necessary to regulate the charging process and prevent overcharging or over-discharging of the batteries.
Wiring and Connectors: Electrical wiring connects the solar panels, inverter, and other components in a safe and efficient manner. Connectors ensure secure connections and facilitate maintenance.
Mounting System: Solar panels need to be securely mounted on a structure, such as a roof, ground-mounted rack, or pole. The mounting system ensures proper orientation and tilt for optimal sunlight exposure.
Grounding Equipment: Proper grounding is essential for safety. Grounding equipment includes grounding wires, rods, and other components to divert electrical currents safely into the ground.
It’s important to note that the size and complexity of your solar system will depend on your energy needs, location, budget, and whether you want to be connected to the grid or operate off-grid. It’s recommended to consult with solar professionals or companies to design and install a system that best fits your requirements.
0 notes
Text
How To Jump Start A Diesel Truck With 3 Batteries? Step-By-Step Guides

The batteries on the truck are all connected in parallel. So, if you need to start your diesel, you must attach one of those batteries to the central engine bay.
A truck engine with 3 batteries, is the connection as simple as above? How to jump-start a diesel truck with 3 batteries? This guide will answer your questions. Let’s read on to discover!
How To Jump Start A Diesel Truck With 3 Batteries?
It is not difficult for you to start a diesel truck engine with three batteries. The start-up process consists of three simple steps for battery and diesel vehicles.
Step 1: Prepare For The Boot Process.

Preparation
You will have to prepare tools for removing the hood, fully charged batteries, clamps, and suitable terminals.
Once you have prepared all the necessary tools, you can proceed to remove the hood altogether. It will take quite a while to complete if it's your first time.
Check out the instructions provided by the manufacturer or browse for suitable visual instruction videos for your vehicle.
You also need to turn off the motor in this step. Your battery must be in the "parked" or "neutral" position. For your safety, although not required, you should turn off the lights before proceeding to the next step.
Step 2: Insert The Battery
You proceed to install the battery compatible with your vehicle. It's best to fully charge the battery beforehand to ensure your truck has enough power to start.
You should install the battery by connecting the first battery-positive terminal to the second female-positive terminal. This rule applies to all batteries.
Step 3: Attach The Battery Anode To The Truck Anode

Attach the battery anode
After attaching the three batteries' anodes, attach the other end of the anode to the corresponding anode on the truck.
As for the cathode, you'll have to adjust the connector to connect to the black end of the jumper. Use clamps and terminals to increase connection accuracy.
Which Battery Is Suitable For Starting Diesel Models?

Suitable batteries for Diesel truck
Battery chargers and cables are essential equipment for starting a diesel engine. But in addition to the above devices, you need to consider compatible batteries.
The battery must have the same voltage as a diesel engine for a smooth start. During installation, you must adhere to the connecting poles.
Besides, it would help if you stored the battery safely by turning off the engine and removing the car key before installation.
In addition to the above general requirements, with each diesel engine, you have a separate note about the battery.
With a three-battery diesel engine, you must ensure the battery is fully charged or has enough power to start your engine.
With a two-battery truck, each battery is in charge of one motor. When inactive, both batteries will be charged. You must be careful when connecting the jumper cable to either pin. Also, before installation, set the vehicle to neutral or parked.
With a two-battery diesel engine, the higher the resistance level, the greater the amount of power needed to turn the engine. To solve this problem, you should set up a dual battery.
This method helps you connect the two batteries more efficiently to limit possible risks.
Tips To Start A Dead-Batteries Diesel

Some tips to follow
How to start a diesel truck when the battery dies is a common question among many drivers. The operations to do, in this case, are not tricky challenges. Here is a three-step process that you can refer to:
Step 1: Preparation
Before making any changes, you must turn off the truck's battery.
You can switch batteries multiple times to make the battery charger connection more efficient. The hot side battery takes a long time to start up but provides more power due to fairly complete charging.
Step 2: Open The Hood
Use specialized tools and open the hood according to the manufacturer's instructions.
Compared to conventional cars, the batteries in diesel trucks are in a rather difficult-to-reach position. So be patient or use a long cable to shorten the processing time.
Remove the battery clamps before connecting the cables to keep the dead diesel truck starter safe. These accessories may cause fire or electric shock on the cable connection.
Step 3: Connect The Battery
Finally, you need to connect three batteries.
The connection principle is to attach the third battery's positive terminal to the first one negative. The current will flow through the storms and start your diesel engine with a dead battery.
With the engine running, it's time to disconnect the cables. Besides the above actions, you must keep the starting voltage high enough for idling vehicles. These notes will help you significantly extend the battery life in your car.
FAQs
Starting a diesel truck with three batteries is not too difficult. Yet, you may have many questions related to this. Here are brief answers to the questions.
Can You Jumpstart A Diesel Truck With A Car?
You can start your truck's engine with a car. So, use the vehicle and the cable to charge one of the two batteries in parallel on the car.
Can You Jumpstart Off A Dual Battery?
You can use dual batteries if you have a jumper cable ready and attach it to the battery with a thicker line.
If your vehicle has dual batteries with cables of the same thickness, you can only use one of the two batteries for the jump star.
How Many Amps Does It Take To Jumpstart A Diesel Truck?
For slow rotation, the jumpstart will require 550 amp. Or, if you want to get through deep puddles, the number goes from 550 to about 900 amps.
Can A Diesel Run On One Battery?
Diesel-powered vehicles can only work best with two batteries. Its powerful motor requires a lot of energy to operate.
Conclusion
How to jump-start a diesel truck with 3 batteries is not as difficult a challenge to solve as you think.
Through the sharing in the article, I hope you have grasped the principles of starting the engine by following the above instructions efficiently.
In case you have trouble starting, don't hesitate to leave a comment below. We're here to help you create your truck with three batteries.
Article Source: https://www.campfireusa.org/how-to-jump-start-a-diesel-truck-with-3-batteries
0 notes
Text
Headphones with Microphone Jabra Black 65 W (Refurbished C)
If you’re passionate about IT and electronics, like being up to date on technology and don’t miss even the slightest details, buy Headphones with Microphone Jabra Black 65 W (Refurbished C) at an unbeatable price. Type: Wireless Battery type: Litio Ion Characteristics: Built-in battery Battery: Yes Connector: USB A Recommended use: Oficina/Centro de llamadas Includes: USB Cable Number of Poles:…

View On WordPress
0 notes
Text
Choosing the Right Wire for Your Installation of a Solar Panel

When you installation of solar panel, you are making a big investment. It pays off over time, and it is a smart way to reduce your carbon footprint.
Before you start, make sure you have all the materials and tools you need. It’s also important to wear safety gear and stay on the ground.
Roof
If you are going to install solar panels on your roof, it’s essential that you do it properly. If you do it could lead to serious problems down the road.
To ensure a safe roof installation, you should work with an experienced contractor. They will be able to determine where to attach the solar mounting brackets on your roof.
They will also be able to determine the correct size for your roof and panels. It’s also a good idea to check with your local building department and the state electrical board to make sure that the installer is licensed.
To begin the installation, you will need stanchions, rails, and mounting brackets. You will also need PV wire, a drill, and screws.
Ground
The installation of a solar panel on the ground is a great way to increase your power generation and decrease your energy bills. This is especially important if you live in an area where the sun is always high enough to produce solar energy.
Typically, a ground-mounted system requires a strong foundation to hold up the panels and other components. This makes it more expensive than a rooftop install.
Standard ground mounts are anchored with steel poles driven into the ground. These are often found in places where ground conditions are not ideal, but they can be used in many other areas as well.
Some ground-mounted systems can be manually adjusted, allowing them to be at a steeper or gentler angle depending on how much sunlight is available. These adjustments can increase your total solar electricity production, but they need to be performed carefully and accurately.
If you are considering installing a ground-mounted solar system, be sure to work with a professional who understands the design and engineering considerations. This is important for a number of reasons, including:
Accessories
Solar panels are an essential part of off-the-grid systems. They allow you to harness the sun energy to power appliances and devices, so you can live without having to pay expensive commercial energy prices.
In addition to solar panels, you also need accessories to help make the installation process easier. These include MC4 connectors, extension cables, monitoring systems, AC/DC disconnects and racking mounts.
Edge skirts are also a good accessory to have for any solar panel setup. These help prevent ice, snow and other debris from getting into the roofline behind the panels and reducing their efficiency.
Other popular solar accessories include outdoor lighting and docking stations for charging your cell phone or tablet. Some even have suction cups that attach to your car windshield so you can charge your portable electronics on the road.
Wiring
Choosing the right wire for your install solar panels Brisbane is essential to making sure it runs efficiently. Using wire that is not rated to handle your system amperage can cause it to run slow or fail to charge your battery bank fully.
The correct wire thickness is also important. If your wire is too thin, it will likely heat up and cause damage to the panel.
Once you have the proper wire selected, it is time to connect your panels together. This can be done in series or parallel.
To wire a series, connect each of the positive terminals on one panel to the negative terminal of the next panel. This creates a line of solar panels, as shown in the diagram above.
#installation of solar panel#solar installation#install solar panels Brisbane#solar panel installation near me#solar installation Brisbane
0 notes
Text

6mm battery pole connectors - IP67 rated and suitable for use in harsh environments; It rotate 360 degrees, so they can accommodate the best angle to arrange heavy cabling. They have mechanical coding that protects against polarity reversal and prevents incorrect mating.
https://www.guchen-connector.com/products/energy-storage-battery-connector/gcs1-6mm-hv-battery-connector.html
0 notes
Text
AUECOOR 1.4Kw Wind: Efficient Off-Grid Power Solution

The AUECOOR 1.4Kw Wind Solar Kit offers a comprehensive solution for off-grid power generation, combining wind and solar energy sources for efficient charging capabilities. With its durable construction and easy installation features, this kit is designed to provide reliable power for various applications. I recently installed the AUECOOR Solar Kit on my boat, and I have been impressed by its performance. The easy installation process, thanks to the included mounting systems and pre-installed diodes, made the setup hassle-free. The panels have proven to be durable, withstanding strong winds and snow loads without any issues. The pure sine wave inverter ensures a quick and responsive reaction, providing stable power output. AUECOOR 1.4Kw Wind: Versatile Power Generation Options Credit - Amazon.com Buy On Amazon The AUECOOR kit is built to withstand harsh weather conditions.4Kw Wind Solar Power kit offers a versatile solution for power generation. With 10pcs 100W mono Solar Panels, a 400W Wind Turbine Generator, and a 2000W 24V Off Grid Inverter, this kit allows users to harness the power of both wind and solar energy simultaneously. This makes it an ideal choice for off-grid applications, such as on a house boat or RV, where reliable power sources are essential. AUECOOR 1.4Kw Wind: Easy Installation and Compatibility Credit - Amazon.com Buy On Amazon One of the key features of the AUECOOR kit is its easy installation process. Compatible with various AUECOOR mounting systems like Z-Brackets, Pole Mounts, and Tilt Mounts, setting up this kit is straightforward. The panels come with pre-installed diodes in the junction box and 90cm cables with MC4 connectors, simplifying the connection process. This user-friendly design ensures that even those new to solar and wind power systems can set it up with ease. AUECOOR 1.4Kw Wind: Durable and Weather-Resistant Design Credit - Amazon.com Buy On Amazon A noteworthy aspect of the AUECOOR kit is its warranty and customer service. Designed to resist high wind and snow loads, the panels offer long-lasting outdoor durability and a prolonged lifespan. The corrosion-resistant aluminum frame further enhances its durability, ensuring that the panels can endure outdoor exposure for years to come. This robust design makes the AUECOOR kit a reliable and durable choice for power generation in various environments. AUECOOR 1.4Kw Wind: Efficient Power Conversion Credit - Amazon.com The AUECOOR kit features a pure sine wave inverter that ensures efficient power conversion. With faster and more sensitive reactions, this inverter provides optimal electrical protection and performance. The aluminum alloy housing adds to its durability, making it rust-resistant, heat-resistant, cold-resistant, and anti-corrosive. These features combine to deliver a reliable power conversion solution that is built to last. AUECOOR 1.4Kw Wind: Warranty and Customer Service Credit - Amazon.com The AUECOOR 1. The kit comes with a 6-year material and workmanship warranty, along with a 25-year power output transfer warranty, providing users with peace of mind regarding their investment. Additionally, the friendly 24/7 customer service ensures that users can seek assistance whenever needed. With reliable warranty coverage and excellent customer support, AUECOOR prioritizes customer satisfaction and product reliability. Pros: - This solar kit allows for both wind and solar energy to be utilized simultaneously, providing flexibility in charging a battery bank. - Easy installation with pre-installed diodes in the junction box and cables with MC4 connectors on the panels for quick and efficient connection. - Designed to withstand high wind and snow loads, offering weather-resistant durability and a longer lifespan with a corrosion-resistant aluminum frame. Cons: - The initial investment for this solar kit may be high, with a price tag of £1,437.31. - Limited information provided regarding the number of reviews and the overall rating of the product. - The warranty coverage may not be as extensive as some other solar kits on the market, with a 6-year material and workmanship warranty and a 25-year power output transfer warranty. Read also: - Portable Mini Machine - Efficient and Quiet Power Solution Generator - Portable and Efficient Power Solution: Spark Petrol Inverter Generator W2000i - Reliable and Efficient Portable Power: Wolf 2000w Petrol Inverter Generator - Wolf 5500w Diesel Generator: Reliable Power Solution with Convenient Features Conclusion Overall, the AUECOOR Solar Kit has exceeded my expectations in terms of performance and durability. With its reliable power generation capabilities and user-friendly features, this kit is a great investment for off-grid power needs. I highly recommend it to anyone looking for a sustainable and efficient energy solution for their home, boat, or RV. Questions & Answers: Question: What makes this solar kit stand out from others on the market? Answer: This solar kit stands out for its ability to harness both wind and solar energy simultaneously, its easy installation features, and its durability in harsh weather conditions. Question: Are there any additional accessories needed for the installation of this solar kit? Answer: This solar kit comes with everything needed for installation, including mounting systems, diodes, cables, and connectors, making it a comprehensive package. Question: How does the warranty coverage compare to other solar kits available? Answer: The warranty coverage for this solar kit includes a 6-year material and workmanship warranty and a 25-year power output transfer warranty, along with 24/7 customer service support. Buy On Amazon Read the full article
0 notes