#awscloudtrail
Explore tagged Tumblr posts
Text
What Is AWS CloudTrail? And To Explain Features, Benefits
AWS CloudTrail
Monitor user behavior and API utilization on AWS, as well as in hybrid and multicloud settings.
What is AWS CloudTrail?
AWS CloudTrail logs every AWS account activity, including resource access, changes, and timing. It monitors activity from the CLI, SDKs, APIs, and AWS Management Console.
CloudTrail can be used to:
Track Activity: Find out who was responsible for what in your AWS environment.
Boost security by identifying odd or unwanted activity.
Audit and Compliance: Maintain a record for regulatory requirements and audits.
Troubleshoot Issues: Examine logs to look into issues.
The logs are easily reviewed or analyzed later because CloudTrail saves them to an Amazon S3 bucket.
Why AWS CloudTrail?
Governance, compliance, operational audits, and auditing of your AWS account are all made possible by the service AWS CloudTrail.
Benefits
Aggregate and consolidate multisource events
You may use CloudTrail Lake to ingest activity events from AWS as well as sources outside of AWS, such as other cloud providers, in-house apps, and SaaS apps that are either on-premises or in the cloud.
Immutably store audit-worthy events
Audit-worthy events can be permanently stored in AWS CloudTrail Lake. Produce audit reports that are needed by external regulations and internal policies with ease.
Derive insights and analyze unusual activity
Use Amazon Athena or SQL-based searches to identify unwanted access and examine activity logs. For individuals who are not as skilled in creating SQL queries, natural language query generation enabled by generative AI makes this process much simpler. React with automated workflows and rules-based Event Bridge alerts.
Use cases
Compliance & auditing
Use CloudTrail logs to demonstrate compliance with SOC, PCI, and HIPAA rules and shield your company from fines.
Security
By logging user and API activity in your AWS accounts, you can strengthen your security posture. Network activity events for VPC endpoints are another way to improve your data perimeter.
Operations
Use Amazon Athena, natural language query generation, or SQL-based queries to address operational questions, aid with debugging, and look into problems. To further streamline your studies, use the AI-powered query result summarizing tool (in preview) to summarize query results. Use CloudTrail Lake dashboards to see trends.
Features of AWS CloudTrail
Auditing, security monitoring, and operational troubleshooting are made possible via AWS CloudTrail. CloudTrail logs API calls and user activity across AWS services as events. “Who did what, where, and when?” can be answered with the aid of CloudTrail events.
Four types of events are recorded by CloudTrail:
Control plane activities on resources, like adding or removing Amazon Simple Storage Service (S3) buckets, are captured by management events.
Data plane operations within a resource, like reading or writing an Amazon S3 object, are captured by data events.
Network activity events that record activities from a private VPC to the AWS service utilizing VPC endpoints, including AWS API calls to which access was refused (in preview).
Through ongoing analysis of CloudTrail management events, insights events assist AWS users in recognizing and reacting to anomalous activity related to API calls and API error rates.
Trails of AWS CloudTrail
Overview
AWS account actions are recorded by Trails, which then distribute and store the events in Amazon S3. Delivery to Amazon CloudWatch Logs and Amazon EventBridge is an optional feature. You can feed these occurrences into your security monitoring programs. You can search and examine the logs that CloudTrail has collected using your own third-party software or programs like Amazon Athena. AWS Organizations can be used to build trails for a single AWS account or for several AWS accounts.
Storage and monitoring
By establishing trails, you can send your AWS CloudTrail events to S3 and, if desired, to CloudWatch Logs. You can export and save events as you desire after doing this, which gives you access to all event details.
Encrypted activity logs
You may check the integrity of the CloudTrail log files that are kept in your S3 bucket and determine if they have been altered, removed, or left unaltered since CloudTrail sent them there. Log file integrity validation is a useful tool for IT security and auditing procedures. By default, AWS CloudTrail uses S3 server-side encryption (SSE) to encrypt all log files sent to the S3 bucket you specify. If required, you can optionally encrypt your CloudTrail log files using your AWS Key Management Service (KMS) key to further strengthen their security. Your log files are automatically decrypted by S3 if you have the decrypt permissions.
Multi-Region
AWS CloudTrail may be set up to record and store events from several AWS Regions in one place. This setup ensures that all settings are applied uniformly to both freshly launched and existing Regions.
Multi-account
CloudTrail may be set up to record and store events from several AWS accounts in one place. This setup ensures that all settings are applied uniformly to both newly generated and existing accounts.
AWS CloudTrail pricing
AWS CloudTrail: Why Use It?
By tracing your user behavior and API calls, AWS CloudTrail Pricing makes audits, security monitoring, and operational troubleshooting possible .
AWS CloudTrail Insights
Through ongoing analysis of CloudTrail management events, AWS CloudTrail Insights events assist AWS users in recognizing and reacting to anomalous activity related to API calls and API error rates. Known as the baseline, CloudTrail Insights examines your typical patterns of API call volume and error rates and creates Insights events when either of these deviates from the usual. To identify odd activity and anomalous behavior, you can activate CloudTrail Insights in your event data stores or trails.
Read more on Govindhtech.com
#AWSCloudTrail#multicloud#AmazonS3bucket#SaaS#generativeAI#AmazonS3#AmazonCloudWatch#AWSKeyManagementService#News#Technews#technology#technologynews
0 notes
Text
0 notes
Photo

MOST POPULAR AWS PRODUCTS
- Amazon EC2
- Amazon RDS
- Amazon S3
- Amazon SNS
- AWS Cloudtrail
Visit www.connectio.in
0 notes
Text
Ingestion of Amazon CloudTrail data in Splunk
Ingestion of AWS CloudTrail data in splunk
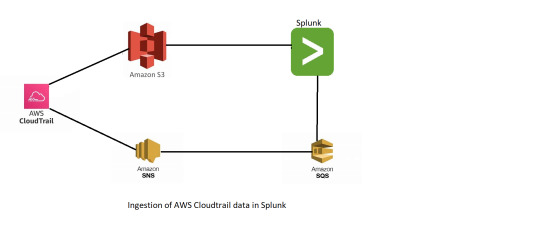
Amazon CloudTrail : AWS CloudTrail is an AWS service that helps you enable governance, compliance, and operational and risk auditing of your AWS account. Actions taken by a user, role, or an AWS service are recorded as events in CloudTrail. Events include actions taken in the AWS Management Console, AWS Command Line Interface, and AWS SDKs and APIs.
https://docs.aws.amazon.com/awscloudtrail/latest/userguide/cloudtrail-user-guide.html
Amazon S3 : Amazon Simple Storage Service (Amazon S3) is an object storage service offering industry-leading scalability, data availability, security, and performance. Customers of all sizes and industries can store and protect any amount of data for virtually any use case, such as data lakes, cloud-native applications, and mobile apps. With cost-effective storage classes and easy-to-use management features, you can optimize costs, organize data, and configure fine-tuned access controls to meet specific business, organizational, and compliance requirements.
https://docs.aws.amazon.com/AmazonS3/latest/userguide/GetStartedWithS3.html
Amazon SNS : Amazon Simple Notification Service (Amazon SNS) is a web service that enables applications, end-users, and devices to instantly send and receive notifications from the cloud.
Amazon SQS : Amazon Simple Queue Service (Amazon SQS) is a fully managed message queuing service that makes it easy to decouple and scale microservices, distributed systems, and serverless applications. Amazon SQS moves data between distributed application components and helps you decouple these components.
Splunk: Splunk is a software platform to search, analyze and visualize the machine-generated data gathered from the websites, applications, sensors, devices etc. which make up your IT infrastructure and business.
Now the steps of Ingestion..
Step 1: First we make an IAM role for the sqs and s3 so, we have to create the Policy for that got to google and search for the Configure CloudTrail inputs for the Splunk Add-on for AWS and under the Configure AWS permissions for the CloudTrail input copy the permissions avialable there,
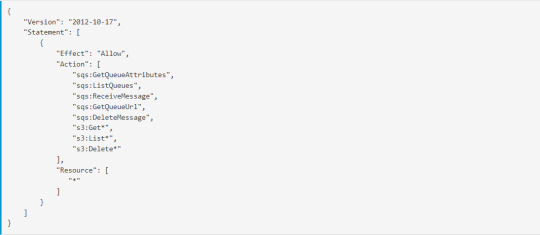
Step2 : Create a policy and add this into the json option as shown in fig.

and after creating the policy add this policy to the user by clicking on add permission. Don’t forget to copy access and security key.
Step 3: Now go to Cloud trail and in the dashboard section.

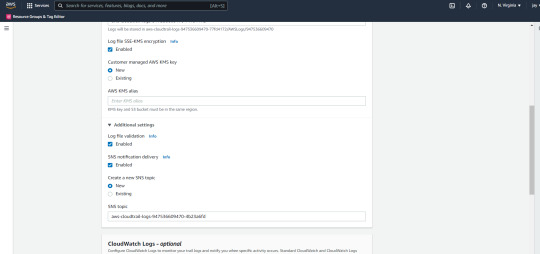
and create the bucket..
Step 4: Now go to SQS and create the queue after that when you go to cloud trail you will see the following queue that you created and click on it.
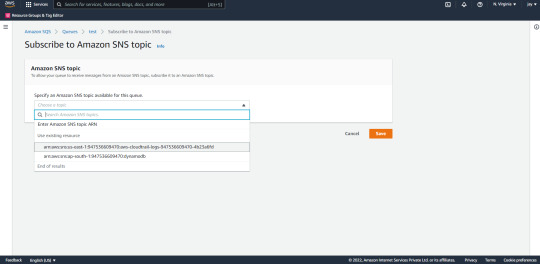
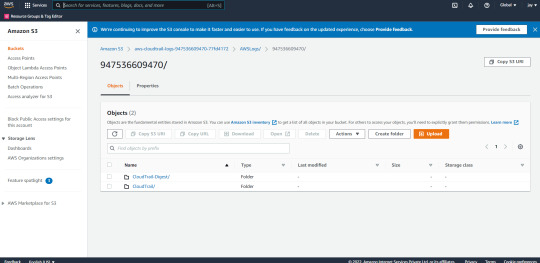
Step 5 : Now its to configure Splunk go to Splunk dashboard and install aws addon from apps as shown in fig.
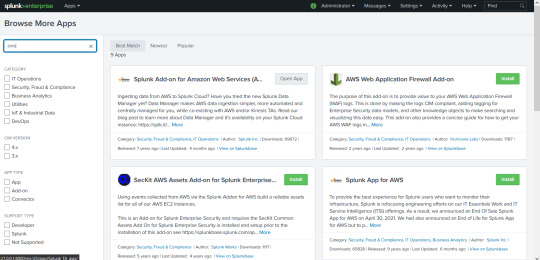
so after the installation you will see the following as sown in fig.
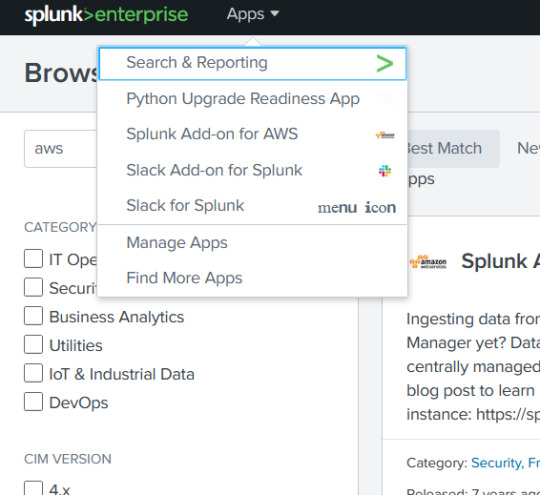
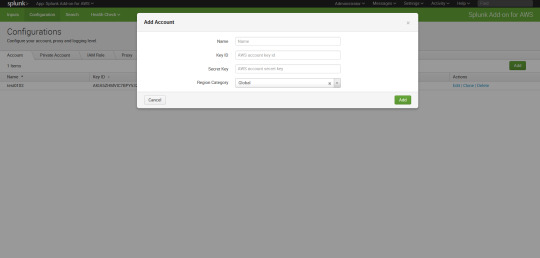
click on the aws and in the configuration option type the access id and secret id of the role that you have created.

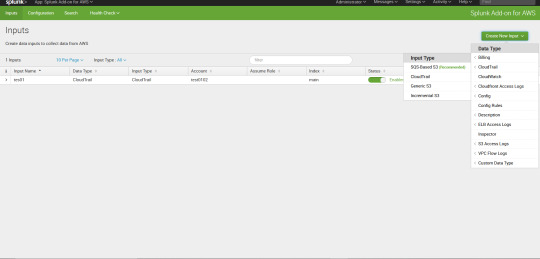
Step 6 : Now its time to go to input and time the details. as shown in fig..
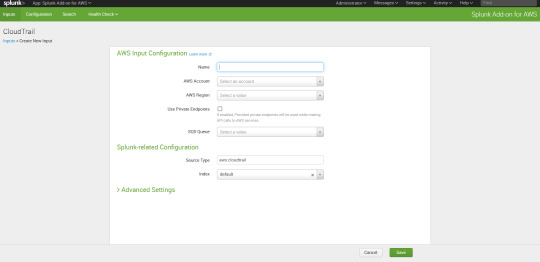
Type the name for the input select the aws account and when you select the account automatically it will connect to sqs queue and for the index you can select main now done save it .
Step 7: Now go to search and reporting.
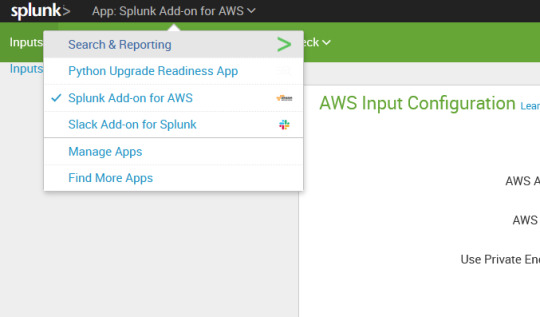
and on the search type : index=main and all set, then you will see the logs that are coming from the cloud trail via sqs ..
For the further information mail : [email protected]
0 notes
Photo

Threat Stack: Proactive Risk Identification and Real-time Threat Detection across AWS http://ehelpdesk.tk/wp-content/uploads/2020/02/logo-header.png [ad_1] In this video, we outline an ing... #amazonec2 #amazonemr #amazons3 #amazonsagemaker #amazonwebservices #aws #awscertification #awscertifiedcloudpractitioner #awscertifieddeveloper #awscertifiedsolutionsarchitect #awscertifiedsysopsadministrator #awscloud #awscloudtrail #ciscoccna #cloud #cloudcomputing #comptiaa #comptianetwork #comptiasecurity #cybersecurity #ethicalhacking #it #kubernetes #linux #microsoftaz-900 #microsoftazure #networksecurity #software #windowsserver
0 notes
Photo

Amazon CloudWatch EventsのイベントルールでターゲットをAmazon SQSにしてAWS Lambdaでイベントソースにして処理するAWS CloudFormationのテンプレートをつくってみた https://ift.tt/2VCgm4X
Amazon CloudWatch EventsのイベントルールでターゲットをAmazon SQSにしてAWS Lambdaでイベントソースにして処理するAWS CloudFormationのテンプレートをつくってみた
AWSマネジメントコンソールからだと簡単に設定できましたが、AWS CloudFormationのテンプレート化するのにいろいろとハマったのでメモ。
リソース
必要最低限となる構成はこんな感じになりました。

利用するサービスは以下になります。
Amazon S3
AWS CloudTrail
Amazon CloudWatch Events
Amazon SQS
AWS Lambda
AWS CloudFormation(リソース管理用)
ポイント
先にポイントをいくつかあげてみます。 完成形のテンプレートはこのあとにおいてます。
Amazon S3のバケットを複数用意する
Amazon CloudWatch EventsでAmazon S3のイベントを扱うのにAWS CloudTrailも必要になります。
Amazon S3 ソースの CloudWatch イベント ルールを作成する (コンソール) – CodePipeline https://docs.aws.amazon.com/ja_jp/codepipeline/latest/userguide/create-cloudtrail-S3-source-console.html
AWS CloudTrail 証跡を作成にはログファイルを出力するAmazon S3のバケットがいりますが、これをイベントを扱いたいバケットにしてしまうと。。。あとはわかりますね。無限ループに陥ります。
また、AWS CloudTrailでログを出力しない設定にすると、イベントが発火しませんでした。
AWS CloudTrailのログファイルを���存するキー名は固定
ログファイルを保存する先はバケット名/AWSLogs/AWSアカウントID/*と指定する必要があります。
テンプレート抜粋
CloudTrailBucketPolicy: Type: AWS::S3::BucketPolicy Properties: Bucket: !Ref OutputBucket PolicyDocument: Version: "2012-10-17" Statement: - Effect: Allow Principal: Service: cloudtrail.amazonaws.com Action: s3:GetBucketAcl Resource: !GetAtt OutputBucket.Arn - Effect: Allow Principal: Service: cloudtrail.amazonaws.com Action: s3:PutObject Resource: !Join - "" - - !GetAtt OutputBucket.Arn - "/AWSLogs/" - !Ref "AWS::AccountId" - "/*" Condition: StringEquals: s3:x-amz-acl: bucket-owner-full-control
AWSLogsを別名にしてみたらAWS CloudFormationのスタック作成でエラーになりました。
Incorrect S3 bucket policy is detected for bucket: <ProjectName>-output (Service: AWSCloudTrail; Status Code: 400; Error Code: InsufficientS3BucketPolicyException; Request ID: 3a9a7575-5226-4f19-b62a-737e87acc9b8)
AWSアカウントIDを指定せずにバケット名/AWSLogs/* とするとイベントが発火しませんでした。
AWS Lambda関数でメッセージの削除はしなくて良い
AWS Lambda関数でAmazon SQSを自前でポーリングして処理する場合、正常に処理が完了したらメッセージを削除する必要があったのですが、イベントソースにするとそれも必要なくなるみたいです。
AWS LambdaがSQSをイベントソースとしてサポートしました! | Developers.IO https://dev.classmethod.jp/articles/aws-lambda-support-sqs-event-source/
次に関数コードを入力します。サンプルの関数はチュートリアル通り以下の内容として保存します。ここでSQSメッセージの削除処理を入れていないことが分かります。
最初はチュートリアルのサンプルだからかな?と思ってましたが実際に動作させると正常終了時にメッセージが勝手に削除されました。こりゃ便利。
なので実装はキューの情報からS3バケットに保存されたオブジェクトのキーを取得して出力しているだけです。
テンプレート抜粋
ReceiveQueFunction: Type: AWS::Lambda::Function Properties: FunctionName: !Sub "${ProjectName}-ReceiveQueFunction" Handler: "index.lambda_handler" Role: !GetAtt LambdaExecutionRole.Arn Code: ZipFile: | from __future__ import print_function import json import os import boto3 def lambda_handler(event, context): for record in event["Records"]: requestParameters = json.loads(record["body"])["detail"]["requestParameters"] print(str(requestParameters)) Runtime: "python3.7" Timeout: "60" ReservedConcurrentExecutions: 3
AWS Lambda関数の同時実行数を調整する
上記テンプレートでReservedConcurrentExecutions: 3と同時実行数を指定していますが、こちらはケース・バイ・ケースで指定する必要があります。
AWS::Lambda::Function – AWS CloudFormation https://docs.aws.amazon.com/ja_jp/AWSCloudFormation/latest/UserGuide/aws-resource-lambda-function.html#cfn-lambda-function-reservedconcurrentexecutions
大量のキューをさばく必要がある場合、同時実行数の制限まで全力でポーリングしてくれます。 なので同時実行数を指定していないと、標準設定の1,000まで同時実行してくれます。アカウントの同時実行数は最大1,000となりますので、もし他にも関数がある場合、影響する可能性があるのでご注意ください。
イベントルールのターゲット指定でバケット名やキーがプレフィックス指定できる
こちらは下記記事をご参考ください。地味に便利です。
Amazon CloudWatch EventsのルールでAmazon S3のキーをプレフィックス指定できた – Qiita https://cloudpack.media/52397
今回はキーをprefix: hoge/とすることでs3://バケット名/hoge/ 配下にオブジェクトがPUTされた場合にイベントが発火する設定にしました。
テンプレート抜粋
CloudWatchEventRule: Type: AWS::Events::Rule Properties: Name: !Sub "${ProjectName}-EventRule" EventPattern: source: - aws.s3 detail-type: - "AWS API Call via CloudTrail" detail: eventSource: - s3.amazonaws.com eventName: - CopyObject - PutObject - CompleteMultipartUpload requestParameters: bucketName: - !Ref InputBucket key: - prefix: hoge/ Targets: - Arn: !GetAtt S3EventQueue.Arn Id: !Sub "${ProjectName}-TarfgetQueue"
SQSのキューポリシーを設定する
今回、一番ドハマリしました。 キューポリシーがなくてもリソースは作成できるのですが、それだとバケットにオブジェクトをPUTしてもイベントが発火しませんでした。AWSのドキュメントを漁ってみてもそれらしき記述が見当たらずでしたが、下記のフォーラムに情報があり知ることができました。
AWS Developer Forums: CloudWatch event rule not sending to … https://forums.aws.amazon.com/message.jspa?messageID=742808
AWSマネジメントコンソールでぽちぽちと設定する場合にはポリシーを勝手に作成してくれるので、テンプレート化する際にハマりやすいポイントだったみたいです。
テンプレート抜粋
SQSQueuePolicy: Type: AWS::SQS::QueuePolicy Properties: PolicyDocument: Version: "2012-10-17" Statement: - Effect: "Allow" Principal: AWS: "*" Action: - "sqs:SendMessage" Resource: - !GetAtt S3EventQueue.Arn Condition: ArnEquals: "aws:SourceArn": !GetAtt CloudWatchEventRule.Arn Queues: - Ref: S3EventQueue
テンプレート
ちょっと長いですがテンプレートになります。
AWSTemplateFormatVersion: "2010-09-09" Parameters: ProjectName: Type: String Default: "<お好みで>" Resources: InputBucket: Type: AWS::S3::Bucket Properties: BucketName: !Sub "${ProjectName}-input" AccessControl: Private PublicAccessBlockConfiguration: BlockPublicAcls: True BlockPublicPolicy: True IgnorePublicAcls: True RestrictPublicBuckets: True OutputBucket: Type: AWS::S3::Bucket Properties: BucketName: !Sub "${ProjectName}-output" AccessControl: Private PublicAccessBlockConfiguration: BlockPublicAcls: True BlockPublicPolicy: True IgnorePublicAcls: True RestrictPublicBuckets: True S3EventQueue: Type: AWS::SQS::Queue Properties: DelaySeconds: 0 VisibilityTimeout: 360 LambdaExecutionRole: Type: AWS::IAM::Role Properties: RoleName: !Sub "${ProjectName}-LambdaRolePolicy" AssumeRolePolicyDocument: Version: "2012-10-17" Statement: - Effect: Allow Principal: Service: lambda.amazonaws.com Action: "sts:AssumeRole" Path: "/" ManagedPolicyArns: - arn:aws:iam::aws:policy/service-role/AWSLambdaBasicExecutionRole Policies: - PolicyName: !Sub "${ProjectName}-LambdaRolePolices" PolicyDocument: Version: "2012-10-17" Statement: - Effect: Allow Action: - s3:* Resource: "*" - PolicyName: !Sub "${ProjectName}-LambdaRoleSQSPolices" PolicyDocument: Version: "2012-10-17" Statement: - Effect: Allow Action: - sqs:ReceiveMessage - sqs:DeleteMessage - sqs:GetQueueAttributes - sqs:ChangeMessageVisibility Resource: !GetAtt S3EventQueue.Arn ReceiveQueFunction: Type: AWS::Lambda::Function Properties: FunctionName: !Sub "${ProjectName}-ReceiveQueFunction" Handler: "index.lambda_handler" Role: !GetAtt LambdaExecutionRole.Arn Code: ZipFile: | from __future__ import print_function import json import os import boto3 def lambda_handler(event, context): for record in event["Records"]: requestParameters = json.loads(record["body"])["detail"]["requestParameters"] print(str(requestParameters)) Runtime: "python3.7" Timeout: "60" ReservedConcurrentExecutions: 3 CloudTrailBucketPolicy: Type: AWS::S3::BucketPolicy Properties: Bucket: !Ref OutputBucket PolicyDocument: Version: "2012-10-17" Statement: - Effect: Allow Principal: Service: cloudtrail.amazonaws.com Action: s3:GetBucketAcl Resource: !GetAtt OutputBucket.Arn - Effect: Allow Principal: Service: cloudtrail.amazonaws.com Action: s3:PutObject Resource: !Join - "" - - !GetAtt OutputBucket.Arn - "/AWSLogs/" - !Ref "AWS::AccountId" - "/*" Condition: StringEquals: s3:x-amz-acl: bucket-owner-full-control CloudTrail: Type: AWS::CloudTrail::Trail DependsOn: - CloudTrailBucketPolicy Properties: TrailName: !Sub "${ProjectName}-Trail" S3BucketName: !Ref OutputBucket EventSelectors: - DataResources: - Type: AWS::S3::Object Values: - Fn::Sub: - "${InputBucketArn}/" - InputBucketArn: !GetAtt InputBucket.Arn ReadWriteType: WriteOnly IncludeManagementEvents: false IncludeGlobalServiceEvents: true IsLogging: true IsMultiRegionTrail: false CloudWatchEventRule: Type: AWS::Events::Rule Properties: Name: !Sub "${ProjectName}-EventRule" EventPattern: source: - aws.s3 detail-type: - "AWS API Call via CloudTrail" detail: eventSource: - s3.amazonaws.com eventName: - CopyObject - PutObject - CompleteMultipartUpload requestParameters: bucketName: - !Ref InputBucket key: - prefix: hoge/ Targets: - Arn: !GetAtt S3EventQueue.Arn Id: !Sub "${ProjectName}-TarfgetQueue" SQSQueuePolicy: Type: AWS::SQS::QueuePolicy Properties: PolicyDocument: Version: "2012-10-17" Statement: - Effect: "Allow" Principal: AWS: "*" Action: - "sqs:SendMessage" Resource: - !GetAtt S3EventQueue.Arn Condition: ArnEquals: "aws:SourceArn": !GetAtt CloudWatchEventRule.Arn Queues: - Ref: S3EventQueue LambdaFunctionEventSourceMapping: Type: AWS::Lambda::EventSourceMapping DependsOn: - S3EventQueue - ReceiveQueFunction Properties: BatchSize: 10 Enabled: true EventSourceArn: !GetAtt S3EventQueue.Arn FunctionName: !GetAtt ReceiveQueFunction.Arn
スタック作成して動かしてみる
最後にざくっと検証してみます。
# リソースを作成 > cd テンプレートファイルがある場所 > aws cloudformation create-stack \ --stack-name <お好みで> \ --template-body file://<テンプレートファイル名> \ --capabilities CAPABILITY_NAMED_IAM \ --region <お好みの> \ --parameters '[ { "ParameterKey": "ProjectName", "ParameterValue": "<お好みで>" } ]' { "StackId": "arn:aws:cloudformation:<お好みのリージョン>:xxxxxxxxxxxx:stack/<お好みのスタック名>/18686480-6f21-11ea-bcf3-020de04cec9a" } # ファイルをアップロード > touch hoge.txt # hogeキー配下にアップロードしない > aws s3 cp hoge.txt s3://<ProjectName>-input/ upload: ./hoge.txt to s3://<ProjectName>-input/hoge/hoge.txt > aws s3 cp hoge.txt s3://<ProjectName>-input/hoge/ upload: ./hoge.txt to s3://<ProjectName>-input/hoge/hoge.txt > aws s3 ls --recursive s3://<ProjectName>-input 2020-03-26 06:28:03 0 hoge.txt 2020-03-26 06:26:12 0 hoge/hoge.txt # Lambda関数のログを確認 > aws logs get-log-events \ --region <お好みのリージョン> \ --log-group-name '/aws/lambda/<ProjectName>-ReceiveQueFunction' \ --log-stream-name '2020/03/26/[$LATEST]ae8735ef9a1c46c38ab241f23a26b384' \ --query "events[].[message]" \ --output text START RequestId: 10f98cf9-c39b-531b-9514-da0f8ea72a42 Version: $LATEST {'bucketName': '<ProjectName>-input', 'Host': '<ProjectName>-input.s3.<お好みのリージョン>.amazonaws.com', 'key': 'hoge/hoge.txt'} END RequestId: 10f98cf9-c39b-531b-9514-da0f8ea72a42 REPORT RequestId: 10f98cf9-c39b-531b-9514-da0f8ea72a42 Duration: 1.85 ms Billed Duration: 100 ms Memory Size: 128 MB Max Memory Used: 69 MB Init Duration: 275.58 ms
やったぜ。
まとめ
AWSマネジメントコンソールで設定すると比較的かんたんに設定できるのですが、CFnのテンプレート化する際にはそこそこ大変でしたが、良い知見を得ることができました。
参考
Amazon S3 ソースの CloudWatch イベント ルールを作成する (コンソール) – CodePipeline https://docs.aws.amazon.com/ja_jp/codepipeline/latest/userguide/create-cloudtrail-S3-source-console.html
AWS LambdaがSQSをイベントソースとしてサポートしました! | Developers.IO https://dev.classmethod.jp/articles/aws-lambda-support-sqs-event-source/
AWS::Lambda::Function – AWS CloudFormation https://docs.aws.amazon.com/ja_jp/AWSCloudFormation/latest/UserGuide/aws-resource-lambda-function.html#cfn-lambda-function-reservedconcurrentexecutions
Amazon CloudWatch EventsのルールでAmazon S3のキーをプレフィックス指定できた – Qiita https://cloudpack.media/52397
AWS Developer Forums: CloudWatch event rule not sending to … https://forums.aws.amazon.com/message.jspa?messageID=742808
Amazon CloudWatch LogsのログをAWS CLIでいい感じに取得する – Qiita https://cloudpack.media/50416
AWS CLIを使ってAWS Lambdaのログ取得時に注意したいこと | Developers.IO https://dev.classmethod.jp/articles/note-log-of-lambda-using-awscli/
元記事はこちら
「Amazon CloudWatch EventsのイベントルールでターゲットをAmazon SQSにしてAWS Lambdaでイベントソースにして処理するAWS CloudFormationのテンプレートをつくってみた」
April 13, 2020 at 04:00PM
0 notes
Text
CloudTrail Lake Features For Cloud Visibility And Inquiries

Enhancing your cloud visibility and investigations with new features added to AWS CloudTrail Lake
Updates to AWS CloudTrail Lake, a managed data lake that may be used for auditing, security investigations, and operational issues. It allows you to aggregate, store, and query events that are recorded by AWS CloudTrail in an immutable manner.
The most recent CloudTrail Lake upgrades are:
Improved CloudTrail event filtering options
Sharing event data stores across accounts
The creation of natural language queries driven by generative AI is generally available.
AI-powered preview feature for summarizing query results
Comprehensive dashboard features include a suite of 14 pre-built dashboards for different use cases, the option to construct custom dashboards with scheduled refreshes, and a high-level overview dashboard with AI-powered insights (AI-powered insights is under preview).
Let’s examine each of the new features individually.
Improved possibilities for filtering CloudTrail events that are ingested into event data stores
With improved event filtering options, you have more control over which CloudTrail events are ingested into your event data stores. By giving you more control over your AWS activity data, these improved filtering options increase the effectiveness and accuracy of security, compliance, and operational investigations. Additionally, by ingesting just the most pertinent event data into your CloudTrail Lake event data stores, the new filtering options assist you in lowering the costs associated with your analytical workflow.
Both management and data events can be filtered using properties like sessionCredentialFromConsole, userIdentity.arn, eventSource, eventType, and eventName.
Sharing event data stores across accounts
Event data repositories have a cross-account sharing option that can be used to improve teamwork in analysis. Resource-Based Policies (RBP) allow it to securely share event data stores with specific AWS principals. Within the same AWS Region in which they were formed, this feature enables authorized organizations to query shared event data stores.
CloudTrail Lake’s generative AI-powered natural language query generation is now widely accessible
AWS revealed this feature in preview form for CloudTrail Lake in June. With this launch, you may browse and analyze AWS activity logs (only management, data, and network activity events) without requiring technical SQL knowledge by creating SQL queries using natural language inquiries. The tool turns natural language searches into ready-to-use SQL queries that you can execute in the CloudTrail Lake UI using generative AI. This makes exploring event data warehouses easier and retrieving information on error counts, the most popular services, and the reasons behind problems. This capability is now available via the AWS Command Line Interface (AWS CLI) for users who prefer command-line operations, offering them even more flexibility.
Preview of the CloudTrail Lake generative AI-powered query result summarizing feature
To further streamline the process of examining AWS account activities, AWS is launching a new AI-powered query results summary function in preview, which builds on the ability to generate queries in natural language. This feature minimizes the time and effort needed to comprehend the information by automatically summarizing the main points of your query results in natural language, allowing you to quickly extract insightful information from your AWS activity logs (only management, data, and network activity events).
Extensive dashboard functionalities
CloudTrail Lake’s new dashboard features, which will improve visibility and analysis throughout your AWS deployments.
The first is a Highlights dashboard that gives you a concise overview of the data events saved in event data stores and the data collected in your CloudTrail Lake management. Important facts, such the most frequent failed API calls, patterns in unsuccessful login attempts, and spikes in resource creation, are easier to swiftly find and comprehend using this dashboard. It highlights any odd patterns or anomalies in the data.
Currently accessible
AWS CloudTrail Lake’s new features mark a significant step forward in offering a complete audit logging and analysis solution. These improvements help with more proactive monitoring and quicker incident resolution across your entire AWS environments by enabling deeper understanding and quicker investigation.
CloudTrail Lake in the US East (N. Virginia), US West (Oregon), Asia Pacific (Mumbai), Asia Pacific (Sydney), Asia Pacific (Tokyo), Canada (Central), and Europe (London) AWS Regions is now offering generative AI-powered natural language query creation.
Previews of the CloudTrail Lake generative AI-powered query results summary feature are available in the Asia Pacific (Tokyo), US East (N. Virginia), and US West (Oregon) regions.
With the exception of the generative AI-powered summarization feature on the Highlights dashboard, which is only available in the US East (N. Virginia), US West (Oregon), and Asia Pacific (Tokyo) Regions, all regions where CloudTrail Lake is available have improved filtering options and cross-account sharing of event data stores and dashboards.
CloudTrail Lake pricing
CloudTrail Lake query fees will apply when you run queries. See AWS CloudTrail price for further information.
Read more on govindhtech.com
#CloudTrailLakeFeatures#CloudVisibility#aws#AWSCloudTrail#AWSCloudTrailprice#CloudTrailLake#summarizingfeature#Sharingeventdata#datastores#technology#technews#news#govindhtech
0 notes
Text
0 notes
Text
AWS CloudTrail Monitors S3 Express One Zone Data Events
AWS CloudTrail
AWS CloudTrail is used to keep track of data events that occur in the Amazon S3 Express One Zone.
AWS introduced you to Amazon S3 Express One Zone, a single-Availability Zone (AZ) storage class designed to provide constant single-digit millisecond data access for your most frequently accessed data and latency-sensitive applications. It is intended to provide up to ten times higher performance than S3 Standard and is ideally suited for demanding applications. S3 directory buckets are used by S3 Express One Zone to store items in a single AZ.
In addition to bucket-level activities like CreateBucket and DeleteBucket that were previously supported, S3 Express One Zone now supports AWS CloudTrail data event logging, enabling you to monitor all object-level operations like PutObject, GetObject, and DeleteObject. In addition to allowing you to benefit from S3 Express One Zone’s 50% cheaper request costs than the S3 Standard storage class, this also enables auditing for governance and compliance.
This new feature allows you to easily identify the source of the API calls and immediately ascertain which S3 Express One Zone items were created, read, updated, or removed. You can immediately take steps to block access if you find evidence of unauthorised S3 Express One Zone object access. Moreover, rule-based processes that are activated by data events can be created using the CloudTrail connection with Amazon EventBridge.
S3 Express One Zone data events logging with CloudTrail
You open the Amazon S3 console first. You will make an S3 bucket by following the instructions for creating a directory bucket, selecting Directory as the bucket type and apne1-az4 as the availability zone. You can type s3express-one-zone-cloudtrail in the Base Name field, and the Availability Zone ID of the Availability Zone is automatically appended as a suffix to produce the final name. Lastly, you click Create bucket and tick the box indicating that data is kept in a single availability zone.
Now you open the CloudTrail console and enable data event tracking for S3 Express One Zone. You put in the name and start the CloudTrail trail that monitors my S3 directory bucket’s activities.
You can choose Data events with Advanced event pickers enabled under Step 2: Choose log events.
S3 Express is the data event type you have selected. To manage data events for every S3 directory bucket, you can select Log all events as my log selector template.
But you just want events for my S3 directory bucket, s3express-one-zone-cloudtrail–apne1-az4–x-s3, to be logged by the event data store. Here, you specify the ARN of my directory bucket and pick Custom as the log selection template.
Complete Step 3 by reviewing and creating. You currently have CloudTrail configured for logging.
S3 Express One Zone data event tracking with CloudTrail in action
You retrieve and upload files to my S3 directory bucket using the S3 interface
Log files are published by CloudTrail to an S3 bucket in a gzip archive, where they are arranged in a hierarchical structure according to the bucket name, account ID, region, and date. You list the bucket connected to my Trail and get the log files for the test date using the AWS CLI.
Let’s look over these files for the PutObject event. You can see the PutObject event type when you open the first file. As you remember, you only uploaded twice: once through the CLI and once through the S3 console in a web browser. This event relates to my upload using the S3 console because the userAgent property, which indicates the type of source that made the API call, points to a browser.
Upon examining the third file pertaining to the event that corresponds to the PutObject command issued through the AWS CLI, I have noticed a slight variation in the userAgent attribute. It alludes to the AWS CLI in this instance.
Let’s now examine the GetObject event found in file number two. This event appears to be related to my download via the S3 console, as you can see that the event type is GetObject and the userAgent relates to a browser.
Let me now demonstrate the event in the fourth file, including specifics about the GetObject command you issued using the AWS CLI. The eventName and userAgent appear to be as intended.
Important information
Starting out The CloudTrail console, CLI, or SDKs can be used to setup CloudTrail data event tracking for S3 Express One Zone.
Regions: All AWS Regions with current availability for S3 Express One Zone can use CloudTrail data event logging.
Activity tracking: You may record object-level actions like Put, Get, and Delete objects as well as bucket-level actions like CreateBucket and DeleteBucket using CloudTrail data event logging for S3 Express One Zone.
CloudTrail pricing
Cost: Just like other S3 storage classes, the amount you pay for S3 Express One Zone data event logging in CloudTrail is determined by how many events you log and how long you keep the logs. Visit the AWS CloudTrail Pricing page to learn more.
For S3 Express One Zone, you may activate CloudTrail data event logging to streamline governance and compliance for your high-performance storage.
Read more on Govindhtech.com
#dataevents#awscloudtrail#AmazonS3#availabilityzone#createbucket#deletebucket#API#AWSCLI#NEWS#technology#technologynews#technologytrends#govindhtech
0 notes
Text
0 notes
Text
0 notes
Photo

複数アカウントのCloudTrailをKMSで暗号化する https://ift.tt/2SGsHl1
前書き
AWSからCIS (Center for Internet Security) AWS Foundations Benchmarkという、汎用的なセキュリティガイドラインが提供されている(*1)。
その中で、以下のようにCloudTrailのログをKMS暗号化することが推奨されている。 2.7 Ensure CloudTrail logs are encrypted at rest using KMS CMKs (Scored)
また、CloudTrailのログは、一つの管理アカウントに集約する運用もままある(*2)。
双方を両立させる設定について、公式ドキュメントに一部(*3)載っているが、通しての手順はネット上でも見つからなかったので、忘備録として残しておく。
構成

Trail管理アカウント(AccountID: 111111111111) バケットを持つアカウント。KMSのCMKもここに作る。 自分自身のTrailログもとる
Trail管理配下アカウント(AccountID: 222222222222) Trailログ取得が必要になるアカウント。
手順
<Trail管理アカウント>S3バケットを作る
次の手順で、S3バケットを自動生成するオプションもあるが、予め作ってあるバケットにTrailログを保存することもできる。ここでは、自分でS3バケットを作る手順で進める。
バケット作成は、デフォルトのまま、任意のリージョンでOK。 ただし、既存のCMKを使う場合は、リージョンを揃える必要がある。
バケットポリシーは公式サイト(*4)より以下となる。
{ "Version": "2012-10-17", "Statement": [ { "Sid": "AWSCloudTrailAclCheck20131101", "Effect": "Allow", "Principal": { "Service": "cloudtrail.amazonaws.com" }, "Action": "s3:GetBucketAcl", "Resource": "arn:aws:s3:::myBucketName" }, { "Sid": "AWSCloudTrailWrite20131101", "Effect": "Allow", "Principal": { "Service": "cloudtrail.amazonaws.com" }, "Action": "s3:PutObject", "Resource": [ "arn:aws:s3:::myBucketName/[optional] myLogFilePrefix/AWSLogs/111111111111/*", "arn:aws:s3:::myBucketName/[optional] myLogFilePrefix/AWSLogs/222222222222/*" ], "Condition": { "StringEquals": { "s3:x-amz-acl": "bucket-owner-full-control" } } } ] }
<Trail管��アカウント>Trail設定をする
Trail認証情報を作成する。 バケット指定はバケット名で行う。 例)myBucketName
KMSもS3バケットと同じく、予め用意したものを指定できるが、ポリシーが結構複雑になるので、自動生成に任せた方が楽。
とりあえず、ここまでの手順でTrailログがバケットに流れ込み出すはず。
<Trail管理アカウント>CMKポリシーの修正
Trail管理配下アカウントのために、CMKポリシーを修正する。 マネジメントコンソール のIAM画面から、先の手順で作られた暗号化キーを参照する。 見つからない場合は、リージョンが合っているかを確認する。※画面右上のものでない
対象キーを選択、キーポリシー欄にて、ポリシービューに切り替えて、編集できる状態にする。
以下の部分を修正する。
{ "Sid": "Allow CloudTrail to encrypt logs", "Effect": "Allow", "Principal": { "Service": "cloudtrail.amazonaws.com" }, "Action": "kms:GenerateDataKey*", "Resource": "*", "Condition": { "StringLike": { "kms:EncryptionContext:aws:cloudtrail:arn": [ "arn:aws:cloudtrail:*:111111111111:trail/*", "arn:aws:cloudtrail:*:222222222222:trail/*" ] } } },
StringLikeの要素をリストにし、管理配下のアカウントを追加する。
<Trail管理配下アカウント>Trail設定をする
ほぼ同様の手順でOK。 バケット名はリージョン内でユニークなはずなので、先と同じくバケット名でよい。
一方、KMSの指定は、ARNで行う。 例)arn:aws:kms:ap-northeast-1:111111111111:key/xxxxxxxx-xxxx-xxxx-xxxx-xxxxxxxxxxx
これで、管理配下のTrailログも、管理アカウントのバケットに流れ込む。
<両方>確認
目視でもいいが、Configでチェックするとより安心。
参考) (*1) https://aws.amazon.com/jp/about-aws/whats-new/2017/12/new-quick-start-implements-security-configurations-to-support-cis-aws-foundations-benchmark/ (*2) https://docs.aws.amazon.com/ja_jp/awscloudtrail/latest/userguide/cloudtrail-receive-logs-from-multiple-accounts.html (*3) https://docs.aws.amazon.com/ja_jp/awscloudtrail/latest/userguide/create-kms-key-policy-for-cloudtrail-encrypt.html (*4) https://docs.aws.amazon.com/ja_jp/awscloudtrail/latest/userguide/cloudtrail-set-bucket-policy-for-multiple-accounts.html
元記事はこちら
「複数アカウントのCloudTrailをKMSで暗号化する」
March 04, 2019 at 12:00PM
0 notes