#anyway. i think my body is like 60% acrylic paint after this.
Explore tagged Tumblr posts
Text
a tale of two tangleds?

this was a fun sketchbook spread I did based on two bagginsheild tangled aus, @shantismurf 's rapunzel!Bilbo and my own rapunzel!Thorin
If you like shantismurf's bilbo, check out this post and if you're interested in my little au, it's linked here!
close ups and bonus thorin doodles under the cut!


#this was so fun to do#ive never done a full spread like this it was rlly cool#i got most of my inspo from the tangled art book i got as a christmas present (which is so cool btw)#anyway. i think my body is like 60% acrylic paint after this.#bagginsheild#bilbo baggins#thorin oakenshield#thorin x bilbo#tangled au#tangled#i make shit sometimes#btw if youre thinking that thorin is too tall#youd be right!#my au is also a human au because i couldnt figure out smaug as mother gothel otherwise
17 notes
·
View notes
Text
How to Make Costume Dragonfly Wings
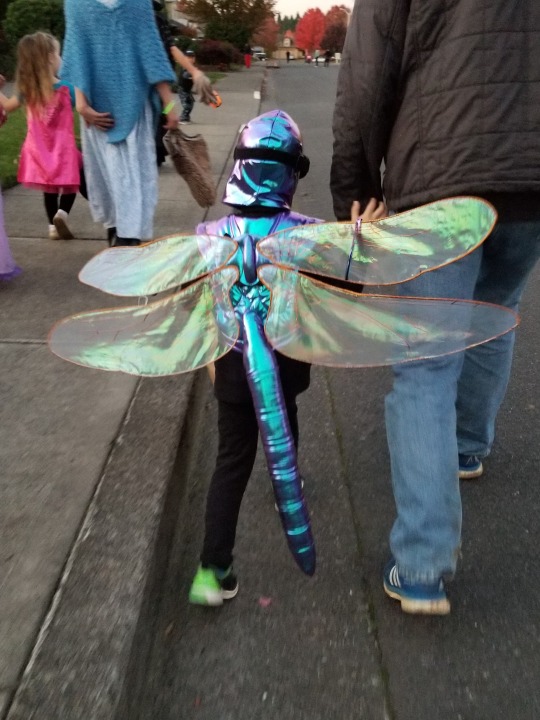
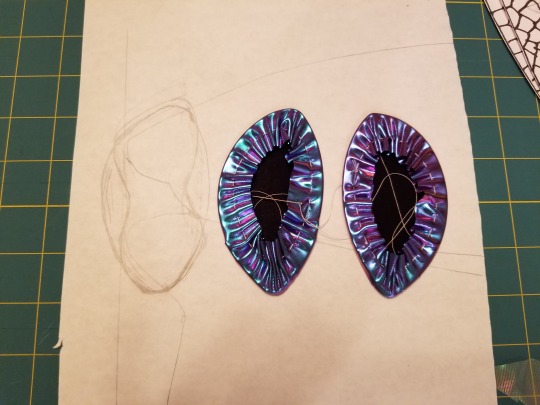
My four-year-old insisted on being a dragonfly this year for Halloween. When I couldn’t find any costume “fairy wings” that could pass for dragonfly wings, I decided to make them myself. I was pleased with how they turned out, so I thought the process was worth documenting. The same technique could be adapted to make anatomically correct wings for any insect costume.

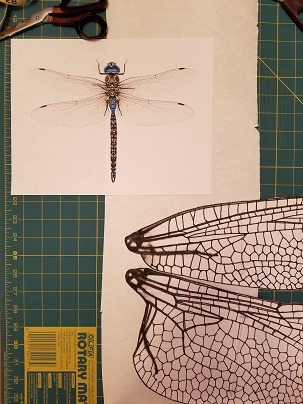
Supplies:
Printer/scanner/copier and paper
Dark pen or marker
Craft paper or butcher paper (or removable fabric stabilizer)
Sewing thread
Invisible monofilament thread
Decorative (rayon) thread for machine embroidery
Sheer woven fabric for wings (knit fabric or netting might work but I haven’t tried it)
1.5 mm polyester millinery wire
Iron and pressing cloth
Fray check
Fabric marker or fabric paint
Exoskeleton fabric (I used a 4-way stretch polyester-spandex cosplay fabric)
Backing fabric (I used black quilting cotton)
Batting
Black 3/8” elastic braid
4 large sew-on snaps
8 medium sew-on snaps
Process:
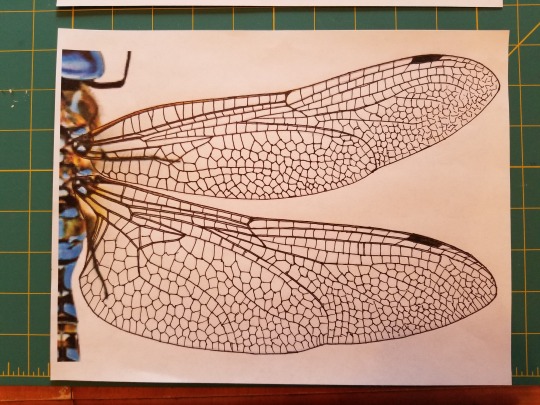
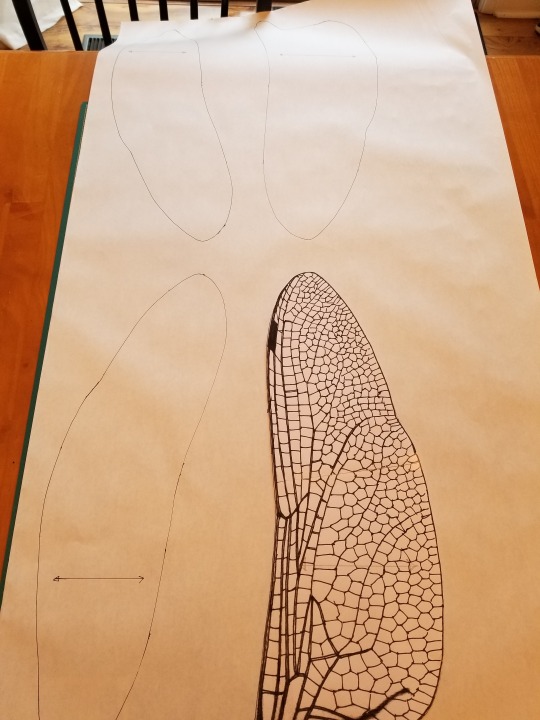
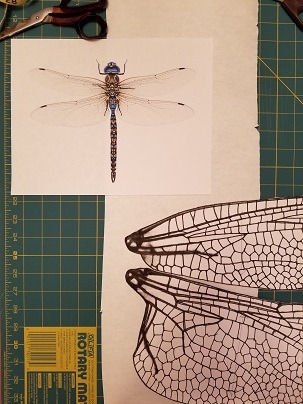
1. Find a detailed photograph of a dragonfly online. Zoom in on one pair of wings and print them on white paper. With a pen or marker, trace any details of the wings, such as the venation, that you want to add to the costume. Copy and enlarge this image to a suitable size (mine were about 18” from thorax attachment to wingtip). Make a copy of the wings that is a mirror image of the first set.
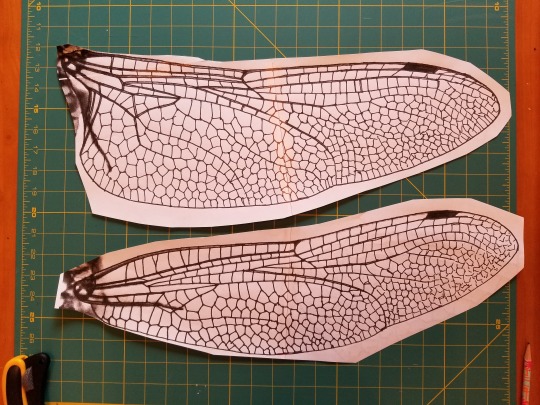
2. Cut the paper wings out along the outside edges. Add lines to indicate grain; you want the straight or crosswise grain to run along the length of the wings as much as possible so that the main body of the wings will not be on the bias. Trace each wing onto a piece of craft paper or butcher paper, making sure the grain lines are all parallel and leaving about two inches between the pieces.
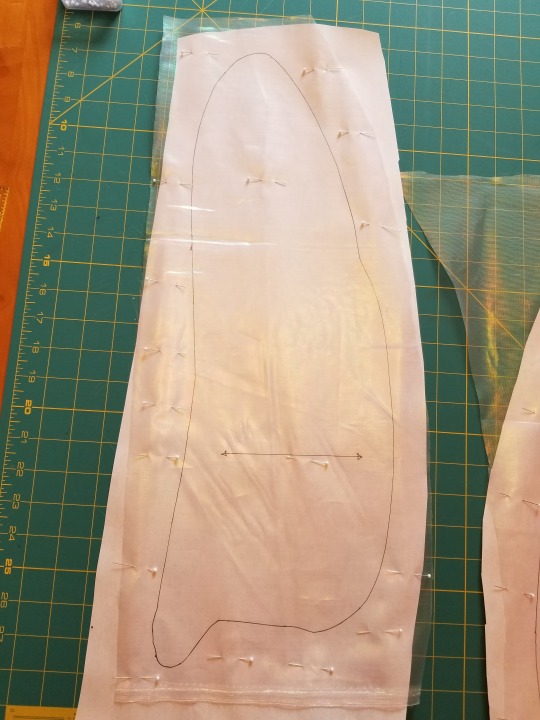
3. Pin a single layer of wing fabric to the craft paper and machine baste the paper to the fabric, directly on the pattern outline, using a medium-long stitch. The basting holds the fabric in place and stabilizes it in preparation for adding the wing armature. I used white thread because these stitches will be covered later, but in retrospect, invisible monofilament would probably have been a better choice. (The pieces can be carefully cut apart before or after stitching; just make sure the fabric stays stable and on grain until you have it basted to the paper.) (Note that I used craft paper because I didn’t have any Sulky Solvy or other “real” stabilizer on hand. If you have more time than I had and are using a washable fabric, you might want to use a dissolving stabilizer here to save time and effort later.)
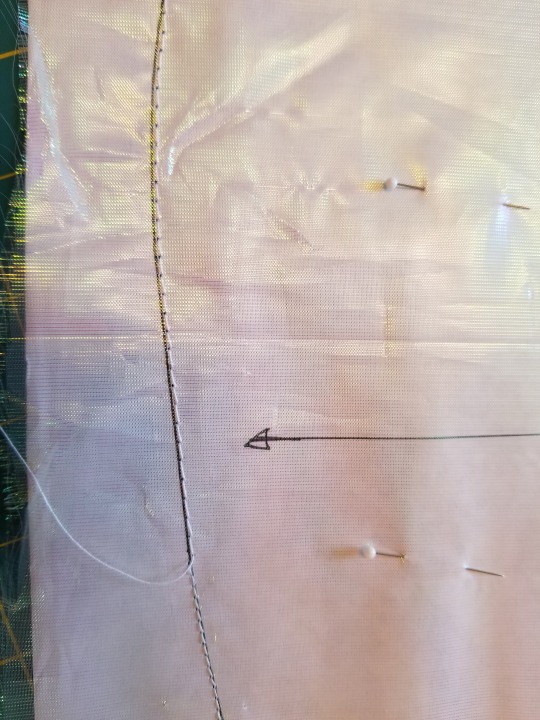
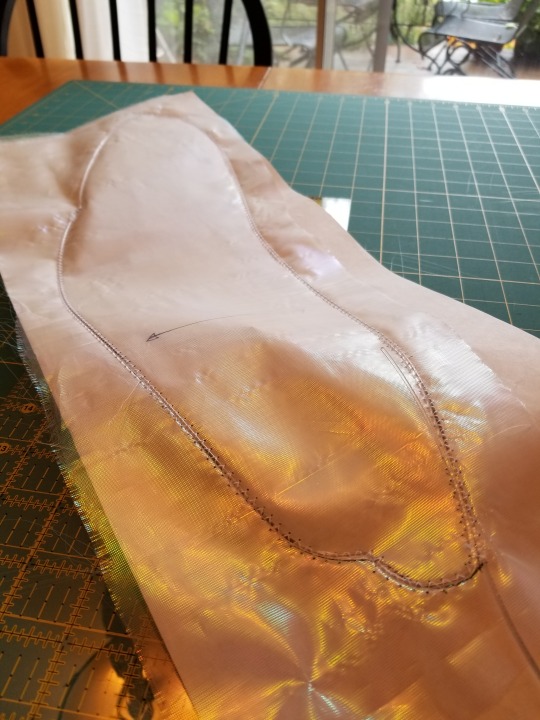
4. For each wing, cut a length of 1.5 mm polyester millinery wire equal to the circumference of the wing outline plus the distance around the wing joint area and 10-12” down the top edge of the wing. Using your original pattern piece for reference, bend the wire along the outline of the wing, so that it matches as closely as possible the outline you’ve drawn and cut around. Double the wire along the wing joint and the top edge of the wing to provide extra stability and support. The wire will not lie flat at this point, but that’s okay. Just focus on accurately placing specific bends and curves along the length of the wire. You’ll sew them in place in the next step. (Tips for working with the wire: Don’t unfasten the coil of wire all at once or you’ll have a mess to untangle. Instead, slip out one loop at a time until you have the length you need. You can gently pull and bend it in your hands to relax some of the coil before you start shaping it. I was able to bend and crimp it using just my fingers, but you might want to also use needle-nose pliers for more accurate corners and sharper angles.)
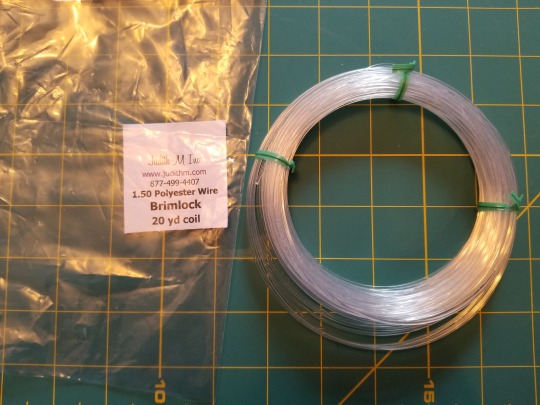
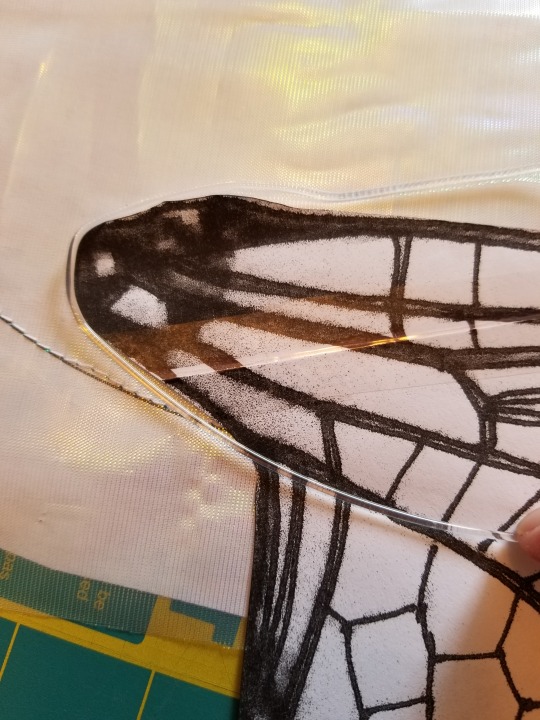
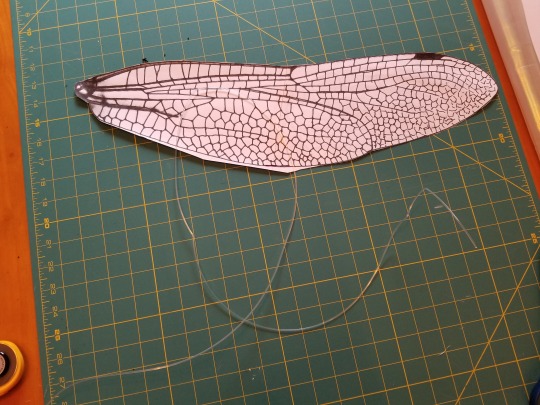
5. Set your machine to zig-zag at a stitch width that accommodates the wire without striking it with the needle. Carefully stitch the wire directly over the top of the wing outline. Keep in mind that you’ll need to switch to a wider stitch for the areas where the wire is doubled.
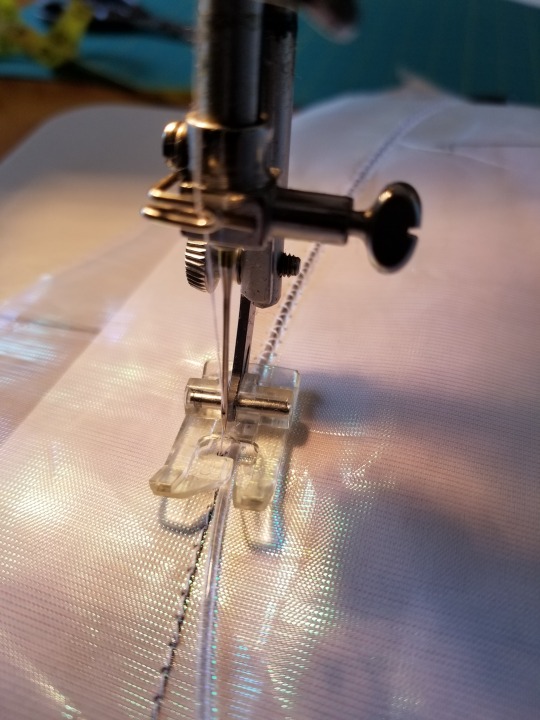
6. To “set” the shape of the wing armature, put a dry iron on low heat. The milliner’s supply shop where I bought my wire says that 60 seconds of 175-degree heat is sufficient to set polyester wire. I found the synthetic setting on my iron was too low, so I used a wool setting. Using a pressing cloth and being careful not to scorch or distort your fabric, press each area of the wing outline for at least 60 seconds. Don’t slide the iron back and forth; just hold it firmly in place at intervals along the wire. Let the wing cool. I weighted mine with my acrylic cutting guide as they cooled, to keep them flat.
7. Carefully tear the paper away from the wing. This is where using a “real” tear-away or dissolving stabilizer might come in handy; getting the bits of craft paper out of the stitches was a royal pain and involved tweezers and lots of patience. :)
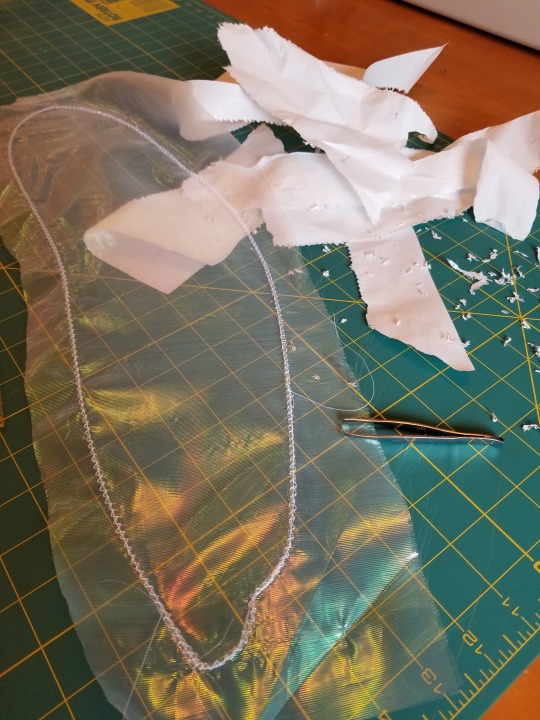
8. Put your machine back on straight stitch and install the zipper foot. With the right side of the wing facing down, fold the extra wing fabric over the wire and pull it as taut as possible without distorting or tearing it. You want to get a little tension on the wing, but not too much; your previous zig-zagging will prevent you from pulling the fabric too far. With the needle on the right side of the foot and the foot snug against the inside edge of the wire, straight stitch through both layers of fabric around the inner circumference of the wing. (Again, I used white thread, but monofilament would be appropriate here.)
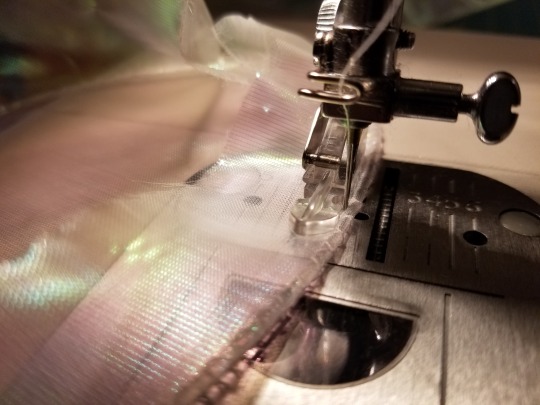
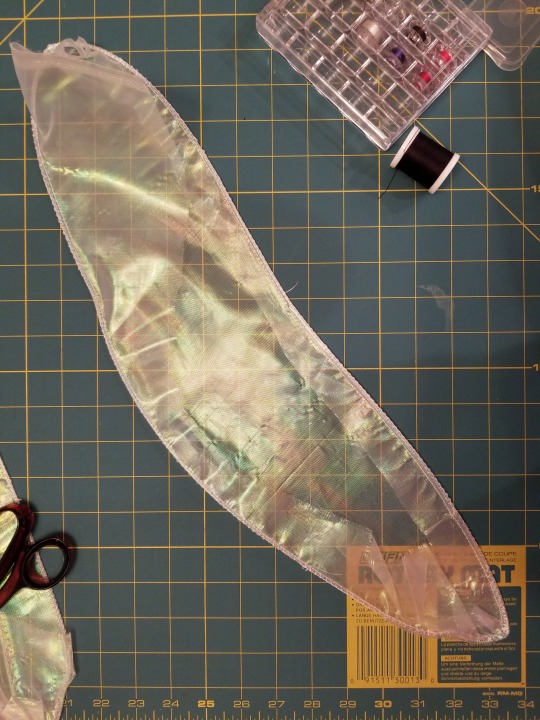
9. Reinstall the standard sewing machine foot. Using a short stitch length and a wide zig-zag setting, with the right side of the wing facing up, satin-stitch around the edge of the wing. I used cinnamon-colored rayon thread for my dragonfly wings.
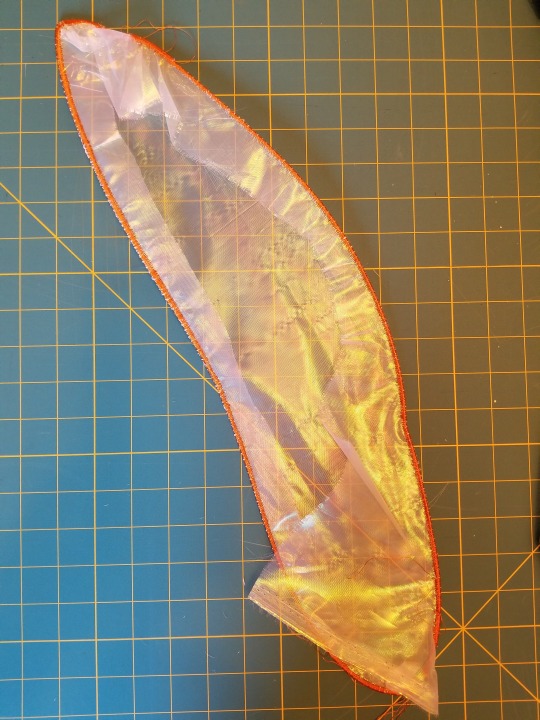
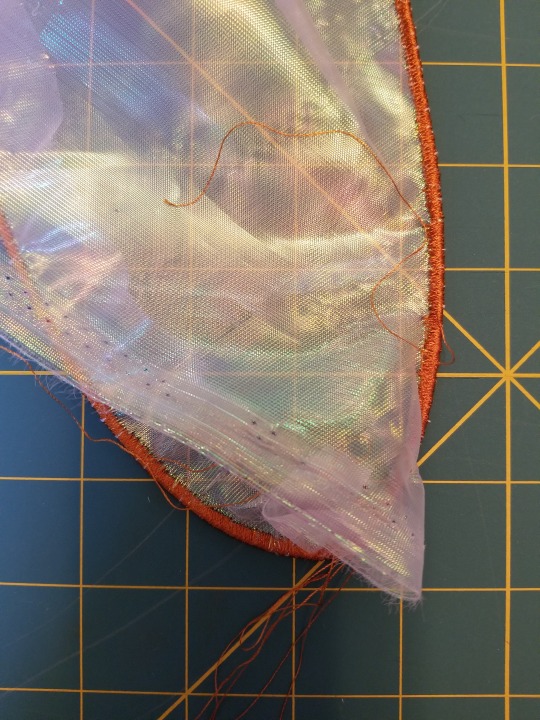
10. Apply Fray-Check to the inside edge of the satin-stitching. Trim away the extra fabric as closely as possible to the stitching, being careful not to poke a hole in your brand-new wing (applique scissors might help).
11. Lay the wing right side up over its original pattern piece and trace details onto the wing using a fabric marker, fabric paint, or other medium. You may want to experiment on a scrap first. Fabric marker was almost invisible on the organza I used, so I went with copper-colored fabric paint. (I tried to protect my pattern from bleed-through using plastic wrap, but this turned out to be a bad idea that caused the paint to smear a little on the first wing.)
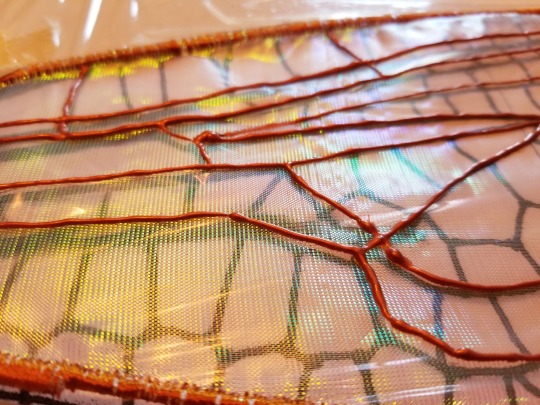
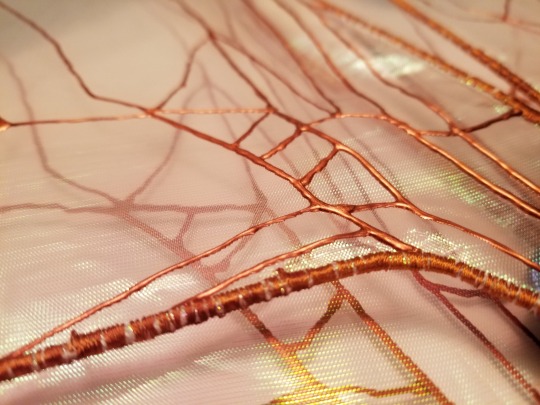
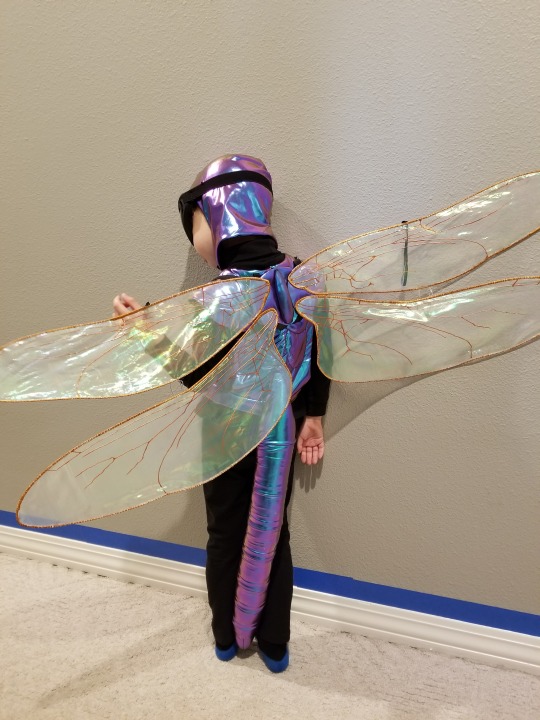
My son wanted wings that would flap (I know, I know; dragonflies don’t flap like that), but I wanted wings that would stay rigidly in place. As a compromise, I decided to make convertible wings; with a 40” wingspan, I figured he’d need to be able to narrow the costume for indoor use anyway. (NB: For wings that have to go through doorways, consider making something less than 36” across; better yet, make something not much wider than the wearer’s shoulders.) Therefore, the remaining steps will produce a set of convertible wings that can be worn upright in one place or loose with loops over the arms for flapping, either attached to an insect costume thorax or separately over regular clothes for dress-up. This process could easily be adapted to make simpler wings.
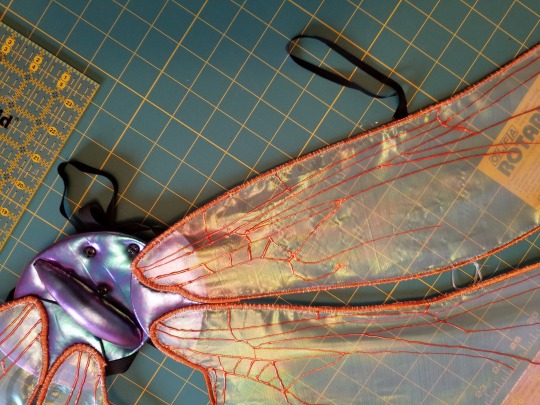
12. The wings will function as pairs, with each pair sewn to a smaller base that will later be attached to a larger base using snaps and elastic. (For fixed wings, you could just sew all four wings to one large base.) To figure out the size and shape of the two smaller wing-muscle bases, I traced the outlines of a pair of wings, positioned as I wanted them relative to the center back line and the back neckline, over the outline of the side back piece of the costume thorax. I shaped the smaller base so that its edge would intersect with the armature at the top and bottom of both wings and so that it would support the narrow “joint” portions of both wing ends. I used the original photo of the dragonfly loosely for reference. Then I sketched in the larger center-back base, shaping it to support one small base on each side of a center decorative element.
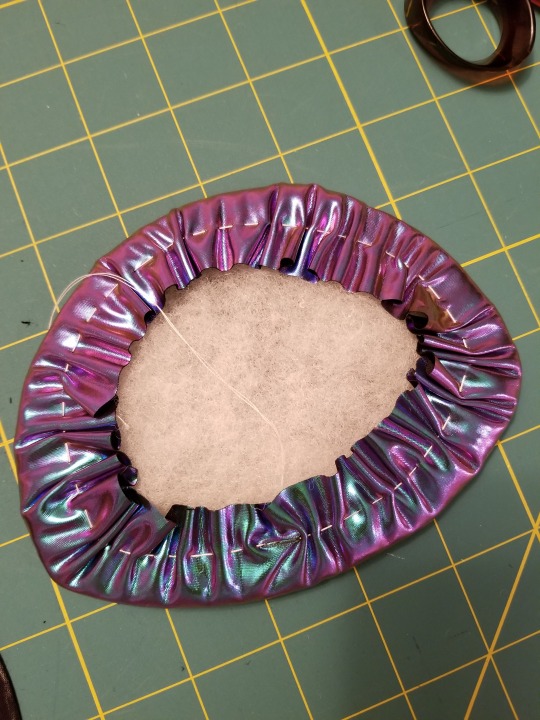
13. For each of the two small wing-muscle bases, shape a piece of 1.5 mm polyester wire to match the outline of the base and secure it into an unbroken loop (I used thread and tape but I think you can also melt it). Cut a piece of exoskeleton fabric about 3/4” larger than the loop. Cut a piece of batting and a piece of backing fabric the same shape as the loop. Lay the wire loop on the wrong side of the exoskeleton fabric, gather the edges of the fabric around the loop, and secure your stitching. Tuck the batting inside, making sure it lies flat. Clip and press under 1/4” of the backing fabric, and stitch it in place over the gathered exoskeleton fabric to hold everything in place and provide a firm foundation for stitching on the wings, snaps, and elastic.
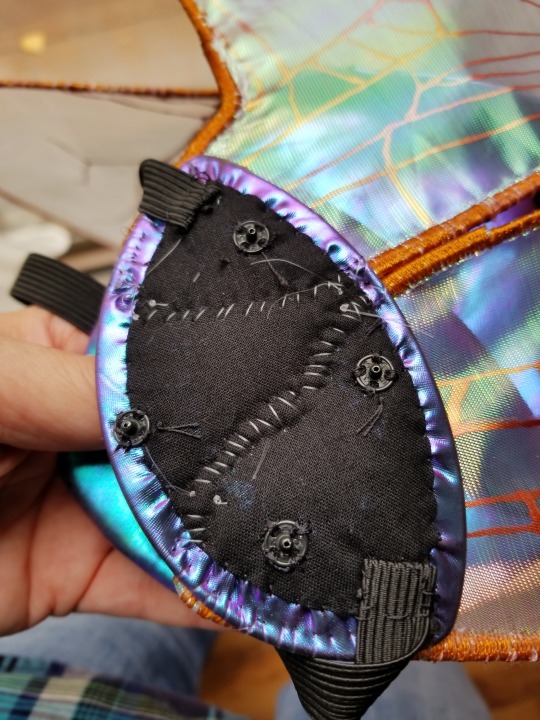
14. Make the larger center-back base in the same way as the smaller wing-muscle bases, but cut the batting 1/2” larger than the loop, and lay it on the wrong side of the exoskeleton fabric before you gather it around the wire loop. Attach any decorative elements you want on the right (exoskeleton fabric) side of the base. (I added a narrow stuffed teardrop shape with a double wire frame hidden on the inside to give additional structural support to the base.)
15. To attach the center-back base to the costume thorax, sew halves of four large snaps onto the back of the base; sew the other halves of the snaps onto the costume thorax in their corresponding positions.
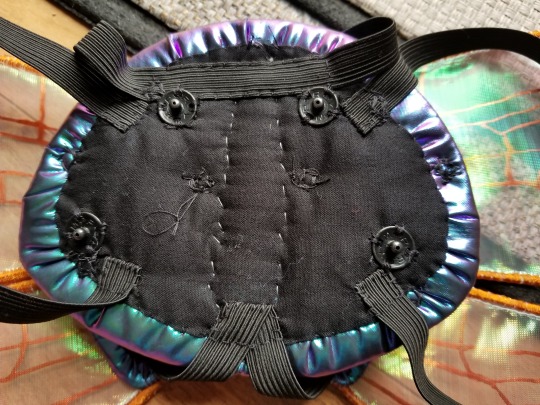
16. To wear the wings without attaching them to a costume, attach two loops of 3/8” elastic to the back of the center-back base, one on each side, to extend around the wearer’s shoulders and upper arms. My loops were 15” around.

17. To attach the wings to the smaller wing-muscle bases, position one pair of wings over the right (exoskeleton fabric) side of a wing-muscle base and pin them in place. Using invisible monofilament thread, whipstitch the wings firmly in place by taking stitches over the wire armature of the wings. Add extra stitches at the points where the wire wing armature intersects with the underlying wire armature of the base. Repeat with the other pair of wings and the other wing-muscle base.
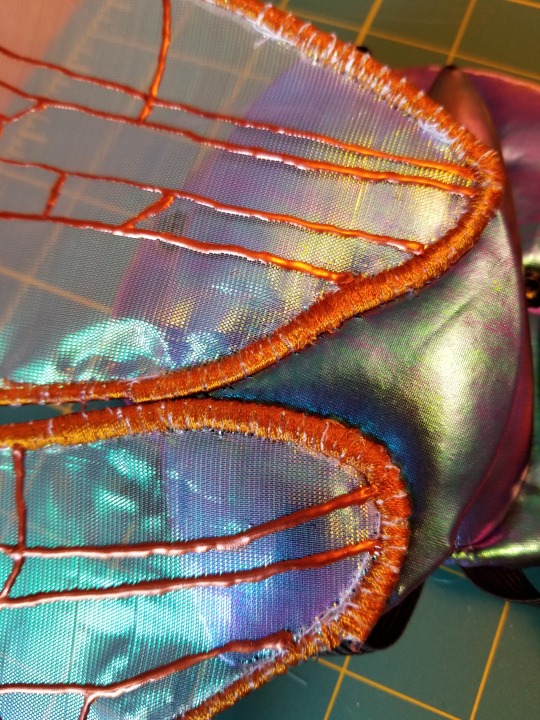
18. To hold the wings to the center-back base in “flapping” mode, cut two pieces of 3/8” elastic. The elastic will be anchored to the back of the center-back base with the four ends attached to the edges of the wing-muscle bases. One piece is for the top edge of the wing-muscle bases, the other is for the bottom edge. The top piece needs to be long enough to allow the top edges of the wings to dangle low enough to hang flat against the wearer’s back, but the bottom piece needs to be just long enough to allow the bottom edge of the wing-muscle bases to be snapped onto the center-back base, and no longer. My top piece extended about 2-1/2” or 3” beyond each side of the top of the center-back base, and my bottom piece extended about 1-1/2” beyond each side of the bottom of the center-back base. Sew the two pieces of elastic firmly to the center base first. Then sew the ends to the edges of the wing-muscle bases that are opposite the wings and closest to the center back, taking care not to twist the elastic.
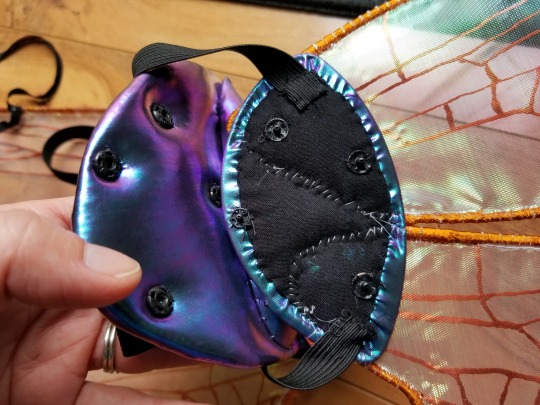
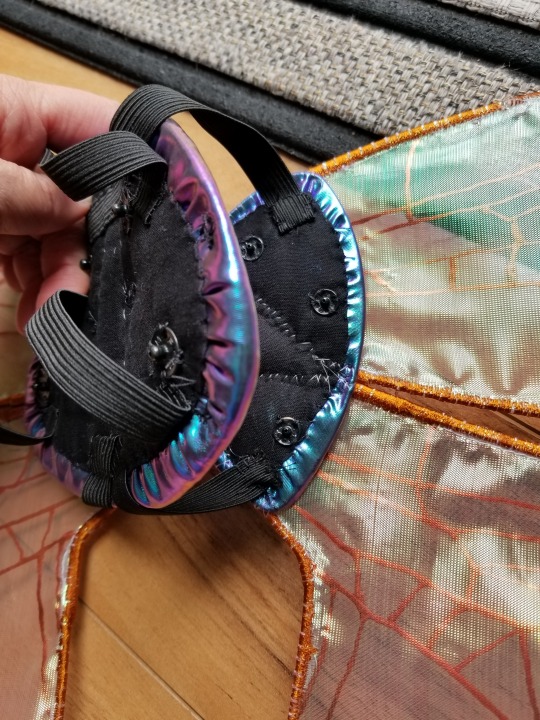
19. To hold the wings to the center-back base in “fixed” mode, position the two smaller wing-muscle bases over the center-back base so that the wings extent at the desired angle. Mark the positions for four medium snaps on each wing-muscle base, placing them strategically for maximum support (e.g., one very near the center of the center-back base, one near the “outer” edge of the wing-muscle base, one near the top edge of the wing-muscle base, and one near the bottom edge). Sew the snap halves into place on the wing-muscle bases and the center-back base.

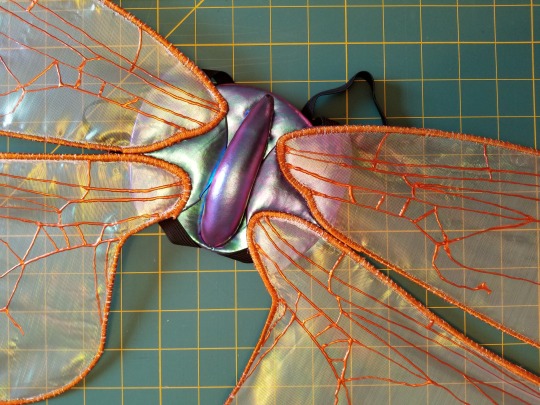
20. To allow the wearer to operate the wings in “flapping” mode, attach a narrow loop of filament or fabric to the center top edge of each top wing, large enough to go around the wearer’s arms. I used a thin strip of my exoskeleton fabric and attached it with invisible monofilament thread.
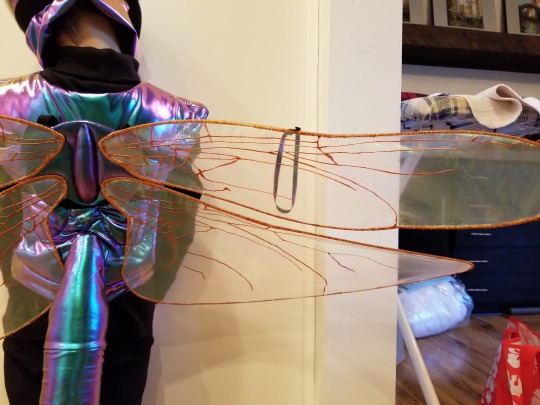
21. Optional: to further stabilize the pairs of wings and provide extra support when they’re being used in “flapping” mode, shape a small square out of a scrap of 1.5 mm polyester wire and attach it at the midpoint between each pair of wings, sewing it to the wing armatures with invisible monofilament thread.
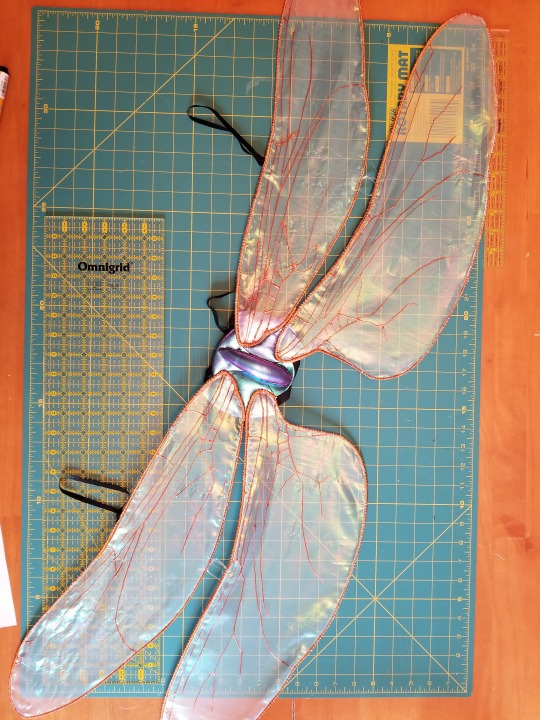
To wear the wings in “flapping” mode, snap the center-back base onto the costume (or slip the elastic loops onto your shoulders/upper arms). Let the wings dangle from the center-back base and slip your arms through the wing loops to control the wings. To wear the wings in “fixed” mode, take your arms out of the wing loops and snap the wing-muscle bases to the center-back base. :)
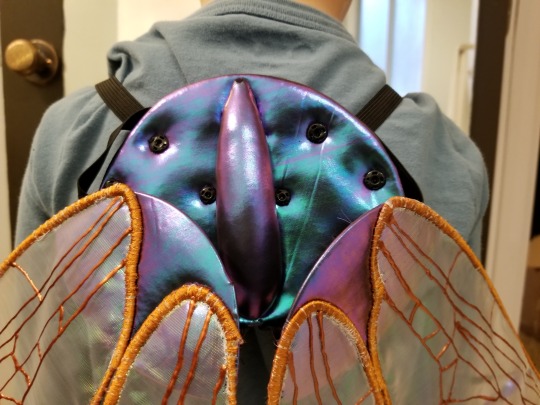
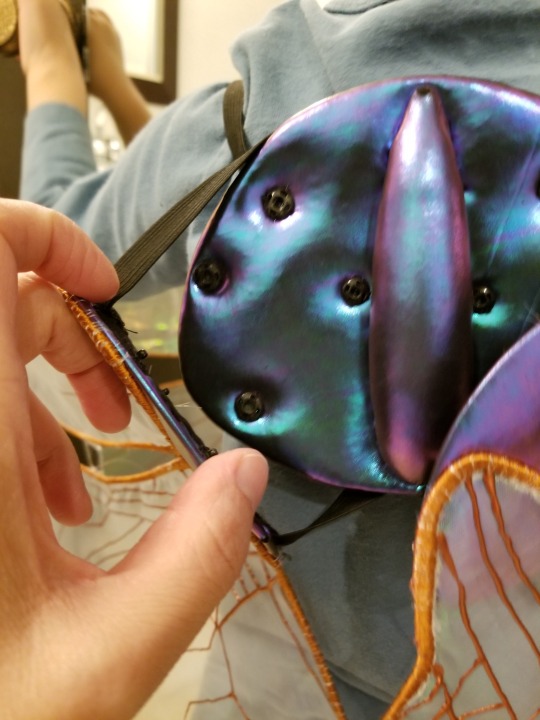
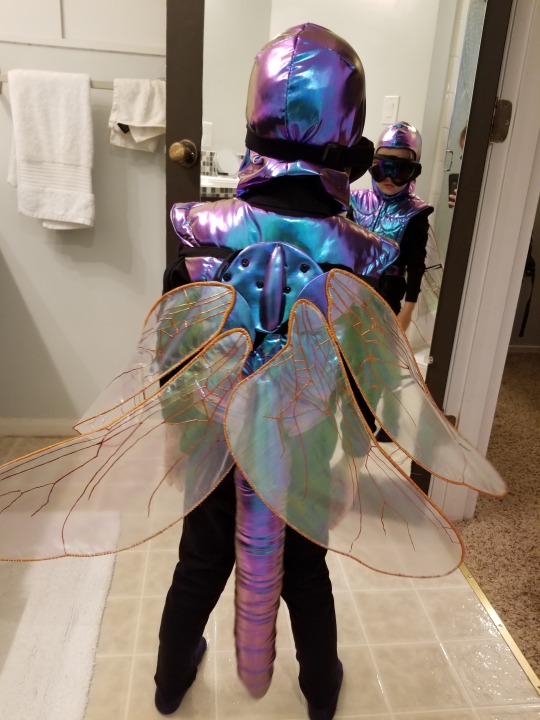
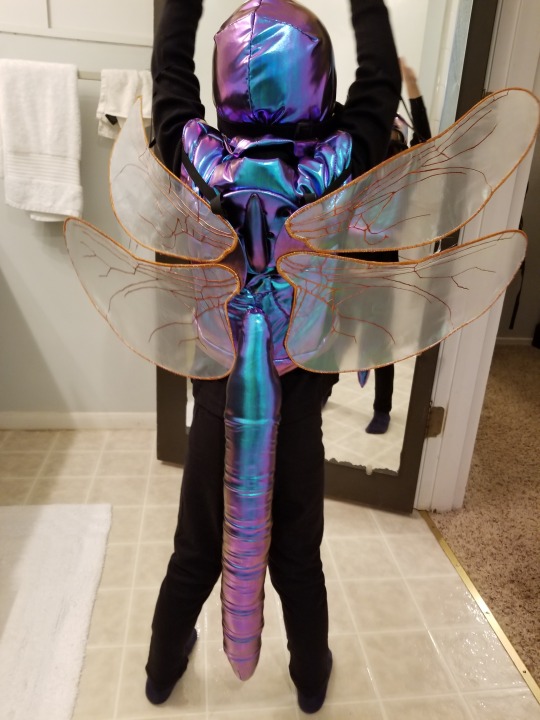
To wear the wings in “fixed” mode, snap each of the smaller wing muscle bases to the larger main base and do not use the narrow arm loops that are attached to the tops of the wings.
10 notes
·
View notes
Text
50 BJD questions
from this post. I’m bored, so I thought I’d take some time and answer them.
1. Have your tastes in sculpts changed over the years? I don’t think so. I still like (most of) the same sculpts now as when I was first introduced to the BJD hobby. Cheekbones and strong noses is a reoccurring theme.
2. Do you have pre-made characters for the dolls that you get home which must fit a certain description, or, do you get them home and let inspiration hit? I’m leaning more towards the latter. If I find a sculpt i like i start to think of what type of character that sculpt could be. company pictures are often a big influence on what the character ends up as.
For example; Felix in a company photo:

and Felix as he looks now:

3. What do you do when you get hooked on a particular sculpt and want it home right here, right now but can’t as you have to save or some other reason? Well, actually, several of my dolls have been bought a little on impulse. It’s like, i find a doll i want, i look at my bank account, i look back at the doll, i spend a few days debating what to do, i look at the doll, i look at my bank account, i think “fuck it! i have money!”, i buy the doll and about a month later i realize i have barely no money.
4. How many dolls are too many to you personally? when i had two dolls i thought that was nice, but three was doable. when i had three dolls i thought that was nice, but four was doable. when i had four dolls i thought, this is good, i don’t need another. and then i got two more dolls and landed on six! that is the max number of dolls i’ve had so far, and that does feel like enough, for real this time. but who knows!
5. What are your thoughts on dolls with already pre-existing characters from movies/books/cartoons/etc.? eh, i’m not so much for that. fine if companies create characters/stories for their events and such, but i don’t really get the whole “here’s a mini version of this character from that thing”. i don’t want to “adopt” someone else’s character, i want to create my own.
6. Acrylic, glass or urethane? And why? glass or urethane. though some of my boys have acrylics. i just thing the former looks better.
7. How much does yellowing bother you? What is acceptable before you want something done to liven up that old yellow resin skin? the only one of my crew who’s got visible yellowing is felix, because he’s the oldest and i had him out in the sun a lot during his first year. it doesn’t really bother me, because it’s pretty even and it’s not super obvious with face up and body blush. it did bother me a little when i got him new hands, and they were so much more pink than his arms, but instead of doing something to de-yellow him, i just blushed his hands to match his forearms.
8. What are your thoughts on anthro BJDs vs actual animal BJDs? i kinda want a doll with hooves, horns and funny ears, because i think it’s cute and it can be used for really cool characters. animal dolls are cool, but not anything i’d be interested in getting.
9. How small is too small? How tall is too tall? Or does height even matter to you? I prefer dolls in the 60-70cm height. i could possibly go down to 50cm. over 70cm feels like a little too much though.
10. Do you talk with your resin buddies while painting them, dressing them, just because? I talk to my crew a lot. when dressing them, when posing them or just randomly when i walk past. there’s a lot of “come here, let me just..., what are you doing?, come on i know you can do this” etc.
fun story: i had a friend’s doll at my place for a while and decided to take some photos of him with my own dolls. when i posed my friend’s doll it was all “could you do this, please?” while i carefully adjusted arms and legs and tested out the flexibility of joints. and when i posed my own it was “bitch, do what i tell you!” while pulling and bending joints like i wanted. (not to say that i’m not careful with my dolls, i just know better how their joints work and how to pose them, than other people’s dolls).
11. Do you have a doll you love but will probably never have because finances or impossible to get? the 5th motif venitu is my grail doll, but i don’t think i’ll ever own one since they have been discontinued and are very hard to get secondhand, because everyone loves them.
12. Do you have a favourite clothing company where you go and buy clothing and/or shoes from? nah
13. Your favourite pair of shoes you ever got home? Picture please! I like these shoes a lot, because i want a pair like them

14. Favourite accessory and, again, picture! not sure these count as accessories, but yeah

15. How many times have you had to redo a face-up in a day? never really had to redo an entire faceup, but eyebrows...i can never seem to get them right on the first try
16. Ever sat screaming and cursing at your sewing machine? Or even if you’ve sown something by hand? Tell us a bit about one of those silly outbursts! i don’t get loud-angry a lot, it’s more heavy sighing and questioning my life choices. and while i do sew a lot, i haven’t really had any major mishaps. i have on occasion made two right/left legs when making pants, though.
17. In the past year have you had to find homes for some of your resin buddies? am looking for a new home for one of my dolls right now. my souldoll madalyn/shiva hybrid. she’s on DoA.
here’s a link
18. Have you ever made any miniature furniture of any kind or do you prefer to buy it? never made, never bought. i would like to have more props for my dolls, but right now i have no space to store them so...maybe later.
19. What would you do if one of your dolls went green or banana yellow? Would you try and salvage the damage somehow by mods and the like, or would you reinvent their character? I would probably start by trying to undo the damage, but if it was irreversible i think i’d end up re-designing the character, using the damage somehow.
20. Ever got two dolls or more home in a year? i got ronja in december 2014 and a body for thoms in january 2015. tan-tan came home in january 2016 and Bellis in july 2016.
21. Are there a certain theme going style/face-up/accessory/other wise? Or are they all fairly different from one another? both, i’d say. i prefer more realistic faceups, usually on the slightly darker side. 90% of all clothes i own are grey or black and i kinda like the bad boy/rocker style. but at the same time, each of my dolls has their own personality and key fashion points.
22. How much is too much to pay for a doll/how little is too little? And why? i don’t think i have a “too little” line. i don’t mind stuff being cheap (but i still want quality so...). and i don’t think i’d ever pay more than 700$ for a doll. 700 is A LOT!
23. Do you do mods? Show us some of your work! Would you do them on rare/limited sculpts? i don’t do mods. but if i had a limited/rare sculp and i knew how to mod and was sure of it turning out good, then sure, i might go for it.
24. Do you prefer getting dolls home blank so that you can do your own face-up, or, do you prefer to have the company paint them for you? i always prefer a professional faceup over my own. (fucking eyebrows...!) but only 2 dolls have come home with company faceups, one with faceup by previous owner and three blank. but i do enjoy painting them, so it’s fine.
25. Do you keep up with the various companies releases, events and the like? nah
26. Ever hated having to cover up a body with clothing because the sculpting was absolutely divine and you’d rather just be able to watch all that naked glory for all time? thoms has a doll chateau body, and while it’s not exactly “pretty”, it’s still a piece of art and i love all the angles on it. i don’t mind the others having clothes so much. but i do adore tan-tans hips and felix’s back a lot...
27. What is your favourite wig brand? home made. a wig you make yourself can literally look exactly however you want. and they always fit perfectly.
28. How many pairs of shoes do you own for your dolls? I currently have a total of 7 pairs, but three are for sale. (poor thoms has no shoes).
29. How many wigs do you have for your dolls? uh, 8? i think. two of which are also for sale. two are sort of home made experiments.
30. Do you have a favourite set of clothing? Do you own it? And if, picture please! i have several pieces of clothing that i really like, but i don’t really have a full set. but i am very fond of zack’s whole outfit. and i don’t actually have a photo of it...not with the right shoes anyway. huh.
31. Do you have a favourite outfit you’ve made yourself? so far i’m pretty proud over tan-tan and bellis’ outfits. most of them are made by me

32. Ever commissioned someone? And what for? nope
33. How many pair of eyes do you have, spare and in use combined? seven? five in use and two spare pairs. no, wait, three spare, one of which is for sale.
34. Ever called in sick because of an incoming package? nope
35. What have been you longest wait? And the shortest? i think zack was the longest. he was almost two months late. the shortest was ronja. i bought her secondhand from someone in sweden, so she arrived only after a few days.
36. Do you prefer shooting single shots or group pictures? single or pairs.
37. Do you prefer male or female dolls? male
38. Ever had that one piece of accessory you could never quite find and are still searching for years later? i don’t think so.
39. Ever had trouble settling for a sculpt for a given character and had to buy multiple sculpts home before finding that perfect one? nope. i make the character based on sculpt, not the other way around.
40. Do you keep a journal in where you write all of your doll related ideas and plans even if they wont always come to fruition? no. i keep most of it in my head, write some notes on stores and such on the computer and have various clothing and accessory scribbles all over, in different sketchpads and notebooks.
41. Ever shot some naughty naked/nude pictures? If not, why? yep! have done some “artistic nudes” in the past, as well as some naughty couples with a friend.
42. What are the longest time you’ve had a layaway running? If you’ve never done one, why are you refraining from making use of this service? never done one, and not sure i ever will. i prefer to pay it all at once. dunno why.
43. Do you mind not being able finding a whole lot of pictures of a given sculpt you want home or do you like it’s exclusivity? i’m pretty okay not finding owner pictures of sculpts i want to buy. if i find myself very indecisive i might go looking for owner pictures and be frustrated if there aren’t any. bellis was such a case. when i first saw him i fell head over heels in love with him, but when i saw the company photos of his profile i hesitated because it looked very weird to me. it still looks weird, but i love him too much to care.
44. Are you more of a share all the pictures type of person or more of a keeping them all to yourself and only share a select few? it depends on where i upload the photos. some sites gets all the photos, both the good, the bad and the weird. other sites only get the good, edited ones.
45. How good are you at sticking to your plans if, say, you told yourself you only were to bring home one more this year and then go on a break? i’d say i’m kind of good at it? i recently got an offer to buy a head i want, and it was hard to decline it, but i knew i had to because i don’t have much of an income right now and i need a new computer first.
46. What doll body is your favourite? don’t really know. i mean, thoms is pretty to look at. zack is the easiest to find clothes for, felix is the steadiest, you just smack him down and he’s stand there. tan-tan and bellis are both easy to pose and pretty enough. so yeah, i don’t know.
47. Who in your resin crew has gone through the biggest transformation since arrival? none of them have really had a complete transformation. i upgraded zack’s style once, but it wasn’t that big a change. the biggest was probably making him blond? felix has overall changed a bit, but that’s mostly because he didn’t have much clothes back when i got him.
48. Do you pamper some more than others? zack and felix are probably a little more pampered than the others. but they are the olest ones, so it makes sense to me.
49. Ever bought something (dolls, clothing, accessories) that looked amazing in the pictures but turned out to be nothing like it upon arrival? a couple of wigs. they have been too big, or just not the same style as the pictures.
50. What are your continued plans for this year? hopefully i will get my thumb out and continue with bellis and tan-tan’s outfits. i also want to make new wigs for zack and bellis, get shoes and new pants for thoms aaand give all but felix new faceups and body blushes.
0 notes