#and enable 2fa if you haven't
Text
1. How to setup 2FA on your accounts
As some of you may know, my friend @why-its-kai's Discord account was taken over this morning by a scammer.
The scam they used was this one, or close enough; but anyway, the exact specifics don't matter.
What matters is, it can happen to you. It can happen to anyone.
The good news is, you can learn how to protect yourself. Making some small changes can already improve your online security by leaps and bounds.
I made a series of 3 posts covering the basics:
How to setup 2FA on your accounts (you are here!)
How to spot a scam
How to set up a password manager.
Protect yourself with 2FA
Two-factor authentication, or 2FA, isn't a silver bullet -- but it exponentially increases your online safety by adding an extra step to the login process that a hacker/scammer does not have access to.
Every account that you care about (and even those you don't) should have some form of 2FA enabled.
Especially email -- should your email become compromised, this can become a catastrophe.
(For websites that don't support 2FA, use a burner email!)
What 2FA should I use?
2FA can take many forms, from the highly convenient (SMS, email) to the highly secure (security keys), but one thing is certain:
Any form of 2FA is better than nothing.
The simplest forms of 2FA are phone number or email. While these are very easy to use, they are unfortunately not very secure.
Still, I repeat: despite their flaws, these forms of 2FA are absolutely, 100% better than not having any 2FA at all.
On the other end of the spectrum, security keys (like for example a Yubikey) are extremely secure, but they cost money and are a bit of a hassle at time. I use them, but for most people, it's overkill.
What you want is an authenticator app.
Important
A note, before we go on…
If you enable multiple forms of 2FA, how secure your account is will depend on your weakest link.
For example, if you enable SMS authentication AND register a security key, your account will only be as safe as the SMS authentication. The security key is essentially useless.
In other words, the least secure form of 2FA you add determines the overall security of your account.
Sometimes, less is more!
Authenticator Apps
First, choose a free, reputable authenticator. Google Authenticator is a good choice. So are Aegis Authenticator or Microsoft Authenticator.
For simplicity, we'll go with Google Authenticator; the process is rather similar for most authenticators.
First, download the app from your app store and install it on your phone.
Enrolling Gmail into GA
Securing your email should be your number 1 priority, so let's enroll a Google account to Google Authenticator.
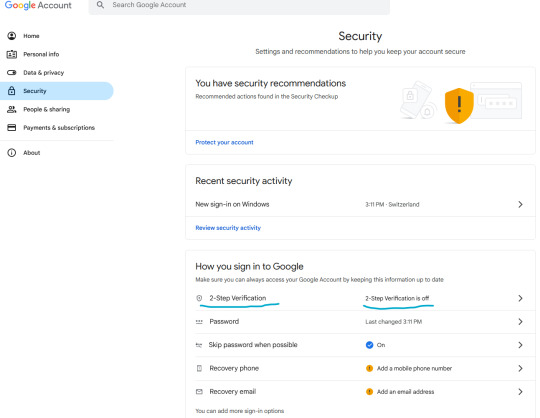
Let's enable two-step verification first.
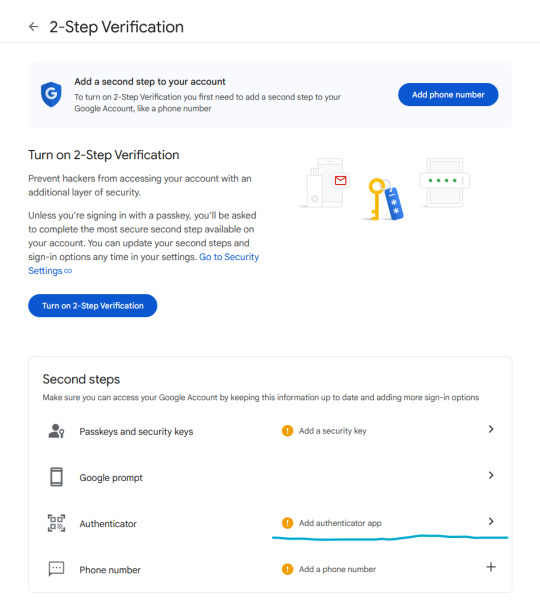
Phone number is better than nothing, but not very safe (SMS verification can be spoofed), so let's click on "Add authenticator app".
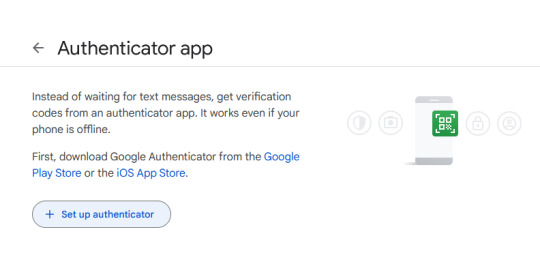
Click on "Set up authenticator". Google will generate a QR-code.
Next, go back to your phone and click on the little multicolored cross. It will bring up a menu; click on "scan a QR code".
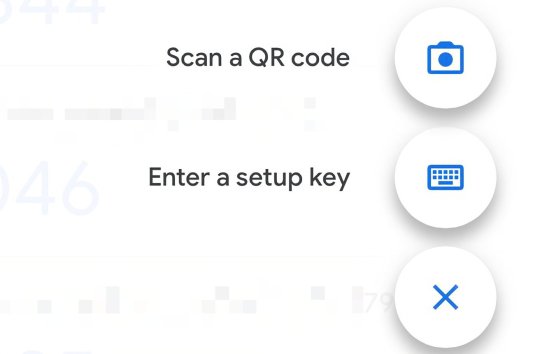
Go ahead and scan the QR code.
Congratulations, you have enrolled your Google account!
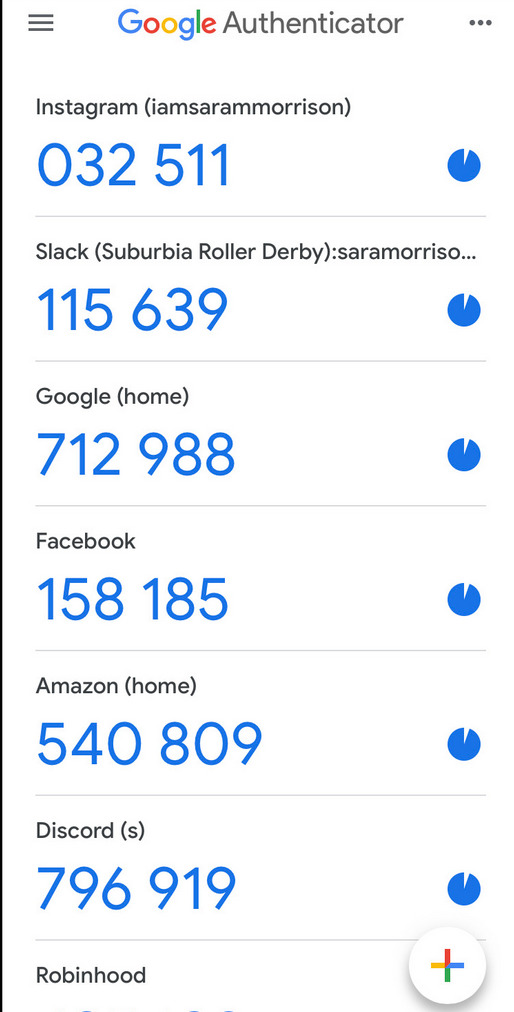
Now, whenever you are asked for a 2FA code, just open the app and copy/paste it.
Note: the codes are stored locally on your phone.
Enabling 2FA on Discord
The process is fairly similar. Go to Settings > My Account:
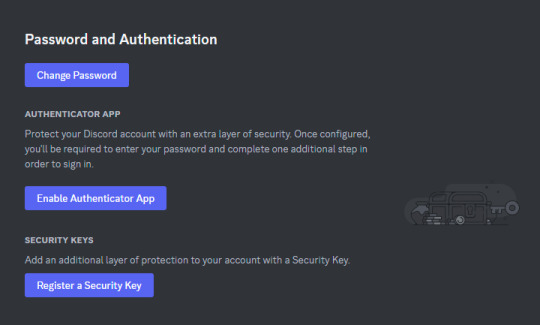
Click on "Enable Authenticator App". You will be prompted for your password. Enter it.
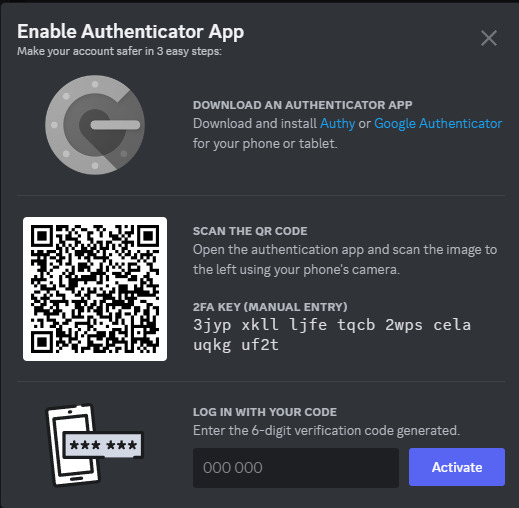
Download Google Authenticator if you haven't already. Scan the QR code as described above.
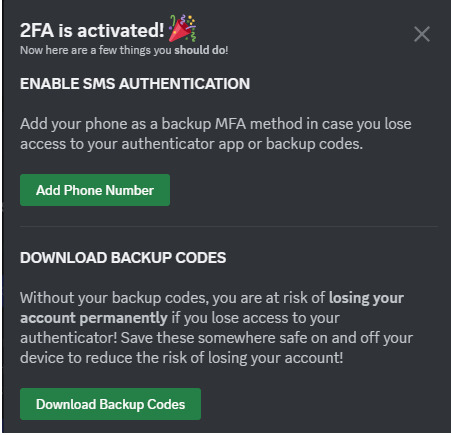
Do take the time to download your backup codes as well!
As explained above, I personally do not recommend setting up SMS authentication here, since authenticator apps are supported, as this weakens the overall security of your account for little benefit.
Stay tuned for parts 2 and 3!
If you have any questions, feel free to PM me.
16 notes
·
View notes
Text
"Uhmm how do I say this... Please don't be mad. I connected to a public wifi days ago and somebody else had access to my account but he couldn't change my password because 2FA was enabled. Then he made fun of my discord account and reported some random people and on servers and that includes you. It is stated here that our accounts could be suspended and our IP addresses could get limited from accessing discord. Could you help me explain to discord staff that the complaints were false? I hope you could help me sort it out because I just realized that its not right to leave it be and it also alerted me that you wouldn't get notified about it, so I messaged you to tell you about it"
If anyone on Discord, especially users you haven't spoken to in a while, sends you such message on DM, you should block the account and write an email on the Discord support website. There is a possible real hacker attack scam going on…
3 notes
·
View notes
Text
Was locked out of this account for a bit due to 2FA not working (not that it caused any noticable disruption, haven't had anything new to post here for a while lol).
I'd recommend y'all go generate your backup codes for 2FA if you use it, or perhaps disable and re-enable it to test that it's working. For me the issue was that I wasn't recieving any text messages so I was just stuck, since you need 2FA to change your password too, there's no way around it. I don't go on this account on mobile so I had no login there either.
Luckily staff were really co-operative with helping me get back in but yeah, heads-up to y'all!
6 notes
·
View notes
Text
How to Recover If Your Facebook Account Is Hacked? Easy Steps
In today's digital age, social media platforms like Facebook have become an integral part of our lives. We use them to connect with friends and family, share our thoughts and experiences, and even conduct business. However, the convenience of social media also comes with security risks, and one of the most common problems users face is having their Facebook account hacked. If you find yourself in this unfortunate situation, it's essential to act quickly to recover your account and secure your personal information.
In this comprehensive guide, we'll walk you through the steps to recover your hacked Facebook account, protect your data, and prevent future breaches.
1. Recognize the Signs of a Hacked Facebook Account
The first step in recovering your hacked Facebook account is to recognize the signs of a compromise. Common indications include:
Unauthorized login notifications: Facebook sends notifications when someone logs into your account from an unfamiliar device or location.
Unusual activity: Strange posts, messages, or friend requests that you didn't initiate.
Changed password or email address: If you can't log in because your password or email address has been changed without your consent, it's a strong indicator of hacking.
Locked out of your account: If you're unable to access your account due to suspicious activity, your account may have been compromised.
2. Immediate Actions to Take
Upon suspecting or confirming a hack, take the following immediate actions:
Change your password: If you can still access your account, change your password immediately. Make it strong by using a combination of upper and lower-case letters, numbers, and symbols.
Log out of other devices: Go to Facebook's Security Settings and log out of all devices to prevent the hacker from continuing to access your account.
Enable two-factor authentication (2FA): Set up 2FA to add an extra layer of security. This usually involves receiving a code on your mobile device that you'll need to enter when logging in.
Check your email account: Ensure that your email account associated with Facebook is secure. Change its password and enable 2FA if you haven't already.
3. Report the Hacked Account to Facebook
To report your hacked account to Facebook, follow these steps:
Go to the Facebook Help Center.
Navigate to the "Security and Login" section.
Click on "I think my account was hacked or someone is using it without my permission."
Follow the on-screen instructions to secure your account and recover it.
4. Recovering Your Hacked Account
Facebook provides a dedicated recovery process for hacked accounts. Follow these steps to recover your account:
Visit the Facebook Account Recovery page.
Enter your email address, phone number, or Facebook username associated with your account.
Follow the instructions to verify your identity. You may be asked to provide a photo ID or answer security questions.
Facebook will guide you through the account recovery process, allowing you to reset your password and secure your account.
5. Check for Unauthorized Activity
Once you regain access to your account, review your activity log for any unauthorized actions, such as posts, messages, or friend requests. Remove any malicious content and unfriend or block suspicious accounts.
6. Strengthen Your Account Security
To prevent future hacks and secure your Facebook account:
Regularly update your password: Change your password at least every six months, and use a unique combination of characters for each platform.
Enable two-factor authentication (2FA): Ensure that 2FA is enabled to provide an extra layer of protection.
Review app permissions: Periodically check which apps have access to your Facebook account and remove any unnecessary ones.
Be cautious with emails and messages: Avoid clicking on suspicious links or providing personal information in response to unsolicited messages.
Educate yourself: Stay informed about common hacking techniques and scams to protect yourself better.
6. Monitor Your Account
Continuously monitor your Facebook account for any unusual activity. Facebook offers features like login alerts, which notify you of any login attempts from unrecognized devices or locations. Stay vigilant and report any suspicious activity promptly.
7. Protect Your Personal Information
Remember that hackers target personal information. Limit the amount of personal data you share on your profile, such as your phone number, address, and birthdate. Adjust your privacy settings to control who can see your posts and personal information.
Conclusion
Recovering a hacked Facebook account can be a stressful experience, but by taking swift and informed action, you can regain control of your profile and protect your data. Follow the steps outlined in this comprehensive guide, and remember to prioritize account security by regularly updating your password, enabling two-factor authentication, and staying vigilant against potential threats. With these precautions in place, you can enjoy the benefits of social media while keeping your personal information safe from hackers.
For More Information - https://www.linkedin.com/pulse/how-recover-your-facebook-account-hacked-neha-kumari
More Articles -
1 note
·
View note
Text
Tiranga Colour Prediction Login: A Comprehensive Guide
In the digital era, online games and prediction platforms have become increasingly popular, offering users both entertainment and the possibility of earning rewards. One such platform that has caught the attention of many is the Tiranga Colour Prediction game. This unique game combines the thrill of prediction with a simple and engaging user interface, making it accessible to a broad audience. Whether you're new to Tiranga Colour Prediction or a seasoned player, understanding the login process and the platform's features is essential for a smooth experience. In this blog post, we'll dive deep into everything you need to know about the Tiranga Colour Prediction login process, including key features, tips for secure access, and troubleshooting common issues.

Understanding Tiranga Colour Prediction
Before delving into the login process, it's crucial to understand what the Tiranga Colour Prediction game is all about. This platform allows users to predict the outcome of various color combinations, adding an element of strategy and excitement to the game. The game's simplicity makes it appealing to a wide range of users, from casual players to those looking to refine their prediction skills.
Tiranga Colour Prediction operates on a basic premise: users are presented with different color options, and they must predict the color that will be selected in the next round. The game is usually fast-paced, with multiple rounds occurring within a short period. Each correct prediction can lead to rewards, making it not just an entertaining game but also a potential way to earn some extra cash.
The platform is designed with user-friendliness in mind, featuring a straightforward interface that even beginners can navigate with ease. However, before you can start playing and predicting colors, you'll need to go through the Tiranga Colour Prediction login process, which we'll cover in detail in the next section.
The Tiranga Colour Prediction Login Process
The Tiranga Colour Prediction login process is your gateway to accessing all the features and functionalities of the platform. Whether you're accessing the game on your smartphone, tablet, or computer, the steps are generally the same, ensuring a consistent user experience across all devices.
1. Creating an Account
Before you can log in, you'll need to create an account if you haven't already done so. The registration process typically involves providing basic information such as your name, email address, and phone number. Some platforms may also require you to create a unique username and password. It's important to choose a strong password to ensure the security of your account.
Once you've filled in all the required fields, you'll likely need to verify your email address or phone number. This step is crucial as it confirms your identity and prevents unauthorized access to your account. After verification, your account will be ready to use, and you can proceed to the login process.
2. Logging In
To log in to the Tiranga Colour Prediction platform, follow these steps:
Step 1: Visit the official website or open the mobile app.
Step 2: Locate the login button, usually found at the top right corner of the homepage.
Step 3: Enter your registered email address or username and password in the provided fields.
Step 4: Click the "Login" button to access your account.
If you've entered the correct credentials, you'll be redirected to your dashboard, where you can start playing the Tiranga Colour Prediction game.
3. Two-Factor Authentication
For added security, some platforms offer two-factor authentication (2FA) during the Tiranga Colour Prediction login process. This feature requires you to enter a verification code sent to your mobile device or email, in addition to your password. Enabling 2FA provides an extra layer of protection, ensuring that only you can access your account.
Key Features of the Tiranga Colour Prediction Platform
Once you've successfully logged in, you'll have access to a variety of features designed to enhance your gaming experience. Understanding these features will allow you to make the most of your time on the platform.
1. User Dashboard
The user dashboard is the central hub where you can access all the features of the Tiranga Colour Prediction platform. From the dashboard, you can view your account balance, track your prediction history, and manage your account settings. The intuitive layout makes it easy to navigate and find the information you need.
2. Prediction History
One of the most useful features available after the Tiranga Colour Prediction login is the prediction history. This section allows you to view your past predictions, including the colors you selected, the outcomes, and the rewards earned. Reviewing your prediction history can help you identify patterns and refine your strategy for future games.
3. Live Prediction Updates
The platform offers live updates during each round of the Tiranga Colour Prediction game. These updates show the current color selection process, allowing you to see the outcome in real-time. This feature adds to the excitement of the game, as you can watch the results unfold instantly.
4. Reward System
Tiranga Colour Prediction offers a reward system that incentivizes correct predictions. The more accurate your predictions, the more rewards you can earn. These rewards can often be redeemed for cash or other prizes, depending on the platform's policies. Understanding the reward system is key to maximizing your earnings while enjoying the game.
Troubleshooting Common Login Issues
While the Tiranga Colour Prediction login process is generally straightforward, users may occasionally encounter issues that prevent them from accessing their accounts. Below are some common problems and solutions to help you troubleshoot and resolve these issues quickly.
1. Forgotten Password
Forgetting your password is a common issue that can prevent you from logging in. If you find yourself in this situation, don't worry—most platforms offer a simple password recovery process. Here's how to reset your password:
Step 1: Click on the "Forgot Password" link on the login page.
Step 2: Enter your registered email address or phone number.
Step 3: Follow the instructions sent to your email or phone to reset your password.
Once you've successfully reset your password, you can log in using the new credentials.
2. Account Lockout
If you enter incorrect login details multiple times, your account may be temporarily locked for security reasons. In such cases, it's best to wait for a few minutes before attempting to log in again. If the problem persists, contact the platform's customer support for assistance.
3. Technical Glitches
Sometimes, technical issues on the platform's end can prevent you from logging in. If you encounter a technical glitch, try refreshing the page or restarting the app. If the problem continues, check the platform's official social media channels or website for any announcements regarding ongoing maintenance or technical difficulties.
Tips for a Secure Tiranga Colour Prediction Login
Security is paramount when accessing online platforms, and the Tiranga Colour Prediction game is no exception. Following these tips will help you maintain the security of your account and protect your personal information.
1. Use a Strong Password
A strong password is your first line of defense against unauthorized access. Avoid using easily guessable passwords, such as "123456" or "password." Instead, create a complex password that includes a combination of letters, numbers, and special characters.
2. Enable Two-Factor Authentication
As mentioned earlier, enabling two-factor authentication adds an extra layer of security to your account. This feature requires you to enter a verification code in addition to your password, making it more difficult for hackers to gain access.
3. Avoid Public Wi-Fi
Logging in to the Tiranga Colour Prediction platform over a public Wi-Fi network can expose your account to security risks. Public Wi-Fi networks are often less secure than private connections, making it easier for hackers to intercept your data. Whenever possible, use a secure, private connection when accessing your account.
4. Log Out After Each Session
If you're using a shared or public device to access the Tiranga Colour Prediction platform, make sure to log out after each session. This simple step can prevent others from accessing your account without your permission.
Conclusion
The Tiranga Colour Prediction login process is a crucial step in accessing the exciting world of color prediction games. By following the steps outlined in this guide, you can ensure a smooth and secure login experience, allowing you to focus on enjoying the game and improving your prediction skills. Whether you're a newcomer or a seasoned player, understanding the login process, platform features, and security tips will enhance your overall experience on the Tiranga Colour Prediction platform.
If you found this guide helpful or have any questions, feel free to leave a comment below. We'd love to hear your thoughts and help you with any additional information you may need. Happy predicting!
0 notes
Text

Eric Albuja's 5 Tips for Staying Safe Online While Traveling
Traveling opens up new experiences and opportunities, but it also exposes you to online risks. Whether you're booking accommodations, checking emails, or sharing updates on social media, staying safe online while traveling is crucial. Eric Albuja, a travel expert from Roanoke, TX, shares five essential tips to help you protect your digital security on the go.
1. Use a VPN for Secure Connections
Public Wi-Fi networks are convenient but often insecure, making them a target for hackers. Eric Albuja Roanoke Tx recommends using a Virtual Private Network (VPN) whenever you connect to public Wi-Fi. A VPN encrypts your internet traffic, making it difficult for cybercriminals to intercept your data. By using a VPN, you can safely browse the web, access your accounts, and protect your personal information, even on unsecured networks.
2. Keep Your Devices Updated
One of the simplest yet most effective ways to protect your online security is to keep your devices updated. Eric advises regularly updating your smartphone, tablet, and laptop with the latest software and security patches. These updates often include fixes for vulnerabilities that could be exploited by hackers. By keeping your devices up-to-date, you reduce the risk of cyberattacks and ensure your data remains secure.
3. Be Cautious with Public Wi-Fi
While public Wi-Fi is convenient, it's essential to be cautious when using it. Eric suggests avoiding online banking, shopping, or accessing sensitive accounts on public networks. If you must use public Wi-Fi, consider connecting through your VPN and limiting your activities to less sensitive tasks. This precaution helps reduce the risk of having your personal information stolen.
4. Enable Two-Factor Authentication
Two-factor authentication (2FA) adds an extra layer of security to your online accounts. Eric recommends enabling 2FA on your essential accounts, such as email, social media, and banking. With 2FA, even if someone gains access to your password, they won't be able to log in without the second form of verification, usually a code sent to your phone. This additional step can help keep your accounts secure while traveling.
5. Back Up Your Data Regularly
Losing your device or having it stolen while traveling can be a nightmare, especially if you haven't backed up your data. Eric Albuja Dallas Tx emphasizes the importance of regularly backing up your important files, photos, and documents to a secure cloud service or external hard drive. In the event of loss or theft, you can restore your data and avoid losing valuable information.
Conclusion
By following these five tips from Eric Albuja, you can enjoy your travels with peace of mind, knowing that your online security is protected. Staying safe online is just as important as physical safety, and these precautions will help ensure that your digital life remains secure while you're on the go.
0 notes
Text
How Do I Remove Activation Lock If I Forgot My Apple ID?
The Activation Lock is a security feature built into Apple devices such as iPhones, iPads, and Macs. It ties your device to your Apple ID, helping prevent unauthorized access or theft. However, it can become an issue when you forget your Apple ID or password, as you will need that information to disable the Activation Lock. This article will explain various methods to remove the Activation Lock if you've forgotten your Apple ID, including the role of iforgot.apple.com.
Understanding Activation Lock
Before delving into the solutions, it's essential to understand what the Activation Lock is and why Apple implements it. Activation Lock is part of the Find My feature, which allows users to locate their Apple devices if lost or stolen. Once the feature is enabled, the device is locked to your Apple ID. If someone attempts to reset or reactivate the device, they will need to enter the Apple ID and password linked to it.
This feature is a powerful deterrent against theft because it makes the device virtually unusable without the correct credentials. However, it can also present a challenge if you forget your Apple ID and need to regain access to your device.
Common Reasons for Forgetting Your Apple ID
You may find yourself locked out of your Apple device due to Activation Lock for several reasons:
You haven't used your Apple ID for a long time and have forgotten the email address or password.
You've recently changed your Apple ID or password but didn't update the information on all your devices.
You’ve inherited a used device from a friend or family member but don’t have access to their Apple ID.
No matter the reason, there are solutions to help you remove the Activation Lock.
Method 1: Recovering Your Apple ID with iForgot.apple.com
If you've forgotten your Apple ID, the first and most straightforward approach is to recover it using Apple's dedicated recovery site: iForgot.apple.com. Follow these steps to recover your Apple ID and password:
Step 1: Visit iForgot.apple.com
Go to the website iForgot.apple.com from any web browser on a computer, smartphone, or tablet.
Step 2: Enter Your Information
Once you're on the site, you’ll be prompted to enter the email address that you believe is associated with your Apple ID. If you can't remember the exact email address, try using any email addresses you may have used with Apple services.
Step 3: Verify Your Identity
Depending on your settings, you may need to verify your identity using security questions, an email verification code, or two-factor authentication (2FA). Apple will send a confirmation code to your phone or email to ensure that you are the account owner.
Step 4: Reset Your Password
Once your identity is verified, you'll be able to reset your password and regain access to your Apple ID. After resetting your password, enter it on the locked device to disable the Activation Lock.
Step 5: Use the New Credentials to Unlock Your Device
Now that you’ve recovered your Apple ID and password, you can use these credentials to remove the Activation Lock from your device. When prompted, enter your Apple ID and the new password. The lock should be removed, and you will regain access to your device.
Method 2: Using Account Recovery for Two-Factor Authentication
If you have two-factor authentication (2FA) enabled on your Apple ID and can't access your account, you can initiate the recovery process directly from iForgot.apple.com. Follow these steps to recover your Apple ID via account recovery:
Step 1: Begin Recovery on iForgot.apple.com
Visit iForgot.apple.com and enter your Apple ID email address. If you’ve forgotten the Apple ID, follow the steps on the screen to try to recover it.
Step 2: Start the Account Recovery Process
If you are unable to access your Apple ID using 2FA or security questions, you’ll be prompted to start the Account Recovery process. Account Recovery is a slower but secure way of regaining access to your Apple ID when traditional methods fail.
Step 3: Provide a Recovery Contact
During the recovery process, Apple may ask you to provide a contact phone number. This number will be used to send updates on the progress of your recovery request.
Step 4: Wait for Account Recovery to Complete
Once you’ve provided the necessary information, Apple will begin the recovery process. This could take several days, depending on your account’s specific security details. Apple will notify you when your account is ready to be restored.
Step 5: Disable Activation Lock
Once your account recovery is complete and you’ve regained access to your Apple ID, use the credentials to disable the Activation Lock on your device. Enter your Apple ID and the new password, and the device should unlock.
Method 3: Contacting Apple Support
If the previous methods don't work, your next option is to contact Apple Support for assistance. In some cases, especially when the device was purchased second-hand or if you’re the legal owner but can't provide the necessary credentials, Apple Support may be able to assist you in removing the Activation Lock.
Step 1: Gather Proof of Ownership
Before contacting Apple Support, gather proof of ownership for the device. This may include a receipt, invoice, or other documentation showing that you legally own the device.
Step 2: Contact Apple Support
Reach out to Apple Support via the Apple website or visit an Apple Store in person. Explain the situation, including that you’ve forgotten your Apple ID and are locked out of your device due to Activation Lock.
Step 3: Follow Apple’s Instructions
Apple Support will guide you through the steps necessary to unlock your device. Depending on the situation, they may require you to provide proof of ownership or other documentation. If they verify that you are the legal owner, they can help disable the Activation Lock.
Method 4: Unlocking a Device without Apple ID via Third-Party Services
If you’re unable to recover your Apple ID or get help from Apple Support, there are third-party services that claim to remove the Activation Lock without requiring your Apple ID. Be cautious, as many of these services may not be legitimate and could potentially be scams. Additionally, using third-party tools could compromise the security and functionality of your device.
That said, there are some reliable third-party tools that have been reported to help with Activation Lock removal. Popular tools include:
Tenorshare 4MeKey
iMobie AnyUnlock
Dr.Fone – Unlock
These tools require you to connect your device to a computer and follow on-screen instructions. Be sure to research any tool thoroughly before using it, and be aware that such methods may void your warranty or violate Apple's terms of service.
Method 5: Requesting Help from the Previous Owner
If you've acquired a used device that is locked with Activation Lock, you will need the Apple ID and password of the previous owner to unlock it. Follow these steps to request their assistance:
Step 1: Contact the Previous Owner
If you know the previous owner, reach out to them and explain that the device is locked. Ask them to either provide their Apple ID and password temporarily or unlock the device themselves.
Step 2: Ask Them to Remove the Device from iCloud
The previous owner can log into their iCloud account from any device or computer and remove the locked device from their account. Here's how they can do it:
Go to iCloud.com and sign in with their Apple ID.
Click on Find My iPhone.
Select All Devices at the top of the screen.
Choose the device you’re trying to unlock.
Click Remove from Account.
This will remove the Activation Lock from the device, allowing you to use it with your Apple ID.
Tips for Preventing Future Lockouts
Once you’ve successfully removed the Activation Lock, it’s crucial to take steps to prevent this issue from happening again in the future. Here are some tips:
Use a Password Manager: Store your Apple ID and password in a secure password manager to avoid forgetting it in the future.
Enable Two-Factor Authentication: Ensure your account is protected with two-factor authentication, which can make it easier to recover your account if you forget your password.
Keep Your Contact Information Updated: Make sure the email address and phone number associated with your Apple ID are always up to date.
Regularly Backup Your Device: Regular backups can help you avoid data loss if you need to reset or recover your device.
Conclusion
Forgetting your Apple ID and being locked out of your device due to Activation Lock can be a stressful experience, but it’s not insurmountable. By utilizing tools such as iforgot.apple.com to recover your Apple ID, contacting Apple Support, or seeking assistance from the previous owner, you can regain access to your device. Always take preventive measures to keep your Apple ID credentials secure to avoid future lockouts.
0 notes
Text
How to Cash Out from Coinbase: A Comprehensive Guide
In today's digital age, cryptocurrencies have become increasingly popular as a means of investment and financial transactions. Among the various platforms available, Coinbase stands out as one of the leading cryptocurrency exchanges, providing users with a secure and user-friendly interface for buying, selling, and storing digital assets. However, for many individuals, the process of cashing out from Coinbase can seem daunting. Fear not, as we present to you a comprehensive guide on how to navigate the intricacies of cashing out from Coinbase to maximize your returns.

Understanding Coinbase
Before delving into the cash-out process, it is essential to understand the fundamentals of Coinbase. Founded in 2012, Coinbase has emerged as a trusted platform for both novice and experienced cryptocurrency enthusiasts. With its intuitive interface and robust security measures, Coinbase has garnered a large user base, making it a preferred choice for buying, selling, and storing various cryptocurrencies, including Bitcoin, Ethereum, Litecoin, and more.
Creating Your Coinbase Account
The first step towards cashing out from Coinbase is to create an account if you haven't already done so. Simply visit the Coinbase website or download the mobile app, and follow the easy sign-up process. You'll be required to provide some basic information and verify your identity to comply with regulatory requirements.
Verifying Your Identity
As part of Coinbase's commitment to security and regulatory compliance, users are required to verify their identity before engaging in certain transactions, including cashing out. This typically involves uploading a government-issued ID, such as a driver's license or passport, and completing a few additional steps for identity verification.
Securing Your Account
Once your account is set up and verified, it's crucial to take proactive steps to secure your Coinbase account. This includes enabling two-factor authentication (2FA), using a strong and unique password, and regularly monitoring your account for any suspicious activity. By taking these precautions, you can safeguard your funds and personal information from unauthorized access.
Cashing Out from Coinbase
Now that your Coinbase account is set up and secure, it's time to explore the various options for cashing out your cryptocurrency holdings. Coinbase offers several withdrawal methods, including bank transfers, PayPal, and cryptocurrency transfers to external wallets.
Bank Transfers
One of the most common methods for cash out from Coinbase is to initiate a bank transfer. To do this, navigate to the "Withdraw" or "Sell" section of your Coinbase account, select the desired cryptocurrency you wish to cash out, and choose the option to withdraw funds to your linked bank account. Follow the prompts to enter the withdrawal amount and complete the transaction.
PayPal
For users looking for a convenient and speedy cash-out option, Coinbase also offers the ability to withdraw funds to a PayPal account. Simply link your PayPal account to your Coinbase account, select the cryptocurrency you wish to withdraw, and choose the option to withdraw to PayPal. Enter the withdrawal amount and confirm the transaction to initiate the transfer.
Cryptocurrency Transfers
Alternatively, if you prefer to maintain full control over your cryptocurrency holdings, you can transfer your funds from Coinbase to an external wallet. This allows you to store your digital assets securely offline and access them whenever you choose. To initiate a cryptocurrency transfer, simply navigate to the "Send" or "Transfer" section of your Coinbase account, enter the recipient's wallet address, specify the amount to transfer, and confirm the transaction.
Tax Implications
It's important to note that withdrawal money from Coinbase may have tax implications depending on your country of residence and the applicable tax laws. In many jurisdictions, cryptocurrency transactions are subject to capital gains tax, and it's essential to report any gains or losses accurately to avoid potential penalties. Consult with a tax professional or accountant for personalized advice on how cashing out from Coinbase may impact your tax situation.
Conclusion
In conclusion, withdrawaling money from Coinbase can be a straightforward process when approached with the right knowledge and preparation. By understanding the fundamentals of Coinbase, securing your account, and exploring the various cash-out options available, you can maximize your returns and achieve your financial goals. Remember to stay informed about any tax implications and seek professional advice if needed. With these tips in mind, you'll be well-equipped to navigate the world of cryptocurrency and make the most of your investments.
0 notes
Text
Streamlining the Process: Tips for Quick Bitcoin Verification on Cash App
Cash App has become a popular platform for Bitcoin transactions, offering a user-friendly interface and convenient features. However, to fully access the benefits of Bitcoin on Cash App, users need to complete the verification process. In this blog, we'll guide you through the step-by-step process on how to verify bitcoin on Cash App, ensuring a secure and seamless experience.

Before we delve into the process, let's understand the importance of Bitcoin verification on the Cash App. Verification is a crucial security measure that helps prevent fraud and unauthorised access and ensures the safety of your Bitcoin transactions. By complying with Know Your Customer (KYC) regulations, Cash App aims to protect users and the platform from potential risks.
Step-by-Step Guide to Bitcoin Verification on Cash App
Create a Cash App Account: If you haven't already, download the Cash App from the app store and sign up using your phone number or email address.
Link a Payment Method: To buy Bitcoin, link your debit card, credit card, or bank account to your Cash App account.
Navigate to the Bitcoin Section: Access the Cash App dashboard and find the Bitcoin section. Click "Buy" or "Sell" to initiate the verification process.
Verify Your Identity: Cash App will prompt you to provide personal information, including your full name, date of birth, and Social Security Number (SSN). This information is necessary to comply with KYC regulations.
Submit Identification Documents: Cash App may require you to submit a photo of your government-issued ID, such as a driver's licence or passport, to verify your identity further. Ensure the photo is clear and legible before uploading.
Wait for Verification: Cash App will review and verify your account once you've submitted your information and documents. Verification times may vary, but the process is typically completed within a few hours to a few days.
Tips for Smooth Verification
Double-check all the details you enter during the Cash App bitcoin verification process to avoid any delays caused by errors.
Ensure that the identification document you submit is valid and not expired.
While verification times may vary, remain patient. Cash App prioritises security and thorough verification to protect users.
Conclusion:
Completing bitcoin verification on Cash App is a necessary step to fully utilize the platform's features and ensure the security of your transactions. You can easily complete the verification process by providing accurate information and following the step-by-step guide. Remember to priorities security by enabling 2FA and keeping your app updated. With a verified Cash App account, you can confidently explore the world of Bitcoin and enjoy a seamless digital currency experience.
#Cash App Bitcoin Verification#Cash App Bitcoin Verification pending#Cash App Bitcoin Verification failed#Cash App Bitcoin Verification denied#how to verify bitcoin on cash app#how to get bitcoin verified on cash app#how to enable Bitcoin verification on the Cash App
0 notes
Text

How To Recover a Hacked Instagram Account-
If your Instagram account has been hacked, there are several steps you can take to recover it. Here's a guide to help you:
Attempt to log in: First, try logging into your Instagram account using your username and password. If the hacker has changed your password, proceed to the next steps.
Use the "Forgot Password" feature: On the login screen, click on the "Forgot password?" link. This will take you to a password recovery page.
Recover using email or phone number: Instagram will ask you to enter the email address or phone number associated with your account. Provide the required information, and if it matches the details in your account, you'll receive a password reset link or code.
Change your password: Follow the instructions sent to your email or phone to reset your Instagram password. Choose a strong, unique password that you haven't used elsewhere. Make sure it contains a combination of letters, numbers, and symbols.
Enable two-factor authentication (2FA): After regaining access to your account, enable two-factor authentication for an extra layer of security. This feature requires a verification code, usually sent to your phone, in addition to your password when logging in.
Review your account settings: Check your Instagram settings to ensure that your email address, phone number, and associated accounts (such as Facebook) haven't been changed or linked to unfamiliar ones.
Remove suspicious applications: If you've given third-party applications access to your Instagram account, revoke their access immediately. Visit your Instagram settings and navigate to "Apps and Websites" to review and remove any suspicious or unrecognized apps.
Report the hack to Instagram: Inform Instagram about the hack through their Help Centre. Go to the app's settings, tap on "Help," and then select "Report a Problem." Explain the situation and provide any relevant details to assist in the investigation.
Be cautious with future security: Strengthen your overall online security by using unique and complex passwords for each of your accounts, enabling two-factor authentication whenever possible, and being mindful of phishing attempts and suspicious links.
Remember, it's essential to act swiftly when your account has been hacked to minimize potential damage. Following these steps should help you hack a instagram and secure it against future compromises.
#InstagramSafety#hackananstagrampassword#hackainstagram#hackig#phonehackingservice#phonehacker#hackwhatsappaccount#whatsappnumberhack#facebookhacker#facebookaccounthackedrecovery#socialmediahackers#socialmediahack#emailhack#ethicalhackerforhire#ethicalhacker#findahacker#contactahacker#paidhacker#professionalhacker#hackerforhire#hackservice
0 notes
Text
Just to give all of you on tumblr some context to what's going on...
yesterday, i posted this on twitter:

the initial tweet, i just kind of posted without thinking about it. about half an hour later, i noticed it had a ton of retweets apparently, and i was like huh what that's weird, why is that. turns out they were all quote retweets from taylor swift stans trying to ratio me. so i posted that reply, also not really thinking too hard about it.
for the record i have less than 500 twitter followers, i don't exactly have a massive audience, i was literally just minding my own business when these obsessive weirdos found me just from namesearching and decided to make it their personal crusade to ruin my day.
anyway they were very mad that i called her racist. they found out that i am white and latched onto that, saying that i was being performative and etc etc. and saying that taylor swift is an angel who can do no wrong.
unfortunately, i made the mistake of engaging with these freaks, and that just made shit worse. they started coming after any mutuals or friends who would reply to my posts, and i checked my email later while out getting meds from the pharmacy and noticed my twitter had several password reset requests!

the swifties were SO mad that they were trying to hack into my fucking twitter account lmao
i rightfully mocked this pitiful attempt and well. the vitriol just kept pouring in. it got to a point where all of them were telling me to "get a job", and mocking the fact that i'm a mid-20s adult who enjoys minecraft. some of them started calling me ugly, i got DMs from people calling me transphobic slurs, etc etc etc. anyway you get the idea. i woke up this morning and discovered some of them were even quote retweeting my selfies calling me ugly. and these people all have their pronouns listed in their bio and they think this is acceptable behavior, to harass a trans woman and call her ugly and say she looks like a man etc.
anyway i think you get the idea at this point. i must apologize for not being diplomatic/mature about this sooner, i shouldve just blocked and not engaged from the beginning, and i am really sorry to anybody else who i dragged into this. but yeah that was my very bad no good twitter day. thanks 4 reading
#vivi bleats#txt#transmisogyny#if any of you came to my defense on twitter i highly recommend you put your account on priv as well#and enable 2fa if you haven't#sorry again for getting you involved
73 notes
·
View notes
Text
Just saw this in a server I'm a part of. Figured others should be aware. Keep safe.

:image ID:
Good afternoon! @everyone
Recently, we have had multiple reports of a new phishing scheme floating around. fishing_pole_and_fish
These phishing schemes are different than the links we have warned those against in the past. This phishing scheme takes place through DM's (Direct Messages) in which someone who you may have messaged at some point sends you the message attached in the image below. The message is intended to be a "call to action", as it invokes fear in the person messaged that they are in some sort of trouble. Rest assured, if you receive this message, you are NOT in any trouble and this was just a way to provoke you to join the Discord.
Once you have joined the server, it will require you to "verify" your account by scanning a QR Code. Never scan a QR Code as a form of verification. This QR Code is used to log in to your account, similar to the option provided to you if you want to log in on a PC/Laptop by scanning the QR Code it presents with your cell phone. This is how the phishing scam takes over your account and compromises your account. Here's what you can do!
safety_vest Account Safety - Let's keep it safe!
→ DO NOT click any links or server invites you do not recognize and from people you do not know!
→ Enable Two-Factor Authentication (2FA) - Instructions can be found here: https://support.discord.com/hc/en-us/articles/219576828-Setting-up-Two-Factor-Authentication
warning *Already clicked the link?
→ Change your password.
→ Enable 2FA - If you haven't already!
→ Contact Discord Support - https://support.discord.com/
Make sure to send the following information:
→ Screenshot of the link that was sent to you.
→ The user's Username and Discord ID.
Don't know how to find their Discord ID? Check out this link - https://support.discord.com/hc/en-us/articles/206346498-Where-can-I-find-my-User-Server-Message-ID-
1 note
·
View note
Last Seen Blogs

spock-o-clock
I've become a Dan and Phil blog I'm sorry

markkramm
Dreamers!

spitballingfireandtears
Ur Mum

katescribblesabit
YIPPEE

spiiicyslooopes
spiiicyslooopes