#also the very first link at the start is my drive folder where you'll find these + like 20 others i havent read
Explore tagged Tumblr posts
Text
The free week for the first act of Remnants of The Past has ended!
Starting today, you'll have the demo available, which covers up to Chapter 4, and purchasing options have been added both on Itch.io and Patreon.
For Itch.io, simply donate the specified amount and you'll have the files available for download. This is linked to your account, so you'll automatically have access to any future updates that may come.
In case you can't (or don't want to) purchase it through Itch.io, I've created a new tier on Patreon that will give you access to the post where you'll find the link to download the files, which also include the rewards of previous tiers. This link will take you to a Google Drive folder, so you'll need to sign in with your Google account if you haven't already. Why a Google Drive folder instead of a direct download link? For one simple reason, and it’s so you'll always have access to updates automatically, without needing to request a new download link and without me having to manually contact each of you to share them. Every time the folder is updated, you'll just need to refresh it and the updated files will appear.
Important note! The game is only available for PC/Mac and Android. I don't have any Apple devices to create an app for iOS. And one last thing to have in mind, I've spent the week trying to fix an issue with the APK, which is that the audio isn't working. I'll let you know if I find the solution, but for now, those who want to play it on mobile will have to do so without music. If anyone has any idea what the problem might be, I'd greatly appreciate the help! My knowledge of programming is very limited xD
I know I'm repeating myself more than a stutterer's echo, but truly, from the bottom of my heart, thank you so much to everyone for the incredible support! It fills me with happiness to know that you're enjoying this story as much as I am making it! Let's hope it won't be long until I can start with Act 2! Have a great day, everyone <3
17 notes
·
View notes
Note
Your non fiction book posts are always so sexy!! Do you have any recommendations for some preferably by South Asian writers?
Omg thank you! Honestly I rarely ever read nonfiction much less by south asian writers but here's some I've read or have in my tbr + other nonfiction I've loved:
My Seditious Heart: Collected Nonfiction, Arundhati Roy
Remnants of a Separation: A History of the Partition through Material Memory, Aanchal Malhotra
The Emperor of All Maladies: A Biography of Cancer, Siddhartha Mukherjee
Incarnations: India in 50 Lives, Sunil Khilnani
In an Antique Land, Amitav Ghosh
City of Djinns: A Year In Delhi*, William Dalrymple
The Fall of Language in the Age of English, Minae Mizumura tr. Julia Winters Carpenter & Mari Yoshihara
Say Nothing: A True Story of Murder and Memory in Northern Ireland, Patrick Radden Keefe
Still Life with Oysters and Lemons: On Objects and Intimacy*, Mark Doty
Pictures and Tears: A History of People Who Have Cried in Front of Paintings, James Elkins
A Field Guide to Getting Lost*, Rebecca Solnit
Dangerous Beauty: Medusa in Classical Art, Kiki Karoglou
Nonrequired Reading: Prose Pieces, Wislawa Szymborska tr. Clare Cavanagh
In Praise of Shadows, Junichir Tanizaki tr. Thomas J. Harper and Edward G. Seidensticker
The Lonely City, Olivia Laing
#compiling this made me realise how little non fic i read 😭#these are books I've read last year + in 2020#also the very first link at the start is my drive folder where you'll find these + like 20 others i havent read#ref#ref: mine#book recs#mine
257 notes
·
View notes
Text
Wench's Beginner CP77 Photomode + Posing Tutorial
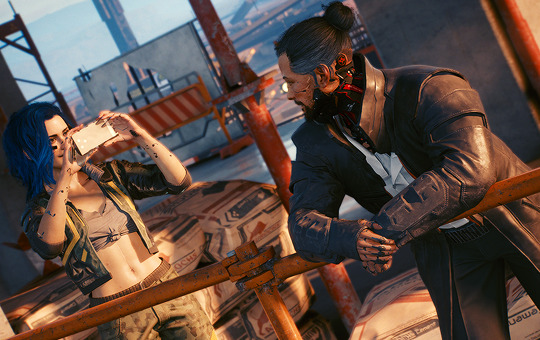
As a relative newcomer to the fandom, I found it kind of difficult to track down precise information on how folks were creating really intricate and beautifully staged screenshots. I realized that my experience might be useful for anyone else just starting on this journey, so here's sort of a Cyberpunk 2077 Photomode + Mods 101 guide for anyone at an absolute loss as to where to start.
This is only going to focus on the basics of using in-game mods and tools for posing and staging, not editing/post-processing or how to get those really high fidelity screenshots. The section on AMM is also intended for those who are brand new to it, so I did omit a few things that I think would be better for a more advanced user.
(Also, since my personal focus tends to be on shippy pics, that's what I use for a lot of examples. Nothing is explicit, but they might be a tad bit spicy for some workplace settings.)
Reblogs have been disabled for this post as it is very out of date. Please refer to the version 2.0 links for the most recent info.
I. Where to Find Mods II. Essentials & Recommendations i. Essential Mods ii. Recommended Mods iii. Posing & Animation Mods iv. Cosmetic Mods v. Niche Mods (aka Goro Takemura Mods) vi. Notable Extras III. Using Appearance Mod Menu (AMM) i. Recommended AMM Settings ii. AMM Features Breakdown IV. Beginner Tips & Tricks
>>>>>>> 4 March 2022 - Version 2.0 is live! <<<<<<<
Reblogs have been disabled for this post as it is very out of date. Please refer to the version 2.0 links for the most recent info.
4 March 2022 - Version 2.0 is live!
I. Where to Find Mods
Unfortunately, mods are kind of spread out all over the place. The Nexus and these two Discord servers are usually the first places I go when I'm looking for something specific, but a lot of modders also house their mods on personal Google Drive folders and MEGA. • Cyberpunk 2077 Nexus • Cyberpunk 2077 Modding Discord • Cyberpunk 2077 Appearance Mod Menu Discord • My CP77 Mod Tag • The Great Big (Vaguely Overwhelming) Pose & Animation Spreadsheet ← This is the best resource to track down poses!
(If you're like me and find Discord chaotic and ill-suited for cataloging things, I highly recommend utilizing the search feature. You can use the in: preface to narrow down the channel you want to search; e.g. a search command in the CP77 Modding Discord could look like in: discord-exclusives hair and you'll get results for "hair" listed in the discord-exclusive channel.)
II. Essentials & Recommendations
i. Essential ModsThese are the bare minimum that you'll need to spawn or swap characters, add in items (like the phone in the header screenshot), and play with lighting tools. CET should be installed first, and then AMM. (If you keep your game updated, make sure you keep these updated, too!) • Cyber Engine Tweaks (CET) • Appearance Mod Menu (AMM)
ii. Recommended Mods These are more of your quality-of-life type add-ons. They aren't needed for posing or spawning, but they're very useful: • Cybercat Save Editor (you can do a lot with this tool, but I mainly use it when I want to change my V's hair or makeup) • Wardrobe Outfit Manager (also useful for a lot of things, but my favorite feature is being able to change clothes while I'm in photomode)
iii. Posing & Animation Mods As I mentioned above, the best, most comprehensive, all-in-one place to find all your posing mods will be the Google spreadsheet linked above. But if that's too much (and it is a lot), these are the two posing mods I cut my teeth on: • If It Fits - V Sits (photomode poses for V) • (POSES) Male NPC - Average Civilian (spawnable poses for male NPCs with the generic locomotion; see note on locomotions under v. Niche Mods below)
iv. Cosmetic Mods This is not a comprehensive list of all the mods I use, but just a handful of my favorites to get you started. (Since I play as a female V, these are femV-centric.) → Hair • Hairstyle Collection• Custom Hairstyle - Femme Fatale• Hairstyle Imports
→ Makeup • Koralina's New Eye Makeup• Eyeshadow Overhaul
→ Clothing • Clothing Set and Recolor Catalogue• Wingdeer's Clothing
v. Niche Mods (aka Goro Takemura Mods) Since I primarily take screenshots of V and Goro, here are a few Goro-centric mods and places to find them. 😘 • Wingdeer's Clothes for Goro • Wingdeer's Locomotion Mods [Note: because most NPC poses are for the "male average" NPC, locomotion mods are needed for characters with their own movement, like Goro. If you don't have the Goro_GenericLocomotion.archive file in your mod folder, he won't spawn with the intended pose.] • Goro's Brown Eyes • Goro Takemura New Clothes • Takemura Simps & Friends Discord
vi. Notable Extras Otis_Inf Injectable Camera is a paid (via Patreon) tool that is especially useful in capturing hi-resolution screenshots and unlocking cutscenes. At one point, it was also the only way to add ambient lights into the game, but AMM now offers that feature. I wouldn't recommend it to beginners, but I feel like I'd be remiss if I didn't mention it, as it is a powerful tool and pretty popular.
There is also Photo Mode Unlocker, which adds more features and functionality to the in-game photomode. I haven't used it so I can't offer much insight here, but like the Injectable Camera, I felt it was worth mentioning.
III. Using Appearance Menu Mod (AMM)
i. Recommended AMM Settings AMM is pretty much plug-and-play, but there are two settings I recommend confirming after you install it.
Click on the Settings tab and then uncheck Spawn as Companion and check Experimental/Fun Stuff. After you check Experimental/Fun Stuff, Enable Freeze Target in Photo Mode will appear. Check that, too.

[Note: Spawn as Companion is actually a really awesome and underrated feature of AMM that lets you have followers in Night City! If you're looking to have some company while you explore and do gigs, check this option. It can be a little glitchy, especially if you fast travel, but it's fun! It really only needs to be turned off if you're working with spawnable NPC poses for photoshoots so your NPCs don't move around everywhere.]
ii. AMM Features Breakdown
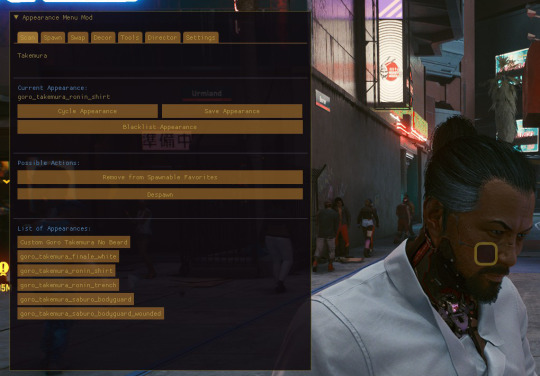
Scan This brings up a scanning reticle and will show you the various options available to you for whatever NPC or object your reticle is on. In this case, I'm scanning Goro, so I can do things like add or remove him from my favorites, despawn him, and cycle through his appearances.
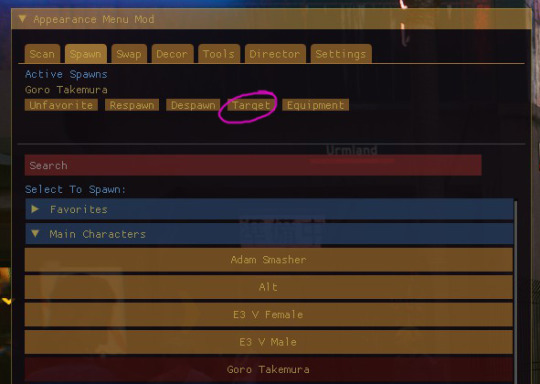
Spawn The Spawn tab is where you can find the huge list of characters you can spawn. It also lists the active spawns you have and gives you a few actions, like favoriting/unfavoriting, respawning, despawning, targeting, and changing their equipment/weapons.
The Target feature here is the most useful when you're trying to maneuver a character around on screen. Clicking this will automatically lock on that character or object so you don't have to manually target them with the reticle.
Spawning NPCs is how most people create their screenshots.
Without any posing mods installed, most NPCs have a few poses you can generate using AMM alone:
1. Their default standing position 2. A crouch position 3. Positions with various weapons 4. If you spawn them as companions, you can freeze them mid-animation cycle as they follow V or engage in combat 5. You can also "kill" them and they'll end up on the ground
However, this is pretty limited, which is why NPC spawnable poses and animation mods have become so popular.
Spawnable poses are named such because when you spawn an NPC, they will spawn with that pose or animation rather than the default standing position. (Some are also made to be toggled with the crouch position, but they're less common.)
Currently, you can only have one NPC spawnable pose/animation per locomotion type, so you'll have to choose one to work with before you launch the game. (If you have more than one in your mod folder, typically nothing severe breaks, you might get a T-pose, but usually whatever pose .archive file is listed first will just be the one that's active.)
Swap The Swap tab will let you scan any NPC and then give you the option to swap them out with another NPC.
Two things to note with this feature: 1. In order for a swap to spawn or despawn, you will have to reload your save. I recommend saving before you swap so you won't have to track your swap down. 2. It can be a little finicky: sometimes poses will break, sometimes NPCs who aren't locked into a location will move, and you can end up with a lot of duplicates in one area.

Decor The Decor tab is very similar to the Spawn tab, but the focus is on objects instead of NPCs.
This is also where you can find the customizable lights, which are one of my favorite tools to use in AMM. It's an easy way to really enhance the look and feel of your screenshots. Here's an example with the Ambient Light:

Tools The Tools tab will vary a bit depending on what object you're locked on and whether or not you're in photomode.
For a beginner, I would say the key features here are:
1. The movement/position information: this is how you can move characters and objects around (you can treat the bars as sliders in which you click and drag, or you can manually enter in coordinates) 2. If you're locked on to an NPC, you can change their facial expression, where they look, and toggle weapons 3. If you're locked on to an NPC, or in some cases, on V, you can also freeze/unfreeze them to hold them in place once they have the best position/facial expression 3. If you're locked on to a customizable light, you can change the positions, intensity, and color of the light 4. You can use the teleport action to jump to different locations in the game (including a fancy mansion for V) 5. You can toggle the time of day (note: this can trigger Relic malfunctions)
Director Unfortunately, I haven't used this feature at all, so I can't really give any insight here. I know it can be used to create live scenes with characters, but since I focus on still screenshots, I haven't really had an incentive to look deeper into it. If I find good documentation for it, I'll add links. 😘
IV. Beginner Tips & Tricks
These aren't intended to be hard-and-fast guidelines for everyone to follow, but just some general suggestions that I think make the modded photomode experience a lot more fun and less overwhelming for anyone just starting.
1. Get comfortable with AMM before adding spawnable poses Spawn your favorite character as-is and get a feel for what they do without any additional mods. Play with the facial expressions in AMM, try freezing and unfreezing them in real-time and photomode, cycle through their appearances, get a feel for how the positioning tools work, toggle the spawn as a companion option, etc.
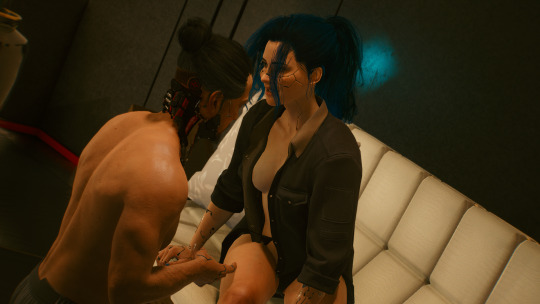
2. Try swapping NPCs before messing around with spawnable poses Some of my favorite ship screenshots came from swapping Goro with existing NPCs, using the default photo mode poses, and using the AMM positioning tools to smoosh and freeze them together just right. It is a little more restrictive than having specific poses right at your disposal, but I think it's also a lot less overwhelming.
I used this technique with a guy sitting on the couch at the entrance of Lizzies to get this one:

If your goal is shippy poses, you can also find a few couple sets around town that you can swap with both your NPC of choice and V. Facial animations will work on both, so you can even change the mood of some presets. This one, for instance, is the "guy helping the drunk chick" swap, but with angry facial expressions and frozen at just the right spot in the animation loop, you can get a whole new vibe:
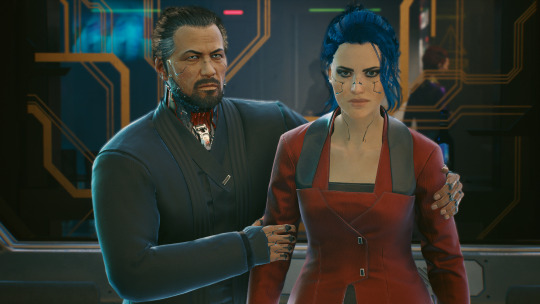
3. Use effective crops and angles to hide awkward clipping Want a character to kneel in front of another character, but don't want to look for a pose or have easily swappable NPC around? Use the AMM positioning tools to clip them through the ground and capture the screenshot from a higher angle. (Goro was basically chopped in half here, but you can't tell!) (More dramatic example here.)
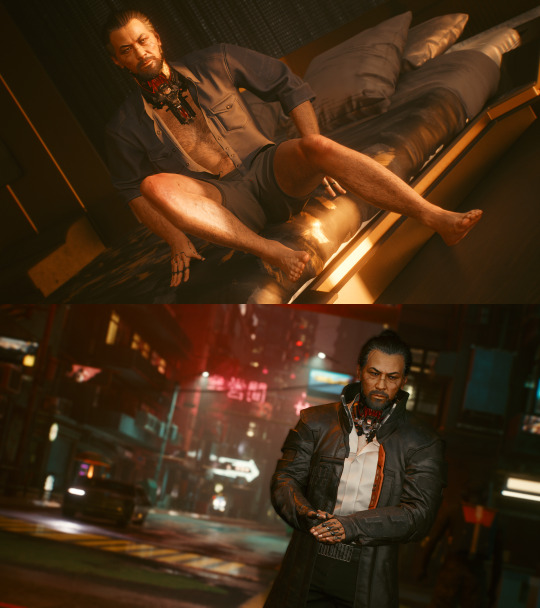
4. Lighting is one of your greatest assets Just like with real-world photography, lighting can make or break a shot. The AMM customizable lights and changing the time of day for outside shoots can really take a screenshot to the next level. The top screenshot was done in the Konpeki hotel room with some golden hour sunlight and the bottom was done with a little ambient light to make Goro visible against the dark street (neither have been edited--these are straight from photomode):
5. Take a ton of shots with just slight variations This is also a tip I'm yoinking from real-world photography: take a ton of shots, but just switch something up slightly each time. Nudge a character in a different direction, switch your field of view, add a tilt, etc. At a certain point, it becomes a numbers game: the more shots you have, the more likely you'll end up with something you really like.
And it's corny as hell, but yes: have fun with it! Taking good screenshots is a creative skill just like photography or drawing or writing--It'll take some time to develop your skillset and style, but as long as you're enjoying the process, it's worth it. 😘
286 notes
·
View notes