#also my computer of 6 years broke at the hinges and i just got a new one
Explore tagged Tumblr posts
Visit Tumblr Blog
Explore Tumblr blogs with no restrictions, modern design and the best experience.
Last Seen Tumblr Blogs


Fun Fact
Average visit duration of Tumblr.com is 10 mins and 25 secs.
Text
creations of 2024
post your favourite and most popular post from each month this year (it’s okay to skip months)
Tagged by @hayden-christensen RIP me i've been on hiatus for 5 months
January Fav: the tragedy of padme amidala Popular: red edit of Anakin Skywalker
February Fav/Popular: wuthering heights x anidala
April Fav: down bad vader/anakin Popular: Hayden Christensen letterboxd
May Fav: this taylor swift x star wars villians edit honorable mention: cal x merrin edit Popular: may the fourth
June fav/popular: a new hope poster gifset
August edgar allen poe x anakin skywalker
tagging: @padmeamidela @padme-amidala @guildfordd @djarin @darcylightninglewis @hegodamask @richardgrimes @singinprincess @cobbbvanth @skywalkcranakin @cal-kestis @calkestis
#year in review#i haven't made a lot of gifsets recently due to irl stuff#also my computer of 6 years broke at the hinges and i just got a new one#y'all 2024 has been THAT bitch#and i'm so tired#but i made a gif yesterday for the first time in 5 months#celebrate the little things
9 notes
·
View notes
Text
Procrastinator's Kitchen Countdown - An Introduction
About 6-7 weeks to go (I hope)
When I came back from studying abroad a few years ago, I moved into a shared flat with a friend of mine. Finding housing in this city is a bit of a hassle, and her former flatmate left a few weeks before I returned, so the arrangement was perfect.
The flat is in the attic of a fairly old "Mehrfamilienhaus", i.e. a house with a number of units big enough for single people or small families. It's fifty steps down to the front door and another seven or so to get into the basement where the washing machine lives (woe is me!).
I like my flat! It was turned from a simple attic into an actual living space somewhat hastily in the 1950's, so the insulation isn't amazing, the doors and windows are fairly old, and it gets really hot in the summer. But it's a decent place to live and it's close to both the university and downtown areas. And because my previous flatmate had lived here for many, many years, the rent had stayed much lower than other places around town, where landlords could increase their ask every time the tenants changed - a frequent occurrence in a city full of students.
Then, four years ago, my friend finished her degree and moved to a different part of the country, which meant I was faced with a decision. I could get a new flatmate (not ideal, since I hate sharing living space with strangers and was really looking forward to living on my own again for a while), or I could try and find a smaller, cheaper place somewhere else in town. However, when I looked around, I realized that my current rent would get me a place about 2/3 the size of my current flat, and to pay less, I would barely get half the space or would have to move to the edges of town. So, I decided to stay and take the rent on myself. After all, it was "just for a short while" and "just until I finished my humanities degree and figured out where I'd go next".
Four years later, I am back in school, studying to get a BSc in computer science, and I'm unlikely to leave town, or even this flat, any time soon.
While I'm glad to have a little more certainty in my life (and finally allowing myself to switch to a career path that actually gives me so, so much joy was easily the best choice I made in the last decade), it also made me realize something: I was no longer in a holding pattern, uncertain whether I would be living in this place for six more months or six more years, and I could start making real plans to make this flat my home.
Which brings me to my kitchen.
My kitchen is pretty small, even by German standards. It's more than the tiny pantry kitchen I had when I first moved out to go to university, but it's still barely big enough to have two people in it at the same time and is nestled under the roof, with the slanted wall coming down to about knee height. The furniture and especially the appliances were already a student-flat-share inheritance when my former flatmate moved in over ten years ago. They got a new fridge when she arrived (the guys living here before had simply hung a bunch of their foods out the window in the winter after their old fridge broke down and apparently had been content with that), but the oven was already worn out at that point. By now, the bottom of the fridge keeps flooding, the sink is starting to leak, and the oven... well.
I have been wanting to bake more cakes and biscuits, and to really try my hand at baking bread for a while. But especially the latter requires you to have fairly good control over your oven's temperature, and for the longest time, my oven door wouldn't even close properly! It took an evening of intense pre-Christmas baking and food-prep to get it hot enough that the warped hinge finally decided to jump back into its original form with an almighty CLANG!, allowing me to close the door without leaving a small gap at the top.
So, about a year and a half ago, once I knew I was going to stay in this flat for the foreseeable future, I started toying with the idea of getting a new kitchen.
For those who don't know, if you rent a flat in Germany, it's maybe 50/50 whether it will come with a kitchen provided by the owner, or you have to bring in your own. Actually, I think having a pre-installed kitchen might be a lot less common than having one, but you can get lucky and buy the previous tenant's kitchen off them for a small fee, which might skew the general perception. Either way, my kitchen is one of the tenant-owned ones.
So, getting new applianves and furniture would fall entirely on my own head (and budget!). This would of course give me a lot of freedom to design it the way I want, but it also means I'll have to figure out what to do with it once I do I move out. I might be able to sell it to the next tenant, or I might even be able to take it with me wherever I move next. But this worry still made it very difficult for me to actually commit to the undertaking - which is one of the main reasons it has taken me until now to get there.
One thing that finally helped sway me was that any time I mentioned possibly getting a new kitchen to people who had actually been in and used the current one (my mother, my sister, my friends), their reaction pretty universally was: "Oh, thank god, finally!!" And as a Christmas/birthday present, my presents promised to chip in financially and help with planning and organizing.
And now, two years after deciding to stay in this flat and well over a year after first opening the IKEA kitchen planner, I Am Finally Doing It!
I have a fairly clear idea of what I want my new kitchen to look like, I have talked to the IKEA kitchen people about logistics and planning, I have created a dedicated section in Notion to keep track of all the cleaning, sorting, ordering, painting, buying, building, etc. I need to do, and I have a rough time frame.
I AM GETTING A NEW KITCHEN!!!
And I'm taking you all along for the ride!
#kitchen countdown#procrastinator's home projects#lili's personal adventures#long post#(this goes in the 'i promised myself not to stress so much about my posts being too long and just Going For It category 😅)#i will try to do some before and after photos at some point and i'm sure there will be floor plans#i am me after all#but it's difficult to get any good angles in the tiny kitchen and it's been a while since i properly scrubbed the floor#so we'll see how long it takes me to get pictures 😅#BUT THIS IS HAPPENING!!!#FINALLY#i am *very* scared and *very* excited!
4 notes
·
View notes
Photo
Clear Sky, 19°C
7 Pacific Hwy, Mooney Mooney NSW 2083, Australia
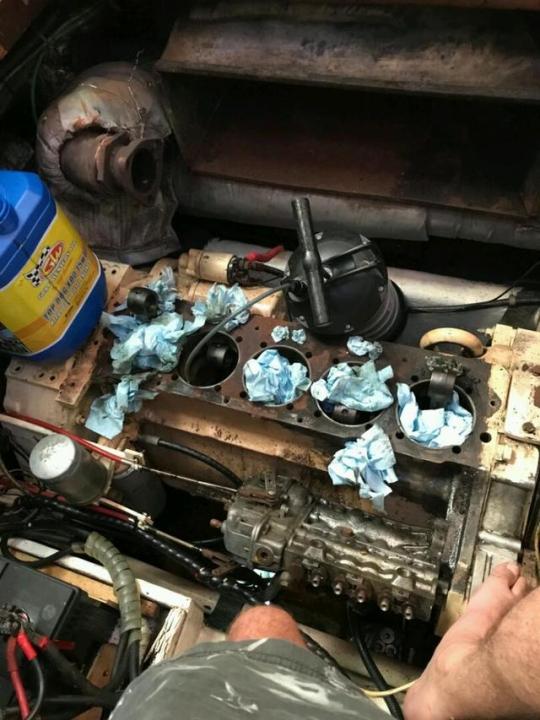
After a considerable amount of time... Stripping down the motor took a lot of effort. What made it particularly tedious was the fact that there was only one spot where you can stand to perform the dismantling operations, on the starboard side engine bearer, just in front of the battery. I used the boarding ramp to span the gap across the top of the motor, which gave me something to lean my upper torso on when performing particularly delicate surgery with the snatch bar, but every operation was tiring, and more than one tool, bolt, nut, washer, screw etc. found its way into the bilge. Fortunately I kept a close eye on what went down there, and recovered everything with the claw tool before I forgot about it. At one stage my best flat head screw driver did the pirouette off the water tank, through the gap in the bulkhead between the two motors, and into the deepest and slimiest part of the bilge. I had to go fishing for it with two magnetic pickup tools taped together in series to reach down that far. Fortunately the magnet on the end was sufficiently powerful that it latched on straight away, and I got the tool back. Particularly galling in these circumstances is the workshop manuals brevity on some operations. "Remove the front side cowling" makes no mention of the fact that there is a bolt on its port side that connects it to the port side cowling with a nut than is inaccessible, similarly the rear side cowling also has a bolt connecting it to the port side cowling with a nut that is inaccessible. And the port side cowling cannot be removed until both inlet and exhaust manifolds have been removed, which cannot be done until the air ducting around the manifolds has been removed, and that operation isn't described. In other examples, simply removing some part doesnt mention the need for a special tool like a socket that has a third of its wall cut away and another socket welded to its side so that it will fit over just one nut that no ordinary tool can get anywhere near. Workshop manuals are fine, up to a point. Slowly but surely I managed to prise off the various cowling and ducts, the fuel lines, belts, the blower, the oil cooler, manifolds, heads, rods and tubes, and finally the barrels. It wasn't until I got the final cylinder barrel off that the problem was revealed. I have to say it was an emotional moment. When I saw the damaged piston and the scoring in the bore, I knew then what I was up for, and I was greatly relieved. If the problem had not been uncovered when I lifted off that last cylinder, then I knew the next step could only be the removal of the entire engine, and that was not something I think I could manage on my own, let alone afford. As I write the heads are waiting to be serviced, and the barrels honed. They have been in the shop for the past month so work on the motor has been halted until I know what parts are needed. I'm suspecting atleast three new pistons and a full set of rings, but I dont know if the #1 cylinder will have to go oversize, and if it does, what that means for the other bores. Pistons alone are over $300, so I'm contemplating a hefty parts bill. Atleast the labour bill won't be so crippling. In the meantime I've drained the motor of oil and given the crankcase a flush with diesel. I am concerned about the amount of grit still sitting in the oil pan which i cannot get to, but I saw a utube last week on flushing engines, and apparently the thing to do is to replace the oil with diesel and run the motor for 5 minutes, and most of this crap should get picked up by the filter, apparently. So I'll give that a go. There is no way of being able to ascertain the state of the crank and bearings. This does worry me, mainly because without knowing where theyre at, I could go to all the trouble of putting the motor back together, only to find myself having to do it all again in short order if theyre bad. I have to console myself with the thought that going to this level of trouble is seriously beyond my capability, and I'm just going to have to trust to luck that they're ok. The piston pins and shells are well within tolerance, so I'm figuring that they should be fine also. Additionally, they get supplied with oil under pressure from the oil pump, and at no stage have I seen the oil pressure cut out completely, so I'm clinging to hope on this one. I had known there was a serious oil leak from the engine, not before the mechanic in Newcastle had pointed it out, but it wasn't entirely obvious where it was coming from. I couldnt see anything dripping off whilst idling on the mooring, so i assumed it had to be a problem only evident whilst under load, and maybe even something to do with running in a heavy sea. Lifting the sole whilst underway at sea has not been an option because it can't be secured, and it's too dangerous anyway, so trying to find the leak hasn't gone much further than looking for evidence of dripping down the sides of the crankcase. One of the fittings for the oil cooler has been leaking (the one that requires the fancy homemade socket tool descibed above) and I'm thinking that this is where all the problems stem from. I wasnt sure at first because there is a cowling over it that directs air from the blower through the cooler and the cylinders, which makes it impossible to see whilst the engine is running, but once I got the blower and the cowlings off it is obvious that this is the source of the leak. So while I'm waiting for the head shop to do their thing I've taken on a few other projects. I stripped down the fresh water pump, because I've been concerned that it hasn't been priming itself, and it hasn't been switching on automatically when the pressure drops from draw down. This has been particularly annoying when your in the shower with a head full of shampoo. Traipsing through the boat leaving wet puddles everywhere, just to cycle the power switch for the pump gets very tedious. With the pump out of the way I get better access to the oily messy that is the front of the motor. I should be able to do a job on it to clean it all up eventually. I've also been looking at connecting up the VHF to a GPS source, so that it can access boat position. This is necessary for the DSC feature to work properly, and was never done when the unit was installed. In addition, I wanted to get a sub connected to the stereo I installed last year. Both of these jobs required access to the space immediately behind the panel at the back of the chart table. I had managed to install the stereo by wiring it through the hole I installed it into, but this was a tedious process, and I figured all along that it would be good if the lid on top could be hinged. I spent a great deal of time trying to work out how the top could be removed, fuguring that it must be screwed on from inside, but i couldnt locate any screws. I bought a USB endoscope to poke inside, but this proved to be far more difficult to use than I had imagined, especially interpreting just what it was looking at, and manipulating it in the required direction for a better view. I found a couple of screws in the liquor cupboard that seemed to be part of the problem, but I still could not get the top off. Eventually I got the shits with it and decided the only way was to implement irresistable force and see what broke. It turned out there were three screws along one side and three dowel joints along the other. I should have been able see all three screws as they were all partially removed, and fortunately there was only a little damage done! I plan not to use hidden screws to put it back together. With top down access to this space I could now solve a couple of mysteries that had baffled me. It turned out that the GPS in the cabin was completely separate to the one in the cockpit, and it was the cockpit GPS that was wired to the Digiboard for the computer on COM5. The cabin GPS turned out to be on COM7, which explained why my computer couldn't "see" it, I didn't know there was a COM7, and I had never thought the cockpit GPS would be wired to the computer, so I had never turned it on whilst I had been playing around. When I added COM7 to the connections for OpenCPN I suddenly had everything working, AIS targets showing up, no more error messages, yada yada. Hooray. Still to figure out is whether I can load a track into the cockpit GPS from the computer, because I think that this might be the one that the autopilot is listening out for. Hooking up the sub hasn't been a success story so far. I've been trying to use the mini molex plugs for power and audio, but haven't had any success finding the 6 pin audio plug. The 4 pin power plug I wired up doesn't seem to want to do the business. Not sure why, but you can bet your house that I've got the wiring wrong and I'll have to go and buy another plug. In the meantime I discovered that the speaker was kaput. The rubber moulding holding the cone in place had rotted, so now I'll have to source a new one. Another project underway is to connect the AIS to the radar so that targets will appear on its display. This requires an NMEA0183 connection between the two, which should be simple, but the greatest failing of this particular standard was to allow manufacturers to implement it as they saw fit. Consequently, it seems no two companies used the same plugs, and as a further consequence, you cannot just buy a cable to connect Furuno equipment to Camino. All cables come with a particular manufacturers plug on one end and bare wires on the other. It's a good thing thing I've got a soldering iron on board (and a spare, and a backup to the spare).
Powered by Journey Diary.
0 notes