#also ignore the quality difference please i can only do so much with my '''''1080p''''' tkk1 version 😩
Explore tagged Tumblr posts
Text

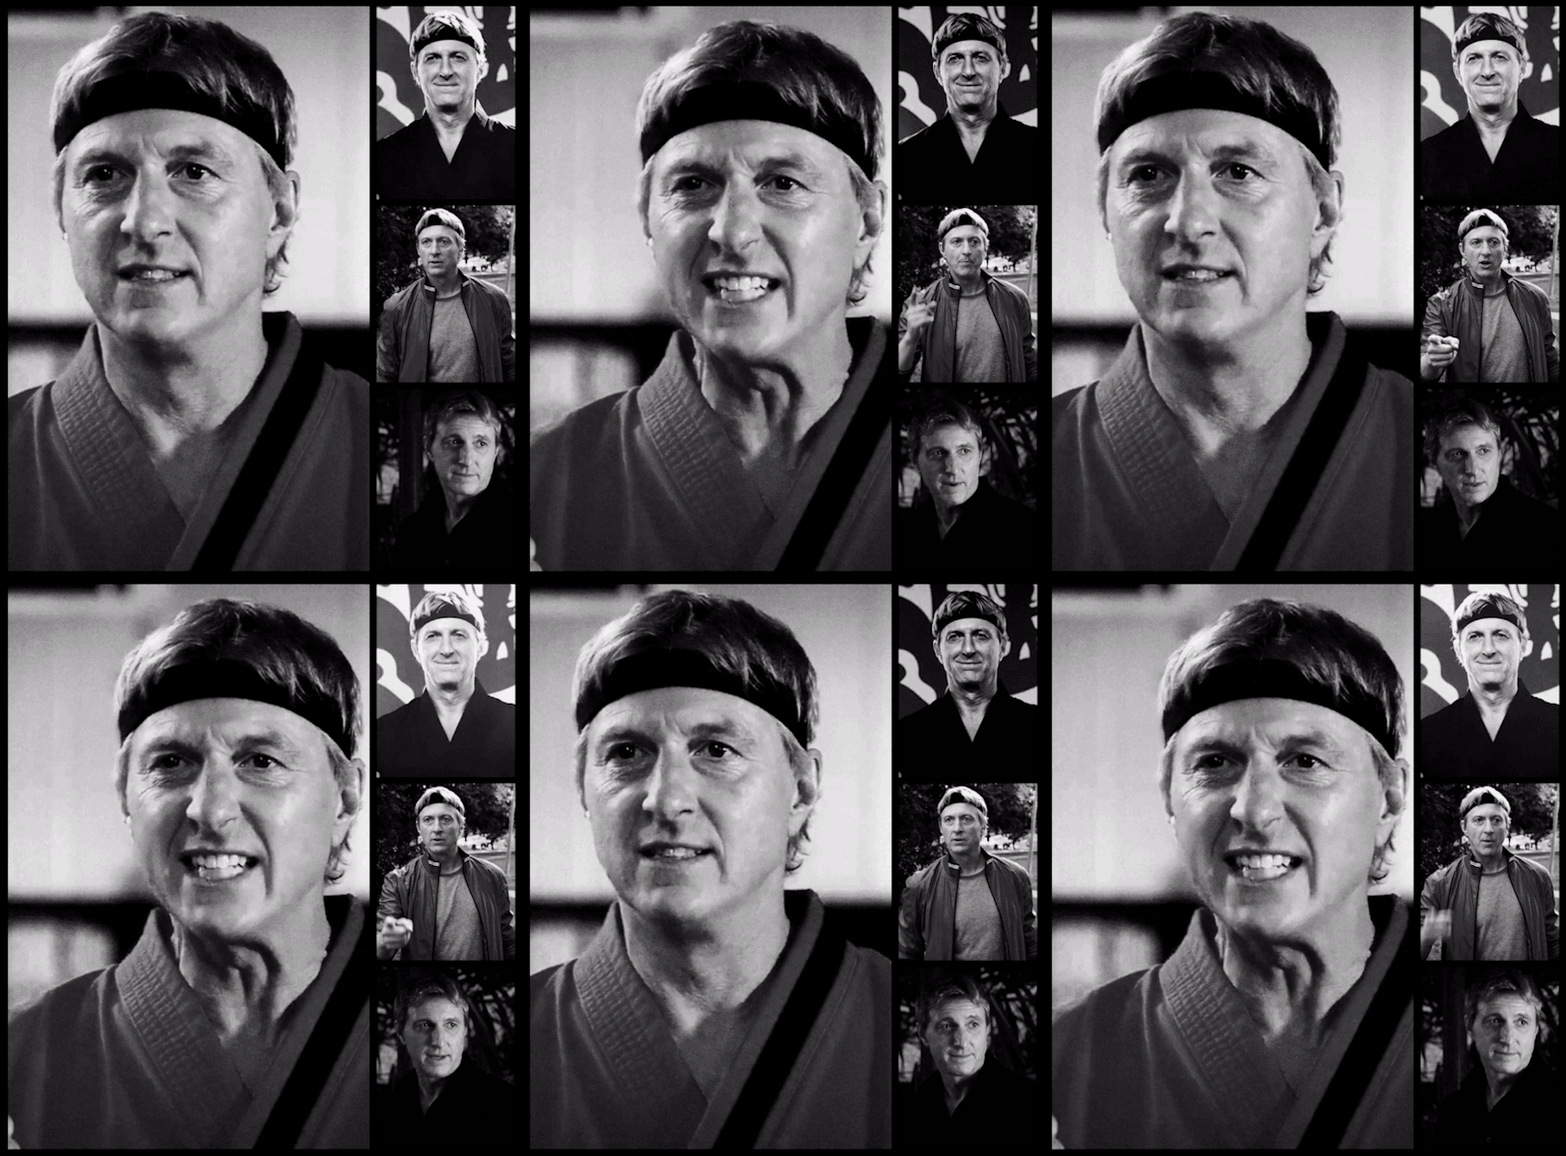
JOHNNY LAWRENCE
August 20th, 1967.
#johnny lawrence#the karate kid#cobra kai#cobrakaiedit#ckedit#thekaratekidedit#tkkedit#efedits#william zabka#HAPPY BIRTHDAY MY BOY & MY WORSTIE I LOVE YOU ❤❤❤❤❤#there are A LOT of glitches here. pretend there aren't!#made a coloured version too but i like this one better#also ignore the quality difference please i can only do so much with my '''''1080p''''' tkk1 version 😩#tkk#tkk x ck#tw flashing#flashing gif
183 notes
·
View notes
Note
Sorry if I bother you, but I really love your gif sets! Do you know some tutorials or, app, or anything, to learn how to make good gif? I am learning and I feel very stupid because all my gifs are shit. (if my ask is inappropriate or anything, please ignore me)
you're not bothering and none of this is inappropriate, you're more than welcome in my inbox! as for your questions, let's see what i can do.
1) tutorials — i've been doing this for long enough that i don't really have much to recommend here, the only tutorials i use nowadays are all about specific things and not how to make gifs as a whole. that being said i've linked this one before, i personally do some things differently but it's a very good tutorial, well-received by gifmakers who are just starting and well written, from what i've skimmed through.
another good post to look through is this one, not a gifmaking tutorial per se but it goes into sizes, sharpening, and how to get neat & clear gifs. two of the main points are A) while you can get away with making gifs out of a 720p quality video, 1080p is what is usually recommended. you could use 4k as well, but a 1080p video is usually easier to find, will take less space in your storage, and will give you really good results already. no need for overkill <3 as for B) size matters here on tumblr dot com, mostly width. the op of the post linked in this paragraph has included a nice graphic for the size limits for gifs, you can refer to it as you make your gifs so that whatever you make won't turn out pixelated once you upload it to tumblr.
if you're curious, i've been asked about my sharpening settings here and i spoke before on tumblr sizing here
2) software — you mentioned app, if by app you mean mobile stuff then i'm sorry, i can't help you! i've never made gifs through mobile and i wouldn't even know which direction to point towards for you to find more information. as for computers, if you mean programs then these are what i use to make my gifs: potplayer (for taking screencaps) and photoshop cc 2020 (for making the actual gifs, this is the post i used but here's one with more links)
now i'd like to mention something my grandma always used to say: no one is born learned. you're not stupid just because it's taking you a while to do something, learning is a process and everyone has their own pace. i've been making gifs for a decade now and i know there are things i could do better! i'm also still learning, i make plenty of "shit" gifs before stumbling my way to something i am okay with posting, and sometimes i'm really proud of what i've made and other times i think it's just "good enough". i understand feeling disheartened but please do not feel stupid about any of this!
no use in putting yourself down, now hold my hand and let's add the finishing touches on this long ass reply <3
3) tips — we've mentioned video quality, sharpening, and sizing. what else, what else. personally i would start simple (and i did, way back when, and still do!! most of my gifs are quite simple). so: cropping/resizing + coloring + sharpening. it'll help get the basics down and then you'll have a good foundation for everything else you might want to learn. i mentioned in another ask, almost two years ago now lmao, that i used to download other people's free psds (that is, pre-made settings and layers to color your gifs) and instead of using them i would open them up and pick them apart to see how people were coloring things, which layers they used, in which order, stuff like that.
remember: there is no right or wrong to do this! you could ask ten different people how they make their gifs, and their preferences for any specific part of the process, and you'd get ten different answers. if you find a tutorial and don't vibe with it, throw that aside and look for another. pick and choose, find what works for you and what doesn't! and that means do not be afraid to experiment and try things out.
also, don't like photoshop? no problem! i started with gimp, now personally i wouldn't recommend it over ps but it's a good program, it taught me a lot, and there's really nothing to hate about it. it might have less functions than ps though, and already a decade ago there weren't that many tutorials/resources for it.
don't like photoshop AND don't want to download a program? try photopea, i haven't used it but it works directly from your browser and it should do everything photoshop does!
let me know if there's anything else i can help with <3
17 notes
·
View notes
Text
How to gif without photoshop
Hello! By popular demand (of like 4 people) I am going to write out a tutorial of how I make gifs when I’m on my personal laptop and don’t have access to photoshop. There is another method I use with a different software that is a bit more complicated and if people are interested, I will make a tutorial of that method as well. I’ll do my best to keep this concise, so let’s get started.
Warning that this is VERY text and image heavy because I know how frustrating it can be when a tutorial feels like it’s skipping steps and I want this to be as clear as possible. Also please read this on desktop, tumblr mobile kills the quality of gifs inside text posts.
This is the video I will be giffing and here is the gif I will be making!

What you need:
A video to gif
For the best results, I recommend a video that is either 720p or 1080p (basically the higher the quality, the better). Videos with good lighting and bright colors also turn out the best. Unfortunately for me, I gif the TV show Prodigal Son a lot and that show has neither of those things, which is why my gif example is from that show; if you can make a scene with zero lighting or vibrancy look even somewhat decent, you can make anything else look good.
A video downloader or screen recorder
This is the video downloader I use and this is the screen recorder but basically any youtube video download website or screen recorder program works. Keep in mind that ezgif has a pretty low upload limit for videos, so if you want to gif something longer than like ~4 minutes, cut the video down to the specific parts you want first on a website like this one.
ezgif
A very straight forward website that anyone can access. You don’t need to download anything, it’s all online.
Bonus: Online Image Editor (not required, but I use this website to add text to gifs)
1. Making the gif:
Once you have a video downloaded, you go to ezgif.com and go to the section video to gif. Click choose a file, scroll to your downloaded video, and hit upload video. Your screen should look like this now.
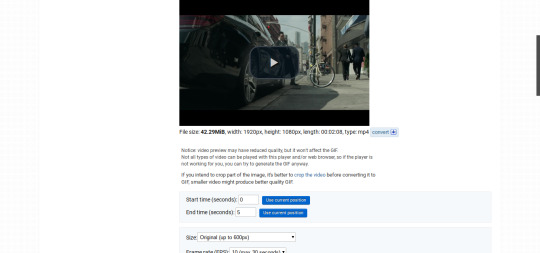
There are two ways to pull out the sections of the video you want to gif. You can either write in the start and end time in the little sections (you have to convert them to seconds: for example, if my gif started at 1:16 and ended at 1:20, it would be 76 seconds and 80 seconds respectively). Or you can do the method that I feel is easier, where you go to the section you want it to start on, hit pause, and hit the blue button that says “use current position” then let the video play until it hits your stopping point, hit pause again, and click on the second “use current position” button.
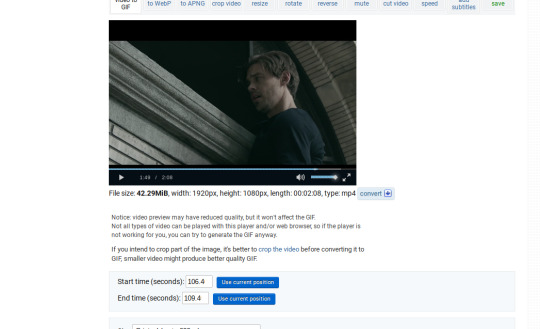
Once you have the start and end time recorded, scroll down to the next part of the screen with the size options. For size, select “540xAUTO (for Tumblr)” since tumblr gif sizes start at 540p and go down the more gifs are in a row. For frame rate, try to do either 20 or 25; the higher the frame rate, the smoother the gif will look. If you are trying to gif something in 540p that is longer, you might need to chose 10 to keep it under 5mb, which is the tumblr gif size limit. For method, leave it on FFMPEG. Then hit, convert to gif.

your gif will now look something like this!

Now, this gif is currently 5.7mb, which is above the size limit for tumblr (5mb or above gifs will still play if I recall, but the quality will be really bad when you post them). If I was planning on keeping the gif this size, I would go back and change the frame rate to either 20 or 10 to get the size down. However, I am going to resize the gif to 268p, so I don’t need to worry about it being to big.
Using the correct gif size for tumblr is one of the easiest ways to make sure the gif looks good! For gifs that take up a whole row, the size should be 540p wide. For two gifs in one row, the size is 268p each. For three gifs in one row, the sizes are 177p, 178p, and 177p in that order. Here is a visual of it.
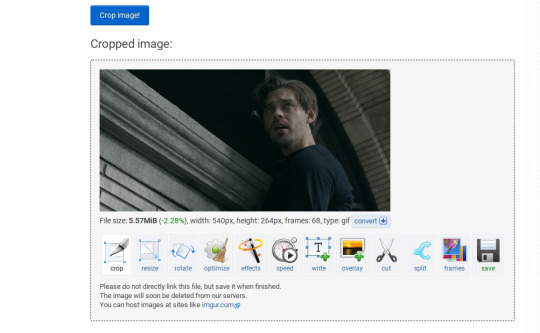
The next step would normally be resizing the gif, but Prodigal Son youtube videos come with a black banner on the top and bottom that I need to crop out. You will see a menu full of options under your gif, and you want to click on “crop.”
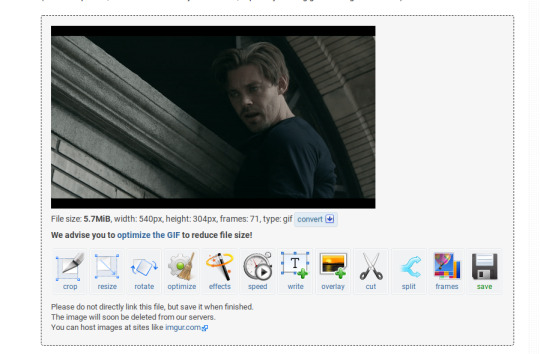
Cropping is pretty straight forward; you just move the little box over the part you want cropped, then hit the “crop image” button. Make sure width stays 540p!

Your gif now looks like this

Next, you look at the options under your gif again, and go to “resize.”
Again, resizing is pretty straight forward. I just put in 268 into the “width” section and leave the “height” section blank since the site will automatically resize the height. You can ignore the other menu options.
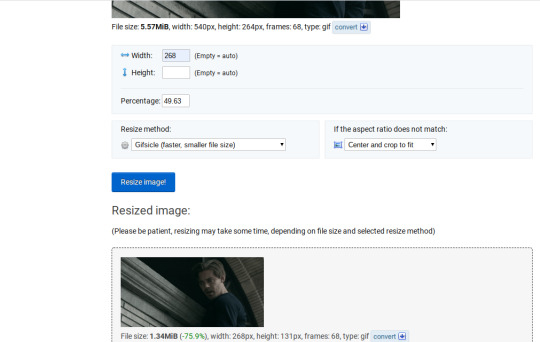
Your gif now looks like this

Next step is optional, but I usually do it. Once again, you go to the menu of options under your gif and select “speed.”

Speed is also super straight forward. I almost always reduce the speed of my gifs somewhere from 90% to 80% no matter what, just because I think it makes it look smoother. For gifs that are of short scenes that go really fast, I will reduce it to anywhere from 70% to 50%. You can try different speeds to test out what you think looks best. For this gif, I’m going to put it at 80%.
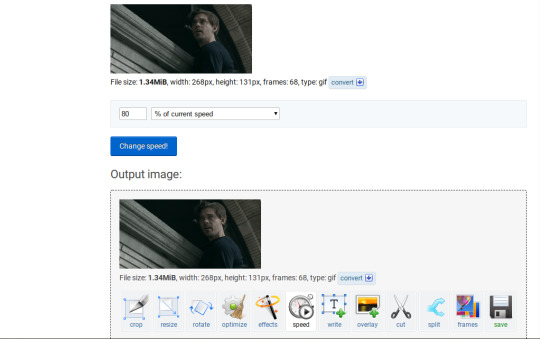
Here’s what we have so far. Congrats, you have made a gif!

Now for the fun part!
2. Coloring the gif
Go to the “effects” option, in the menu under your gif. You will see a LOT of options, but the panels I’m going to focus on are “colorize”, “brightness and contrast” and “color presets”. This section is going to vary a lot depending on what specific video you are giffing so remember to be flexible and try lots of different options out! It took me a while to get to a place where I can just eye a scene and know what settings to use. It’s super easy to go back and tweak a setting if the gif doesn’t look like how you want it the first time, but it’s a lot of trial and error.
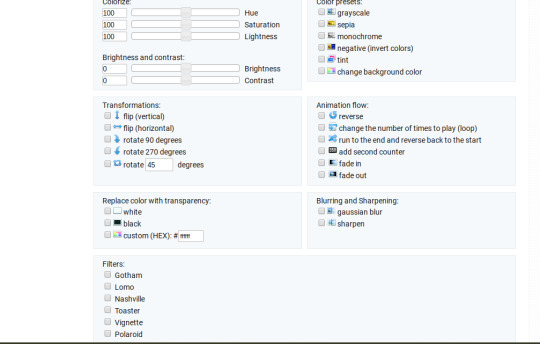
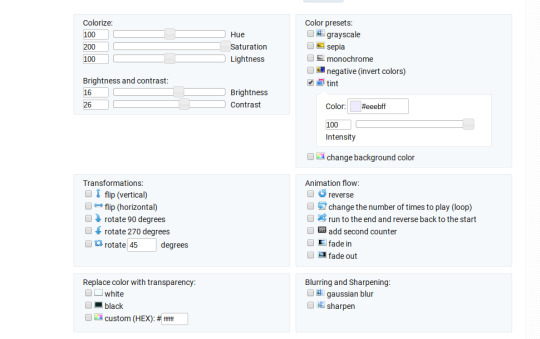
The main option I focus on in the “colorize” section, is “saturation.” This is what will make all the color in your gif pop out. The saturation I use varies a ton; for scenes that already are colorful/bright, I usually keep it around 120 to 150, since you don’t want it to be over saturated. If I’m making an edit that is supposed to look toned down or more grey/neutral tones, I’ll decreases the saturation in the range of like 90-40. For a show like Prodigal Son, where there is basically zero color vibrancy, I tend to go full out with saturation, usually in the 150-200 range. For this gif, I have it all the way up to 200.
Next is brightness and contrast. This also varies wildly, but a good rule of thumb is I always try to keep my contrast at least 5 points higher than whatever my brightness is, it just makes the lighting more even. You need to find a good balance; obviously, the darker the scene, the higher you want the brightness and contrast, but if you go too high, the gif with be staticy/grainy. For Prodigal Son, which has horrible lighting, my brightness is anywhere from 10-30 and my contrast is anywhere from 15-35. For this gif, my brightness is on the lower side since the scene is outside in natural light; brightness is 16, contrast is 26.

After you get those settings, I go over to “color presets” section and click on the “tint” option. It will pull up a color chart that looks like this
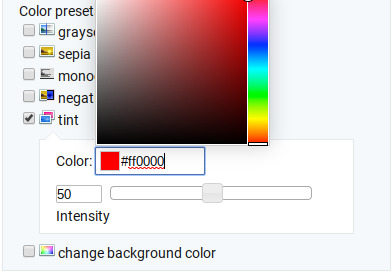
You ALWAYS want the intensity up to 100. This part is where the most trial and error occurs; there isn’t any one color option that works for every gif. The shade I use most often is light red/pink or light blue/light purple. For scenes that are lacking warm tones (which is almost all of Prodigal Son) I tend to go to the light reds, and for scenes that are lacking cool tones, I go to the light blues. The light reds are best for making characters skin tones look more...like actual skin tones and not totally washed out. To select a color, you just move your mouse around the chart. This is the range of color codes I tend to use.
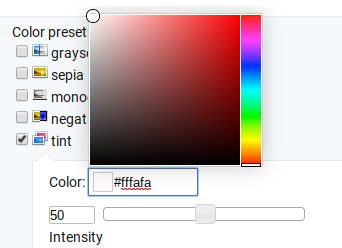
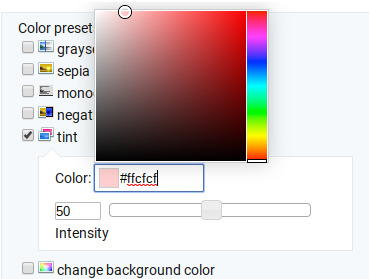
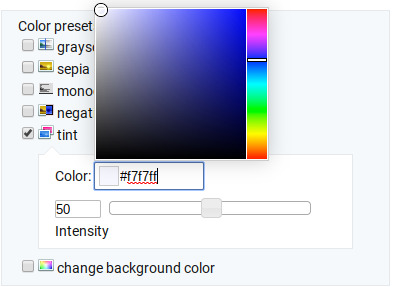
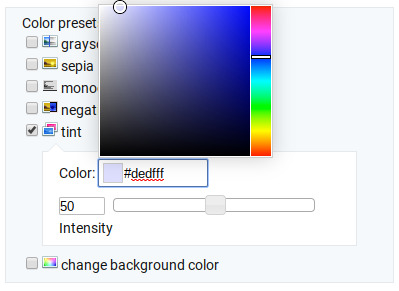
Again, intensity should be up to 100 (it automatically starts at 50 and I was too lazy to move it while getting screen shots :P).
For this gif, I actually used a new technique I’ve been trying out where I start with a light blue tint to even out the color tones, then once that gif is done, I go back to effects and add a layer of pink to make the colors brighter. Usually, one color works fine, but sometimes it’s hard to find a good balance (the red colors can get too red and the blue sometimes brings out too much of a yellow shade). For now, I have my color tint set at #eeebff.
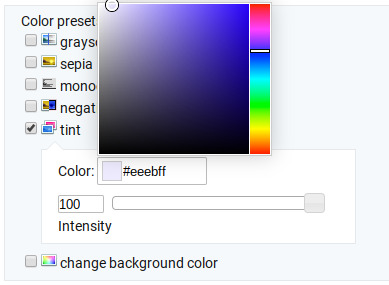
Ultimately, this is what my effect settings look like and this is what the gif looks like now.

Now, like I said before, I added another layer of tint to this gif. All you have to do is go to the menu under your gif, and click on effects again.
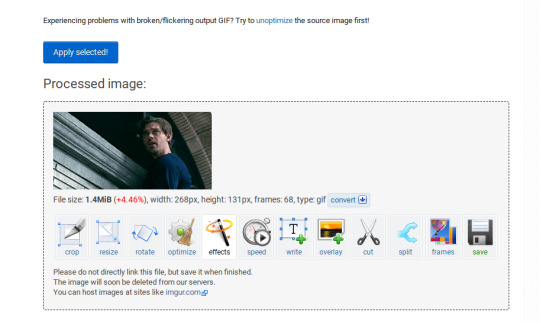
It will take you back to the panel you were just on, expect now your colored gif is on the top and all the settings are blank again. The only setting you need to use now is the tint option; go there, and select a light red shade. I used #fff0f0.

And here is the final gif! To save it, just right click and hit “save image as.”

I know it seems like a long process, but once you get a hang of it, it goes by super fast, especially if all your gifs are coming from the same video.
BONUS: Adding text
If you are trying to gif something with dialogue or you want a quote to put over your gif, you will want to put text over it. ezgif has a “text” option that you can use if you want, but I personally don’t really like their font options, so I use the website Online Image Editor.

This is what it looks like. You can either hit “upload an image” and upload your saved gif, or you can go back to ezgif, right click the gif, hit “copy image url” and paste that url into the “upload from url” option. The web page should now look like this.
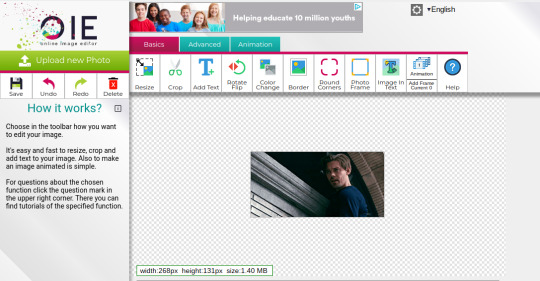
It’s pretty straight forward from here; click on the “add text” button and a menu will appear on the left hand with options for the text.
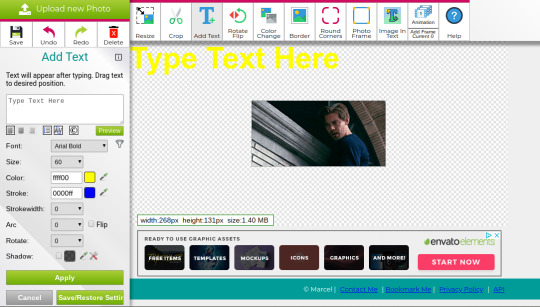
Type whatever you want the caption to be in the “type text here” box. This website has a ton of font options you can play around with, but when I just want to caption a gif, I stick with “Arial Bold Italic.” For a 268p gif, the font size should be 10-12, depending on how much writing you plan to put on each gif (if some gifs are going to have more writing than others, pick a smaller font size so it stays consistent!) When I make a 540p, the font goes up to 14-16. I use white for the color and black for the stroke. I make the strokewith 3 because it makes the caption stand out more. Once all these settings are selected, hit the “preview” button under the text box.
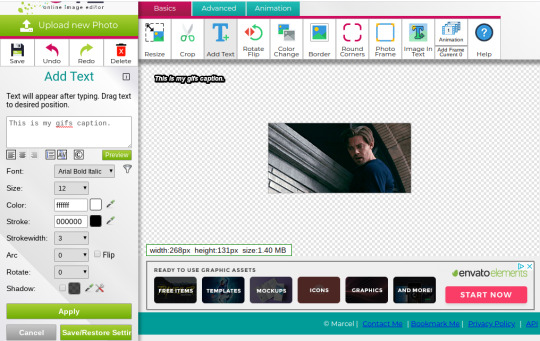
You can now drag your text anywhere you want on the image! The only bad thing about this website is that it doesn’t automatically center text, so you either have to eyeball it, or if you’re picky, like me, open up one of those online ruler applications and use it to measure out the center. For captions, I move the text just slightly above the bottom of the gif.
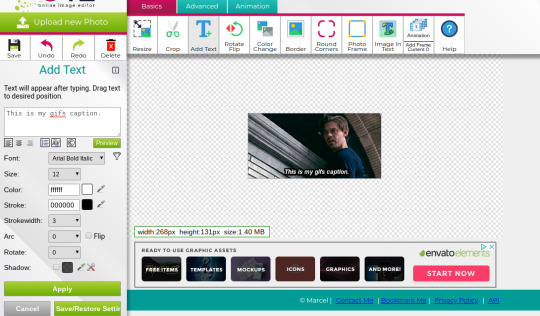
Finally, you hit apply. Once your gif has the text on it, all you have to do to save it is right click it and hit “save image as.” And here is the finished project!
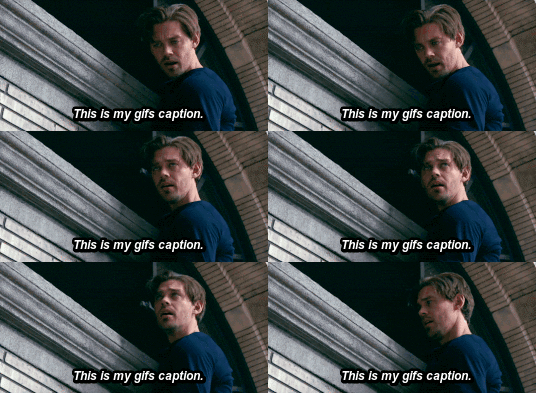
That got a lot longer than I thought it would, but I hope it was informative! If anything was unclear or if you have further questions, feel free to send me an ask. Thank you for reading.
#gif tutorial#giffing tutorial#giffing#gifmaking#mine#my gifs#long post#I hope this makes sense lol#pls rb if it helped!!!#also if mobile doesn't keep the read more...idek
378 notes
·
View notes
Text
a complete gif tutorial
hi! so i was requested by @popalice007 to make a tutorial on how to make gifs and i am very happy to oblige! this will cover pretty much everything, from capturing frames to saving the final product. this is just how i personally do it, and there are loads of other ways to gif, and i recommend looking at other gifmakers’ tutorials to get a more well rounded view on how to gif. please continue reading if you are interested, and please like/reblog if you find it useful!
disclaimer this is going to get really wordy as i try to explain where to find things and how to do them and my thought process behind why i do them, but please send me a message/ask if something needs clarified!
also some of the pictures can be viewed in full size by clicking on them!
part 1: required materials and other tips
just another heads up, i have a pc, and while i believe most of this should be the same whether you have a mac or a pc, i could be very wrong as i’m not a computer expert and have never really used anything besides windows.
so the two programs i use are kmplayer and adobe photoshop cs5 portable. kmplayer can be downloaded for free here. i have the 32 bit version for windows, so that is what i’m going to be providing the instructions for, since the 64 bit version seems to be a little different. photoshop is pretty expensive, but thepiratebay has several torrents for it, and other downloads and torrents for it do exist. i downloaded mine quite awhile ago so i don’t remember exactly where and how i did it so it might require some researching. i would just double check the comments and instructions to make sure the download will work. there are also dedicated photoshop tumblrs that will probably have links to downloads.
if you are giffing a scene from a tv show, movie, video, etc, you also need to have the video saved somewhere on your computer/flashdrive/whatever. hd-source is a good source for tv shows, and there are tons of other sources. i download a lot from thepiratebay using a program called utorrent (i just use the free version) but beware because since you are downloading copyrighted materials it isnt legal, and while i have never had a problem, i have heard of people getting warning letters from their internet providers. you can also download youtube videos and videos from other places and there are lots of other ways to get videos that i won’t cover.
no matter where you get your video, you want it to be pretty high quality, since the higher quality the video is, the clearer and nicer the gif will turn out to be. most of the time you want 720p if you can get it. 1080p is nice and if you can get your hands on it without the video size being enormous you can certainly utilize it, but it isn’t a necessity and usually i don’t bother. anything lower than 480p can get to looking pretty grainy especially if you are doing full size 540 px gifs, but if you are giffing something from a convention panel video taken by a phone, for example, you don’t really have an option.
additionally, if you are giffing dialogue, find a script online somewhere or find subtitles. you can transcribe it yourself if you want, but if a character is mumbling or has an accent or something i like to be sure of what they are saying.
and finally, have some patience! a lot of the popular gifmakers have been doing this for years and have streamlined their process so it doesn’t take hours, but as a beginner it takes time to get everything right,so it is totally normal if you get to feeling frustrated.
part 2: capturing the frames
first you will want to have an idea of what scene you would like to gif. before i get started i create a new folder where i want the captured frames to go, and i name it something memorable so i can find it again later. kmplayer does also automatically create a folder called capture that you can use if you want. if you are doing a gifset like this, i would have 8 different folders and gave each of those gifs/scenes their own folders.
however, the example i’m going to be using throughout this tutorial is going to be a dialogue scene, specifically this one here, just because they can get a little more complicated imo (plus i want to show how i use the text tool etc). if i’m giffing a scene where characters are talking, even if the scene is a long one with back and forth dialogue, i usually like to cap it all at once and put it in the same folder, and then i separate it out later in photoshop. you can also plan ahead and put all the different bits in different folders, thats up to you and your personal preference.
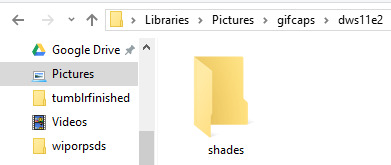
next i open up kmplayer. kmplayer likes to update pretty regularly and will let you know when you open it if it wants to update. it doesn’t usually hurt to ignore it if you are in a rush, but i usually let it do its thing and make sure i don’t also download whatever browser service, etc. it also wants to install. sometimes ads show up on the right side, you can close them by hitting the little arrow between the ads and the video screen
to open the video, click on “kmplayer” in the upper left hand corner and then click on “open files”. search for your video file and double click it to open it

kmplayer will then open the video, and if its 720p often i have to make the window smaller because it fill up the entire screen and i need to be able to see other windows besides the video. if i remember correctly when you first download kmplayer it isnt automatically set to keep the aspect ratio the same, so if you need to, hit the f2 key to open the preferences or click the lightning bolt on top next to kmplayer, and then click on preferences. under general and then screen on the sidebar, and then under general again i have my settings like so, and hopefully that resolves that issue if you have it. you might have to reopen the video again for that to kick in but i’m not positive. if it still doesn’t work try to google it. i’ve had the problem a couple times and the answer is out there but i’m no tech pro.

anyway, i then locate the beginning of the scene that i want to gif. you can click around on the bottom along the progress bar, as well as using alt+left or right to jump forward and back a minute, the left or right arrow key to jump 5 seconds, or the f key to go forward a single frame. every frame counts, and it is preferable to have too many frames and have to delete them later than to find out your gif will only be 10 frames long because you started capping in the middle of the scene, or because you stopped capping too early. i typically will watch the clip a few times so that i have a set idea of where i want to start and stop.
once you are paused at the beginning of the scene you want to gif, press ctrl+g to open kmplayer’s frame extraction window. click on the folder icon so that you can locate that empty folder you had made earlier. this is where kmplayer will save the screencaps. i then set my settings to png, continuously, original size, and every frame, like so

now we are ready to start capturing! click start on the frame extraction window, and then click back over to the video (this is why i make the video window smaller, so that i can see the video and the frame extraction window at the same time). once i’m back on the window, i hold down and/or tap the f key. kmplayer will capture the frames as you go along. the audio plays along with it albeit choppily which is why i watch the clip several times beforehand, because it can be hard to follow and is disorienting. you can also click the play and pause button, but, again, the audio tends to play at a different rate and it gets confusing, so for me frame by frame is the way to go. keep tapping f until you get to end of the scene/wherever you want to stop. i keep the folder where the caps go open usually so if i mess up or change my mind on where to start/end, i can delete the whole folder and create a new empty one to start over again. this process takes practice and is often dependent on what you are trying to gif and its not a big deal if you have to try it a couple times to get it right.
once you have reached the end of the scene, click back over to the frame extraction window and click stop. if you are giffing multiple scenes from the same video you can click the folder icon and select a different folder to save frames into and then repeat the process of finding the scene and capping it, or if you want to cap from a different video, you can open a new video and cap from there. then if you are satisfied and have all your caps, you are free to exit out of kmplayer.
part 3: making the gif
now it is time to actually make the gif! go ahead and open photoshop, and if it is your first time you can play around and familiarize yourself with where things are. basic gifs don’t require a lot of the tools that photoshop has, and you can customize some as to what windows and panels are open. below is what my workspace typically looks like so that i can get to certain things quicker, but i will explain as i go along where the controls normally are found in the toolbar. also, if you hover over a control photoshop will tell you what it is and what it does.


to open the frames, go to file, then scripts, then load multiple dicom files. then find your folder of caps, select it, and then click OK to open
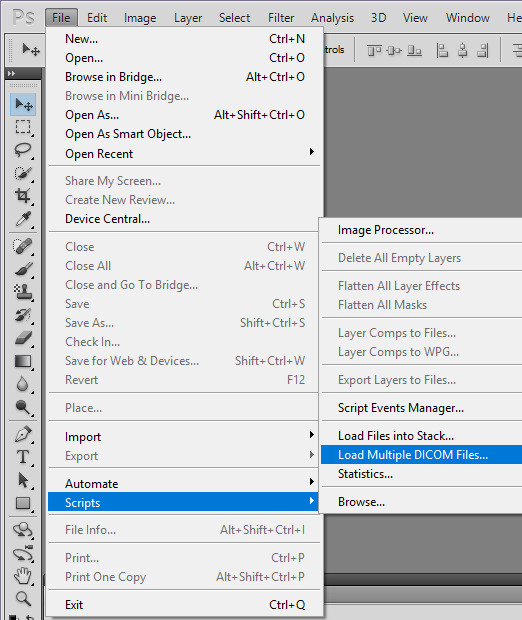
be aware that depending on the number of frames in that file and the size of the images it sometimes can take awhile to fully load. once they are loaded, you should be able to see all those screencaps as layers on the right hand side of the screen. if not, go to the top where it says windows and click on layers. i frequently accidentally cap a couple extra frames where the scene shifts and i go ahead and delete those layers by highlighting them (use the shift or ctrl key to highlight several at a time) and then clicking on the trashcan at the bottom of the layers sidepanel.
next we are going to turn these layers into gif frames! i have combined this step into an action that i use to automatically do this for me to save time since i gif on a semi regular basis, but the steps are as follows.
first, make sure the animation bar is open. if it is not then go up to window and click animation, and then it should open at the bottom of the screen. you also have to be in frame animation mode. on the upper right hand corner of that panel is an icon with four lines and and an arrow. click on that and then click on convert to frame animation. then in the same menu click make frames from layers.

this can also sometimes take some time if there are a lot of caps but when its done loading there will be frames in the animation bar. in the animation menu click select all frames. then, underneath any of the frames, there will be an arrow beside where it says 0 sec. click it and change the frame delay. what you set it to can be up to personal preference. i typically set mine to 0.07 or 0.08 which seems a bit slow, but i find when i convert the gif to a smart object (we’ll get to that) that seems to speed it up a little so i’ve just stuck with it. feel free to change the delay if you find later that that is too slow for your taste. also in lower left corner of the animation bar is where you set how many times the gif loops. change it from once to forever. the controls to play the gif are also below the frames.

since i gif a scene like this all in one big long take, it is now time to separate it into separate gifs if need be. if you are making a gifset like this you can skip this part because you most likely capped frames from different scenes and gave them their own folders, so they shouldnt need separating.
sometimes you have to get creative on how you split apart the scene, and there arent really any hard and fast rules. here are some things i like to keep in mind:
the camera angles - this is the most important for me. if the camera goes from showing one character to another, or from one angle to another, i separate those into separate gifs pretty much no matter what.
the length of the gifs - this is dependent on the size you are going to crop to, how much movement the scene has, how much color, etc., but i typically try not to go over 80-100 frames in a 265px width gif. they can be trimmed down later, but if it takes 200 frames for the camera to switch to the other character, don’t make that one gif
the dialogue - if there is a natural break in the dialogue, that is a good place to end a gif. you don’t need 50 frames of no one speaking if you are doing a gifset with dialogue.
how many gifs you are making/size - at some point you have to decide how wide your gifs will be and how many of them. if your gifs will be 268 px wide (2 columns of gifs) then you have to have an even number of gifs, and you will need to separate to account for that
going along with the first tip, i’m going to separate the frames by camera changes. i do this first so that way when i crop the gifs, i get things centered how i like.
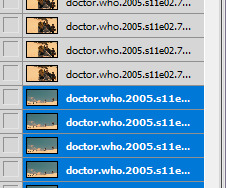
you can see here by looking at the thumbnails of the layers what i mean by the camera changing angles.
first, press ctrl+n to open a new blank image. if the preset doesn’t say dicom files, click on that menu and click dicom files, that way the new image will be the same size as the original. hit ok.
next, highlight the layers in the original that are going to be the new gif. hold shift while clicking the first and last layer that you want to be in the new gif to do that. click on them, hold, and drag them over to the new document. they will probably be off center and/or invisible. if the layers are invisible click an empty box next to one of the layers so that an eye appears and the layer shows up. then click the move tool and move the layers around til the fill the document correctly. be sure not to stretch/transform the layers by dragging on the edges and corners. as long as all the layers are still highlighted they should all move at once.

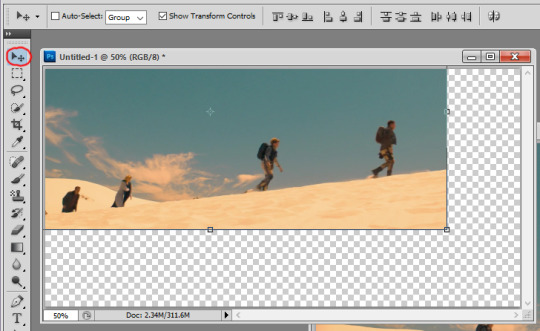
next, scroll to the bottom of the layers and delete the blank layer. then repeat the steps to make frames and set the time delay and there is your new gif!
the layers for that new gif are still in the original document, so go ahead and hit the trashcan to delete them, as well as the now blank frames. continue opening new documents and splitting up the scene until you have a new gif for every camera change. the last gif i leave in the original document. i ended up with 5 camera changes so 6 gifs to start with
at this point i crop each gif. tumblr has a guide for image sizes, and the width is the most important thing to follow there. the height is really up to you. if i’m only doing two or four gifs i tend to make them taller than if i do 8 or 10 gifs just because it looks better to me. i’m going to probably end up with 8 gifs because a couple bits are a little long, so i’m going to go with 268 px as the width and 175px as the height. again, the 268 part is the important part to get right since i’m doing two gifs across. to crop, find the crop tool on the left and set your dimensions at the top. make sure when you enter your dimensions, it is in pixels/px and not inches or centimeters.
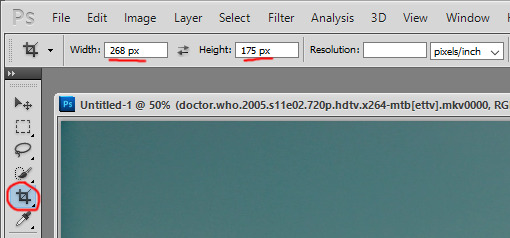
click, hold, and drag to stretch to create a shadow for what you cropping. i usually go as big as the edges of the image will allow, and then bring the corners in a tad, since occasionally i get a video that has a black outline and i don’t like to have that in the gif. either hit enter or the checkmark in the upper right corner of the toolbar to crop.

you might have to zoom at this point and resize your window. in the bottom left corner there is a percentage you can change, and now that the gif is cropped it will be small enough that you can set it to 100% if it isn’t that already. continue to crop the remaining gifs to the same size. after this i usually play through each one to make sure i have everything in the frame and roughly centered. if you need to undo, press ctrl+z or ctrl+alt+z and recrop or redo whatever needs redone. there is also a history you can pull up under windows, and you can use that to backtrack multiple steps.
next i figure out if i need to break up any of the gifs because of their length. with a gif this size i can probably get away with having more frames and i can trim them later, but if a gif has more than 100 frames i look and see if i can either trim it down now because there is a lot of frames without talking or movement, or if there is a natural break in dialogue where i can split it into two gifs. there are also times when the gifs are really short that you can sometimes combine with a gif before or after that one. that’s your perogative ultimately and what you think looks good but will fall under the 3mb limit, and takes practice and experience to get an idea if a gif is going to be too large. sometimes i go back and rewatch the scene to figure out where to split things up. i also keep in mind that i want 8 gifs for this scene and right now i have 6, so i need to create 2 more, whether i separate two gifs in half, or separate one gif into three new ones.
ultimately i decided to split my largest gif of 180 frames into 3 gifs because it has quite a bit of dialogue, and the other gifs are either already under 80 frames or can easily have some frames deleted out of it. between using the script, rewatching the scene a few more times, and trying to lipread what the doctor was saying, i decided to separate between frames 65/66 and 120/121 so that way they were roughly the same number of frames. the process to separate them is the same as it was when we had the big original gif. i selected the last frame i wanted to include in the new gif so that way the eye appears next to the corresponding layer in the layer panel, and this is how i know which layers to drag to the new document. for example, in the picture i’m moving frames 1-65 to the new document, so i select frame 65, then find that layer and select all the layers below and including that layer and drag them. then repeat the steps to make the frames, etc.
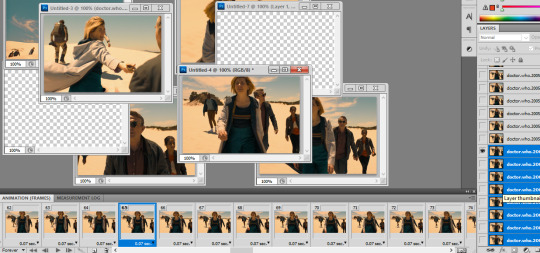
go ahead and delete the empty frames, as well as any frames on the other gifs you may want to delete to trim them up.
so now we should have all of our gifs laid out! my next step is to sharpen them, and i do this using smart objects, and the steps are as follows. (i also made this into an action.)
first, select all the frames and all the layers in the gif. if you deleted some frames but didn’t delete the corresponding layers, don’t worry about it, it doesn’t matter and doesn’t affect the final product.
next, click on convert to timeline animation. this is in the animation menu where we earlier found convert to frame animation.
then, at the top go to filter and click on convert for smart filters. this creates a smart object and turns all of the frames and layers into just a single layer/object. this allows us to sharpen the whole gif at once instead of having to sharpen each frame one at a time (trust me that takes forever if you don’t have an action or do it this way).

next under filter again, then under sharpen, click on smart sharpen. this brings up a window with a bunch of settings. these are what mine are:
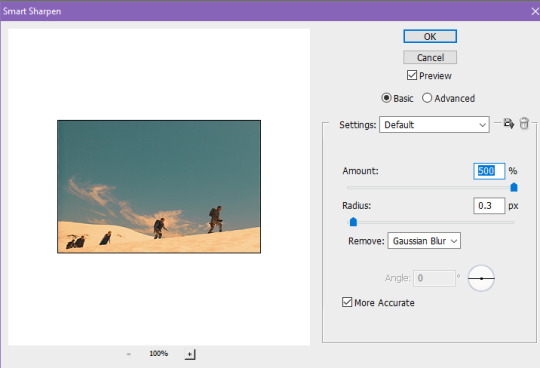
repeat this for every gif. look how much better they look already!
at this point, if you haven’t saved yet, do it now! this is a good time to save and take a break. go to file and then save. the format should be set as photoshop/.psd. i go ahead and rename the files too, for example, dwshades1 and so on. i number them too so i can get the order right when i upload them. with it saved as a psd, you could close out and reopen it later and the layers will all be there.
next is coloring! this is technically optional, but is usually the most fun part of giffing in my opinion, and i tend to find uncolored gifs rather boring and bland. this is where you can do some brightening, color correcting, make gifs black and white, and more! its time to get creative with those adjustments.
as there are so many ways to color things, and whole tutorials dedicated just to coloring, i’m only going to show the basics of where to find the adjustments and some of the different adjustment layers that i use most. my first step always though is to create a group just for the coloring layers. the button to create a group is at the bottom of the layer panel and looks like a folder. the button to the left of that is the one that contains the different adjustments you can make.

the black and white circle contains a list of different adjustments you can make. the two i like to use most are curves and vibrance. curves is really useful to brighten gifs and vibrance obviously adds vibrance. my advice is to just play around with all the settings, and look at coloring tutorials. a lot of gifmakers also have psds that you can download. you can either use them as is to apply to your gifs and credit the maker, or just study what they did and learn from it.
anyway, i went ahead and colored my gifs. here is a before and after look, as well as a list of adjustment layers i added:
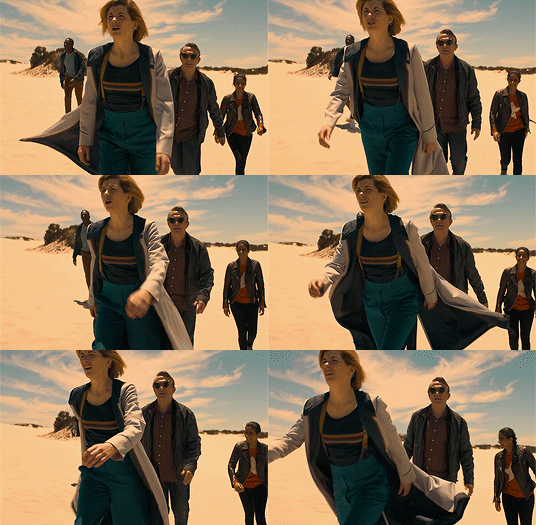


in this case the before gif doesn’t look bad, but that isn’t always the case, sometimes they start out super dark and colorless. and i like the tone and colors of the colored gif better (you can see how much i like purples and blues lol). again, all personal preference.
whether you color or not, if you have dialogue in your gifs, the next step is adding it in! if the gif doesn’t have a dialogue or if you don’t want to add text, you can skip this next bit.
first, select the text tool on the left side toolbar, it looks like a T. next i choose my font, font size, and color at the top. here are my settings, the key thing is to make it easy to read.

there are more settings like bold and italics under window and then character. these are my settings.

after these are set, click in roughly the middle of the gif and start typing the text that goes with that gif. i usually start with white for the first person to speak, and then change to yellow for the second person and so on, so that way its clear who is speaking, but that’s up to you. when the text starts to go off the edge of the gif, i hit enter to start the next line until i’m out of text. otherwise photoshop will allow you to type right off the edge of the gif.
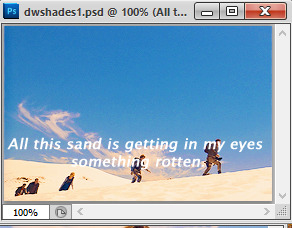
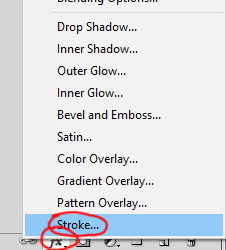
a little hard to read, right? that’s why i add stroke, which outlines the text. to do this, make sure the text layer is highlighted, and then click the fx button at the bottom of the layer panel, and then click stroke.
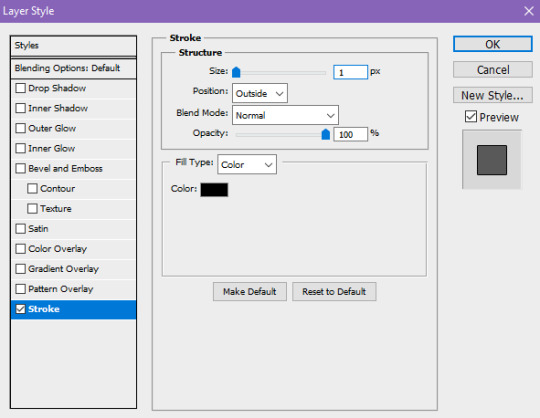
these are the settings i use. usually i only have to change the size from 3 to 1px. hit ok.
so much easier to read! also, double check to make sure that the text layer is above the coloring layers.
next, i want to move the text to where i want. select the move tool on the left, and first move the text layer all the way to the bottom. photoshop has it so that it is kind of magnetized to the edges. i then go back to the character menu and change the baseline shift setting to 5 pt.
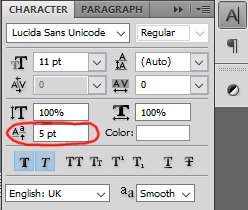
however, when you click to a different gif it doesn’t reset back to 0, so manually reset it back to 0 before moving your text layer, then change it to 5 again.
next, to center it on the gif. first select the gif layer, then hold ctrl while you select the text layer. the order is important, if you select the text then the gif, the gif will be moved to center itself around the text. then, with the move tool still selected, click this button on the top tool bar to align horizontal centers.

great! now save your gif again, and repeat all these steps for the text for every gif that you are adding text to. most of the time i type the text on each gif first, and then move the text that way i’m not switching tools a dozen times, but it really doesn’t matter.
your gifs are officially done! time to save them in a format that you can upload to tumblr. go up to file, and click save for web and devices. these are my settings, but you can play around with some of the ones on the upper right side. however, you want to make sure that it is a gif, and that it is set to loop forever. those are circled. hit save, name your gif however you want, and save it somewhere you can find it later. do this for all of your gifs.

the other thing i circled in the document size. tumblr does not allow you to upload images that are above 3mb. if yours is above this, you have a few options to cut down on the size. changing the settings on this window such as going from diffusion to pattern, or reducing the number of colors can change the size, but if you reduce the number of colors, you lose some quality. you can also change your coloring layers around, because making a bright gif with a lot of colors can increase the size. black and white gifs tend to be smaller.
the option i tend to go for if i want to keep the colors and quality, is to reduce the number of frames you have. its a little trickier to do in timeline mode than it is when the frames are all there, but this is how to do it. if your gifs are all under 3mb, you can skip ahead to uploading.
in the timeline animation bar, there are blue rectangularish sliders you can move at the beginning and end, as well as a triangular one that shows where you are within the gif. decide the new place where you want the gif to start and end, and move the rectangle sliders there, like so. one tick over does not equal a frame, so i use the triangle indicator to figure out how many frames over i’m moving.

then in the animation bar menu, click trim document duration to work area. this will set your gif to begin and end where those sliders were. at this point you can try saving again to see if your gif is below 3mb. if so, then save it! if not, continue to move the sliders and trim until your gif is below the limit.
so now all your gifs are saved and ready to be uploaded! upload them like you would any other photo post. i always save as a draft first so i can make sure they upload right and so i can look them over again to be sure they are looping correctly and have no typos. only then do i close out of photoshop. tag with the appropriate edit tags (for example, dwedit for doctor who) or tag popular blogs for maximum exposure, but be aware that only the first 5 tags count and will appear in the tags. post and you are done! congrats!
#popalice007#yeahps#completeresources#chaoticresources#gif tutorial#hey look something original#my resources
46 notes
·
View notes
Photo

PSA: 4K 144 Hz monitors use chroma subsampling for 144 Hz
(Crossposted from r/Monitors by request)
I'm seeing a lot of user reviews for the new 4K 144 Hz monitors, and it seems like everyone mentions that it looks noticeably worse at 144 Hz. I keep expecting these posts to say "due to the 4:2:2 chroma subsamping", but instead they say "I'm not sure why" or something like that, both on here and on various forums. It seems monitor companies have done their usual good job of "forgetting" to inform people of this limitation, as most of the early adopters are apparently unaware that it is not actually capable of full 4K 144 Hz even though the subsampling was mentioned in the Anandtech article a month or two ago. In any case, I want to make people aware of what chroma subsampling is, and that these first-gen 4K 144 Hz monitors use it.
Chroma Subsampling
Chroma subsampling is a method of reducing bandwidth by partially lowering the resolution of the image.
Imagine you have a 4K image; 3840 × 2160 pixels. Each pixel is composed of a RED value between 0–255, a GREEN value 0–255, and a BLUE value 0–255. You could imagine this 3840 × 2160 full color image as three separate monochrome images; a 3840 × 2160 grid of RED values, one of GREEN values, and another of BLUE values, which are overlaid on each other to make the final image.
Now, imagine that you reduce the resolution of the RED and GREEN images to 1920 × 1080, and when you reconstruct the full image you do it as if you were upscaling a 1080p image on a 4K screen (with nearest neighbor scaling); use each 1080p pixel value for a square of 4 pixels on the 4K screen. This upscaling is only done for the RED and GREEN values; the BLUE image is still at full resolution so BLUE has a unique value for every 4K pixel.
This is the basic principle behind chroma subsampling. Reducing resolution on some of the pixel components, but not all of them.
The description above, of reducing resolution by half in both the vertical and horizontal resolution, on 2 of the 3 components, is analogous to 4:2:0 chroma subsampling. This reduces bandwidth by one half (One channel at full resolution, and 2 channels at one-quarter resolution = same number of samples as 1.5 out of 3 full-resolution channels)
Full resolution on all components is known as "4:4:4" or non-subsampled. Generally it's best to avoid calling it "4:4:4 subsampling", because it sounds like you're saying "uncompressed compression". 4:4:4 means no subsampling is being used.
4:2:2 subsampling is cutting the resolution in half in only one direction (i.e. 1920 × 2160; horizontal reduction, but full vertical resolution) on 2 out of the 3 components. This reduces the bandwidth by one third.
YCbCr
Above, I used subsampling RGB components only as an example; "RGB subsampling" would be truly horrible and has never ever been used or even considered for use, to my knowledge. In an RGB system, since each of the 3 components dictates the brightness of one of the primary colors, changing one of the RGB values affects both the hue and brightness of the resulting total color. Therefore, using one R, G, or B value on a neighboring pixel makes a very noticeable change, so subsampling would degrade the image by quite a lot.
Instead, subsampling is only paired with YCbCr. YCbCr is a different method of specifying colors, used as an alternative to RGB for transmission. Of course, physically speaking, every display generates an image using discrete red green and blue elements, so eventually every image will need to be converted to the RGB format in order to be displayed, but for transmission, YCbCr has some useful properties.
What is YCbCr Anyway?
People get confused about what YCbCr actually is; misuse of terminology all over the place adds to the confusion, with people incorrectly calling it a "color space" or "color model" or things like that. Really, it is an offshoot of the RGB system, it is literally just RGB with a different axis system. Imagine a two-dimensional cartesian (X-Y) coordinate system, then imagine drawing a new set of axes diagonally, at 45º angles to the standard set, and specifying coordinates using those axes instead of the standard set. That is basically what YCbCr is, except in 3 dimensions instead of 2.
If you draw the R, G, and B axes as a standard 3D axis set, then just draw 3 new axes at 45º-45º angles to the original, and there you have your Y, Cb, and Cr axes. It is just a different coordinate system, but specifies the same thing as the RGB system.
You can see how the YCbCr axes compare to the familiar "RGB cube" formed by the RGB axis set (RGB axes themselves not shown, unfortunately): https://upload.wikimedia.org/wikipedia/commons/b/b8/YCbCr.GIF
Why Even Use YCbCr?
YCbCr is useful because it specifies brightness and color separately. Notice in the image from the previous section, the Y axis (called the "luma" component) goes straight down the path of equal-RGB values (greys), from black to white. The Cb and Cr values (the "chroma" components) specify the position perpendicular to the Y axis, which is a plane of equal-brightness colors. This effectively makes 1 component for brightness, and 2 components for specifying the hue/color relative to that brightness, whereas in RGB the brightness and hue are both intertwined in the values of all 3 color channels.
This means you can do cool things like remove the chroma components entirely, and be left with a greyscale version of the image; this is how color television was first rolled out, by transmitting in YCbCr*. Any black-and-white televisions could still receive the exact same broadcast, they simply would ignore the Cb and Cr components from the signal. (*EDIT: Technically, old broadcasting used an analog system which is referred to as "YPbPr" while the term "YCbCr" is used for the digital equivalent, but it's the same concept).
Chroma subsampling also works much better in YCbCr, because the human eye is much less sensitive to changes in color than it is to changes in brightness. Therefore you can subsample the chroma components without touching the luma component, and reduce the color resolution without affecting the brightness of each pixel, which doesn't look much different to our eyes. Therefore, YCbCr chroma subsampling (perceptually) affects the image much less than subsampling RGB components directly would be. When converted back to RGB of course, every pixel will still have a unique RGB value, but it won't be quite the same as it would be if the YCbCr chroma subsampling had not been applied.
Terminology Notes
Since RGB-format images don't have luma or chroma components, you can't have "chroma subsampling" on an RGB image, since there are no chroma values for you to subsample in the first place. Terms like "RGB 4:4:4" are redundant/nonsensical. RGB format is always full resolution in all channels, which is equivalent or better than YCbCr 4:4:4. You can just call it RGB, RGB is always "4:4:4".
Also, chroma subsampling is not a form of compression, because it doesn't involve any de-compression on the receiving side to recover any of the data. It is simply gone. 4:2:2 removes half the color information from the image, and 4:2:0 removes 3/4 of it, and you don't get any of it back. The information is simply removed, and that's all there is to it. So please don't refer to it as "4:2:2 compression" or "compressed using chroma subsampling" or things like that, it's no more a form of compression than simply reducing resolution from 4K to 1080p is; that isn't compression, that's just reducing the resolution. By the same token, 4:2:2 isn't compression, it's just subsampling (reducing the resolution on 2/3 of the components).
Effects of Chroma Subsampling
Chroma subsampling reduces image quality. Since chroma subsampling is, in effect, a partial reduction in resolution, its effects are in line with what you might expect from that. Most notably, fine text can be affected significantly, so chroma subsampling is generally considered unacceptable for desktop use. Hence, it is practically never used for computers; many monitors don't even support chroma subsampling. The reduction in quality tends to be much less noticeable in natural images (i.e. excluding test images specifically designed to exploit subsampling). 4:2:2 is the standard for pretty much all movies and TV content, since it reduces the bandwidth for both transmission and disc storage significantly.
Interface Limitations - Why No Support for 4K 144 Hz RGB?
Chroma subsampling has started seeing implementation on computers in situations where bandwidth is insufficient for full resolution. The first notable example of this was NVIDIA adding 4K 60 Hz support to its HDMI 1.4 graphics cards (Kepler and Maxwell 1.0). Normally, HDMI 1.4 is only capable of around 30 Hz at 4K, but with 4:2:0 subsampling (which reduced bandwidth by half), double the framerate can be achieved within the same bandwidth constraints, at the cost of image quality.
Now, we're seeing it in these 4K 144 Hz monitors. With full RGB or YCbCr 4:4:4 color, DisplayPort 1.4 provides enough bandwidth for up to 120 Hz at 4K (3840 × 2160) with 8 bpc color depth, or up to around 100 Hz at 4K with 10 bpc color depth (exact limits depend on the timing format, which depends on the specific hardware; in these particular monitors, they apparently cap at 98 Hz at 4K 10 bpc). These monitors claim to support 4K 144 Hz with 10 bpc color depth, so some form of bandwidth reduction must be used, which in this case is YCbCr 4:2:2.
Before anyone mentions HDMI 2.1, it's not possible to implement HDMI 2.1 yet. Only the master specification has been released. I know a lot of people seem to think that when the specification is released, we'll start seeing products any day now, but that's not the case at all. The specification is the document that tells you how to build an HDMI 2.1 device; the release of that document is when engineers start designing silicon that is capable of that, let alone displays that use that silicon. The DisplayPort 1.4 standard was released in the early 2016, over 2 years ago, and we're only just now starting to see it implemented in monitors (I believe it has been implemented on only 1 monitor prior to this, the Dell UP3218K). Also, there are no graphics cards with HDMI 2.1 yet, so it wouldn't help much right now on a monitor anyway.
The HDMI 2.1 compliance test specification isn't even finished being written yet, so even if you had HDMI 2.1 silicon ready somehow, there's currently no way to have it certified, as the testing procedures haven't been released by the HDMI Forum yet. HDMI 2.1 is still under development from a consumer perspective. The release of the main specification is only a release for engineers.
DSC Compression - The Missed Opportunity
The creators of these monitors could have opted to use Display Stream Compression (DSC), which is a form of compression, unlike subsampling; it reduces bandwidth, and the image is reconstructed on the receiving side. DSC is part of the DisplayPort 1.4 standard, but Acer/ASUS chose not to implement it, likely for hardware availability reasons; presumably no one has produced display controllers that support DSC, and Acer/ASUS wanted to rush to get the product out rather than implement 4K 144 Hz properly. Note that DP 1.4 supports up to 4K 120 Hz uncompressed and non-subsampled; they could have simply released it as a 4K 120 Hz monitor with no tricks, but that sweet 144 Hz number was calling to them I guess. They probably feel marketing a "120 Hz" monitor would seem outdated, and don't want to be outdone by competition. Such is life in this industry... Still, they can be run at 120 Hz non-subsampled if you want, no capability has been lost by adding subsampling. Just that people are not getting what they expected due to the unfortunate lack of transparency about the limitations of the product.
EDIT: I forgot that these are G-Sync monitors. This is most likely why the monitor manufacturers did not support proper 4K 144 Hz using DSC, dual cables, or some other solution. When you make a G-Sync display, you have no choice but to use the NVIDIA G-Sync module as the main display controller instead of whatever else is available on the market. This means you are forced to support only the features that the G-Sync module has. There are several versions of the G-Sync module (these monitors use a new one, with DisplayPort 1.4 support), but G-Sync has historically always been way behind on interface support and very barebones in feature support, so come to think of it I highly doubt that the new G-Sync module supports DSC, or PbP/MST (for dual cable solutions).
If this is the case, it's more the fault of NVIDIA for providing an inadequate controller to the market, than the monitor manufacturers for "choosing" to use chroma subsampling (it would be the only way of achieving 144 Hz in that case). However it is still on them for not simply releasing it as a 4K 120 Hz display, or being clear about the chroma subsampling used for 144 Hz. Anyway, we'll have to wait and see what they do when they release FreeSync or No-sync 4K 144 Hz monitors, where NVIDIA's limitations don't apply.
DSC Concerns
Before anyone says "meh we don't want DSC anyway", I'll answer the two reservations I anticipate people will have.
DSC is a lossy form of compression. While it is true that DSC is not mathematically lossless, it is much much better than chroma subsampling since it recovers almost all of the original image. Considering that in natural images most people don't even notice 4:2:2 subsampling, image quality reduction with DSC is not going to be noticeable. The only question is how it performs with text, which remains to be seen since no one has implemented it. Presumably it will handle a lot better than subsampling.
Latency. "Compression will add tons of lag!". According to VESA, DSC adds no more than 1 raster scan line of latency. Displays are refreshed one line at a time, rather than all at once; on a 4K display, the monitor refreshes 2160 lines of pixels in a single refresh. At 144 Hz, each full refresh is performed over the course of 6.944 ms, therefore each individual line takes around 3.2 microseconds (0.0032 ms), actually less than that due to blanking intervals, but that's a whole different topic :P https://www.displayport.org/faq/#tab-display-stream-compression-dsc
How does VESA’s DSC Standard compare to other image compression standards?
Compared to other image compression standards such as JPEG or AVC, etc., DSC achieves visually lossless compression quality at a low compression ratio by using a much simpler codec (coder/decoder) circuit. The typical compression ratio of DSC range from 1:1 to about 3:1 which offers significant benefit in interface data rate reduction. DSC is designed specifically to compress any content type at low compression with excellent results. The simple decoder (typically less than 100k gates) takes very little chip area, which minimizes implementation cost and device power use, and adds no more than one raster scan line (less than 8 usec in a 4K @ 60Hz system) to the display’s throughput latency, an unnoticeable delay for interactive applications.
Conclusion
I know the internet loves to jump on any chance to rant about corporate deceptions, so I suppose now it's time to sit back and watch the philosophical discussions go... Is converting to YCbCr, reducing the resolution to 1920 × 2160 in 2 out of 3 components, and converting back to RGB really still considered 4K?
Then again, a lot of people are still stuck all the way back at considering anything other than 4096 × 2160 to be "4K" at all :P (hint: the whole "true 4K is 4096 × 2160" was just made up by uninformed consumer journalists when they were scrambling to write the first "4K AND UHD EXPLAINED" article back when 4K TVs were first coming out; in the cinema industry where the term originated from, "4K" is and always has been a generic term referring to any format ≈4000 pixels wide; somehow people have latched onto the "true 4K" notion and defend it like religion though... But anyway, getting off topic :3)
These 4K 144 Hz monitors use YCbCr 4:2:2 chroma subsampling for 4K 144 Hz which is a huge disappointment for me personally. The best you can get with RGB or YCbCr 4:4:4 is 4K 120 Hz with 8 bpc color depth, or 4K 98 Hz with 10 bpc color depth (HDR). Honestly that's fine to me, I'd run it at 120 Hz 8 bpc personally, I'm just disappointed they used subsampling over DSC to get the 144 Hz. Just a friendly PSA though, so hopefully fewer people will be caught off guard by this. I'd wait for second-generation 4K 144 Hz monitors personally.
66 notes
·
View notes
Text
AMD Radeon RX 570: Review 2021 | Test| Specs| Hashrate | Profit (Bad and Good)
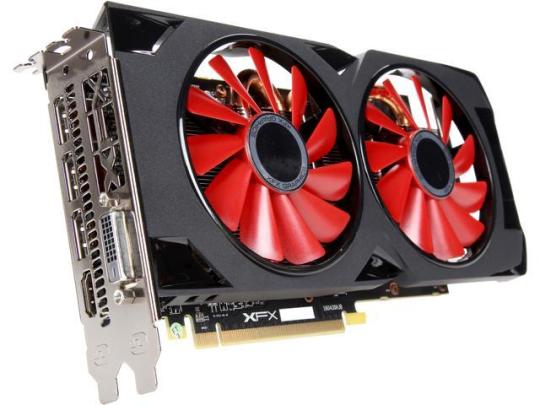
AMD Radeon RX 570 in mining: Best Review 2021 | Testing| Hashrate | Profitability | Specs | Best Coins (Ethereum) - The RX 570 video cards have shown good performance in mining and have proven themselves in the field of ether mining. On the AMD RX 570, mining can bring good profit, but for this you need to carefully study the range of products from various manufacturers and properly overclock the video card. The article will describe the overclocking of the RX 570 8gb video card, for mining, which card model is more suitable and how you can reduce the power consumption of the RX 570 in mining. Please note About The AMD Radeon RX 570 Review - The Review was done earlier than 2021 so their will be variation interms of the rate would earn when currency exchange is taken into consideration. AMD RX 570 in mining, characteristics and relevance (2021) The profit that a coin mining farm can bring to the owner depends on the power of the video card. Therefore, the need for new products among video cards arises more from miners than from gamers. Miners, at the earliest opportunity, evaluate and give recommendations on new video cards, give them performance ratings and describe the possibility of overclocking the memory and processor of the device. After the release, RX 570 attracted the interest of farm owners, and those who were just about to start mining. In order to somehow cover the shortage of video cards, various manufacturers have released their own models of cards based on this chip. This ensured the popularity of RX 570 cards among miners and the demand in the computer hardware market. They gradually began to take leadership positions in this area and stood alongside their predecessor, the RX series. On the RX 570 video card , Ethereum mining performed well and thanks to this, it became the main device that mines coins on algorithms that do not use ASIC architecture . But, even the arrival of the first ASIKs on the air did not put an end to gpu mining. Cheap and hardy RX graphics cards have remained profitable. However, everything flows, everything changes. Several years ago, the powerful and relatively inexpensive 570 ousted not only the bulky and energy-consuming R9 series cards from the cryptoasset mining market, but also its closest relatives, the RX 470. And now this model is being replaced by the Navi series graphics adapters. However, it cannot be said that the RX 570 is no longer relevant for mining. Many crypto-miners have cards of this line and still mine Ether. Of course, this primarily concerns gpu devices with 8GB memory, but with the current Ethereum rate, it’s too early to write off four gigabytes, because there is also Ethereum classic, which can be mined on the RX 570 for at least a couple of years, and if its modernized algorithm does not break through ASIK and more. Ravencoin also brings good profit, so it's too early to write off this model and let's get acquainted with its technical parameters. People Also Asked: Questions about Radeon RX 570 Radeon RX 570 - Still Enough for 1080p in 2021? https://www.youtube.com/watch?v=W5kideA_roE The standard features of the RX 570 - number of processors - 2048 pcs. ; - interface - PCI-E ; - number of texture units - 128 pcs. ; - core frequency - 1255 MHz. ; - memory frequency - 7000 MHz. ; - memory capacity - 256 bits ; - maximum power consumption - 150 watts . Which RX 570 is the best for mining, model selection The RX 570 video card was produced in two variations: 4 GB and 8 GB of memory . Buying this model for mining in 2018, you can ignore the amount of video memory. Indeed, this option has practically no effect on the speed of mining coins of the Ethash (DaggerHashimoto) algorithm. Last spring, everyone was ready for the fact that for another month or two and 4 GB will not be able to mine ETH and ETC , but for the RX 570 these are the most profitable coins. Of course, many other coins and tokens have been created on the basis of Dagger Hashimoto, but the profitability of mining will drop significantly. As a result, it turned out, how it happened. A very interesting story happened to the classic. The miners using AMD products were predicted to fail, but they continue to work safely. As of February 3, 2021, a mining farm of six RX 570 cards brings on Ether about $ 15 per day (without deducting the cost of electricity). Where to mine Ethereum Classic is practically irrelevant. The hashrate on both Windows and Linux is almost the same. By mining the ETC token, you can earn 3 USD in 24 hours. The profit on other Ethash coins is even smaller. On Equihash, the reds lag behind the greens, except for the Beam crypto coin. On kryptonite, after the departure of Monero, there were no profitable alts for a long time, but then Haven went up in price. The market is going up now, in the cold season you can successfully mine RVN. and other tokens can become more profitable. Perhaps not today, that by tomorrow someone will launch a new, profitable for mining, the project and the situation will improve. In addition, it should be borne in mind that Ethereum is switching to PoS mining, and the Ethereum classic project, according to Vitalik Buterin, will merge with large ether in the near future, and then these coins will become inaccessible for traditional mining. But still, 8 GB cards have more opportunities, for example, they can be used to mine a very promising Grin coin and other altcoins Cuckatoo31. Once, miners, due to indicators that do not change depending on the amount of memory, when mining with the DaggerHashimoto and Equihash algorithms, chose the one that was cheaper , that is, the version with 4 GB . When the exchange rate began to change, many had to think about buying a version with a large amount of memory. Therefore, it is better to immediately overpay a little and take the 8 GB version . This applies not only to the RX 570, in a year and a half the turn of the six-gig 1660 S and 5600 XT will come . Get new models with 8 GB or higher memory. Even if the rate does not change for the worse, at any time a new algorithm may appear or the existing one may change, which will require more RAM to increase the hash rate. RAM sticks from Elpida and Hynix have pretty good overclocking potential and are found in RX 570 cards from most manufacturers. But there are also video cards with memory from Samsung, after the timing firmware they can provide a very high hash rate. Such memory chips are installed in Gigabyte RX 570 ( mainly AORUS) and in Sapphire Nitro + RX 570 . https://www.youtube.com/watch?v=UmsxM-gGles Also, a good cooling system is an important parameter when choosing a card. This is exactly what the PowerColor RX 570 Red Devil has . There are as many as 3 fans installed on this card, due to which it remains as cold as possible. Top 10 Question Asked About The AMD Radeon RX 570 By Customer Before they Buy Top 10 Question Asked About The AMD Radeon RX 570 By Customer Before they BUY Question 1: Does The RX 570 card works for a power supply thermaltake tr2-600nl2nc 600w (not certified)??? Answer: Yes Question 2: Does the RX 570 works with a msi z97 motherboard lga1150 ddr3 Answer: Yes! but got to have the 500watt PSU. Question 3: The AMD Radeon 570, Is this the same as an amd rx 580 8gb? Answer: No, the RX 580 has more compute units and usually a faster GPU core clock speed. The RX 580 is a better performing graphics card. Question 4: Has anyone installed this on an older fm2+ mobo? i have the msi a88x g45 board with the a10-7800. pcpartpicker said it should. anyone done this? Answer: This card is perfect for bottom of line motherboards. To make sure, go to userbenchmark and see if anyone else is running it. I have mine on an Asus 320m, which is absolutely bottom tier. Answer 2: I would say this will run well. I recently had to upgrade to another board and cpu, BUT I had the rx580 8gb on my fm2a75m-dgs. I loved it, but couldn’t get the full power from the card. Turning off shadows and any graphics that utilize more cpu power helps things for playing on a 4K tv. Question 5: So i got all my parts not to long ago. when built everything turned on but i got a no singal screen. the gpu light turns too. what should i do? Answer: Sorry you are having issues with the card. My install went without a hitch and I am pleased with the card overall. Your symptoms sound kinda vague and diagnosing the issue without hands on examination would be a fruitless task to take on. It could be many so things from something so simple as plugging into motherboard video ports instead of the ports on the video card all the way to a defective GPU. If you'er a Prime member I would suggest sending it back if it's within the Amazon Prime return period. I would then get another unit or a different RX 570 brand name (suggest MSI or Sapphire brands both are very good and not much more expensive). The Power Color 8GB version is even less expensive than the XFX but it's on par with XFX in quality. If that doesn't resolve the issue you may have problems with other parts of your system. Something to check is to see if the GPU is on your motherboard's compatibility list for GPU's. I think it's unlikely that that is the problem, but if all else fails perhaps it may be a contributing issue. Good Luck. Question 6: Is it normal for the fans not spinning at start up? Answer: no Answer from other Customer: This card waits until the temps get high enough before it brings the fans on (usually like 50c or so) Question 7: Can the blue LED above the power connector be disabled? Answer: You could put some paint, tape, or glue on it, but no light means no power. Question 8: What is the warranty on this card? Answer: The XFX website says the warranty is 3 years for manufacturers defects. Question 9: Is The Radeon RX 570 a 16 pcie? Answer: Yes Question 10: Will this card work with dell optiplex 9020 & 4 monitors plus run well on x-plane 11 and ms2020? i would like to buy two to run 6 or 7 monitors? Answer: This card is pretty bad on its own so id say if you wanna run alot of monitors id get a different gpu ( From a customer Point of View) Top 3 Best Reviews of the Radeon RX 570 by Customer on Amazon XFX Radeon RX 570 RS Edition 1286MHz, 8gb GDDR5, DX12 VR Ready, Dual BIOS, 3xDP HDMI DVI, AMD Graphics Card (RX-570P8DFD6) Amazon Customer Review 1: I have this paired with a GIGABYTE B360M DS3H Mobo, 8GB 2400 DDR4 ram, and believe it or not a pentium gold g5400, And a Samsung Evo 850 512gb SSD, alongside 2 1TB HDDs. This card does not disappoint it's f****** awesome, Fornite at 1920X1080 100 FPS in performance mode without overclocking. Apex legends in the menu 150 FPS in game highest 112 FPS when things get crowded about 70 it has dipped as low as 58 FPS but that's impressive with this buget GPU and Budget CPU. Dolphin emulator all GameCube games play perfect Mario sunshine in at 50 FPS other games look great like HD remasters!! such as Mario's brothers mansion. Brawl for Wii locked at 60 FPS in fullscreen. No errors in N64 or Wii/GC emulators. My favorite part with the software from amd it's super simple to keep track of CPU,GPU,RAM usage and load. The fans on this GPU may not spin at all unless the temp is at 60C or above so don't freak if the fans are not spinning with the AMD software in the performance section you can override 0 RPM and have fans spin at desired speed. Hope this helped! Amazon Customer Review 2: Primarily used in conjunction with an old Intel i7 4770k, ASUS Z87-A mobo, 16GB DDR3 1866Mhz and replaces an old GTX 750. Decent gaming with 1080p. AVOID installing the Radeon Adrenalin software package. Version 2020-edition-20.4.2-apr23 crashes EVERY SINGLE TIME with Doom Eternal in Windows 10 x64. Run the Adrenalin software package to unpack the drivers, then cancel the installation. Then manually install the drivers through the Windows device manager from the directory where the drivers were unpacked to avoid installing the PURELY OPTIONAL Adrenalin software. Fan noise is barely audible-to-acceptable when gaming. I'm using a full-sized ATX with 120mm intakes and exhausts, so air flow around the video card isn't a problem. Fans are barely audible within a fully-enclosed ATX case when playing Doom Eternal at 1920x1080 / Ultra Nightmare Settings, but it can burst to 100% LOUD AS HELL during POST and stress testing. And I mean LOUD, like fan noise from a 1000 watt microwave kitchen oven! What's weird about this card is that it has 2 heat pipes installed BUT it has room for a 3rd. There are cut-outs in the heat fins and extra space in the heat-sink where a 3rd heat pipe can be installed, but are purposely left empty. It still works, though. Amazon Customer Review 3: I recently purchased this item (RX 570 version) for use in my recording studio, where we have 4 24" displays in place for mixing and recording music tracks. I wasn't completely sure if this would support our application, but it turned out to be the perfect choice. We did have to purchase 3 cables to go from the card's 3 DisplayPorts to the HDMI inputs on 3 of the monitors and connected the 4th using a standard HDMI cable. Worth noting that you will need two 6-pin power cables available from your PC's power supply to power the card. All in all, the installation and setup took less than an hour. But, that included setting up four displays and downloading the drivers, physically installing the card, etc... I recommend this to anyone needing up to 4 monitors controlled with one display adapter. Worst Review by Customers of the AMD Radeon RX 570 On Amazon Worst Review by Customers of the AMD Radeon RX 570 On Amazon Worst Review of Customers on Amazon RX 570: When I first received this card, I was extremely happy to finally have a graphics card that gives me double the performance compared to my other graphics card. Except after using this card for more than 2 hours, it starts to crash and screen flicker my monitor. I did everything I could to make sure it wasn't my drivers that was the issue by installing old drivers and new ones and I still got the same problems. I even upgraded to windows 10 and I still have issues with this graphics card crashing my computer. When I plug in my old gpu, it works perfectly even though i used the same connectors and drivers and never once got an issue with my old gpu. So i returned this card and got a replacement, also the display ports stopped working after a few days of use. After i got my replacement, I thought the card was good and I didn't have to return it but same issues started to happen after using this card again for more than 2 hours. I felt like they sent me faulty cards on purpose or they don't test their graphics cards because twice in a row I got faulty cards from this manufacturer. I had such a massive headache from this card from this manufacturer. I tried to play devils advocate and gave XFX a chance to to redeem themselves by giving me a replacement gpu and that even didn't worked. I will never buy from this manufacturer ever again because I never had this issue with other gpu makers but this one I have to deal with constant crashing of my drivers and computer but when I use my other gpu's I have no issues. This manufacture made me lost trust in AMD because even though 150 bucks isn't a lot to most people, it means a lot to me because my family lives pay check to pay check and it's hard to save up that kind of money and for the product that I paid for to die on me in less than 2 weeks is absurd. Please note (RX 570): In spite of the bad review by a few customers, we experience no such issues (not saying you won't) but We would comfortably recommend this product for mining cryptocurrency based on our testing that we will be continuing below. Hashrate on different algorithms, algorithm calculator - RX 570 It makes no sense to mine bitcoins and other currencies, the SHA-256 algorithm on the RX 570. No GPU comes close to the performance of an ASIC . In general, AMD video cards are so far the most profitable mining devices compared to Nvidia for the same money. Specification - AMD Radeon RX 570 The RX 570 with factory settings will be able to mine coins at this speed: AlgorithmHashrateConsumptionEthhash17 Mh / s120 wattsEthash4GB29-30 MH / s120 wattsZhash19 H/s100 wattsKawPow13 MH / s150 wattsCNHeavy640 H/s110 wattsBeamhash14 H/s120 wattsAion85 H/s100 wattsNeoScrypt700 Kh / s140 wattsBCD7.3 Mh / s110 wattsTimeTravel108.0 Mh / s115 wattsX16R5 Mh / s100 wattsLyra2Z0.42 Mh / s110 wattsHex2.1 Mh / s85 wattsProgPow6.7 Mh / s130 wattsX22i3.4 Mh / s110 watts These values show that mining Ethereum, Ravencoin. Haven. Ethereum Classic and other coins will provide good profits. To figure out what the cards are capable of, you can find out how they manifest themselves on various algorithms. Mining Ethereum The Ethereum dag file has already crossed the 4GB mark, so there can be no question of a speed of 30 megahash for a four-gigabyte. On Linux, after long dances with a tambourine, at best you will get 17 Mh / s, and an inexperienced miner will get no more than 11 Mh / s. It makes sense to get Ether on Windows on four gigabytes, only in the hope of a future colossal increase in value. On cards with 8 GB of video memory, it is now necessary to mine Ether, it brings tangible profit. From one card you will take "clean" about 150 rubles per day. The indicator was calculated at the time of publication, the exact profitability can be calculated on the Whattomine website . Regarding the double mining popular in the past, it should be said that it has long been out of date. True, there is ETH + Zill, but this is still not dual mining in its purest form. You just take a little distraction from Ether in order to serve the zilik, since in this network miners are required only periodically. Ethash4GB This category includes both the modernized ETC algorithm and all other alts running on regular Ethash. Compared to big Ether, the profit is less. In addition to the classic in the current period on Ethash4GB, gpu miners have nothing to mine. The four-geek ASIKI Innosilicon works here. Mining Rawencoin After changing the algorithm, the ravens also changed their color. Previously, this coin was mined on green cards, now more on red ones. The coin is profitable, but very fry at cards. In winter, nothing else, but in summer, no additional cooling is possible. Mining Zcash This algorithm has long been under the control of ASICS miners . So mining Zcash doesn't make sense. It is worth paying attention to lesser-known coins only if we are talking about dual mining, which the video card can handle without any problems. How to flash RX 570 for mining How to flash RX 570 for mining The RX 570 firmware for mining is an important procedure. Without this, it is impossible to achieve the highest hash rate. Any miner can flash a Bios 570 video card, based on the instructions. The correct RX 570 firmware for mining can be a turning point in the mining of coins, which will affect profits and allow you to make more money. Stock firmwares for cards can be found on specialized sites and forums for miners Techpowerup. You can find the timings yourself, for example, here: https://forum.bits.media/index.php?/topic/38510-eth. The SRBPolarisV3 program is ideal for editing the BIOS, the download link is https://mega.nz/#F!TVgGHQZS!yfmtIvbF67iS4QrEJqb26g. If the video card has Samsung memory installed, then we change the timings from 1750 and higher, and from 1500 and higher for other versions. It is worth paying attention to the compliance of the program with the maximum characteristics of the equipment in order to get rid of the overclocking of the video card after overclocking. It is recommended to leave 5% of the total performance unused so as not to damage the device. Read the full article
0 notes