#YouTube scraper Python
Explore tagged Tumblr posts
Text
How to start learning a coding?

Starting to learn coding can be a rewarding journey. Here’s a step-by-step guide to help you begin:
Choose a Programming Language
Beginner-Friendly Languages: Python, JavaScript, Ruby.
Consider Your Goals: What do you want to build (websites, apps, data analysis, etc.)?
Set Up Your Development Environment
Text Editors/IDEs: Visual Studio Code, PyCharm, Sublime Text.
Install Necessary Software: Python interpreter, Node.js for JavaScript, etc.
Learn the Basics
Syntax and Semantics: Get familiar with the basic syntax of the language.
Core Concepts: Variables, data types, control structures (if/else, loops), functions.
Utilize Online Resources
Interactive Tutorials: Codecademy, freeCodeCamp, Solo Learn.
Video Tutorials: YouTube channels like CS50, Traversy Media, and Programming with Mosh.
Practice Regularly
Coding Challenges: LeetCode, HackerRank, Codewars.
Projects: Start with simple projects like a calculator, to-do list, or personal website.
Join Coding Communities
Online Forums: Stack Overflow, Reddit (r/learn programming).
Local Meetups: Search for coding meetups or hackathons in your area.
Learn Version Control
Git: Learn to use Git and GitHub for version control and collaboration.
Study Best Practices
Clean Code: Learn about writing clean, readable code.
Design Patterns: Understand common design patterns and their use cases.
Build Real Projects
Portfolio: Create a portfolio of projects to showcase your skills.
Collaborate: Contribute to open-source projects or work on group projects.
Keep Learning
Books: “Automate the Boring Stuff with Python” by Al Sweigart, “Eloquent JavaScript” by Marijn Haverbeke.
Advanced Topics: Data structures, algorithms, databases, web development frameworks.
Sample Learning Plan for Python:
Week 1-2: Basics (Syntax, Variables, Data Types).
Week 3-4: Control Structures (Loops, Conditionals).
Week 5-6: Functions, Modules.
Week 7-8: Basic Projects (Calculator, Simple Games).
Week 9-10: Advanced Topics (OOP, Data Structures).
Week 11-12: Build a Portfolio Project (Web Scraper, Simple Web App).
Tips for Success:
Stay Consistent: Practice coding daily, even if it’s just for 15-30 minutes.
Break Down Problems: Divide problems into smaller, manageable parts.
Ask for Help: Don’t hesitate to seek help from the community or peers.
By following this structured approach and leveraging the vast array of resources available online, you'll be on your way to becoming proficient in coding. Good luck!
TCCI Computer classes provide the best training in online computer courses through different learning methods/media located in Bopal Ahmedabad and ISCON Ambli Road in Ahmedabad.
For More Information:
Call us @ +91 98256 18292
Visit us @ http://tccicomputercoaching.com/
#computer technology course#computer coding classes near me#IT computer course#computer software courses#computer coding classes
0 notes
Text
Mastering Python: Advanced Strategies for Intermediate Learners
Delving Deeper into Core Concepts
As an intermediate learner aiming to level up your Python skills, it’s crucial to solidify your understanding of fundamental concepts. Focus on mastering essential data structures like lists, dictionaries, sets, and tuples.
Considering the kind support of Learn Python Course in Hyderabad, Whatever your level of experience or reason for switching from another programming language, learning Python gets much more fun.

Dive into the intricacies of Object-Oriented Programming (OOP), exploring topics such as classes, inheritance, and polymorphism. Additionally, familiarize yourself with modules, packages, and the Python Standard Library to harness their power in your projects.
Exploring Advanced Python Techniques
Once you’ve strengthened your core knowledge, it’s time to explore more advanced Python topics. Learn about decorators, context managers, and other advanced techniques to enhance the structure and efficiency of your code. Dive into generators, iterators, and concurrency concepts like threading, multiprocessing, and asyncio to tackle complex tasks and optimize performance in your projects.
Applying Skills Through Practical Projects
Practical application is key to mastering Python effectively. Start by working on hands-on projects that challenge and expand your skills. Begin with smaller scripts and gradually progress to larger, more complex applications. Whether it’s building web scrapers, automation tools, or contributing to open-source projects, applying your knowledge in real-world scenarios will solidify your understanding and boost your confidence as a Python developer.
Leveraging Online Resources and Courses
Take advantage of the plethora of online resources available to advance your Python skills further. Enroll in advanced Python courses offered by platforms like Coursera, edX, and Udemy to gain in-depth knowledge of specific topics. Additionally, explore tutorials on YouTube channels such as Corey Schafer and Tech with Tim for valuable insights and practical guidance.
Engaging with the Python Community
Active participation in the Python community can accelerate your learning journey. Join discussions on forums like Stack Overflow and Reddit’s r/learnpython and r/Python to seek help, share knowledge, and network with fellow developers. Attend local meetups, workshops, and Python conferences to connect with industry professionals and stay updated on the latest trends and best practices.
Enrolling in the Best Python Certification Online can help people realise Python's full potential and gain a deeper understanding of its complexities.

Enriching Learning with Python Books
Python books offer a wealth of knowledge and insights into advanced topics. Dive into titles like “Fluent Python” by Luciano Ramalho, “Effective Python” by Brett Slatkin, and “Python Cookbook” by David Beazley and Brian K. Jones to deepen your understanding and refine your skills.
Enhancing Problem-Solving Abilities
Strengthen your problem-solving skills by tackling coding challenges on platforms like LeetCode, HackerRank, and Project Euler. These platforms offer a diverse range of problems that will challenge your algorithmic thinking and hone your coding proficiency.
Exploring Related Technologies
Expand your horizons by exploring technologies that complement Python. Delve into web development with frameworks like Django and Flask, explore data science with libraries like Pandas, NumPy, and Scikit-Learn, and familiarize yourself with DevOps tools such as Docker and Kubernetes.
Keeping Abreast of Updates
Python is a dynamic language that evolves continuously. Stay updated with the latest developments by following Python Enhancement Proposals (PEPs), subscribing to Python-related blogs and newsletters, and actively participating in online communities. Keeping abreast of updates ensures that your skills remain relevant and up-to-date in the ever-evolving landscape of Python development.
#python course#python training#python#technology#tech#python online training#python programming#python online course#python online classes
0 notes
Text
A Comprehensive Guide On How To Scrape YouTube Comments Using Python?

Introduction to YouTube
YouTube is a well-known online video-sharing platform that allows users to upload, view, and share videos. Three former PayPal teams- Steve Chen, Chad Hurley, and Jawed Karim, created it in February 2005. Google acquired YouTube in November 2006 for $1.65 billion, and it has since become one of the most visited websites.
Users can create their channels on YouTube and upload videos in various formats, including vlogs, music videos, tutorials, documentaries, and more. The platform provides various tools and features for video editing, customization, and optimization. Viewers can interact with videos by liking, commenting, sharing them, and subscribing to channels to receive updates on new content.
YouTube has significantly impacted media consumption, entertainment, and the internet culture. It has become a platform for content creators to reach a global audience and has given rise to many successful YouTubers and influencers. YouTube's algorithm suggests videos based on users' preferences and viewing history, making it a powerful platform for discovering new content.
What is Web Scraping?
Web scraping, or data extraction, is the process of extracting data from websites. It automatically collects data from web pages and stores it in a structured format. It has become one of the powerful tools for market researchers to quickly and easily collect large amounts of data. Several companies provide cutting-edge social media app data scraping services to extract valuable information from social media platforms.
About YouTube Comments
YouTube comments are user-generated responses or feedback on videos uploaded to the YouTube platform. They provide a space for viewers to engage with the content, express their thoughts, ask questions, share opinions, and interact with other viewers and the content creator.
YouTube comments are available below the video player on the video's webpage. YouTube allows users to leave comments anonymously or through their YouTube channel or Google account. Users can write text comments, reply to others, and engage in conversations within the comment section. You must rely on professional that use advanced methodologies and tools to scrape YouTube comments.
List Of Data Field

Following are the data fields that are available on scraping YouTube comments:
Video ID
Comment Text
Comment Author
Comment ID
Comment Metadata
User Information
Comment Replies
Likes & Dislikes
Why Scrape YouTube Comments?
One of the significant reasons to scrape YouTube comments is to stay updated and trendy in the respective industry. If you are willing to scale up your business, you must collect large amounts of data. The YouTube comments provide entirely new data that is only available in some places and aid more in comprehensive analysis. These comments are a valuable source for sentiment analysis, brand monitoring, tracking competitors, and several other purposes. The scraped data will help understand the user experience, customer pain points, other services, etc.
Leveraging the benefits of YouTube comment scraper, you can quickly and efficiently get essential data to help make informed decisions and boost your business.
Sentiment Analysis: Analyzing the sentiment of YouTube comments can provide an understanding of how viewers perceive and react to a particular video or topic. By scraping comments and applying sentiment analysis techniques, you can gauge the overall sentiment, including positive, negative, or neutral associated with a video. This information will help evaluate audience reactions and adjust the strategies accordingly.
User Engagement: YouTube comments serve as a platform for viewers to engage with content creators and each other. Scrape YouTube comments to assess the engagement, interaction, and community participation surrounding a video. This data will help in building stronger relationships with viewers.
Feedback: Scraping YouTube comments allows content creators to gather feedback directly from their audience. Analyzing comments can provide valuable insights into viewers' opinions, suggestions, etc. By understanding the feedback, creators can improve their content, address concerns, and enhance the viewing experience.
Market research: YouTube comments can be a rich source of market research data. By scraping comments related to specific products, brands, or topics, businesses can gain insights into consumer opinions, preferences, and experiences. This information helps identify trends, evaluate customer satisfaction, and inform marketing strategies.
Steps to Scrape YouTube Comments with Python


This function will find all usernames and comments from the comment section. We will scrape only the newly loaded 20 comments per scroll.


Wrapping Up: Thus, scraping YouTube comments is the best option to understand the viewer's sentiment and use the data to optimize the content accordingly. It will help collect customer feedback and enhance your products and services
For further details, contact iWeb Data Scraping now! You can also reach us for all your web scraping service and mobile app data scraping needs.
#ScrapeYouTubeCommentsUsingPython#YouTubecommentscraper#scrapingYouTubecommentsusingPython#scrapeYouTubecomments#socialmediaappdatascrapingservices
0 notes
Text
Crawl and scrape videos, channels, subscribers, and other variations of public data by using our YouTube scraper. Try the best tool available now
#youtube scraper#web Scraping YouTube Data#Scraping Data from YouTube#YouTube Data Scraping Services#YouTube scraper Python#YouTube comment scraper#YouTube Channel Scraper#YouTube Data Scraper
1 note
·
View note
Text
How to YouTube Channel List Data Scraping ?
Scrape YouTube video channels with a search term or URL as an input to get video data like channel name, a number of views, likes,Subscribers email list as well as a number of sub scribers with results provided in different formats like JSON, HTML, and XLS.
About YouTube YouTube is a video sharing site (free), which makes that easier to watch videos online. You may even create as well as upload own videos as well as share with others. Initially started in 2005, this website is amongst the most popular websites on the Web, as visitors watch about 6 billion hours of videos every month!
With YouTube, you can find lots and lots of videos. On average, 100 hours of video get uploaded every minute on YouTube! So,you will always have something new to watch! You'll get all types of videos on YouTube including adorable cats, science lessons, cooking demos, fast fashion tips, and many more.
Listing Of Data Fields At iWeb Scraping, we scrape the following data fields from YouTube channels:
YouTube Channel URL Banner Image URL Channel Logo Image URL Channel Title Verified No Of Subscribers Description Email Location Joined Date Number Of Views Social Media Links
YouTube Channel Scraper – Get All Video Links From YouTube Channel
The quality insights as well as end results of a data application depend completely on the quality of data and that’s why at iWeb Scraping,we offer the best YouTube API services to scrape YouTube channel or scrape YouTube search results.
YouTube has all the user-generated content. Rather than having videos from key TV networks or movie studios, you can find creative and amazing videos created by people.
You can also record and share personal videos, and be a part of any available community. With iWeb Scraping, it’s easy to do scraping videos using Python. iWeb Scraping provides the best YouTube Channel List Scraping Services to scrape or extract data from the YouTube channel list.
https://www.iwebscraping.com/youtube-channel-list-scraping.php
1 note
·
View note
Text
E-Commerce Website Data Scraping Services

Web Scraping is the process where you can automate the process of data extraction in speed and a better manner. By this, you will come to know about implementing the use of crawlers or robots that automatically scrape a particular page and website and extract the required information. It can help you to extract data that is invisible and you can copy-past also. However, it can also help to take care of saving the extracted data in a better way and readable format. Usually, the extracted data is available in CSV format
3i Data Scraping Services can be useful in extracting product data from E-commerce Website Data Scraping Services doesn’t matter how big data is.
How to use Web Scraping for E-Commerce?
E-commerce data scraping is the best way to take out the better result. Before I should start various benefits of using an E-Commerce Product Scraper, I want to go over how you can use potentially it.
Evaluate Demand:
E-commerce data can be monitor to maintain all the categories, products, price, reviews, listing rates. By this, you can rearrange the entire product sale in various categories depending on various demands.
Better Price Strategy:
In this, you can use product data sets which include product name, categories, type of products, reviews, ratings, and you will get all the information from top e-commerce websites so that you can influence Competitors' pricing strategy and
Competitors’ Price Scraping from the eCommerce Website
Reseller Management:
From this, you can manage all your partners & resellers through E-Commerce Product Data Extraction data from all the different stores. Various types of data processing can be disclosed if there are different terms of MAP violation.
Marketplace Tracking:
You can easily monitor all your ranking which is advised for all the keywords for specific products through 3i Data Scraping Services and you can measure the competitors on how you can optimize
Product Review & ratings scraping
for ranking and you can scrape the data via different tools and we can able to help you to scrape the data for E-Commerce Website Data Scraper Tools.
Identify Frauds:
While using the crawling method which can automatically scrape the product data as well as you will be able to see Ups & Downs in the pricing. By this, you can utilize to discover the authenticity of a seller.
Campaign Monitoring:
There are many famous websites like Twitter, LinkedIn, Facebook, and YouTube, in which we can scrape the data like comments which is associated with brands as well as the competitor’s brands.
List of Data Fields
At 3i Data Scraping Services, we can scrape or extract the data fields for E-commerce Website Data Scraping Services. The list is given below:
Description
Product Name
Breadcrumbs
Price/Currency
Brand
MPN/GTIN/SKU
Images
Availability
Review Count
Average Rating
URL
Additional Properties
E-Commerce Web Scraping API
Our one of the best E-commerce web Scraping API Services using Python can extract different data from E-commerce sites to provide quick replies within real-time and can scrape E-Commerce Product Reviews within real-time. We do have the ability to automate the business processes using API as well as empower various apps and workflow within data integrations. You can easily use our ready to use customized APIs.
List of E-commerce Product Data Scraping, Web Scraping API
At 3i Data Scraping, we can scrape data fields for any of the web scraping API
Amazon API
BestBuy.com API
AliExpress API
eBay API
HM.com API
Costco.com API
Google Shopping API
Macys.com API
Nordstrom.com API
Target API
Walmart.com API
Tmall API
This is the above data fields for the web scraping API we can scrape or extract the data as per the client’s needs.
How You Can Scrape Product from Different Websites
The another way to scrape product information is you can easily make different API calls using product URL for claiming the product data in real-time. It is just like and close API for all the shopping websites.
Why 3i Data Scraping Services
We are providing the services in such a way that the customer experience should be wonderful. All the clients like to works with us and we are having a 99% customer retention ratio. We do have the team which talks to you within a few minutes and you can ask regarding your requirements.
We provide services that are scalable and capable of crawling that we have the capability to scrape thousands of pages per second as well as scraping data from millions of pages every day. Our wide-range infrastructure makes enormous scale for web scraping becomes easier and trouble-free through many complexes with JavaScript website or Ajax, IP Blocking, and CAPTCHA.
If you are looking for the best E-Commerce Data Scraping Services then contact 3i Data Scraping Services.
#Webscraping#datascraping#webdatascraping#web data extraction#web data scraping#Ecommerce#eCommerceWebScraping#3idatascraping#USA
1 note
·
View note
Text
How to YouTube Channel List Data Scraping ?
Scrape YouTube video channels with a search term or URL as an input to get video data like channel name, a number of views, likes, Subscribers email list as well as a number of sub scribers with results provided in different formats like JSON, HTML, and XLS.
About YouTube YouTube is a video sharing site (free), which makes that easier to watch videos online. You may even create as well as upload own videos as well as share with others.
Initially started in 2005, this website is amongst the most popular websites on the Web, as visitors watch about 6 billion hours of videos every month!
With YouTube, you can find lots and lots of videos. On average, 100 hours of video get uploaded every minute on YouTube!
So,you will always have something new to watch! You'll get all types of videos on YouTube including adorable cats, science lessons, cooking demos, fast fashion tips, and many more.
Listing Of Data Fields At iWeb Scraping, we scrape the following data fields from YouTube channels:
YouTube Channel URL Banner Image URL Channel Logo Image URL Channel Title Verified No Of Subscribers Description Email Location Joined Date Number Of Views Social Media Links
YouTube Channel Scraper – Get All Video Links From YouTube Channel
The quality insights as well as end results of a data application depend completely on the quality of data and that’s why at iWeb Scraping,we offer the best YouTube API services to scrape YouTube channel or scrape YouTube search results.
YouTube has all the user-generated content. Rather than having videos from key TV networks or Smovie studios, you can find creative and amazing videos created by people.
You can also record and share personal videos, and be a part of any available community. With iWeb Scraping, it’s easy to do scraping videos using Python. iWeb Scraping provides the best YouTube Channel List Scraping Services to scrape or extract data from the YouTube channel list.
https://www.iwebscraping.com/youtube-channel-list-scraping.php
0 notes
Text
Building A Web Scraper

Create A Web Scraper
Web Scraper Google Chrome
Web Scraper Lite
Web Scraper allows you to build Site Maps from different types of selectors. This system makes it possible to tailor data extraction to different site structures. Export data in CSV, XLSX and JSON formats. Build scrapers, scrape sites and export data in CSV format directly from your browser. Use Web Scraper Cloud to export data in CSV, XLSX. It also has a number of built-in extensions for tasks like cookie handling, user-agent spoofing, restricting crawl depth, and others, as well as an API for easily building your own additions. For an introduction to Scrapy, check out the online documentation or one of their many community resources, including an IRC channel, Subreddit, and a. This question is related to link building method i am doing seo for web development company and website has more than 2lac backlinks, majority of backlinks come from social bookmarking, article and press release submission. In this recent penguin 2.0 update, i lost my ranking on majority of keywords. Advanced tactics 1. Customizing web query. Once you create a Web Query, you can customize it to suit your needs. To access Web query properties, right-click on a cell in the query results and choose Edit Query.; When the Web page you’re querying appears, click on the Options button in the upper-right corner of the window to open the dialog box shown in screenshot given below.
What Are Web Scrapers And Benefits Of Using Them?

A Web Scraper is a data scraping tool that quite literally scrapes or collects data off from websites. Microsoft office for mac catalina. It is the process of extracting information and data from a website, transforming the information on a web-page into a structured format for further analysis. Web Scraper is a term for various methods used to extract and collect information from thousands of websites across the Internet. Generally, you can get rid of copy-pasting work by using the data scrapers. Those who use web scraping tools may be looking to collect certain data to sell to other users or to use for promotional purposes on a website. Web Data Scrapers also called Web data extractors, screen scrapers, or Web harvesters. one of the great things about the online web data scrapers is that they give us the ability to not only identify useful and relevant information but allow us to store that information for later use.
Create A Web Scraper
How To Build Your Own Custom Scraper Without Any Skill And Programming Knowledge?
Modern post boxes uk. Sep 02, 2016 This question is related to link building method i am doing seo for web development company and website has more than 2lac backlinks, majority of backlinks come from social bookmarking, article and press release submission. In this recent penguin 2.0 update, i lost my ranking on majority of keywords.
Web Scraper Google Chrome
If you want to build your own scraper for any website and want to do this without coding then you are lucky you found this article. Making your own web scraper or web crawler is surprisingly easy with the help of this data miner. It can also be surprisingly useful. Now, it is possible to make multiple websites scrapers with a single click of a button with Any Site Scraper and you don’t need any programming for this. Any Site Scraper is the best scraper available on the internet to scrape any website or to build a scraper for multiple websites. Now you don’t need to buy multiple web data extractors to collect data from different websites. If you want to build Yellow Pages Data Extractor, Yelp Data Scraper, Facebook data scraper, Ali Baba web scraper, Olx Scraper, and many web scrapers like these websites then it is all possible with AnySite Scraper. Over, If you want to build your own database from a variety of websites or you want to build your own custom scraper then Online Web Scraper is the best option for you.
Build a Large Database Easily With Any site Scraper
In this modern age of technology, All businesses' success depends on big data and the Businesses that don’t rely on data have a meager chance of success in a data-driven world. One of the best sources of data is the data available publicly online on social media sites and business directories websites and to get this data you have to employ the technique called Web Data Scraping or Data Scraping. Building and maintaining a large number of web scrapers is a very a complex project that like any major project requires planning, personnel, tools, budget, and skills.
Web scraping with django python. Web Scraping using Django and Selenium # django # selenium # webscraping. Muhd Rahiman Feb 25 ・13 min read. This is a mini side project to tinker around with Django and Selenium by web scraping FSKTM course timetable from MAYA UM as part of my self-learning prior to FYP. Automated web scraping with Python and Celery is available here. Making a web scraping application with Python, Celery, and Django here. Django web-scraping. Improve this question. Follow asked Apr 7 '19 at 6:14. User9615577 user9615577. Add a comment 2 Answers Active Oldest Votes. An XHR GET request is sent to the url via requests library. The response object html is. If your using django, set up a form with a text input field for the url on your html page. On submission this url will appear in the POST variables if you've set it up correctly.
Jul 10, 2019 The Switch itself (just the handheld screen) includes a slot for a microSD Card and a USB Type-C Connector. The Nintendo Switch Dock includes two USB 2.0 Ports and a TV Output LED in the front. The 'Switch tax' also applies to many games that had been previously released on other platforms ported later to the Switch, where the Switch game price reflects the original price of the game when it was first released rather than its current price. It is estimated that the cost of Switch games is an average of 10% over other formats. Get the detailed specs for the Nintendo Switch console, the Joy-Con controllers, and more. Switch specs. The S5200-ON is a complete family of switches:12-port, 24-port, and 48-port 25GbE/100GbE ToR switches, 96-port 25GbE/100GbE Middle of Row (MoR)/End of Row (EoR) switch, and a 32-port 100GbE Multi-Rate Spine/Leaf switch. From the compact half-rack width S5212F-ON providing an ideal form factor. Switch resistance is referred to the resistance introduced by the switch into the circuit irrespective of its contact state. The resistance will be extremely high (ideally infinite) when the switch is open and a finite very low value (ideally zero) when the switch is closed. 2: Graph Showing Typical Switch Resistance Pattern.
Web Scraper Lite
You will most likely be hiring a few developers who know-how to build scale-able scrapers and setting up some servers and related infrastructure to run these scrapers without interruption and integrating the data you extract into your business process. You can use full-service professionals such as Anysite Scraper to do all this for you or if you feel brave enough, you can tackle this yourself.
Apr 15, 2021 Currently, you cannot stream Disney Plus on Switch, however, there is a piece of good news for Nintendo Switch users. It seems that Disney lately announced that Disney Plus streaming service will be accessible on Nintendo’s handheld console. The news originates from a presentation slide revealing the new streaming service available on consoles. Disney plus on switch. Mar 15, 2021 Though mentioned earlier, Disney Plus is available on few gaming consoles. Unfortunately, it is not available on Nintendo Switch as of now. Chances are there to bring it in on the future updates as Nintendo Switch is getting popular day by day. Despite the own store by Nintendo switch, it has only a few apps present. No, there is no Disney Plus app on the Nintendo Switch. If you want to stream movies or shows on your Switch, you can instead download the Hulu or YouTube apps. Visit Business Insider's homepage. Nov 30, 2020 Disney Plus is not available on the handheld console. The Switch only offers YouTube and Hulu as of now, not even Netflix. This tells us that the Nintendo Switch is indeed capable of hosting a.

0 notes
Text
Web page Degree Question Evaluation at Scale with Google Colab, Python, & the GSC API [Video Instructions Included]
New Post has been published on http://tiptopreview.com/page-level-query-analysis-at-scale-with-google-colab-python-the-gsc-api-video-instructions-included/
Web page Degree Question Evaluation at Scale with Google Colab, Python, & the GSC API [Video Instructions Included]
The creator’s views are fully his or her personal (excluding the unlikely occasion of hypnosis) and should not all the time replicate the views of Moz.
The YouTube playlist referenced all through this weblog might be discovered right here:6 Part YouTube Series [Setting Up & Using the Query Optimization Checker]
Anybody who does search engine optimization as a part of their job is aware of that there’s plenty of worth in analyzing which queries are and aren’t sending site visitors to particular pages on a website.
The commonest makes use of for these datasets are to align on-page optimizations with present rankings and site visitors, and to establish gaps in rating key phrases.
Nevertheless, working with this information is extraordinarily tedious as a result of it’s solely accessible within the Google Search Console interface, and you must take a look at just one web page at a time.
On prime of that, to get info on the textual content included within the rating web page, you both must manually overview it or extract it with a software like Screaming Frog.
You want this sort of view:

…however even the above view would solely be viable one web page at a time, and as talked about, the precise textual content extraction would have needed to be separate as effectively.
Given these obvious points with the available information on the search engine optimization neighborhood’s disposal, the info engineering crew at Inseev Interactive has been spending plenty of time desirous about how we will enhance these processes at scale.
One particular instance that we’ll be reviewing on this put up is a straightforward script that permits you to get the above information in a versatile format for a lot of nice analytical views.
Higher but, this can all be accessible with just a few single enter variables.
A fast rundown of software performance
The software mechanically compares the textual content on-page to the Google Search Console prime queries on the page-level to let you realize which queries are on-page in addition to what number of occasions they seem on the web page. An non-obligatory XPath variable additionally permits you to specify the a part of the web page you need to analyze textual content on.
This implies you’ll know precisely what queries are driving clicks/impressions that aren’t in your <title>, <h1>, and even one thing as particular as the primary paragraph inside the primary content material (MC). The sky is the restrict.
For these of you not acquainted, we’ve additionally supplied some fast XPath expressions you should utilize, in addition to the way to create site-specific XPath expressions inside the “Input Variables” part of the put up.
Submit setup utilization & datasets
As soon as the method is about up, all that’s required is filling out a brief record of variables and the remaining is automated for you.
The output dataset contains a number of automated CSV datasets, in addition to a structured file format to maintain issues organized. A easy pivot of the core evaluation automated CSV can offer you the under dataset and plenty of different helpful layouts.

… Even some “new metrics”?
Okay, not technically “new,” however in case you completely use the Google Search Console person interface, then you definitely haven’t possible had entry to metrics like these earlier than: “Max Position,” “Min Position,” and “Count Position” for the required date vary – all of that are defined within the “Running your first analysis” part of the put up.

To essentially exhibit the influence and usefulness of this dataset, within the video under we use the Colab software to:
[3 Minutes] — Discover non-brand <title> optimization alternatives for https://www.inseev.com/ (round 30 pages in video, however you may do any variety of pages)
[3 Minutes] — Convert the CSV to a extra useable format
[1 Minute] – Optimize the primary title with the ensuing dataset
youtube
Okay, you’re all set for the preliminary rundown. Hopefully we have been in a position to get you excited earlier than transferring into the considerably uninteresting setup course of.
Remember the fact that on the finish of the put up, there may be additionally a bit together with a number of useful use circumstances and an instance template! To leap immediately to every part of this put up, please use the next hyperlinks:
[Quick Consideration #1] — The online scraper constructed into the software DOES NOT help JavaScript rendering. In case your web site makes use of client-side rendering, the total performance of the software sadly is not going to work.
[Quick Consideration #2] — This software has been closely examined by the members of the Inseev crew. Most bugs [specifically with the web scraper] have been discovered and glued, however like another program, it’s doable that different points might come up.
For those who encounter any errors, be happy to achieve out to us immediately at [email protected] or [email protected], and both myself or one of many different members of the info engineering crew at Inseev can be joyful that will help you out.
If new errors are encountered and glued, we’ll all the time add the up to date script to the code repository linked within the sections under so essentially the most up-to-date code might be utilized by all!
One-time setup of the script in Google Colab (in lower than 20 minutes)
Stuff you’ll want:
Google Drive
Google Cloud Platform account
Google Search Console entry
Video walkthrough: software setup course of
Under you’ll discover step-by-step editorial directions so as to arrange the whole course of. Nevertheless, if following editorial directions isn’t your most popular methodology, we recorded a video of the setup course of as effectively.
As you’ll see, we begin with a model new Gmail and arrange the whole course of in roughly 12 minutes, and the output is totally well worth the time.
youtube
Remember the fact that the setup is one-off, and as soon as arrange, the software ought to work on command from there on!
Editorial walkthrough: software setup course of
4-half course of:
Obtain the information from Github and arrange in Google Drive
Arrange a Google Cloud Platform (GCP) Mission (skip if you have already got an account)
Create the OAuth 2.zero consumer ID for the Google Search Console (GSC) API (skip if you have already got an OAuth consumer ID with the Search Console API enabled)
Add the OAuth 2.zero credentials to the Config.py file
Half one: Obtain the information from Github and arrange in Google Drive
Obtain supply information (no code required)
1. Navigate here.
2. Choose “Code” > “Download Zip”
*You can too use ‘git clone https://github.com/jmelm93/query-optmization-checker.git‘ in case you’re extra comfy utilizing the command immediate.

Provoke Google Colab in Google Drive
If you have already got a Google Colaboratory setup in your Google Drive, be happy to skip this step.
1. Navigate here.
2. Click on “New” > “More” > “Connect more apps”.

three. Search “Colaboratory” > Click on into the applying web page.

four. Click on “Install” > “Continue” > Check in with OAuth.

5. Click on “OK” with the immediate checked so Google Drive mechanically units acceptable information to open with Google Colab (non-obligatory).

Import the downloaded folder to Google Drive & open in Colab
1. Navigate to Google Drive and create a folder known as “Colab Notebooks”.
IMPORTANT: The folder must be known as “Colab Notebooks” because the script is configured to search for the “api” folder from inside “Colab Notebooks”.

Error leading to improper folder naming.
2. Import the folder downloaded from Github into Google Drive.
On the finish of this step, it is best to have a folder in your Google Drive that accommodates the under objects:

Half two: Arrange a Google Cloud Platform (GCP) venture
If you have already got a Google Cloud Platform (GCP) account, be happy to skip this half.
1. Navigate to the Google Cloud web page.
2. Click on on the “Get started for free” CTA (CTA textual content might change over time).
three. Check in with the OAuth credentials of your selection. Any Gmail electronic mail will work.
four. Observe the prompts to enroll in your GCP account.
You’ll be requested to provide a bank card to enroll, however there may be at present a $300 free trial and Google notes that they received’t cost you till you improve your account.
Half three: Create a 0Auth 2.zero consumer ID for the Google Search Console (GSC) API
1. Navigate here.
2. After you log in to your required Google Cloud account, click on “ENABLE”.

three. Configure the consent display screen.
Within the consent display screen creation course of, choose “External,” then proceed onto the “App Information.”
Instance under of minimal necessities:


Skip “Scopes”
Add the e-mail(s) you’ll use for the Search Console API authentication into the “Test Users”. There may very well be different emails versus simply the one which owns the Google Drive. An instance could also be a consumer’s electronic mail the place you entry the Google Search Console UI to view their KPIs.

four. Within the left-rail navigation, click on into “Credentials” > “CREATE CREDENTIALS” > “OAuth Client ID” (Not in picture).

5. Inside the “Create OAuth client ID” kind, fill in:

6. Save the “Client ID” and “Client Secret” — as these shall be added into the “api” folder config.py file from the Github information we downloaded.
These ought to have appeared in a popup after hitting “CREATE”
The “Client Secret” is functionally the password to your Google Cloud (DO NOT put up this to the general public/share it online)
Half 4: Add the OAuth 2.zero credentials to the Config.py file
1. Return to Google Drive and navigate into the “api” folder.
2. Click on into config.py.

three. Select to open with “Text Editor” (or one other app of your selection) to change the config.py file.

four. Replace the three areas highlighted under together with your:
CLIENT_ID: From the OAuth 2.zero consumer ID setup course of
CLIENT_SECRET: From the OAuth 2.zero consumer ID setup course of
GOOGLE_CREDENTIALS: Electronic mail that corresponds together with your CLIENT_ID & CLIENT_SECRET

5. Save the file as soon as up to date!
Congratulations, the boring stuff is over. You at the moment are prepared to start out utilizing the Google Colab file!
Operating your first evaluation
Operating your first evaluation could also be slightly intimidating, however keep it up and it’ll get straightforward quick.
Under, we’ve supplied particulars concerning the enter variables required, in addition to notes on issues to remember when working the script and analyzing the ensuing dataset.
After we stroll via these things, there are additionally a number of instance initiatives and video walkthroughs showcasing methods to make the most of these datasets for consumer deliverables.
Organising the enter variables
XPath extraction with the “xpath_selector” variable
Have you ever ever wished to know each question driving clicks and impressions to a webpage that aren’t in your <title> or <h1> tag? Properly, this parameter will help you do exactly that.
Whereas non-obligatory, utilizing that is extremely inspired and we really feel it “supercharges” the evaluation. Merely outline website sections with Xpaths and the script will do the remaining.
youtube
Within the above video, you’ll discover examples on the way to create website particular extractions. As well as, under are some common extractions that ought to work on nearly any website on the internet:
‘//title’ # Identifies a <title> tag
‘//h1’ # Identifies a <h1> tag
‘//h2’ # Identifies a <h2> tag
Web site Particular: Learn how to scrape solely the primary content material (MC)?
Chaining Xpaths – Add a “|” Between Xpaths
‘//title | //h1’ # Will get you each the <title> and <h1> tag in 1 run
‘//h1 | //h2 | //h3’ # Will get you each the <h1>, <h2> and <h3> tags in 1 run
Different variables
Right here’s a video overview of the opposite variables with a brief description of every.
youtube
‘colab_path’ [Required] – The trail by which the Colab file lives. This ought to be “/content/drive/My Drive/Colab Notebooks/”.
‘domain_lookup’ [Required] – Homepage of the web site utilized for evaluation.
‘startdate’ & ‘enddate’ [Required] – Date vary for the evaluation interval.
‘gsc_sorting_field’ [Required] – The software pulls the highest N pages as outlined by the person. The “top” is outlined by both “clicks_sum” or “impressions_sum.” Please overview the video for a extra detailed description.
‘gsc_limit_pages_number’ [Required] – Numeric worth that represents the variety of ensuing pages you’d like inside the dataset.
‘brand_exclusions’ [Optional] – The string sequence(s) that generally lead to branded queries (e.g., something containing “inseev” shall be branded queries for “Inseev Interactive”).
‘impressions_exclusion’ [Optional] – Numeric worth used to exclude queries which are probably irrelevant as a result of lack of pre-existing impressions. That is primarily related for domains with sturdy pre-existing rankings on a big scale variety of pages.
‘page_inclusions’ [Optional] – The string sequence(s) which are discovered inside the desired evaluation web page kind. For those who’d like to research the whole area, go away this part clean.
Operating the script
Remember the fact that as soon as the script finishes working, you’re typically going to make use of the “step3_query-optimizer_domain-YYYY-MM-DD.csv” file for evaluation, however there are others with the uncooked datasets to browse as effectively.
Sensible use circumstances for the “step3_query-optimizer_domain-YYYY-MM-DD.csv” file might be discovered within the “Practical use cases and templates” section.
That said, there are a few important things to note while testing things out:
1. No JavaScript Crawling: As mentioned at the start of the post, this script is NOT set up for JavaScript crawling, so if your target website uses a JS frontend with client-side rendering to populate the main content (MC), the scrape will not be useful. However, the basic functionality of quickly getting the top XX (user-defined) queries and pages can still be useful by itself.
2. Google Drive / GSC API Auth: The first time you run the script in each new session it will prompt you to authenticate both the Google Drive and the Google Search Console credentials.
GSC authentication: Authenticate whichever email has permission to use the desired Google Search Console account.
If you attempt to authenticate and you get an error that looks like the one below, please revisit the “Add the email(s) you’ll use the Colab app with into the ‘Test Users'” from Part 3, step 3 in the process above: setting up the consent screen.

Quick tip: The Google Drive account and the GSC Authentication DO NOT have to be the same email, but they do require separate authentications with OAuth.
3. Running the script: Either navigate to “Runtime” > “Restart and Run All” or use the keyboard shortcut CTRL + fn9 to start running the script.
4. Populated datasets/folder structure: There are three CSVs populated by the script – all nested within a folder structure based on the “domain_lookup” input variable.
Automated Organization [Folders]: Each time you rerun the script on a new domain, it will create a new folder structure in order to keep things organized.
Automated Organization [File Naming]: The CSVs include the date of the export appended to the end, so you’ll always know when the process ran as well as the date range for the dataset.
5. Date range for dataset: Inside of the dataset there is a “gsc_datasetID” column generated, which includes the date range of the extraction.

6. Unfamiliar metrics: The resulting dataset has all the KPIs we know and love – e.g. clicks, impressions, average (mean) position — but there are also a few you cannot get directly from the GSC UI:
‘count_instances_gsc’ — the number of instances the query got at least 1 impression during the specified date range. Scenario example: GSC tells you that you were in an average position 6 for a large keyword like “flower delivery” and you only received 20 impressions in a 30-day date range. Doesn’t seem possible that you were really in position 6, right? Well, now you can see that was potentially because you only actually showed up on one day in that 30-day date range (e.g. count_instances_gsc = 1)
Quick tip #1: Large variance in max/min may tell you that your keyword has been fluctuating heavily.
Quick tip #2: These KPIs, in conjunction with the “count_instances_gsc”, can exponentially further your understanding of query performance and opportunity.
Practical use cases and templates
Access the recommended multi-use template.
Beneficial use: Obtain file and use with Excel. Subjectively talking, I consider Excel has a way more person pleasant pivot desk performance compared to Google Sheets — which is essential for utilizing this template.
Various use: For those who wouldn’t have Microsoft Excel otherwise you want a unique software, you should utilize most spreadsheet apps that comprise pivot performance.
For many who go for another spreadsheet software program/app:
Under are the pivot fields to imitate upon setup.
You might have to regulate the Vlookup features discovered on the “Step 3 _ Analysis Final Doc” tab, relying on whether or not your up to date pivot columns align with the present pivot I’ve provided.
Mission instance: Title & H1 re-optimizations (video walkthrough)
Mission description: Find key phrases which are driving clicks and impressions to excessive worth pages and that don’t exist inside the <title> and <h1> tags by reviewing GSC question KPIs vs. present web page parts. Use the ensuing findings to re-optimize each the <title> and <h1> tags for pre-existing pages.
Mission assumptions: This course of assumes that inserting key phrases into each the <title> and <h1> tags is a robust search engine optimization apply for relevancy optimization, and that it’s essential to incorporate associated key phrase variants into these areas (e.g. non-exact match key phrases with matching SERP intent).
youtube
Mission instance: On-page textual content refresh/re-optimization
Mission description: Find key phrases which are driving clicks and impressions to editorial items of content material that DO NOT exist inside the first paragraph inside the physique of the primary content material (MC). Carry out an on-page refresh of introductory content material inside editorial pages to incorporate excessive worth key phrase alternatives.
Mission assumptions: This course of assumes that inserting key phrases into the primary a number of sentences of a chunk of content material is a robust search engine optimization apply for relevancy optimization, and that it’s essential to incorporate associated key phrase variants into these areas (e.g. non-exact match key phrases with matching SERP intent).
youtube
Last ideas
We hope this put up has been useful and opened you as much as the concept of utilizing Python and Google Colab to supercharge your relevancy optimization technique.
As talked about all through the put up, maintain the next in thoughts:
Github repository shall be up to date with any adjustments we make sooner or later.
There’s the potential of undiscovered errors. If these happen, Inseev is joyful to assist! In actual fact, we’d truly admire you reaching out to analyze and repair errors (if any do seem). This fashion others don’t run into the identical issues.
Apart from the above, when you have any concepts on methods to Colab (pun supposed) on information analytics initiatives, be happy to achieve out with concepts.
Source link
0 notes
Text
Page Level Query Analysis at Scale with Google Colab, Python, & the GSC API [Video Instructions Included]
The YouTube playlist referenced throughout this blog can be found here:6 Part YouTube Series [Setting Up & Using the Query Optimization Checker]
Anyone who does SEO as part of their job knows that there’s a lot of value in analyzing which queries are and are not sending traffic to specific pages on a site.
The most common uses for these datasets are to align on-page optimizations with existing rankings and traffic, and to identify gaps in ranking keywords.
However, working with this data is extremely tedious because it’s only available in the Google Search Console interface, and you have to look at only one page at a time.
On top of that, to get information on the text included in the ranking page, you either need to manually review it or extract it with a tool like Screaming Frog.
You need this kind of view:

…but even the above view would only be viable one page at a time, and as mentioned, the actual text extraction would have had to be separate as well.
Given these apparent issues with the readily available data at the SEO community’s disposal, the data engineering team at Inseev Interactive has been spending a lot of time thinking about how we can improve these processes at scale.
One specific example that we’ll be reviewing in this post is a simple script that allows you to get the above data in a flexible format for many great analytical views.
Better yet, this will all be available with only a few single input variables.
A quick rundown of tool functionality
The tool automatically compares the text on-page to the Google Search Console top queries at the page-level to let you know which queries are on-page as well as how many times they appear on the page. An optional XPath variable also allows you to specify the part of the page you want to analyze text on.
This means you’ll know exactly what queries are driving clicks/impressions that are not in your <title>, <h1>, or even something as specific as the first paragraph within the main content (MC). The sky's the limit.
For those of you not familiar, we’ve also provided some quick XPath expressions you can use, as well as how to create site-specific XPath expressions within the "Input Variables" section of the post.
Post setup usage & datasets
Once the process is set up, all that’s required is filling out a short list of variables and the rest is automated for you.
The output dataset includes multiple automated CSV datasets, as well as a structured file format to keep things organized. A simple pivot of the core analysis automated CSV can provide you with the below dataset and many other useful layouts.

… Even some "new metrics"?
Okay, not technically "new," but if you exclusively use the Google Search Console user interface, then you haven’t likely had access to metrics like these before: "Max Position," "Min Position," and "Count Position" for the specified date range – all of which are explained in the "Running your first analysis" section of the post.

To really demonstrate the impact and usefulness of this dataset, in the video below we use the Colab tool to:
[3 Minutes] — Find non-brand <title> optimization opportunities for https://www.inseev.com/ (around 30 pages in video, but you could do any number of pages)
[3 Minutes] — Convert the CSV to a more useable format
[1 Minute] – Optimize the first title with the resulting dataset
youtube
Okay, you’re all set for the initial rundown. Hopefully we were able to get you excited before moving into the somewhat dull setup process.
Keep in mind that at the end of the post, there is also a section including a few helpful use cases and an example template! To jump directly to each section of this post, please use the following links:
One-time setup of the script in Google Colab
Running your first analysis
Practical use cases and templates
[Quick Consideration #1] — The web scraper built into the tool DOES NOT support JavaScript rendering. If your website uses client-side rendering, the full functionality of the tool unfortunately will not work.
[Quick Consideration #2] — This tool has been heavily tested by the members of the Inseev team. Most bugs [specifically with the web scraper] have been found and fixed, but like any other program, it is possible that other issues may come up.
If you encounter any errors, feel free to reach out to us directly at [email protected] or [email protected], and either myself or one of the other members of the data engineering team at Inseev would be happy to help you out.
If new errors are encountered and fixed, we will always upload the updated script to the code repository linked in the sections below so the most up-to-date code can be utilized by all!
One-time setup of the script in Google Colab (in less than 20 minutes)
Things you’ll need:
Google Drive
Google Cloud Platform account
Google Search Console access
Video walkthrough: tool setup process
Below you’ll find step-by-step editorial instructions in order to set up the entire process. However, if following editorial instructions isn’t your preferred method, we recorded a video of the setup process as well.
As you’ll see, we start with a brand new Gmail and set up the entire process in approximately 12 minutes, and the output is completely worth the time.
youtube
Keep in mind that the setup is one-off, and once set up, the tool should work on command from there on!
Editorial walkthrough: tool setup process
Four-part process:
Download the files from Github and set up in Google Drive
Set up a Google Cloud Platform (GCP) Project (skip if you already have an account)
Create the OAuth 2.0 client ID for the Google Search Console (GSC) API (skip if you already have an OAuth client ID with the Search Console API enabled)
Add the OAuth 2.0 credentials to the Config.py file
Part one: Download the files from Github and set up in Google Drive
Download source files (no code required)
1. Navigate here.
2. Select "Code" > "Download Zip"
*You can also use 'git clone https://github.com/jmelm93/query-optmization-checker.git' if you’re more comfortable using the command prompt.

Initiate Google Colab in Google Drive
If you already have a Google Colaboratory setup in your Google Drive, feel free to skip this step.
1. Navigate here.
2. Click "New" > "More" > "Connect more apps".
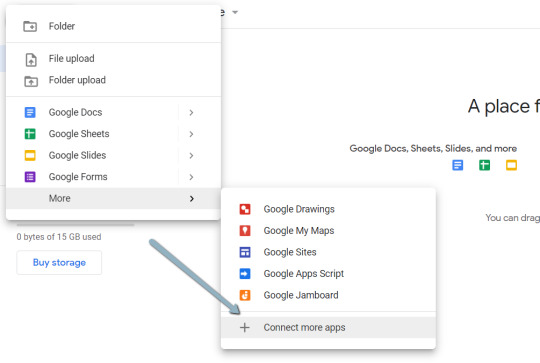
3. Search "Colaboratory" > Click into the application page.
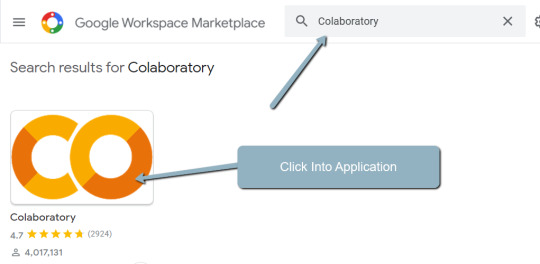
4. Click "Install" > "Continue" > Sign in with OAuth.

5. Click "OK" with the prompt checked so Google Drive automatically sets appropriate files to open with Google Colab (optional).

Import the downloaded folder to Google Drive & open in Colab
1. Navigate to Google Drive and create a folder called "Colab Notebooks".
IMPORTANT: The folder needs to be called "Colab Notebooks" as the script is configured to look for the "api" folder from within "Colab Notebooks".
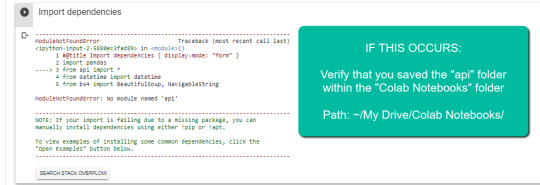
Error resulting in improper folder naming.
2. Import the folder downloaded from Github into Google Drive.
At the end of this step, you should have a folder in your Google Drive that contains the below items:

Part two: Set up a Google Cloud Platform (GCP) project
If you already have a Google Cloud Platform (GCP) account, feel free to skip this part.
1. Navigate to the Google Cloud page.
2. Click on the "Get started for free" CTA (CTA text may change over time).
3. Sign in with the OAuth credentials of your choice. Any Gmail email will work.
4. Follow the prompts to sign up for your GCP account.
You’ll be asked to supply a credit card to sign up, but there is currently a $300 free trial and Google notes that they won’t charge you until you upgrade your account.
Part three: Create a 0Auth 2.0 client ID for the Google Search Console (GSC) API
1. Navigate here.
2. After you log in to your desired Google Cloud account, click "ENABLE".

3. Configure the consent screen.
In the consent screen creation process, select "External," then continue onto the "App Information."
Example below of minimum requirements:


Skip "Scopes"
Add the email(s) you’ll use for the Search Console API authentication into the "Test Users". There could be other emails versus just the one that owns the Google Drive. An example may be a client’s email where you access the Google Search Console UI to view their KPIs.
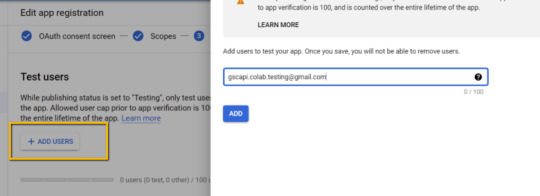
4. In the left-rail navigation, click into "Credentials" > "CREATE CREDENTIALS" > "OAuth Client ID" (Not in image).

5. Within the "Create OAuth client ID" form, fill in:
Application Type = Desktop app
Name = Google Colab
Click "CREATE"
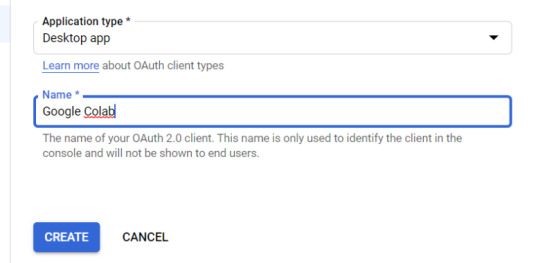
6. Save the "Client ID" and "Client Secret" — as these will be added into the "api" folder config.py file from the Github files we downloaded.
These should have appeared in a popup after hitting "CREATE"
The "Client Secret" is functionally the password to your Google Cloud (DO NOT post this to the public/share it online)
Part four: Add the OAuth 2.0 credentials to the Config.py file
1. Return to Google Drive and navigate into the "api" folder.
2. Click into config.py.

3. Choose to open with "Text Editor" (or another app of your choice) to modify the config.py file.

4. Update the three areas highlighted below with your:
CLIENT_ID: From the OAuth 2.0 client ID setup process
CLIENT_SECRET: From the OAuth 2.0 client ID setup process
GOOGLE_CREDENTIALS: Email that corresponds with your CLIENT_ID & CLIENT_SECRET

5. Save the file once updated!
Congratulations, the boring stuff is over. You are now ready to start using the Google Colab file!
Running your first analysis
Running your first analysis may be a little intimidating, but stick with it and it will get easy fast.
Below, we’ve provided details regarding the input variables required, as well as notes on things to keep in mind when running the script and analyzing the resulting dataset.
After we walk through these items, there are also a few example projects and video walkthroughs showcasing ways to utilize these datasets for client deliverables.
Setting up the input variables
XPath extraction with the "xpath_selector" variable
Have you ever wanted to know every query driving clicks and impressions to a webpage that aren’t in your <title> or <h1> tag? Well, this parameter will allow you to do just that.
While optional, using this is highly encouraged and we feel it "supercharges" the analysis. Simply define site sections with Xpaths and the script will do the rest.
youtube
In the above video, you’ll find examples on how to create site specific extractions. In addition, below are some universal extractions that should work on almost any site on the web:
'//title' # Identifies a <title> tag
'//h1' # Identifies a <h1> tag
'//h2' # Identifies a <h2> tag
Site Specific: How to scrape only the main content (MC)?
Chaining Xpaths – Add a "|" Between Xpaths
'//title | //h1' # Gets you both the <title> and <h1> tag in 1 run
'//h1 | //h2 | //h3' # Gets you both the <h1>, <h2> and <h3> tags in 1 run
Other variables
Here’s a video overview of the other variables with a short description of each.
youtube
'colab_path' [Required] – The path in which the Colab file lives. This should be "/content/drive/My Drive/Colab Notebooks/".
'domain_lookup' [Required] – Homepage of the website utilized for analysis.
'startdate' & 'enddate' [Required] – Date range for the analysis period.
'gsc_sorting_field' [Required] – The tool pulls the top N pages as defined by the user. The "top" is defined by either "clicks_sum" or "impressions_sum." Please review the video for a more detailed description.
'gsc_limit_pages_number' [Required] – Numeric value that represents the number of resulting pages you’d like within the dataset.
'brand_exclusions' [Optional] – The string sequence(s) that commonly result in branded queries (e.g., anything containing "inseev" will be branded queries for "Inseev Interactive").
'impressions_exclusion' [Optional] – Numeric value used to exclude queries that are potentially irrelevant due to the lack of pre-existing impressions. This is primarily relevant for domains with strong pre-existing rankings on a large scale number of pages.
'page_inclusions' [Optional] – The string sequence(s) that are found within the desired analysis page type. If you’d like to analyze the entire domain, leave this section blank.
Running the script
Keep in mind that once the script finishes running, you’re generally going to use the "step3_query-optimizer_domain-YYYY-MM-DD.csv" file for analysis, but there are others with the raw datasets to browse as well.
Practical use cases for the "step3_query-optimizer_domain-YYYY-MM-DD.csv" file can be found in the "Practical use cases and templates" section.
That said, there are a few important things to note while testing things out:
1. No JavaScript Crawling: As mentioned at the start of the post, this script is NOT set up for JavaScript crawling, so if your target website uses a JS frontend with client-side rendering to populate the main content (MC), the scrape will not be useful. However, the basic functionality of quickly getting the top XX (user-defined) queries and pages can still be useful by itself.
2. Google Drive / GSC API Auth: The first time you run the script in each new session it will prompt you to authenticate both the Google Drive and the Google Search Console credentials.
Google Drive authentication: Authenticate to whatever email is associated with the Google Drive with the script.
GSC authentication: Authenticate whichever email has permission to use the desired Google Search Console account.
If you attempt to authenticate and you get an error that looks like the one below, please revisit the "Add the email(s) you’ll use the Colab app with into the 'Test Users'" from Part 3, step 3 in the process above: setting up the consent screen.
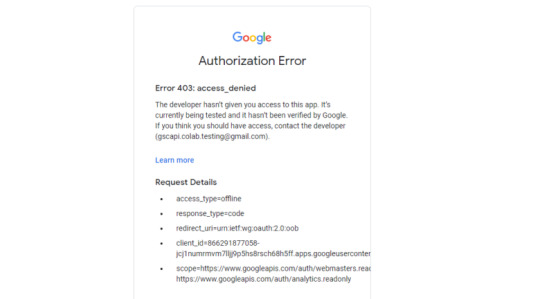
Quick tip: The Google Drive account and the GSC Authentication DO NOT have to be the same email, but they do require separate authentications with OAuth.
3. Running the script: Either navigate to "Runtime" > "Restart and Run All" or use the keyboard shortcut CTRL + fn9 to start running the script.
4. Populated datasets/folder structure: There are three CSVs populated by the script – all nested within a folder structure based on the "domain_lookup" input variable.
Automated Organization [Folders]: Each time you rerun the script on a new domain, it will create a new folder structure in order to keep things organized.
Automated Organization [File Naming]: The CSVs include the date of the export appended to the end, so you’ll always know when the process ran as well as the date range for the dataset.
5. Date range for dataset: Inside of the dataset there is a "gsc_datasetID" column generated, which includes the date range of the extraction.

6. Unfamiliar metrics: The resulting dataset has all the KPIs we know and love – e.g. clicks, impressions, average (mean) position — but there are also a few you cannot get directly from the GSC UI:
'count_instances_gsc' — the number of instances the query got at least 1 impression during the specified date range. Scenario example: GSC tells you that you were in an average position 6 for a large keyword like "flower delivery" and you only received 20 impressions in a 30-day date range. Doesn’t seem possible that you were really in position 6, right? Well, now you can see that was potentially because you only actually showed up on one day in that 30-day date range (e.g. count_instances_gsc = 1)
'max_position' & 'min_position' — the MAXIMUM and MINIMUM ranking position the identified page showed up for in Google Search within the specified date range.
Quick tip #1: Large variance in max/min may tell you that your keyword has been fluctuating heavily.
Quick tip #2: These KPIs, in conjunction with the "count_instances_gsc", can exponentially further your understanding of query performance and opportunity.
Practical use cases and templates
Access the recommended multi-use template.
Recommended use: Download file and use with Excel. Subjectively speaking, I believe Excel has a much more user friendly pivot table functionality in comparison to Google Sheets — which is critical for using this template.
Alternative use: If you do not have Microsoft Excel or you prefer a different tool, you can use most spreadsheet apps that contain pivot functionality.
For those who opt for an alternative spreadsheet software/app:
Below are the pivot fields to mimic upon setup.
You may have to adjust the Vlookup functions found on the "Step 3 _ Analysis Final Doc" tab, depending on whether your updated pivot columns align with the current pivot I’ve supplied.
Project example: Title & H1 re-optimizations (video walkthrough)
Project description: Locate keywords that are driving clicks and impressions to high value pages and that do not exist within the <title> and <h1> tags by reviewing GSC query KPIs vs. current page elements. Use the resulting findings to re-optimize both the <title> and <h1> tags for pre-existing pages.
Project assumptions: This process assumes that inserting keywords into both the <title> and <h1> tags is a strong SEO practice for relevancy optimization, and that it’s important to include related keyword variants into these areas (e.g. non-exact match keywords with matching SERP intent).
youtube
Project example: On-page text refresh/re-optimization
Project description: Locate keywords that are driving clicks and impressions to editorial pieces of content that DO NOT exist within the first paragraph within the body of the main content (MC). Perform an on-page refresh of introductory content within editorial pages to include high value keyword opportunities.
Project assumptions: This process assumes that inserting keywords into the first several sentences of a piece of content is a strong SEO practice for relevancy optimization, and that it’s important to include related keyword variants into these areas (e.g. non-exact match keywords with matching SERP intent).
youtube
Final thoughts
We hope this post has been helpful and opened you up to the idea of using Python and Google Colab to supercharge your relevancy optimization strategy.
As mentioned throughout the post, keep the following in mind:
Github repository will be updated with any changes we make in the future.
There is the possibility of undiscovered errors. If these occur, Inseev is happy to help! In fact, we would actually appreciate you reaching out to investigate and fix errors (if any do appear). This way others don’t run into the same problems.
Other than the above, if you have any ideas on ways to Colab (pun intended) on data analytics projects, feel free to reach out with ideas.
0 notes
Text
Page Level Query Analysis at Scale with Google Colab, Python, & the GSC API [Video Instructions Included]
The YouTube playlist referenced throughout this blog can be found here:6 Part YouTube Series [Setting Up & Using the Query Optimization Checker]
Anyone who does SEO as part of their job knows that there’s a lot of value in analyzing which queries are and are not sending traffic to specific pages on a site.
The most common uses for these datasets are to align on-page optimizations with existing rankings and traffic, and to identify gaps in ranking keywords.
However, working with this data is extremely tedious because it’s only available in the Google Search Console interface, and you have to look at only one page at a time.
On top of that, to get information on the text included in the ranking page, you either need to manually review it or extract it with a tool like Screaming Frog.
You need this kind of view:

…but even the above view would only be viable one page at a time, and as mentioned, the actual text extraction would have had to be separate as well.
Given these apparent issues with the readily available data at the SEO community’s disposal, the data engineering team at Inseev Interactive has been spending a lot of time thinking about how we can improve these processes at scale.
One specific example that we’ll be reviewing in this post is a simple script that allows you to get the above data in a flexible format for many great analytical views.
Better yet, this will all be available with only a few single input variables.
A quick rundown of tool functionality
The tool automatically compares the text on-page to the Google Search Console top queries at the page-level to let you know which queries are on-page as well as how many times they appear on the page. An optional XPath variable also allows you to specify the part of the page you want to analyze text on.
This means you’ll know exactly what queries are driving clicks/impressions that are not in your <title>, <h1>, or even something as specific as the first paragraph within the main content (MC). The sky's the limit.
For those of you not familiar, we’ve also provided some quick XPath expressions you can use, as well as how to create site-specific XPath expressions within the "Input Variables" section of the post.
Post setup usage & datasets
Once the process is set up, all that’s required is filling out a short list of variables and the rest is automated for you.
The output dataset includes multiple automated CSV datasets, as well as a structured file format to keep things organized. A simple pivot of the core analysis automated CSV can provide you with the below dataset and many other useful layouts.

… Even some "new metrics"?
Okay, not technically "new," but if you exclusively use the Google Search Console user interface, then you haven’t likely had access to metrics like these before: "Max Position," "Min Position," and "Count Position" for the specified date range – all of which are explained in the "Running your first analysis" section of the post.

To really demonstrate the impact and usefulness of this dataset, in the video below we use the Colab tool to:
[3 Minutes] — Find non-brand <title> optimization opportunities for https://www.inseev.com/ (around 30 pages in video, but you could do any number of pages)
[3 Minutes] — Convert the CSV to a more useable format
[1 Minute] – Optimize the first title with the resulting dataset
youtube
Okay, you’re all set for the initial rundown. Hopefully we were able to get you excited before moving into the somewhat dull setup process.
Keep in mind that at the end of the post, there is also a section including a few helpful use cases and an example template! To jump directly to each section of this post, please use the following links:
One-time setup of the script in Google Colab
Running your first analysis
Practical use cases and templates
[Quick Consideration #1] — The web scraper built into the tool DOES NOT support JavaScript rendering. If your website uses client-side rendering, the full functionality of the tool unfortunately will not work.
[Quick Consideration #2] — This tool has been heavily tested by the members of the Inseev team. Most bugs [specifically with the web scraper] have been found and fixed, but like any other program, it is possible that other issues may come up.
If you encounter any errors, feel free to reach out to us directly at [email protected] or [email protected], and either myself or one of the other members of the data engineering team at Inseev would be happy to help you out.
If new errors are encountered and fixed, we will always upload the updated script to the code repository linked in the sections below so the most up-to-date code can be utilized by all!
One-time setup of the script in Google Colab (in less than 20 minutes)
Things you’ll need:
Google Drive
Google Cloud Platform account
Google Search Console access
Video walkthrough: tool setup process
Below you’ll find step-by-step editorial instructions in order to set up the entire process. However, if following editorial instructions isn’t your preferred method, we recorded a video of the setup process as well.
As you’ll see, we start with a brand new Gmail and set up the entire process in approximately 12 minutes, and the output is completely worth the time.
youtube
Keep in mind that the setup is one-off, and once set up, the tool should work on command from there on!
Editorial walkthrough: tool setup process
Four-part process:
Download the files from Github and set up in Google Drive
Set up a Google Cloud Platform (GCP) Project (skip if you already have an account)
Create the OAuth 2.0 client ID for the Google Search Console (GSC) API (skip if you already have an OAuth client ID with the Search Console API enabled)
Add the OAuth 2.0 credentials to the Config.py file
Part one: Download the files from Github and set up in Google Drive
Download source files (no code required)
1. Navigate here.
2. Select "Code" > "Download Zip"
*You can also use 'git clone https://github.com/jmelm93/query-optmization-checker.git' if you’re more comfortable using the command prompt.

Initiate Google Colab in Google Drive
If you already have a Google Colaboratory setup in your Google Drive, feel free to skip this step.
1. Navigate here.
2. Click "New" > "More" > "Connect more apps".
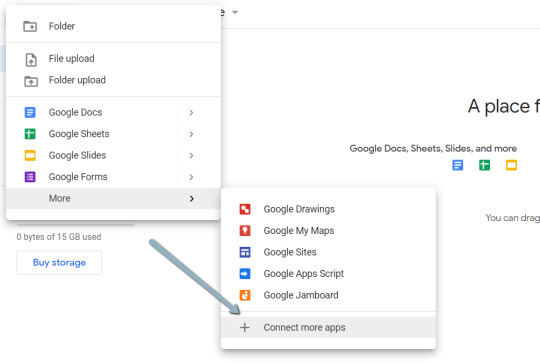
3. Search "Colaboratory" > Click into the application page.
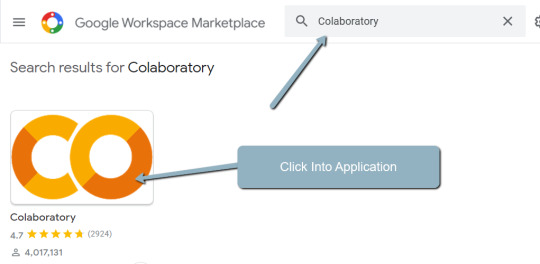
4. Click "Install" > "Continue" > Sign in with OAuth.

5. Click "OK" with the prompt checked so Google Drive automatically sets appropriate files to open with Google Colab (optional).
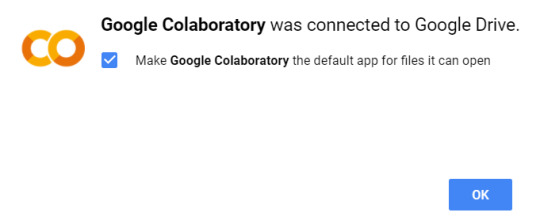
Import the downloaded folder to Google Drive & open in Colab
1. Navigate to Google Drive and create a folder called "Colab Notebooks".
IMPORTANT: The folder needs to be called "Colab Notebooks" as the script is configured to look for the "api" folder from within "Colab Notebooks".
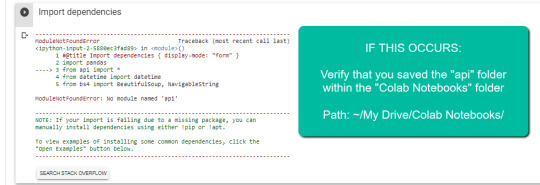
Error resulting in improper folder naming.
2. Import the folder downloaded from Github into Google Drive.
At the end of this step, you should have a folder in your Google Drive that contains the below items:

Part two: Set up a Google Cloud Platform (GCP) project
If you already have a Google Cloud Platform (GCP) account, feel free to skip this part.
1. Navigate to the Google Cloud page.
2. Click on the "Get started for free" CTA (CTA text may change over time).
3. Sign in with the OAuth credentials of your choice. Any Gmail email will work.
4. Follow the prompts to sign up for your GCP account.
You’ll be asked to supply a credit card to sign up, but there is currently a $300 free trial and Google notes that they won’t charge you until you upgrade your account.
Part three: Create a 0Auth 2.0 client ID for the Google Search Console (GSC) API
1. Navigate here.
2. After you log in to your desired Google Cloud account, click "ENABLE".
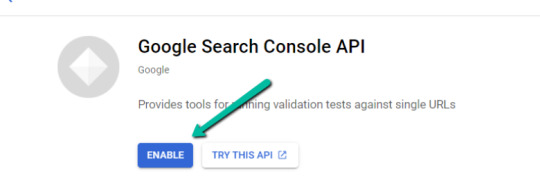
3. Configure the consent screen.
In the consent screen creation process, select "External," then continue onto the "App Information."
Example below of minimum requirements:
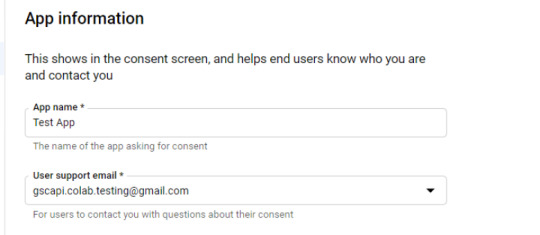

Skip "Scopes"
Add the email(s) you’ll use for the Search Console API authentication into the "Test Users". There could be other emails versus just the one that owns the Google Drive. An example may be a client’s email where you access the Google Search Console UI to view their KPIs.
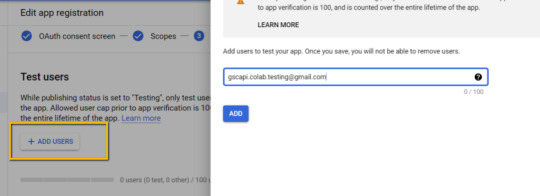
4. In the left-rail navigation, click into "Credentials" > "CREATE CREDENTIALS" > "OAuth Client ID" (Not in image).

5. Within the "Create OAuth client ID" form, fill in:
Application Type = Desktop app
Name = Google Colab
Click "CREATE"
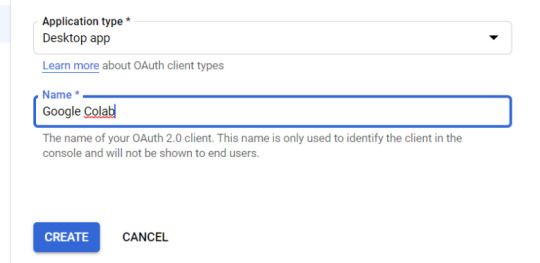
6. Save the "Client ID" and "Client Secret" — as these will be added into the "api" folder config.py file from the Github files we downloaded.
These should have appeared in a popup after hitting "CREATE"
The "Client Secret" is functionally the password to your Google Cloud (DO NOT post this to the public/share it online)
Part four: Add the OAuth 2.0 credentials to the Config.py file
1. Return to Google Drive and navigate into the "api" folder.
2. Click into config.py.

3. Choose to open with "Text Editor" (or another app of your choice) to modify the config.py file.

4. Update the three areas highlighted below with your:
CLIENT_ID: From the OAuth 2.0 client ID setup process
CLIENT_SECRET: From the OAuth 2.0 client ID setup process
GOOGLE_CREDENTIALS: Email that corresponds with your CLIENT_ID & CLIENT_SECRET

5. Save the file once updated!
Congratulations, the boring stuff is over. You are now ready to start using the Google Colab file!
Running your first analysis
Running your first analysis may be a little intimidating, but stick with it and it will get easy fast.
Below, we’ve provided details regarding the input variables required, as well as notes on things to keep in mind when running the script and analyzing the resulting dataset.
After we walk through these items, there are also a few example projects and video walkthroughs showcasing ways to utilize these datasets for client deliverables.
Setting up the input variables
XPath extraction with the "xpath_selector" variable
Have you ever wanted to know every query driving clicks and impressions to a webpage that aren’t in your <title> or <h1> tag? Well, this parameter will allow you to do just that.
While optional, using this is highly encouraged and we feel it "supercharges" the analysis. Simply define site sections with Xpaths and the script will do the rest.
youtube
In the above video, you’ll find examples on how to create site specific extractions. In addition, below are some universal extractions that should work on almost any site on the web:
'//title' # Identifies a <title> tag
'//h1' # Identifies a <h1> tag
'//h2' # Identifies a <h2> tag
Site Specific: How to scrape only the main content (MC)?
Chaining Xpaths – Add a "|" Between Xpaths
'//title | //h1' # Gets you both the <title> and <h1> tag in 1 run
'//h1 | //h2 | //h3' # Gets you both the <h1>, <h2> and <h3> tags in 1 run
Other variables
Here’s a video overview of the other variables with a short description of each.
youtube
'colab_path' [Required] – The path in which the Colab file lives. This should be "/content/drive/My Drive/Colab Notebooks/".
'domain_lookup' [Required] – Homepage of the website utilized for analysis.
'startdate' & 'enddate' [Required] – Date range for the analysis period.
'gsc_sorting_field' [Required] – The tool pulls the top N pages as defined by the user. The "top" is defined by either "clicks_sum" or "impressions_sum." Please review the video for a more detailed description.
'gsc_limit_pages_number' [Required] – Numeric value that represents the number of resulting pages you’d like within the dataset.
'brand_exclusions' [Optional] – The string sequence(s) that commonly result in branded queries (e.g., anything containing "inseev" will be branded queries for "Inseev Interactive").
'impressions_exclusion' [Optional] – Numeric value used to exclude queries that are potentially irrelevant due to the lack of pre-existing impressions. This is primarily relevant for domains with strong pre-existing rankings on a large scale number of pages.
'page_inclusions' [Optional] – The string sequence(s) that are found within the desired analysis page type. If you’d like to analyze the entire domain, leave this section blank.
Running the script
Keep in mind that once the script finishes running, you’re generally going to use the "step3_query-optimizer_domain-YYYY-MM-DD.csv" file for analysis, but there are others with the raw datasets to browse as well.
Practical use cases for the "step3_query-optimizer_domain-YYYY-MM-DD.csv" file can be found in the "Practical use cases and templates" section.
That said, there are a few important things to note while testing things out:
1. No JavaScript Crawling: As mentioned at the start of the post, this script is NOT set up for JavaScript crawling, so if your target website uses a JS frontend with client-side rendering to populate the main content (MC), the scrape will not be useful. However, the basic functionality of quickly getting the top XX (user-defined) queries and pages can still be useful by itself.
2. Google Drive / GSC API Auth: The first time you run the script in each new session it will prompt you to authenticate both the Google Drive and the Google Search Console credentials.
Google Drive authentication: Authenticate to whatever email is associated with the Google Drive with the script.
GSC authentication: Authenticate whichever email has permission to use the desired Google Search Console account.
If you attempt to authenticate and you get an error that looks like the one below, please revisit the "Add the email(s) you’ll use the Colab app with into the 'Test Users'" from Part 3, step 3 in the process above: setting up the consent screen.
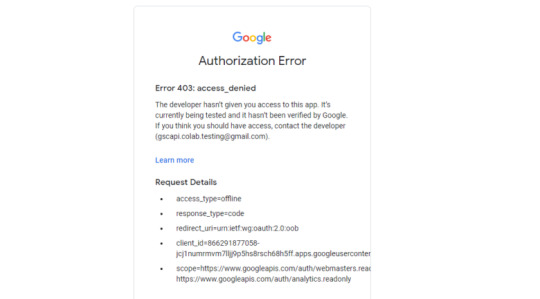
Quick tip: The Google Drive account and the GSC Authentication DO NOT have to be the same email, but they do require separate authentications with OAuth.
3. Running the script: Either navigate to "Runtime" > "Restart and Run All" or use the keyboard shortcut CTRL + fn9 to start running the script.
4. Populated datasets/folder structure: There are three CSVs populated by the script – all nested within a folder structure based on the "domain_lookup" input variable.
Automated Organization [Folders]: Each time you rerun the script on a new domain, it will create a new folder structure in order to keep things organized.
Automated Organization [File Naming]: The CSVs include the date of the export appended to the end, so you’ll always know when the process ran as well as the date range for the dataset.
5. Date range for dataset: Inside of the dataset there is a "gsc_datasetID" column generated, which includes the date range of the extraction.

6. Unfamiliar metrics: The resulting dataset has all the KPIs we know and love – e.g. clicks, impressions, average (mean) position — but there are also a few you cannot get directly from the GSC UI:
'count_instances_gsc' — the number of instances the query got at least 1 impression during the specified date range. Scenario example: GSC tells you that you were in an average position 6 for a large keyword like "flower delivery" and you only received 20 impressions in a 30-day date range. Doesn’t seem possible that you were really in position 6, right? Well, now you can see that was potentially because you only actually showed up on one day in that 30-day date range (e.g. count_instances_gsc = 1)
'max_position' & 'min_position' — the MAXIMUM and MINIMUM ranking position the identified page showed up for in Google Search within the specified date range.
Quick tip #1: Large variance in max/min may tell you that your keyword has been fluctuating heavily.
Quick tip #2: These KPIs, in conjunction with the "count_instances_gsc", can exponentially further your understanding of query performance and opportunity.
Practical use cases and templates
Access the recommended multi-use template.
Recommended use: Download file and use with Excel. Subjectively speaking, I believe Excel has a much more user friendly pivot table functionality in comparison to Google Sheets — which is critical for using this template.
Alternative use: If you do not have Microsoft Excel or you prefer a different tool, you can use most spreadsheet apps that contain pivot functionality.
For those who opt for an alternative spreadsheet software/app:
Below are the pivot fields to mimic upon setup.
You may have to adjust the Vlookup functions found on the "Step 3 _ Analysis Final Doc" tab, depending on whether your updated pivot columns align with the current pivot I’ve supplied.
Project example: Title & H1 re-optimizations (video walkthrough)
Project description: Locate keywords that are driving clicks and impressions to high value pages and that do not exist within the <title> and <h1> tags by reviewing GSC query KPIs vs. current page elements. Use the resulting findings to re-optimize both the <title> and <h1> tags for pre-existing pages.
Project assumptions: This process assumes that inserting keywords into both the <title> and <h1> tags is a strong SEO practice for relevancy optimization, and that it’s important to include related keyword variants into these areas (e.g. non-exact match keywords with matching SERP intent).
youtube
Project example: On-page text refresh/re-optimization
Project description: Locate keywords that are driving clicks and impressions to editorial pieces of content that DO NOT exist within the first paragraph within the body of the main content (MC). Perform an on-page refresh of introductory content within editorial pages to include high value keyword opportunities.
Project assumptions: This process assumes that inserting keywords into the first several sentences of a piece of content is a strong SEO practice for relevancy optimization, and that it’s important to include related keyword variants into these areas (e.g. non-exact match keywords with matching SERP intent).
youtube
Final thoughts
We hope this post has been helpful and opened you up to the idea of using Python and Google Colab to supercharge your relevancy optimization strategy.
As mentioned throughout the post, keep the following in mind:
Github repository will be updated with any changes we make in the future.
There is the possibility of undiscovered errors. If these occur, Inseev is happy to help! In fact, we would actually appreciate you reaching out to investigate and fix errors (if any do appear). This way others don’t run into the same problems.
Other than the above, if you have any ideas on ways to Colab (pun intended) on data analytics projects, feel free to reach out with ideas.
0 notes
Text
Page Level Query Analysis at Scale with Google Colab, Python, & the GSC API [Video Instructions Included]
The YouTube playlist referenced throughout this blog can be found here:6 Part YouTube Series [Setting Up & Using the Query Optimization Checker]
Anyone who does SEO as part of their job knows that there’s a lot of value in analyzing which queries are and are not sending traffic to specific pages on a site.
The most common uses for these datasets are to align on-page optimizations with existing rankings and traffic, and to identify gaps in ranking keywords.
However, working with this data is extremely tedious because it’s only available in the Google Search Console interface, and you have to look at only one page at a time.
On top of that, to get information on the text included in the ranking page, you either need to manually review it or extract it with a tool like Screaming Frog.
You need this kind of view:

…but even the above view would only be viable one page at a time, and as mentioned, the actual text extraction would have had to be separate as well.
Given these apparent issues with the readily available data at the SEO community’s disposal, the data engineering team at Inseev Interactive has been spending a lot of time thinking about how we can improve these processes at scale.
One specific example that we’ll be reviewing in this post is a simple script that allows you to get the above data in a flexible format for many great analytical views.
Better yet, this will all be available with only a few single input variables.
A quick rundown of tool functionality
The tool automatically compares the text on-page to the Google Search Console top queries at the page-level to let you know which queries are on-page as well as how many times they appear on the page. An optional XPath variable also allows you to specify the part of the page you want to analyze text on.
This means you’ll know exactly what queries are driving clicks/impressions that are not in your <title>, <h1>, or even something as specific as the first paragraph within the main content (MC). The sky's the limit.
For those of you not familiar, we’ve also provided some quick XPath expressions you can use, as well as how to create site-specific XPath expressions within the "Input Variables" section of the post.
Post setup usage & datasets
Once the process is set up, all that’s required is filling out a short list of variables and the rest is automated for you.
The output dataset includes multiple automated CSV datasets, as well as a structured file format to keep things organized. A simple pivot of the core analysis automated CSV can provide you with the below dataset and many other useful layouts.

… Even some "new metrics"?
Okay, not technically "new," but if you exclusively use the Google Search Console user interface, then you haven’t likely had access to metrics like these before: "Max Position," "Min Position," and "Count Position" for the specified date range – all of which are explained in the "Running your first analysis" section of the post.

To really demonstrate the impact and usefulness of this dataset, in the video below we use the Colab tool to:
[3 Minutes] — Find non-brand <title> optimization opportunities for https://www.inseev.com/ (around 30 pages in video, but you could do any number of pages)
[3 Minutes] — Convert the CSV to a more useable format
[1 Minute] – Optimize the first title with the resulting dataset
youtube
Okay, you’re all set for the initial rundown. Hopefully we were able to get you excited before moving into the somewhat dull setup process.
Keep in mind that at the end of the post, there is also a section including a few helpful use cases and an example template! To jump directly to each section of this post, please use the following links:
One-time setup of the script in Google Colab
Running your first analysis
Practical use cases and templates
[Quick Consideration #1] — The web scraper built into the tool DOES NOT support JavaScript rendering. If your website uses client-side rendering, the full functionality of the tool unfortunately will not work.
[Quick Consideration #2] — This tool has been heavily tested by the members of the Inseev team. Most bugs [specifically with the web scraper] have been found and fixed, but like any other program, it is possible that other issues may come up.
If you encounter any errors, feel free to reach out to us directly at [email protected] or [email protected], and either myself or one of the other members of the data engineering team at Inseev would be happy to help you out.
If new errors are encountered and fixed, we will always upload the updated script to the code repository linked in the sections below so the most up-to-date code can be utilized by all!
One-time setup of the script in Google Colab (in less than 20 minutes)
Things you’ll need:
Google Drive
Google Cloud Platform account
Google Search Console access
Video walkthrough: tool setup process
Below you’ll find step-by-step editorial instructions in order to set up the entire process. However, if following editorial instructions isn’t your preferred method, we recorded a video of the setup process as well.
As you’ll see, we start with a brand new Gmail and set up the entire process in approximately 12 minutes, and the output is completely worth the time.
youtube
Keep in mind that the setup is one-off, and once set up, the tool should work on command from there on!
Editorial walkthrough: tool setup process
Four-part process:
Download the files from Github and set up in Google Drive
Set up a Google Cloud Platform (GCP) Project (skip if you already have an account)
Create the OAuth 2.0 client ID for the Google Search Console (GSC) API (skip if you already have an OAuth client ID with the Search Console API enabled)
Add the OAuth 2.0 credentials to the Config.py file
Part one: Download the files from Github and set up in Google Drive
Download source files (no code required)
1. Navigate here.
2. Select "Code" > "Download Zip"
*You can also use 'git clone https://github.com/jmelm93/query-optmization-checker.git' if you’re more comfortable using the command prompt.

Initiate Google Colab in Google Drive
If you already have a Google Colaboratory setup in your Google Drive, feel free to skip this step.
1. Navigate here.
2. Click "New" > "More" > "Connect more apps".
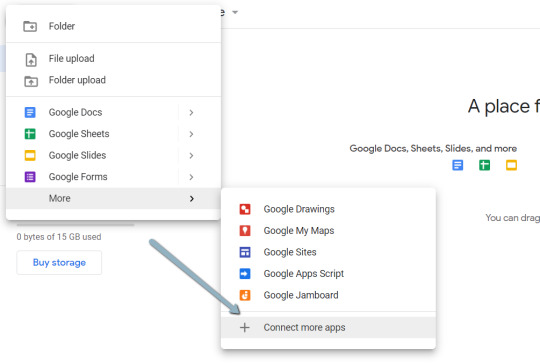
3. Search "Colaboratory" > Click into the application page.

4. Click "Install" > "Continue" > Sign in with OAuth.

5. Click "OK" with the prompt checked so Google Drive automatically sets appropriate files to open with Google Colab (optional).

Import the downloaded folder to Google Drive & open in Colab
1. Navigate to Google Drive and create a folder called "Colab Notebooks".
IMPORTANT: The folder needs to be called "Colab Notebooks" as the script is configured to look for the "api" folder from within "Colab Notebooks".

Error resulting in improper folder naming.
2. Import the folder downloaded from Github into Google Drive.
At the end of this step, you should have a folder in your Google Drive that contains the below items:

Part two: Set up a Google Cloud Platform (GCP) project
If you already have a Google Cloud Platform (GCP) account, feel free to skip this part.
1. Navigate to the Google Cloud page.
2. Click on the "Get started for free" CTA (CTA text may change over time).
3. Sign in with the OAuth credentials of your choice. Any Gmail email will work.
4. Follow the prompts to sign up for your GCP account.
You’ll be asked to supply a credit card to sign up, but there is currently a $300 free trial and Google notes that they won’t charge you until you upgrade your account.
Part three: Create a 0Auth 2.0 client ID for the Google Search Console (GSC) API
1. Navigate here.
2. After you log in to your desired Google Cloud account, click "ENABLE".

3. Configure the consent screen.
In the consent screen creation process, select "External," then continue onto the "App Information."
Example below of minimum requirements:
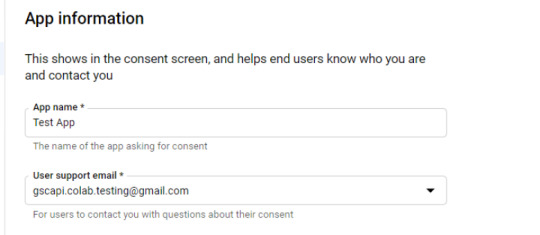

Skip "Scopes"
Add the email(s) you’ll use for the Search Console API authentication into the "Test Users". There could be other emails versus just the one that owns the Google Drive. An example may be a client’s email where you access the Google Search Console UI to view their KPIs.

4. In the left-rail navigation, click into "Credentials" > "CREATE CREDENTIALS" > "OAuth Client ID" (Not in image).

5. Within the "Create OAuth client ID" form, fill in:
Application Type = Desktop app
Name = Google Colab
Click "CREATE"

6. Save the "Client ID" and "Client Secret" — as these will be added into the "api" folder config.py file from the Github files we downloaded.
These should have appeared in a popup after hitting "CREATE"
The "Client Secret" is functionally the password to your Google Cloud (DO NOT post this to the public/share it online)
Part four: Add the OAuth 2.0 credentials to the Config.py file
1. Return to Google Drive and navigate into the "api" folder.
2. Click into config.py.
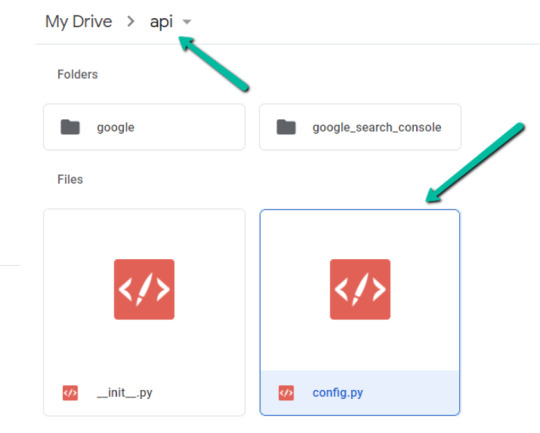
3. Choose to open with "Text Editor" (or another app of your choice) to modify the config.py file.

4. Update the three areas highlighted below with your:
CLIENT_ID: From the OAuth 2.0 client ID setup process
CLIENT_SECRET: From the OAuth 2.0 client ID setup process
GOOGLE_CREDENTIALS: Email that corresponds with your CLIENT_ID & CLIENT_SECRET

5. Save the file once updated!
Congratulations, the boring stuff is over. You are now ready to start using the Google Colab file!
Running your first analysis
Running your first analysis may be a little intimidating, but stick with it and it will get easy fast.
Below, we’ve provided details regarding the input variables required, as well as notes on things to keep in mind when running the script and analyzing the resulting dataset.
After we walk through these items, there are also a few example projects and video walkthroughs showcasing ways to utilize these datasets for client deliverables.
Setting up the input variables
XPath extraction with the "xpath_selector" variable
Have you ever wanted to know every query driving clicks and impressions to a webpage that aren’t in your <title> or <h1> tag? Well, this parameter will allow you to do just that.
While optional, using this is highly encouraged and we feel it "supercharges" the analysis. Simply define site sections with Xpaths and the script will do the rest.
youtube
In the above video, you’ll find examples on how to create site specific extractions. In addition, below are some universal extractions that should work on almost any site on the web:
'//title' # Identifies a <title> tag
'//h1' # Identifies a <h1> tag
'//h2' # Identifies a <h2> tag
Site Specific: How to scrape only the main content (MC)?
Chaining Xpaths – Add a "|" Between Xpaths
'//title | //h1' # Gets you both the <title> and <h1> tag in 1 run
'//h1 | //h2 | //h3' # Gets you both the <h1>, <h2> and <h3> tags in 1 run
Other variables
Here’s a video overview of the other variables with a short description of each.
youtube
'colab_path' [Required] – The path in which the Colab file lives. This should be "/content/drive/My Drive/Colab Notebooks/".
'domain_lookup' [Required] – Homepage of the website utilized for analysis.
'startdate' & 'enddate' [Required] – Date range for the analysis period.
'gsc_sorting_field' [Required] – The tool pulls the top N pages as defined by the user. The "top" is defined by either "clicks_sum" or "impressions_sum." Please review the video for a more detailed description.
'gsc_limit_pages_number' [Required] – Numeric value that represents the number of resulting pages you’d like within the dataset.
'brand_exclusions' [Optional] – The string sequence(s) that commonly result in branded queries (e.g., anything containing "inseev" will be branded queries for "Inseev Interactive").
'impressions_exclusion' [Optional] – Numeric value used to exclude queries that are potentially irrelevant due to the lack of pre-existing impressions. This is primarily relevant for domains with strong pre-existing rankings on a large scale number of pages.
'page_inclusions' [Optional] – The string sequence(s) that are found within the desired analysis page type. If you’d like to analyze the entire domain, leave this section blank.
Running the script
Keep in mind that once the script finishes running, you’re generally going to use the "step3_query-optimizer_domain-YYYY-MM-DD.csv" file for analysis, but there are others with the raw datasets to browse as well.
Practical use cases for the "step3_query-optimizer_domain-YYYY-MM-DD.csv" file can be found in the "Practical use cases and templates" section.
That said, there are a few important things to note while testing things out:
1. No JavaScript Crawling: As mentioned at the start of the post, this script is NOT set up for JavaScript crawling, so if your target website uses a JS frontend with client-side rendering to populate the main content (MC), the scrape will not be useful. However, the basic functionality of quickly getting the top XX (user-defined) queries and pages can still be useful by itself.
2. Google Drive / GSC API Auth: The first time you run the script in each new session it will prompt you to authenticate both the Google Drive and the Google Search Console credentials.
Google Drive authentication: Authenticate to whatever email is associated with the Google Drive with the script.
GSC authentication: Authenticate whichever email has permission to use the desired Google Search Console account.
If you attempt to authenticate and you get an error that looks like the one below, please revisit the "Add the email(s) you’ll use the Colab app with into the 'Test Users'" from Part 3, step 3 in the process above: setting up the consent screen.

Quick tip: The Google Drive account and the GSC Authentication DO NOT have to be the same email, but they do require separate authentications with OAuth.
3. Running the script: Either navigate to "Runtime" > "Restart and Run All" or use the keyboard shortcut CTRL + fn9 to start running the script.
4. Populated datasets/folder structure: There are three CSVs populated by the script – all nested within a folder structure based on the "domain_lookup" input variable.
Automated Organization [Folders]: Each time you rerun the script on a new domain, it will create a new folder structure in order to keep things organized.
Automated Organization [File Naming]: The CSVs include the date of the export appended to the end, so you’ll always know when the process ran as well as the date range for the dataset.
5. Date range for dataset: Inside of the dataset there is a "gsc_datasetID" column generated, which includes the date range of the extraction.

6. Unfamiliar metrics: The resulting dataset has all the KPIs we know and love – e.g. clicks, impressions, average (mean) position — but there are also a few you cannot get directly from the GSC UI:
'count_instances_gsc' — the number of instances the query got at least 1 impression during the specified date range. Scenario example: GSC tells you that you were in an average position 6 for a large keyword like "flower delivery" and you only received 20 impressions in a 30-day date range. Doesn’t seem possible that you were really in position 6, right? Well, now you can see that was potentially because you only actually showed up on one day in that 30-day date range (e.g. count_instances_gsc = 1)
'max_position' & 'min_position' — the MAXIMUM and MINIMUM ranking position the identified page showed up for in Google Search within the specified date range.
Quick tip #1: Large variance in max/min may tell you that your keyword has been fluctuating heavily.
Quick tip #2: These KPIs, in conjunction with the "count_instances_gsc", can exponentially further your understanding of query performance and opportunity.
Practical use cases and templates
Access the recommended multi-use template.
Recommended use: Download file and use with Excel. Subjectively speaking, I believe Excel has a much more user friendly pivot table functionality in comparison to Google Sheets — which is critical for using this template.
Alternative use: If you do not have Microsoft Excel or you prefer a different tool, you can use most spreadsheet apps that contain pivot functionality.
For those who opt for an alternative spreadsheet software/app:
Below are the pivot fields to mimic upon setup.
You may have to adjust the Vlookup functions found on the "Step 3 _ Analysis Final Doc" tab, depending on whether your updated pivot columns align with the current pivot I’ve supplied.
Project example: Title & H1 re-optimizations (video walkthrough)
Project description: Locate keywords that are driving clicks and impressions to high value pages and that do not exist within the <title> and <h1> tags by reviewing GSC query KPIs vs. current page elements. Use the resulting findings to re-optimize both the <title> and <h1> tags for pre-existing pages.
Project assumptions: This process assumes that inserting keywords into both the <title> and <h1> tags is a strong SEO practice for relevancy optimization, and that it’s important to include related keyword variants into these areas (e.g. non-exact match keywords with matching SERP intent).
youtube
Project example: On-page text refresh/re-optimization
Project description: Locate keywords that are driving clicks and impressions to editorial pieces of content that DO NOT exist within the first paragraph within the body of the main content (MC). Perform an on-page refresh of introductory content within editorial pages to include high value keyword opportunities.
Project assumptions: This process assumes that inserting keywords into the first several sentences of a piece of content is a strong SEO practice for relevancy optimization, and that it’s important to include related keyword variants into these areas (e.g. non-exact match keywords with matching SERP intent).
youtube
Final thoughts
We hope this post has been helpful and opened you up to the idea of using Python and Google Colab to supercharge your relevancy optimization strategy.
As mentioned throughout the post, keep the following in mind:
Github repository will be updated with any changes we make in the future.
There is the possibility of undiscovered errors. If these occur, Inseev is happy to help! In fact, we would actually appreciate you reaching out to investigate and fix errors (if any do appear). This way others don’t run into the same problems.
Other than the above, if you have any ideas on ways to Colab (pun intended) on data analytics projects, feel free to reach out with ideas.
0 notes
Text
Page Level Query Analysis at Scale with Google Colab, Python, & the GSC API [Video Instructions Included]
The YouTube playlist referenced throughout this blog can be found here:6 Part YouTube Series [Setting Up & Using the Query Optimization Checker]
Anyone who does SEO as part of their job knows that there’s a lot of value in analyzing which queries are and are not sending traffic to specific pages on a site.
The most common uses for these datasets are to align on-page optimizations with existing rankings and traffic, and to identify gaps in ranking keywords.
However, working with this data is extremely tedious because it’s only available in the Google Search Console interface, and you have to look at only one page at a time.
On top of that, to get information on the text included in the ranking page, you either need to manually review it or extract it with a tool like Screaming Frog.
You need this kind of view:

…but even the above view would only be viable one page at a time, and as mentioned, the actual text extraction would have had to be separate as well.
Given these apparent issues with the readily available data at the SEO community’s disposal, the data engineering team at Inseev Interactive has been spending a lot of time thinking about how we can improve these processes at scale.
One specific example that we’ll be reviewing in this post is a simple script that allows you to get the above data in a flexible format for many great analytical views.
Better yet, this will all be available with only a few single input variables.
A quick rundown of tool functionality
The tool automatically compares the text on-page to the Google Search Console top queries at the page-level to let you know which queries are on-page as well as how many times they appear on the page. An optional XPath variable also allows you to specify the part of the page you want to analyze text on.
This means you’ll know exactly what queries are driving clicks/impressions that are not in your <title>, <h1>, or even something as specific as the first paragraph within the main content (MC). The sky's the limit.
For those of you not familiar, we’ve also provided some quick XPath expressions you can use, as well as how to create site-specific XPath expressions within the "Input Variables" section of the post.
Post setup usage & datasets
Once the process is set up, all that’s required is filling out a short list of variables and the rest is automated for you.
The output dataset includes multiple automated CSV datasets, as well as a structured file format to keep things organized. A simple pivot of the core analysis automated CSV can provide you with the below dataset and many other useful layouts.

… Even some "new metrics"?
Okay, not technically "new," but if you exclusively use the Google Search Console user interface, then you haven’t likely had access to metrics like these before: "Max Position," "Min Position," and "Count Position" for the specified date range – all of which are explained in the "Running your first analysis" section of the post.

To really demonstrate the impact and usefulness of this dataset, in the video below we use the Colab tool to:
[3 Minutes] — Find non-brand <title> optimization opportunities for https://www.inseev.com/ (around 30 pages in video, but you could do any number of pages)
[3 Minutes] — Convert the CSV to a more useable format
[1 Minute] – Optimize the first title with the resulting dataset
youtube
Okay, you’re all set for the initial rundown. Hopefully we were able to get you excited before moving into the somewhat dull setup process.
Keep in mind that at the end of the post, there is also a section including a few helpful use cases and an example template! To jump directly to each section of this post, please use the following links:
One-time setup of the script in Google Colab
Running your first analysis
Practical use cases and templates
[Quick Consideration #1] — The web scraper built into the tool DOES NOT support JavaScript rendering. If your website uses client-side rendering, the full functionality of the tool unfortunately will not work.
[Quick Consideration #2] — This tool has been heavily tested by the members of the Inseev team. Most bugs [specifically with the web scraper] have been found and fixed, but like any other program, it is possible that other issues may come up.
If you encounter any errors, feel free to reach out to us directly at [email protected] or [email protected], and either myself or one of the other members of the data engineering team at Inseev would be happy to help you out.
If new errors are encountered and fixed, we will always upload the updated script to the code repository linked in the sections below so the most up-to-date code can be utilized by all!
One-time setup of the script in Google Colab (in less than 20 minutes)
Things you’ll need:
Google Drive
Google Cloud Platform account
Google Search Console access
Video walkthrough: tool setup process
Below you’ll find step-by-step editorial instructions in order to set up the entire process. However, if following editorial instructions isn’t your preferred method, we recorded a video of the setup process as well.
As you’ll see, we start with a brand new Gmail and set up the entire process in approximately 12 minutes, and the output is completely worth the time.
youtube
Keep in mind that the setup is one-off, and once set up, the tool should work on command from there on!
Editorial walkthrough: tool setup process
Four-part process:
Download the files from Github and set up in Google Drive
Set up a Google Cloud Platform (GCP) Project (skip if you already have an account)
Create the OAuth 2.0 client ID for the Google Search Console (GSC) API (skip if you already have an OAuth client ID with the Search Console API enabled)
Add the OAuth 2.0 credentials to the Config.py file
Part one: Download the files from Github and set up in Google Drive
Download source files (no code required)
1. Navigate here.
2. Select "Code" > "Download Zip"
*You can also use 'git clone https://github.com/jmelm93/query-optmization-checker.git' if you’re more comfortable using the command prompt.

Initiate Google Colab in Google Drive
If you already have a Google Colaboratory setup in your Google Drive, feel free to skip this step.
1. Navigate here.
2. Click "New" > "More" > "Connect more apps".
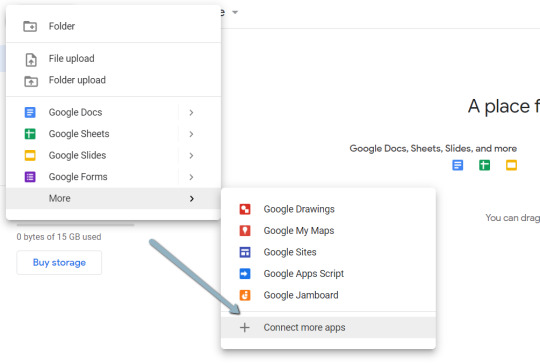
3. Search "Colaboratory" > Click into the application page.
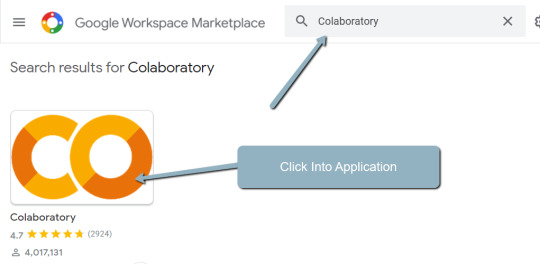
4. Click "Install" > "Continue" > Sign in with OAuth.

5. Click "OK" with the prompt checked so Google Drive automatically sets appropriate files to open with Google Colab (optional).

Import the downloaded folder to Google Drive & open in Colab
1. Navigate to Google Drive and create a folder called "Colab Notebooks".
IMPORTANT: The folder needs to be called "Colab Notebooks" as the script is configured to look for the "api" folder from within "Colab Notebooks".

Error resulting in improper folder naming.
2. Import the folder downloaded from Github into Google Drive.
At the end of this step, you should have a folder in your Google Drive that contains the below items:

Part two: Set up a Google Cloud Platform (GCP) project
If you already have a Google Cloud Platform (GCP) account, feel free to skip this part.
1. Navigate to the Google Cloud page.
2. Click on the "Get started for free" CTA (CTA text may change over time).
3. Sign in with the OAuth credentials of your choice. Any Gmail email will work.
4. Follow the prompts to sign up for your GCP account.
You’ll be asked to supply a credit card to sign up, but there is currently a $300 free trial and Google notes that they won’t charge you until you upgrade your account.
Part three: Create a 0Auth 2.0 client ID for the Google Search Console (GSC) API
1. Navigate here.
2. After you log in to your desired Google Cloud account, click "ENABLE".

3. Configure the consent screen.
In the consent screen creation process, select "External," then continue onto the "App Information."
Example below of minimum requirements:
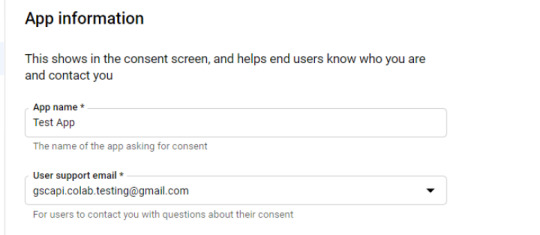

Skip "Scopes"
Add the email(s) you’ll use for the Search Console API authentication into the "Test Users". There could be other emails versus just the one that owns the Google Drive. An example may be a client’s email where you access the Google Search Console UI to view their KPIs.

4. In the left-rail navigation, click into "Credentials" > "CREATE CREDENTIALS" > "OAuth Client ID" (Not in image).

5. Within the "Create OAuth client ID" form, fill in:
Application Type = Desktop app
Name = Google Colab
Click "CREATE"
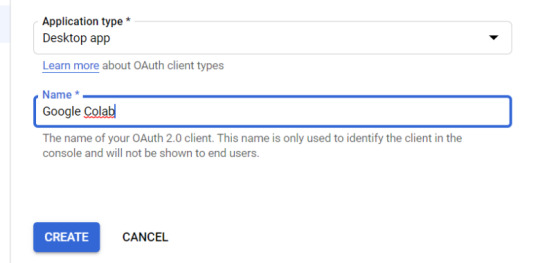
6. Save the "Client ID" and "Client Secret" — as these will be added into the "api" folder config.py file from the Github files we downloaded.
These should have appeared in a popup after hitting "CREATE"
The "Client Secret" is functionally the password to your Google Cloud (DO NOT post this to the public/share it online)
Part four: Add the OAuth 2.0 credentials to the Config.py file
1. Return to Google Drive and navigate into the "api" folder.
2. Click into config.py.
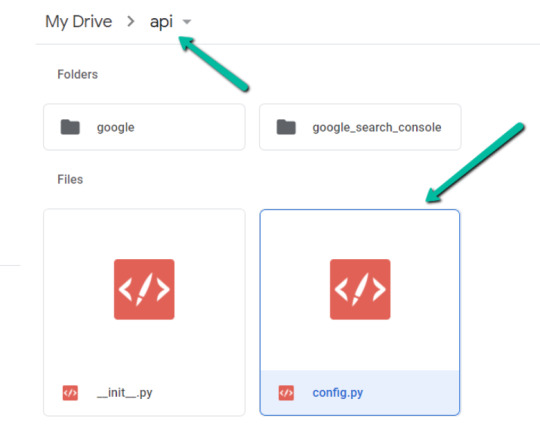
3. Choose to open with "Text Editor" (or another app of your choice) to modify the config.py file.

4. Update the three areas highlighted below with your:
CLIENT_ID: From the OAuth 2.0 client ID setup process
CLIENT_SECRET: From the OAuth 2.0 client ID setup process
GOOGLE_CREDENTIALS: Email that corresponds with your CLIENT_ID & CLIENT_SECRET

5. Save the file once updated!
Congratulations, the boring stuff is over. You are now ready to start using the Google Colab file!
Running your first analysis
Running your first analysis may be a little intimidating, but stick with it and it will get easy fast.
Below, we’ve provided details regarding the input variables required, as well as notes on things to keep in mind when running the script and analyzing the resulting dataset.
After we walk through these items, there are also a few example projects and video walkthroughs showcasing ways to utilize these datasets for client deliverables.
Setting up the input variables
XPath extraction with the "xpath_selector" variable
Have you ever wanted to know every query driving clicks and impressions to a webpage that aren’t in your <title> or <h1> tag? Well, this parameter will allow you to do just that.
While optional, using this is highly encouraged and we feel it "supercharges" the analysis. Simply define site sections with Xpaths and the script will do the rest.
youtube
In the above video, you’ll find examples on how to create site specific extractions. In addition, below are some universal extractions that should work on almost any site on the web:
'//title' # Identifies a <title> tag
'//h1' # Identifies a <h1> tag
'//h2' # Identifies a <h2> tag
Site Specific: How to scrape only the main content (MC)?
Chaining Xpaths – Add a "|" Between Xpaths
'//title | //h1' # Gets you both the <title> and <h1> tag in 1 run
'//h1 | //h2 | //h3' # Gets you both the <h1>, <h2> and <h3> tags in 1 run
Other variables
Here’s a video overview of the other variables with a short description of each.
youtube
'colab_path' [Required] – The path in which the Colab file lives. This should be "/content/drive/My Drive/Colab Notebooks/".
'domain_lookup' [Required] – Homepage of the website utilized for analysis.
'startdate' & 'enddate' [Required] – Date range for the analysis period.
'gsc_sorting_field' [Required] – The tool pulls the top N pages as defined by the user. The "top" is defined by either "clicks_sum" or "impressions_sum." Please review the video for a more detailed description.
'gsc_limit_pages_number' [Required] – Numeric value that represents the number of resulting pages you’d like within the dataset.
'brand_exclusions' [Optional] – The string sequence(s) that commonly result in branded queries (e.g., anything containing "inseev" will be branded queries for "Inseev Interactive").
'impressions_exclusion' [Optional] – Numeric value used to exclude queries that are potentially irrelevant due to the lack of pre-existing impressions. This is primarily relevant for domains with strong pre-existing rankings on a large scale number of pages.
'page_inclusions' [Optional] – The string sequence(s) that are found within the desired analysis page type. If you’d like to analyze the entire domain, leave this section blank.
Running the script
Keep in mind that once the script finishes running, you’re generally going to use the "step3_query-optimizer_domain-YYYY-MM-DD.csv" file for analysis, but there are others with the raw datasets to browse as well.
Practical use cases for the "step3_query-optimizer_domain-YYYY-MM-DD.csv" file can be found in the "Practical use cases and templates" section.
That said, there are a few important things to note while testing things out:
1. No JavaScript Crawling: As mentioned at the start of the post, this script is NOT set up for JavaScript crawling, so if your target website uses a JS frontend with client-side rendering to populate the main content (MC), the scrape will not be useful. However, the basic functionality of quickly getting the top XX (user-defined) queries and pages can still be useful by itself.
2. Google Drive / GSC API Auth: The first time you run the script in each new session it will prompt you to authenticate both the Google Drive and the Google Search Console credentials.
Google Drive authentication: Authenticate to whatever email is associated with the Google Drive with the script.
GSC authentication: Authenticate whichever email has permission to use the desired Google Search Console account.
If you attempt to authenticate and you get an error that looks like the one below, please revisit the "Add the email(s) you’ll use the Colab app with into the 'Test Users'" from Part 3, step 3 in the process above: setting up the consent screen.

Quick tip: The Google Drive account and the GSC Authentication DO NOT have to be the same email, but they do require separate authentications with OAuth.
3. Running the script: Either navigate to "Runtime" > "Restart and Run All" or use the keyboard shortcut CTRL + fn9 to start running the script.
4. Populated datasets/folder structure: There are three CSVs populated by the script – all nested within a folder structure based on the "domain_lookup" input variable.
Automated Organization [Folders]: Each time you rerun the script on a new domain, it will create a new folder structure in order to keep things organized.
Automated Organization [File Naming]: The CSVs include the date of the export appended to the end, so you’ll always know when the process ran as well as the date range for the dataset.
5. Date range for dataset: Inside of the dataset there is a "gsc_datasetID" column generated, which includes the date range of the extraction.

6. Unfamiliar metrics: The resulting dataset has all the KPIs we know and love – e.g. clicks, impressions, average (mean) position — but there are also a few you cannot get directly from the GSC UI:
'count_instances_gsc' — the number of instances the query got at least 1 impression during the specified date range. Scenario example: GSC tells you that you were in an average position 6 for a large keyword like "flower delivery" and you only received 20 impressions in a 30-day date range. Doesn’t seem possible that you were really in position 6, right? Well, now you can see that was potentially because you only actually showed up on one day in that 30-day date range (e.g. count_instances_gsc = 1)
'max_position' & 'min_position' — the MAXIMUM and MINIMUM ranking position the identified page showed up for in Google Search within the specified date range.
Quick tip #1: Large variance in max/min may tell you that your keyword has been fluctuating heavily.
Quick tip #2: These KPIs, in conjunction with the "count_instances_gsc", can exponentially further your understanding of query performance and opportunity.
Practical use cases and templates
Access the recommended multi-use template.
Recommended use: Download file and use with Excel. Subjectively speaking, I believe Excel has a much more user friendly pivot table functionality in comparison to Google Sheets — which is critical for using this template.
Alternative use: If you do not have Microsoft Excel or you prefer a different tool, you can use most spreadsheet apps that contain pivot functionality.
For those who opt for an alternative spreadsheet software/app:
Below are the pivot fields to mimic upon setup.
You may have to adjust the Vlookup functions found on the "Step 3 _ Analysis Final Doc" tab, depending on whether your updated pivot columns align with the current pivot I’ve supplied.
Project example: Title & H1 re-optimizations (video walkthrough)
Project description: Locate keywords that are driving clicks and impressions to high value pages and that do not exist within the <title> and <h1> tags by reviewing GSC query KPIs vs. current page elements. Use the resulting findings to re-optimize both the <title> and <h1> tags for pre-existing pages.
Project assumptions: This process assumes that inserting keywords into both the <title> and <h1> tags is a strong SEO practice for relevancy optimization, and that it’s important to include related keyword variants into these areas (e.g. non-exact match keywords with matching SERP intent).
youtube
Project example: On-page text refresh/re-optimization
Project description: Locate keywords that are driving clicks and impressions to editorial pieces of content that DO NOT exist within the first paragraph within the body of the main content (MC). Perform an on-page refresh of introductory content within editorial pages to include high value keyword opportunities.
Project assumptions: This process assumes that inserting keywords into the first several sentences of a piece of content is a strong SEO practice for relevancy optimization, and that it’s important to include related keyword variants into these areas (e.g. non-exact match keywords with matching SERP intent).
youtube
Final thoughts
We hope this post has been helpful and opened you up to the idea of using Python and Google Colab to supercharge your relevancy optimization strategy.
As mentioned throughout the post, keep the following in mind:
Github repository will be updated with any changes we make in the future.
There is the possibility of undiscovered errors. If these occur, Inseev is happy to help! In fact, we would actually appreciate you reaching out to investigate and fix errors (if any do appear). This way others don’t run into the same problems.
Other than the above, if you have any ideas on ways to Colab (pun intended) on data analytics projects, feel free to reach out with ideas.
0 notes
Text
Page Level Query Analysis at Scale with Google Colab, Python, & the GSC API [Video Instructions Included]
The YouTube playlist referenced throughout this blog can be found here:6 Part YouTube Series [Setting Up & Using the Query Optimization Checker]
Anyone who does SEO as part of their job knows that there’s a lot of value in analyzing which queries are and are not sending traffic to specific pages on a site.
The most common uses for these datasets are to align on-page optimizations with existing rankings and traffic, and to identify gaps in ranking keywords.
However, working with this data is extremely tedious because it’s only available in the Google Search Console interface, and you have to look at only one page at a time.
On top of that, to get information on the text included in the ranking page, you either need to manually review it or extract it with a tool like Screaming Frog.
You need this kind of view:

…but even the above view would only be viable one page at a time, and as mentioned, the actual text extraction would have had to be separate as well.
Given these apparent issues with the readily available data at the SEO community’s disposal, the data engineering team at Inseev Interactive has been spending a lot of time thinking about how we can improve these processes at scale.
One specific example that we’ll be reviewing in this post is a simple script that allows you to get the above data in a flexible format for many great analytical views.
Better yet, this will all be available with only a few single input variables.
A quick rundown of tool functionality
The tool automatically compares the text on-page to the Google Search Console top queries at the page-level to let you know which queries are on-page as well as how many times they appear on the page. An optional XPath variable also allows you to specify the part of the page you want to analyze text on.
This means you’ll know exactly what queries are driving clicks/impressions that are not in your <title>, <h1>, or even something as specific as the first paragraph within the main content (MC). The sky's the limit.
For those of you not familiar, we’ve also provided some quick XPath expressions you can use, as well as how to create site-specific XPath expressions within the "Input Variables" section of the post.
Post setup usage & datasets
Once the process is set up, all that’s required is filling out a short list of variables and the rest is automated for you.
The output dataset includes multiple automated CSV datasets, as well as a structured file format to keep things organized. A simple pivot of the core analysis automated CSV can provide you with the below dataset and many other useful layouts.

… Even some "new metrics"?
Okay, not technically "new," but if you exclusively use the Google Search Console user interface, then you haven’t likely had access to metrics like these before: "Max Position," "Min Position," and "Count Position" for the specified date range – all of which are explained in the "Running your first analysis" section of the post.

To really demonstrate the impact and usefulness of this dataset, in the video below we use the Colab tool to:
[3 Minutes] — Find non-brand <title> optimization opportunities for https://www.inseev.com/ (around 30 pages in video, but you could do any number of pages)
[3 Minutes] — Convert the CSV to a more useable format
[1 Minute] – Optimize the first title with the resulting dataset
youtube
Okay, you’re all set for the initial rundown. Hopefully we were able to get you excited before moving into the somewhat dull setup process.
Keep in mind that at the end of the post, there is also a section including a few helpful use cases and an example template! To jump directly to each section of this post, please use the following links:
One-time setup of the script in Google Colab
Running your first analysis
Practical use cases and templates
[Quick Consideration #1] — The web scraper built into the tool DOES NOT support JavaScript rendering. If your website uses client-side rendering, the full functionality of the tool unfortunately will not work.
[Quick Consideration #2] — This tool has been heavily tested by the members of the Inseev team. Most bugs [specifically with the web scraper] have been found and fixed, but like any other program, it is possible that other issues may come up.
If you encounter any errors, feel free to reach out to us directly at [email protected] or [email protected], and either myself or one of the other members of the data engineering team at Inseev would be happy to help you out.
If new errors are encountered and fixed, we will always upload the updated script to the code repository linked in the sections below so the most up-to-date code can be utilized by all!
One-time setup of the script in Google Colab (in less than 20 minutes)
Things you’ll need:
Google Drive
Google Cloud Platform account
Google Search Console access
Video walkthrough: tool setup process
Below you’ll find step-by-step editorial instructions in order to set up the entire process. However, if following editorial instructions isn’t your preferred method, we recorded a video of the setup process as well.
As you’ll see, we start with a brand new Gmail and set up the entire process in approximately 12 minutes, and the output is completely worth the time.
youtube
Keep in mind that the setup is one-off, and once set up, the tool should work on command from there on!
Editorial walkthrough: tool setup process
Four-part process:
Download the files from Github and set up in Google Drive
Set up a Google Cloud Platform (GCP) Project (skip if you already have an account)
Create the OAuth 2.0 client ID for the Google Search Console (GSC) API (skip if you already have an OAuth client ID with the Search Console API enabled)
Add the OAuth 2.0 credentials to the Config.py file
Part one: Download the files from Github and set up in Google Drive
Download source files (no code required)
1. Navigate here.
2. Select "Code" > "Download Zip"
*You can also use 'git clone https://github.com/jmelm93/query-optmization-checker.git' if you’re more comfortable using the command prompt.

Initiate Google Colab in Google Drive
If you already have a Google Colaboratory setup in your Google Drive, feel free to skip this step.
1. Navigate here.
2. Click "New" > "More" > "Connect more apps".
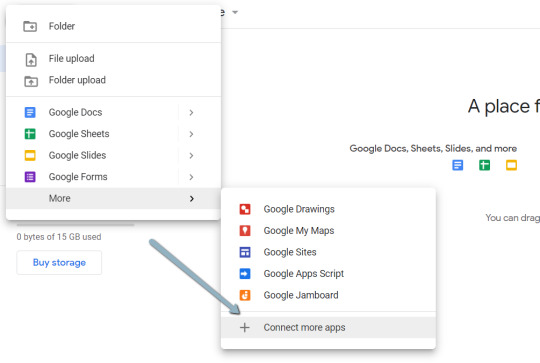
3. Search "Colaboratory" > Click into the application page.

4. Click "Install" > "Continue" > Sign in with OAuth.

5. Click "OK" with the prompt checked so Google Drive automatically sets appropriate files to open with Google Colab (optional).
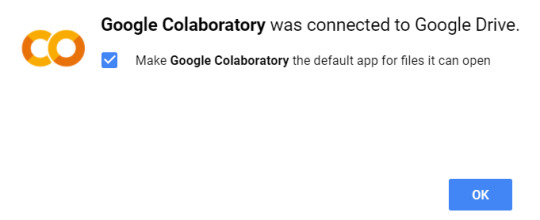
Import the downloaded folder to Google Drive & open in Colab
1. Navigate to Google Drive and create a folder called "Colab Notebooks".
IMPORTANT: The folder needs to be called "Colab Notebooks" as the script is configured to look for the "api" folder from within "Colab Notebooks".
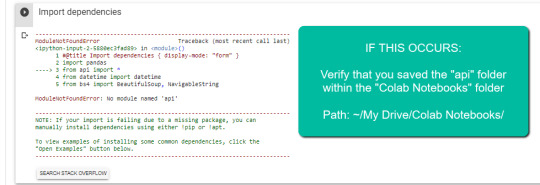
Error resulting in improper folder naming.
2. Import the folder downloaded from Github into Google Drive.
At the end of this step, you should have a folder in your Google Drive that contains the below items:

Part two: Set up a Google Cloud Platform (GCP) project
If you already have a Google Cloud Platform (GCP) account, feel free to skip this part.
1. Navigate to the Google Cloud page.
2. Click on the "Get started for free" CTA (CTA text may change over time).
3. Sign in with the OAuth credentials of your choice. Any Gmail email will work.
4. Follow the prompts to sign up for your GCP account.
You’ll be asked to supply a credit card to sign up, but there is currently a $300 free trial and Google notes that they won’t charge you until you upgrade your account.
Part three: Create a 0Auth 2.0 client ID for the Google Search Console (GSC) API
1. Navigate here.
2. After you log in to your desired Google Cloud account, click "ENABLE".
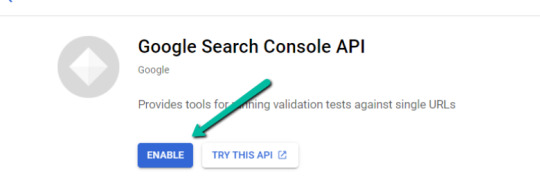
3. Configure the consent screen.
In the consent screen creation process, select "External," then continue onto the "App Information."
Example below of minimum requirements:


Skip "Scopes"
Add the email(s) you’ll use for the Search Console API authentication into the "Test Users". There could be other emails versus just the one that owns the Google Drive. An example may be a client’s email where you access the Google Search Console UI to view their KPIs.

4. In the left-rail navigation, click into "Credentials" > "CREATE CREDENTIALS" > "OAuth Client ID" (Not in image).

5. Within the "Create OAuth client ID" form, fill in:
Application Type = Desktop app
Name = Google Colab
Click "CREATE"
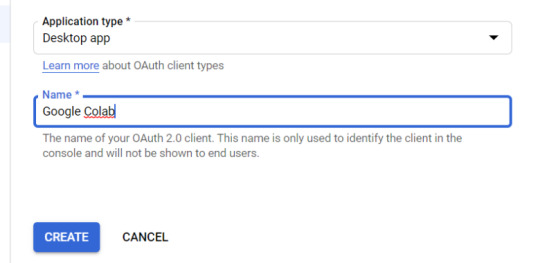
6. Save the "Client ID" and "Client Secret" — as these will be added into the "api" folder config.py file from the Github files we downloaded.
These should have appeared in a popup after hitting "CREATE"
The "Client Secret" is functionally the password to your Google Cloud (DO NOT post this to the public/share it online)
Part four: Add the OAuth 2.0 credentials to the Config.py file
1. Return to Google Drive and navigate into the "api" folder.
2. Click into config.py.

3. Choose to open with "Text Editor" (or another app of your choice) to modify the config.py file.

4. Update the three areas highlighted below with your:
CLIENT_ID: From the OAuth 2.0 client ID setup process
CLIENT_SECRET: From the OAuth 2.0 client ID setup process
GOOGLE_CREDENTIALS: Email that corresponds with your CLIENT_ID & CLIENT_SECRET

5. Save the file once updated!
Congratulations, the boring stuff is over. You are now ready to start using the Google Colab file!
Running your first analysis
Running your first analysis may be a little intimidating, but stick with it and it will get easy fast.
Below, we’ve provided details regarding the input variables required, as well as notes on things to keep in mind when running the script and analyzing the resulting dataset.
After we walk through these items, there are also a few example projects and video walkthroughs showcasing ways to utilize these datasets for client deliverables.
Setting up the input variables
XPath extraction with the "xpath_selector" variable
Have you ever wanted to know every query driving clicks and impressions to a webpage that aren’t in your <title> or <h1> tag? Well, this parameter will allow you to do just that.
While optional, using this is highly encouraged and we feel it "supercharges" the analysis. Simply define site sections with Xpaths and the script will do the rest.
youtube
In the above video, you’ll find examples on how to create site specific extractions. In addition, below are some universal extractions that should work on almost any site on the web:
'//title' # Identifies a <title> tag
'//h1' # Identifies a <h1> tag
'//h2' # Identifies a <h2> tag
Site Specific: How to scrape only the main content (MC)?
Chaining Xpaths – Add a "|" Between Xpaths
'//title | //h1' # Gets you both the <title> and <h1> tag in 1 run
'//h1 | //h2 | //h3' # Gets you both the <h1>, <h2> and <h3> tags in 1 run
Other variables
Here’s a video overview of the other variables with a short description of each.
youtube
'colab_path' [Required] – The path in which the Colab file lives. This should be "/content/drive/My Drive/Colab Notebooks/".
'domain_lookup' [Required] – Homepage of the website utilized for analysis.
'startdate' & 'enddate' [Required] – Date range for the analysis period.
'gsc_sorting_field' [Required] – The tool pulls the top N pages as defined by the user. The "top" is defined by either "clicks_sum" or "impressions_sum." Please review the video for a more detailed description.
'gsc_limit_pages_number' [Required] – Numeric value that represents the number of resulting pages you’d like within the dataset.
'brand_exclusions' [Optional] – The string sequence(s) that commonly result in branded queries (e.g., anything containing "inseev" will be branded queries for "Inseev Interactive").
'impressions_exclusion' [Optional] – Numeric value used to exclude queries that are potentially irrelevant due to the lack of pre-existing impressions. This is primarily relevant for domains with strong pre-existing rankings on a large scale number of pages.
'page_inclusions' [Optional] – The string sequence(s) that are found within the desired analysis page type. If you’d like to analyze the entire domain, leave this section blank.
Running the script
Keep in mind that once the script finishes running, you’re generally going to use the "step3_query-optimizer_domain-YYYY-MM-DD.csv" file for analysis, but there are others with the raw datasets to browse as well.
Practical use cases for the "step3_query-optimizer_domain-YYYY-MM-DD.csv" file can be found in the "Practical use cases and templates" section.
That said, there are a few important things to note while testing things out:
1. No JavaScript Crawling: As mentioned at the start of the post, this script is NOT set up for JavaScript crawling, so if your target website uses a JS frontend with client-side rendering to populate the main content (MC), the scrape will not be useful. However, the basic functionality of quickly getting the top XX (user-defined) queries and pages can still be useful by itself.
2. Google Drive / GSC API Auth: The first time you run the script in each new session it will prompt you to authenticate both the Google Drive and the Google Search Console credentials.
Google Drive authentication: Authenticate to whatever email is associated with the Google Drive with the script.
GSC authentication: Authenticate whichever email has permission to use the desired Google Search Console account.
If you attempt to authenticate and you get an error that looks like the one below, please revisit the "Add the email(s) you’ll use the Colab app with into the 'Test Users'" from Part 3, step 3 in the process above: setting up the consent screen.

Quick tip: The Google Drive account and the GSC Authentication DO NOT have to be the same email, but they do require separate authentications with OAuth.
3. Running the script: Either navigate to "Runtime" > "Restart and Run All" or use the keyboard shortcut CTRL + fn9 to start running the script.
4. Populated datasets/folder structure: There are three CSVs populated by the script – all nested within a folder structure based on the "domain_lookup" input variable.
Automated Organization [Folders]: Each time you rerun the script on a new domain, it will create a new folder structure in order to keep things organized.
Automated Organization [File Naming]: The CSVs include the date of the export appended to the end, so you’ll always know when the process ran as well as the date range for the dataset.
5. Date range for dataset: Inside of the dataset there is a "gsc_datasetID" column generated, which includes the date range of the extraction.

6. Unfamiliar metrics: The resulting dataset has all the KPIs we know and love – e.g. clicks, impressions, average (mean) position — but there are also a few you cannot get directly from the GSC UI:
'count_instances_gsc' — the number of instances the query got at least 1 impression during the specified date range. Scenario example: GSC tells you that you were in an average position 6 for a large keyword like "flower delivery" and you only received 20 impressions in a 30-day date range. Doesn’t seem possible that you were really in position 6, right? Well, now you can see that was potentially because you only actually showed up on one day in that 30-day date range (e.g. count_instances_gsc = 1)
'max_position' & 'min_position' — the MAXIMUM and MINIMUM ranking position the identified page showed up for in Google Search within the specified date range.
Quick tip #1: Large variance in max/min may tell you that your keyword has been fluctuating heavily.
Quick tip #2: These KPIs, in conjunction with the "count_instances_gsc", can exponentially further your understanding of query performance and opportunity.
Practical use cases and templates
Access the recommended multi-use template.
Recommended use: Download file and use with Excel. Subjectively speaking, I believe Excel has a much more user friendly pivot table functionality in comparison to Google Sheets — which is critical for using this template.
Alternative use: If you do not have Microsoft Excel or you prefer a different tool, you can use most spreadsheet apps that contain pivot functionality.
For those who opt for an alternative spreadsheet software/app:
Below are the pivot fields to mimic upon setup.
You may have to adjust the Vlookup functions found on the "Step 3 _ Analysis Final Doc" tab, depending on whether your updated pivot columns align with the current pivot I’ve supplied.
Project example: Title & H1 re-optimizations (video walkthrough)
Project description: Locate keywords that are driving clicks and impressions to high value pages and that do not exist within the <title> and <h1> tags by reviewing GSC query KPIs vs. current page elements. Use the resulting findings to re-optimize both the <title> and <h1> tags for pre-existing pages.
Project assumptions: This process assumes that inserting keywords into both the <title> and <h1> tags is a strong SEO practice for relevancy optimization, and that it’s important to include related keyword variants into these areas (e.g. non-exact match keywords with matching SERP intent).
youtube
Project example: On-page text refresh/re-optimization
Project description: Locate keywords that are driving clicks and impressions to editorial pieces of content that DO NOT exist within the first paragraph within the body of the main content (MC). Perform an on-page refresh of introductory content within editorial pages to include high value keyword opportunities.
Project assumptions: This process assumes that inserting keywords into the first several sentences of a piece of content is a strong SEO practice for relevancy optimization, and that it’s important to include related keyword variants into these areas (e.g. non-exact match keywords with matching SERP intent).
youtube
Final thoughts
We hope this post has been helpful and opened you up to the idea of using Python and Google Colab to supercharge your relevancy optimization strategy.
As mentioned throughout the post, keep the following in mind:
Github repository will be updated with any changes we make in the future.
There is the possibility of undiscovered errors. If these occur, Inseev is happy to help! In fact, we would actually appreciate you reaching out to investigate and fix errors (if any do appear). This way others don’t run into the same problems.
Other than the above, if you have any ideas on ways to Colab (pun intended) on data analytics projects, feel free to reach out with ideas.
0 notes
Text
Can Selenium Be Used For Web Scraping?
What is Web Scraping?
Web scraping is the large-scale extraction of data from the internet. It is carried out automatically. Scraping can produce a lot of specific information for the study, depending on the technology you employ.
Web scraping programs do not examine data on their own. They can, however, remove duplicates, mistakes, and missing data from the data set they return. Web scrapers get information from a website by scanning itself through the code for the items you need, or by pulling the full code off the page.
What is Scraping Used for?
Web scraping has a wide range of applications. Some firms use it for marketing, to obtain information on price trends or reviews, or to learn more about their clients' characteristics. Scraping is a technique used by some to evaluate the websites of competitors.
Scraping is a technique used by big firms like Google to gather data on people's behavior and purchasing patterns. That's how the targeted adverts follow you throughout the internet come to be.
Every day individuals can benefit from scraping. Before creating your content, you may scrape data from popular blogs or YouTube videos to discover which ones do well.
Various other uses of web scraping will include:
Scraping Job Board Websites For The Most Well-Received Applications
Scraping Social Media Platforms For Information On User Involvement, Particularly For Users In Your Specialty
Data From The Google Search Engine Result Page (SERP) Is Being Scraped For SEO Ranking Advice.
Scraping Large E-Commerce Sites To Compare Prices
Data From E-Commerce Product Descriptions Is Scraped For SEO Purposes.
Scrapers or scraper bots are programs that scan the internet for information and return it. You can make your own if you know how to code, but if you plan to undertake large-scale data scraping, it's far easier to acquire one from a respected business.
Why Selenium is used for Web Scraping?
Selenium is a free, open-source website development tool that automates online browsing. It was created in 2004 and is mostly used to test websites and apps across a variety of browsers.
Selenium is a collection of testing tools, but Selenium WebDriver is the one that everyone uses for web scraping. WebDriver is in charge of cross-browser validation that is automated.
WebDriver may be used for web scraping in the same way as other automated crawlers because it's automated. You can program it to operate like a crawler. However, it is better for code testing.
What are the Drawbacks of Using Selenium for Web Scraping?
Selenium was not designed for web scraping but was created for automated testing. For using it as a scraper, you will need to create workarounds using coding and programing.
Selenium's learning curve is greater than those of purpose-built web scrapers because it isn't meant for scraping. Beginners may need to spend some time understanding the program in order and get it to do whatever they want, whereas web scrapers will work that way right out of the box.
When using Selenium to scrape data, there are additional speed difficulties. It's a lot slower than the other web scraping tools out there, therefore it's not a good choice for a large-scale or even medium-scale scraping business.
What Selenium Can be Used For?
Selenium is best used for what it was designed for: testing web pages. Selenium makes sense if you're a developer who wants to test websites across many browsers.
Selenium is an excellent choice if you're constructing a page or app and want to scrape data from it while also testing it. This allows you to keep an eye on the code while developing it and test functionality at the same time. Selenium performs admirably in this small-scale application.
Selenium is a good option if you need to scrape a website that requires JavaScript. Selenium may have an advantage here because many online scraping solutions utilize Python rather than JavaScript.
Selenium is also helpful for folks who are just getting started with web scraping. It shows everything in real time, giving the user visual feedback that helps them remember what they're learning.
Selenium, on the other hand, will be more of a barrier than a benefit if you want to get started quickly and execute large-scale data scraping jobs.
What to Use Instead of Selenium?
A pre-built scraping program is a method to just go if you ever need fast results and have no coding skills. An API that can extract HTML code from any website URL you enter, allowing you to scrape a site in seconds. You can save the output once the scraping is finished.
You may get started straight away with a pre-built scraper, allowing you to experiment with various parameters and requests. Different request parameters, home or data center proxies, and so on can all be tried out. You don't have to manually enter several bits of data when using a web scraping API you simply enter one website Address and it provides the code.
A pre-built scraper can be programmed to extract data from a website as infrequently or as frequently as you require. However, you should not bombard a page with thousands of requests every second. You can avoid getting blocked by programming your scraper to submit requests at random intervals of seconds or minutes.
Scrapers that are pre-built come with a high-quality collection of proxies that you can employ when scraping. When submitting data requests, proxies are an essential part of any online scraper's toolset because they disguise your location and identity by simulating regular human surfing.
Customer service is frequently available for pre-built tools. That implies you can reach out to their staff if you have a need that their scraper doesn't currently address. They may be able to include everything into the program to fulfill your requirements. So, you don't have to, a program works out the problems.
Using a solid pre-built scraper, you won't have to bother about anti-bot mechanisms. Anti-bot procedures and workarounds will have been planned by the team behind it.
Finally, the design of a pre-built tool is typically simple and uncomplicated. A good web scraping tool will be simple and quick to use, allowing you to get up to speed quickly without having to spend a lot of time learning the basics.
Final Words
iWeb Scraping creates pre-built APIs for a wide range of applications, including social media data, SERP pages, and more. They're all simple to use and come with a dedicated support team available 24 hours a day, seven days a week.
Visit the website to learn more about the many scraping tools available, and get in touch with us if you require a customized solution. Our programs can collaborate with you to create something that fulfills your requirements.
For more details, contact iWeb Scraping today!!
https://www.iwebscraping.com/can-selenium-be-used-for-web-scraping.php
1 note
·
View note