#When you use shift+Windows+S to screenshot you can adjust your selection with the arrow keys. Didn't know that.
Text
Learning all kinds of neat
thin
#...gs about what the right arrow is capable of doing since mine is REFUSING TO BEHAVE#Random Timbit#for instance you can move through parts of your post. Or move between results types on a search engine#(i.e. web; image;shopping;maps etc.)#When you use shift+Windows+S to screenshot you can adjust your selection with the arrow keys. Didn't know that.#Really annoying to have that be a test of reaction speed and timing now#I /did/ know you can use arrow keys to navigate apps in expose view or whatever it's called on windows (alt+tab)#....also in case it's not obvious while the main text body of a tumblr post has arrow control the tags don't. At least not in the same way#I really am gonna have to take this thing apart and take compressed air to it and maybe clean the keyboard contacts and hope that fixes it
0 notes
Text
Tutorial: How to make a preset for face TS4 (EN)
We will need MorphMaker and Blender (v 2.78)
I attached the archive with an empty blend file and texture maps, it is convenient for future work => CLICK
Simplified version (only in screenshots) => CLICK
Русская версия => ЗДЕСЬ
Let's start.
1. Launch MorphMaker.
On the "Create BGEO" we need to export a mesh base. Be sure to give the same name, so as not to confuse, it will be needed.


2. After export, go to an empty Blender and import obj.


3. In the working field a few lods appear. It is rational to create presets at lod0, since in the game when the camera is removed from the character, small details will not be visible. So lod1,2 and 3 are hidden by clicking on the pictogram of the eye. Then go to the very first (lod0) and select it in the meshes window.

4. This model can be superimposed texture to make it easier to navigate. Go to the materials tab, create a new layer.

5. Then on the texture tab and repeat the same steps to create a layer.

6. Scroll down, open the file selection window and select the downloaded png file from my archive. Since in the example I used the female model, we select the appropriate texture.


7. First of all, we switch to sculpt mode. Choose a brush from the list of proposed.

8. We look at the size of the brush - it is a circle showing the field of action of the tool.
Reduce or enlarge it with hotkeys [ and ]. Thus we give the desired shape, without going into details.
You can rotate the camera around your head using the mouse wheel while holding it and you can change the scale using its scroll.
1) Return the camera exactly in front view - number 1 on the small keyboard unit
2) Side view - number 3 on the small block of the keyboard
3) Top view - number 7 on a small block of the keyboard
4) Number 9 will reflect the angle in which you are now
5) And number 5 removes all distortions in the model display and adds an auxiliary grid in the front and side view.
If you are satisfied with the form that turned out, you can immediately go to step 15.

9. If the main form suits you, but you need to correct some details, go to the edit mode.

10. Remove the selection by pressing the hot key “A”. Then select each vertex with the right mouse button that needs to be corrected, and use the list of hot keys:
1) With the “Shift” pressed, click on the vertices right click - select several
2) Select the vertex and press “G”, then move the mouse - move outside the coordinates
3) Select vertices and pull the arrows around it - move in different planes (x, y or z)

11. To proportionally move several points relative to the selected point, you can turn on the proportional editing tool.
A few words about his work:
1) Select a point or several points
2) Press the “S” or “G” hot key
3) Turn the mouse wheel forward or backward to adjust the area of impact (marked with a round rim, similar to the brush tool)
4) Reset the activity of hot keys by clicking the right mouse button
5) Pull the coordinate arrows near the vertices
The more area you select, the more points around the main will be involved.
The tool can also be turned off if it is not necessary.

12. Sometimes a small nuisance happens in the form of vertices getting stuck inside the mesh, it looks like this ↓
To correct such surprises, click on the icon visibility restrictions.

13. Now we can see the dots in the background and foreground, the mesh becomes transparent. Select the desired vertex, you can turn off visibility and pull the point in different directions to get it out of the trap.


14. To save time, you can move the vertices symmetrically.
To do this, select several vertices and click:
1) “S” - to increase or decrease the area
2) “G” - to move the area regardless of planes
3) “S” then “X, Y or Z” - to move the area depending on the plane

When the result is satisfied, you can go into object mode.

15. Let's return to our hidden lods. They need to be returned by clicking on the same eye icons. Then move the cursor to the work area with meshes and press “A” to select everything.

Next, go to tab file -> export -> obj file format.

16. Save with a new name, this is important.

17. Return to MorphMaker.
Specify the path to the base obj file, which was exported at the very beginning, specify the path to the file just saved. Set the name and click “Create BGEO”.

Then save the file that the program has converted.

18. The penultimate step is to configure the display and operation of the preset.
Go to the tab “Create / Edit Slider and / or Preset Package”
Open the “Add / Edit Sculpts” subtab, create a new sculpt by clicking on the “Add Sculpt” button. We set the same name that was given in step 17, select the converted sculpt in the “BGEO” line and put down hashtags (I do not recommend putting a hashtag of men and children if you made a preset on a female sculptor, since it is strongly distorted in the game, create presets for each ages and gender separately).
Next, click “Save Sculpt”.


19. Now go to the next tab - “Add / Edit CAS Presets”, click the button “Add New CAS Preset” and set the same hashtags.


20. When finished with them, you need to select the sculptor created earlier. Click “Add Sculpt”. Expand the selection line and click on our newly created. He is there alone.

21. The latest manipulations will be the creation of an avatar, its size should be from 100x100px to 400x400px for better quality.

Create any image in Photoshop, I inserted a screen from a blender, but then I will change it to another. We import a preview in the selection window and save it.

22. When the fields are completely filled, the hashtags are indicated, the names are chosen and the sculpt is selected, you can save the preset and save the new package file.


READY!
P.S. Tutorial created at the request of subscribers.
638 notes
·
View notes
Text
How To Rotate Screen In Sims 4 Guide
How do i rotate in sims 4? Taking screenshots and making videos of sims 4.

How To Rotate Screen In Sims 4
How to play the sims freeplay on bluestacks/ how to skip the tutorial/ how to rotate the camera/ rotate screen/ the sims freeplay.step 1:

How to rotate screen in sims 4. Release the cursor when you are satisfied with the position. It has the buttons to rotate the camera. Move the cursor to the rotate object in the same direction.
How to switch camera to top view in sims 4. Hit the “control” key on your keyboard and hold it down. View full content the sims 4 freely rotating the camera while building tutorial
Or by keyboard, hold the. You can rotate objects in sims 4 camera mode the same way as the build mode. How do i rotate the screen on sims 4?
Click on the camera at the top right of the screen and that will open the camera controls. You rotate objects by putting then down, still holding the button, and dragging the mouse in any. If your mouse has no center button, hold down ctrl while scrolling or use the directional arrow to tilt the angle.
'c' and 'v' will take a screenshot or record a video, respectively. (pc) read description for laptop controls & full instructions on how to tilt your camera angle up & down in the sims 4. These are stored in documents/electronic arts/the sims 4/screenshots and the sims 4/recorded videos.
Press the scroll wheel down down while moving the mouse to rotate the camera, scroll in and out to zoom in and out. How do you rotate on sims 4 on a laptop? You can still move around by holding right click.
Once you’re in build mode and have selected an item, there are three different ways to rotate items and objects in the sims 4. Sims 4 camera settings and use (tilt and rotate) press the scroll wheel down down while moving the mouse to rotate the camera, scroll in and out to zoom in and out. Click on the object you want to rotate and drag the cursor to any direction.
If you are using a trackpad, ctrl + a/s/w/d for adjustments. How to rotate objects in sims 4 on pc enter the build mode. How do you freely rotate objects in sims 4?
Press “ctrl + shift + tab” on your keyboard, or navigate from the main menu. I found that it was a pain on the beginning, but you just have to get used to it. Press the scroll wheel down down while moving the mouse to rotate the camera, scroll in and out to zoom in and out.
To do this on a pc, follow the steps below: How do i rotate the camera in sims 4 without a mouse? Please leave a like if this video hel.
Hold mouse wheel, rotate view or tilt camera up/down to. How do you rotate precisely in sims 4? Press and hold the “alt” key.
Or by keyboard, hold the ctrl key and click and drag to tilt and turn the camera around to your liking. Release the mouse when you find the perfect position. Or by keyboard, hold the ctrl.
How do you rotate rooms in sims 4 mac? How do you rotate items on sims 4 with keyboard? Sims 4 camera settings and use (tilt and rota.
You can also hold ctrl & mouse wheel button while moving the mouse to rotate the view, but the other way is easier. How to rotate the camera angle in sims 4 on a windows pc follow the instructions below to control the camera angle in sims 4 live mode: Or by keyboard, hold the ctrl.
(comma and period) keys to rotate it clockwise/counterclockwise.
0 notes
Text
Shift Command For Mac Os

To use a keyboard shortcut, press and hold one or more modifier keys and then press the last key of the shortcut. For example, to use Command-C (copy), press and hold the Command key, then the C key, then release both keys. Mac menus and keyboards often use symbols for certain keys, including modifier keys:

On keyboards made for Windows PCs, use the Alt key instead of Option, and the Windows logo key instead of Command.
When you take a screenshot on your Mac – using the Shift-Command-3 shortcut to capture the whole screen, or Shift-Command-4 to capture a portion of it – the image files are saved straight to. Displays the Mac OS X Help Viewer: Command+Shift+A: Takes you to your Applications folder: Command+Shift+C: Takes you to the top-level Computer location: Command+Shift+G: Takes you to a folder that you specify: Command+Shift+H: Takes you to your Home folder: Command+Shift+I: Connects you to your iDisk: Command+Shift+Q: Logs you out: Command+Shift+N.

Some keys on some Apple keyboards have special symbols and functions, such as for display brightness , keyboard brightness , Mission Control, and more. If these functions aren't available on your keyboard, you might be able to reproduce some of them by creating your own keyboard shortcuts. To use these keys as F1, F2, F3, or other standard function keys, combine them with the Fn key.
Cut, copy, paste, and other common shortcuts
Command-X: Cut the selected item and copy it to the Clipboard.
Command-C: Copy the selected item to the Clipboard. This also works for files in the Finder.
Command-V: Paste the contents of the Clipboard into the current document or app. This also works for files in the Finder.
Command-Z: Undo the previous command. You can then press Shift-Command-Z to Redo, reversing the undo command. In some apps, you can undo and redo multiple commands.
Command-A: Select All items.
Command-F: Find items in a document or open a Find window.
Command-G: Find Again: Find the next occurrence of the item previously found. To find the previous occurrence, press Shift-Command-G.
Command-H: Hide the windows of the front app. To view the front app but hide all other apps, press Option-Command-H.
Command-M: Minimize the front window to the Dock. To minimize all windows of the front app, press Option-Command-M.
Command-O: Open the selected item, or open a dialog to select a file to open.
Command-P: Print the current document.
Command-S: Save the current document.
Command-T: Open a new tab.
Command-W: Close the front window. To close all windows of the app, press Option-Command-W.
Option-Command-Esc: Force quit an app.
Command–Space bar: Show or hide the Spotlight search field. To perform a Spotlight search from a Finder window, press Command–Option–Space bar. (If you use multiple input sources to type in different languages, these shortcuts change input sources instead of showing Spotlight. Learn how to change a conflicting keyboard shortcut.)
Control–Command–Space bar: Show the Character Viewer, from which you can choose emoji and other symbols.
Control-Command-F: Use the app in full screen, if supported by the app.
Space bar: Use Quick Look to preview the selected item.
Command-Tab: Switch to the next most recently used app among your open apps.
Shift-Command-5: In macOS Mojave or later, take a screenshot or make a screen recording. Or use Shift-Command-3 or Shift-Command-4 for screenshots. Learn more about screenshots.
Shift-Command-N: Create a new folder in the Finder.
Command-Comma (,): Open preferences for the front app.
Sleep, log out, and shut down shortcuts
You might need to press and hold some of these shortcuts for slightly longer than other shortcuts. This helps you to avoid using them unintentionally.
How to scan for mac address on network. Download a free network analyzer to monitor, analyze and troubleshoot your network. How does it work? Choose a subnet from the Local Subnet combo box and click the Start button or F5 to execute scan. Colasoft MAC Scanner will display scan results in the list, including IP address, MAC address, Host Name and Manufacture. It will group all IP.
Power button: Press to turn on your Mac or wake it from sleep. Press and hold for 1.5 seconds to put your Mac to sleep.* Continue holding to force your Mac to turn off.
Option–Command–Power button* or Option–Command–Media Eject : Put your Mac to sleep.
Control–Shift–Power button* or Control–Shift–Media Eject : Put your displays to sleep.
Control–Power button* or Control–Media Eject : Display a dialog asking whether you want to restart, sleep, or shut down.
Control–Command–Power button:* Force your Mac to restart, without prompting to save any open and unsaved documents.
Control–Command–Media Eject : Quit all apps, then restart your Mac. If any open documents have unsaved changes, you will be asked whether you want to save them.
Control–Option–Command–Power button* or Control–Option–Command–Media Eject : Quit all apps, then shut down your Mac. If any open documents have unsaved changes, you will be asked whether you want to save them.
Control-Command-Q: Immediately lock your screen.
Shift-Command-Q: Log out of your macOS user account. You will be asked to confirm. To log out immediately without confirming, press Option-Shift-Command-Q.
Download microsoft office for free full version mac. * Does not apply to the Touch ID sensor.

Finder and system shortcuts
Command-D: Duplicate the selected files.
Command-E: Eject the selected disk or volume.
Command-F: Start a Spotlight search in the Finder window.
Command-I: Show the Get Info window for a selected file.
Command-R: (1) When an alias is selected in the Finder: show the original file for the selected alias. (2) In some apps, such as Calendar or Safari, refresh or reload the page. (3) In Software Update preferences, check for software updates again.
Shift-Command-C: Open the Computer window.
Shift-Command-D: Open the desktop folder.
Shift-Command-F: Open the Recents window, showing all of the files you viewed or changed recently.
Shift-Command-G: Open a Go to Folder window.
Shift-Command-H: Open the Home folder of the current macOS user account.
Shift-Command-I: Open iCloud Drive.
Shift-Command-K: Open the Network window.
Option-Command-L: Open the Downloads folder.
Shift-Command-N: Create a new folder.
Shift-Command-O: Open the Documents folder.
Shift-Command-P: Show or hide the Preview pane in Finder windows.
Shift-Command-R: Open the AirDrop window.
Shift-Command-T: Show or hide the tab bar in Finder windows.
Control-Shift-Command-T: Add selected Finder item to the Dock (OS X Mavericks or later)
Shift-Command-U: Open the Utilities folder.
Option-Command-D: Show or hide the Dock.
Control-Command-T: Add the selected item to the sidebar (OS X Mavericks or later).
Option-Command-P: Hide or show the path bar in Finder windows.
Option-Command-S: Hide or show the Sidebar in Finder windows.
Command–Slash (/): Hide or show the status bar in Finder windows.
Command-J: Show View Options.
Command-K: Open the Connect to Server window.
Control-Command-A: Make an alias of the selected item.
Command-N: Open a new Finder window.
Option-Command-N: Create a new Smart Folder.
Command-T: Show or hide the tab bar when a single tab is open in the current Finder window.
Option-Command-T: Show or hide the toolbar when a single tab is open in the current Finder window.
Option-Command-V: Move the files in the Clipboard from their original location to the current location.
Command-Y: Use Quick Look to preview the selected files.
Option-Command-Y: View a Quick Look slideshow of the selected files.
Command-1: View the items in the Finder window as icons.
Command-2: View the items in a Finder window as a list.
Command-3: View the items in a Finder window in columns.
Command-4: View the items in a Finder window in a gallery.
Command–Left Bracket ([): Go to the previous folder.
Command–Right Bracket (]): Go to the next folder.
Command–Up Arrow: Open the folder that contains the current folder.
Command–Control–Up Arrow: Open the folder that contains the current folder in a new window.
Command–Down Arrow: Open the selected item.
Right Arrow: Open the selected folder. This works only when in list view.
Left Arrow: Close the selected folder. This works only when in list view.
Command-Delete: Move the selected item to the Trash.
Shift-Command-Delete: Empty the Trash.
Option-Shift-Command-Delete: Empty the Trash without confirmation dialog.
Command–Brightness Down: Turn video mirroring on or off when your Mac is connected to more than one display.
Option–Brightness Up: Open Displays preferences. This works with either Brightness key.
Control–Brightness Up or Control–Brightness Down: Change the brightness of your external display, if supported by your display.
Option–Shift–Brightness Up or Option–Shift–Brightness Down: Adjust the display brightness in smaller steps. Add the Control key to this shortcut to make the adjustment on your external display, if supported by your display.
Option–Mission Control: Open Mission Control preferences.
Command–Mission Control: Show the desktop.
Control–Down Arrow: Show all windows of the front app.
Option–Volume Up: Open Sound preferences. This works with any of the volume keys.
Option–Shift–Volume Up or Option–Shift–Volume Down: Adjust the sound volume in smaller steps.
Option–Keyboard Brightness Up: Open Keyboard preferences. This works with either Keyboard Brightness key.
Option–Shift–Keyboard Brightness Up or Option–Shift–Keyboard Brightness Down: Adjust the keyboard brightness in smaller steps.
Option key while double-clicking: Open the item in a separate window, then close the original window.
Command key while double-clicking: Open a folder in a separate tab or window.
Command key while dragging to another volume: Move the dragged item to the other volume, instead of copying it.
Option key while dragging: Copy the dragged item. The pointer changes while you drag the item.
Option-Command while dragging: Make an alias of the dragged item. The pointer changes while you drag the item.
Option-click a disclosure triangle: Open all folders within the selected folder. This works only when in list view.
Command-click a window title: See the folders that contain the current folder.
Learn how to use Command or Shift to select multiple items in the Finder.
Click the Go menu in the Finder menu bar to see shortcuts for opening many commonly used folders, such as Applications, Documents, Downloads, Utilities, and iCloud Drive.
Mac Os Command List

Document shortcuts
Mac Os Shell Commands
The behavior of these shortcuts may vary with the app you're using.
Command-B: Boldface the selected text, or turn boldfacing on or off.
Command-I: Italicize the selected text, or turn italics on or off.
Command-K: Add a web link.
Command-U: Underline the selected text, or turn underlining on or off.
Command-T: Show or hide the Fonts window.
Command-D: Select the Desktop folder from within an Open dialog or Save dialog.
Control-Command-D: Show or hide the definition of the selected word.
Shift-Command-Colon (:): Display the Spelling and Grammar window.
Command-Semicolon (;): Find misspelled words in the document.
Option-Delete: Delete the word to the left of the insertion point.
Control-H: Delete the character to the left of the insertion point. Or use Delete.
Control-D: Delete the character to the right of the insertion point. Or use Fn-Delete.
Fn-Delete: Forward delete on keyboards that don't have a Forward Delete key. Or use Control-D.
Control-K: Delete the text between the insertion point and the end of the line or paragraph.
Fn–Up Arrow: Page Up: Scroll up one page.
Fn–Down Arrow: Page Down: Scroll down one page.
Fn–Left Arrow: Home: Scroll to the beginning of a document.
Fn–Right Arrow: End: Scroll to the end of a document.
Command–Up Arrow: Move the insertion point to the beginning of the document.
Command–Down Arrow: Move the insertion point to the end of the document.
Command–Left Arrow: Move the insertion point to the beginning of the current line.
Command–Right Arrow: Move the insertion point to the end of the current line.
Option–Left Arrow: Move the insertion point to the beginning of the previous word.
Option–Right Arrow: Move the insertion point to the end of the next word.
Shift–Command–Up Arrow: Select the text between the insertion point and the beginning of the document.
Shift–Command–Down Arrow: Select the text between the insertion point and the end of the document.
Shift–Command–Left Arrow: Select the text between the insertion point and the beginning of the current line.
Shift–Command–Right Arrow: Select the text between the insertion point and the end of the current line.
Shift–Up Arrow: Extend text selection to the nearest character at the same horizontal location on the line above.
Shift–Down Arrow: Extend text selection to the nearest character at the same horizontal location on the line below.
Shift–Left Arrow: Extend text selection one character to the left.
Shift–Right Arrow: Extend text selection one character to the right.
Option–Shift–Up Arrow: Extend text selection to the beginning of the current paragraph, then to the beginning of the following paragraph if pressed again.
Option–Shift–Down Arrow: Extend text selection to the end of the current paragraph, then to the end of the following paragraph if pressed again.
Option–Shift–Left Arrow: Extend text selection to the beginning of the current word, then to the beginning of the following word if pressed again.
Option–Shift–Right Arrow: Extend text selection to the end of the current word, then to the end of the following word if pressed again.
Control-A: Move to the beginning of the line or paragraph.
Control-E: Move to the end of a line or paragraph.
Control-F: Move one character forward.
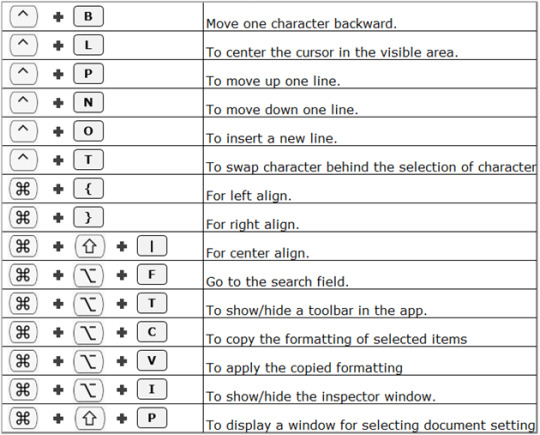
Control-B: Move one character backward.
Control-L: Center the cursor or selection in the visible area.
Control-P: Move up one line.
Control-N: Move down one line.
Control-O: Insert a new line after the insertion point.
Control-T: Swap the character behind the insertion point with the character in front of the insertion point.
Command–Left Curly Bracket ({): Left align.
Command–Right Curly Bracket (}): Right align.
Shift–Command–Vertical bar (|): Center align.
Option-Command-F: Go to the search field.
Option-Command-T: Show or hide a toolbar in the app.
Option-Command-C: Copy Style: Copy the formatting settings of the selected item to the Clipboard.
Option-Command-V: Paste Style: Apply the copied style to the selected item.
Option-Shift-Command-V: Paste and Match Style: Apply the style of the surrounding content to the item pasted within that content.
Option-Command-I: Show or hide the inspector window.
Shift-Command-P: Page setup: Display a window for selecting document settings.
Shift-Command-S: Display the Save As dialog, or duplicate the current document.
Shift–Command–Minus sign (-): Decrease the size of the selected item.
Shift–Command–Plus sign (+): Increase the size of the selected item. Command–Equal sign (=) performs the same function.
Shift–Command–Question mark (?): Open the Help menu.
Other shortcuts
Shift Command For Mac Os 10.13

Cached
For more shortcuts, check the shortcut abbreviations shown in the menus of your apps. Every app can have its own shortcuts, and shortcuts that work in one app might not work in another.
And the best program to create presentations that we can download to our Mac is definitely Microsoft PowerPoint, the classic tool included in the Microsoft Office suite. Powerpoint download for mac free. When it comes to presenting a project or idea, giving a conference or explaining any concept in public, it's always a good idea to reinforce your talk with supporting audiovisual material. PowerPoint for Mac: the best tool to create presentationsEver since it first appeared in the 80s', this program has evolved constantly, incorporating improvements to adapt it to the demands and technological possibilities of each moment.
Apple Music shortcuts: Choose Help > Keyboard shortcuts from the menu bar in the Music app.
Other shortcuts: Choose Apple menu > System Preferences, click Keyboard, then click Shortcuts.
Learn more
Create your own shortcuts and resolve conflicts between shortcuts
Change the behavior of the function keys or modifier keys
0 notes
Text
Commands For Mac Os


Safe mode: shift. Safe mode is a way of starting up your Mac that makes sure it performs certain. How many times did you have something running on your Mac and you wanted to make. An A-Z Index of the Apple macOS command line (macOS bash) afconvert Audio File Convert afinfo Audio File Info afplay Audio File Play airport Manage Apple AirPort alias Create an alias. alloc List used and free memory apropos Search the whatis database for strings asr Apple Software Restore atsutil Font registration system utility automator Run an Automator workflow awk Find and Replace text.
To use a keyboard shortcut, press and hold one or more modifier keys and then press the last key of the shortcut. For example, to use Command-C (copy), press and hold the Command key, then the C key, then release both keys. Mac menus and keyboards often use symbols for certain keys, including modifier keys:
On keyboards made for Windows PCs, use the Alt key instead of Option, and the Windows logo key instead of Command.
Some keys on some Apple keyboards have special symbols and functions, such as for display brightness , keyboard brightness , Mission Control, and more. If these functions aren't available on your keyboard, you might be able to reproduce some of them by creating your own keyboard shortcuts. To use these keys as F1, F2, F3, or other standard function keys, combine them with the Fn key.
Cut, copy, paste, and other common shortcuts
Command-X: Cut the selected item and copy it to the Clipboard.
Command-C: Copy the selected item to the Clipboard. This also works for files in the Finder.
Command-V: Paste the contents of the Clipboard into the current document or app. This also works for files in the Finder.
Command-Z: Undo the previous command. You can then press Shift-Command-Z to Redo, reversing the undo command. In some apps, you can undo and redo multiple commands.
Command-A: Select All items.
Command-F: Find items in a document or open a Find window.
Command-G: Find Again: Find the next occurrence of the item previously found. To find the previous occurrence, press Shift-Command-G.
Command-H: Hide the windows of the front app. To view the front app but hide all other apps, press Option-Command-H.
Command-M: Minimize the front window to the Dock. To minimize all windows of the front app, press Option-Command-M.
Command-O: Open the selected item, or open a dialog to select a file to open.
Command-P: Print the current document.
Command-S: Save the current document.
Command-T: Open a new tab.
Command-W: Close the front window. To close all windows of the app, press Option-Command-W.
Option-Command-Esc: Force quit an app.
Command–Space bar: Show or hide the Spotlight search field. To perform a Spotlight search from a Finder window, press Command–Option–Space bar. (If you use multiple input sources to type in different languages, these shortcuts change input sources instead of showing Spotlight. Learn how to change a conflicting keyboard shortcut.)
Control–Command–Space bar: Show the Character Viewer, from which you can choose emoji and other symbols.
Control-Command-F: Use the app in full screen, if supported by the app.
Space bar: Use Quick Look to preview the selected item.
Command-Tab: Switch to the next most recently used app among your open apps.
Shift-Command-5: In macOS Mojave or later, take a screenshot or make a screen recording. Or use Shift-Command-3 or Shift-Command-4 for screenshots. Learn more about screenshots.
Shift-Command-N: Create a new folder in the Finder.
Command-Comma (,): Open preferences for the front app.
Sleep, log out, and shut down shortcuts
You might need to press and hold some of these shortcuts for slightly longer than other shortcuts. This helps you to avoid using them unintentionally.
Key Commands For Mac Os

Power button: Press to turn on your Mac or wake it from sleep. Press and hold for 1.5 seconds to put your Mac to sleep.* Continue holding to force your Mac to turn off.
Option–Command–Power button* or Option–Command–Media Eject : Put your Mac to sleep.
Control–Shift–Power button* or Control–Shift–Media Eject : Put your displays to sleep.
Control–Power button* or Control–Media Eject : Display a dialog asking whether you want to restart, sleep, or shut down.
Control–Command–Power button:* Force your Mac to restart, without prompting to save any open and unsaved documents.
Control–Command–Media Eject : Quit all apps, then restart your Mac. If any open documents have unsaved changes, you will be asked whether you want to save them.
Control–Option–Command–Power button* or Control–Option–Command–Media Eject : Quit all apps, then shut down your Mac. If any open documents have unsaved changes, you will be asked whether you want to save them.
Control-Command-Q: Immediately lock your screen.
Shift-Command-Q: Log out of your macOS user account. You will be asked to confirm. To log out immediately without confirming, press Option-Shift-Command-Q.
* Does not apply to the Touch ID sensor.
Finder and system shortcuts
Command-D: Duplicate the selected files.
Command-E: Eject the selected disk or volume.
Command-F: Start a Spotlight search in the Finder window.
Command-I: Show the Get Info window for a selected file.
Command-R: (1) When an alias is selected in the Finder: show the original file for the selected alias. (2) In some apps, such as Calendar or Safari, refresh or reload the page. (3) In Software Update preferences, check for software updates again.
Shift-Command-C: Open the Computer window.
Shift-Command-D: Open the desktop folder.
Shift-Command-F: Open the Recents window, showing all of the files you viewed or changed recently.
Shift-Command-G: Open a Go to Folder window.
Shift-Command-H: Open the Home folder of the current macOS user account.
Shift-Command-I: Open iCloud Drive.
Shift-Command-K: Open the Network window.
Option-Command-L: Open the Downloads folder.
Shift-Command-N: Create a new folder.
Shift-Command-O: Open the Documents folder.
Shift-Command-P: Show or hide the Preview pane in Finder windows.
Shift-Command-R: Open the AirDrop window.
Shift-Command-T: Show or hide the tab bar in Finder windows.
Control-Shift-Command-T: Add selected Finder item to the Dock (OS X Mavericks or later)
Shift-Command-U: Open the Utilities folder.
Option-Command-D: Show or hide the Dock.
Control-Command-T: Add the selected item to the sidebar (OS X Mavericks or later).
Option-Command-P: Hide or show the path bar in Finder windows.
Option-Command-S: Hide or show the Sidebar in Finder windows.
Command–Slash (/): Hide or show the status bar in Finder windows.
Command-J: Show View Options.
Command-K: Open the Connect to Server window.
Control-Command-A: Make an alias of the selected item.
Command-N: Open a new Finder window.
Option-Command-N: Create a new Smart Folder.
Command-T: Show or hide the tab bar when a single tab is open in the current Finder window.
Option-Command-T: Show or hide the toolbar when a single tab is open in the current Finder window.
Option-Command-V: Move the files in the Clipboard from their original location to the current location.
Command-Y: Use Quick Look to preview the selected files.
Option-Command-Y: View a Quick Look slideshow of the selected files.
Command-1: View the items in the Finder window as icons.
Command-2: View the items in a Finder window as a list.
Command-3: View the items in a Finder window in columns.
Command-4: View the items in a Finder window in a gallery.
Command–Left Bracket ([): Go to the previous folder.
Command–Right Bracket (]): Go to the next folder.
Command–Up Arrow: Open the folder that contains the current folder.
Command–Control–Up Arrow: Open the folder that contains the current folder in a new window.
Command–Down Arrow: Open the selected item.
Right Arrow: Open the selected folder. This works only when in list view.
Left Arrow: Close the selected folder. This works only when in list view.
Command-Delete: Move the selected item to the Trash.
Shift-Command-Delete: Empty the Trash.
Option-Shift-Command-Delete: Empty the Trash without confirmation dialog.
Command–Brightness Down: Turn video mirroring on or off when your Mac is connected to more than one display.
Option–Brightness Up: Open Displays preferences. This works with either Brightness key.
Control–Brightness Up or Control–Brightness Down: Change the brightness of your external display, if supported by your display.
Option–Shift–Brightness Up or Option–Shift–Brightness Down: Adjust the display brightness in smaller steps. Add the Control key to this shortcut to make the adjustment on your external display, if supported by your display.
Option–Mission Control: Open Mission Control preferences.
Command–Mission Control: Show the desktop.
Control–Down Arrow: Show all windows of the front app.
Option–Volume Up: Open Sound preferences. This works with any of the volume keys.
Option–Shift–Volume Up or Option–Shift–Volume Down: Adjust the sound volume in smaller steps.
Option–Keyboard Brightness Up: Open Keyboard preferences. This works with either Keyboard Brightness key.
Option–Shift–Keyboard Brightness Up or Option–Shift–Keyboard Brightness Down: Adjust the keyboard brightness in smaller steps.
Option key while double-clicking: Open the item in a separate window, then close the original window.
Command key while double-clicking: Open a folder in a separate tab or window.
Command key while dragging to another volume: Move the dragged item to the other volume, instead of copying it.
Option key while dragging: Copy the dragged item. The pointer changes while you drag the item.
Option-Command while dragging: Make an alias of the dragged item. The pointer changes while you drag the item.
Option-click a disclosure triangle: Open all folders within the selected folder. This works only when in list view.
Command-click a window title: See the folders that contain the current folder.
Learn how to use Command or Shift to select multiple items in the Finder.
Click the Go menu in the Finder menu bar to see shortcuts for opening many commonly used folders, such as Applications, Documents, Downloads, Utilities, and iCloud Drive.

Document shortcuts
The behavior of these shortcuts may vary with the app you're using.
Command-B: Boldface the selected text, or turn boldfacing on or off.
Command-I: Italicize the selected text, or turn italics on or off.
Command-K: Add a web link.
Command-U: Underline the selected text, or turn underlining on or off.
Command-T: Show or hide the Fonts window.
Command-D: Select the Desktop folder from within an Open dialog or Save dialog.
Control-Command-D: Show or hide the definition of the selected word.
Shift-Command-Colon (:): Display the Spelling and Grammar window.
Command-Semicolon (;): Find misspelled words in the document.
Option-Delete: Delete the word to the left of the insertion point.
Control-H: Delete the character to the left of the insertion point. Or use Delete.
Control-D: Delete the character to the right of the insertion point. Or use Fn-Delete.
Fn-Delete: Forward delete on keyboards that don't have a Forward Delete key. Or use Control-D.
Control-K: Delete the text between the insertion point and the end of the line or paragraph.
Fn–Up Arrow: Page Up: Scroll up one page.
Fn–Down Arrow: Page Down: Scroll down one page.
Fn–Left Arrow: Home: Scroll to the beginning of a document.
Fn–Right Arrow: End: Scroll to the end of a document.
Command–Up Arrow: Move the insertion point to the beginning of the document.
Command–Down Arrow: Move the insertion point to the end of the document.
Command–Left Arrow: Move the insertion point to the beginning of the current line.
Command–Right Arrow: Move the insertion point to the end of the current line.
Option–Left Arrow: Move the insertion point to the beginning of the previous word.
Option–Right Arrow: Move the insertion point to the end of the next word.
Shift–Command–Up Arrow: Select the text between the insertion point and the beginning of the document.
Shift–Command–Down Arrow: Select the text between the insertion point and the end of the document.
Shift–Command–Left Arrow: Select the text between the insertion point and the beginning of the current line.
Shift–Command–Right Arrow: Select the text between the insertion point and the end of the current line.
Shift–Up Arrow: Extend text selection to the nearest character at the same horizontal location on the line above.
Shift–Down Arrow: Extend text selection to the nearest character at the same horizontal location on the line below.
Shift–Left Arrow: Extend text selection one character to the left.
Shift–Right Arrow: Extend text selection one character to the right.
Option–Shift–Up Arrow: Extend text selection to the beginning of the current paragraph, then to the beginning of the following paragraph if pressed again.
Option–Shift–Down Arrow: Extend text selection to the end of the current paragraph, then to the end of the following paragraph if pressed again.
Option–Shift–Left Arrow: Extend text selection to the beginning of the current word, then to the beginning of the following word if pressed again.
Option–Shift–Right Arrow: Extend text selection to the end of the current word, then to the end of the following word if pressed again.
Control-A: Move to the beginning of the line or paragraph.
Control-E: Move to the end of a line or paragraph.
Control-F: Move one character forward.
Control-B: Move one character backward.
Control-L: Center the cursor or selection in the visible area.
Control-P: Move up one line.
Control-N: Move down one line.
Control-O: Insert a new line after the insertion point.
Control-T: Swap the character behind the insertion point with the character in front of the insertion point.
Command–Left Curly Bracket ({): Left align.
Command–Right Curly Bracket (}): Right align.
Shift–Command–Vertical bar (|): Center align.
Option-Command-F: Go to the search field.
Option-Command-T: Show or hide a toolbar in the app.
Option-Command-C: Copy Style: Copy the formatting settings of the selected item to the Clipboard.
Option-Command-V: Paste Style: Apply the copied style to the selected item.
Option-Shift-Command-V: Paste and Match Style: Apply the style of the surrounding content to the item pasted within that content.
Option-Command-I: Show or hide the inspector window.
Shift-Command-P: Page setup: Display a window for selecting document settings.
Shift-Command-S: Display the Save As dialog, or duplicate the current document.
Shift–Command–Minus sign (-): Decrease the size of the selected item.
Shift–Command–Plus sign (+): Increase the size of the selected item. Command–Equal sign (=) performs the same function.
Shift–Command–Question mark (?): Open the Help menu.
Other shortcuts
For more shortcuts, check the shortcut abbreviations shown in the menus of your apps. Every app can have its own shortcuts, and shortcuts that work in one app might not work in another.
Apple Music shortcuts: Choose Help > Keyboard shortcuts from the menu bar in the Music app.
Other shortcuts: Choose Apple menu > System Preferences, click Keyboard, then click Shortcuts.
Terminal Commands For Mac Os
Learn more
Commands For Mac Os
Create your own shortcuts and resolve conflicts between shortcuts
Change the behavior of the function keys or modifier keys
0 notes
Text
Shortcuts Excel For Mac

Excel Shortcuts For Macbook Pro
Keyboard Shortcuts For Excel Macros
Save As
To use a keyboard shortcut, press and hold one or more modifier keys and then press the last key of the shortcut. For example, to use Command-C (copy), press and hold the Command key, then the C key, then release both keys. Mac menus and keyboards often use symbols for certain keys, including modifier keys:
On keyboards made for Windows PCs, use the Alt key instead of Option, and the Windows logo key instead of Command.
This article describes the keyboard shortcuts, function keys, and some other common shortcut keys in Excel for Mac. Notes: The settings in some versions of the Mac operating system (OS) and some utility applications might conflict with keyboard shortcuts and function key operations in Office for Mac. Excel Shortcuts List for Mac and PC (Searchable) How to Use this Shortcut List: + Indicates to hold the previous key, while pressing the next key. The first type of keyboard shortcuts accesses the ribbon. You can try it by pressing the Alt-key. After pressing Alt key, letters will be shown on the ribbon.
Some keys on some Apple keyboards have special symbols and functions, such as for display brightness , keyboard brightness , Mission Control, and more. If these functions aren't available on your keyboard, you might be able to reproduce some of them by creating your own keyboard shortcuts. To use these keys as F1, F2, F3, or other standard function keys, combine them with the Fn key.
Cut, copy, paste, and other common shortcuts
Command-X: Cut the selected item and copy it to the Clipboard.
Command-C: Copy the selected item to the Clipboard. This also works for files in the Finder.
Command-V: Paste the contents of the Clipboard into the current document or app. This also works for files in the Finder.
Command-Z: Undo the previous command. You can then press Shift-Command-Z to Redo, reversing the undo command. In some apps, you can undo and redo multiple commands.
Command-A: Select All items.
Command-F: Find items in a document or open a Find window.
Command-G: Find Again: Find the next occurrence of the item previously found. To find the previous occurrence, press Shift-Command-G.
Command-H: Hide the windows of the front app. To view the front app but hide all other apps, press Option-Command-H.
Command-M: Minimize the front window to the Dock. To minimize all windows of the front app, press Option-Command-M.
Command-O: Open the selected item, or open a dialog to select a file to open.
Command-P: Print the current document.
Command-S: Save the current document.
Command-T: Open a new tab.
Command-W: Close the front window. To close all windows of the app, press Option-Command-W.
Option-Command-Esc: Force quit an app.
Command–Space bar: Show or hide the Spotlight search field. To perform a Spotlight search from a Finder window, press Command–Option–Space bar. (If you use multiple input sources to type in different languages, these shortcuts change input sources instead of showing Spotlight. Learn how to change a conflicting keyboard shortcut.)
Control–Command–Space bar: Show the Character Viewer, from which you can choose emoji and other symbols.
Control-Command-F: Use the app in full screen, if supported by the app.
Space bar: Use Quick Look to preview the selected item.
Command-Tab: Switch to the next most recently used app among your open apps.
Shift-Command-5: In macOS Mojave or later, take a screenshot or make a screen recording. Or use Shift-Command-3 or Shift-Command-4 for screenshots. Learn more about screenshots.
Shift-Command-N: Create a new folder in the Finder.
Command-Comma (,): Open preferences for the front app.
Sleep, log out, and shut down shortcuts
You might need to press and hold some of these shortcuts for slightly longer than other shortcuts. This helps you to avoid using them unintentionally.
Power button: Press to turn on your Mac or wake it from sleep. Press and hold for 1.5 seconds to put your Mac to sleep.* Continue holding to force your Mac to turn off.
Option–Command–Power button* or Option–Command–Media Eject : Put your Mac to sleep.
Control–Shift–Power button* or Control–Shift–Media Eject : Put your displays to sleep.
Control–Power button* or Control–Media Eject : Display a dialog asking whether you want to restart, sleep, or shut down.
Control–Command–Power button:* Force your Mac to restart, without prompting to save any open and unsaved documents.
Control–Command–Media Eject : Quit all apps, then restart your Mac. If any open documents have unsaved changes, you will be asked whether you want to save them.
Control–Option–Command–Power button* or Control–Option–Command–Media Eject : Quit all apps, then shut down your Mac. If any open documents have unsaved changes, you will be asked whether you want to save them.
Control-Command-Q: Immediately lock your screen.
Shift-Command-Q: Log out of your macOS user account. You will be asked to confirm. To log out immediately without confirming, press Option-Shift-Command-Q.
* Does not apply to the Touch ID sensor.

Finder and system shortcuts
Command-D: Duplicate the selected files.
Command-E: Eject the selected disk or volume.
Command-F: Start a Spotlight search in the Finder window.
Command-I: Show the Get Info window for a selected file.
Command-R: (1) When an alias is selected in the Finder: show the original file for the selected alias. (2) In some apps, such as Calendar or Safari, refresh or reload the page. (3) In Software Update preferences, check for software updates again.
Shift-Command-C: Open the Computer window.
Shift-Command-D: Open the desktop folder.
Shift-Command-F: Open the Recents window, showing all of the files you viewed or changed recently.
Shift-Command-G: Open a Go to Folder window.
Shift-Command-H: Open the Home folder of the current macOS user account.
Shift-Command-I: Open iCloud Drive.
Shift-Command-K: Open the Network window.
Option-Command-L: Open the Downloads folder.
Shift-Command-N: Create a new folder.
Shift-Command-O: Open the Documents folder.
Shift-Command-P: Show or hide the Preview pane in Finder windows.
Shift-Command-R: Open the AirDrop window.
Shift-Command-T: Show or hide the tab bar in Finder windows.
Control-Shift-Command-T: Add selected Finder item to the Dock (OS X Mavericks or later)
Shift-Command-U: Open the Utilities folder.
Option-Command-D: Show or hide the Dock.
Control-Command-T: Add the selected item to the sidebar (OS X Mavericks or later).
Option-Command-P: Hide or show the path bar in Finder windows.
Option-Command-S: Hide or show the Sidebar in Finder windows.
Command–Slash (/): Hide or show the status bar in Finder windows.
Command-J: Show View Options.
Command-K: Open the Connect to Server window.
Control-Command-A: Make an alias of the selected item.
Command-N: Open a new Finder window.
Option-Command-N: Create a new Smart Folder.
Command-T: Show or hide the tab bar when a single tab is open in the current Finder window.
Option-Command-T: Show or hide the toolbar when a single tab is open in the current Finder window.
Option-Command-V: Move the files in the Clipboard from their original location to the current location.
Command-Y: Use Quick Look to preview the selected files.
Option-Command-Y: View a Quick Look slideshow of the selected files.
Command-1: View the items in the Finder window as icons.
Command-2: View the items in a Finder window as a list.
Command-3: View the items in a Finder window in columns.
Command-4: View the items in a Finder window in a gallery.
Command–Left Bracket ([): Go to the previous folder.
Command–Right Bracket (]): Go to the next folder.
Command–Up Arrow: Open the folder that contains the current folder.
Command–Control–Up Arrow: Open the folder that contains the current folder in a new window.
Command–Down Arrow: Open the selected item.
Right Arrow: Open the selected folder. This works only when in list view.
Left Arrow: Close the selected folder. This works only when in list view.
Command-Delete: Move the selected item to the Trash.
Shift-Command-Delete: Empty the Trash.
Option-Shift-Command-Delete: Empty the Trash without confirmation dialog.
Command–Brightness Down: Turn video mirroring on or off when your Mac is connected to more than one display.
Option–Brightness Up: Open Displays preferences. This works with either Brightness key.
Control–Brightness Up or Control–Brightness Down: Change the brightness of your external display, if supported by your display.
Option–Shift–Brightness Up or Option–Shift–Brightness Down: Adjust the display brightness in smaller steps. Add the Control key to this shortcut to make the adjustment on your external display, if supported by your display.
Option–Mission Control: Open Mission Control preferences.
Command–Mission Control: Show the desktop.
Control–Down Arrow: Show all windows of the front app.
Option–Volume Up: Open Sound preferences. This works with any of the volume keys.
Option–Shift–Volume Up or Option–Shift–Volume Down: Adjust the sound volume in smaller steps.
Option–Keyboard Brightness Up: Open Keyboard preferences. This works with either Keyboard Brightness key.
Option–Shift–Keyboard Brightness Up or Option–Shift–Keyboard Brightness Down: Adjust the keyboard brightness in smaller steps.
Option key while double-clicking: Open the item in a separate window, then close the original window.
Command key while double-clicking: Open a folder in a separate tab or window.
Command key while dragging to another volume: Move the dragged item to the other volume, instead of copying it.
Option key while dragging: Copy the dragged item. The pointer changes while you drag the item.
Option-Command while dragging: Make an alias of the dragged item. The pointer changes while you drag the item.
Option-click a disclosure triangle: Open all folders within the selected folder. This works only when in list view.
Command-click a window title: See the folders that contain the current folder.
Learn how to use Command or Shift to select multiple items in the Finder.
Click the Go menu in the Finder menu bar to see shortcuts for opening many commonly used folders, such as Applications, Documents, Downloads, Utilities, and iCloud Drive.
Document shortcuts
The behavior of these shortcuts may vary with the app you're using.
Command-B: Boldface the selected text, or turn boldfacing on or off.
Command-I: Italicize the selected text, or turn italics on or off.
Command-K: Add a web link.
Command-U: Underline the selected text, or turn underlining on or off.
Command-T: Show or hide the Fonts window.
Command-D: Select the Desktop folder from within an Open dialog or Save dialog.
Control-Command-D: Show or hide the definition of the selected word.
Shift-Command-Colon (:): Display the Spelling and Grammar window.
Command-Semicolon (;): Find misspelled words in the document.
Option-Delete: Delete the word to the left of the insertion point.
Control-H: Delete the character to the left of the insertion point. Or use Delete.
Control-D: Delete the character to the right of the insertion point. Or use Fn-Delete.
Fn-Delete: Forward delete on keyboards that don't have a Forward Delete key. Or use Control-D.
Control-K: Delete the text between the insertion point and the end of the line or paragraph.
Fn–Up Arrow: Page Up: Scroll up one page.
Fn–Down Arrow: Page Down: Scroll down one page.
Fn–Left Arrow: Home: Scroll to the beginning of a document.
Fn–Right Arrow: End: Scroll to the end of a document.
Command–Up Arrow: Move the insertion point to the beginning of the document.
Command–Down Arrow: Move the insertion point to the end of the document.
Command–Left Arrow: Move the insertion point to the beginning of the current line.
Command–Right Arrow: Move the insertion point to the end of the current line.
Option–Left Arrow: Move the insertion point to the beginning of the previous word.
Option–Right Arrow: Move the insertion point to the end of the next word.
Shift–Command–Up Arrow: Select the text between the insertion point and the beginning of the document.
Shift–Command–Down Arrow: Select the text between the insertion point and the end of the document.
Shift–Command–Left Arrow: Select the text between the insertion point and the beginning of the current line.
Shift–Command–Right Arrow: Select the text between the insertion point and the end of the current line.
Shift–Up Arrow: Extend text selection to the nearest character at the same horizontal location on the line above.
Shift–Down Arrow: Extend text selection to the nearest character at the same horizontal location on the line below.
Shift–Left Arrow: Extend text selection one character to the left.
Shift–Right Arrow: Extend text selection one character to the right.
Option–Shift–Up Arrow: Extend text selection to the beginning of the current paragraph, then to the beginning of the following paragraph if pressed again.
Option–Shift–Down Arrow: Extend text selection to the end of the current paragraph, then to the end of the following paragraph if pressed again.
Option–Shift–Left Arrow: Extend text selection to the beginning of the current word, then to the beginning of the following word if pressed again.
Option–Shift–Right Arrow: Extend text selection to the end of the current word, then to the end of the following word if pressed again.
Control-A: Move to the beginning of the line or paragraph.
Control-E: Move to the end of a line or paragraph.
Control-F: Move one character forward.
Control-B: Move one character backward.
Control-L: Center the cursor or selection in the visible area.
Control-P: Move up one line.
Control-N: Move down one line.
Control-O: Insert a new line after the insertion point.
Control-T: Swap the character behind the insertion point with the character in front of the insertion point.
Command–Left Curly Bracket ({): Left align.
Command–Right Curly Bracket (}): Right align.
Shift–Command–Vertical bar (|): Center align.
Option-Command-F: Go to the search field.
Option-Command-T: Show or hide a toolbar in the app.
Option-Command-C: Copy Style: Copy the formatting settings of the selected item to the Clipboard.
Option-Command-V: Paste Style: Apply the copied style to the selected item.
Option-Shift-Command-V: Paste and Match Style: Apply the style of the surrounding content to the item pasted within that content.
Option-Command-I: Show or hide the inspector window.
Shift-Command-P: Page setup: Display a window for selecting document settings.
Shift-Command-S: Display the Save As dialog, or duplicate the current document.
Shift–Command–Minus sign (-): Decrease the size of the selected item.
Shift–Command–Plus sign (+): Increase the size of the selected item. Command–Equal sign (=) performs the same function.
Shift–Command–Question mark (?): Open the Help menu.
Other shortcuts
For more shortcuts, check the shortcut abbreviations shown in the menus of your apps. Every app can have its own shortcuts, and shortcuts that work in one app might not work in another.
Apple Music shortcuts: Choose Help > Keyboard shortcuts from the menu bar in the Music app.
Other shortcuts: Choose Apple menu > System Preferences, click Keyboard, then click Shortcuts.
Learn more
Create your own shortcuts and resolve conflicts between shortcuts
Change the behavior of the function keys or modifier keys
If you’re used to working with Excel on Windows, one of the most confusing aspects of using Excel on a Mac is shortcuts. Even basic shortcuts you’ve been using for years in Windows may not work as you expect.
After a few problems, you might wind up thinking that Mac shortcuts are “totally different” or somehow “broken”. In reality, Excel shortcuts on the Mac are quite capable, you just have to understand and adjust to certain differences.
In this article, I’ll walk you through the key differences you need to be aware of to work productively with Excel shortcuts on a Mac.
1. Special symbols
One of more confusing aspects of keyboard shortcuts on the Mac are the symbols you’ll see for certain keys. For example, the Command key is abbreviated as ⌘, the Control key with ⌃, and the option key as ⌥. These symbols have a long history on the Mac, and you’ll find them in menus everywhere.
The Mac Finder – abbreviations appear in all applications, not just Excel
You’ll see these symbols in menus across all applications, so they’re not specific to Excel. There really aren’t too many symbols, so I recommend that you bite the bullet and memorize them. The table below shows some example shortcuts with a translation.
CommandShortcutTranslationNew workbook⌘NCommand NSave As⌘⇧SCommand Shift SToggle ribbon⌘⌥RCommand Option RPaste Special⌃⌘VControl Command VSelect row⇧SpaceShift Space
2. Function keys
Excel Shortcuts For Macbook Pro
Like their counterparts in the Windows world, Mac keyboards have function keys. These keys sit at the top of the keyboard and are labeled F1 to F12 on standard keyboards and F13, F14 and higher on extended keyboards.
Standard Mac keyboard with 12 function keys
As you know, function keys are uses for many shortcuts in Excel. For example, you can use F1 for help, F7 for spelling, and shift + F3 to insert a function. But if you try these shortcuts directly on a Mac, they don’t work. Why?
By default, Function keys on a Mac control the computer itself, things like screen brightness, volume, video pause and play, and so on. This means that if press only the function keys in Excel, you’ll end up controlling the Mac, and not Excel.
To make function keys work like you expect in Excel, you need to add a key: the function or fn key. You’ll find the fn key in the lower left on your keyboard. Here are a few examples:
Keyboard Shortcuts For Excel Macros
CommandWindowsMacNew chartF11fn F11Calculate worksheetsF9fn F9Open SpellingF7fn F7Evaluate formulaF9fn F9
If you really hate using the fn key, you can change this behavior by changing a preference at System Preferences > Keyboard. Here you can check a box that will that will change function key behavior to work like “standard function keys”.
If you do this, however, note that you won’t be able to use function keys for things like Brightness, Volume, etc. unless you hold down the fn key. In essence, this setting reverses behavior so that you need to use fn to control the Mac.
Personally, I like using the function keys to control the computer, so I leave this setting alone, and just the fn key when needed in Excel.
3. Missing keys
Save As
Another difference that may trip you up on a Mac is certain keys are missing.
Unless you’re using an extended keyboard, keys like Home, End, backspace, Page up, and Page down are nowhere to be found. This is a problem, because many of these keys are used in Excel shortcuts. The solution is to use specific substitutions, as shown in the table below.
WindowsMac equivalentHomefn arrow leftEndfn arrow rightPage Upfn arrow upPage Downfn arrow downScreen rightfn option arrow downScreen leftfn option arrow upMove to Last cellfn control arrow rightMove to first cellfn control arrow leftDeletefn DeleteBackspaceDelete
The substitutions let you perform the same actions you can do in Windows. However, They can make some shortcuts seem complicated on a Mac because you have to use more keys. What mac for music.

Note: If you’re using an extended keyboard on a Mac, you don’t need to worry about substitutions, since you’ll have keys for Home, End, Page up, etc.
Extended keyboards have all the keys

4. Ribbon shortcuts
In the world of shortcuts, perhaps the most painful difference on a Mac is a lack of ribbon shortcuts.
In Excel on Windows, you can use so called accelerator keys to access almost every command in Excel using only your keyboard. This doesn’t matter much when you’re performing an action that has a dedicated shortcut (i.e. Control + B for bold), since dedicated shortcuts are faster than ribbon shortcuts. But when you want to trigger an action that doesn’t have a dedicated shortcut (like sort, hide gridlines, align text, etc.), it hurts a bit.
Excel ribbon in Windows with accelerator keys visible. No equivalent on the Mac!
5. Just different
Finally, some Excel shortcuts are just plain different on a Mac.

For example, the shortcut for Edit Cell in Windows is F2, and on a Mac, it’s Control + U. The shortcut to toggle absolute and relative references is F4 in Windows, while on a Mac, its Command T. For a complete list of Windows and Mac shortcuts, see our side-by-side list.
If you want to see more Excel shortcuts for the Mac in action, see our our video tips. These videos come from our video training. Whenever we use a shortcut, we show both the Windows and Mac version.
Note: With the introduction of Excel 2016 on the Mac, Microsoft has started to adjust Mac shortcuts to be more aligned with Windows. We’re currently testing Excel 2016 on the Mac, and will publish a summary once we have a good understanding of the shortcut changes.
0 notes
Text
Tutorial: recording your screen and turning it into a .gif
I’ve received several asks on how I record my theme previews and post them as gifs to showcase live effects instead of screenshots, so here’s a tutorial!
Programs: Open Broadcaster Software (DL), Photoshop
(ง •̀‿•́)ง Remember that this is for recording your own content only.
Once you’ve opened OBS, go to “Settings...”.

Go to “Video” in the left sidebar.
Make sure the recording resolution is the same as your screen size.
You can choose to adjust the “Resolution Downscale” to prevent lag during recording (especially if you have a large screen res.)

Click “Apply” and go to “Broadcast Settings” back in the sidebar.
Enter your File Path location; this is where your recording will be saved on your computer. Make sure the line ends with “.mp4”. I recommend leaving the the “Replay-$T” section intact, as this automatically names your recordings.

Click “Apply” again and “OK”.
Once you’re back in the main window, click “Start Recording”. Click the same button to stop recording. Your file will be saved in the File Path location you previously entered.

Now for the Photoshop part! Go to “File --> Import --> Video Frames to Layers...” and open your recorded file.

Ensure that the “Make Frame Animation” box is ticked.
Define the animation duration by moving the black arrows. You can preview which frames to start/stop at by using the arrow keys above it.

Reveal/show your animation window via “Window --> Timeline” (window appears at the bottom of your screen).
Select all the layers in the “Layers” window (shift + click the final layer).
Select all frames in the “Timeline” window (shift + click the final frame).
Once you’ve selected everything, click the small menu button above the “Timeline” window on the right hand side, and click “Convert to Video Timeline”.

Now is the time to crop it to show a certain selected area of your screen, only if you want to! [Example here]. (Shortcut: press C)
Next, turn it into a Smart Object via “Filter --> Convert for Smart Filters”.
This is now your gif! Resize it to become smaller via “Image --> Image Size...”. This is to reduce the file size and prevent any further potential lag. In this example, I’ve resized it to 540px wide. You can learn more about Tumblr dimensions here.

This step is optional: sharpening your gif. Images tend to drop in quality when resized, so sharpening can help.
Go to “Filter --> Sharpen --> Smart Sharpen...”.

These are the settings I tend to go for, but feel free to adjust the “Amount” percentage as necessary whilst you keep an eye on how sharp the result is.

You’re almost done! To save it as a gif, go to “File --> Save for Web...”.

Change the looping option to “Forever”. Click “Save” and you’re done!

If you’re posting the gif(s) on Tumblr, keep in mind that images will only show & load properly if they are under 3MB (correct as of June 2017). You can check the file size in the bottom left corner of the “Save for Web...” window:

Thanks for checking out this tutorial! Feel free to drop me a message if you have any questions! :)
#resources#tutorial#my tutorial#I hope everything makes sense!#this is super image-heavy so I put it under a read-more#HT posts#obs
600 notes
·
View notes
Text
.gif tutorial for survivor
the thirty-fourth season of survivor, survivor: game changers, is premiering this wednesday, so i figured now’s a better time than ever to post another one of these things for people who are just getting into .gif making, or would like to get in on the action!
this will be a step-by-step tutorial, presented via screenshots. at the end of the post, i’ll have a .psd download available to use on gifs!
here’s what you’re gonna need, kiddos:
KMplayer; this is a frame extractor/video player. this is what you’ll use to capture frames from episodes and videos.
Photoshop. I use Photoshop CC for Windows. you’ll need to torrent photoshop. here’s a link from piratebay for it. please keep in mind that this is not the same link that i used when i dl’d photoshop a couple of years ago, but it should work fine. the download process is simple. other links for photoshop downloads can be found here: [x] [x] [x].
a survivor episode with 720p or 1080p quality. i usually torrent from rarbg, 1337, and piratebay. the piratebay link directs you to episode one of mvgx. when searching for episodes, search “survivor s(number)e(number)”, for example, for the game changers premier, i would search “survivor s34e01”.
feel free to message me if you’re confused about anything and i’ll help you out as soon as possible!

first, you need to open up your KMplayer and your video. i tend to torrent .mkv files because of the quality, and i settle for .mp4 if it’s a youtube video.
kmplayer - to open your file, right click and select ‘Open File(s)…’ and choose your video. it may take a while for the video to load, depending on the quality and length.
now, get to the part of the video you’d like to gif. you can use the left and right arrow keys to skip through the video faster. now, open up the frame extraction window. (CTRL + G)
select the folder you want your frames to go in. i have 10 different folders titled ‘GIF1′, ‘GIF2′, ‘GIF3′, etc… i find it much easier to just capture all the frames you want at one time, and then turn them into gifs.
these are my settings:

you always want to have “original size” selected, unless you’re dealing with a higher quality episode they may open in kmplayer looking like the image below. if this is the case, select “specified size” instead and make sure its 1280 x 720!

make sure you’re at the scene you’d like, and click ‘Start’, KMplayer will start capturing each frame. it may lag a little bit, but let it capture the scene you want before clicking ‘Stop’.
it’s okay if you got frames you didn’t want, it happens to me all the time! locate the folder in which your frames went and simply delete the ones you don’t want. my gifs are usually 30-75 frames long (sometimes even longer, thanks to the new gif size limit), it may not seem like a lot, but it is!
once you’ve gotten all your frames, you can open up your version of photoshop.
BEFORE YOU DO ANYTHING, click on the ‘Window’ tab at the top and make sure ‘Animation’ is checked.
alright, now go to File > Scripts > Load Files into Stack… and select the folder where your frames are. it may take a while for your frames to load up, just be patient.


when all your frames are loaded up, it should look like this:

then click “create frame animation.” after that, you’ll click the small tab at the bottom right, and then click “make frames from layers”:

it will look like this, and then you have to click the tab again + reverse frames. this is important because you don’t want your gif playing backwards:

click that same button again and click on ‘Select All Frames’, this will, well….. select all your frames.
click on the ‘0 sec’ on any frame and select ‘Other…’ and type in ‘0.05′. this is the speed i always use, but you can use any speed you wish, though i feel that 0.05 looks the best!
now this is where the fun begins. you’re gonna crop your gif. for 8 or 10 gifs posts i usually do 268x145.

After you crop, you’ll go to Image > Image Size (make sure your setting match here so your gif is resized properly!):

once you’re done with that, you will convert your frames to a video timeline:

and then you will select all of the layers on the right side. once you have those selected, you will have to click Filter > Convert to Smart Filters. this will speed up the sharpening process, essentially, so you don’t have to do it one frame at a time:

after that, click Filter > Sharpen > Smart Sharpen:

make sure your setting match this:

after you sharpen, you color your gif, or add a psd.


i usually like my gifs to be pretty bright and blue because they look nice like that imo! but everyone should develop their own coloring style over time. but just as a starter, the download link for this psd will be provided below! i might make a coloring tutorial eventually!
you’re also going to add your text! i have a psd saved so i can just automatically drag texts over and just type the new caption. you may need to adjust the timeline at the bottom because text layers sometimes add additional frames to the gif.

now that all of that is done, you can click File > Save for Web. NEVER save gifs with ‘Save as…’
here are my save settings (i feel like this is the most crucial part to making your gifs look nice, crisp, and as high quality as possible):

you can change Selective to Adaptive if it looks better for your coloring! i’d suggest always using Pattern! i’m not kidding, use pattern or i’ll flag ur gifsets as inappropriate and have ur blog shut down.
YOUR GIF MUST BE UNDER 3MB, OR IT WON’T PLAY ON TUMBLR. as of now, 3MB gifs work fine in photosets, but still don’t load in text posts, so if you’re making a gif just to post in a text post, it has to be under 2MB.
if your gif is over 3mb you can either delete some frames, or lower the colors by choosing one of the numbers here:

don’t select anything lower than 64, because then it looks grainy and desaturated. or save it, reopen it and delete some frames (not too much though)
after saving your gif, close everything and reopen it normally. the frame delay speed is usually set back to 0.07 (because it was converted to a video timeline). so just select the very first frame, scroll to the end of your frames and hold SHIFT while selecting the last frame and change the delay to 0.05. then save again with ‘Save for Web & Devices’
PSD DOWNLOAD LINK
because i just made that psd for that scene, it probably works best on the marooning of s34e01. every psd will usually need adjustments, so make it your own and make it look good to you!
that’s about it really! please like/reblog if you use the psd and if the tutorial helps! and again, feel free to message me about anything!
67 notes
·
View notes
Text
Ctrl Alt End For Mac


Mac Ctrl Alt Del
Ctrl Alt End For Macbook
To use a keyboard shortcut, press and hold one or more modifier keys and then press the last key of the shortcut. For example, to use Command-C (copy), press and hold the Command key, then the C key, then release both keys. Mac menus and keyboards often use symbols for certain keys, including modifier keys:
Your Mac keyboard may lack Home and End keys, but you can jump to the beginning and end of documents, pages and apps with one of two keyboard shortcuts. Matt Elliott June 18, 2015 9:16 a.m. The Left/Right Arrows are Home/End respectively, the Up/Down Arrows are Page Up/Down respectively. Unless they've changed the design of the keyboard recently those operations should be marked on the arrow keys. The fn key elicits the secondary operation of the keys, so Control+End would have to be done as fn+Control+Right Arrow. Option–Shift–Right Arrow: Extend text selection to the end of the current word, then to the end of the following word if pressed again. Control-A: Move to the beginning of the line or paragraph. Control-E: Move to the end of a line or paragraph. Control-F: Move one character forward. Control-B: Move one character backward. 30 keyboard shortcuts Mac users need to know This collection of keyboard shortcuts for macOS can help users get the most from their iMacs, MacBook Pro and MacBook laptops. Ctrl Alt Delete on Mac.
Hack for cs go mac.
On keyboards made for Windows PCs, use the Alt key instead of Option, and the Windows logo key instead of Command.
Some keys on some Apple keyboards have special symbols and functions, such as for display brightness , keyboard brightness , Mission Control, and more. If these functions aren't available on your keyboard, you might be able to reproduce some of them by creating your own keyboard shortcuts. To use these keys as F1, F2, F3, or other standard function keys, combine them with the Fn key.
Cut, copy, paste, and other common shortcuts
Command-X: Cut the selected item and copy it to the Clipboard.
Command-C: Copy the selected item to the Clipboard. This also works for files in the Finder.
Command-V: Paste the contents of the Clipboard into the current document or app. This also works for files in the Finder.
Command-Z: Undo the previous command. You can then press Shift-Command-Z to Redo, reversing the undo command. In some apps, you can undo and redo multiple commands.
Command-A: Select All items.
Command-F: Find items in a document or open a Find window.
Command-G: Find Again: Find the next occurrence of the item previously found. To find the previous occurrence, press Shift-Command-G.
Command-H: Hide the windows of the front app. To view the front app but hide all other apps, press Option-Command-H.
Command-M: Minimize the front window to the Dock. To minimize all windows of the front app, press Option-Command-M.
Command-O: Open the selected item, or open a dialog to select a file to open.
Command-P: Print the current document.
Command-S: Save the current document.
Command-T: Open a new tab.
Command-W: Close the front window. To close all windows of the app, press Option-Command-W.
Option-Command-Esc: Force quit an app.
Command–Space bar: Show or hide the Spotlight search field. To perform a Spotlight search from a Finder window, press Command–Option–Space bar. (If you use multiple input sources to type in different languages, these shortcuts change input sources instead of showing Spotlight. Learn how to change a conflicting keyboard shortcut.)
Control–Command–Space bar: Show the Character Viewer, from which you can choose emoji and other symbols.
Control-Command-F: Use the app in full screen, if supported by the app.
Space bar: Use Quick Look to preview the selected item.
Command-Tab: Switch to the next most recently used app among your open apps.
Shift-Command-5: In macOS Mojave or later, take a screenshot or make a screen recording. Or use Shift-Command-3 or Shift-Command-4 for screenshots. Learn more about screenshots.
Shift-Command-N: Create a new folder in the Finder.
Command-Comma (,): Open preferences for the front app.
Sleep, log out, and shut down shortcuts
You might need to press and hold some of these shortcuts for slightly longer than other shortcuts. This helps you to avoid using them unintentionally.

Mac Ctrl Alt Del
Power button: Press to turn on your Mac or wake it from sleep. Press and hold for 1.5 seconds to put your Mac to sleep.* Continue holding to force your Mac to turn off.
Option–Command–Power button* or Option–Command–Media Eject : Put your Mac to sleep.
Control–Shift–Power button* or Control–Shift–Media Eject : Put your displays to sleep.
Control–Power button* or Control–Media Eject : Display a dialog asking whether you want to restart, sleep, or shut down.
Control–Command–Power button:* Force your Mac to restart, without prompting to save any open and unsaved documents.
Control–Command–Media Eject : Quit all apps, then restart your Mac. If any open documents have unsaved changes, you will be asked whether you want to save them.
Control–Option–Command–Power button* or Control–Option–Command–Media Eject : Quit all apps, then shut down your Mac. If any open documents have unsaved changes, you will be asked whether you want to save them.
Control-Command-Q: Immediately lock your screen.
Shift-Command-Q: Log out of your macOS user account. You will be asked to confirm. To log out immediately without confirming, press Option-Shift-Command-Q.
* Does not apply to the Touch ID sensor.
Finder and system shortcuts
Command-D: Duplicate the selected files.
Command-E: Eject the selected disk or volume.
Command-F: Start a Spotlight search in the Finder window.
Command-I: Show the Get Info window for a selected file.
Command-R: (1) When an alias is selected in the Finder: show the original file for the selected alias. (2) In some apps, such as Calendar or Safari, refresh or reload the page. (3) In Software Update preferences, check for software updates again.
Shift-Command-C: Open the Computer window.
Shift-Command-D: Open the desktop folder.
Shift-Command-F: Open the Recents window, showing all of the files you viewed or changed recently.
Shift-Command-G: Open a Go to Folder window.
Shift-Command-H: Open the Home folder of the current macOS user account.
Shift-Command-I: Open iCloud Drive.
Shift-Command-K: Open the Network window.
Option-Command-L: Open the Downloads folder.
Shift-Command-N: Create a new folder.
Shift-Command-O: Open the Documents folder.
Shift-Command-P: Show or hide the Preview pane in Finder windows.
Shift-Command-R: Open the AirDrop window.
Shift-Command-T: Show or hide the tab bar in Finder windows.
Control-Shift-Command-T: Add selected Finder item to the Dock (OS X Mavericks or later)
Shift-Command-U: Open the Utilities folder.
Option-Command-D: Show or hide the Dock.
Control-Command-T: Add the selected item to the sidebar (OS X Mavericks or later).
Option-Command-P: Hide or show the path bar in Finder windows.
Option-Command-S: Hide or show the Sidebar in Finder windows.
Command–Slash (/): Hide or show the status bar in Finder windows.
Command-J: Show View Options.
Command-K: Open the Connect to Server window.
Control-Command-A: Make an alias of the selected item.
Command-N: Open a new Finder window.
Option-Command-N: Create a new Smart Folder.
Command-T: Show or hide the tab bar when a single tab is open in the current Finder window.
Option-Command-T: Show or hide the toolbar when a single tab is open in the current Finder window.
Option-Command-V: Move the files in the Clipboard from their original location to the current location.
Command-Y: Use Quick Look to preview the selected files.
Option-Command-Y: View a Quick Look slideshow of the selected files.
Command-1: View the items in the Finder window as icons.
Command-2: View the items in a Finder window as a list.
Command-3: View the items in a Finder window in columns.
Command-4: View the items in a Finder window in a gallery.
Command–Left Bracket ((): Go to the previous folder.
Command–Right Bracket ()): Go to the next folder.
Command–Up Arrow: Open the folder that contains the current folder.
Command–Control–Up Arrow: Open the folder that contains the current folder in a new window.
Command–Down Arrow: Open the selected item.
Right Arrow: Open the selected folder. This works only when in list view.
Left Arrow: Close the selected folder. This works only when in list view.
Command-Delete: Move the selected item to the Trash.
Shift-Command-Delete: Empty the Trash.
Option-Shift-Command-Delete: Empty the Trash without confirmation dialog.
Command–Brightness Down: Turn video mirroring on or off when your Mac is connected to more than one display.
Option–Brightness Up: Open Displays preferences. This works with either Brightness key.
Control–Brightness Up or Control–Brightness Down: Change the brightness of your external display, if supported by your display.
Option–Shift–Brightness Up or Option–Shift–Brightness Down: Adjust the display brightness in smaller steps. Add the Control key to this shortcut to make the adjustment on your external display, if supported by your display.
Option–Mission Control: Open Mission Control preferences.
Command–Mission Control: Show the desktop.
Control–Down Arrow: Show all windows of the front app.
Option–Volume Up: Open Sound preferences. This works with any of the volume keys.
Option–Shift–Volume Up or Option–Shift–Volume Down: Adjust the sound volume in smaller steps.
Option–Keyboard Brightness Up: Open Keyboard preferences. This works with either Keyboard Brightness key.
Option–Shift–Keyboard Brightness Up or Option–Shift–Keyboard Brightness Down: Adjust the keyboard brightness in smaller steps.
Option key while double-clicking: Open the item in a separate window, then close the original window.
Command key while double-clicking: Open a folder in a separate tab or window.
Command key while dragging to another volume: Move the dragged item to the other volume, instead of copying it.
Option key while dragging: Copy the dragged item. The pointer changes while you drag the item.
Option-Command while dragging: Make an alias of the dragged item. The pointer changes while you drag the item.
Option-click a disclosure triangle: Open all folders within the selected folder. This works only when in list view.
Command-click a window title: See the folders that contain the current folder.
Learn how to use Command or Shift to select multiple items in the Finder.
Click the Go menu in the Finder menu bar to see shortcuts for opening many commonly used folders, such as Applications, Documents, Downloads, Utilities, and iCloud Drive.
Document shortcuts
The behavior of these shortcuts may vary with the app you're using.
Command-B: Boldface the selected text, or turn boldfacing on or off.
Command-I: Italicize the selected text, or turn italics on or off.
Command-K: Add a web link.
Command-U: Underline the selected text, or turn underlining on or off.
Command-T: Show or hide the Fonts window.
Command-D: Select the Desktop folder from within an Open dialog or Save dialog.
Control-Command-D: Show or hide the definition of the selected word.
Shift-Command-Colon (:): Display the Spelling and Grammar window.
Command-Semicolon (;): Find misspelled words in the document.
Option-Delete: Delete the word to the left of the insertion point.
Control-H: Delete the character to the left of the insertion point. Or use Delete.
Control-D: Delete the character to the right of the insertion point. Or use Fn-Delete.
Fn-Delete: Forward delete on keyboards that don't have a Forward Delete key. Or use Control-D.
Control-K: Delete the text between the insertion point and the end of the line or paragraph.
Fn–Up Arrow: Page Up: Scroll up one page.
Fn–Down Arrow: Page Down: Scroll down one page.
Fn–Left Arrow: Home: Scroll to the beginning of a document.
Fn–Right Arrow: End: Scroll to the end of a document.
Command–Up Arrow: Move the insertion point to the beginning of the document.
Command–Down Arrow: Move the insertion point to the end of the document.
Command–Left Arrow: Move the insertion point to the beginning of the current line.
Command–Right Arrow: Move the insertion point to the end of the current line.
Option–Left Arrow: Move the insertion point to the beginning of the previous word.
Option–Right Arrow: Move the insertion point to the end of the next word.
Shift–Command–Up Arrow: Select the text between the insertion point and the beginning of the document.
Shift–Command–Down Arrow: Select the text between the insertion point and the end of the document.
Shift–Command–Left Arrow: Select the text between the insertion point and the beginning of the current line.
Shift–Command–Right Arrow: Select the text between the insertion point and the end of the current line.
Shift–Up Arrow: Extend text selection to the nearest character at the same horizontal location on the line above.
Shift–Down Arrow: Extend text selection to the nearest character at the same horizontal location on the line below.
Shift–Left Arrow: Extend text selection one character to the left.
Shift–Right Arrow: Extend text selection one character to the right.
Option–Shift–Up Arrow: Extend text selection to the beginning of the current paragraph, then to the beginning of the following paragraph if pressed again.
Option–Shift–Down Arrow: Extend text selection to the end of the current paragraph, then to the end of the following paragraph if pressed again.
Option–Shift–Left Arrow: Extend text selection to the beginning of the current word, then to the beginning of the following word if pressed again.
Option–Shift–Right Arrow: Extend text selection to the end of the current word, then to the end of the following word if pressed again.
Control-A: Move to the beginning of the line or paragraph.
Control-E: Move to the end of a line or paragraph.
Control-F: Move one character forward.
Control-B: Move one character backward.
Control-L: Center the cursor or selection in the visible area.
Control-P: Move up one line.
Control-N: Move down one line.
Control-O: Insert a new line after the insertion point.
Control-T: Swap the character behind the insertion point with the character in front of the insertion point.
Command–Left Curly Bracket ((): Left align.
Command–Right Curly Bracket ()): Right align.
Shift–Command–Vertical bar (|): Center align.
Option-Command-F: Go to the search field.
Option-Command-T: Show or hide a toolbar in the app.
Option-Command-C: Copy Style: Copy the formatting settings of the selected item to the Clipboard.
Option-Command-V: Paste Style: Apply the copied style to the selected item.
Option-Shift-Command-V: Paste and Match Style: Apply the style of the surrounding content to the item pasted within that content.
Option-Command-I: Show or hide the inspector window.
Shift-Command-P: Page setup: Display a window for selecting document settings.
Shift-Command-S: Display the Save As dialog, or duplicate the current document.
Shift–Command–Minus sign (-): Decrease the size of the selected item.
Shift–Command–Plus sign (+): Increase the size of the selected item. Command–Equal sign (=) performs the same function.
Shift–Command–Question mark (?): Open the Help menu.
Other shortcuts
For more shortcuts, check the shortcut abbreviations shown in the menus of your apps. Every app can have its own shortcuts, and shortcuts that work in one app might not work in another.
You’ve always done great work, so I’m sure you will address it if you haven’t already. Loops for mac. There are a few frequent crashes others have mentioned as well. I love all of the new content since the last major update, but the bugs with the current version have left many like myself a little disappointed.
Apple Music shortcuts: Choose Help > Keyboard shortcuts from the menu bar in the Music app.
Other shortcuts: Choose Apple menu > System Preferences, click Keyboard, then click Shortcuts.
Learn more
Ctrl Alt End For Macbook
Create your own shortcuts and resolve conflicts between shortcuts
Change the behavior of the function keys or modifier keys
0 notes
Text
Most daily used Windows 10 keyboard shortcuts and gestures
Windows 10 keyboard shortcuts
Using computer is our daily work. It is time consuming if we don’t use Keyboard shortcuts. Here are most daily used keyboard shortcuts and gestures for Windows 10. Mouse or touchpad and maybe even a touch screen. It does not take much more than that to move in a basic way in any operating system, but if what we want is to do it efficiently, saving time and a few clicks, it never hurts to know some of its gestures and keyboard shortcuts.
In this regard, Windows 10 not only continues to allow us to use some of the classic shortcuts that we all know by heart, but along with its new features it has also implemented new ones that help us to use them quickly and easily. Below you have the list with the best touchpad gestures and keyboard shortcuts , although remember that if they do not convince you there are tools to create custom shortcuts also available.
One thing you have to keep in mind is that these keyboard shortcuts are generic for Windows, but then other applications may have their own shortcuts. This means that yes, there are shortcuts like the ones in the screenshots that will work on all sites, but then each application can have its specific shortcuts. In fact, remember that you also have lists of shortcuts Word and shortcuts Excel.
Touchpad Gestures
Whether in laptops, ultrabooks or even hybrids like Microsoft’s Surface, when there is no room for a mouse, the touchpad will take its place as a tool to help us move through the operating system. It is not always the most comfortable due to its small size, but with these gestural commands you can get the most out of it.
Touchpad
One finger press : Normal click.
Two-finger tap : Right click.
Three-finger tap: Open Cortana searches. It can be changed to open notifications.
Four-finger tap: Open the notification center.
Double click with one finger : Double click.
Double tap with one finger and drag : Select texts or applications. It also serves to drag icons.
Swipe up or down with two fingers : Scroll on the screen.
Swipe up with three fingers : Opens the task view, and within them we can slide down with three fingers to select which one to view.
Three-finger swipe down : Displays the desktop. If we swipe up with three fingers again, the windows are shown again.
Swipe left or right with three fingers : Navigate between open windows.
Four-finger swipe left or right : Switch virtual desktops.
Four-finger swipe up : Go to the multitasking screen.
Pinch in or out Zoom in or out.
Keyboard shortcuts
Keyboard shortcuts are small resources with which by just combining two or three keys we can save a few clicks or having to move from one side of the screen to the other. Undoubtedly there are some that we will use much more than others , but it is never a bad thing to know them all, since you never know when the mouse will fail us.
Active windows control
With these commands you can move the active window and adjust it in different areas of the screen , from the left or right half to the lower left or upper right edges. It’s a perfect way to play with the windows you’re working with and adjust them in such a way that you can make the most of your screen space.
Windows Key + Left : Places the active window in the left half of the screen.
Windows Key + Right : Places the active window in the right half of the screen.
Windows Key + Up : Depending on which half the active window is in, moves it to the top.
Windows Key + Down : Depending on which half the active window is in, moves it to the bottom.
Windows key + ,: Hide all windows until the Windows key is released.
Windows key + D : Minimize all windows.
Ctrl + Shift + M : Restores all minimized windows to full screen.
Windows key + Start : Minimizes all windows except the active one.
Windows key + E : Launch the file explorer.
Windows key + T : Navigate between the windows on the taskbar. Hit enter to open them when they are selected.
Windows key + A number : Opens the window located in the position corresponding to the number on the taskbar.
Alt + Tab : You alternate between the different open windows.
Alt + F4 : Close the active window
Windows key + Shift + Left or Right : Moves the active window to another monitor, whenever there is one, located to the left or right of the main one.
Windows key + L : Lock your session and stay on the unlock screen.
Windows key + M : Minimize all your windows.
Control of virtual desktops
Virtual desktops are one of the great novelties of Windows 10, and something that Microsoft users have long been waiting to settle for seeing them in other operating systems. Using them to organize yourself better without having to click on the menus is also just a keystroke away thanks to the following shortcuts.
Windows key + Ctrl + D : Create a new virtual desktop
Windows key + Ctrl + Left : You move to the virtual desktop on the left.
Windows key + Ctrl + Right : You move to the virtual desktop on the right.
Windows key + Ctrl + F4 : Close the active virtual desktop.
Windows key + Tab : The task view opens, in which in addition to the open windows you can also see the desktops.
Shortcuts for file explorer
Now we leave you with some shortcuts with which you will be able to interact with the file explorer and the directories that are inside.
Alt + D : Go to the address bar.
Ctrl + E : Go to searches in the address bar.
Ctrl + F : Go to the search bar.
Ctrl + N : Open a new window.
Ctrl + W : Close the active window.
Ctrl + mouse wheel : Change the size of the displayed elements.
Alt + P : Open the preview pane.
Alt + Enter : Enter the properties.
Alt + Right Arrow : Go to the next file.
Alt + Up Arrow : Go to the file that the file you are in belongs to.
Alt + Left Arrow : Go to the previous file.
End : Go to the end of the content window.
Home : Go to the top of the content window.
F11 : Maximize or minimize the active window.
Cortana control, taskbar and settings
Cortana is another of the main protagonists of Windows 10, and as such we can turn to her and use it naturally as many times as we want, either to find a file, look at information of interest or simply to tell us a joke. With Windows 10 we can also access this virtual assistant and some configuration menus based on keyboard shortcuts.
Windows key + Q or Windows + S : Open the Windows 10 finder.
Windows key + C : Open Cortana. The shortcut is disabled by default, and you have to activate it in Cortana’s settings.
Windows key + I : Open the Windows 10 settings panel.
Windows key + A : Open the Windows 10 notification panel.
Windows key + X : Open the context menu of the start button.
Windows key + S : Open the browser menu.
Shift + access application in taskbar : Open the application immediately or open a new instance of the application
Control + Shift + access application in taskbar : Open the application as administrator
Shift + right click on application access on taskbar : Open the application window menu
Shift + grouped buttons : Opens the different grouped windows
Text control
Who has not ever used the classic keyboard shortcuts to copy and paste text? I bet most of you. Even so, and although the use of these shortcuts is widespread, there are many others that will help us to have greater control over our texts and that we may not know as much . Here are a few.
Ctrl + V or Shift + Insert : Paste a text where we have the cursor.
Ctrl + C or Ctrl + Insert : Copies the selected text to the clipboard.
Ctrl + X : Cuts the selected text on the clipboard.
Ctrl + A : Select all text on the page.
Ctrl + F : Write a text to find it on the page.
Shift + Left, Right, Up or Down : Move the cursor through the text selecting the one you are passing along the way. Keep pressing the keys to select more text.
Ctrl + Shift + Left or Right : Move the cursor one word to the left or right by selecting the text you are passing through.
Shift + Start or End : Move the cursor to the beginning or end of the line selecting the text you pass through.
Shift + Page Up or Page Down : Move the cursor to the upper or lower edge of the visible screen by selecting the text you are passing through.
Ctrl + Shift + Home or End : Move the cursor to the upper or lower end of the text selecting the one you pass through.
Other little shortcuts to master Windows 10
Keyboard, mouse or touchpad and maybe even a touch screen. It does not take much more than that to move in a basic way in any operating system, but if what we want is to do it efficiently, saving time and a few clicks, it never hurts to know some of its gestures and keyboard shortcuts.
In this regard, Windows 10 not only continues to allow us to use some of the classic shortcuts that we all know by heart, but along with its new features it has also implemented new ones that help us to use them quickly and easily. Below you have the list with the best touchpad gestures and keyboard shortcuts , although remember that if they do not convince you there are tools to create custom shortcuts also available.
One thing you have to keep in mind is that these keyboard shortcuts are generic for Windows, but then other applications may have their own shortcuts. This means that yes, there are shortcuts like the ones in the screenshots that will work on all sites, but then each application can have its specific shortcuts. In fact, remember that you also have lists of shortcuts Word and shortcuts Excel .
Touchpad gestures
Whether in laptops, ultrabooks or even hybrids like Microsoft’s Surface, when there is no room for a mouse, the touchpad will take its place as a tool to help us move through the operating system. It is not always the most comfortable due to its small size, but with these gestural commands you can get the most out of it.
One finger press : Normal click.
Two-finger tap : Right click.
Three-finger tap: Open Cortana searches. It can be changed to open notifications.
Four-finger tap: Open the notification center.
Double click with one finger : Double click.
Double tap with one finger and drag : Select texts or applications. It also serves to drag icons.
Swipe up or down with two fingers : Scroll on the screen.
Swipe up with three fingers : Opens the task view, and within them we can slide down with three fingers to select which one to view.
Three-finger swipe down : Displays the desktop. If we swipe up with three fingers again, the windows are shown again.
Swipe left or right with three fingers : Navigate between open windows.
Four-finger swipe left or right : Switch virtual desktops.
Four-finger swipe up : Go to the multitasking screen.
Pinch in or out Zoom in or out.
Keyboard shortcuts
Keyboard shortcuts are small resources with which by just combining two or three keys we can save a few clicks or having to move from one side of the screen to the other. Undoubtedly there are some that we will use much more than others , but it is never a bad thing to know them all, since you never know when the mouse will fail us.
Active windows control
We can easily use Windows 10 keyboard shortcuts in active windows control. With these commands you can move the active window and adjust it in different areas of the screen , from the left or right half to the lower left or upper right edges. It’s a perfect way to play with the windows you’re working with and adjust them in such a way that you can make the most of your screen space.
Windows Key + Left : Places the active window in the left half of the screen.
Windows Key + Right : Places the active window in the right half of the screen.
Windows Key + Up : Depending on which half the active window is in, moves it to the top.
Windows Key + Down : Depending on which half the active window is in, moves it to the bottom.
Windows key + ,: Hide all windows until the Windows key is released.
Windows key + D : Minimize all windows.
Ctrl + Shift + M : Restores all minimized windows to full screen.
Windows key + Start : Minimizes all windows except the active one.
Windows key + E : Launch the file explorer.
Windows key + T : Navigate between the windows on the taskbar. Hit enter to open them when they are selected.
Windows key + A number : Opens the window located in the position corresponding to the number on the taskbar.
Alt + Tab : You alternate between the different open windows.
Alt + F4 : Close the active window
Windows key + Shift + Left or Right : Moves the active window to another monitor, whenever there is one, located to the left or right of the main one.
Windows key + L : Lock your session and stay on the unlock screen.
Windows key + M : Minimize all your windows.
Control of virtual desktops
Windows 10 keyboard shortcuts if used with virtual desktop, makes our work easier. Virtual desktops are one of the great novelties of Windows 10, and something that Microsoft users have long been waiting to settle for seeing them in other operating systems. Using them to organize yourself better without having to click on the menus is also just a keystroke away thanks to the following shortcuts.
Windows key + Ctrl + D : Create a new virtual desktop
Windows key + Ctrl + Left : You move to the virtual desktop on the left.
Windows key + Ctrl + Right : You move to the virtual desktop on the right.
Windows key + Ctrl + F4 : Close the active virtual desktop.
Windows key + Tab : The task view opens, in which in addition to the open windows you can also see the desktops.
Shortcuts for file explorer
Windows 10 keyboard shortcuts can be easier for file explorer. Now we leave you with some shortcuts with which you will be able to interact with the file explorer and the directories that are inside.
Alt + D : Go to the address bar.
Ctrl + E : Go to searches in the address bar.
Ctrl + F : Go to the search bar.
Ctrl + N : Open a new window.
Ctrl + W : Close the active window.
Ctrl + mouse wheel : Change the size of the displayed elements.
Alt + P : Open the preview pane.
Alt + Enter : Enter the properties.
Alt + Right Arrow : Go to the next file.
Alt + Up Arrow : Go to the file that the file you are in belongs to.
Alt + Left Arrow : Go to the previous file.
End : Go to the end of the content window.
Home : Go to the top of the content window.
F11 : Maximize or minimize the active window.
Cortana control, taskbar and settings
Windows 10 keyboard shortcuts can be easily used in Cortona. Cortana is another of the main protagonists of Windows 10, and as such we can turn to her and use it naturally as many times as we want, either to find a file, look at information of interest or simply to tell us a joke. With Windows 10 we can also access this virtual assistant and some configuration menus based on keyboard shortcuts.
Windows key + Q or Windows + S : Open the Windows 10 finder.
Windows key + C : Open Cortana. The shortcut is disabled by default, and you have to activate it in Cortana’s settings.
Windows key + I : Open the Windows 10 settings panel.
Windows key + A : Open the Windows 10 notification panel.
Windows key + X : Open the context menu of the start button.
Windows key + S : Open the browser menu.
Shift + access application in taskbar : Open the application immediately or open a new instance of the application
Control + Shift + access application in taskbar : Open the application as administrator
Shift + right click on application access on taskbar : Open the application window menu
Shift + grouped buttons : Opens the different grouped windows
Text control
Windows 10 keyboard shortcuts is easier to control text. Who has not ever used the classic keyboard shortcuts to copy and paste text? I bet most of you. Even so, and although the use of these shortcuts is widespread, there are many others that will help us to have greater control over our texts and that we may not know as much . Here are a few.
Ctrl + V or Shift + Insert : Paste a text where we have the cursor.
Ctrl + C or Ctrl + Insert : Copies the selected text to the clipboard.
Ctrl + X : Cuts the selected text on the clipboard.
Ctrl + A : Select all text on the page.
Ctrl + F : Write a text to find it on the page.
Shift + Left, Right, Up or Down : Move the cursor through the text selecting the one you are passing along the way. Keep pressing the keys to select more text.
Ctrl + Shift + Left or Right : Move the cursor one word to the left or right by selecting the text you are passing through.
Shift + Start or End : Move the cursor to the beginning or end of the line selecting the text you pass through.
Shift + Page Up or Page Down : Move the cursor to the upper or lower edge of the visible screen by selecting the text you are passing through.
Ctrl + Shift + Home or End : Move the cursor to the upper or lower end of the text selecting the one you pass through.
Other little shortcuts to master Windows 10
Windows 10 is much more than what we can see with the naked eye . Like many other operating systems, it is full of hidden functions or that require more navigation to get to them, so having keyboard shortcuts to access them can save us valuable time. Here are a few more to complete our collection.
Ctrl + Shift + Esc : Open the Windows 10 task manager.
Windows key + R : Opens the Run dialog box.
Shift + Del : Deletes a file permanently without sending it to the trash.
Alt + Enter : Shows the properties of the selected file
Windows key + U : Access the Ease of Access Center.
Windows key + Imp Pant Petsis : Take a screenshot that is automatically saved in the captures folder, within the Images folder.
Windows key + Shift + S : Open the screenshot menu to decide which area to capture.
Windows key + G : Open the game bar.
Windows key + H : Starts dictation mode.
Windows key + K : Open the connect panel.
Windows key + Alt + G : If enabled, starts screen recording in the background.
Windows key + Alt + R : Stop screen recording.
Windows Key + P : With a second display connected, navigate between display modes.
Windows Key + D : Opens Feedback Hub.
Windows key + “+” : Zoom in with the Magnifier application.
Windows key + “-“ : Zoom out with the Magnifier application.
Windows key + Alt + D : Shows and hides the Windows calendar.
And with this repertoire of gestures and keyboard shortcuts, any of you should be able to use Microsoft’s new operating system at full speed. We have tried to list as many as we have been able to, but surely some of them have escaped us, so do not be shy when it comes to advising others so that we can add them.
The post Most daily used Windows 10 keyboard shortcuts and gestures appeared first on Technoeager.
from WordPress https://ift.tt/2QvVWs3
via IFTTT
0 notes
Quote
GIFs (Graphics Interchange Format) are all the rage nowadays on social media – the likes of Facebook, Instagram, Twitter, WhatsApp are flooded with clips from movies, TV shows, and other videos distilled down into looping GIFs.
If you have ever wondered about creating your own GIF, the good news is, it is not as complex as it looks. All you need is decent editing software. So, we bring you a Gyazo GIF guide to help you create GIFs from videos without any hassles using the software Gyazo.
How to Make a GIF with Gyazo
Table of Contents
What is Gyazo and Gyazo GIF
Gyazo is a Japanese open-source and free screenshot program for Windows, Mac OS X, and Linux which was introduced in 2009. It is a simple tool that allows you to create screenshots with ease and uploads them online, producing an exclusive URL to the screenshot. The screenshots are saved on Gyazo servers and can be easily searched by app name, web address or date.
Gyazo GIF is another tool from the makers of Gyazo. This application is used to create GIF animations up to 7 seconds in length but with no sound. It uploads saved images on the web by itself. Similar to capturing screenshots, you can choose the screen section of the video that you want to record.
Where Will You Get the Gyazo Tool?
The Gyazo and Gyazo GIF apps for your desktop can be downloaded via gyazo.com.
It is available for Windows 7 and later, Mac OS X 10.7 and later, Android 4.4 and up, and also as an extension for Chrome, Firefox and Microsoft Edge.
Downloading and Installing Gyazo for Mac:
Head to the downloads page at https://gyazo.com/download.
Click the Download button.
Once the download is complete, open a Finder window and select your Downloads folder. Double-click the downloaded file (Gyazo.dmg) to reveal the Gyazo and Gyazo GIF app icons.
Drag and drop the Gyazo and Gyazo GIF app icons over Applications in the Finder sidebar.
To launch the, just click the Gyazo icon in your Applications folder.
Downloading and Installing Gyazo for Windows:
Go to the downloads page at https://gyazo.com/download.
Click the Download button and wait for the file to download.
Click the downloaded file (Gyazo.exe) to install.
To run the apps, double-click the icon on your Windows Desktop and select the screen.
Downloading Gyazo Extension for Browsers and Android:
For Google Chrome: https://chrome.google.com/webstore/detail/gyazo/ffdaeeijbbijklfcpahbghahojgfgebo
For Firefox: https://addons.mozilla.org/en-US/android/addon/gyazo-official/
For Microsoft Edge: https://www.microsoft.com/en-us/store/p/gyazo-extension-for-edge/9nf31nnx69v1
Gyazo for Android: Gyazo for Android only supports capturing images and not making animated GIFs at this time. https://play.google.com/store/apps/details?id=com.notainc.gyazo&hl=en
How to Use Gyazo GIF
Owing to its easy to use and perhaps the cleanest interface, Gyazo can be used by anyone. So, whether you are a professional or a beginner, all you have to do is just follow these simple steps:
Find and click on the Gyazo icon on your desktop (Make sure you pin it to taskbar).
Click and move the cross-hair cursor to choose the area that you want to start recording with.
Just as you release your mouse, the unselected area will become dim and the recording will start automatically.
The elements as depicted in the image below are:
Cancels the recording.
Stops/pauses the recording.
Finishes the recording.
Time tracker for the recording.
Just as the recording begins, the time tracker starts moving along the maximum recording limit of 7 seconds. You do not need to click any icons (a,b or c) when you want to record the maximum length.
However, to get GIFs less than 7 seconds you must:
Start recording then click on the icon (b) to stop at any point. If you want to cancel and try again, click on the icon (a).
Click on the icon (c) to save and upload it at that point.
When the recording finishes, the link is copied to your clipboard automatically and a tab will open with your new GIF.
Using Gyazo GIF Hotkey
Gyazo for Windows has hotkeys by default but unfortunately, Gyazo for Mac does not. Now, however, you can install a Gyazo extension for Google Chrome and add custom keyboard shortcuts to it.
For Windows Users:
Gyazo for Windows has hotkeys by default and can be launched with ctrl+shift+G.
You can change your shortcut keys by opening Gyazo settings either from the start menu or by right-clicking on the Gyazo icon in your taskbar.
For Mac Users:
There are no Gyazo GIF hotkeys for Mac. Nevertheless, you can install the Gyazo extension for Google Chrome and add custom keyboard shortcuts to it.
Add custom shortcuts to Gyazo for Chrome
Go to chrome://extensions/ in your browser’s address bar or click on Settings > More Tools > Extensions to open up the extensions page. On scrolling down to the bottom you will find a Keyboard Shortcuts option. Click it to open “Keyboard shortcuts for Extensions and Apps”.
Now you can set up custom shortcuts for the Gyazo extension (for example, command + E), and click OK. Now you can launch the extension with shortcuts.
When you launch the extension you can choose the select mode by the keyboard as well (E: Element, S: Select Area, P: Visible Page, W: Whole Page).
Some Useful Features of Gyazo GIF
Image uploading
Gyazo also allows users to upload an image by dragging the image to the Gyazo icon. You can also upload an image without opening a new tab in your web browser.
Cloud storage
Gyazo uploads every screenshot to its servers, permitting free cloud storage, which as per Gyazo can be used indefinitely.
Ivy Search
Ivy Search is a feature of Gyazo that lets premium users find an image from a hazy idea with related images. According to Gyazo’s blog, Ivy Search works the same way in which you recall things in your brain.
Premium Accounts (Ninja)
Users can upgrade their free account to Premium for a monthly subscription fee. Premium users have access to unlimited storage and uploading. They can draw arrows on images, use Ivy Search as of version 3.0 and later, and see no advertisements.
Some Alternatives to Gyazo
There are also some other programs like Gyazo which are fun to work with. Take a look at the list below if you want to explore Gyazo alternatives.
Giphy: Giphy is a great tool if you want to find already existing animated GIFs. You can search by artist, keyword or category. You can also upload your own GIF, one best Gyazo alternative.
GIFMaker: GIF Maker allows users to upload and string together images to create a GIF. After uploading the images, users can fine-tune the canvas size and animation speed. This tool also allows you to get audio from any Youtube video.
GIMP: Another Gyazo alternative is GIMP. GIMP strings together individual images and brings the frames together by animation. Its unique feature is the ability to single out specific frames and adjust the timing for that frame independent of the others in the GIF.
Recordit: Recordit is a useful software that allows users to create a quick recording of their screen. You can record for up to 5 minutes.
Ezgif: Ezgif is a GIF-resizing tool, which allows you to either resize the GIF to fit a certain space or optimize it by reducing some of its effects.
Final Thoughts
Gyazo GIF is a great tool which can make your online conversations more entertaining, as well as complement your presentation. We hope you find this guide useful. If you have used any Gyazo alternatives feel free to share your experience with us.
source http://wtf.telenor.com.np/2019/12/11/how-to-use-gyazo-gif-tool-like-a-pro/
http://www.globalone.com.np/2019/12/how-to-use-gyazo-gif-tool-like-pro.html
0 notes
Text
Websites for Hour of Code by Grade
This December will again host the Hour of Code, a one-hour introduction to programming designed to demystify the subject and show that anyone can be a maker, a creator, and an innovator. Last year, almost 300,000 students (age 4-104) participated from over 180 countries and wrote almost 20 billion lines of code. The 200,000+ teachers involved came away believing that, of all their education tools, coding was the best at teaching children to think. It’s easy to see why when you look at fundamental programming concepts:
abstraction and symbolism – variables are common in math, but also in education. Tools, toolbars, icons, images all represent something bigger
creativity – think outside the box
if-then thinking – actions have consequences
debugging – write-edit-rewrite; try, fail, try again. When you make a mistake, don’t give up or call an expert. Look at what happened and fix where it went wrong.
logic – go through a problem from A to Z
sequencing – know what happens when
If you’re planning to participate in Hour of Code, here are a series of activities — broken down by grade — that will kickstart your effort. They can be done individually or in small groups.
Introduce each of these activities by watching “I Like Programming“, a video that discusses why the great programmers of our time fell in love with this activity.
**Grade-levels below are guidelines. Feel free to use whichever project fits your students.
Kindergarten — Human Robot
Start young programmers by teaching sequencing. Show images of stages in, say, their morning preparations. Ask them to organize the list in the order completed as they get ready for school. Call it “sequencing” and expect them to use this domain-specific word.
Next, pick an activity from the sequence — say, walking into the classroom and sitting down. Use yourself as a model of how to perform that activity and ask students for specific directions on how you would complete this task. For example:
Move right foot, then left, 4 times.
Turn right; walk 4 steps.
Turn around (left and left again).
Drop backpack to floor (or place under chair).
Sit
Only do what they tell you. For example, if they say “walk to the chair”, look confused. They haven’t provided enough direction. They must “debug” the “script” and try again.
First Grade — Follow one of the free online Hour of Code activities
Using activities offered on websites like Code.org, Kodable, or Tynker is the easiest way to get involved as the site does the planning for you. Before starting, review the digital citizenship associated with visiting an online site (such as privacy, staying on the assigned website, and not talking to strangers).
Instead of following a pre-planned activity, try one of these sites that introduce age-appropriate programming:
Scratch Jr.
Tinkercad
If you use iPads, here are some great options:
Cargo-Bot
Daisy the Dinosaur
For more suggestions, here’s a list of coding websites. Scroll to the section for first grade.
Second Grade — Animation
Use a free program like Pivot Stick Figure Animator or Stickman to program a stick figure. Both are simple to use, but offer different options. Preview them first to pick the one best suited to your student group.
Pivot Stick Figure is a download. Students program a stick figure to do pretty much anything they want by adjusting the “joints” in his body
Draw a Stickman is a web-based tool or app that turns a simple drawing into a story by asking questions of the creator. Students draw an image; the site animates it and then asks questions as the figure moves, requiring students to add detail to the Stickman’s adventure. They can pick from several story themes in creating their finished story.
If you use iPads, try Stick Nodes or Stickman.
Third Grade — Pixel Art
Pixel Art is the blocky drawing that is most famous for appearing in Minecraft. For this project, students will use a spreadsheet program.
Open the spreadsheet program you use in your school (Google Sheets, Excel, or another). Show students how to turn the cells into squares rather than rectangles by doing the following (or watch this video):
Select all cells by grabbing the box that sits at the intersection of the rows and columns
Drag a column header’s edge to resize the column width to match the row height.
Students now write directions for which color is poured into what squares to create their drawing. For example:
Blue: A1, B1, C1, D1, G1, H1, I1, J1, A2, B2, I2, J2, A3, J3, A5, A6, A7, A8, A9, A10,
When done, students have a neighbor test the directions to see if they can create the intended drawing.
Fourth Grade — Shortkeys
By fourth grade, students appreciate technology for how it can speed up their classwork and will seek out ways to use it for that purpose. Creating a shortkey is a quick and easy way to complete repetitive activities and will become a favorite with students. If necessary, adapt the following Windows/iPad directions to the device used in your school:
Go to Start
Right click on the desired program (either a program or a tool is fine)
Select “properties”
Click in “shortcut”
Push key combination you want to use, say, Ctrl+Alt+S
Save
On iPads, these are called “hotkeys”:
Go to Settings > General Settings > Keyboard Settings.
Scroll down and click “add new shortcut.”
Popular shortkeys are to open programs, activate tools, and take screenshots using the digital device’s native tool.
Fifth Grade — Macros
Creating macros gives students an easy way to add a standards-based heading or any other repetitive task required for their schoolwork without having to retype it each time. Adapt these MS Word directions to your digital device:
Click View – Macros– Record Macros.
Specify a name for the macro.
Choose whether it should be a keyboard shortcut or a button.
Once you click OK, notice your mouse looks like a cassette tape, indicating that anything you click will be part of the macro. Click all elements you would like to be part of your macro.
Stop recording by clicking View – Stop Recording.
Click for a video on how to create macros.
Sixth-Seventh Grade — Code a Widget
Widgets are free, personalized mini-apps that do almost anything the user can program, from calculating the calories in a recipe to solving complex problems. Students can browse Wolfram/Alpha’s gallery for a widget that fits their need and embed the code into their personal website, or build their own widget from scratch using Wolfram Alpha’s Builder tool. The level of difficulty will determine how long it takes.
Click to view slideshow.
Eighth Grade — Alice
Alice is a free downloadable programming tool for 8th grade and above that shows students how to create interactive stories, animations, and games. Besides Math Standards, Alice supports these Common Core writing skills:
8.3a Engage and orient the Alice world viewer by establishing a context and point of view and introducing a narrator and/or characters; organize an event sequence that unfolds naturally and logically.
8.3b Use narrative techniques in the Alice World, such as dialogue, pacing, description, and reflection, to develop experiences, events, and/or characters.
8.3c In Alice world dialogue and action, use a variety of transitions to convey sequence, signal shifts from one time frame or setting to another, and show relationships among experiences and events.
8.3d Use precision and appropriate tools throughout to convey events.
8.3e Provide a conclusion to the Alice world story that follows events.
Divide the class into groups. Have each group pick one of the following resources, preview it, and be prepared to share their thoughts and take questions from classmates:
basic Alice programming instructions
overview of Alice by Middle School students
Duke University’s Alice “Getting Started” videos are here
Next, groups open Alice and go through the tutorial by clicking “Start Tutorial” in the Welcome to Alice dialogue box. When done, create an animated avatar as follows:
Choose “room” template, then “Setup Scene.”
Choose “class Biped,” “class Person,” then child, female, light and avatar that is shown.
Push OK until avatar appears in the room.
Using circle at avatar’s feet, turn him/her until s/he faces right, and then press “edit code.”
In tab that says “this child/person,” click on heavy black arrow facing down. Then click arrow facing right to reach individual body parts. Choose a body part and give it direction. Run program to see results. Debug program if it doesn’t work.
If students get stuck, they can go through Alice online documentation, Help files, or ask for assistance from classmates. Remind them not to give up. Keep making changes. It will work.
If you have time: In groups, students watch movie trailer of Despicable Me (or similar). Analyze how avatars move their limbs, mouths, and how they walk. Compare this to humans. For example, which leg moves first? How do joints move? How do arms and legs move in relation to each other? Does body bob up-down or side-to-side as avatar moves? List the movements and then construct a walking avatar in Alice world.
Click to view slideshow.
***
Here’s a collection that goes across grade levels:
It’s designed to show that anyone can learn the basics to be a maker, a creator, and an innovator. Here are unusual projects (each, about one hour in length) you can use in your classroom to participate in this wildly popular event:
Alt Codes
IFTTT
QR codes
Wolfram Alpha widgets
Alt Codes
Grade level: 4-12
Alt codes are those symbols that are created by holding down the Alt key and pushing a series of numbers, like these for copyright and the Spanish question mark:
Alt + 0169 = ©
Alt+0191 = ¿
There are hundreds of them for PCs, Macs, and Chromebooks. Click the link for your digital device.
Tip: Press the ALT key. While it is pressed, put in the numbers from your NUMBER PAD. It doesn’t work using the numbers at the top of the keyboard. Make sure the NUM LOCK is on.
Wolfram/Alpha Widget
Grade level: 7-12
Widgets are free personalized mini-apps that can do almost anything the user can program, from calculating the calories in a recipe to solving complex problems. You can either browse Wolfram/Alpha’s gallery for a widget that fits your need and embed the code into your personal website, or you can build your own widget from scratch using their Builder tool. The level of difficulty will determine how long it takes so start simple during Hour of Code.
IFTTT
Grade level: 9-12
IFTTT allows users to create ‘recipes’ to automate functions, such as being notified when the weather changes or the arrival of an event. It uses a simple statement—IF THIS THEN THAT. Users create a recipe by choosing a trigger channel from IFTTT’s library, then a trigger, and finally an action channel. For example:
IF they post a photo on Instagram THEN share it on Twitter
IF it’s going to rain tomorrow THEN send me a text message
IF my children are near home THEN turn on the lights
Click for more on IFTTT.
QR Codes
This is so simple, you’re going to love it:
Open the QR Code reader on your phone or mobile device.
Center the QR Code within the provided frame.
Once the code is read (which happens within seconds), it will automatically activate the data.
QR Codes can include data for almost anything. The tool you select will offer a list. You’ll check what you want to do and get started. Here are some of the options:
Website URL: Scanning this QR code will give you a prompt to open the website.
Telephone Number: Scanning this QR code will give you a prompt to call the number.
Plain Text: Scanning this QR code will give you a prompt to search the web using your default search provider in Safari.
SMS Message: Scanning this QR code will give you a prompt to compose the specified message to the specified number.
Email Address: Scanning this QR code will give you a prompt to compose an email to the specified email address.
Calendar Event: Scanning this QR code will give you a prompt to add the specified event to your calendar.
Location of event: Provide a large QR Code at the entrance to the school or event location with a map and directions to the room where it is located. Attendees merely scan the QR Code and follow the line that leads to the event.
There are dozens of ways to incorporate QR Codes into your classroom. Here are a few, starting with introducing it during Hour of Code:
Introduce QR Codes during Hour of Code to show students the basics of building a code and then using it.
Record voice instructions for a project; save it as an MP3 and turn it into a QR code.
Have new students follow a QR Code scavenger hunt to find all the important places in the school (with their parents if you do it for Back to School Night). That makes all of that information available on their phones for later use.
Add QR codes to homework sheets that link to help. For example, if the student forgets how to solve a math problem, the QR code will take them to help.
Embed concert programs, directions for station activities, and parent contact information as QR Codes instead of printing
For high school students: Create their resume with a QR Code. They can easily share it with everyone, include it on a business card, or send it in an email. The recipient will automatically have it on their mobile device–no worries about losing it.
For a school art display: Include all data on the student artist in a QR Code. It is small and doesn’t distract from the glorious artwork being presented.
Record students reading a short story and embed it into a QR Code. Post these on a gallery in your classroom where students can stop and visit anytime for a quick story read by their classmates.
Have students draw a picture of themselves with a QR code over their belly. On the QR Code, they’ll type about themselves with at least one fascinating fact most classmates wouldn’t know. Let students scan these with their iPads or another digital device to find out more about their new classmates.
***
What are you doing for Hour of Code? Share your projects in the comments.
More on Hour of Code:
Lesson plan bundle for Hour of Code
Hour of Code: Scratch Jr.
Hour of Code–Why Not
Jacqui Murray has been teaching K-18 technology for 30 years. She is the editor/author of over a hundred tech ed resources including a K-12 technology curriculum, K-8 keyboard curriculum, K-8 Digital Citizenship curriculum. She is an adjunct professor in tech ed, Master Teacher, webmaster for four blogs, an Amazon Vine Voice, CSTA presentation reviewer, freelance journalist on tech ed topics, contributor to NEA Today and author of the tech thrillers, To Hunt a Sub and Twenty-four Days. You can find her resources at Structured Learning.
Websites for Hour of Code by Grade published first on https://medium.com/@DLBusinessNow
0 notes
Text
Websites for Hour of Code by Grade
This December will again host the Hour of Code, a one-hour introduction to programming designed to demystify the subject and show that anyone can be a maker, a creator, and an innovator. Last year, almost 300,000 students (age 4-104) participated from over 180 countries and wrote almost 20 billion lines of code. The 200,000+ teachers involved came away believing that, of all their education tools, coding was the best at teaching children to think. It’s easy to see why when you look at fundamental programming concepts:
abstraction and symbolism – variables are common in math, but also in education. Tools, toolbars, icons, images all represent something bigger
creativity – think outside the box
if-then thinking – actions have consequences
debugging – write-edit-rewrite; try, fail, try again. When you make a mistake, don’t give up or call an expert. Look at what happened and fix where it went wrong.
logic – go through a problem from A to Z
sequencing – know what happens when
If you’re planning to participate in Hour of Code, here are a series of activities — broken down by grade — that will kickstart your effort. They can be done individually or in small groups.
Introduce each of these activities by watching “I Like Programming“, a video that discusses why the great programmers of our time fell in love with this activity.
**Grade-levels below are guidelines. Feel free to use whichever project fits your students.
Kindergarten — Human Robot
Start young programmers by teaching sequencing. Show images of stages in, say, their morning preparations. Ask them to organize the list in the order completed as they get ready for school. Call it “sequencing” and expect them to use this domain-specific word.
Next, pick an activity from the sequence — say, walking into the classroom and sitting down. Use yourself as a model of how to perform that activity and ask students for specific directions on how you would complete this task. For example:
Move right foot, then left, 4 times.
Turn right; walk 4 steps.
Turn around (left and left again).
Drop backpack to floor (or place under chair).
Sit
Only do what they tell you. For example, if they say “walk to the chair”, look confused. They haven’t provided enough direction. They must “debug” the “script” and try again.
First Grade — Follow one of the free online Hour of Code activities
Using activities offered on websites like Code.org, Kodable, or Tynker is the easiest way to get involved as the site does the planning for you. Before starting, review the digital citizenship associated with visiting an online site (such as privacy, staying on the assigned website, and not talking to strangers).
Instead of following a pre-planned activity, try one of these sites that introduce age-appropriate programming:
Scratch Jr.
Tinkercad
If you use iPads, here are some great options:
Cargo-Bot
Daisy the Dinosaur
For more suggestions, here’s a list of coding websites. Scroll to the section for first grade.
Second Grade — Animation
Use a free program like Pivot Stick Figure Animator or Stickman to program a stick figure. Both are simple to use, but offer different options. Preview them first to pick the one best suited to your student group.
Pivot Stick Figure is a download. Students program a stick figure to do pretty much anything they want by adjusting the “joints” in his body
Draw a Stickman is a web-based tool or app that turns a simple drawing into a story by asking questions of the creator. Students draw an image; the site animates it and then asks questions as the figure moves, requiring students to add detail to the Stickman’s adventure. They can pick from several story themes in creating their finished story.
If you use iPads, try Stick Nodes or Stickman.
Third Grade — Pixel Art
Pixel Art is the blocky drawing that is most famous for appearing in Minecraft. For this project, students will use a spreadsheet program.
Open the spreadsheet program you use in your school (Google Sheets, Excel, or another). Show students how to turn the cells into squares rather than rectangles by doing the following (or watch this video):
Select all cells by grabbing the box that sits at the intersection of the rows and columns
Drag a column header’s edge to resize the column width to match the row height.
Students now write directions for which color is poured into what squares to create their drawing. For example:
Blue: A1, B1, C1, D1, G1, H1, I1, J1, A2, B2, I2, J2, A3, J3, A5, A6, A7, A8, A9, A10,
When done, students have a neighbor test the directions to see if they can create the intended drawing.
Fourth Grade — Shortkeys
By fourth grade, students appreciate technology for how it can speed up their classwork and will seek out ways to use it for that purpose. Creating a shortkey is a quick and easy way to complete repetitive activities and will become a favorite with students. If necessary, adapt the following Windows/iPad directions to the device used in your school:
Go to Start
Right click on the desired program (either a program or a tool is fine)
Select “properties”
Click in “shortcut”
Push key combination you want to use, say, Ctrl+Alt+S
Save
On iPads, these are called “hotkeys”:
Go to Settings > General Settings > Keyboard Settings.
Scroll down and click “add new shortcut.”
Popular shortkeys are to open programs, activate tools, and take screenshots using the digital device’s native tool.
Fifth Grade — Macros
Creating macros gives students an easy way to add a standards-based heading or any other repetitive task required for their schoolwork without having to retype it each time. Adapt these MS Word directions to your digital device:
Click View – Macros– Record Macros.
Specify a name for the macro.
Choose whether it should be a keyboard shortcut or a button.
Once you click OK, notice your mouse looks like a cassette tape, indicating that anything you click will be part of the macro. Click all elements you would like to be part of your macro.
Stop recording by clicking View – Stop Recording.
Click for a video on how to create macros.
Sixth-Seventh Grade — Code a Widget
Widgets are free, personalized mini-apps that do almost anything the user can program, from calculating the calories in a recipe to solving complex problems. Students can browse Wolfram/Alpha’s gallery for a widget that fits their need and embed the code into their personal website, or build their own widget from scratch using Wolfram Alpha’s Builder tool. The level of difficulty will determine how long it takes.
Click to view slideshow.
Eighth Grade — Alice
Alice is a free downloadable programming tool for 8th grade and above that shows students how to create interactive stories, animations, and games. Besides Math Standards, Alice supports these Common Core writing skills:
8.3a Engage and orient the Alice world viewer by establishing a context and point of view and introducing a narrator and/or characters; organize an event sequence that unfolds naturally and logically.
8.3b Use narrative techniques in the Alice World, such as dialogue, pacing, description, and reflection, to develop experiences, events, and/or characters.
8.3c In Alice world dialogue and action, use a variety of transitions to convey sequence, signal shifts from one time frame or setting to another, and show relationships among experiences and events.
8.3d Use precision and appropriate tools throughout to convey events.
8.3e Provide a conclusion to the Alice world story that follows events.
Divide the class into groups. Have each group pick one of the following resources, preview it, and be prepared to share their thoughts and take questions from classmates:
basic Alice programming instructions
overview of Alice by Middle School students
Duke University’s Alice “Getting Started” videos are here
Next, groups open Alice and go through the tutorial by clicking “Start Tutorial” in the Welcome to Alice dialogue box. When done, create an animated avatar as follows:
Choose “room” template, then “Setup Scene.”
Choose “class Biped,” “class Person,” then child, female, light and avatar that is shown.
Push OK until avatar appears in the room.
Using circle at avatar’s feet, turn him/her until s/he faces right, and then press “edit code.”
In tab that says “this child/person,” click on heavy black arrow facing down. Then click arrow facing right to reach individual body parts. Choose a body part and give it direction. Run program to see results. Debug program if it doesn’t work.
If students get stuck, they can go through Alice online documentation, Help files, or ask for assistance from classmates. Remind them not to give up. Keep making changes. It will work.
If you have time: In groups, students watch movie trailer of Despicable Me (or similar). Analyze how avatars move their limbs, mouths, and how they walk. Compare this to humans. For example, which leg moves first? How do joints move? How do arms and legs move in relation to each other? Does body bob up-down or side-to-side as avatar moves? List the movements and then construct a walking avatar in Alice world.
Click to view slideshow.
***
Here’s a collection that goes across grade levels:
It’s designed to show that anyone can learn the basics to be a maker, a creator, and an innovator. Here are unusual projects (each, about one hour in length) you can use in your classroom to participate in this wildly popular event:
Alt Codes
IFTTT
QR codes
Wolfram Alpha widgets
Alt Codes
Grade level: 4-12
Alt codes are those symbols that are created by holding down the Alt key and pushing a series of numbers, like these for copyright and the Spanish question mark:
Alt + 0169 = ©
Alt+0191 = ¿
There are hundreds of them for PCs, Macs, and Chromebooks. Click the link for your digital device.
Tip: Press the ALT key. While it is pressed, put in the numbers from your NUMBER PAD. It doesn’t work using the numbers at the top of the keyboard. Make sure the NUM LOCK is on.
Wolfram/Alpha Widget
Grade level: 7-12
Widgets are free personalized mini-apps that can do almost anything the user can program, from calculating the calories in a recipe to solving complex problems. You can either browse Wolfram/Alpha’s gallery for a widget that fits your need and embed the code into your personal website, or you can build your own widget from scratch using their Builder tool. The level of difficulty will determine how long it takes so start simple during Hour of Code.
IFTTT
Grade level: 9-12
IFTTT allows users to create ‘recipes’ to automate functions, such as being notified when the weather changes or the arrival of an event. It uses a simple statement—IF THIS THEN THAT. Users create a recipe by choosing a trigger channel from IFTTT’s library, then a trigger, and finally an action channel. For example:
IF they post a photo on Instagram THEN share it on Twitter
IF it’s going to rain tomorrow THEN send me a text message
IF my children are near home THEN turn on the lights
Click for more on IFTTT.
QR Codes
This is so simple, you’re going to love it:
Open the QR Code reader on your phone or mobile device.
Center the QR Code within the provided frame.
Once the code is read (which happens within seconds), it will automatically activate the data.
QR Codes can include data for almost anything. The tool you select will offer a list. You’ll check what you want to do and get started. Here are some of the options:
Website URL: Scanning this QR code will give you a prompt to open the website.
Telephone Number: Scanning this QR code will give you a prompt to call the number.
Plain Text: Scanning this QR code will give you a prompt to search the web using your default search provider in Safari.
SMS Message: Scanning this QR code will give you a prompt to compose the specified message to the specified number.
Email Address: Scanning this QR code will give you a prompt to compose an email to the specified email address.
Calendar Event: Scanning this QR code will give you a prompt to add the specified event to your calendar.
Location of event: Provide a large QR Code at the entrance to the school or event location with a map and directions to the room where it is located. Attendees merely scan the QR Code and follow the line that leads to the event.
There are dozens of ways to incorporate QR Codes into your classroom. Here are a few, starting with introducing it during Hour of Code:
Introduce QR Codes during Hour of Code to show students the basics of building a code and then using it.
Record voice instructions for a project; save it as an MP3 and turn it into a QR code.
Have new students follow a QR Code scavenger hunt to find all the important places in the school (with their parents if you do it for Back to School Night). That makes all of that information available on their phones for later use.
Add QR codes to homework sheets that link to help. For example, if the student forgets how to solve a math problem, the QR code will take them to help.
Embed concert programs, directions for station activities, and parent contact information as QR Codes instead of printing
For high school students: Create their resume with a QR Code. They can easily share it with everyone, include it on a business card, or send it in an email. The recipient will automatically have it on their mobile device–no worries about losing it.
For a school art display: Include all data on the student artist in a QR Code. It is small and doesn’t distract from the glorious artwork being presented.
Record students reading a short story and embed it into a QR Code. Post these on a gallery in your classroom where students can stop and visit anytime for a quick story read by their classmates.
Have students draw a picture of themselves with a QR code over their belly. On the QR Code, they’ll type about themselves with at least one fascinating fact most classmates wouldn’t know. Let students scan these with their iPads or another digital device to find out more about their new classmates.
***
What are you doing for Hour of Code? Share your projects in the comments.
More on Hour of Code:
Lesson plan bundle for Hour of Code
Hour of Code: Scratch Jr.
Hour of Code–Why Not
Jacqui Murray has been teaching K-18 technology for 30 years. She is the editor/author of over a hundred tech ed resources including a K-12 technology curriculum, K-8 keyboard curriculum, K-8 Digital Citizenship curriculum. She is an adjunct professor in tech ed, Master Teacher, webmaster for four blogs, an Amazon Vine Voice, CSTA presentation reviewer, freelance journalist on tech ed topics, contributor to NEA Today and author of the tech thrillers, To Hunt a Sub and Twenty-four Days. You can find her resources at Structured Learning.
Websites for Hour of Code by Grade published first on https://medium.com/@DigitalDLCourse
0 notes
Text
Hour of Code Lesson Plans by Grade
This December will again host the Hour of Code, a one-hour introduction to programming designed to demystify the subject and show that anyone can be a maker, a creator, and an innovator. Last year, almost 300,000 students (age 4-104) participated from over 180 countries and wrote almost 20 billion lines of code. The 200,000+ teachers involved came away believing that, of all their education tools, coding was the best at teaching children to think. It’s easy to see why when you look at fundamental programming concepts:
abstraction and symbolism – variables are common in math, but also in education. Tools, toolbars, icons, images all represent something bigger
creativity – think outside the box
if-then thinking – actions have consequences
debugging – write-edit-rewrite; try, fail, try again. When you make a mistake, don’t give up or call an expert. Fix it.
logic – go through a problem from A to Z
sequencing – know what happens when
If you’re planning to participate in Hour of Code, here are activities by grade that will kickstart your effort. They can be done individually or in small groups.
Essential Question
How do I program a series of activities — and why?
Big Idea
I can break activities down into their most basic steps
Teacher Preparation
About 75 minutes — fifteen minutes prep and sixty for the coding activity that is part of Hour of Code.
Introduce each of these activities by watching “I Like Programming“, a video that discusses why the great programmers of our time fell in love with this activity.
**Grade-levels below are guidelines. Feel free to use whichever project fits your students.
Kindergarten — Human Robot
Start young programmers by teaching sequencing. Show images of stages in, say, their morning preparations. Ask them to organize the list in the order completed as they get ready for school. Call it “sequencing” and expect them to use this domain-specific word.
Next, pick an activity from the sequence — say, walking into the classroom and sitting down. Use yourself as a model of how to perform that activity and ask students for specific directions on how you would complete this task. For example:
Move right foot, then left, 4 times.
Turn right; walk 4 steps.
Turn around (left and left again).
Drop backpack to floor (or place under chair).
Sit
Only do what they tell you. For example, if they say “walk to the chair”, look confused. They haven’t provided enough direction. They must “debug” the “script” and try again.
For more suggestions, here’s a list of coding websites. Scroll to the section for kindergarten.
First Grade — Follow one of the free online Hour of Code activities
Using activities offered on websites like Code.org, Kodable, or Tynker is the easiest way to get involved as the site does the planning for you. Before starting, review the digital citizenship associated with visiting an online site (such as privacy, staying on the assigned website, and not talking to strangers).
If you don’t want to follow a pre-planned activity, try one of these sites that introduce age-appropriate programming:
Scratch Jr.
Tinkercad
If you use iPads, here are great options:
Cargo-Bot
Daisy the Dinosaur
For more suggestions, here’s a list of coding websites. Scroll to the section for first grade.
Second Grade — Animation
Use a free program like Pivot Stick Figure Animator or Stickman to program a stick figure:
Pivot Stick Figure is a download. Students program a stick figure to do pretty much anything they want by adjusting the “joints” in his body
Draw a Stickman is a web-based tool or app that turns a simple drawing into a story by asking questions of the creator. Students draw an image; the site animates it and then asks questions as the figure moves, requiring students to add detail to the Stickman’s adventure. They can pick from several story themes in creating their finished story.
If you use iPads, try Stick Nodes or Stickman.
For more suggestions, here’s a list of coding websites. Scroll to the section for second grade.
Third Grade — Pixel Art
Pixel Art is the blocky drawing that is most famous for appearing in Minecraft and Tetris. For this project, students will use a spreadsheet program.
Open the spreadsheet program you use in your school (Google Sheets, Excel, or another). Show students how to turn the cells into squares rather than rectangles by doing the following (or watch this video):
Select all cells by grabbing the box that sits at the intersection of the rows and columns
Drag a column header’s edge to resize the column width to match the row height.
Students now write directions for which color is poured into what squares to create their drawing. For example:
Blue: A1, B1, C1, D1, G1, H1, I1, J1, A2, B2, I2, J2, A3, J3, A5, A6, A7, A8, A9, A10,
When done, students have a neighbor test the directions to see if they can create the intended drawing.
For more suggestions, here’s a list of coding websites. Scroll to the section for third grade.
Fourth Grade — Shortkeys
By fourth grade, students appreciate technology for how it can speed up their classwork and will seek ways to use it for that purpose. Creating a shortkey is a quick and easy way to complete repetitive activities and will become a favorite with students. If necessary, adapt the following Windows/iPad directions to the device used in your school:
Go to Start
Right click on the desired program (either a program or a tool is fine)
Select “properties”
Click in “shortcut”
Push key combination you want to use, say, Ctrl+Alt+S
Save
On iPads, these are called “hotkeys”:
Go to Settings > General Settings > Keyboard Settings.
Scroll down and click “add new shortcut.”
Popular shortkeys are to open programs, activate tools, and take screenshots using the digital device’s native tool.
For more suggestions, here’s a list of coding websites. Scroll to the section for fourth grade.
Fifth Grade — Macros
Creating macros gives students an easy way to add a standards-based heading or any other repetitive task required for schoolwork without having to retype it each time. Adapt these MS Word directions to your digital device:
Click View – Macros– Record Macros.
Specify a name for the macro.
Choose whether it should be a keyboard shortcut or a button.
Once you click OK, notice your mouse looks like a cassette tape, indicating that anything you click will be part of the macro. Click all elements you would like to be part of your macro.
Stop recording by clicking View – Stop Recording.
Click for a video on how to create macros.
For more suggestions, here’s a list of coding websites. Scroll to the section for fifth grade.
Sixth Grade — Build an App
If necessary, explain to students what an “app” is and why they want to build one. For this project, follow the videos and directions included in MIT’s App Inventor and create one (or all) beginning level apps such as:
TalkToMe Text-to-speech app
Extended TalkToMe—shake the phone!
BallBounce Game app
Digital Doodle drawing app
Here are three alternative popular app-creation sites:
Game Salad
Apps Geyser
TinyTap App
Don’t expect students to complete this project during the Hour of Code. Expect only that they get started.
For more suggestions, here’s a list of coding websites. Scroll to the section for Middle School.
Seventh Grade — Code a Widget
Widgets are free, personalized mini-apps that do almost anything the user can program, from calculating the calories in a recipe to solving complex problems. Students can browse Wolfram/Alpha’s gallery for a widget that fits their need and embed the code into their personal website, or build their own widget from scratch using Wolfram Alpha’s Builder tool. The level of difficulty will determine how long it takes.
Click to view slideshow.
For more suggestions, here’s a list of coding websites. Scroll to the section for Middle School.
Eighth Grade — Alice
Alice is a free downloadable programming tool for 8th grade and above that shows students how to create interactive stories, animations, and games. Besides Math Standards, Alice supports these Common Core writing skills:
8.3a Engage and orient the Alice world viewer by establishing a context and point of view and introducing a narrator and/or characters; organize an event sequence that unfolds naturally and logically.
8.3b Use narrative techniques in the Alice World, such as dialogue, pacing, description, and reflection, to develop experiences, events, and/or characters.
8.3c In Alice world dialogue and action, use a variety of transitions to convey sequence, signal shifts from one time frame or setting to another, and show relationships among experiences and events.
8.3d Use precision and appropriate tools throughout to convey events.
8.3e Provide a conclusion to the Alice world story that follows events.
Divide the class into groups. Have each group pick one of the following resources, preview it, and be prepared to share their thoughts and take questions from classmates:
basic Alice programming instructions
overview of Alice by Middle School students
Duke University’s Alice “Getting Started” videos are here
Next, groups open Alice and go through the tutorial by clicking “Start Tutorial” in the Welcome to Alice dialogue box. When done, create an animated avatar as follows:
Choose “room” template, then “Setup Scene.”
Choose “class Biped,” “class Person,” then child, female, light and avatar that is shown.
Push OK until avatar appears in the room.
Using circle at avatar’s feet, turn him/her until s/he faces right, and then press “edit code.”
In tab that says “this child/person,” click on heavy black arrow facing down. Then click arrow facing right to reach individual body parts. Choose a body part and give it direction. Run program to see results. Debug program if it doesn’t work.
If students get stuck, they can go through Alice online documentation, Help files, or ask for assistance from classmates. Remind them not to give up. Keep making changes. It will work.
If you have time: In groups, students watch movie trailer of Despicable Me (or similar). Analyze how avatars move their limbs, mouths, and how they walk. Compare this to humans. For example, which leg moves first? How do joints move? How do arms and legs move in relation to each other? Does body bob up-down or side-to-side as avatar moves? List the movements and then construct a walking avatar in Alice world.
Click to view slideshow.
High School
Here’s a list of great activities geared for the high school student.
***
What are you doing for Hour of Code? Share your projects in the comments.
More on Hour of Code:
Lesson plan bundle for Hour of Code
10 Unusual Projects to Energize Hour of CodeHour of Code: Scratch Jr.
Hour of Code 101
Augmented Reality with Metaverse
Jacqui Murray has been teaching K-18 technology for 30 years. She is the editor/author of over a hundred tech ed resources including a K-8 technology curriculum, K-8 keyboard curriculum, K-8 Digital Citizenship curriculum. She is an adjunct professor in tech ed, Master Teacher, webmaster for four blogs, an Amazon Vine Voice reviewer, CAEP reviewer, CSTA presentation reviewer, freelance journalist on tech ed topics, contributor to NEA Today and TeachHUB, and author of the tech thrillers, To Hunt a Sub and Twenty-four Days. You can find her resources at Structured Learning.
Hour of Code Lesson Plans by Grade published first on https://seminarsacademy.tumblr.com/
0 notes
Text
Windows 10 Insider Preview Build 18234 released for Skeap Ahead

Windows 10 Insider Preview Build 18234 released for Skeap Ahead.
Microsoft To-Do gets ink support!
Capture and complete your tasks naturally with Ink! We’ve added support for handwritten input to allow you to capture your tasks seamlessly in Microsoft To-Do (Version 1.39.1808.31001 and higher).
Sticky Notes 3.0
Last week, we rolled out a major update to Sticky Notes for Windows Insiders who have opted into Skip Ahead.
Snip & Sketch gets better!
We recently flighted version 10.1807.2286.0 of Snip & Sketch to Skip Ahead, which included the highly requested delay snip feature. There was a bug in Build 18219 blocking the New button from working, so please try it out today once you upgrade! Just click the chevron next to the New button in the app and you’ll now find options to “Snip now”, “Snip in 3 seconds”, and “Snip in 10 seconds”. If you have the app open or pinned to your taskbar, you can also just right click the icon in the taskbar to get these options, since we’ve added them to the jump list.
General changes, improvements, and fixes
The dark theme File Explorer payload mentioned here is included in this build!
We fixed the issue where logging out of your user profile or shutting down your PC would cause the PC to bugcheck (GSOD).
Thanks everyone for your feedback about the XAML shadows we added recently. We’re taking them offline for the moment while we work on addressing some of the things you shared with us. You will also notice that the acrylic has been removed from some popup controls. They will be back in a future flight.
We fixed an issue resulting in the taskbar flyouts (network, volume, etc) no longer having an acrylic background.
We fixed an issue resulting in hangs when using WSL in the previous flight.
We’ve updated the Emoji Panel to now support search and tooltips for the Emoji 11 emoji that were added recently. These keywords will also populate text predictions when typing with the touch keyboard.
We fixed an issue where explorer.exe would crash if you were in Tablet Mode and opened Task View while in portrait orientation.
We fixed an issue where the app icons in Task View might appear slightly blurry on high DPI devices.
We fixed an issue where on narrow devices activities in Timeline might slightly overlap the scrollbar.
We fixed an issue where you might unexpectedly get an error saying no supported app is installed, after clicking certain activities in Timeline, even though a supported app was installed.
We fixed issue where Taskbar background could become transparent when changing graphics device.
We fixed an issue resulting in pinning to app icons to the taskbar taking longer than usual recently.
We fixed an issue where after setting a pin and removing it, the option to setup a pin from the lock screen could get stuck as the default login method, rather than the login screen remembering your preferred login method.
We’ve made some adjustments to improve the amount of CPU that cdpusersvc uses.
We fixed an issue resulting in New button in Snip & Sketch not working.
We fixed an issue resulting in Notepad’s “Search with Bing” feature searching for “10 10” instead of “10 + 10” if that was the search query. We also fixed an issue where accented characters would end up as question marks in the resulting search.
We fixed an issue where Ctrl + 0 to reset the zoom level in Notepad wouldn’t work if the 0 was typed from a keypad.
We fixed a recent issue resulting in an increase in the amount of time taken to open large files in Notepad when word wrap was enabled.
Thanks for everyone that’s shared feedback about naming the tabs you’ve set aside in Microsoft Edge. We’re evaluating the right approach for this feature and in the meantime it has been removed.
We fixed an issue where downloading a big file in Microsoft Edge would stop at the 4gb mark.
We fixed an issue where clicking the “more” button in Microsoft Edge’s inline definition pop up when reading in recent flights would open a blank pane.
We fixed an issue where items in Microsoft Edge’s Settings and More menu would become truncated when the option to increase text size was enabled in Settings.
We fixed an issue where using Find on page in Microsoft Edge didn’t highlight/select the current instance of the result.
We fixed an issue where after resetting Microsoft Edge saved favorites would get stuck showing a star next to the favorite name rather than populating the website’s favicon (if available).
We fixed an issue where text copied from certain websites in Microsoft Edge couldn’t be pasted into other UWP apps.
We fixed an issue that could result in the contents of the Microsoft Edge window becoming offset from its window frame.
We fixed an issue resulting in the spellchecking menu appearing in the wrong place when you right-clicked on a misspelled word in Microsoft Edge.
We fixed an issue for Insiders using Windows 10 in S Mode recently resulting opening Word from a Word Online document not working.
We fixed an issue impacting Teams resulting all unsent typed text disappearing following the completion of an emoji composition (for example being turned into a smiley).
We fixed an issue where nearby sharing would become blocked on the sender device after canceling share to three different devices.
We fixed an issue resulting in the nearby sharing section of the Share UI not being visible for some users despite being enabled.
We fixed an issue in recent flights where components of a notification with a progress bar (like the one when using nearby sharing) might flash every time the progress bar updated.
We fixed an issue from recent builds resulting in share target windows (aka the app you select when prompted from the Share UI) not closing when you pressed Alt+F4 or the X.
We fixed an issue resulting in a decrease in Start reliability over the last few flights.
We fixed an impactful race condition in recent flights resulting in Cortana crashing when launching tips and doing web searches.
We fixed an issue where right-clicking the desktop and expanding the New subsection of the context menu took longer than usual recently.
We fixed the issue causing Office in the Store to fail to launch with an error about a .dll not being designed to run on Windows on PCs running in S Mode.
We fixed an issue where, when installing a font for a single user (rather than installing as admin “for all users”), the install would fail with an unexpected error saying that the file was not a valid font file.
We fixed an issue where non-admin local users would get an error saying that updating the security questions for their account required admin permissions.
We fixed a recent issue where color and wallpaper settings weren’t correctly applied after a system upgrade when migration was done in offline mode.
We fixed an issue resulting in the amount of time it took to launch Settings having noticeably increased recently.
We fixed an issue where if Settings was open to “Bluetooth & Other Devices” and then minimized to the taskbar, when you tried to resume the app Settings would crash.
We fixed an issue from recent builds where the first time you manually selected the date in Date & Time Settings, it would revert to Jan 1st.
We’re updating the image size limit for clipboard history (WIN + V) from 1MB to 4MB to accommodate the potential size of full screen screenshots taken on a high-DPI devices.
We fixed an issue where when using the Chinese (Simplified) IME it would leak memory on focus switch, adding up over time.
We fixed an issue resulting in text prediction and shapewriting not working when typing in Russian using the touch keyboard.
We fixed a recent issue that could result in some flakey network connectivity (including networks stuck “identifying”, and stale network flyout connectivity state). Note, there are a variety of factors that may impact your networking experience, so if you continue to experience flakiness after upgrading to this build, please log feedback.
Thanks everyone who tried out and shared feedback about the performance visualizations we added to the game bar with Build 17692. We’re taking them offline for now to re-evaluate the best possible approach going forward and work on giving you a great gaming experience on your PC.
We fixed an issue in Narrator so when toggling a checkbox with a braille display and Narrator, the displayed state is now updated and the control information is maintained on the display.
Known issues
When you use the Ease of Access Make Text bigger setting, you might see text clipping issues, or find that text is not increasing in size everywhere.
When using Narrator Scan mode Shift + Selection commands in Edge, the text does not get selected properly.
Narrator sometimes does not read in the Settings app when you navigate using Tab and arrow keys. Try switching to Narrator Scan mode temporarily. And when you turn Scan mode off again, Narrator will now read when you navigate using Tab and arrows key. Alternatively, you can restart Narrator to work around this issue.
This build fixes a general issue resulting in links that launched one app from another app not working in the last flights for some Insiders, however there’s one specific variant of this that will still not work in today’s build: Clicking on web links in PWAs such as Twitter doesn’t open the browser. We’re working on a fix.
You may notice the background of notifications and the Action Center lose color and become transparent (with an acrylic effect). We’re aware that for notifications this can make them difficult to read and appreciate your patience as we work on a fix.
Known issues for Developers
If you install any of the recent builds from the Fast ring and switch to the Slow ring – optional content such as enabling developer mode will fail. You will have to remain in the Fast ring to add/install/enable optional content. This is because optional content will only install on builds approved for specific rings.
Read the full article
0 notes
Text
Websites for Hour of Code by Grade
This December will again host the Hour of Code, a one-hour introduction to programming designed to demystify the subject and show that anyone can be a maker, a creator, and an innovator. Last year, almost 300,000 students (age 4-104) participated from over 180 countries and wrote almost 20 billion lines of code. The 200,000+ teachers involved came away believing that, of all their education tools, coding was the best at teaching children to think. It’s easy to see why when you look at fundamental programming concepts:
abstraction and symbolism – variables are common in math, but also in education. Tools, toolbars, icons, images all represent something bigger
creativity – think outside the box
if-then thinking – actions have consequences
debugging – write-edit-rewrite; try, fail, try again. When you make a mistake, don’t give up or call an expert. Look at what happened and fix where it went wrong.
logic – go through a problem from A to Z
sequencing – know what happens when
If you’re planning to participate in Hour of Code, here are a series of activities — broken down by grade — that will kickstart your effort. They can be done individually or in small groups.
Essential Question
How do I program a series of activities — and why?
Big Idea
I can break activities down into their most basic steps
Teacher Preparation
About 75 minutes — fifteen minutes prep and sixty for the coding activity that is part of Hour of Code.
Introduce each of these activities by watching “I Like Programming“, a video that discusses why the great programmers of our time fell in love with this activity.
**Grade-levels below are guidelines. Feel free to use whichever project fits your students.
Kindergarten — Human Robot
Start young programmers by teaching sequencing. Show images of stages in, say, their morning preparations. Ask them to organize the list in the order completed as they get ready for school. Call it “sequencing” and expect them to use this domain-specific word.
Next, pick an activity from the sequence — say, walking into the classroom and sitting down. Use yourself as a model of how to perform that activity and ask students for specific directions on how you would complete this task. For example:
Move right foot, then left, 4 times.
Turn right; walk 4 steps.
Turn around (left and left again).
Drop backpack to floor (or place under chair).
Sit
Only do what they tell you. For example, if they say “walk to the chair”, look confused. They haven’t provided enough direction. They must “debug” the “script” and try again.
First Grade — Follow one of the free online Hour of Code activities
Using activities offered on websites like Code.org, Kodable, or Tynker is the easiest way to get involved as the site does the planning for you. Before starting, review the digital citizenship associated with visiting an online site (such as privacy, staying on the assigned website, and not talking to strangers).
Instead of following a pre-planned activity, try one of these sites that introduce age-appropriate programming:
Minecraft (especially if you have the education edition)
Scratch Jr.
Tinkercad
If you use iPads, here are some great options:
Cargo-Bot
Daisy the Dinosaur
For more suggestions, here’s a list of coding websites. Scroll to the section for first grade.
Second Grade — Animation
Use a free program like Pivot Stick Figure Animator or Stickman to program a stick figure. Both are simple to use, but offer different options. Preview them first to pick the one best suited to your student group.
Pivot Stick Figure is a download. Students program a stick figure to do pretty much anything they want by adjusting the “joints” in his body
Draw a Stickman is a web-based tool or app that turns a simple drawing into a story by asking questions of the creator. Students draw an image; the site animates it and then asks questions as the figure moves, requiring students to add detail to the Stickman’s adventure. They can pick from several story themes in creating their finished story.
If you use iPads, try Stick Nodes, Stickman, or Scribble Movie.
Third Grade — Pixel Art
Pixel Art is the blocky drawing that is most famous for appearing in Minecraft. For this project, students will use a spreadsheet program.
Open the spreadsheet program you use in your school (Google Sheets, Excel, or another). Show students how to turn the cells into squares rather than rectangles by doing the following (or watch this video):
Select all cells by grabbing the box that sits at the intersection of the rows and columns
Drag a column header’s edge to resize the column width to match the row height.
Students now write directions for which color is poured into what squares to create their drawing. For example:
Blue: A1, B1, C1, D1, G1, H1, I1, J1, A2, B2, I2, J2, A3, J3, A5, A6, A7, A8, A9, A10,
When done, students have a neighbor test the directions to see if they can create the intended drawing.
Fourth Grade — Shortkeys
By fourth grade, students appreciate technology for how it can speed up their classwork and will seek out ways to use it for that purpose. Creating a shortkey is a quick and easy way to complete repetitive activities and will become a favorite with students. If necessary, adapt the following Windows/iPad directions to the device used in your school:
Go to Start
Right click on the desired program (either a program or a tool is fine)
Select “properties”
Click in “shortcut”
Push key combination you want to use, say, Ctrl+Alt+S
Save
On iPads, these are called “hotkeys”:
Go to Settings > General Settings > Keyboard Settings.
Scroll down and click “add new shortcut.”
Popular shortkeys are to open programs, activate tools, and take screenshots using the digital device’s native tool.
Fifth Grade — Macros
Creating macros gives students an easy way to add a standards-based heading or any other repetitive task required for their schoolwork without having to retype it each time. Adapt these MS Word directions to your digital device:
Click View – Macros– Record Macros.
Specify a name for the macro.
Choose whether it should be a keyboard shortcut or a button.
Once you click OK, notice your mouse looks like a cassette tape, indicating that anything you click will be part of the macro. Click all elements you would like to be part of your macro.
Stop recording by clicking View – Stop Recording.
Click for a video on how to create macros.
Sixth Grade — Build an App
If necessary, explain to students what an “app” is and why they want to build one. For this project, follow the videos and directions included in MIT’s App Inventor and create one (or all) beginning level apps such as:
TalkToMe Text-to-speech app
Extended TalkToMe—shake the phone!
BallBounce Game app
Digital Doodle drawing app
Here are three alternative popular app-creation sites:
Game Salad
Apps Geyser
TinyTap App
Don’t expect students to complete this project during the Hour of Code. Expect only that they get started.
Seventh Grade — Code a Widget
Widgets are free, personalized mini-apps that do almost anything the user can program, from calculating the calories in a recipe to solving complex problems. Students can browse Wolfram/Alpha’s gallery for a widget that fits their need and embed the code into their personal website, or build their own widget from scratch using Wolfram Alpha’s Builder tool. The level of difficulty will determine how long it takes.
Click to view slideshow.
Eighth Grade — Alice
Alice is a free downloadable programming tool for 8th grade and above that shows students how to create interactive stories, animations, and games. Besides Math Standards, Alice supports these Common Core writing skills:
8.3a Engage and orient the Alice world viewer by establishing a context and point of view and introducing a narrator and/or characters; organize an event sequence that unfolds naturally and logically.
8.3b Use narrative techniques in the Alice World, such as dialogue, pacing, description, and reflection, to develop experiences, events, and/or characters.
8.3c In Alice world dialogue and action, use a variety of transitions to convey sequence, signal shifts from one time frame or setting to another, and show relationships among experiences and events.
8.3d Use precision and appropriate tools throughout to convey events.
8.3e Provide a conclusion to the Alice world story that follows events.
Divide the class into groups. Have each group pick one of the following resources, preview it, and be prepared to share their thoughts and take questions from classmates:
basic Alice programming instructions
overview of Alice by Middle School students
Duke University’s Alice “Getting Started” videos are here
Next, groups open Alice and go through the tutorial by clicking “Start Tutorial” in the Welcome to Alice dialogue box. When done, create an animated avatar as follows:
Choose “room” template, then “Setup Scene.”
Choose “class Biped,” “class Person,” then child, female, light and avatar that is shown.
Push OK until avatar appears in the room.
Using circle at avatar’s feet, turn him/her until s/he faces right, and then press “edit code.”
In tab that says “this child/person,” click on heavy black arrow facing down. Then click arrow facing right to reach individual body parts. Choose a body part and give it direction. Run program to see results. Debug program if it doesn’t work.
If students get stuck, they can go through Alice online documentation, Help files, or ask for assistance from classmates. Remind them not to give up. Keep making changes. It will work.
If you have time: In groups, students watch movie trailer of Despicable Me (or similar). Analyze how avatars move their limbs, mouths, and how they walk. Compare this to humans. For example, which leg moves first? How do joints move? How do arms and legs move in relation to each other? Does body bob up-down or side-to-side as avatar moves? List the movements and then construct a walking avatar in Alice world.
Click to view slideshow.
***
What are you doing for Hour of Code? Share your projects in the comments.
–published first on TeachHUB
More on Hour of Code:
Lesson plan bundle for Hour of Code
Hour of Code: Scratch Jr.
Hour of Code–Why Not
Jacqui Murray has been teaching K-8 technology for 15 years. She is the editor/author of over a hundred tech ed resources including a K-8 technology curriculum, K-8 keyboard curriculum, K-8 Digital Citizenship curriculum. She is an adjunct professor in tech ed, CSG Master Teacher, webmaster for four blogs, an Amazon Vine Voice book reviewer, CAEP reviewer, CSTA presentation reviewer, freelance journalist on tech ed topics, and a weekly contributor to TeachHUB. You can find her resources at Structured Learning.
Websites for Hour of Code by Grade published first on http://ift.tt/2x0Vr0e
0 notes
Last Seen Blogs

too-strange-for-earth
It Izz What It Izz

shslexplorer-blog
Super High School Level explorer

one-piece-moment-comparisons
One Piece Moment Comparisons

nekem-csak-o-maradt
V. ❤️💞

onepiece-birthdays
The World Economy News Paper Birthday Pages