#When did they increase the image filesize limit????
Explore tagged Tumblr posts
Note
I saw on someone else's post that you offered to show them how to make gifs? I am super interested in making The Magicians gifs so I was wondering if you could teach me as well? Or even make a public post or tutorial or something? Thank you!!!!
Yeah, of course! There are a lot of ways to make gifs, some of them undoubtedly better than what I do. But, for me, I have a couple methods I generally use, one with Photoshop (when I want very specific control over the colors, composition, type styles, etc.), and the other with just a free tool (when I just want to make a gif that looks decent and not sink a ton of time into it).
I’ll go over the free tool method here; it’s more straightforward and limited, but wayyyy friendlier for someone just starting out. Also, again: it’s free. (But lemme know if you wanna talk Photoshop and I’m always happy to open that giant can of worms.)
One nice thing about gifs becoming the one true currency of the web is that a lot of gif-oriented sites have built gif-making tools in the past couple years and made them free and easy to use, so we can all become gif-producing worker bees, constantly toiling to keep up with the internet’s insatiable demand for gifs.
I use Gif Brewery 3 for mac, built by Gfycat. (There’s also Giphy’s GIF Capture which I’ve used a few times and didn’t hate.) So for the purposes of this tutorial, Step 0: Download and install Gif Brewery 3
So! Now let’s make a gif. Let’s say I want to make some gifs of Margo taking her throne as high king.
Step 1: Open Netflix in Google Chrome (i.e. not Safari because it blanks your screen if you try to record your screen while a video’s playing) or play a DVD on your computer, or pull up the scene you want on YouTube. Basically get a video of the scene you want playing on your computer screen in whatever fashion you prefer.
Step 2: Open Gif Brewery and select “Record Screen.” Resize the window that Gif Brewery then opens up so that it frames the video, hit record, and then play the part of the video you want to gif.

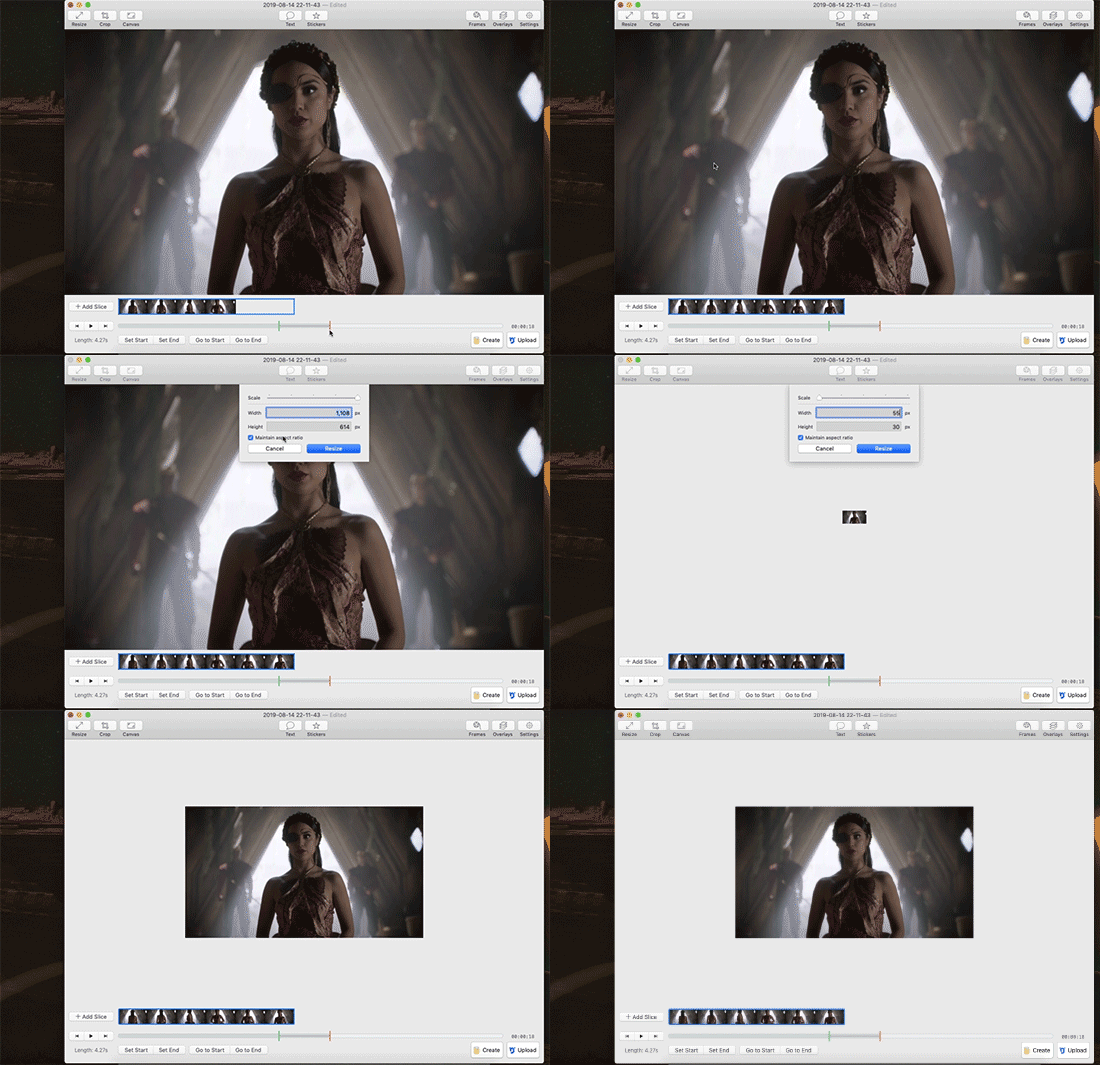
Step 3: When you’re done with video, click “Stop.” Gif Brewery will then open the video clip that you made in their interface. You can close your browser and the blue frame window. You can see the full clip you just recorded in Gif Brewery. Trim the extra bits off of the clip by dragging the green bar to define your start point and the red bar to define your end point.

Step 4: Resize! Tumblr’s main content box is 540 pixels wide. So if you’re making a gif that’s meant to be full width, you can size down to that width. Make sure “Maintain Aspect Ratio” is checked. (Now’s a good time to also crop if you want to, say, gif only Margo’s face without the space to her left and right.)

Step 5: So now we have something that’s the size and shape of a gif. If you want to add text, now’s a good time to do it. Use the “Text” button at the top of the window to open the Text box. Here you add your text, adjust the font weight, size, color, and border if you’re using one. I’m going to use a Billie Eilish lyric for this example because I’m cliche as hell.
If you’re making a standard-style gif with a text caption, you’ll use a bold san serif font like Helvetica, with a black border around it to make sure it’s readable, and then keeping it small and centered at the bottom of your gif, like so:

But! if you’re feeling Artsy, go nuts with your font choice and placement. Find a font that captures the tone your message and clip are conveying. You can find a wide range of free fonts on Google Fonts or good old DaFont. I want that badass Margo ‘tude, so I’m using a grungy font and Margo’s signature bright fuschia. Drag the text box to move and resize it until you’re happy with it.

Step 6: Time to fix your colors! Screen captured images basically always look more dark and muted than they should. The fix is to fuss and fuss and fuss and then fuss some more over the colors. Gif Brewery has limited color controls, but as I’ve learned, you can still spend an inordinate amount of time fussing over them. The Magicians makes this an especially good exercise in finding the limits of your patience because they’re always backlighting scenes in a way that blow out your brightness when you try to make even small edits. (Which is why I’m switching over to a different shot that’s easier to work with for this example. Margo’s hella backlit in our gif.)

Exposure Adjust: Increase exposure to make your brights brighter
Gamma Adjust: Increase gamma to make your darks richer
Saturation: Increase to make the colors as rich as they can be
Vibrance: I also like increasing vibrance for even more of a pop of color
Hue Adjust: their hue controls are funky, but you can make some minor adjustments if at this point your gif looks weirdly too red or yellow.
Play around until you find what looks good to your eye. For a gif that’s meant to look like it’s colored normally, watch out for things like: the whole thing looks too dark and you have to squint to see the details; you overbrightened and now the white is blown out and blinding; or you oversaturated so much things look pixely and glitchy.
Step 7: Open the Settings panel with the button at the top right. Time for more fussing to make sure the timing, frames, and settings are how you want them.

HERE’S THE THING: Tumblr does NOT let you upload gifs larger than 3mb. So everything you’re doing in this panel is a balancing game to keep your gif under 3mb without letting it look like trash. These are the settings you’ll fiddle with most often:
Speed is set to 100% by default. But you may want to slow it down, especially if your clip is only a couple seconds long. Slower means it’s easier to see the subtle changes in a character’s expressions and it makes the action look less jerky. The slower you set your speed, the more frames will be added to the gif, so keep an eye on that.
Frames per Second is what it sounds like. The lower you set this number, the fewer frames you’ll use, but the animation will look jerkier. You want enough frames per second that your animation looks as smooth as a hot knife sliding through butter. 12 is their default. I try to not go lower than 10. When I’m feeling particularly luxurious, I’ll set this to 15.
Color Count: Gifs can use as many as 256 colors and as few as 2, if you don’t care about your gif being an offense to nature. You can set it to the low 200s without compromising on quality, though, so that’s what I did here.
Step 8: Hit “Create” and wait an inordinate amount of time while your gif renders. When it finally, finally does, check the filesize on the bottom right. In the above gif, you’ll see my gif was 2.1mb. Perfect. So I can hit save and it’s done. But if it had said anything larger than 3mb, I’d have hit “Cancel” and then fiddled with the settings some more to get the number of frames down.
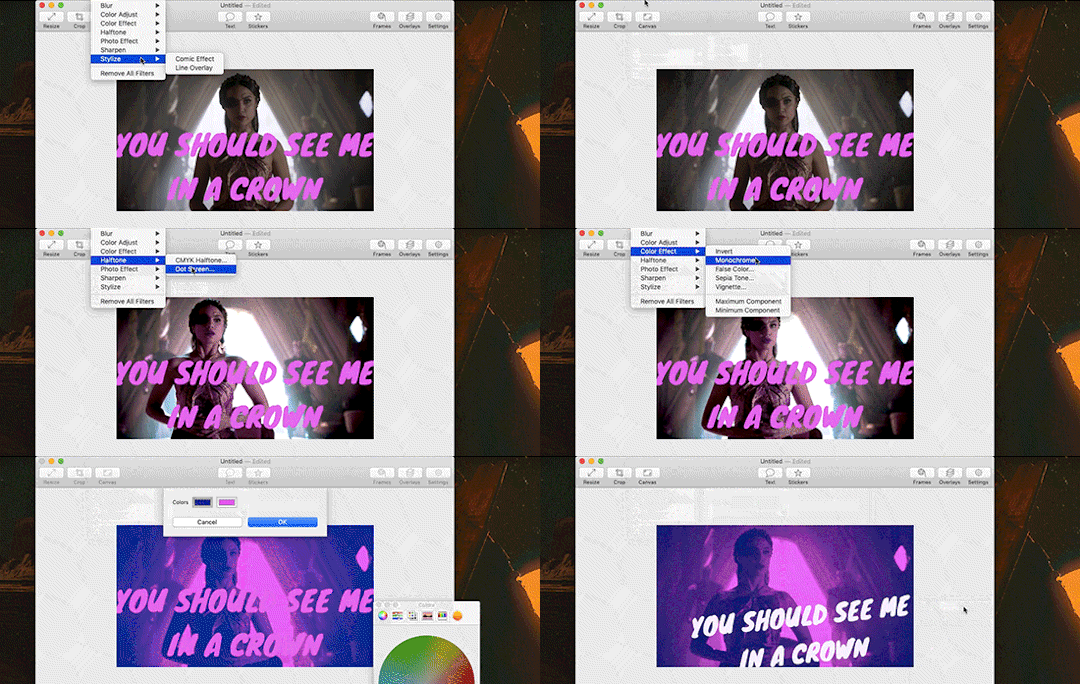
Alt-Step 6B: If I want to do anything fancier/artsy-ier/more unique than this kind of gif, this is when I’d usually crack open Photoshop. But there is some room for creativity within Gif Brewery. Let’s go back to Margo and look at some of our options:

In the Filters menu, you can see there are a number of bre-built Photo Effects to play with. Sometimes they look awesome; sometimes they look like trash. So experiment! There’s also rando filters like Halftone effects. And the Color Effects can give you options like adding a vignette, fading the colors to old-timey sepia tones, or creating a duotone like I ended up doing.
Have fun with it and look for effects that will support the tone you’re setting with clip and text you chose. So like for this Margo example, going black and white, or dark and heavy, etc. would not have been tonally consistent with the badass vibe I’m going for.
And I… think that’s it? At least to get started. Hopefully that helps, let me know if you have any questions! Or want to talk about anything beyond the basics. I’m always happy to dive into the specifics of how a particular effect was made, or how to add more advanced refinements.
#bookster-lover#tutorial#pls don't judge my gif-making abilities based on#the shitty gifs I had to make to capture my screen
49 notes
·
View notes