#UV Cured Acrylic tapes
Explore tagged Tumblr posts
Visit Tumblr Blog
Explore Tumblr blogs with no restrictions, modern design and the best experience.
Last Seen Tumblr Blogs


Fun Fact
Tumblr Inc. is using 66 technologies for its website.
Text
UV Cured Acrylic Foam Tapes Market Trends Rising Demand in Construction and Building Applications
UV-cured acrylic foam tapes are gaining significant attention across various industries due to their strong adhesive properties, versatility, and ability to offer durable bonding solutions. With advancements in manufacturing technologies and growing demand across sectors like automotive, construction, and electronics, the UV-cured acrylic foam tapes market is experiencing notable growth. These tapes are used for bonding, sealing, and cushioning, which makes them highly desirable in several applications.

UV Cured Acrylic Foam Tapes Market Trends: Growing Demand in Automotive Industry
The automotive sector is increasingly adopting UV-cured acrylic foam tapes for bonding applications. These tapes provide superior bonding strength and are essential in reducing the use of mechanical fasteners, thereby enhancing vehicle aesthetics. With the growth of electric vehicles and lightweighting trends, the demand for UV-cured acrylic foam tapes is anticipated to rise, contributing significantly to market expansion.
UV Cured Acrylic Foam Tapes Market Trends: Rising Demand in Construction and Building Applications
In the construction and building industries, UV-cured acrylic foam tapes are used for mounting, sealing, and weatherproofing applications. Their resistance to UV radiation and ability to withstand extreme temperatures makes them an ideal choice for both residential and commercial buildings. As infrastructure projects grow worldwide, the demand for these tapes is expected to increase.
UV Cured Acrylic Foam Tapes Market Trends: Advancements in UV Curing Technology
The UV-cured acrylic foam tapes market is benefiting from advancements in UV curing technology. This innovation improves the curing process, making it faster and more efficient. As manufacturers continue to innovate in the field, these tapes are becoming even more reliable and cost-effective for a variety of applications, which will likely propel market growth.
UV Cured Acrylic Foam Tapes Market Trends: Expansion in Packaging Industry
The packaging industry is increasingly utilizing UV-cured acrylic foam tapes for sealing, fastening, and product protection. These tapes offer high adhesive strength and are used for secure packaging, ensuring that products are safely transported without damage. As global trade continues to grow, the demand for such tapes in packaging is expected to rise.
UV Cured Acrylic Foam Tapes Market Trends: Focus on Eco-Friendly Solutions
Sustainability is a key focus in today’s manufacturing landscape, and the UV-cured acrylic foam tapes market is not immune to this shift. Manufacturers are moving toward eco-friendly formulations, such as water-based adhesives, to create more sustainable products. This eco-conscious shift is expected to play a significant role in the market’s future.
UV Cured Acrylic Foam Tapes Market Trends: Integration with Smart Technologies
As industries move toward smart manufacturing, the integration of smart technologies in adhesive products is becoming increasingly common. UV-cured acrylic foam tapes are being optimized for smart applications, including self-monitoring and real-time performance analytics. This trend is likely to see further growth as the demand for high-tech solutions increases.
UV Cured Acrylic Foam Tapes Market Trends: Rising Use in Electronics Industry
The electronics sector is another significant driver of the UV-cured acrylic foam tapes market. These tapes are used for assembly, bonding, and sealing of sensitive electronic components. With the rapid pace of innovation and the increasing production of consumer electronics, demand for these tapes in this sector is expected to continue to grow.
UV Cured Acrylic Foam Tapes Market Trends: Customization and Tailored Solutions
Customization is becoming a prominent trend in the UV-cured acrylic foam tapes market. Manufacturers are offering tailored solutions to meet the specific requirements of various industries, including automotive, electronics, and construction. The ability to customize tape thickness, adhesive strength, and durability is contributing to the market’s growth as it caters to diverse applications.
UV Cured Acrylic Foam Tapes Market Trends: Increasing Adoption in Green Building Projects
The growing trend of green building and eco-friendly construction practices is driving the demand for UV-cured acrylic foam tapes. These tapes are often used in energy-efficient buildings for their insulating properties and ability to reduce energy consumption. As sustainable construction practices continue to grow, the market for UV-cured acrylic foam tapes will see an uptick in demand.
UV Cured Acrylic Foam Tapes Market Trends: Demand for Lightweight Solutions
As industries focus on reducing product weight, UV-cured acrylic foam tapes are gaining traction due to their lightweight nature and strong adhesive capabilities. They are replacing traditional bonding methods, such as mechanical fasteners, due to their ability to provide a lightweight solution without sacrificing strength or durability. This trend is especially prominent in the automotive and aerospace industries.
Conclusion
The UV-cured acrylic foam tapes market is witnessing a period of rapid growth, driven by advancements in technology, rising demand across various industries, and increasing focus on sustainability. As the market evolves, innovations in curing technology and eco-friendly products will shape the future of the industry. The continuous adoption of these tapes in automotive, construction, electronics, and packaging sectors suggests a bright future ahead for UV-cured acrylic foam tapes.
#UV Cured Acrylic Foam Tapes Market#UV Cured Acrylic Foam Tapes Market trends#UV Cured Acrylic Foam Tapes#UV Cured Acrylic tapes#UV Cured tapes#UV Cured tapes products
0 notes
Text
When asked how I do something, I really can't answer. It's just something brain-wise that doesn't work out.
I've been asked a few times how I did these eyes:


I wasn't able to really tell people how even though they're rather simple.
I did just make another pair for my new-to-me Yo-Tenshi Yuki in a similar way because the glass eyes she came with are deformed and it was difficult to get her to look in one direction, and maybe I can write it out.... Were I better at explaining how I do things, I'd be a you-tuber. 😅
These are half acrylic, half UV resin.
It's critical that you work in a UV-free environment. The resin needs time to settle before being cured to get the right visual effect and you'll keep using the same exact batch of custom colored resin throughout, so you don't want it to cure prematurely.
My office has weird lights that don't produce any UV and blackout curtains so it's the perfect place.
I haven't tried this with different colors in the same eyes, but I bet it looks neat.

The eye base should have a shallow, flat iris indentation with walls that are straight up and down. A deeper indentation would probably work, too, but shallow is fine because the resin layer will be thin.
Probably any shape would work, not just round.
These are old D. Eye. Y. kits.

The first layer will be just something shiny but only in the middle. On the eyes shown above I used these oversized glitter hexies. They have a slight purple sheen when the light hits them just so. For Yuki's eyes I used metallic silver snowflake glitter, and you'll see how that looks different later.
This is optional, of course. I like the little bit of shine it gives and feel like it adds back some depth that's lost due to the indentation being shallow and flat.
Put a teeny blip of clear resin into the eye base, then your shiny, center it, and cure so it doesn't move around. Try not to get any resin on the top of that shiny piece because you'll need to adhere a pupil to it and it's easier if the surface you're sticking a pupil on is flat.
These eyes use one color of resin.

This is actually my leftover resin after I've cured it to clean up, but you'll want to mix a little UV resin with just enough colorant (resin dye, alcohol ink, etc.) so that it's still transparent but has an obvious color to it. It's a trial and error thing. I chose purple because the eyes she came with were purple.
I don't add any sparkle until after the next step because I feel like glitter in or visually over the pupil looks like dust or some sort of problem.
I have a pupil mold. If you're dexterous enough you can dab bits of this colored resin onto the sticky side of some packing or resin tape to make pupils, but make pupils with your colored resin.
After the pupils are molded you can add your sparkle to the remaining resin if you want.
Next you'd add just enough resin to the eye base over the shiny layer that you can see a bit of color (adjust for how much color you want), and it's important that you make sure the resin climbs the walls of the indentation. That's how you get that slightly darker line around the outside of the iris.
Do not fill the indentation or you won't get the visual effect of a darker line around the outside. It's a really thin layer of resin, just enough to apply your desired color. Give the resin time to settle so that the layer is even other than where it's clinging to the walls of the indentation.
Put in your pupils, center them, and cure.
At this point I decided I wanted to add a little sparkle to Yuki's eyes, but only a little because the metallic snowflakes are kind of intense...
To add a little sparkle at this point I mixed it into the resin then carefully applied the thinnest of thin layers only around the pupil, let it rest so it settles evenly, and cure.
Next is doming, which is done just like any other pair of resin eyes. Plop your resin on, let it's own surface tension create the dome you want, cure, and you're done. The UV resin I use is kind of thick with high surface tension which works great for doming.
So. Hope that uh...... Made sense.
Anyway, here are the eyes I just finished for Yuki with an extra piece of the snowflake glitter so you can see what I was talking about:


The pupils being a bit transparent lets light bounce off that shiny item in the back creating depth.
The metallic snowflake being in the back makes them really intense, which wasn't exactly what I was going for, but it's nice nonetheless.
Now I just need to get her (I decided she's a girl because she looks like a mini Mimi to me) a wig, clothes, and some wings since hers weren't included.
32 notes
·
View notes
Text

Break down of my melon soda float prop for my Sailor Jupiter Bunny Suit build. You could easily tweak this for any other drink prop and the majority of materials were sourced from Daiso, including the tray it velcros to so it's fairly low budget.

Materials:
-Desired cup/glass for drink (I would advise sticking with plastic versions for weight and safety reasons) -Plastic ice cubes -Masking or Washi tape -Clear seed beads or Caviar beads in multiple sizes -Clear craft glue -Super glue -UV Resin & alcohol dye OR Stain Glass window paint (Gallery Glass would be my rec) - Some sort of thin, clear plastic sheeting I used part of a salad container -*Muddle spoons or straw or similar decor (polymer clay sprinkles, glitter, any sort of inclusion) -*Foam clay & an ice cream mold or scoop if you want to make a float -*Acrylic paint -*Velcro or Magnets if you would like to stick to a prop tray that you can also remove for photos
*= optional materials
‼️ SAFETY ADVISORY ‼️
If you choose to use UV resin for this you must have proper PPE. That means gloves, respirator with appropriate filters, mixing cups, well filtered workspace, and knowing how to properly dispose of scrap. Do not pour it down drains, please cure all runoff or extra fully before disposing of in household waste. Resin that is still in it's liquid state must be disposed of in chemical waste, this includes paper towels or anything else used to "clean up". You can take a moment to read more here or do your own googling for proper precautions before getting started.

The first thing I did was make my ice cream scoop since it needed to cure for a few days. I found this great little scoop mold I shaped the foam clay too and froze for a bit. Once it was firm enough to remove I set it by a window to dry. Then worked on making a clear plastic base that would fit inside my glass and act as the "top" of my "liquid".


When the base was done and fit snugly to my glass I primed my dry ice cream scoop in glue. This was partly to keep a barrier over the blue foam so the color didn't leach, and partly to give the acrylic paint something to bite into without being absorbed by the foam. Then it was painted a nice shade of vanilla and glued to the plastic base with craft glue. I poked two holes on the underside to also add a pair of short metal flat head wire supports to make sure it didn't peel off. The supports themselves were set with super glue, a bit overkill I know.

Between my paint layers drying I was also puzzle piecing in ice cubes in the glass to see what combination looked the most appealing. However, it also needed to accommodate that clear plastic base so there was constant test fittings. The trick here with fit is you want the cubes to fit snug vertically but not touching the sides of the cup too. You need that wiggle room for the UV resin/window paint. If it rattles around on the sides a bit that would be ideal.

When I found a composition that worked I carefully super glued each cube only where it touched the other cubes. Sometimes superglue oxidizes a little funny on clear surfaces and it can leave a sort of foggy buildup. In those instances you can wipe it away with an alcohol swab to keep things looking clear. As with the step before I keep checking the fit to the glass to make sure I have proper clearance to keep the base level.


When my cubes were one weird unit the fun began! I mixed some different sized clear seed beads (you can also use caviar beads) in some clear pva glue. You want a more dry mixture so it helps to let it set up a bit and get sort of gummy. The idea is replicating how bubbles accumulate in carbonated drinks, so keeping it at points where you would imagine they would get trapped under cubes helps. Of course so does referencing an actual drink lol. I just piled on and semi sculpted the beads in chunks and waited for them to cure.


Of course this same bubble detail was added to the clear base under the ice cream scoop as well. This time just around the perimeter of the scoop. At this point I realized I was forgetting something, the cherry! It is actually an earring I lose the pair to lol. I also cut out a small slot in the plastic base to fit a straw through. On the right you can see how everything looks at this last and final test fit before the "soda" portion was added. The washi tape was used to keep the inner lip clean of UV resin later, but also to mark where my base should be resting.

Putting the cubes and top layer to the side I got to mixing my UV resin. As a point of reference I used just under 1 jumbo tube of the Daiso clear resin which is around 20g or .70oz of product. I mixed some liquid pigment to the shade of green I wanted and got to pouring. Keeping the tape on I poured all of my resin in and kept turning my glass for even coverage. Once that was good to go I sat outside for about 5 minutes slowly turning the glass in direct sun until the resin set enough to stop moving. At this point the washi tape was peeled off. Then I left in on my porch to finish curing in the sun until the following day. The cup will get warm to hot depending on the volume of UV resin so please be mindful. If you were to use window paint I would build up the color over a few days in thin coats and like a silicone brush. When the cup was fully cured I fit my cubes back in and the clear base, and added the straw to the little divot to make sure it all fit well. It did so I went ahead and removed the straw and added some super glue to the top most cube that laid flush against that little sheet of plastic and pressed the ice cream scoop on the base firmly into place. Once it was in I slipped the straw through the divot on the side and mixed a little more green resin that was poured around the ice cream scoop to seal it all in. Then it was once again left on my porch for a full day. If you were doing this in window paint a thick layer on top and texture it to look more like a drink. Though do to it's want to self level there may be some mild resistance until it starts to set up. When my prop was fully cured I added some velcro to the base so it would stick to my drink tray and be peeled off for photos not pictured lmao. Badda bing badda boom it was done!

Lightweight, fun to make, and fairly low budget this is a prop you could make with things from most dollar stores not just Daiso. Personally I think the dollar tree two part acrylic champagne flutes would be perfect for this.
#my cosplay#Cosplay WIP#cosplay prop#prop drink#fake food#melon soda#melon soda float#Bunny Suit#I have been trying to get the explanation for this together since last July/August so lmao here we are
25 notes
·
View notes
Text
Here are the steps and some tricks that I use to make water bases for my minis! (〃´▽`〃)
Thank you @lisuune for asking!~☆ I hope this will be of help!
1st step is to decide what the base "water" colour is!
For murky pounds you can use browns and beige, for a swamp, I use dark greens, olive, and sepia, for deep water the best would be shades of blue, depending of the depth that you want.
I'll use this mini as an example. I had some fun pouring cheap acrylics mixed with regular white/school glue (not obligatory, but I added a drop of silicone oil for the eye effects). I cut a plastic bag in two and let the acrylics dry. After acrylics dry, they turn to plastic, which is easy to cut and glued on the base.
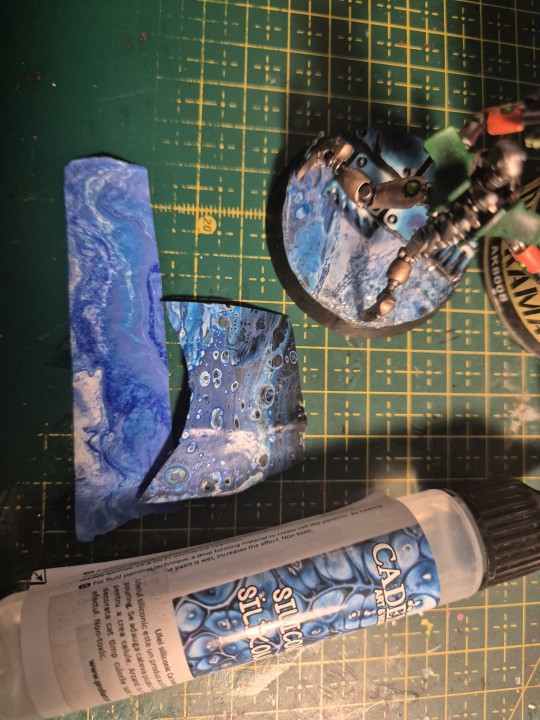
(I need to flip my cutting mate, sorry for the mess (ó﹏ò。))
Always let painrs dry in a well ventilated place.
2nd step is to decide what sort of "water" you shall use.
I am mostly using two materials, but there are a few others as well. I never tried them, but I read that people use transparent glue, varnish medium, or medium gel. I personally have experience with resin (both UV and regular epoxy resin) and clear acrylic.
(! Always work in a well ventilated space with resin ! It is super important, the fumes are toxic! Wearing gloves with resin is a must!)

When pouring, you can use a silicone mold for the base, or as my silly ass did the first time, use a little tape to create a dam (this only works if you intend to pour just a little).
Depending on how much you need, you can use: acrylic and epoxy resin for projects where you need a lot. Those allow you to pour multiple layers that will merge marvellously!
The trick is to be patient to let it dry, and pour very slowly to avoid air bubbles. Usually, a spritz or spray of alcohol is enough to eliminate the surface bubbles!
While acrylic is way safer and friendly for beginners, resin allows you to do neat tricks.
Use UV resin when you don't have to use a lot, because it doesn't layer as nicely as the regular one that needs to dry to gel (harden).
You can leave the UV resin under sunlight, and it will harden, or you can use an UV lamp, or flashlight, which will cause it to harden in seconds!
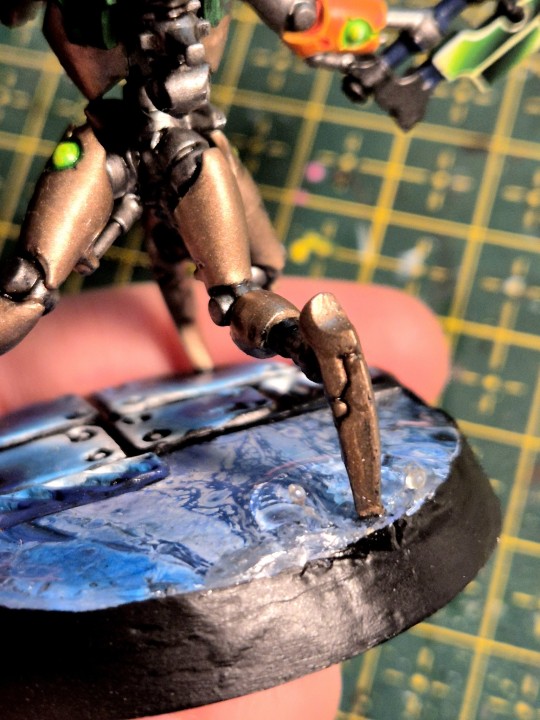
I made here a watter ripping by using a compressed air can and curing as it was blown into place. (*sensible chuckle*).
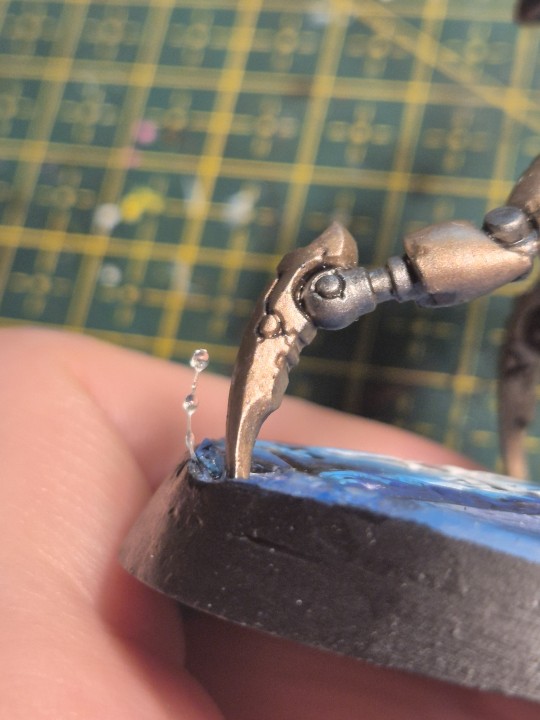
If you have fishing wire or transparent tread, you can pour a few drops on it and cure it for a cute splash effect!
As an extra, I use putty to make the "solid ground". I really like the Green Stuff world rolling pins, but a 3D printed one can work just as fine! (Don't forget to cover them with sculptor vaseline, or just water. For me, I prefer starch, that is why mine are so dusty)

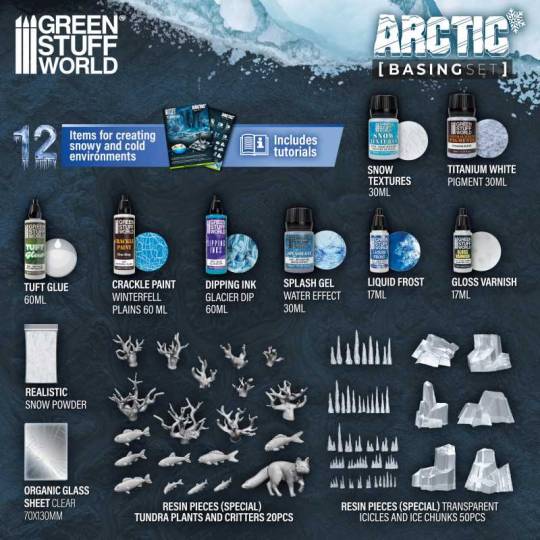
I saw some beautiful basing kits from GSW, that I will absolutely buy to try. They have them for all kinds of terrain, including water, swamps, lava etc.
Happy basing !~♡
(。・ω・。)ノ♡
15 notes
·
View notes
Text
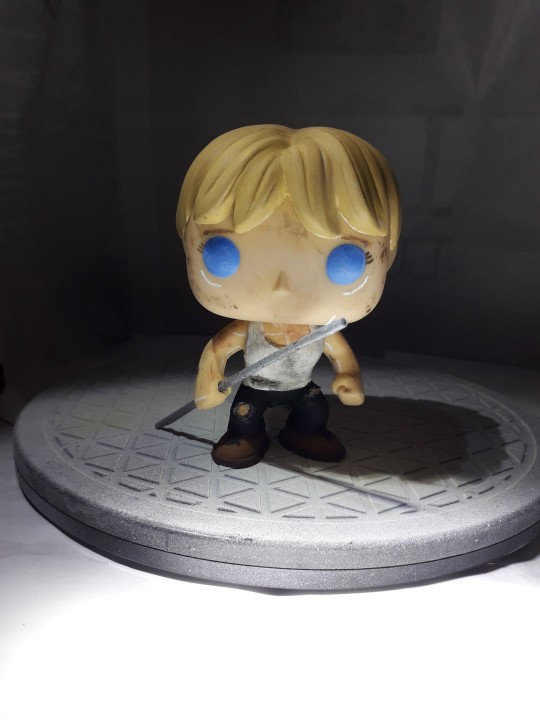
How to Build Your Own 'Augmented Super Wife Supersoldier From The Future' Funko Pop.
A Semi-Coherent Guide By RC.
This is a long one. A loooooooong one.
I meant to do this like two and a half years ago, but in the spirit of keeping this fandom's head above water, and the fact I'm at the hospital (nothing serious!) with nothing to do for the next couple of hours, I'm doing it now.
So if, like me, you are still bitter that Grace and Dani didn't get official Funkos, or official *anything* due to manufacturer short-sightedness, why not say 'fuck it' and build yer own?
This rambling tutorial will attempt to demonstrate how to build Grace from the 'when they start to kill me, run' scene.
Like, literally that bit 😋.
Anywho. Let's do this!
You will need:
- Funko Pop DIY (female)
- Polymer clay (eg. Sculpy, Fimo, CosClay). I'd advise against cheapo no-name alternatives purely because in my experience the baking times/temperatures stated are absolute garbo. Also, polymer clay will give off quite gnarly fumes while curing, so better to use a trusted source. But if cheapo's all ya got, it's all ya got.
Other modeling materials you might consider instead of polymer clay include...
Epoxy clay (eg. Milliput, Apoxie Sculpt, The Army Painter 'Green Stuff', even something like J-B Weld or similar 2 part plumber's/repair putty).
Plain ol' air drying clay (eg. DAS, FimoAir, Gedeo).
You could even whip up a batch of 'cold porcelain', or an oven cure salt dough from ingredients you probably already have at home. Make sure you clear coat any salt dough creations properly after curing as over time ambient moisture may mess with it.
Each option above has its own pros and cons. Do your research if you aren't sure. Me? I used Fimo.
*ahem* Carrying on...
- Masking tape
- Hobby knife
- Pin vice
- Kebab skewer (wooden), or styrene rod
- Paint brushes
- Primer (plus dust mask if you're using a rattle can indoors)
- Sandpaper (around 400 grit oughta do it but you could probably go 200 either side of that and get a good result)
- Acrylic paints (optional: Posca PC-1MR pens in black and white for fine detail).
- Crafter's heat gun, or a hairdryer
- Varnish/clear coat.
Optional extras: Airbrush, spray booth/cardboard box, rotary tool, oven thermometer, artist's/cake decorating turntable, UV resin, silver leafing pen, jeweller's files, jeweller's wire, acetone, superglue or 5 minute epoxy, a lil piece of sponge, pearl mica powder, scavenged Funko Pop head 😈.
Step One: Grab your Funko DIY and separate the head from body using heat to soften the vinyl enough to wangle it off the neck post. Shoving it in a mug of hot water for a few minutes should do the trick. Make sure to dry out the head as much as possible. Last thing you want is mould growing inside it. This is Terminator, not The Last Of Us 😉. Alternatively you could use your heat gun/hairdryer, but I explain in Step Six why the water bath approach is a better option (imho) at this early stage.
(You are giving this entire thing a quick read through before you start, right? I dunno about the rest of you but I like to have at least a basic idea of the work ahead before I get stuck in. Saves finding out you're missing a necessary tool/material at an inopportune moment and all).
Stop rambling, RC. Sorry. It's easier to be succinct when you haven't lost half your photos 🤦♀️. Moving on...
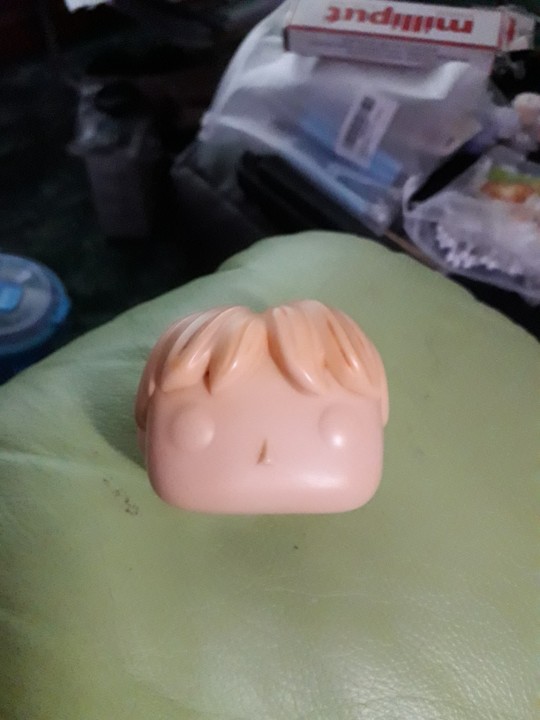
If you don't wanna attempt to sculpt the hair yourself you can, as I did, take a kitbashing approach instead of using the supplied DIY head. Grab one of the many commercially available Funkos with a decent approximation of the hairstyle you want and then go Step One on em. Buy 'pre-loved', buy BNIB, dig one out of a dumpster, steal one from your lil cousin, it doesn't matter. Procure as your time/budget/situation dictates. Improvise where necessary.
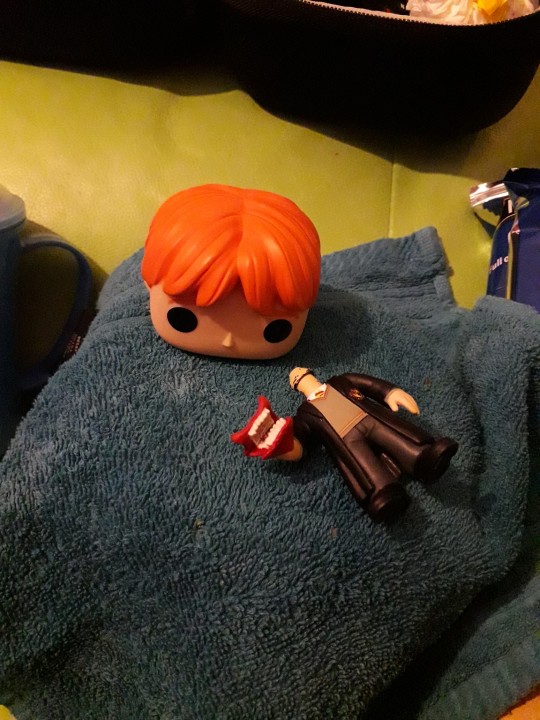
Sorry, Ron. I need your floppy hair. I do not need your clothes.
Or your boots. Or your motorcycle.
...😋
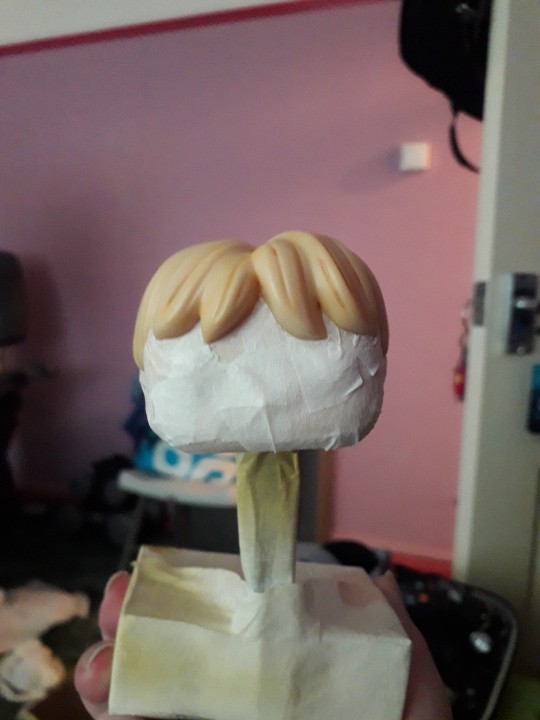
Step Two: Take the body of the Funko DIY and mark out the position of the tank top and the cuffs of the jeans. These will be used as guides for when you add the clay.
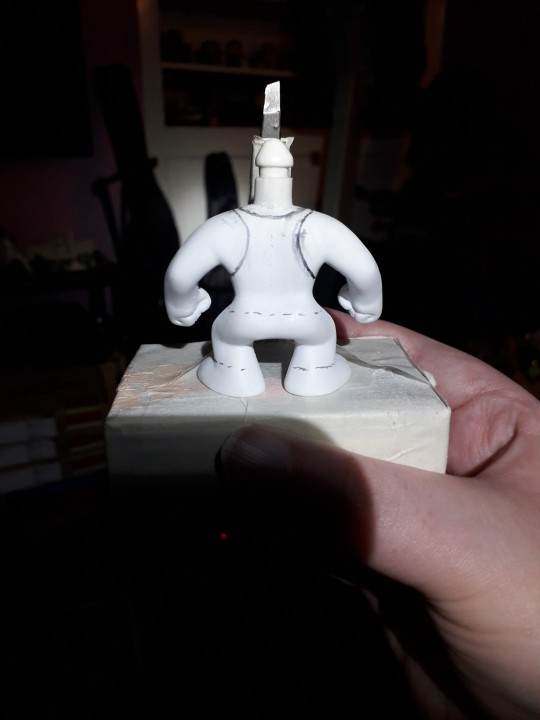
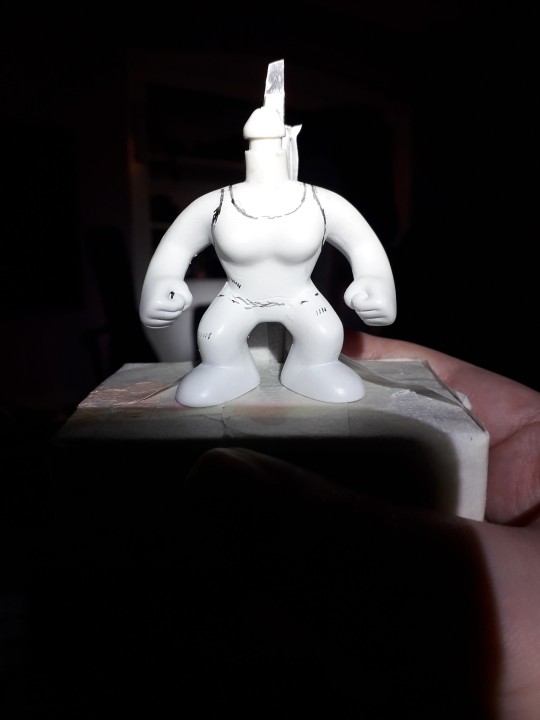
At this point I used a pin vice to drill the hole thru the fist for the rebar. If you're a crazy person you could use a rotary tool with an appropriately sized bit attached.
To make the rebar I fashioned a mould from a drinking straw and filled it with UV resin. Because I'm awkward. A wooden kebab skewer, or some hobbyist's styrene rod (eg. Evergreen Scale Models) would work just as well. Just cut it to size, paint it silver and you're golden. I used a metallic leafing pen. You use whatever you've got handy. Doesn't have to be shiny. A flat grey acrylic would work just fine.
Use jeweller's files and sandpaper to make small adjustments to the hand hole and rebar respectively in order to get a good press fit. There's always glue if you overdo it 😉. But don't add the rebar to the model just yet, as you're gonna need room to manoeuvre for the next bit.
Step Three: How do you make it look like your figure is wearing clothes when you don't have much real estate to work with?
You fake it, that's how.
You do not need to model an entire set of clothes! It's an arse ache, and we're all about working smarter not harder on the RC channel.
So, take your modeling compound of choice, roll a chunk of it out to the desired thickness, and then cut into strips, say 2-3mm wide. Use your best judgement here.
Now, using the jeans as our example, wrap a strip around the bottom of the leg where the cuff would sit. Cut off any excess and blend out the join. Just give it a lil rub and it's like it was never there. Like magic! You should have a nice defined edge at the bottom, just above the foot. Now see the top edge of your lil clay strip? Well, you wanna start pushing and flattening the clay to blend the edge right out so it fades back into the body.
Repeat for the other leg, and the bottom of the tank top. The straps are relatively simple, tho the bits that pass under the arms can be fiddly due to lack of space. Use a hobby knife to shape and crisp up those edges and then blend out the extraneous edge. Same thing with the neckline.
Run a strip around each foot to form the soles of the boots, and a lil 'x' on the top of the feet to give the impression of laces.
For the rips in the clothing you can simply gouge out a little of the clay. If there isn't any on that part of the model (the knee for example) roll out a little wormy dealie (for you North of the Border fans 😉), position it as needed, blend out the edges, then gouge as required.
If you're playing on hardcore mode, this might be the time to start piling clay on the Funko DIY head and sculpting the hair. You may prefer to leave it til the head's re-attached tho. It depends on the material you're using. If you don't think it'll stand up to a bit of manhandling while pushing the head back onto the body, save this step til that bit's done.
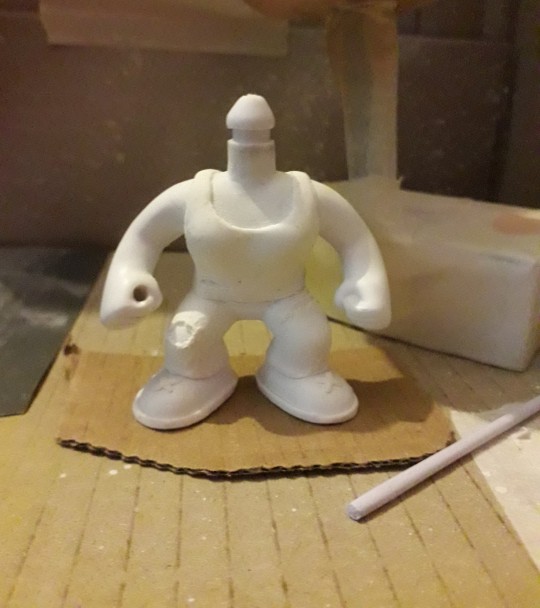
Cure according to the clay manufacturer's instructions. The vinyl will not melt at the temperatures required to cure polymer clay, but if you don't wanna risk it or you don't wanna use your food oven to cook plastic, with all the gnarly fumes and stuff, I've given you plenty of air dry and/or non toxic alternatives. Consistent temperature is key with polymer clay. Undercooked, it's quite brittle. An oven thermometer comes in handy here if you've got one.
Step Four: Primetime!!! Some like to brush on primer, which is fine if you're painting a fence or throwing gesso on a canvas. Not so fine if you're painting a figurine imho. I mean, unless it's Cassandra from Doctor Who. A good rattle can of spray paint is what you want ideally, but again, it's about what you can afford/wangle/manage with your crafting space, so feel free to ignore me and brush away!
First rule of Primer Club: several light coats are better than one heavy coat. Second rule of Primer Club: knock each coat back a lil with sandpaper before applying the next one. Third rule of Primer Club: sit your rattle can in a warm water bath for five minutes before shaking it up to improve flow.
You can get primer specifically for plastics but while I would recommend it, it's not absolutely necessary.
A scavenged head may need masking off if the base colour already matches the skin colour of your character. Save yourself a bit of painting innit. You can get really tight, clean edges against the hairline with a hobby knife. If the hairstyle, hair colour, and skin colour match straight outta the box? Congrats! Why are you even reading this? 😜.
That thing in the background is a portable spray booth (that other thing is a turntable). A cardboard box is also a portable spray booth if you want it to be. Only thing it doesn't have is an extractor fan. So put on a dust mask, and open a window or work outside.
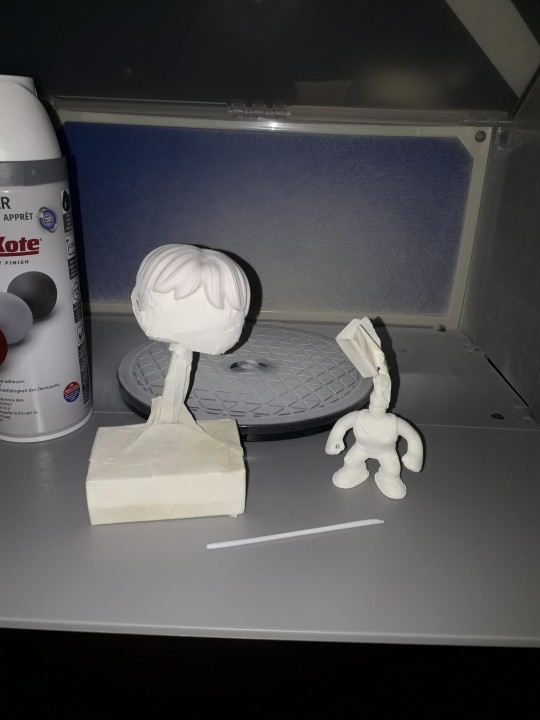
The DIY figure comes primed outta the box, so if you're using the DIY head and are planning on sculpting the hair after re-attachment you don't need to prime it. Unless you want to.
Step Five: Time to paint that shizz. You don't need me to walk you thru this bit, right?
Right?...
Masking is your friend if you don't trust your ability to freehand with a brush. If you're masking over a part you've already painted and are afraid of pulling the paint off, you can knock the level of tack on the tape down by sticking it to yourself (or your clothes) a couple of times before applying it. Some prefer to add a light layer of clear coat to 'lock in' the underlying paint. It's like a real life 'save point'. Some people do both. Some use masking fluid. Some use silly putty/blu-tac/plasticine. Play around, see what works. You do you.
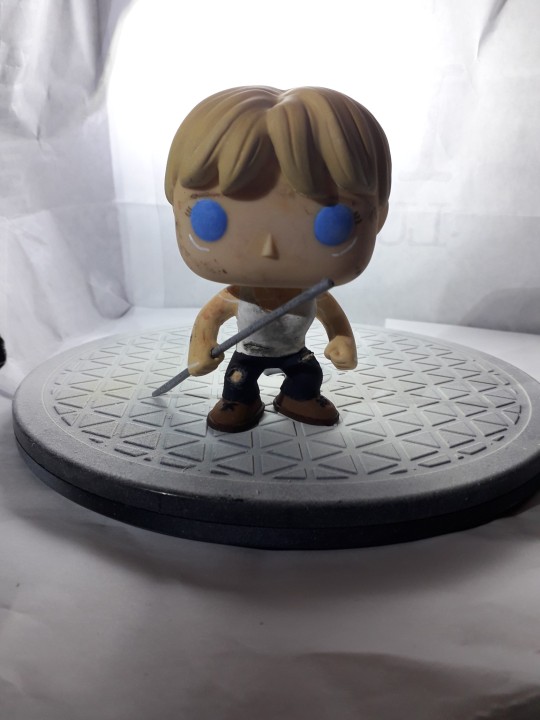
I painted Grace's eyes blue coz Grace is extra and so am I. I threw a lil bit of pearl powder in there to add a subtle shimmer, as I thought going full metallic blue might be a bit too extra.
Lady Funkos have eyelashes. Don't forget the eyelashes.
(I nearly forgot the eyelashes).
A fine tipped Posca pen comes in handy here if you've got one.
Ditto the eyebrows, tho those aren't just for the ladies obvs.
For Grace's augmentation scars, again I recommend a Posca pen but a brush will do.
DO NOT PAINT THE NECK POST. Don't even varnish the neck post. Keep that bitch masked up until you're ready to reattach the head. Like, you can get away with painting the very bottom if you're worried the bare plastic will show even with the head attached, but that's it. Any more will be making a rod for your own back.
You have a choice now. Whether to weather your figure. I chose to add that extra level of detail as it made sense to me. Use a combination of dark washes, dry brushing, and/or sponge stipling to add dirt, blood etc. If ya want.
When you're happy with your paint job, give everything (except the neck post!!!!) a couple of layers of clear coat.
Step Six: When it comes to reattaching the head you probably don't wanna be dunking anything in water by this point, just in case. So we're gonna soften the neck post (and around the base of the head if necessary) with hot air instead. Use a hairdryer if you don't have a heat gun. DO NOT use an industrial or decorator's heat gun for the love o' god. That shit's meant for stripping paint, not gently warming vinyl figurines. It'd be like using a nuke to shake a cherry tree, and you'd likely burn yourself. A hairdryer is more than capable of doing the job.
Why did we not use the hairdryer for Step One? To be honest there's nothing stopping you if that's what you wanna do, but as you don't have direct access to the bits that need softening at that point you will have to wait for the heat to penetrate. You could be doing other things in that time by letting a water bath do the work for you.
Now, however, you do have direct access, so you'll probably find you only need to blast the hot air for 10 seconds or so.
Step Seven: So, you've got the head re-attached, and your paint job is finished and clear coated. That means it's time to add the rebar. If you went a bit too far with the drilling or sanding now's the time to get your glue on. As an final extra touch you can spiral some thin jeweller's wire around the length of the rebar to make it look more rebar-y. I didn't do this bit as the wire I had in my possession at the time was too thick for my tastes.
But whether you opt for that or not, congratulations on making your very own Grace Funko Pop!
I'm still planning on making security guard and future war versions of Grace, and at least one version of Dani. Yeah, I've been saying that for the last two years, but it's still absolutely happening, trust me.
Anyway. That'll do it. If you have any questions, or you need further explanations or recommendations etc. y'all know where to find me.
8 notes
·
View notes
Text
0 notes
Text
Best RV Roof Sealant: A Comprehensive Guide
Owning an RV is an exciting experience that offers freedom and adventure. However, maintaining the roof of your RV is essential to ensure it lasts for years to come. One of the most important aspects of RV maintenance is sealing the roof. A high-quality RV roof sealant protects against leaks, weather damage, and UV rays, keeping your RV in top condition. In this guide, we’ll explore what makes a sealant the best for your RV and how to choose the right one for your needs.
Why Use an RV Roof Sealant?
The roof of your RV is constantly exposed to harsh elements, including sunlight, rain, snow, and debris. Over time, these factors can cause wear and tear, leading to cracks and leaks. An RV roof sealant:
Prevents water damage by sealing cracks and seams.
Protects against UV damage, which can weaken the roof material.
Enhances the lifespan of your RV roof.
Provides a smooth finish, improving the overall appearance of your RV.
Key Features of the Best RV Roof Sealant
When choosing a sealant, look for these essential features:
Weather Resistance
The best sealants can withstand extreme weather conditions, from scorching heat to freezing temperatures.
UV Protection
UV rays can cause significant damage to an RV roof. A sealant with UV resistance prevents cracking and fading.
Flexibility
RV roofs expand and contract due to temperature changes. A flexible sealant adapts to these movements without cracking.
Ease of Application
Choose a sealant that is easy to apply, even for beginners. Many products come with instructions and require minimal tools.
Durability
A good sealant provides long-lasting protection, reducing the need for frequent reapplications.
Types of RV Roof Sealants
There are various types of sealants available, each suited for specific roofing materials and needs:
Silicone-Based Sealants
Silicone sealants are waterproof and provide excellent weather resistance. However, they may not adhere well to all surfaces.
Acrylic Sealants
Acrylic sealants are versatile and easy to apply. They are ideal for minor repairs and touch-ups.

Liquid Rubber Sealants
Liquid rubber sealants, such as RV Rubber Roof Sealant, are highly durable and offer superior flexibility. They are perfect for long-term protection.
Tape Sealants
Sealant tapes are convenient for quick fixes. They are great for sealing seams but may not provide the same level of durability as liquid sealants.
How to Apply an RV Roof Sealant
Applying a roof sealant may seem daunting, but it’s a straightforward process. Here’s a step-by-step guide:
Clean the Roof
Remove dirt, debris, and any old sealant from the roof. Use a mild cleaner and allow the surface to dry completely.
Inspect the Roof
Check for cracks, leaks, and areas that need sealing. Mark these spots for easy identification.
Prepare the Sealant
Follow the manufacturer’s instructions for preparing the sealant. Some products may require mixing.
Apply the Sealant
Use a brush, roller, or caulking gun to apply the sealant evenly. Focus on seams, edges, and areas prone to leaks.
Let It Cure
Allow the sealant to dry as per the instructions. Avoid exposing the roof to water during this time.
Inspect the Work
Once the sealant has cured, inspect the roof to ensure all areas are properly sealed.
Benefits of Using RV Roof Magic
When it comes to RV roofing solutions, RV Rubber Roof Sealant stands out as a top choice. Here’s why:
Superior Durability: Provides long-lasting protection against leaks and weather damage.
Easy Application: Designed for DIY enthusiasts, with minimal tools required.
Versatility: Works on a variety of roofing materials, including EPDM, TPO, and fiberglass.
UV Resistance: Protects against harmful UV rays, extending the life of your RV roof.
Cost-Effective: Reduces the need for frequent repairs and reapplications.
Conclusion
Choosing the best RV roof sealant is crucial for protecting your investment and ensuring a worry-free travel experience. Products like RV Rubber Roof Sealant offer excellent protection, ease of use, and long-term value. By maintaining your RV roof with high-quality sealants, you can enjoy countless adventures without the stress of roof-related issues.
Regular inspections, timely repairs, and the right sealant are all you need to keep your RV in great shape. So, gear up, seal your roof, and hit the road with confidence!
0 notes
Text
What to Use Instead of Nail Clips for Polygel: Alternatives to Achieve the Perfect Cure
Polygel nails are a popular choice for those looking for a long-lasting, durable manicure that combines the best features of both gel and acrylic. The process of applying polygel involves building up layers of the gel and curing them under a UV or LED lamp.
For optimal results, nail clips are often used to secure the nail form in place while the polygel is being cured. However, there are several alternatives you can use if you don't have nail clips on hand or want to try something different. Here are some creative solutions to ensure your polygel nails cure perfectly without the need for nail clips.

1. Foil and Cotton Balls
One of the simplest alternatives to nail clips is using aluminum foil along with cotton balls. This method is particularly useful if you need to hold a nail form or tip in place while the gel cures.
How to Use:
Soak a cotton ball in alcohol or a gel remover, and place it over the nail form.
Wrap a piece of aluminum foil tightly around the finger, securing the cotton ball in place.
This will keep the form secure while you cure the gel in the UV or LED lamp.
This method is easy to do and often used for removing gel polish, but it works just as well to hold your nail form in place during the application process.
2. Elastic Bands
Elastic bands or hair ties can also be a practical solution for holding a nail form in place. These are particularly effective if you're looking for a quick and temporary fix.
How to Use:
Gently place the nail form or tip on your nail as you normally would.
Use an elastic band to wrap around the base of your finger to hold the form in place. Make sure the band isn't too tight so it doesn't cause discomfort or disrupt the curing process.
Cure your nails under the lamp as usual.
Elastic bands are a great tool to use if you're working on multiple nails and need something simple and effective.
3. Clothespins
Clothespins are another excellent alternative to nail clips. They're lightweight and can be easily found around the house.
How to Use:
Apply the polygel and place your nail form on the nail as usual.
Use a clothespin to clamp the nail form to the free edge of the nail.
Cure your nails under the UV/LED lamp while the clothespin holds everything in place.
The clothespin method is easy to do, cost-effective, and works well for holding tips or forms steady during the curing process.
4. Binder Clips
If you're looking for a more robust solution, binder clips can be a great substitute for nail clips. These clips have a strong grip and can be used to hold the nail form securely in place.
How to Use:
Position the nail form on your finger as you would with a nail clip.
Use a binder clip to gently pinch the form to your nail.
Cure your nails under the UV or LED lamp.
Binder clips provide a firmer hold and are especially useful for those who have larger nail beds or need extra support while curing their nails.
5. Silicone Nail Forms
Silicone nail forms are a flexible and reusable alternative to both traditional nail forms and clips. They can mold to the shape of your nail and hold the gel in place while it cures.
How to Use:
Apply the polygel and gently press the silicone nail form onto your natural nail.
The form will stick without the need for additional tools, and you can cure the nail as usual.
These forms are great for those who want a mess-free, reusable option that doesn’t require any extra clips or bands.
6. Tape
For a super simple, at-home solution, tape can be a surprisingly effective tool for securing a nail form while curing polygel.
How to Use:
Place the nail form or tip on your nail.
Use tape (preferably medical or painter’s tape) to secure the form by wrapping it around the sides of your finger and the form itself.
Cure the nails under your UV or LED lamp.
Tape is lightweight, inexpensive, and can be easily cut to the appropriate size to ensure it holds everything securely.
Conclusion
While nail clips are a convenient tool for curing polygel nails, they are not the only option available. Alternatives like foil and cotton balls, elastic bands, clothespins, binder clips, silicone nail forms, and tape can all be effective substitutes to help achieve a flawless manicure.
Whether you're looking for a temporary fix or a more permanent solution, these alternatives can help ensure your polygel nails cure evenly and securely every time.
Experiment with these options to find the one that works best for your needs, and enjoy your beautiful, long-lasting nails without the reliance on traditional nail clips!
0 notes
Text
Rise of Adhesives And Sealants Industry: An Overview

Adhesives and sealants are widely used in construction, automotive, packaging and other industries. They play an important role in joining different materials and surfaces together and also be used for sealing and filling gaps.
Types of Adhesives
There are various types of adhesives used for different applications:
- Pressure-sensitive adhesives: These adhesives are applied with finger pressure and cure with pressure forming a bond. Common examples include adhesive tapes and stickers.
- Reactive adhesives: They harden by a chemical reaction such as polymerization. Epoxies, urethanes and acrylics are examples of reactive adhesives.
- Thermosetting adhesives: On application of heat and pressure, these adhesives undergo polymerization forming cross-linked bonds resulting in a permanent bond. Common thermosetting adhesives include phenol-formaldehyde and melamine-formaldehyde.
- Thermoplastic adhesives: Unlike thermosets, these adhesives soften on application of heat and forms bond on cooling. Examples are polyamide, polyester and polyolefin hot melts.
- Anaerobic adhesives: Also known as locking adhesives, they cure and bond in the absence of air when confined in an airtight gap. They are used for threadlocking and retaining fasteners.
Uses of Different Types of Adhesives
Understanding the uses of different types of Adhesives And Sealants is important for their appropriate selection:
- Pressure-sensitive adhesives are used for mounting posters, stickers, medical tapes. They offer instant bonding without need of heat or pressure.
- Reactive adhesives like epoxies offer high strength bonds and are used for structural gluing of metals, composites, ceramics. Urethanes are used in automotive and footwear industries.
- Thermosetting adhesives are preferred for applications requiring high heat resistance like aircraft components. Phenolic resins bond wood, paper, plastics, and textiles.
- Thermoplastic adhesives allow repositioning during assembly and are suitable for wood working, packaging, footwear. Hot melts bond plastics, textiles and rubber quickly.
- Anaerobic adhesives provide protection from shock and vibration in assembled parts like threaded fasteners.
Selection of Sealants
Sealants are used to prevent leakage, dampness and passage of air, gases or noise through gaps and joints. Their selection depends on the following factors:
- Movement accommodation: Dynamic sealants allow for expansion/contraction during temperature fluctuations. Static sealants are used where movement is negligible.
- Substrate material: Silicones, polyurethanes, polysulfides are suitable for different materials like metal, glass, wood, plastic, ceramic etc.
- Weather resistance: Weatherproof sealants withstand UV radiation, rain, temperature extremes without degrading.
- Adhesion: Proper surface preparation and primer improves adhesion of sealants to different substrates.
- Aesthetics: Color matched sealants provide pleasing appearance and are used externally. Clear sealants maintain transparency.
- Chemical resistance: Acid/alkali resistant sealants protect against various corrosive chemicals.
- Hardness: Flexible soft sealants accommodate movements better than rigid hard sealants.
Applications of Adhesives and Sealants
Some major applications of adhesives and sealants:
Packaging industry: Case sealing, carton closing, case banding, pouch sealing uses hot melts andPressure sensitive adhesives. Self-adhesive labels apply reactive adhesives.
Construction: Floor, wall and ceiling tiles;glazing; waterproofing uses polysulfide,polyurethane and epoxy sealants.PU adhesives bond wood,composite etc.
Automotive: Reactive hot melts and PUR adhesives bond exterior body panels. Epoxy and silicones seal engine,transmission components.
Electronics: Surface mount devices,screen protectors use acrylic adhesives.Potting compounds seal electronic circuits.
Furniture:Woodworking uses PVA(polyvinyl acetate)andpolyurethane adhesives.Edge-bandingthermoplastic adhesives.
Bookbinding,footwear,apparel use rubber and hot melt adhesives. Thread lockers secure fasteners with anaerobic adhesives.
Advantages of Using Adhesives and Sealants
- Join materials of unequal thickness - In woodworking and furniture industries pieces can be of uneven thickness.
- Join dissimilar materials - Metals, plastics, ceramics can be bonded using structural adhesives providing design flexibility.
- Improved load distribution and stress dissipation over joints.
- Corrosion resistance over mechanical fasteners such as rivets and bolts prone to corrosion.
- Provides protective barrier against moisture, air, chemicals. Prevents leakage and infiltration.
- Aesthetic seamless joints that do not interfere with fluid/air flow.
- Reduces part counts and provides design simplification compared to multiple component mechanical joints.
Adhesives and sealants provide durable, reliable and cost-effective solutions across different industries for joining and sealing applications. Their judicious selection based on end use ensures optimal performance. Continuous research led to development of newer variants suitable for specialized needs.
Get more insights on Adhesives And Sealants
About Author:
Priya Pandey is a dynamic and passionate editor with over three years of expertise in content editing and proofreading. Holding a bachelor's degree in biotechnology, Priya has a knack for making the content engaging. Her diverse portfolio includes editing documents across different industries, including food and beverages, information and technology, healthcare, chemical and materials, etc. Priya's meticulous attention to detail and commitment to excellence make her an invaluable asset in the world of content creation and refinement.
(LinkedIn- https://www.linkedin.com/in/priya-pandey-8417a8173/)
#Adhesives#Sealants#BondingSolutions#IndustrialAdhesives#ConstructionSealants#EpoxyAdhesives#SiliconeSealants#StructuralBonding#AutomotiveAdhesives
0 notes
Text
UV Cured Acrylic Foam Tapes Market Trends Revolutionizing Construction and Assembly Processes
The UV cured acrylic foam tapes market has shown significant momentum in recent years, primarily driven by innovations in adhesive technology and the growing demand for versatile, high-performance bonding solutions. These tapes are designed with acrylic foam and cured using ultraviolet light, offering enhanced bonding strength, durability, and resistance to harsh environmental factors. As industries seek more efficient and reliable solutions for bonding and sealing applications, UV cured acrylic foam tapes are emerging as a preferred choice.

Key Trends Driving the UV Cured Acrylic Foam Tapes Market
Technological Advancements in Adhesive Solutions
One of the most prominent trends in the UV-cured acrylic foam tapes market is the continued evolution of adhesive technology. Manufacturers are focused on developing tapes with superior bonding strength, higher resistance to temperature fluctuations, and improved UV stability. This has resulted in the introduction of specialized UV-cured acrylic foam tapes tailored for a variety of applications in automotive, electronics, and construction. These advancements are helping to meet the increasing demand for high-performance bonding solutions, particularly in industries requiring durable, long-lasting adhesion.
Sustainability and Eco-Friendly Materials
As sustainability becomes a more significant concern across industries, the UV-cured acrylic foam tapes market is also undergoing changes to reduce its environmental impact. Manufacturers are increasingly using eco-friendly materials and developing processes that reduce energy consumption during production. UV curing, in particular, is considered a more energy-efficient curing method compared to traditional heat-based curing processes. This contributes to lower emissions and less resource consumption, making UV-cured acrylic foam tapes an environmentally friendly choice for companies aiming to meet sustainability goals.
Expanding Applications in the Automotive Industry
The automotive industry is one of the largest adopters of UV-cured acrylic foam tapes, with applications ranging from exterior bonding, sealing, and mounting to interior trim and noise reduction. The trend toward lightweight, fuel-efficient vehicles is driving the demand for tapes that provide strong, reliable adhesion while minimizing the weight of the final product. These tapes are also preferred for their ability to bond dissimilar materials, such as metal, glass, and plastics, which is essential in modern automotive design. As electric vehicles (EVs) and advanced vehicle systems continue to evolve, the demand for high-performance adhesives is expected to increase.
Increasing Demand in Electronics and Consumer Goods
Another major trend influencing the market is the rising demand for UV-cured acrylic foam tapes in the electronics and consumer goods sectors. These tapes are widely used in the assembly of electronic devices such as smartphones, computers, and televisions. They offer high-strength bonding for components like screens, touch panels, and internal parts, as well as excellent resistance to moisture and temperature variations. As consumer electronics become more sophisticated, there is a growing need for advanced adhesive solutions that provide clean, efficient, and durable bonding. The trend toward miniaturization in electronic devices also contributes to the increasing use of UV-cured acrylic foam tapes.
Focus on Enhanced Durability and Performance
Durability is a key factor driving the adoption of UV-cured acrylic foam tapes in several industries. These tapes provide exceptional resistance to UV light, moisture, chemicals, and temperature extremes. Manufacturers are focused on enhancing these properties further, allowing UV-cured acrylic foam tapes to perform in even the most challenging environments. This trend has led to the development of tapes that offer long-term performance in applications such as outdoor signage, building materials, and heavy-duty industrial equipment.
Global Expansion and Market Growth
As the global demand for UV-cured acrylic foam tapes increases, manufacturers are expanding their presence in emerging markets. The growth of industries such as construction, automotive, and electronics in regions like Asia-Pacific, Latin America, and Middle East & Africa is driving demand for high-performance adhesive solutions. In particular, rapid industrialization and infrastructure development in these regions are expected to further boost market growth. To meet this demand, manufacturers are investing in regional production facilities and expanding their distribution networks to ensure a consistent supply of UV-cured acrylic foam tapes worldwide.
Customization and Tailored Solutions
Customization is another growing trend in the UV-cured acrylic foam tapes market. Manufacturers are increasingly offering tailored adhesive solutions to meet the unique needs of different industries. Customizable features include varying levels of thickness, bonding strength, and resistance to specific environmental factors. This trend allows manufacturers to create bespoke products for clients in diverse sectors, from automotive and construction to electronics and consumer goods. As industries continue to evolve, there will be an increasing need for highly specialized adhesive products that cater to specific applications.
Challenges in the UV Cured Acrylic Foam Tapes Market
Despite the rapid growth and technological innovations, the UV-cured acrylic foam tapes market faces several challenges. One major obstacle is the high cost of production compared to other types of adhesive tapes. The use of advanced materials and UV curing technology often requires higher initial investments, which can make these tapes less affordable for smaller manufacturers. Additionally, while the market is expanding globally, companies must navigate regulatory challenges related to environmental standards and manufacturing processes.
Conclusion
The UV-cured acrylic foam tapes market is evolving with strong growth driven by technological advancements, sustainability, and a broadening range of applications. As industries demand more durable, high-performance adhesive solutions, manufacturers are meeting these needs with innovative products designed to withstand extreme conditions while promoting environmental responsibility. Moving forward, the trend of sustainability, coupled with global expansion and technological advancements, will shape the future of this market, offering new opportunities for companies and consumers alike.
#UV Cured Acrylic Foam Tapes Market#UV Cured Acrylic Foam Tapes#UV Cured Acrylic Foam Tapes Market trends
0 notes
Text
Repainting Aluminium Joinery
Aluminium joinery, known for its durability and sleek appearance, is a popular choice in modern architecture. Over time, however, its finish may fade or become worn due to exposure to the elements. Repainting aluminium joinery can breathe new life into your windows, doors, or other fixtures, enhancing both aesthetics and longevity. In this comprehensive guide, we will explore the steps and considerations involved in repainting aluminium joinery.
Understanding Aluminium Joinery
Aluminium joinery refers to windows, doors, and other structures made from aluminium frames. These frames are lightweight, resistant to corrosion, and offer excellent structural integrity. Despite these advantages, aluminium joinery can lose its original finish due to factors such as weathering, UV exposure, and general wear and tear.
Reasons for Repainting
Repainting aluminium joinery serves several purposes:
Aesthetic Enhancement: Restoring the original color or giving it a new look can enhance the overall appearance of your home or building.
Protection: A fresh coat of paint provides an additional layer of protection against corrosion and weathering, potentially extending the lifespan of the aluminium joinery.
Cost Savings: Repainting can be more cost-effective than replacing entire fixtures, especially if the aluminium frames are still in good condition structurally.
Steps to Repaint Aluminium Joinery
Repainting aluminium joinery involves thorough preparation and the use of suitable materials. Here’s a step-by-step guide to the process:
Step 1: Preparation
Gather Materials:
Paint stripper or solvent
Sandpaper (medium grit)
Clean rags
Masking tape
Primer suitable for aluminium
Paint suitable for aluminium
Paintbrushes or rollers
Paint thinner (if applicable)
Prepare the Surface:
Clean the Surface: Remove any dirt, grease, or old paint using a suitable cleaner or solvent. Ensure the surface is completely dry before proceeding.
Remove Old Paint (if necessary): Use paint stripper or solvent according to manufacturer instructions to strip off old paint. This step may not be required if the old paint is in good condition.
Sand the Surface: Lightly sand the aluminium surface with medium-grit sandpaper to create a smooth texture for better paint adhesion. Wipe off any dust with a clean rag.
Step 2: Masking and Protection
Masking: Use masking tape to protect adjacent surfaces that you don’t want to paint, such as glass panes or adjacent walls.
Protection: Cover floors and furniture to prevent accidental paint splatters.
Step 3: Priming
Apply Primer: Use a primer specifically formulated for aluminium surfaces. Apply a thin, even coat of primer using a paintbrush or roller. Allow the primer to dry completely as per the manufacturer's instructions.
Step 4: Painting
Choose the Right Paint: Select a high-quality paint suitable for aluminium surfaces. Water-based acrylic paints or enamel paints are commonly used for this purpose.
Apply Paint: Apply the paint evenly with a paintbrush or roller, following the grain of the aluminium. Multiple thin coats are preferable to one thick coat for better coverage and durability.
Allow Drying: Ensure each coat of paint is fully dry before applying the next coat. This typically takes a few hours depending on the type of paint and environmental conditions.
Step 5: Finishing Touches
Remove Masking: Carefully remove masking tape before the paint is fully cured to avoid peeling off the new paint.
Clean Up: Clean brushes, rollers, and any spills with paint thinner or water (depending on the type of paint used).
Maintenance Tips
To prolong the lifespan of your repainted aluminium joinery:
Regular Cleaning: Clean surfaces regularly with a mild detergent and water to remove dirt and grime.
Inspection: Periodically inspect for signs of wear or damage, and touch up paint as needed to prevent corrosion.
Avoid Abrasive Cleaners: Use gentle cleaners and avoid abrasive materials that could scratch or damage the paint finish.
Conclusion
Repainting aluminium joinery can transform the appearance of your home or building while providing added protection against the elements. By following the steps outlined in this guide and using quality materials, you can achieve a professional-looking finish that enhances both the aesthetic appeal and durability of your aluminium fixtures. Remember to prioritize preparation and choose the right products for optimal results. With proper maintenance, your repainted aluminium joinery can maintain its beauty and functionality for years to come.
#repaint#recolour#Restore faded aluminium joinery#Recolour Aluminium joinery#painting aluminium window frames#repaint aluminium joinery#painting aluminium windows#can you paint aluminium window frames
1 note
·
View note
Text
Creating acrylic keychains is a fun and creative way to personalize your accessories.
Creating acrylic keychains is a fun and creative way to personalize your accessories. Here's a step-by-step guide to making your own how to make acrylic keychains
Materials Needed:
Acrylic Blanks: Pre-cut acrylic shapes or sheets you can cut yourself.
Keychain Hardware: Key rings, jump rings, and small chains.
Vinyl or Paint: For decorating the acrylic.
Cutting Machine (optional): Such as a Cricut or Silhouette for cutting vinyl.
Weeding Tools: For removing excess vinyl.
Transfer Tape: For applying vinyl to the acrylic.
UV Resin and UV Lamp: Optional, for a glossy finish and added durability.
Drill (if using acrylic sheets): For creating holes in the acrylic.
Sandpaper: For smoothing edges if you cut your own acrylic.
Step-by-Step Instructions:
1. Design Your Keychain
Sketch or Digital Design: Start by creating a design. If you have a cutting machine, you can use software like Cricut Design Space or Silhouette Studio to create or import designs.
Size and Shape: Decide on the size and shape of your keychain. Common shapes include circles, squares, hearts, and stars.
2. Prepare the Acrylic
Pre-Cut Blanks: If you're using pre-cut blanks, skip to the decorating step.
Cutting Acrylic Sheets: If you're cutting your own, use a cutting machine or a jigsaw to cut the desired shape. Smooth the edges with sandpaper.
Drilling Holes: If your blanks don’t have holes, use a small drill to create a hole for the keychain hardware.
3. Decorate the Acrylic
Vinyl Decoration:
Cut your design out of adhesive vinyl using a cutting machine or scissors.
Weed out the excess vinyl, leaving only your design.
Use transfer tape to pick up your design from the backing and apply it to the acrylic blank.
Smooth out any bubbles or wrinkles using a squeegee or credit card.
Painting: Alternatively, you can paint your design directly onto the acrylic using acrylic paints. Use painter’s tape for clean lines and let each layer dry before adding details.
4. Seal the Design (Optional)
For added durability and a glossy finish, you can seal your design with UV resin.
Apply a thin layer of UV resin over the decorated side of the acrylic.
Use a UV lamp to cure the resin, following the manufacturer's instructions.
5. Assemble the Keychain
Attach the keychain hardware:
Open a jump ring using pliers.
Insert it through the hole in the acrylic blank.
Attach the key ring or small chain to the jump ring and close it securely with pliers.
Tips and Tricks:
Layering Vinyl: If your design has multiple colors, cut each color separately and layer them carefully on the acrylic.
Edge Protection: If you find the edges of your acrylic blank are sharp, gently sand them down for a smoother finish.
Customization: Personalize each keychain with initials, names, or unique designs to make great gifts.
Troubleshooting:
Bubbles Under Vinyl: If bubbles form under the vinyl, use a needle to puncture them and smooth out the air.
Resin Application: Ensure a dust-free environment when applying UV resin to avoid imperfections.
Creating acrylic keychains is an enjoyable craft that allows for a great deal of creativity and personalization. With these steps and tips, you can create unique and stylish keychains for yourself or as thoughtful gifts for others.
0 notes
Text

What type of adhesive is Bopp?
Bopp adhesive refers to a type of adhesive used with BOPP (Biaxially Oriented Polypropylene) films. These films are widely used in packaging applications due to their clarity, strength, and resistance to moisture and chemicals. The adhesives used with BOPP films can vary depending on the specific application, but they generally fall into a few main categories:
Water-Based Acrylic Adhesives: These adhesives are environmentally friendly and offer good adhesion properties. They are commonly used for labels and tapes that require a clear and strong bond.
Hot Melt Adhesives: These adhesives are applied in a molten state and solidify upon cooling. They provide a strong bond and are often used in applications where quick adhesion is needed, such as in packaging tapes.
Solvent-Based Adhesives: These adhesives use organic solvents to dissolve the adhesive components. They offer excellent adhesion and durability but are less environmentally friendly due to the release of volatile organic compounds (VOCs).
UV-Curable Adhesives: These adhesives are cured using ultraviolet light, offering fast curing times and strong adhesion. They are used in applications where precision and speed are important.
The choice of adhesive depends on the specific requirements of the application, such as the need for clarity, strength, environmental considerations, and the type of BOPP film being used.
1 note
·
View note
Text
Pressure Sensitive Adhesives Market: The Impact of Sustainability Trends on Market Growth

Pressure-sensitive adhesives (PSAs) are a type of adhesive that bonds two surfaces together when pressure is applied. They are non-vulcanizing adhesives, meaning that they do not require heat or a curing agent to set. PSAs are used in a wide variety of applications, including labels, tapes, medical devices, and packaging.
Key Drivers
The key drivers of the pressure-sensitive adhesives market include:
Increasing demand for packaging: PSAs are widely used in the packaging industry for labels, tapes, and other packaging materials. The growing demand for packaged goods is driving the demand for PSAs.
Rising disposable incomes: The rising disposable incomes of consumers is leading to increased demand for consumer goods, such as personal care products, electronics, and home appliances. PSAs are used in a variety of consumer goods, and the increasing demand for these goods is driving the demand for PSAs.
Growing healthcare industry: The growing healthcare industry is driving the demand for PSAs used in medical devices and surgical tapes.
Technological advancements: Technological advancements in the PSA industry are leading to the development of new and improved PSAs with better performance characteristics. This is driving the demand for PSAs in various applications.
Market Segmentation The global pressure-sensitive adhesives market is segmented by type, technology, application, and region.
By type:
Acrylic Rubber Silicone Others
By technology:
Solvent-borne Water-borne Hot melt UV-curable
By application:
Packaging Consumer goods Healthcare Transportation Others
By region:
North America Europe Asia Pacific Latin America Middle East and Africa
Competitive Landscape
The global pressure-sensitive adhesives market is highly competitive, with a number of major players operating in the market. The key players in the market include:
3M Henkel Avery Dennison H.B. Fuller Sika Dow Bostik Ashland Wacker Chemie National Starch Arkema
These players are focused on developing new and improved PSAs, expanding their product portfolios, and entering new markets.
Trends
The key trends in the pressure-sensitive adhesives market include:
Increasing demand for sustainable PSAs: There is a growing demand for sustainable PSAs that are made from renewable resources and have a low environmental impact.
Development of pressure-sensitive adhesives for new applications: PSAs are being developed for new applications, such as wearable devices and electric vehicles.
Growth of the e-commerce market: The growth of the e-commerce market is driving the demand for PSAs used in packaging and shipping.
Conclusion
The global pressure-sensitive adhesives market is expected to grow steadily in the coming years, driven by the increasing demand for PSAs in various industries. The key players in the market are focused on developing new and improved PSAs, expanding their product portfolios, and entering new markets.
#Pressure Sensitive Adhesives Market Share#Pressure Sensitive Adhesives Market Growth#Pressure Sensitive Adhesives Market Demand#Pressure Sensitive Adhesives Market Trend#Pressure Sensitive Adhesives Market Analysis
0 notes
Text
Industrial adhesives Manufacturers

Benefits of Using Adhesives in Trailer Manufacturing
Trailer manufacturing is a complex and demanding process that requires high-quality materials and techniques. One of the most important aspects of trailer manufacturing is the bonding of different components, such as metal, wood, plastic, and fiberglass. Traditionally, mechanical fasteners such as screws, rivets, and bolts have been used to join these components, but they have some drawbacks, such as:
- They create stress concentrations and weaken the structure
- They increase the weight and reduce the fuel efficiency of the trailer
- They require drilling holes and additional tools and labor
- They create corrosion and noise issues
- They affect the aesthetics and aerodynamics of the trailer
To overcome these challenges, many trailer manufacturers have switched to using adhesives as an alternative or complementary method of bonding. Adhesives offer several benefits over mechanical fasteners, such as:
- They distribute the stress evenly and enhance the strength and durability of the trailer
- They reduce the weight and improve the fuel efficiency of the trailer
- They eliminate the need for drilling holes and simplify the assembly process
- They prevent corrosion and noise problems
- They improve the appearance and aerodynamics of the trailer
Adhesives are also versatile and can bond different types of materials with different shapes and sizes. They can also provide additional functions, such as sealing, damping, and thermal insulation. Adhesives are available in different forms, such as liquids, pastes, tapes, and films, and can be applied using various methods, such as spraying, brushing, rolling, or dispensing.
However, not all adhesives are suitable for trailer manufacturing. Some factors that need to be considered when choosing an adhesive are:
- The compatibility of the adhesive with the materials to be bonded
- The environmental conditions that the trailer will be exposed to, such as temperature, humidity, UV radiation, and chemical agents
- The performance requirements of the trailer, such as load-bearing capacity, impact resistance, fatigue resistance, and flexibility
- The curing time and method of the adhesive
- The cost-effectiveness and safety of the adhesive
Therefore, it is important to consult with an adhesive expert or supplier before selecting an adhesive for trailer manufacturing. Some examples of adhesives that are commonly used in trailer manufacturing are:
- Epoxy adhesives: These are high-performance adhesives that can bond metal, wood, plastic, and fiberglass. They have excellent mechanical properties, chemical resistance, and temperature resistance. They can be cured at room temperature or with heat.
- Polyurethane adhesives: These are flexible adhesives that can bond metal, wood, plastic, and fiberglass. They have good impact resistance, vibration damping, and weather resistance. They can be cured at room temperature or with moisture.
- Acrylic adhesives: These are fast-curing adhesives that can bond metal, plastic, and fiberglass. They have good shear strength, peel strength, and UV resistance. They can be cured at room temperature or with heat.
In conclusion, adhesives are a valuable tool for trailer manufacturing that can improve the quality, performance, efficiency, and appearance of trailers. By choosing the right adhesive for the right application, trailer manufacturers can achieve optimal results and gain a competitive edge in the market.
0 notes