#Thermal lamination machine
Explore tagged Tumblr posts
Visit Tumblr Blog
Explore Tumblr blogs with no restrictions, modern design and the best experience.
Last Seen Tumblr Blogs


Fun Fact
Tumblr Inc. is using 66 technologies for its website.
Text
Advanced machines help factories work faster and with fewer mistakes. Machines like hot foil stamping machines add shiny designs to products, while paper cutting machines cut paper quickly and accurately. These machines save time, reduce waste, and improve quality. At Friends Engineering Company, we provide modern machines to help businesses work better and stay ahead in manufacturing.
#Hot foil stamping machine#Paper cutting machine#Thermal lamination machine#Guillotine paper cutting machine#Hot and cold lamination machine
0 notes
Text
Choosing the Right Thermal Lamination Machine: A Comprehensive Guide

Lamination machines are a valuable tool for protecting documents, enhancing presentations, and preserving important materials. A thermal lamination machine uses heat to bond layers of plastic film over a sheet, ensuring a smooth, professional, and durable finish. Whether you're laminating office documents, ID cards, or printed materials for personal use, the right machine can make all the difference. This guide explores the features, benefits, and types of thermal laminators while highlighting key considerations like lamination machine price and the differences between thermal and cold lamination machines.
What is a Thermal Lamination Machine?
A thermal lamination machine is a device that uses heat-activated adhesive to apply a protective plastic film over paper or similar materials. The film is typically available in sheets or rolls, and the machine heats the adhesive to create a durable, protective layer that is resistant to water, tearing, and wear.
Thermal laminators are widely used in offices, schools, and personal projects due to their reliability and high-quality results. These machines are often preferred for their ability to laminate a wide range of items, from certificates and menus to business cards and signs.
Key Features of a Thermal Lamination Machine
Heat Activation: The primary function of a thermal laminator is its use of heat to bond plastic film onto documents. It ensures a professional, long-lasting finish that protects against wear and tear.
Sheet Laminators: Most thermal laminators are designed to work with laminator sheets, which are pre-cut to standard sizes like A4, A3, and legal sizes. These sheets come with pre-applied adhesive that activates when heated by the machine.
Speed and Versatility: Modern thermal laminators are faster and more versatile than ever before. They can handle a variety of materials and thicknesses, allowing for both thin, flexible lamination as well as thicker, more rigid protective layers.
Automatic Shutoff: For safety and energy efficiency, many machines feature automatic shutoff capabilities, turning off after periods of inactivity to prevent overheating.
Thermal vs. Cold Lamination Machine
Before deciding on a thermal laminator, it’s important to understand the difference between thermal and cold lamination machines. While thermal laminators use heat, cold lamination machines use pressure to bond the film to the material. Here's a quick comparison:
Thermal Laminator: Offers a higher-quality, more durable finish. It works best for flat, smooth surfaces and is ideal for documents, photos, and printed materials. However, thermal lamination is not recommended for heat-sensitive materials like inkjet prints or certain types of paper.
Cold Lamination Machine: Uses pressure-sensitive adhesive to laminate materials without heat. It’s better for heat-sensitive materials and offers more flexibility, but the end product may not be as durable as with thermal lamination.
Why Choose a Thermal Lamination Machine?
High-Quality Results: Thermal laminators produce a sleek, polished finish that is resistant to moisture, dust, and general wear. This makes them ideal for laminating important documents that need to stand the test of time.
Durability: Unlike cold lamination, thermal lamination creates a bond that is much stronger, giving the laminated document a longer lifespan. This is crucial for frequently used items like menus, signs, or educational materials.
Versatile Usage: Thermal laminators can handle a variety of materials and applications. From photographs and business cards to educational materials and posters, thermal lamination enhances the durability and appearance of almost any printed item.
Affordability: Although thermal lamination machines can vary in price, they offer excellent value over time due to their long-lasting results. The lamination machine price depends on factors like brand, size, and features, but investing in a quality machine is worth it for both professional and personal use.
Factors to Consider When Buying a Thermal Laminator
Lamination Machine Price: Pricing is always a significant consideration. The cost of a thermal laminator can vary depending on its size, features, and brand. While smaller, portable machines may be more affordable, larger machines are necessary for handling bigger projects.
Sheet Compatibility: Ensure that the laminator can work with the appropriate lamination sheets. Most standard machines can handle A4 sheets, but if you frequently laminate larger documents or posters, you may want to consider a machine that accommodates larger formats like A3.
Thickness Capacity: Lamination thickness is measured in mils (thousandths of an inch). For everyday use, a machine that handles 3 to 5 mil thick laminating pouches is sufficient. For heavy-duty laminations, such as signs or frequently handled materials, a machine that accommodates thicker pouches (up to 10 mils) may be necessary.
Speed: Some thermal laminators take time to heat up and process materials. If you're working in a fast-paced environment or need to laminate a large number of sheets, investing in a machine with a faster warm-up and processing time can save you a lot of time and frustration.
Portability: Smaller, portable laminators are ideal for occasional use or small spaces. These are also great for those who need a portable cash counting machine. However, if you have larger-scale lamination needs, opt for a machine with higher capacity and durability.
Tips for Using a Thermal Lamination Machine
Preheat Properly: Always allow your machine to preheat fully before starting the lamination process. This ensures that the adhesive is evenly distributed across the film for a smooth finish.
Use the Right Sheets: Depending on the material you’re laminating, different thicknesses of laminator sheets are available. For delicate materials, choose thinner sheets, while thicker sheets provide greater protection for heavier materials.
Regular Maintenance: Clean the rollers regularly to avoid film buildup, which can cause jams or uneven lamination. Many machines come with maintenance kits to ensure longevity.
Conclusion
A thermal lamination machine is an excellent investment for those who need to protect important documents, create professional presentations, or simply enhance the appearance of printed materials. With a variety of features, sizes, and price points available, there's a laminator to suit every need. By understanding the difference between thermal and cold lamination machines, considering key factors like lamination machine price and sheet compatibility, and knowing how to use and maintain the machine effectively, you can get the most out of your investment. Whether for professional, educational, or personal use, a thermal laminator is a versatile and practical tool for protecting and preserving your documents.
0 notes
Text
0 notes
Text
My bookbinding tools and stuff
I started binding in July 2023, so I'm certainly no expert, but in case you're interested in what I use to create my binds…
I use Adobe InDesign to typeset and Illustrator for graphics
I print on an old Canon laser printer for black and white and an Epson ET-3830 inkjet for color
I purchase my shortgrain paper from Church Paper (for folios) and the long grain paper I use for quartos is just whatever (nothing special)
I love my punching cradle and guide that I got off etsy.
I use this thread (that I wax with beeswax) for sewing signatures
I love this cardstock for endpapers (Craft Consortium ink drops) but I collect pads of 12x12 cardstock in various designs from craft stores.
I like this bookboard (in black specifically)
ETA: I recently ordered precut boards from Hollander's. I cannot recommend this enough. I got the .10 thick board.
I use these tools for spacing and squaring when creating covers
Everything gets stuck together with this glue. (GET THE POINTY TOP!)
I have an old Silhouette Cameo for cutting vinyl and applying foil to bookcloth (with this pen)
I use this foil quill for freehanding
I apply laser toner foil with this Scotch laminator
I have a thermal binding machine from Amazon and I use these glue strips with it
I have this guillotine (but I don't recommend black for visibility reasons)
I have purchased bookcloth from Hollander's, Colophon, and Amazon. I don't recommend the Allure line if you are decorating with HTV or paint.
Get this heat and bond if you want to make your own bookcloth
I make ribbon bookmarks with charms like these and these crimps.
I get positive feedback and help and kindness from @renegadeguild
Caveat: These are just the tools and supplies I use. I am not an expert. I'm a hobbyist who is relatively new to it. Some of the things I use might be "wrong" but every book I've made works, so who cares?
If you want to see what it looks like when I bind something, here's a short video.
306 notes
·
View notes
Text
Backslide by Blackkat!
I was testing to see what the limit was for "how big can I make a paperback!" Turns out anything over 125k in this method (legal size quarto) won't fit under my guillotine! Lots of sanding occurred because Backslide (by @blackkatmagick ) was a perfect (for testing) 128k and it did NOT fit under my guillotine. Very educational!
It's a gorgeous and chonky boy. A whopping 776 pages!!! I used my thermal binding machine and it did not flinch.
The cover is designed in canva and printed on cheap cardstock. Then I half laminated it (only laminated the cover side, the back side is plain cardstock so it can be glued).
I also learned why we don't use scrap paper to protect the book in the thermal binding machine-- some of the text from my scrap paper rubbed off onto the spine and won't come off! Fortunately this book is for my own shelf and I'm not bothered by mistakes at all :)
I did spend about an hour fighting the guillotine, sanding, and even got out a chisel to whack at it.
I made many, many mistakes but thankfully few are evident in the final form of the book!
Hope you enjoy :)


The fic can be found here on ao3!
Longtext:
81 notes
·
View notes
Text
3 Beautiful Ways to Use Pressed and Dried Flowers | DIY Crafts You’ll Actually Keep!
I started working with dried flowers and pressed botanicals a few years ago, and it has taught me a few things.
Delicate dried flowers can burn or disintegrate in epoxy resin.
Glossy Mod Podge however much we love it, can make you cry (and even ruin your floral project).
Depending on your project, pressed flowers MUST be chosen as carefully as you would choose fabric, paper, or paint colors.
So how can you still work with these lovely mediums and create long lasting, archival art that you can be proud of? Read more to learn about 3 of the most botanical-friendly crafts.
Framed Glass Art

What you’ll need:
Double sided glass frame. (any size)I buy mine on Aliexpress or Amazon.
Clear glue, glossy mod podge, or a tape runner.
Pressed flowers
Scissors
How to make it:
Start by selecting your botanical specimens and arranging them in your frame. Use scissors to trim and refine your arrangement until it is to your liking.
Remove all of the flowers, and strategically place dots of clear glue on the inner glass. Wait until your glue becomes tacky. The time will depend on the type of glue that you’re using.
Tip: Test out the cure time by placing a few different sized glue dots on a plastic surface. See how long it takes for the glue to become more viscous and less runny.
Place the flowers onto the glass. Make sure to tack down all specimens with glue until they’re difficult to move. Allow the glue to dry completely before closing the glass frame.
Once dry, display your beautiful arrangement!
I love making smaller arrangements for office spaces and display shelves. These also make adorable secondary gifts in care packages.
Glass offers a more eco-friendly alternative to epoxy resin. Though I love working with resin, I’ve started to become more conscious and selective of my usage to creation ratio.
2. Floral Bookmarks

What you’ll need:
Pressed flowers. Preferably long stem flowers that press very flat such as fleabane and daisies. You can also use small flowers without stems.
Self or thermal laminating sheets.
Thermal laminator. (If using thermal lamination)
Scissors
Cricut Cutting Machine (highly recommended for a cleaner result) However, you can also create your own frames. Simply use two gift tags or rectangular pieces of paper. Measure and cut out another rectangle of your preferred size in the center of your paper. Use an X-Acto knife to make the cut out.
Kraft paper cardstock
Glue stick, or my personal recommendation, Kuretake Glue Pens. They will make less of a mess, and create a longer lasting bond on kraft paper.
How to make it:
If using a Cricut machine, start a new project in Cricut Design Space.
Search for “bookmark frame” in the “images” section.
Select a design you like the shape of. You can also create your own by “slicing” new shapes into existing templates.
Resize your design. Choose whatever size will accommodate the shape of your flowers.
Cut out your frames out on kraft paper.
Once you’ve cut out your design, remove half of the frames from the mat. Leave the other half on the mat. This will make keeping them flat easier once you’re ready to assemble everything.
Laminate your flowers. Be sure to use your frame as a guide to arrange them within the window. Leave an inch of space between each arrangement for cutting if you’re making more than one bookmark.
Cut around the flowers, leaving a bit of allowance for gluing them onto the frame. I never measure like I should. Just use the frame as guide to avoid cutting off too much laminating plastic. We will hide the ugly jagged cutting job later. 😅
Return to the mat and apply a generous layer of Kuretake glue to the entire surface of the frames still stuck to the Cricut mat.
Carefully place the laminated floral arrangement on the frame.
Apply another layer of glue around the edges of the lamination, and also on the other frame.
Place the second frame over one of the mat frames, and press down firmly. Tip: You can also place a book on top to keep them flat.
Let your bookmarks dry for about 20 minutes before adding your embellishments. I love using key charms, grommets, ribbons, or tassels.
Check out my inspo photos below! Get creative with decorating.
3. UV Resin Pendants
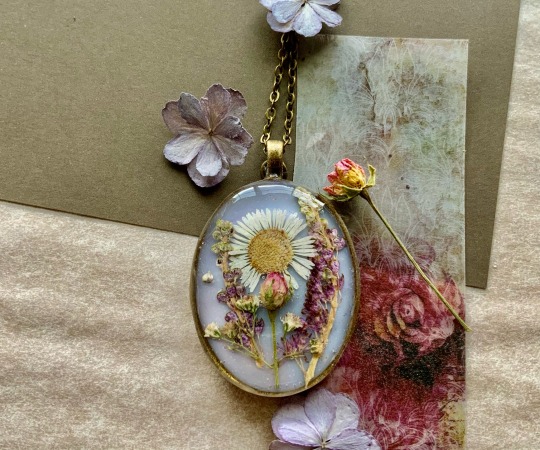
Before I started working with UV resin, I was told that it isn’t light fast. Which is true for most resins on the market. I’ve also heard that it yellows over time and that the UV light burns flowers.
These are all things that I’ve experienced working with flowers in UV resin. However, I’ve managed to make projects that have stayed glossy, clear, and beautiful for over 2 years now, and I want to share my tips and tricks!
Tip #1: USE a high quality UV resin such as the one from Counter Culture DIY.
Tip #2: AVOID using delicate flowers such as forget-me-nots, hydrangeas, larkspur, etc. If the petals are thin and delicate, they WILL become distorted or burn. Think florets, spaced petals, and small leaves.
Tip #3: USE opaque, strong, and VERY flat flowers such as pressed Violets, Chamomile, Fleabane daisies, Rosettes, Queen Anne’s Lace, and Baby’s Breath.
Tip #4: AVOID flowers with too many overlapping petals. These will trap air bubbles inside of your resin layers that tend to express during curing. They tend to cause very large holes and gaps.
What you’ll need:
Very high quality UV resin (My suggestion: Counter Culture DIY)
Cabochon bases or frame pendants
Barrier tape (if using a frame instead of cabochon base.)
Toothpicks to pop bubbles (I actually prefer using a sewing needle)
Light Curer such as a nail lamp. I use the Melody Susie 36W nail lamp from Amazon. Counter Culture DIY sells one specifically for their UV resin as well.
Pressed Flowers (My favorite seller on Etsy)
Optional: Colorants. I use mica powders, acrylic paints, and black and white resins from Counter Culture DIY (not sponsored, I wish!) These give your resin a background to stand out against.
Nitrile gloves
How to make it:
Start by applying a thin layer of UV resin to your base or taped frame. This will be the layer with color (if using pigments).
2. Pop any visible bubbles with a toothpick and cure the first layer for about 1-3 minutes.
3. Apply a thin dot of clear resin to the first cured layer. This will give your flowers something to stick to as you arrange them.
4. Once your flowers are arranged, apply a few strategic dots of resin around them to keep them in place. Cure the first thin layer without covering the flowers completely. Remember to pop bubbles!
5. Continue to add thin layers. Cure each layer for 1-3 minutes each. Repeat this process until your flowers are covered and your top coat has a domed appearance.
6. Finished! Avoid touching your project for several minutes until fully cooled. You don’t want fingerprints in your shiny top coat!
For more floral project ideas, check out my Pinterest below!
#pressed flowers#unique gifts#vintageinspired#art#home & lifestyle#floraldesign#fashion#books and literature#cottagecore#beauty#art tutorial#easy art#art ideas#artists on tumblr#books & libraries#floralart#handmade art#diy art#diy tutorial#journaling#inspo#writing#craftinspiration#my art#art supplies#artwork#floral#flowers#paper craft#diy ideas
3 notes
·
View notes
Text
How Permanent Magnet Machines Work

Permanent magnet machines (PMMs) are widely used in various industries due to their efficiency, reliability, and compact design. These machines leverage permanent magnets instead of electromagnets or field windings to generate a magnetic field, making them an essential component in modern electrical applications such as electric vehicles, wind turbines, and industrial automation. This article explores the working principles, types, and advantages of permanent magnet machines.
Basic Working Principle of Permanent Magnet Machines
At the core of a permanent magnet machine is a rotor containing permanent magnets that create a constant magnetic field. Unlike traditional electric machines that rely on externally supplied current to generate magnetism, PMMs use naturally occurring magnetization, eliminating the need for additional excitation. The interaction between the permanent magnet field and the stator windings produces torque, which drives the machine.
PMMs operate based on Faraday’s Law of Electromagnetic Induction, where a rotating magnetic field induces an electromotive force (EMF) in the stator windings. This process allows for energy conversion between electrical and mechanical forms, making PMMs highly efficient.
Key Components of Permanent Magnet Machines
Stator: The stationary part of the machine, consisting of laminated iron cores and copper windings. It plays a crucial role in producing the necessary magnetic flux interaction with the rotor.
Rotor: The rotating component embedded with permanent magnets that generate a continuous magnetic field.
Permanent Magnets: Usually made from materials like neodymium, ferrite, or samarium-cobalt, these magnets provide a strong and stable magnetic field without the need for an external power source.
Bearings and Shaft: These components ensure smooth mechanical movement and support the rotor's rotation.
Types of Permanent Magnet Machines
Permanent magnet machines come in different types depending on their construction and operational characteristics:
Permanent Magnet Synchronous Machines (PMSMs)
Operate in synchronism with the supply frequency.
Commonly used in electric vehicles (EVs), industrial motors, and robotics due to their high efficiency and precise control.
2. Permanent Magnet Brushless DC Motors (BLDC)
Use an electronic commutation system instead of mechanical brushes.
Found in applications like household appliances, drones, and medical devices.
3. Permanent Magnet Generators (PMGs)
Convert mechanical energy into electrical energy efficiently.
Used in wind turbines, hydroelectric power plants, and backup power systems.
Advantages of Permanent Magnet Machines
PMMs offer several advantages over traditional electric machines, making them a preferred choice in modern engineering applications:
Higher Efficiency: With no additional excitation losses, PMMs operate at higher efficiencies, reducing energy consumption.
Compact and Lightweight: The elimination of field windings leads to a smaller and lighter design, making them ideal for space-constrained applications.
Improved Reliability: Fewer moving parts and reduced electrical losses increase the machine's lifespan and durability.
Better Power Density: PMMs can generate more power in a smaller footprint, enhancing performance in applications like EVs and renewable energy.
Reduced Maintenance: The absence of brushes (in BLDC motors) and lower heat generation contribute to minimal maintenance requirements.
Challenges in Permanent Magnet Machines
Despite their numerous benefits, PMMs also face some challenges:
High Material Costs: Rare-earth magnets, such as neodymium, can be expensive and subject to price fluctuations.
Thermal Management: Excessive heating can lead to magnet demagnetization, reducing machine performance.
Magnetic Field Control: Managing flux interactions and preventing demagnetization require careful design considerations.
Recycling and Sustainability: Extracting and recycling rare-earth materials pose environmental concerns.
Future Trends in Permanent Magnet Machine Technology
To overcome challenges and improve performance, researchers and manufacturers are developing advanced PMM technologies, including:
Use of non-rare-earth magnets to reduce dependency on expensive materials.
Hybrid PMM designs combining traditional and PM technologies for enhanced performance.
Smart control algorithms to optimize energy efficiency and real-time monitoring.
Integration with IoT and AI to improve predictive maintenance and automation capabilities.
Conclusion
Permanent magnet machines have transformed various industries by offering higher efficiency, compact design, and superior performance compared to conventional electric machines. Their applications range from electric vehicles and wind power generation to industrial automation and consumer electronics. As technological advancements continue, PMMs will become even more powerful, efficient, and environmentally friendly, solidifying their place in the future of electrical engineering.
0 notes
Text
A Comprehensive Guide to Printed Circuit Board (PCB) Manufacturing
Title: A Comprehensive Guide to Printed Circuit Board (PCB) Manufacturing
Introduction Printed Circuit Boards (PCBs) are the backbone of modern electronic devices, providing a platform for electrical connections between components. The manufacturing process of PCBs requires precision, technical expertise, and adherence to industry standards to ensure high functionality and reliability. This guide will walk you through the PCB manufacturing process, covering essential topics, strategies, and step-by-step tutorials.
Outline
Overview of PCB Manufacturing
Importance of PCBs in modern electronics
Types of PCBs (Single-layer, double-layer, multi-layer, rigid, flexible, rigid-flex) pcb assembly
Common materials used in PCB fabrication
PCB Design and Layout
Introduction to PCB design software (Eagle, Altium, KiCad, OrCAD)
Key design considerations (trace width, spacing, via placement)
Design for manufacturability (DFM) guidelines
Prototyping and testing the design before manufacturing
PCB Fabrication Process
Substrate material selection
Copper cladding and etching process
Layer alignment and lamination in multilayer boards
Drilling and plating through-holes and vias
Component Assembly and Soldering Techniques
Surface Mount Technology (SMT) vs. Through-Hole Technology (THT)
Pick-and-place machines and manual component placement
Reflow soldering and wave soldering processes
Inspection methods (Automated Optical Inspection, X-ray, Functional Testing)
Quality Control and Testing Strategies
Electrical testing (Flying probe, bed-of-nails testing)
Environmental stress testing (thermal cycling, humidity testing)
Common defects and troubleshooting techniques
Tutorials for DIY and Small-Scale PCB Manufacturing
How to create a PCB at home using etching techniques
Using a CNC machine for PCB prototyping
Ordering PCBs from a professional manufacturer (Gerber file preparation and submission)
Future Trends in PCB Manufacturing
Advances in flexible and stretchable PCBs
3D printed circuit boards
AI-driven PCB design and automated manufacturing
Conclusion The PCB manufacturing process is a blend of design, engineering, and precise execution. Understanding the various steps, from design to assembly and testing, helps ensure the production of high-quality and reliable PCBs. With advancing technology, the industry continues to evolve, offering more efficient and sophisticated solutions. Whether you're a hobbyist, an engineer, or a manufacturer, mastering PCB manufacturing techniques is essential for innovation in electronics.
By following the strategies and tutorials outlined in this guide, you can confidently design and manufacture PCBs that meet your specific requirements.
0 notes
Text
Used Thermal Lamination Machine for SALE
Komfi - SAGITTA
Buy Directly from SELLER -
Manufacturer: Komfi
Year: 2012
Machine Availability: In Production
Price: On Request
Location: Czech Republic
#print #Komfi #OffsetMachine #machinedalal
0 notes
Text
A Comprehensive Guide to Printed Circuit Board (PCB) Manufacturing
Introduction Printed Circuit Boards (PCBs) are the backbone of modern electronic devices, providing a platform for electrical connections between components. The manufacturing process of PCBs requires precision, technical expertise, and adherence to industry standards to ensure high functionality and reliability. This guide will walk you through the PCB manufacturing process, covering essential topics, strategies, and step-by-step tutorials.
Outline
Overview of PCB Manufacturing
Importance of PCBs in modern electronics pcb assembly
Types of PCBs (Single-layer, double-layer, multi-layer, rigid, flexible, rigid-flex)
Common materials used in PCB fabrication
PCB Design and Layout
Introduction to PCB design software (Eagle, Altium, KiCad, OrCAD)
Key design considerations (trace width, spacing, via placement)
Design for manufacturability (DFM) guidelines
Prototyping and testing the design before manufacturing
PCB Fabrication Process
Substrate material selection
Copper cladding and etching process
Layer alignment and lamination in multilayer boards
Drilling and plating through-holes and vias
Component Assembly and Soldering Techniques
Surface Mount Technology (SMT) vs. Through-Hole Technology (THT)
Pick-and-place machines and manual component placement
Reflow soldering and wave soldering processes
Inspection methods (Automated Optical Inspection, X-ray, Functional Testing) pcb manufacturing
Quality Control and Testing Strategies
Electrical testing (Flying probe, bed-of-nails testing)
Environmental stress testing (thermal cycling, humidity testing)
Common defects and troubleshooting techniques
Tutorials for DIY and Small-Scale PCB Manufacturing
How to create a PCB at home using etching techniques
Using a CNC machine for PCB prototyping
Ordering PCBs from a professional manufacturer (Gerber file preparation and submission)
Future Trends in PCB Manufacturing
Advances in flexible and stretchable PCBs
3D printed circuit boards
AI-driven PCB design and automated manufacturing
Conclusion The PCB manufacturing process is a blend of design, engineering, and precise execution. Understanding the various steps, from design to assembly and testing, helps ensure the production of high-quality and reliable PCBs. With advancing technology, the industry continues to evolve, offering more efficient and sophisticated solutions. Whether you're a hobbyist, an engineer, or a manufacturer, mastering PCB manufacturing techniques is essential for innovation in electronics.
By following the strategies and tutorials outlined in this guide, you can confidently design and manufacture PCBs that meet your specific requirements.
0 notes
Text
Advanced machines help factories work faster and with fewer mistakes. Machines like hot foil stamping machines add shiny designs to products, while paper cutting machines cut paper quickly and accurately. These machines save time, reduce waste, and improve quality. At Friends Engineering Company, we provide modern machines to help businesses work better and stay ahead in manufacturing.
#Hot foil stamping machine#Paper cutting machine#Fully automatic paper cutting machine#Guillotine paper cutting machine#Thermal lamination machine
0 notes
Text
Hot and Cold Laminator Machines: Which One is Right for You?

Lamination is a process that has become indispensable for both businesses and individuals. Whether it’s preserving important documents, creating professional ID cards, or crafting vibrant displays, lamination ensures longevity, durability, and a polished finish. When exploring lamination solutions, one key question arises: Hot or Cold Laminator Machine. Which one should you choose?
While both options serve the same purpose, they differ in functionality, applications, and suitability for specific needs. This blog will delve into the differences between hot and cold laminator machines, their benefits, and how to decide which one fits your requirements.
1. What is a Laminator Machine?
A laminator machine applies a protective layer of plastic film to documents, photographs, and other materials to safeguard them from wear and tear, moisture, and fading. The process enhances durability and gives materials a professional appearance.
Laminators are broadly classified into hot laminators and cold laminators, each catering to distinct purposes and preferences.
2. Hot Laminator Machines: How They Work
Hot laminators use heat and pressure to seal lamination film onto materials. The film is coated with adhesive that activates when heated, bonding securely to the document.
Advantages of Hot Laminators:
Stronger Seal: The heat-activated adhesive creates a more durable bond, making the lamination resistant to peeling or damage.
Glossy Finish: Hot laminators produce a clear, polished finish, enhancing the visual appeal of materials.
Cost-Effective: Lamination pouches for hot laminators are generally more affordable than cold laminator films.
Best Uses:
Certificates and diplomas.
Photographs and artwork.
Signage and posters.
Considerations:
Requires warm-up time before use.
Not suitable for heat-sensitive materials like wax-based prints or certain types of photographs.
3. Cold Laminator Machines: How They Work
Cold laminators use pressure-sensitive adhesive to bond the lamination film to the document. These machines do not rely on heat, making them ideal for materials that could be damaged by high temperatures.
Advantages of Cold Laminators:
Safe for Heat-Sensitive Materials: Perfect for lamination needs involving delicate items like thermal prints or old photographs.
No Warm-Up Time: Instant readiness saves time, especially for quick or high-volume tasks.
Eco-Friendly Options: Many cold laminators use recyclable films, aligning with sustainable practices.
Best Uses:
Heat-sensitive documents (e.g., thermal receipts).
Stickers and decals.
Materials with uneven surfaces.
Considerations:
Cold lamination films are often more expensive.
The bond may not be as strong as heat-sealed lamination, especially for items exposed to heavy handling.
4. Key Differences Between Hot and Cold Laminators

5. Factors to Consider When Choosing a Laminator
A. Type of Materials
If you’re laminating photographs, thermal receipts, or items that can warp under heat, a cold laminator is the safer option.
For standard documents, posters, and ID cards, hot laminators are a better fit.
B. Volume of Work
Businesses with frequent, high-volume lamination needs may prefer a hot laminator for its efficiency and cost-effectiveness.
Cold laminators are ideal for occasional use or specialized tasks requiring immediate readiness.
C. Budget
Hot laminators are typically more economical, both in terms of the machine and the lamination film.
Cold laminators might involve a higher initial cost but offer unique benefits for niche applications.
D. Desired Finish
Choose hot laminators for a sleek, professional look.
Opt for cold laminators if you prioritize preserving delicate textures or original details.
6. Innovations in Laminator Machines
The laminator market has seen significant advancements, offering users modern features for enhanced convenience:
Dual-Function Machines: Some laminators now combine hot and cold capabilities, allowing users to switch modes as needed.
Eco-Friendly Films: Increasing demand for recyclable and biodegradable lamination films supports sustainability.
Touchscreen Controls: Newer models feature user-friendly interfaces for precise settings.
7. Maintenance Tips for Laminator Machines
To ensure your laminator performs optimally and lasts longer, follow these maintenance practices:
Clean Rollers Regularly: Residue from adhesive can accumulate, affecting performance.
Use the Correct Film: Always match the film type and size to your Laminator machine specifications.
Avoid Overloading: Exceeding the machine’s capacity can cause jams or damage.
8. Final Verdict: Which Laminator Should You Choose?
The choice between a hot and cold laminator ultimately depends on your specific needs. Here’s a quick summary:
Choose Hot Laminators if: You handle standard materials, prefer cost-effective solutions, and need a durable, polished finish.
Choose Cold Laminators if: You work with heat-sensitive materials, need immediate use, or prioritize eco-friendly options.
For those who require versatility, a dual-function laminator offers the best of both worlds, catering to a wide range of projects.
Conclusion
Hot and cold laminator machines are both invaluable tools that cater to different lamination needs. Whether you’re a business owner, educator, or hobbyist, understanding the strengths and limitations of each type ensures you make an informed decision. By investing in the right laminator, you can protect your documents, enhance presentations, and even spark creativity with unique projects. Embrace the power of lamination today and elevate your work to new levels of professionalism and durability!
youtube
#sheet laminator#thermal laminator#lamination machines#hot laminator#cold lamination machine#Youtube
0 notes
Text
Check out few tips to survive and retain your business in the printing and packaging industry.
#Guillotine Paper Cutting Machine#corrugation machine#die cutting machine#thermal lamination machine
0 notes
Text
7 Affordable Ways to Refresh Your Flooring
If you want to make a big statement, your flooring is the one aspect of your home that can instantly transform its appearance. Once you update the material, color, finish, or style of your floors, your home will gain a brand-new feel.
Most people believe that improving the state of the floors would not be as substantial an enhancement as getting new furniture or altering the room arrangement. However, professional interior designers disagree. Experts claim that even minor changes in the floors can lighten up rooms while also improving the internal acoustics and the environment. To help you with that, we bring you affordable ways to refresh your flooring.
What are the most popular types of flooring? Before we get into how you can make your floors shine again, we will go over some of the most prevalent types and their differences. Remember, not all flooring has the same specifications, so different care techniques apply to each.
Carpet - This is and has always been a popular option both among homes and businesses. Carpeting is cozy and adds a pleasant and inviting feel to an area. If you have children, this is often the most secure solution. Carpet care is simple, especially when you hire professionals, thanks to advanced carpet cleaning Hardwood - This is an elegant choice - hardwood flooring provides a touch of class to any room. Harwood also increases the value of your property. It comes in many options and can be rather costly. Regardless of the choice of pattern, hardwood floors can be plastered and varnished after some time. Laminate - This is a material that is easy and very quick to install, and just as easy to maintain. Due to its resistance to wear and scratches, laminate is the perfect choice for the flooring in the busiest rooms in your home. Vinyl - Vinyl is a floor covering with many advantages. It is great for humid rooms, is very resistant, absorbs noise, and comes in many designs. Good thermal and sound insulation is one of the main reasons to choose vinyl, plus it's easy to maintain. Tile - Tiles are quite common and very low-maintenance. They are highly long-lasting and waterproof. Areas like kitchens, toilets, and laundry facilities mostly use moisture-proof floors like tiles, but you can put them anywhere. Affordable ways to refresh your flooring
Give it a deep clean You are sure to notice that your flooring becomes harder to clean after a while and slowly loses the original shine. No matter how often you wash it, it looks clean only immediately after and then as if you haven't even cleaned. The result is lacking because your floors need a deep clean and polish with professional machines and tools.
Namely, when it comes to floors, there is a possibility that the impurities have penetrated deep into the small cracks and that it is necessary to apply special measures to remove the most stubborn dirt. The process of Chem‑Dry cleaning of flooring is fast and efficient, and our team is well-coordinated and always up to the task.
Paint the floors For some people, the idea of floor painting seems like a big and difficult job. But it's a charming way to add a bright and cheerful look to the rooms in the home interior. The dyeing process takes some time, requires patience and meticulous work. However, it is cost-effective - painting the floors can cost you much less than changing the flooring in your home.
When you decide to paint the floors, we suggest that you don't paint all the flooring in the house the same color. Decide which room you want to transform, and choose the design and colors depending on the furniture. Another popular idea is to use more than one color and create patterns like stripes or any design you want.
Use rugs If you want a really quick and affordable solution to refresh your flooring, rugs are the right way to go. Area rugs will liven up the design of your rooms and make them look more stylish. Plus, they come in so many shapes, sizes, and colors, so there's plenty to choose from. You can style them according to your taste and the aesthetic of your home.
Combine flooring materials Consider a variety of floor materials in different sections of your house if you start to find your flooring monotonous. This is a popular technique in business areas already, but it's also a nice concept to utilize for your house.
There is no problem when mixing solid wood, carpet, tiles, concrete, or even all available flooring materials. Just arrange it meticulously to satisfy your esthetic and practical needs.
Planing The reparation process begins with planing, removing varnish and the damaged layer of the floor by sanding in several stages. It is crucial to clean and polish the substrate well after planing, so you might want to consider a temporary move and stay elsewhere during the project.
It is possible to change the color, as well as additionally express the structure of the wood itself with some of the manual processing techniques - brushing, patination, heat treatment, manual planing. And lastly, with the final layer, you provide the floor with shine and new protection with varnish, oil, or wax.
Varnishing If your floor has retained its quality and there are no traces of damage, it is possible to sand the surface layer and apply a new layer of varnish. This will give it protection and shine without performing a complete reparation and planing process. Of course, you should clean your wood floor well first.
We can say that this is the right choice when the floor is new(ish), and you want to refresh it or change the final finish, for example, from glossy to matte.
Install new tiles over the old tiles If you are tired of your tiles, we have an idea: installing one set of tiles over another. This approach is very unusual, but it works! It's incredibly physically demanding and hence expensive to remove old tiles. This is a cheaper and faster way to accomplish it. If you are seeking inexpensive options, ceramic tiles are available in a broad range of models and are reasonably priced.
Final thoughts We hope our guide has inspired you to get to work and refresh your flooring. Your home will surely look brighter, newer, and cleaner. Good luck!
0 notes
Text
Errors Related to Lamination Settings in Flexographic Printing


Learn about common lamination errors in flexographic printing and effective troubleshooting methods. Discover how to ensure high-quality results with Pasargad Iranian Ink Company. Introduction Flexographic printing, renowned for its efficiency and versatility, often incorporates lamination to enhance the durability and appearance of printed materials. However, lamination settings can sometimes present challenges that impact the final product quality. At Pasargad Iranian Ink Company, we emphasize the importance of understanding and correcting these issues to maintain superior print standards. This article explores common lamination errors in flexographic printing and provides effective troubleshooting methods. Common Lamination Errors in Flexographic Printing - Delamination: One of the most prevalent issues, delamination occurs when the laminated layers separate from each other. This can result from inadequate adhesive application, improper curing, or suboptimal pressure during the lamination process. - Wrinkling and Bubbles: Wrinkles and bubbles can appear between laminated layers due to uneven adhesive application, improper tension control, or contamination on the substrate surface. These defects compromise the aesthetic and functional quality of the product. - Tunneling: Tunneling refers to the formation of air pockets or tunnels between the laminated layers. This is often caused by incorrect tension settings, inadequate adhesive spread, or temperature fluctuations during lamination. - Curling: Curling occurs when the laminated material curls up at the edges, often due to imbalanced tension between the laminated layers or differences in the thermal expansion rates of the materials used. - Poor Adhesion: Inadequate adhesion between the laminate and the substrate can result from using the wrong type of adhesive, insufficient curing time, or incompatible materials. Troubleshooting Lamination Errors - Ensure Proper Adhesive Application: Use the appropriate amount of adhesive and ensure it is evenly spread across the substrate. Adjusting the adhesive's viscosity and using high-quality adhesives designed for specific materials can help achieve better results. - Control Tension Settings: Proper tension control is crucial to prevent wrinkles, bubbles, and tunneling. Regularly calibrate the tension settings and monitor them throughout the lamination process to maintain consistent results. - Optimize Curing Conditions: Ensure that the adhesive is fully cured before further processing. Adjusting the curing temperature and time based on the adhesive manufacturer's recommendations can prevent delamination and adhesion issues. - Maintain Cleanliness: Contaminants on the substrate surface can lead to poor adhesion and bubbles. Implement strict cleaning protocols to ensure that surfaces are free from dust, oils, and other contaminants before lamination. - Monitor Environmental Conditions: Temperature and humidity fluctuations can affect the lamination process. Maintain a stable environment in the lamination area to prevent issues like curling and tunneling. - Regular Maintenance of Equipment: Regularly inspect and maintain lamination equipment to ensure optimal performance. Replace worn-out parts and calibrate machines to avoid inconsistencies in the lamination process. Conclusion Lamination is a critical step in flexographic printing that enhances the durability and visual appeal of printed materials. By understanding and addressing common lamination errors, such as delamination, wrinkling, tunneling, curling, and poor adhesion, you can ensure high-quality results. At Pasargad Iranian Ink Company, we are committed to helping our clients achieve excellence in printing through continuous innovation and support. Read the full article
0 notes