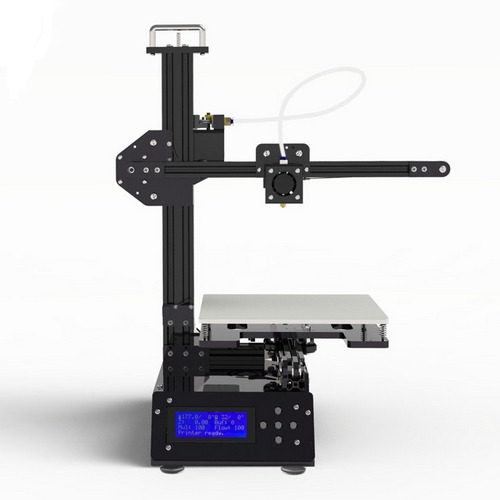
#The one here was sliced in Repetier Host and the one on the bed now was done in Cura
Explore tagged Tumblr posts
Visit Tumblr Blog
Explore Tumblr blogs with no restrictions, modern design and the best experience.
Last Seen Tumblr Blogs


Fun Fact
Tumblr has a 66 index score for customer satisfaction in the US.
Text

My army grows
#photopost#3d printing tag#I've got another Strive Sol printing now#The one here was sliced in Repetier Host and the one on the bed now was done in Cura#Repetier seems super nice if you've got the time/patience to fine tune every single printing setting for a print#But Cura (the software I usually use) has safety rails to keep the user from accidentally generating a print doomed to fail haha#Worth a shot though. Love me a little experimentation
25 notes
·
View notes
Text
Geeetech A10M: A Low-Cost, High Effort Color Mixing 3D Printer
Geeetech A10M
7.00 / 10
Read Reviews
Read More Reviews
Read More Reviews
Read More Reviews
Read More Reviews
Read More Reviews
Read More Reviews
Read More Reviews
Read More Reviews
Read More Reviews
Read More Reviews


Shop Now
A printer which on paper gives a lot for a low price, but it is not that simple in practice. You'll spend more time fiddling with settings than using the Geeetech A10M. There's potential here, but finding it takes some patience.
Specifications
Brand: Geeetech
Build Volume: 8.66 x 8.66 x 10.2 inches (220 x 220 x 260mm)
Printing Accuracy: Up to 0.1mm
Connectivity: SD card, USB, optional Wi-Fi upgrade
Heated Build Plate: Yes
Feed Type: Bowden Tube
Dimensions: 7.4 x 9.25 x 18.31 inches (18.80 x 23.50 x 46.50 cm)
Weight: 16.7 lbs (7.6 kg)
Dual-Color Printing: As standard, color mixing
Pros
Color Mixing is impressive when it works
Easy to find replacement parts
Very cheap for a dual-extrusion printer
Completely moddable and easy to upgrade
Cons
Incredibly hard to get good prints
Flawed design on the filament spool holders
Buy This Product
Geeetech A10M other
Shop
<![CDATA[ // Bottom var galleryThumbs1 = new Swiper('.gallery-thumbs-1', { spaceBetween: 10, slidesPerView: 10, freeMode: true, watchSlidesVisibility: true, watchSlidesProgress: true, centerInsufficientSlides: true, allowTouchMove: false, preventClicks: false, breakpoints: { 1024: { slidesPerView: 6, } }, }); // Top var galleryTop1 = new Swiper('.gallery-top-1', { spaceBetween: 10, allowTouchMove: false, loop: true, preventClicks: false, breakpoints: { 1024: { allowTouchMove: true, } }, navigation: { nextEl: '.swiper-button-next', prevEl: '.swiper-button-prev', }, thumbs: { swiper: galleryThumbs1 } }); ]]>
The Geeetech A10M is a low budget dual-extrusion color mixing 3d printer costing just $239. While the initial setup and general use are easy, getting decent 3d prints from it is difficult to master.
youtube
Two Extruders, One Nozzle
At first glance, the Geeetech A10M has a very familiar design. It shares the same frame and stepper motor configuration as many other 3D printers at this price range. The build volume is8.66 x 8.66 x 10.2 inches and it has a heated bed featuring a composite sticky-backed build plate cover.
Where things differ is the dual extruders mounted to the top of the frame, feeding into a single color-mixing chamber via two Bowden tubes. The filament is then printed via a single 0.4mm diameter brass nozzle, allowing for two-color printing along with mixed colors and gradients.
It also features a 360-degree fan ventilation system at the hot end, which does a decent job of regulating temperature, but makes quite a lot of noise when in operation. A nice touch is the filament run-out sensors, which send stop signals to the printer when no more filament is available.
It has a simple LCD 2004 display, which is one color and has a backlight, controlled via a rotary encoder. It also features a hard reset tactile button for when things inevitably go wrong.
The A10M takes both regular SD cards and microSD cards and can be connected to a computer directly via a USB cable. There is an optional Wi-Fi module and 3D leveling sensor for the printer, but they weren't supplied for this review.
Build volume: 8.66 x 8.66 x 10.2 inches (220 x 220 x 260mm)
Printing accuracy: 0.1mm
Frame: Aluminum
Nozzle diameter: 0.4mm
Max. print temperature: 250C
Connectivity: SD Card, USB
File format: G-code, STL
XY-axis positioning accuracy: 0.011mm
Z-axis positioning accuracy: 0.0025mm
Voltage: 110-240V
Power: 360W
Weight: 7.6kg
Dimensions: 7.4 x 9.25 x 18.31 inches (18.80 x 23.50 x 46.50 cm)
Fully Assembled, Apart From the Bits That Aren't
Many 3d printers come assembled but in two parts, and setting them up is as simple as attaching the z-axis gantry to the base. The A10M is slightly more involved, as you need to attach both extruders to the frame, along with the LCD screen.
Putting it together is a mostly simple process, and the full-color guide with photographs gives step by step instructions. Attaching the Z-axis limit switch took some doing, however, as it's tucked down near the bottom of the frame, but those with nimble fingers might not have an issue.

The power supply for the A10M isn't in the base. It comes as a separate unit that attaches to the Z-axis frame. Geeetech provides all the tools required for assembly, along with various spare parts, screws, cleaning tools, and a metal scraper for freeing prints from the build plate.
Preparing to Print
Before printing, the quick-start guide advises leveling the build plate. Like many printers, the A10M comes with a tool for making sure your nozzle is at the correct height - a piece of card.
There is a menu option for leveling the bed, which moves the nozzle to each corner before prompting to move to the next when ready. Leveling is done by hand, using four plastic hand screws under the bed. It's an easy process, and once done, I didn't find the bed slipped at all during the rest of the review.
The extruders have spring-loaded plastic catches allowing you to push filament down into the Bowden tubes. From there, you can set the printer to pre-heat for PLA or ABS use via the menu and extrude some filament from each extruder to check there are no blockages.
A Test Print in Two Senses
You get enough filament in the package to print a test file provided by Geeetech, which is a gradient colored dog. Printing was seemingly all going to plan, but there was a power cut halfway through. This turned out to be a fortuitous way to test the automatic continue function of the Marlin 1.1.8 firmware the A10M uses, which is designed for this eventuality.
Things didn't go to plan. There was an ominous line around the dog's neck at the end of printing, and attempting to get it off the build plate did not end well.
I'm not sure what went wrong here, but given the unusual circumstances, I moved on to other prints without thinking too much of it. Unfortunately, that's when things got quite difficult.
A Forest of Failed Prints
From here, I had issues with almost every print I did. Most 3D printers need some adjustments to get things right, but after multiple attempts, tweaking setting after setting, things didn't improve all that much.
Some of my prints had evidence of significant layer shifting, despite there seeming to be nothing that would cause it.
Other prints had problems with retraction, leaving a stringy mess behind and prints with a mottled surface. Unusually, changing settings that would typically result in this getting better did not seem to do all that much. This, like all FDM printers, is never going to get prints quite as detailed as resin printers like the Nova3d Bene4 Mono we recently reviewed, but it should be capable of printing with an accuracy of up 0.1mm layer height.
Color mixing was hit and miss, with gradients generally coming out well, but block colors sometimes appearing blended and sometimes just not working at all. I could go on, but the simplest way to express how hard this printer can be to use is this: Out of perhaps 20 prints, I'd consider 3 to be fully successful.
In truth, hitting the sweet spot can be tough with all 3D printers, so this is the stuff that might improve over time, but there are some design flaws that can be game-breaking.
A Large Oversight
The filament run-out sensors are a great idea in principle. When your filament runs out the printer stops. They are attached right behind each extruder so that filament can run through them off the spool before being extruded to the hot end.
The problem is that regular-sized spools hang down into the runout sensors and even get caught on the plastic spring switch for loading filament into the extruder. Because of this, I never could test the runout sensors. During one print, the plastic switch even caught on to the spool, ruining it.
You could always point out that this printer might not have been designed for these types of spools, but I was using Geeetech's own branded PLA on spools I consider to be regularly sized for 3D printing.
While many of the other issues of this printer can be put down to requiring patience and specialist knowledge to master, this seems like a large oversight in design.
Great Customer Service and an Active Community
On the plus side, Geeetech's customer service is excellent, and it provides support via their Facebook group, forum, and email. Its official YouTube channel also has a number of videos showing how to clean, configure, and maintain the printer, including one I followed to combat layer shifting in the Y-axis.
Due to this printer's budget nature and the potential color-mixing can bring, there is also a committed community using the A10M, and a Facebook group for Geeetech Printer Owners.
If you own this printer and are having a hard time, there is a lot of help out there to work out what is wrong, which is something many beginners will appreciate.
The Software Side
Geeetech recommends using Repetier-Host for slicing models before printing, which is easy to use and similar to most other programs for producing Gcode. There are also profiles for the A10M for Cura, Simplify3d, and Slic3r, among others.

Repetier-Host uses the CuraEngine slicer and produces Gcode for printing via USB, SD card, or Wi-Fi if you've got the module. They also provide software called Color Mixer for importing Gcode to add gradients, color steps, or mix filament colors.

It's easy to use, and a simple way to visualize how colors will turn out before printing.
A Printer for Tinkerers
Despite all the issues, I don't think the Geeetech A10M is a bad printer. It's just one aimed at people who are willing to put the time in to learn it's quirks. The design is completely modular, and you can swap out hardware and software at will. The mainboard even has a bootloader and is compatible with the Arduino IDE.
One thing is certain: The A10M is not for beginners or those looking for a stress-free 3D printer that's functional out of the box. If you like tinkering for hours on end and prefer fixing broken toys to buying new ones, it might just be for you.
Who knows, at the end of the tunnel, there might just be a perfect dual-color 3D print.
Geeetech A10M: A Low-Cost, High Effort Color Mixing 3D Printer posted first on grassroutespage.blogspot.com
0 notes
Text
Geeetech A10M: A Low-Cost, High Effort Color Mixing 3D Printer
Geeetech A10M
7.00 / 10
Read Reviews
Read More Reviews
Read More Reviews
Read More Reviews
Read More Reviews
Read More Reviews
Read More Reviews
Read More Reviews
Read More Reviews
Read More Reviews
Read More Reviews


Shop Now
A printer which on paper gives a lot for a low price, but it is not that simple in practice. You'll spend more time fiddling with settings than using the Geeetech A10M. There's potential here, but finding it takes some patience.
Specifications
Brand: Geeetech
Build Volume: 8.66 x 8.66 x 10.2 inches (220 x 220 x 260mm)
Printing Accuracy: Up to 0.1mm
Connectivity: SD card, USB, optional Wi-Fi upgrade
Heated Build Plate: Yes
Feed Type: Bowden Tube
Dimensions: 7.4 x 9.25 x 18.31 inches (18.80 x 23.50 x 46.50 cm)
Weight: 16.7 lbs (7.6 kg)
Dual-Color Printing: As standard, color mixing
Pros
Color Mixing is impressive when it works
Easy to find replacement parts
Very cheap for a dual-extrusion printer
Completely moddable and easy to upgrade
Cons
Incredibly hard to get good prints
Flawed design on the filament spool holders
Buy This Product
Geeetech A10M other
Shop
// Bottom var galleryThumbs1 = new Swiper('.gallery-thumbs-1', { spaceBetween: 10, slidesPerView: 10, freeMode: true, watchSlidesVisibility: true, watchSlidesProgress: true, centerInsufficientSlides: true, allowTouchMove: false, preventClicks: false, breakpoints: { 1024: { slidesPerView: 6, } }, }); // Top var galleryTop1 = new Swiper('.gallery-top-1', { spaceBetween: 10, allowTouchMove: false, loop: true, preventClicks: false, breakpoints: { 1024: { allowTouchMove: true, } }, navigation: { nextEl: '.swiper-button-next', prevEl: '.swiper-button-prev', }, thumbs: { swiper: galleryThumbs1 } });
The Geeetech A10M is a low budget dual-extrusion color mixing 3d printer costing just $239. While the initial setup and general use are easy, getting decent 3d prints from it is difficult to master.
youtube
Two Extruders, One Nozzle
At first glance, the Geeetech A10M has a very familiar design. It shares the same frame and stepper motor configuration as many other 3D printers at this price range. The build volume is8.66 x 8.66 x 10.2 inches and it has a heated bed featuring a composite sticky-backed build plate cover.
Where things differ is the dual extruders mounted to the top of the frame, feeding into a single color-mixing chamber via two Bowden tubes. The filament is then printed via a single 0.4mm diameter brass nozzle, allowing for two-color printing along with mixed colors and gradients.
It also features a 360-degree fan ventilation system at the hot end, which does a decent job of regulating temperature, but makes quite a lot of noise when in operation. A nice touch is the filament run-out sensors, which send stop signals to the printer when no more filament is available.
It has a simple LCD 2004 display, which is one color and has a backlight, controlled via a rotary encoder. It also features a hard reset tactile button for when things inevitably go wrong.
The A10M takes both regular SD cards and microSD cards and can be connected to a computer directly via a USB cable. There is an optional Wi-Fi module and 3D leveling sensor for the printer, but they weren't supplied for this review.
Build volume: 8.66 x 8.66 x 10.2 inches (220 x 220 x 260mm)
Printing accuracy: 0.1mm
Frame: Aluminum
Nozzle diameter: 0.4mm
Max. print temperature: 250C
Connectivity: SD Card, USB
File format: G-code, STL
XY-axis positioning accuracy: 0.011mm
Z-axis positioning accuracy: 0.0025mm
Voltage: 110-240V
Power: 360W
Weight: 7.6kg
Dimensions: 7.4 x 9.25 x 18.31 inches (18.80 x 23.50 x 46.50 cm)
Fully Assembled, Apart From the Bits That Aren't
Many 3d printers come assembled but in two parts, and setting them up is as simple as attaching the z-axis gantry to the base. The A10M is slightly more involved, as you need to attach both extruders to the frame, along with the LCD screen.
Putting it together is a mostly simple process, and the full-color guide with photographs gives step by step instructions. Attaching the Z-axis limit switch took some doing, however, as it's tucked down near the bottom of the frame, but those with nimble fingers might not have an issue.

The power supply for the A10M isn't in the base. It comes as a separate unit that attaches to the Z-axis frame. Geeetech provides all the tools required for assembly, along with various spare parts, screws, cleaning tools, and a metal scraper for freeing prints from the build plate.
Preparing to Print
Before printing, the quick-start guide advises leveling the build plate. Like many printers, the A10M comes with a tool for making sure your nozzle is at the correct height - a piece of card.
There is a menu option for leveling the bed, which moves the nozzle to each corner before prompting to move to the next when ready. Leveling is done by hand, using four plastic hand screws under the bed. It's an easy process, and once done, I didn't find the bed slipped at all during the rest of the review.
The extruders have spring-loaded plastic catches allowing you to push filament down into the Bowden tubes. From there, you can set the printer to pre-heat for PLA or ABS use via the menu and extrude some filament from each extruder to check there are no blockages.
A Test Print in Two Senses
You get enough filament in the package to print a test file provided by Geeetech, which is a gradient colored dog. Printing was seemingly all going to plan, but there was a power cut halfway through. This turned out to be a fortuitous way to test the automatic continue function of the Marlin 1.1.8 firmware the A10M uses, which is designed for this eventuality.
Things didn't go to plan. There was an ominous line around the dog's neck at the end of printing, and attempting to get it off the build plate did not end well.
I'm not sure what went wrong here, but given the unusual circumstances, I moved on to other prints without thinking too much of it. Unfortunately, that's when things got quite difficult.
A Forest of Failed Prints
From here, I had issues with almost every print I did. Most 3D printers need some adjustments to get things right, but after multiple attempts, tweaking setting after setting, things didn't improve all that much.
Some of my prints had evidence of significant layer shifting, despite there seeming to be nothing that would cause it.
Other prints had problems with retraction, leaving a stringy mess behind and prints with a mottled surface. Unusually, changing settings that would typically result in this getting better did not seem to do all that much. This, like all FDM printers, is never going to get prints quite as detailed as resin printers like the Nova3d Bene4 Mono we recently reviewed, but it should be capable of printing with an accuracy of up 0.1mm layer height.
Color mixing was hit and miss, with gradients generally coming out well, but block colors sometimes appearing blended and sometimes just not working at all. I could go on, but the simplest way to express how hard this printer can be to use is this: Out of perhaps 20 prints, I'd consider 3 to be fully successful.
In truth, hitting the sweet spot can be tough with all 3D printers, so this is the stuff that might improve over time, but there are some design flaws that can be game-breaking.
A Large Oversight
The filament run-out sensors are a great idea in principle. When your filament runs out the printer stops. They are attached right behind each extruder so that filament can run through them off the spool before being extruded to the hot end.
The problem is that regular-sized spools hang down into the runout sensors and even get caught on the plastic spring switch for loading filament into the extruder. Because of this, I never could test the runout sensors. During one print, the plastic switch even caught on to the spool, ruining it.
You could always point out that this printer might not have been designed for these types of spools, but I was using Geeetech's own branded PLA on spools I consider to be regularly sized for 3D printing.
While many of the other issues of this printer can be put down to requiring patience and specialist knowledge to master, this seems like a large oversight in design.
Great Customer Service and an Active Community
On the plus side, Geeetech's customer service is excellent, and it provides support via their Facebook group, forum, and email. Its official YouTube channel also has a number of videos showing how to clean, configure, and maintain the printer, including one I followed to combat layer shifting in the Y-axis.
Due to this printer's budget nature and the potential color-mixing can bring, there is also a committed community using the A10M, and a Facebook group for Geeetech Printer Owners.
If you own this printer and are having a hard time, there is a lot of help out there to work out what is wrong, which is something many beginners will appreciate.
The Software Side
Geeetech recommends using Repetier-Host for slicing models before printing, which is easy to use and similar to most other programs for producing Gcode. There are also profiles for the A10M for Cura, Simplify3d, and Slic3r, among others.

Repetier-Host uses the CuraEngine slicer and produces Gcode for printing via USB, SD card, or Wi-Fi if you've got the module. They also provide software called Color Mixer for importing Gcode to add gradients, color steps, or mix filament colors.
It's easy to use, and a simple way to visualize how colors will turn out before printing.
A Printer for Tinkerers
Despite all the issues, I don't think the Geeetech A10M is a bad printer. It's just one aimed at people who are willing to put the time in to learn it's quirks. The design is completely modular, and you can swap out hardware and software at will. The mainboard even has a bootloader and is compatible with the Arduino IDE.
One thing is certain: The A10M is not for beginners or those looking for a stress-free 3D printer that's functional out of the box. If you like tinkering for hours on end and prefer fixing broken toys to buying new ones, it might just be for you.
Who knows, at the end of the tunnel, there might just be a perfect dual-color 3D print.
Geeetech A10M: A Low-Cost, High Effort Color Mixing 3D Printer published first on http://droneseco.tumblr.com/
0 notes
Text
26 best 3D printers under $200/$300
3D printing is becoming ever more accessible - with a brand new 3D printer now costing as little as $79! We thought that we’d do a quick round up of some of the most affordable 3D printers on the market. We haven't had the chance to test all of these personally, so if you have any feedback do let us know - but check out a selection of machines under $300 below. And don’t forget to head over to MyMiniFactory to grab free 3D-printable models when you do start printing!
----------------------------------------------------------------------------------------------------
STARTT $99.99
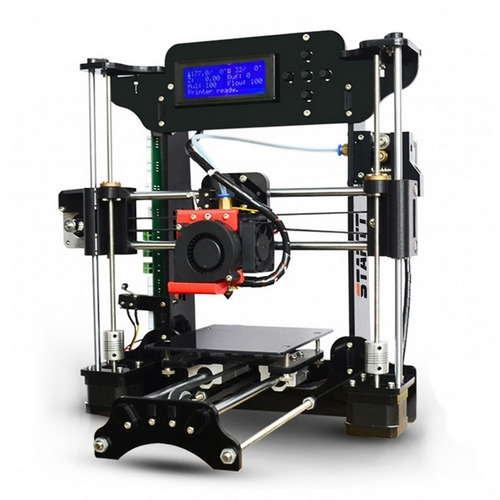
The STARTT is a great way to start(t) with 3D printing. It is supplied as a simple kit that can be assembled in around 5 hours, enabling you to understand how a 3D printer works. Despite this model being affordably priced, the printing quality is impressive. The STARTT is compatible with any open source slicer like Cura, and is loaded with pre-sliced 3D printable designs, compliments of MyMiniFactory.
You can purchase this model here.
Check out some of STARTT’s 3D-printable designs here!
Key Statistics:
DIY kit: Yes Type: FDM Weight: 4 kg Max. build volume: 120 mm x 140 mm x 130 mm Min. layer height: 100 microns Filament diameter: 1.75 mm Extruder: Single Heated bed: No Open source: Yes Wireless: No
----------------------------------------------------------------------------------------------------
101 Hero $79
101HERO launched on Kickstarter with the objective of being the world's most affordable 3D printer - the campaign was a great success raising more than $1M. This printer will come in 2 editions the Customer Version will be a kid-friendly edition, which allows users to print designs via an SD card. The Designer & Developer version will be more advanced, with a USB connection and open-source software compatibility.
You can pre-order this printer here.
Try out some support free prints on this one to get started, grab them here.
Key Statistics:
DIY kit: 90% pre-assembled Type: FDM Weight: 1.86 kg Max. build volume: 150 mm diameter x 100 mm height Min. layer height: 50 microns Filament diameter: 1.75 mm Extruder: Single Heated bed: No Open source: Designer & developer version only Wireless: No
----------------------------------------------------------------------------------------------------
Tronxy X1 $187
This Chinese aluminium DIY kit is one of the cheapest 3D printers on the market. Suitable for PLA and ABS, it’s a basic model, easy to assemble and it can be recommended to beginners.
You can purchase this 3D printer here.
Key Statistics:
DIY kit: Yes Type: FDM Weight: 3.5 kg Max. build volume: 150 mm x 150 mm x 150 mm Min. layer height: 100 microns Filament diameter: 1.75 mm Extruder: Single Heated bed: No Open source: No Wireless: No
----------------------------------------------------------------------------------------------------
Tronxy P802M $204
It makes use of Repetier-Host and Cura for slicing. The P802M is great value for its cost and is recommended for home use and to beginners.
You can purchase this model here.
Download free electronics 3D-printable designs here.
Key Statistics:
DIY kit: Yes Type: FDM Weight: 8 kg Max. build volume: 220 mm x 220 mm x 240 mm Min. layer height: 50 microns Filament diameter: 1.75 mm Extruder: Single Heated bed: Yes Open source: No Wireless: No
----------------------------------------------------------------------------------------------------
Anet A8 $170
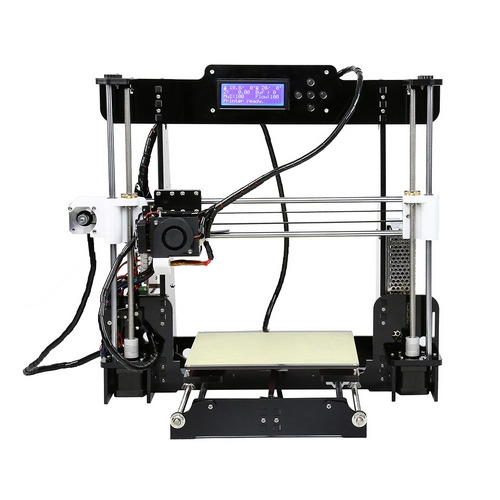
The A8 is the cheapest model from the Chinese brand Anet. Some parts of this DIY kit can be 3D printed and changed if needed. This model is very popular which means there is a great community on the web, and lots of customisation available to kick start your 3D experience. The A8's affordable price tag makes it a favourite among consumers, but that doesn't mean that this printer isn't a 3D printing powerhouse. It boasts a large print area and very capable NEMA17 motors to navigate the print-space. The A8 comes stock with a versatile extruder and heated bed, which makes it capable of printing a diverse selection of filaments.
You can buy this 3D printer here.
And for the DIY lovers, here you can download for free thousands of 3D-printable spare parts!
Key Statistics:
DIY kit: Yes Type: FDM Weight: 8.5 kg Max. build volume: 220 mm x 220 mm x 240 mm Min. layer height: 100 microns Filament diameter: 1.75 mm Extruder: Single Heated bed: Yes Open source: No Wireless: No
----------------------------------------------------------------------------------------------------
Anet A6 $198
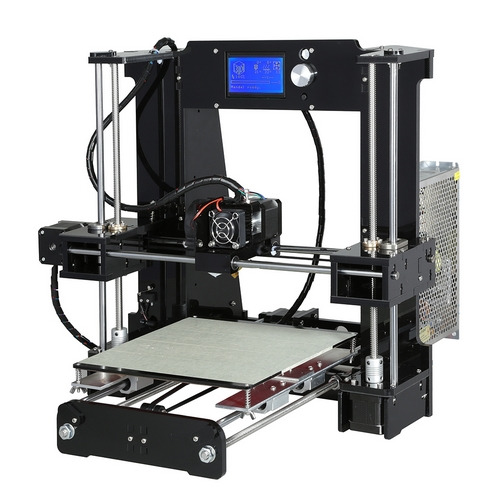
The A6 is a bit more expensive than the A2 and A8 but has a bigger build volume.This model is a 3D printer with acrylic frame and single extruder. To maintain the garage-built feel and the handmade charms, Anet A6 3D desktop printer is also a build-it-yourself kit.
You can purchase this model here.
The build volume will enable you to print objects such as these.
Key Statistics:
DIY kit: Yes Type: FDM Weight: 7.6 kg Max. build volume: 220 mm x 220 mm x 250 mm Min. layer height: 100 microns Filament diameter: 1.75 mm Extruder: Single Heated bed: Yes Open source: No Wireless: No
----------------------------------------------------------------------------------------------------
Anet A2 $203
The A2 has a build volume a bit smaller than the A6 and A8, but also a smaller minimum layer height. This 3D printer adopts the high-end configuration with stable performance, and the compact body ensures portability. It is an unassembled DIY kit, which provides you with a step-by-step guide to build the 3D printer from scratch.
You can buy this model here.
Key Statistics:
DIY kit: Yes Type: FDM Weight: 4 kg Max. build volume: 220 mm x 220 mm x 220 mm Min. layer height: 50 microns Filament diameter: 1.75 mm Extruder: Single Heated bed: Yes Open source: No Wireless: No
----------------------------------------------------------------------------------------------------
Super Helper SH105 $149
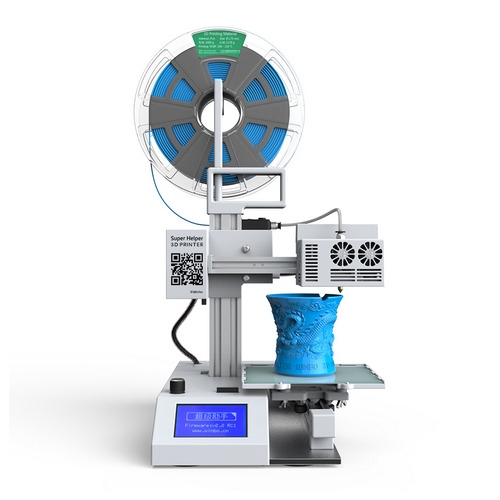
Launched by the Chinese brand Winbo, the SH105 is one of the cheapest 3D printers on the market. The SH105L is $50 more expensive than the SH105 and includes a laser head. Described as being suitable for a wide variety of applications including education, design, manufacturing, and general home and business use, the Super Helper looks to be easy to use, and its portability is a big plus.
You can purchase this 3D printer here,.
Judging by the photo this one is going to be great for planters - download some here.
Key Statistics:
DIY kit: No Type: FDM Weight: 3.6 kg Max. build volume: 105 mm x 105 mm x 155 mm Min. layer height: 40 microns Filament diameter: 1.75 mm Extruder: Single Heated bed: No Open source: No Wireless: No
----------------------------------------------------------------------------------------------------
Q3D OneUp 3D $199
This self-assembled 3D printer is one of the cheapest on the market for the moment, and clearly a good and honest printer for its price. For beginners, buying and building a DIY kit like this one (2-8 hours to build) is recommended to understand the ins and outs and the ups and downs of a 3D printer. With over 7,000 units out in the wild, the OneUp is the standard for entry level 3D printer kits. This model sets itself apart from other 3D printers in its class by using the finest linear motion components, including chromed, induction hardened linear shafts, dual precision ACME screws (for the Z axis) and LM8LUU linear bearings for double the rigidity over the LM8UU bearings used in most printer kits. Each of the linear motion components is tied together with a CNC laser cut melamine frame (made in the USA) which provides not only rigidity but lightweight for high-speed printing. With improved print speeds up to 100mm/s due to the lighter weight extruder and hot end, print time is apparently cut almost in half.
You can purchase this model here.
And here are some free 3D-printable designs great for first-time printers!
Key Statistics:
DIY kit: Yes Type: FDM Weight: 4 kg Max. build volume: 100 mm x 100 mm x 125 mm Min. layer height: 50 microns Filament diameter: 1.75 mm Extruder: Single Heated bed: Optional Open source: No Wireless: No
----------------------------------------------------------------------------------------------------
Creality CR-7 $256
The Creality CR-7 is a good machine for 3D DIY enthusiasts, and suitable for a wide range of customers. This desktop 3D printer is easy to assemble, electric-proof, anti-scald and scratch resistant. With its Ilight weight, stability, and low noise, it will provide you with a good experience of 3D printing.
You can purchase this model here.
Key Statistics:
DIY kit: Yes Type: FDM Weight: 3.5 kg Max. build volume: 130 mm x 150 mm x 100 mm Min. layer height:100 microns Filament diameter: 1.75 mm Extruder: Single Heated bed: No Open source: No Wireless: No
----------------------------------------------------------------------------------------------------
Q3D TwoUp 3D $239
The TwoUp has the same specs than the OneUp except that the build volume is bigger: 175 L x 175 W x 125 H.
Buy it here.
Key Statistics:
DIY kit: Yes Type: FDM Weight: 4 kg Max. build volume: 175 mm x 175 mm x 125 mm Min. layer height: 50 microns Filament diameter: 1.75 mm Extruder: Single Heated bed: Optional Open source: No Wireless: No
----------------------------------------------------------------------------------------------------
Q3D ThreeUp 3D $279
The ThreeUp has the same specs than the OneUp and the TwoUp except that the building volume is even is bigger: 175 L x 175 W x 210 H.
You can purchase it here.
Key Statistics:
DIY kit: Yes Type: FDM Weight: 5.9 kg Max. build volume: 175 mm x 175 mm x 210 mm Min. layer height: 50 microns Filament diameter: 1.75 mm Extruder: Single Heated bed: Optional Open source: No Wireless: No
----------------------------------------------------------------------------------------------------
Da Vinci Junior $189.99
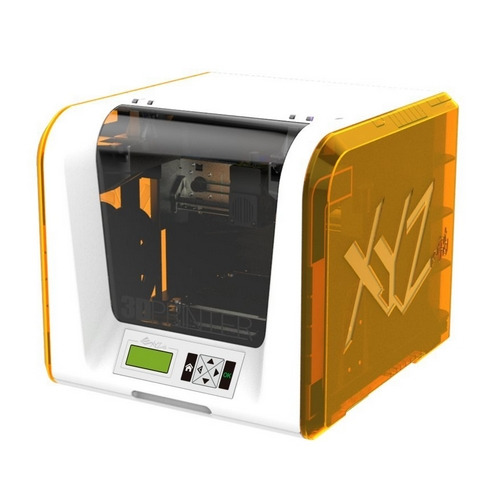
This 3D printer is the cheapest machine from XYZprinting, who also sell the Da Vinci miniMaker and the Da Vinci Mini. The Da Vinci Jr. has a robust build size of 5.9 x 5.9 x 5.9 inches and a resolution of 100 to 400 microns. Its design allows for the inclusion of an auto-feeding filament system, which takes the PLA filament to the extruder, and ensures that the filament is loaded properly and is ready to print. The Jr. 1.0 only prints in DEHP-free and Heavy metal-free PLA filament.
You can purchase this 3D printer here.
Key Statistics:
DIY kit: No Type: FDM Weight: 15 kg Max. build volume: 150 mm x 150 mm x150 mm Min. layer height: 100 microns Filament diameter: 1.75 mm Extruder: Single Heated bed: No Open source: Yes Wireless: Yes
----------------------------------------------------------------------------------------------------
Da Vinci miniMaker $249.99
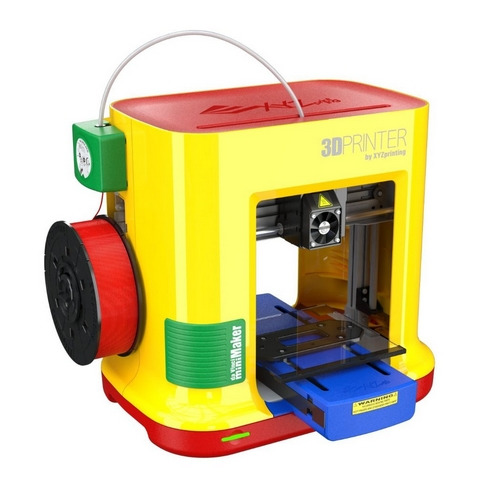
The Da Vinci miniMaker is a desktop 3D printer for beginners and children. Eco-friendly and easy to use, its lightweight and compact design fit easily in tight places. It has an auto-leveling bed and the auto-calibrating extruder module ensures the best possible prints. The miniMaker only prints in DEHP-free and Heavy metal-free PLA filament, ensuring that prints are safe for children and family.
You can purchase this model here.
The Da Vinci miniMaker will enable you to print very cool designs, such as toys and games downloadable here for free.
Key Statistics:
DIY kit: No Type: FDM Weight: 11.5 kg Max. build volume: 150 mm x 150 mm x150 mm Min. layer height: 100 microns Filament diameter: 1.75 mm Extruder: Single Heated bed: No Open source: Yes Wireless: No
----------------------------------------------------------------------------------------------------
Da Vinci Mini $288.79
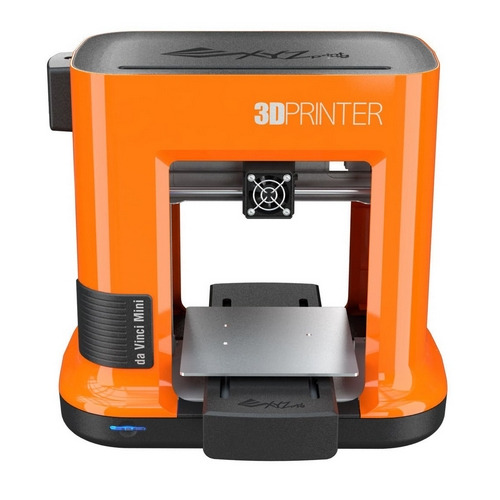
The Da Vinci Mini is a multifunctional 3D printer for beginners. This model is 30 percent smaller than da Vinci Jr. 1.0 and has a 5.9 inch x 5.9 inch x 5.9 inch aluminium print bed for larger and finer prints.
You can buy this model here.
Key Statistics:
DIY kit: No Type: FDM Weight: 10 kg Max. build volume: 150 mm x 150 mm x150 mm Min. layer height: 100 microns Filament diameter: 1.75 mm Extruder: Single Heated bed: No Open source: Yes Wireless: Yes
----------------------------------------------------------------------------------------------------
Monoprice Select Mini $199.99

The US technology company Monoprice imported the Malyan M200 from China, rebadged each unit to carry their logo and offered it for sale at the very affordable price of $199.99. Unlike most other low-cost 3D printers, this printer ships fully assembled and has already been calibrated at the factory. Sample PLA filament and a MicroSD card with preinstalled models are included so you can start printing right out of the box. Whilst there are a few defaults, the Select Mini is a good product for its price, and is a recommendable 3D printer for first-time users.
You can purchase this 3D printer here.
Key Statistics:
DIY kit: No Type: FDM Weight: 4.5 kg Max. build volume: 120 mm x 120 mm x120 mm Min. layer height: 100 microns Filament diameter: 1.75 mm Extruder: Single Heated bed: Yes Open source: No Wireless: Yes
----------------------------------------------------------------------------------------------------
TEVO Tarantula i3 $201

The Tarantula i3 is based on the Prusa i3, a proven design with tens of thousands users all around the world. This DIY kit features automatic bed levelling (optional) and bigger bed (optional). The auto-leveling version uses a proximity sensor to detect the aluminium print bed where the normal version of the printer uses a microswitch to detect the end of travel for the Z-Axis movement (vertical limits). It is very good value for the cost and will enable you to understand how 3D printing works.
You can buy this model here.
Key Statistics:
DIY kit: Yes Type: FDM Weight: 7.5 kg Max. build volume: 200 mm x 200 mm x 200 mm (or 200mm x 280mm x 200mm optional) Min. layer height: 50 microns Filament diameter: 1.75 mm Extruder: Dual Heated bed: Yes Open source: Yes Wireless: No
----------------------------------------------------------------------------------------------------
HE3D EI3 $210

This DIY 3D printer is the cheapest one from the Chinese brand HE3D. This kit has an upgraded frame using 2020 and 2040 extruded aluminium beams and 7mm reinforced acrylic supports and an upgraded ATmega2560 control board with support for up to two print heads and an intuitive LCD user interface panel. The heated 8x8x8 inch print area, 12 micron X/Y accuracy and 50-micron layer accuracy, and auto z-calibration ensure each print will achieve stunning detail and quality. The extruder’s wide temperature ranges support a variety of printer filament material including most varieties of PLA, ABS, PETG, Wood, and PVA material.
You can purchase this model here.
Key Statistics:
DIY kit: Yes Type: FDM Weight: 8.5 kg Max. build volume: 200 mm x 200 mm x 200 mm Min. layer height: 50 microns Filament diameter: 1.75 mm Extruder: Single or dual/triple optional Heated bed: Yes Open source: No Wireless: No
----------------------------------------------------------------------------------------------------
HE3D K200 $239
This DIY 3D printer, bigger than the HE3D EI3, will enable you to print objects in very good quality. The K200 breaks from the traditional limitations of Cartesian printers and offers precision and speed with a build volume over 1000 inches (11 in. diameter, 11 in. height)! The kit is built with the new enthusiast and experts in mind. With high quality 2020 aluminium extruded beams and acrylic forms the construction is simple, yet very robust. The E3D double extruder opens the possibilities to multiple print colours without having to pause, clean, and reposition. Both extruders support temperature range up to 260C to support almost all filament material including PLA, ABS, TPU, WOOD, PVA, Nylon, PVA, PP and most of their variants. The upgraded LCD interface and ATmega2560 control board with RAMPS PLUS2 and 80 step precision motors give this printer an ultra-high print quality down to 12 micron X, Y and 50-micron layer accuracy.
You can buy this 3D printer here.
Printing tall objects like these won’t be an issue anymore!
Key Statistics:
DIY kit: Yes Type: FDM Weight: 9 kg Max. build volume: 200 mm diameter x 300 mm height Min. layer height: 50 microns Filament diameter: 1.75 mm Extruder: Single or dual optional Heated bed: Optional Open source: No Wireless: No
----------------------------------------------------------------------------------------------------
FLSUN Prusa i3 $219

This Chinese model is a good and affordable 3D printer for beginners. The metal structure is stable and provides a good printing accuracy. It has a high precision Y-axis position plate and guarantees Y-axis positioning accuracy. The printer controller is integrated motherboard, easy to connect and support DIY spread.
You can purchase this printer here.
If you feel like this will be easy to build, try printing these objects with it!
Key Statistics:
DIY kit: Yes Type: FDM Weight: 10 kg Max. build volume: 200 mm x 200 mm x 200 mm Min. layer height:100 microns Filament diameter: 1.75 mm Extruder: Single Heated bed: Yes Open source: Yes Wireless: No
----------------------------------------------------------------------------------------------------
Heacent i3 $145
This Chinese DIY kit is an affordable 3D printer that will give you a good step-by-step learning experience. Suitable for a wide range of customers, the quality of the product is apparently very good for its price.
Purchase this 3D printer here.
Key Statistics:
DIY kit: Yes Type: FDM Weight: 6.6 kg Max. build volume: 200 mm x 200 mm x 180 mm Min. layer height: 100 microns Filament diameter: 1.75 mm Extruder: Single Heated bed: Yes Open source: No Wireless: No
----------------------------------------------------------------------------------------------------
Geeetech Prusa I3 pro B $248.54
The Prusa I3 pro B is the cheapest 3D printer from Geeetech. It is based on Geeetech I3 pro, except its simple assembly, easy debugging and more stable performance, compared with the I3 pro, I3 pro B features a newly added potential for 3D printing—support 5 types of filament: ABS, PLA, Wood-Polymer, Nylon and flexible PLA., create flexible hinges, joints, shaped parts; enable you to get the most out of your 3D Printer.
You can buy this model here.
Key Statistics:
DIY kit: Yes Type: FDM Weight: 8.5 kg Max. build volume: 200 mm x 200 mm x 180 mm Min. layer height: 100 microns Filament diameter: 1.75 mm, 3.0 mm Extruder: Single Heated bed: Yes Open source: No Wireless: No
----------------------------------------------------------------------------------------------------
Geeetech Prusa I3 pro C $299
A little bit more expensive, the Prusa I3 pro C has the same specs than the pro B except that it has 2 extruders. You can print a single two-color object, or you can print two objects in one print job, each made from a different colour. You can also print one single-color object, as with other single-extruder 3D printers. Or you can use one extruder for infill or support. The 2 extruder motors push filament through 2 head separately, so mixing colours printing is not applicable for the moment. Geeetech I3 pro C support 5 types of filament: ABS, PLA, Wood-Polymer, Nylon and flexible PLA.
Buy this 3D printer here.
Key Statistics:
DIY kit: Yes Type: FDM Weight: 9 kg Max. build volume: 200 mm x 200 mm x 180 mm Min. layer height: 100 microns Filament diameter: 1.75 mm, 3.0 mm Extruder: Dual Heated bed: Yes Open source: No Wireless: No
----------------------------------------------------------------------------------------------------
Cetus 3D $299
After a successful Kickstarter campaign, Cetus 3D launched a very basic and solid printer. Quiet, small and cheap, this model can be recommended for every beginner. At 0.25, the build volume to machine volume ratio is excellent, and the light weight will enable you to take it with you everywhere. The Cetus 3D printer features cloud-based support for remote printing and notifications as well as dedicated 3D printing software.
You can purchase the Cetus 3D here.
Key Statistics:
DIY kit: No Type: FDM Weight: 3.2 kg Max. build volume: 180 mm x 180 mm x 180 mm Min. layer height: 50 microns Filament diameter: 1.75 mm Extruder: Single Heated bed: No Open source: Yes Wireless: Yes
----------------------------------------------------------------------------------------------------
M3D Micro $299
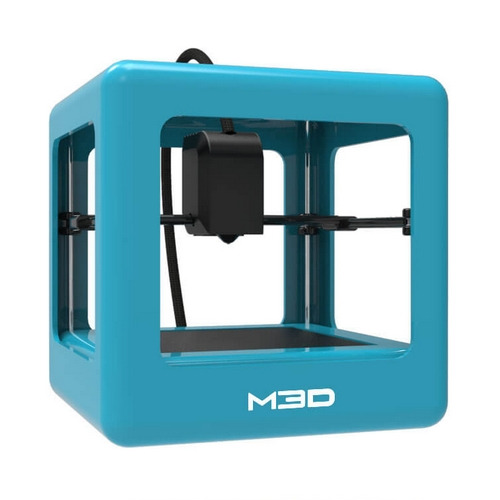
Rated best 3D printer in class by 3D Forged & Tom's Guide, this model is the cheapest 3D printer from M3D. The Micro is the world’s first truly consumer 3D printer and is powered by "Micro Motion Technology," a series of next generation innovations, creating precision at a fraction of the cost of other 3D Printers. Sporting a compact design, cool colour choices, user-friendly software, and replaceable print beds and nozzles, it’s a great 3D printer for beginners and experts alike. The Micro comes with M3D Software for Windows operating systems. The software has an easy-to-use interface and is fully touch screen capable. The M3D Software allows you to organise the 3D models you've downloaded into an easy to view library.
You can buy this 3D printer here.
Key Statistics:
DIY kit: No Type: FDM Weight: 1 kg Max. build volume: Base:109 mm x 113 mm x 74 mm, and above the 74 mm: 91 mm x 84 mm x 42 mm Min. layer height: 50 microns Filament diameter: 1.75 mm Extruder: Single Heated bed: No Open source: Yes Wireless: No
----------------------------------------------------------------------------------------------------
Snapmaker $299
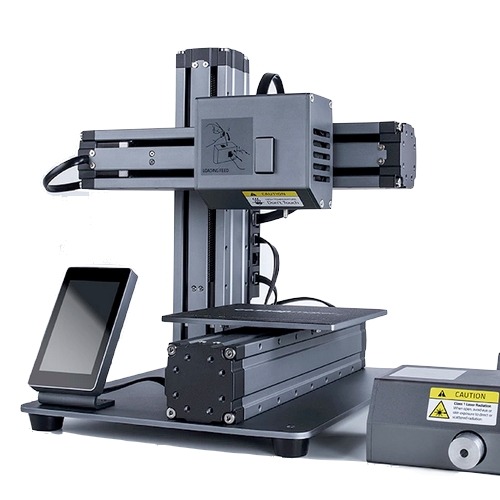
A Kickstarter campaign has been launched to raise funds for this affordable all-metal and all-in-one 3d printer. It is easy-to-use for beginners, expandable for makers, and will enable you to do 3D printing, laser engraving and CNC carving. Designed for quick assembly, strong expandability and real affordability. Snapmaker has an innovative modular design, which enables a flat-packed and low-cost shipping, quick assembly and personalised modification. With the intuitive-to-use 3.2-inch colour touchscreen, you can conveniently control all print settings.
You can pre-order the Snapmaker here.
Key Statistics:
DIY kit: Yes Type: FDM Weight: 4.5 kg Max. build volume: 125 mm x 125 mm x 125 mm Min. layer height: 50 microns Filament diameter: 1.75 mm Extruder: Single Heated bed: Yes Open source: Yes Wireless: No
----------------------------------------------------------------------------------------------------
Bonus: other notable entry level 3D printers
----------------------------------------------------------------------------------------------------
Dagoma DiscoEasy200 $317
The french brand Dagoma improved its model Discovery, who became DiscoEasy. This model is based on an open source design, which makes it easy to modify. Its 3D files are accessible for free online. The Dagoma DiscoEasy200 does not provide natively a printing bed but can get one as an option. Compared to its predecessor, the DiscoEasy200 offers a new electronic card, an additional fan on the extruder and a SD card port instead of a mini SD. This 3D printer is intuitive and recommendable to the beginners.
You can purchase this model here.
And here are some cool objects designed by Dagoma that you can print with the DiscoEasy200!
Key Statistics:
DIY kit: No Type: FDM Weight: 5 kg Max. build volume: 200 mm x 200 mm x 200 mm Min. layer height: 100 microns Filament diameter: 1.75 mm Extruder: Single Heated bed: No Open source: Yes Wireless: No
----------------------------------------------------------------------------------------------------
Kodama Trinus $379
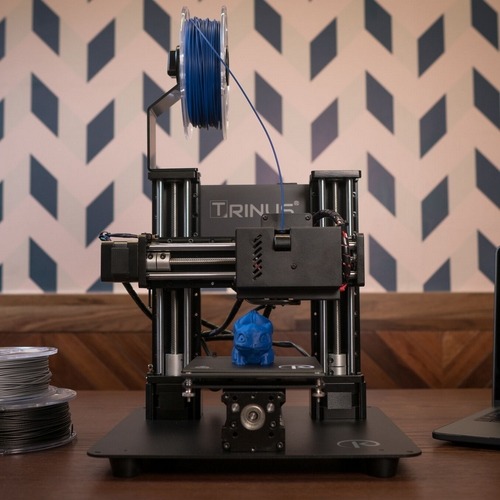
Kodama launched a Kickstarter campaign to market the new affordable 2-in-1 Trinus 3D printer. Trinus is a professional-grade desktop 3D printer that can easily be converted into a laser engraver. The kit contains only 11 parts and can be assembled easily. You can also equip the Trinus with a heated bed and a safety enclosure. This all-metal 3D printer extrudes PLA, ABS, PC, Flex, wood and most other materials available on the market. This model is very quiet and print objects in good quality.
You can pre-order the Trinus here.
Key Statistics:
DIY kit: Yes Type: FDM Weight: 9.8 kg Max. build volume: 120 mm x 125 mm x 125 mm Min. layer height:50 microns Filament diameter: 1.75 mm Extruder: Single Heated bed: Optional Open source: No Wireless: No
----------------------------------------------------------------------------------------------------
Honorable Mentions:
New Matter MOD-t $399
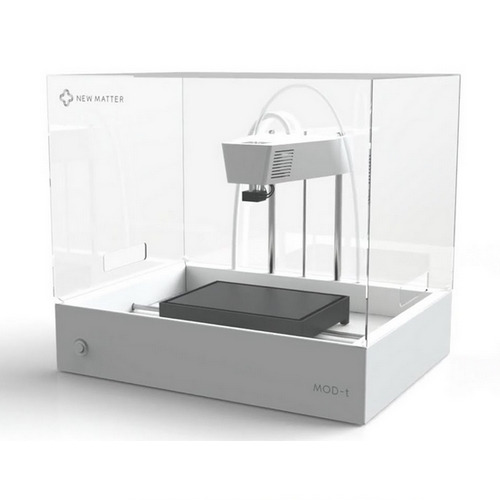
New Matter launched the MOD-t after realising an Ingiegogo campaign. This model is easy to use and has a good printing quality. The MOD-t’s beautiful clear cover and patented design makes it one of the quietest desktop 3D printers available, so it can easily live in a classroom or living room without causing disruption. The MOD-t is dependable with WiFi connectivity, a simple set-up process, and intuitive controls. If any questions arise, the New Matter Customer Support team is available for users through email, phone, and chat.The Wall Street Journal recommends the MOD-t for anybody’s “first foray into 3-D.”
You can purchase this 3D printer here.
Key Statistics:
DIY kit: No Type: FDM Weight: 5 kg Max. build volume: 150 mm x 100 mm x 125 mm Min. layer height:100 microns Filament diameter: 1.75 mm Extruder: Single Heated bed: No Open source: Yes Wireless: No
----------------------------------------------------------------------------------------------------
Robo 3D C2 $699.99
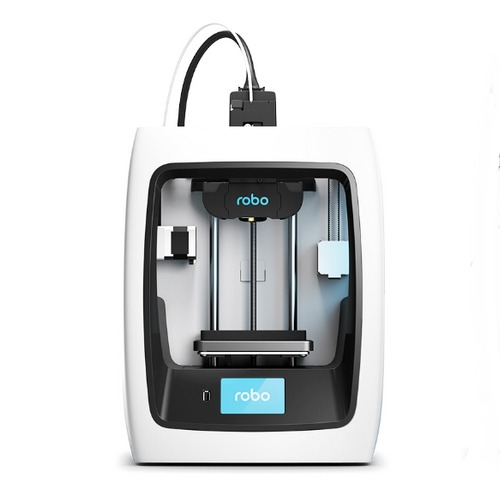
The Robo 3D C2 is a small desktop 3D printer launched after a Kickstarter campaign. This model is more expensive but can print with great quality and efficiency. The Robo 3D C2 is a small desktop 3D printer. It has a nice and simple design, with an easy to access build platform. It is compatible with the Robo app and also adds a Wifi connectivity for a smooth user experience. The Robo 3D C2 print bed is not heated so it is not capable of 3D printing ABS.
You can buy this model here.
Key Statistics:
DIY kit: No Type: FDM Weight: 9.4 kg Max. build volume: 127 mm x 127 mm x 152.4 mm Min. layer height: 20 microns Filament diameter: 1.75 mm Extruder: Single Heated bed: No Open source: Yes Wireless: Yes
----------------------------------------------------------------------------------------------------
Prusa i3 MK2 kit $786
The very popular Prusa i3 from Josef Prusa is considered as the 3D printer with the best quality for its cost. It comes with a bunch of clever features and is upgradable. With tens of thousands users all around the planet, this popular model has a made a big impression on the 3D printing community since it was launched. All parts of this 3D printer are Open Source and are part of the RepRap project.
You can buy this 3D printer here,
Check out the Prusa MyMiniFactory profile here if you need spare parts!
Key Statistics:
DIY kit: Yes Type: FDM Weight: 6.5 kg Max. build volume: 250 mm x 210 mm x 200 mm Min. layer height: 50 microns Filament diameter: 1.75 mm Extruder: Single Heated bed: Yes Open source: Yes Wireless: No
1 note
·
View note